Indel B BI 24 HOME PLUS User manual

ISTRUZIONI PER L’USO
INSTRUCTIONS FOR USE
MODE D’EMPLOI
GEBRAUCHSANLEITUNGEN
INSTRUCCIONES PARA EL USO
Руководство Пользователя
BI 24 HOME PLUS
BI 24 HOME PLUS_13-09-2017
INDEL B S.p.A.
Via Sarsinate, 27
47866 S. Agata Feltria (RN) ITALY
Tel.: +39 0541 848 711 - Fax: +39 0541 848 741
www.indelb.com

FRIGO CANTINA PER VINI
BI 24 HOME PLUS
Sommario
Caratteristiche, 2
Avvertenze
Dati tecnici
Installazione, 4
Posizionamento e collegamento
Descrizione dell’apparecchio, 5
Vista d’insieme
Pannello di controllo
Avvio e utilizzo, 6
Vani invecchiamento
Regolazione manuale delle temperature
Estrazione dei ripiani in legno
Stoccare le bottiglie, 7
Modalità stoccaggio
Manutenzione e anomalie, 8
Manutenzione e cura
Anomalie e rimedi
I
Istruzioni per l’uso
IGB F
Italiano, 1 English, Français,
DE
Deutsch, Espanol,
RU

I
2BI 24 HOME PLUS_13-09-2017
Avvertenze di
! È importante conservare questo libretto
per poterlo consultare in ogni momento. In
caso di vendita, di cessione o di trasloco,
assicurarsi che resti insieme all’apparecchio.
! Leggere attentamente le istruzioni: ci sono
importanti informazioni sull’installazione,
sull’uso e sulla sicurezza.
! Per evitare pericoli dovuti all’instabilità
dell’apparecchio, questo deve essere fissato
attenendosi scrupolosamente alle istruzioni
di montaggio.
! In caso di trasloco o spostamento tenere
l’apparecchio in posizione verticale.
! L’apparecchio può essere utilizzato da
bambini di età non inferiore a 8 anni e
da persone con ridotte capacità siche,
sensoriali o mentali, o prive di esperienza o
della necessaria conoscenza, purché sotto
sorveglianza oppure dopo che le stesse
abbiano ricevuto istruzioni relative all’uso
sicuro dell’apparecchio e alla comprensione
dei pericoli ad esso inerenti.
! I bambini non devono giocare con
l’apparecchio. La pulizia e la manutenzione
destinata ad essere effettuata dall’utilizzatore
non deve essere effettuata da bambini senza
sorveglianza.
! I bambini devono essere sorvegliati per
assicurarsi che non giochino con l'apparec-
chio.
! Ad apparecchio installato, il cavo elettrico
e la presa della corrente devono essere
facilmente raggiungibili.
Se il cavo e la presa della corrente non sono
raggiungibili, assicurarsi che la spina sia
collegata ad un interruttore di rete.
! Mantenere libere da ostruzioni le aperture di
ventilazione nell'involucro dell'apparecchio.
! Non utilizzare, per accelerare il processo
di sbrinamento, dispositivi meccanici o altri
mezzi diversi da quelli raccomandati dal
costruttore.
Caratteristiche
! Non danneggiare il circuito del refrigerante.
! Per effettuare la sostituzione del LED
rivolgersi al centro assistenza. Non fissare
a lampada in funzione, può essere dannoso
per gli occhi.
! Il cavo non deve subire piegature o
compressioni.
! Ilcavodeveesserecontrollatoperiodicamente
e sostituito solo da tecnici autorizzati.
! Il cavo di alimentazione è di tipo Y, in
caso di sostituzione rivolgersi al centro
assistenza.
! Non utilizzare apparecchi elettrici all'interno
degli scomparti per la conservazione dei cibi,
se questi non sono del tipo raccomandato
dal costruttore.
!Non conservare sostanze esplosive in que-
sto apparecchio, come bombolette per are-
osol con propellente inammabile.
! Il Costruttore declina ogni responsabilità
qualora queste norme non vengano
rispettate.
! Mantenere prive di ostruzioni le aperture
di ventilazione dell'apparecchiatura o della
struttura che la incorpora.
! Non usare dispositivi meccanici
o altri mezzi per accelerare il processo
di scongelamento, che non siano quelli
consigliati dal produttore.
! Non danneggiare il circuito del refrigerante.
! Non usare dispositivi elettrici all'interno
dei vani per la conservazione dei cibi
dell'apparecchiatura, a meno che non siano
dei tipo consigliato dal produttore.
! Non conservare in questa apparecchiatura
sostanze esplosive quali lattine spray con
un propellente infiammabile.
! Rischio di incendio o di scossa elettrica.

I
3
BI 24 HOME PLUS_13-09-2017
! Prestare attenzione a non danneggiare
il circuito del refrigerante. Esso contiene
isobutano (R600a), un gas naturale con un
elevato livello di compatibilità ambientale.
Tale gas è infiammabile.
! Qualora si verifichi un danno al circuito
del refrigerante, accertarsi che nella stanza
non vi siano fiamme né fonti di accensione.
Ventilare la stanza.
! Non lasciare che oggetti caldi tocchino le
parti in plastica dell'apparecchiatura
! Non conservare gas e liquidi infiammabili
all'interno dell'apparecchiatura.
! Non porre prodotti o oggetti infiammabili,
né prodotti che contengono liquido
infiammabile, all'interno, vicino o sopra
l'apparecchiatura.
! Non toccare il compressore o il
condensatore. Scottano!
! Il dispositivo è una cantina per vini. È
previsto solamente per la conservazione dei
vini.
! Conservare il vino solamente in bottiglie
non aperte.
! La cantina per vini non è adatta per il
raffreddamento degli alimenti.
! Nella cantina per vini non conservare cibi
deperibili.
! Il frigorifero non è previsto per entrare a
contatto con i cibi.
! Il frigorifero non è previsto per la corretta
conservazione di farmaci.

I
4BI 24 HOME PLUS_13-09-2017
Attenzione! Etichetta situata in prossimità della lampada.
DATI TECNICI
Modello BI 24 HOME PLUS
Temperature 1 Zona
Dimensioni
larghezza cm 56
altezza cm 44,8
profondità cm 55,5
Peso**
Peso
36,6 kg
42 kg
Potenza elettrica 62 W
Corrente 0,3 A
Lampade 3 W
Consumo 0,38 kWh / 24h
Tensione in Volt* 220-240V
Frequenza Hz* 50 o 50/60
* A seconda dei paesi, questi valori sono soggetti a variazioni. Per conoscere
le caratteristiche specifiche del vostro apparecchio, consultare la targhetta
caratteristiche del prodotto.
** Apparecchio vuoto.
Caratteristiche
I
5
BI 24 HOME PLUS_13-09-2017
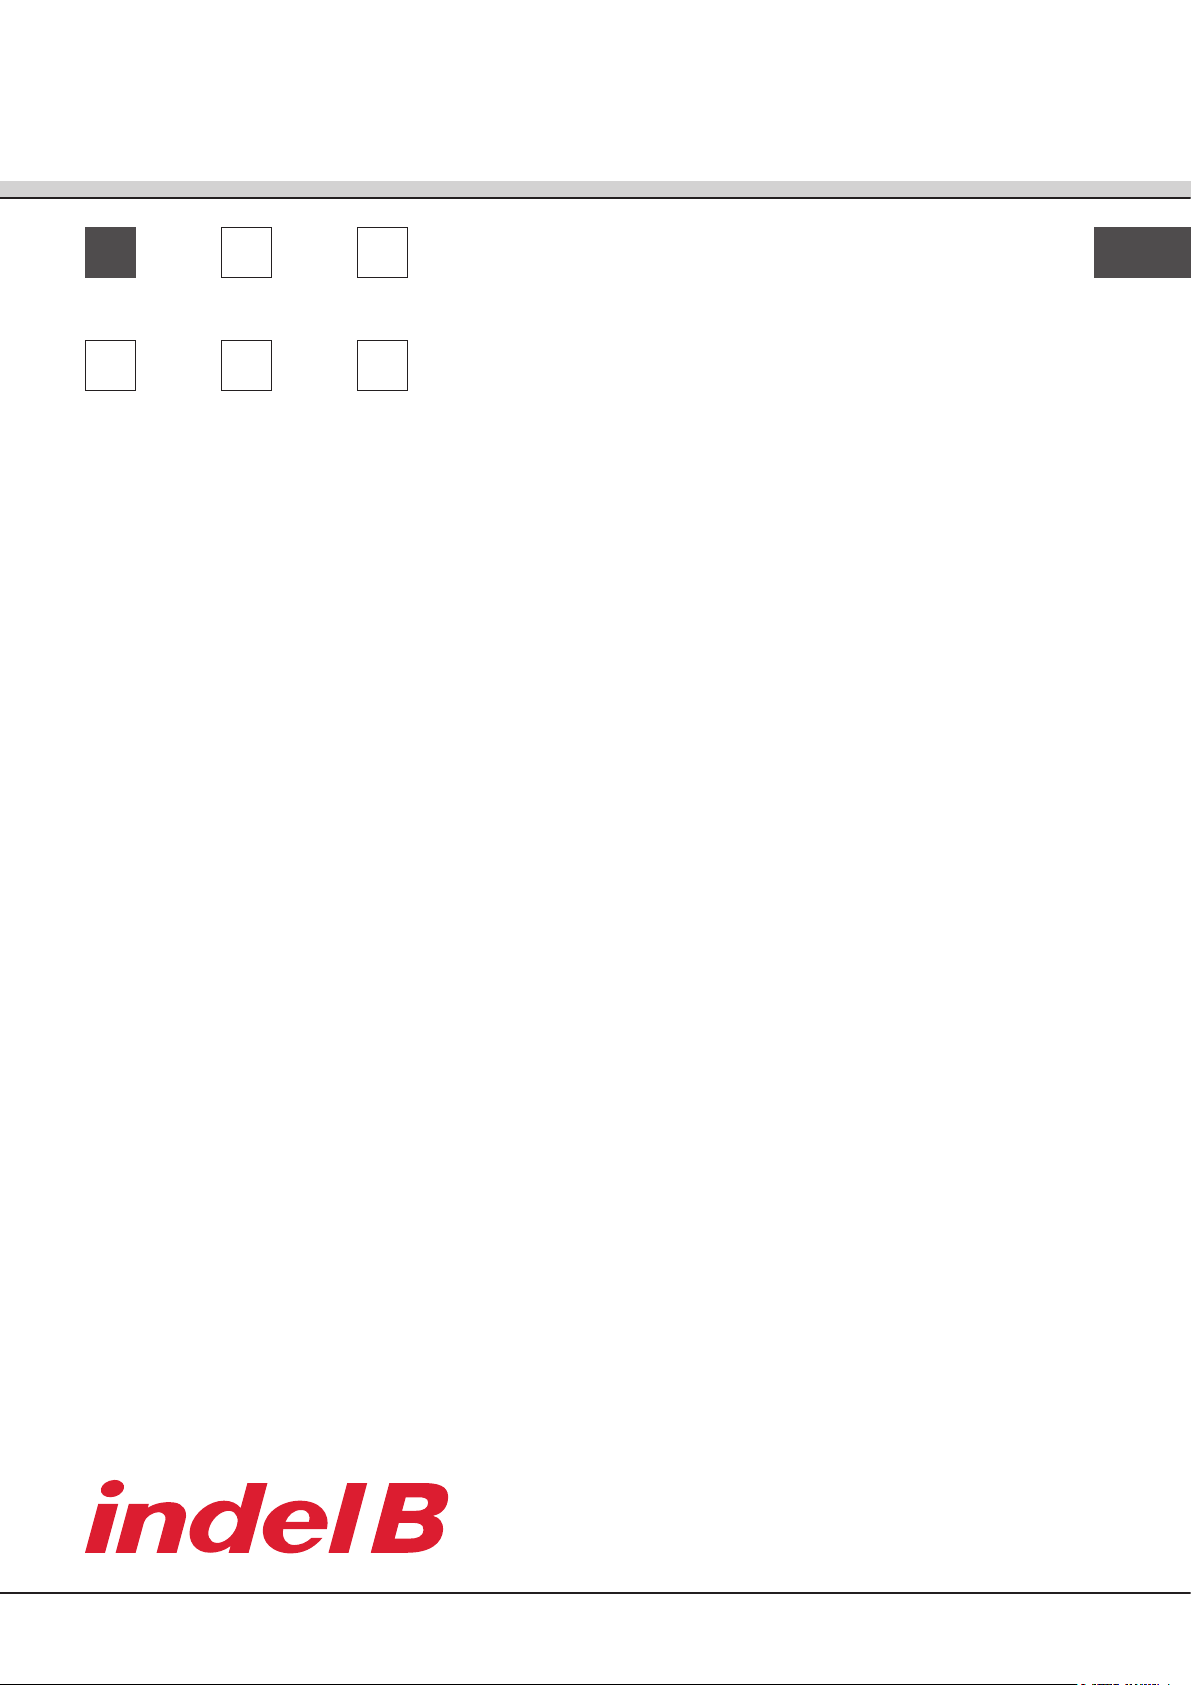
Posizionamento e collegamento
Disimballo
1 Disimballare subito l'apparecchio e
controllare che non abbia subito danni
nel trasporto. Se fosse danneggiato non
collegarlo e contattare il Rivenditore.
2 Togliere con cautela le protezioni e gli
adesivi, aprire l'anta e verificare l'integrità
dei vari componenti.
3 Estrarre il cavo dell'alimentazione elettrica.
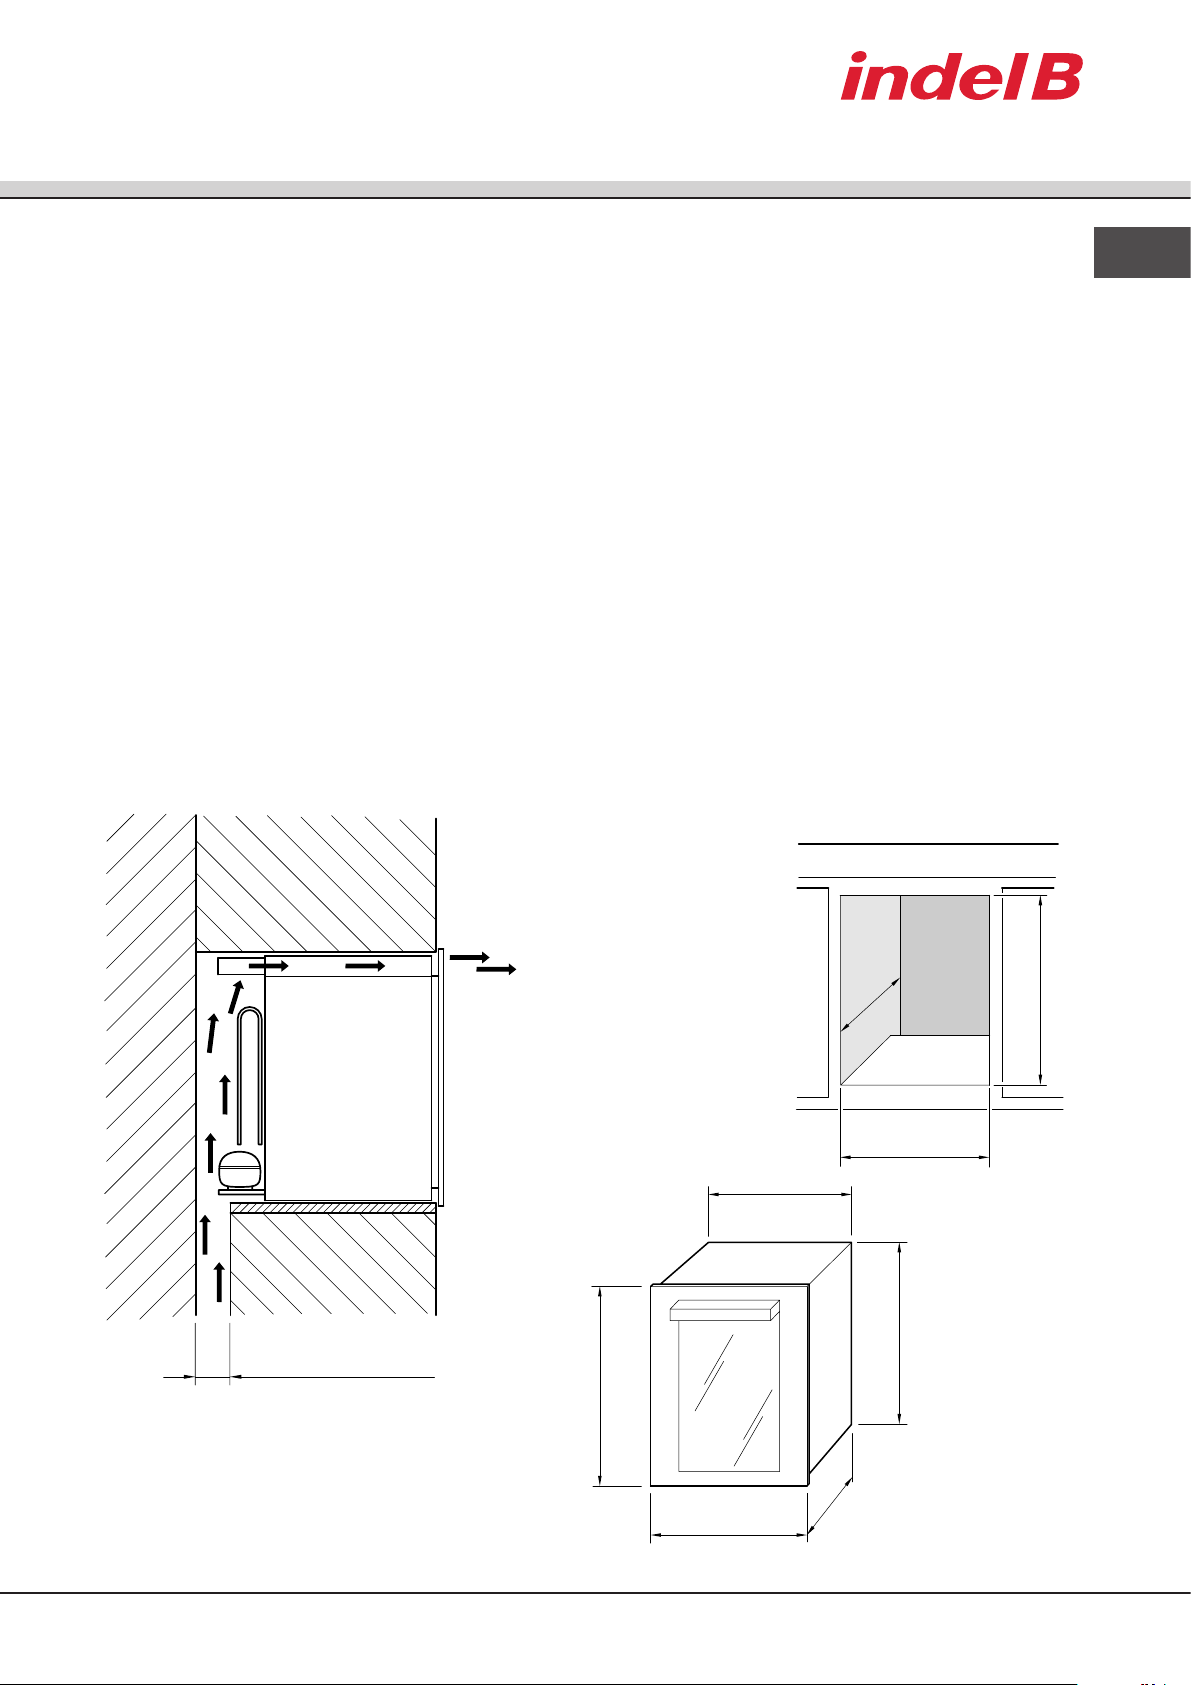
Posizionamento
1 Posizionare l'apparecchio in un ambiente
ben aerato, non umido e libero (evitare
armadi a muro chiusi).
2 Lasciare l'apparecchio lontano da fonti di
calore.
3 Rispettare le distanze minime tra
l'apparecchio ed il vano in cui verrà
posizionato, per garantire all'apparecchio
stesso una perfetta ventilazione.
Vedi figura.
Installazione
Collegamento elettrico
Dopo il trasporto, posizionare l'apparecchio
verticalmente e attendere almeno 3 ore prima
di collegarlo all'impianto elettrico. Prima di
inserire la spina nella presa della corrente,
accertarsi che:
• la presa abbia la messa a terra e sia a
norma di legge;
• la presa sia in grado di sopportare il carico
massimo di potenza della macchina,
indicato nella tabella Dati tecnici o nella
targhetta caratteristiche in basso a destra
(vedi Descrizione dell'apparecchio);
• la tensione di alimentazione sia compresa
nei valori indicati nella tabella Dati tecnici
o nella targhetta caratteristiche in basso a
destra (vedi Descrizione dell'apparecchio);
• la presa sia compatibile con la spina
dell'apparecchio. In caso contrario sostituire
la presa o la spina; non usare prolunghe e
prese multiple.
189A0431
Spazio per aerazione:
minimo 50 mm
189A0432
189A0433
560
587
460
448
555
Quota battuta
fianco mobile
560 min.
450 min.
560
min.
Dimensioni
del vano
Dimensioni
della cantina
I
6BI 24 HOME PLUS_13-09-2017
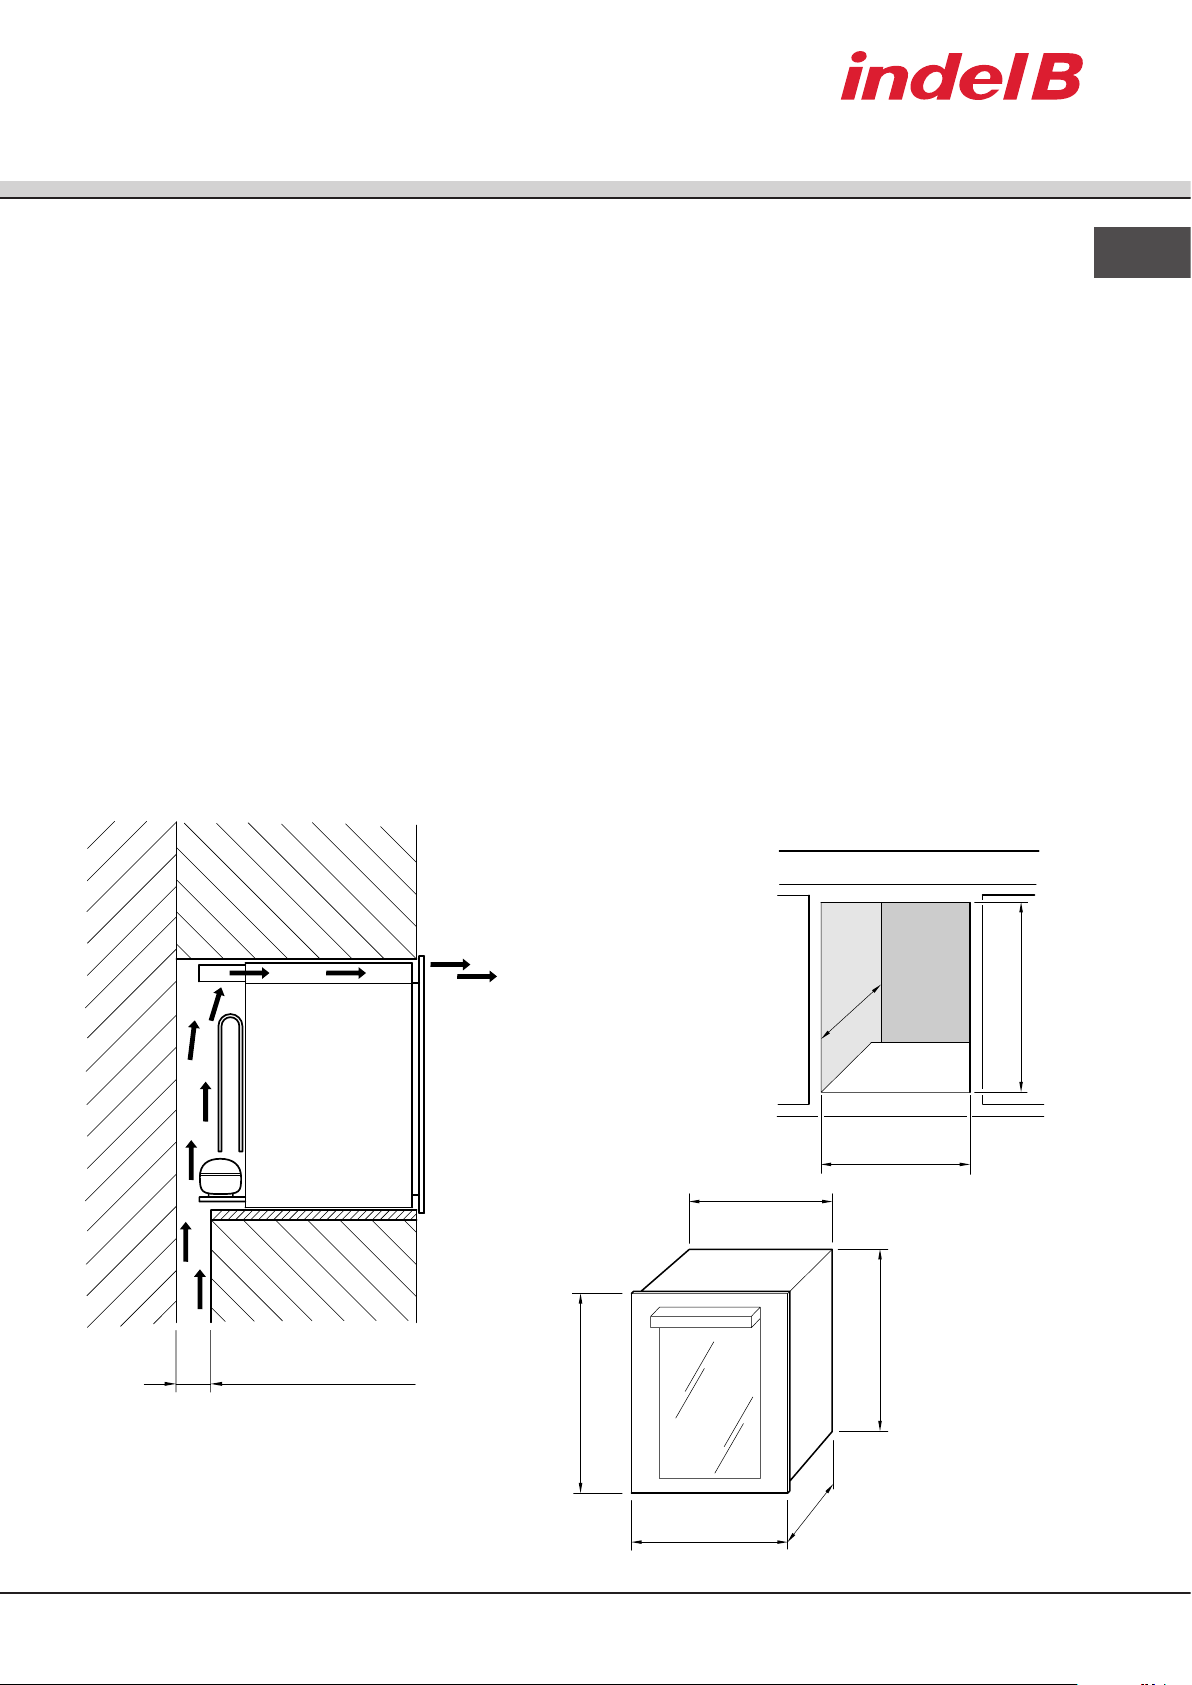
Descrizione
dell’apparecchio
Vista d’insieme
PANNELLO DI
CONTROLLO
ANTA
VETRO
Pannello di controllo
VANO
INVECCHIAMENTO
RIPIANI TARGHETTA
CARATTERISTICHE
DISPLAY TASTO
PER DIMINUIRE
LA TEMPERATURA TASTO PER
AUMENTARE LA
TEMPERATURA
TASTO
PER SETTAGGIO
TEMPERATURA
INDICATORE DI
ACCENSIONE
LUCE
SPIA DI
ALIMENTAZIONE
ELETTRICA
LUCE
TASTO DI
ACCENSIONE
(ON/OFF)
SPIA DI
FUNZIONAMENTO

I
7
BI 24 HOME PLUS_13-09-2017
Avvio e utilizzo
Regolazione manuale della temperatura
Qualora dovesse rendersi necessario, è
possibile modificare la temperatura secondo
quanto segue:
1. Al momento della connessione alla rete
elettrica, il display visualizza la temperatura
impostata all’interno del vano.
2. Premere il tasto (vedi Pannello di
controllo) per circa un secondo; l’indicatore
della temperatura comincerà a lampeggiare.
3. Premere i tasti o fino al
raggiungimento della temperatura
desiderata.
4. Attendere 5 secondi perché l’indicatore
torni fisso; la temperatura è stata impostata.
5. Attendere che l’adeguamento della
temperatura abbia effetto ed introdurre le
bottiglie di vino nella cantina.
La luce interna non si accende (oppure
si spegne temporaneamente) quando la
temperatura, all’interno, supera i 24°C, ciò
per consentire un raggiungimento più veloce
della temperatura impostata.
Estrazione dei ripiani in legno
ATTENZIONE:
I ripiani in legno non sono scorrevoli, non
estrarli con il carico di bottiglie per evitare il
rischio di rottura delle stesse.
I ripiani si possono estrarre per pulizia solo
senza bottiglie.
Vano invecchiamento
Il frigo cantina è composto da un vano
invecchiamento la cui principale funzione
è garantire ai vini condizioni ottimali di
conservazione.
La sua temperatura è stata regolata in
fabbrica su una temperatura considerata
ottimale per la maggior parte dei casi e
corrisponde a 15°.
Il vino è un prodotto complesso che deriva
da una evoluzione lenta e lunga, e necessita
di condizioni specifiche per esprimersi al
meglio.
Tutti i vini si conservano alla stessa
temperatura, mentre le temperature di
servizio e di degustazione cambiano in base
al vino.
Perciò, così come per le cantine naturali
dei produttori, anche per il frigo cantina
non è importante il valore assoluto della
temperatura di conservazione, quanto la sua
costanza nel tempo: la conservazione del
vino è ideale qualunque sia la temperatura, a
condizione che la temperatura non subisca
variazioni.
I
8BI 24 HOME PLUS_13-09-2017
Stoccare le bottiglie
Stoccaggio classico con 24 bottiglie
Se si desidera sistemare le bottiglie per
la conservazione del vino in modo tale da
renderle visibili e facilmente estraibili, si
consiglia la configurazione a 24 bottiglie
(bordolesi o misto bordolesi e renane).
Posizionare nelle apposite nicchie di
ciascuno dei 3 ripiani in legno un numero
massimo di 6 bottiglie; altre 6 bottiglie
possono essere collocate nelle apposite
feritoie poste sulla base della cantina per un
totale di 24 bottiglie.
Si suggerisce di collocare le bottiglie più
lunghe (Tipo Renane) nella base della
cantina. Questa ultima è predisposta per
ospitare bottiglie di dimensioni maggiori.
! Un ripiano
in legno, può
sorreggere in
sicurezza un
massimo di 22
bottiglie.
Stoccaggio con bottiglie Champagnotta
Per la loro dimensione maggiore rispetto alle
bottiglie classiche, quelle Champagnotta si
devono collocare sulla base della cantina in
un numero massimo di 5.
Se si volessero stoccare altre bottiglie di
tipo Champagnotta si deve rimuovere il 3°
ripiano e si devono collocare le bottiglie
su quelle poste sulla base della cantina in
senso opposto rispetto alle precedenti. E’
possibile così stoccare fino a 9 bottiglie di
tipo Champagnotta.
Altre configurazioni per lo stoccaggio
delle bottiglie
STANDARD
24 Bottiglie (100%
coricate)
3 griglie utilizzate
CONSERVAZIONE
28 Bottiglie (100%
coricate)
non utilizzando le
griglie
I
9
BI 24 HOME PLUS_13-09-2017
Manutenzione e anomalie
Manutenzione e cura
Escludere la corrente elettrica
Durante i lavori di pulizia e manutenzione è necessario isolare l'apparecchio dalla rete di
alimentazione:
staccare la spina dalla presa.
Anomalie e rimedi
Può accadere che l'apparecchio non funzioni. Prima di telefonare al Rivenditore, controllare
che non si tratti di un problema facilmente risolvibile aiutandosi con il seguente elenco.
ANOMALIE POSSIBILI CAUSE/SOLUZIONI
Il compressore non funziona • La spina non è inserita nella presa della corrente o
non abbastanza da fare contatto, oppure in casa non
c'è corrente.
• La presa della corrente non funziona (verificare
collegandovi un altro apparecchio elettrico).
Il compressore non si ferma mai • Contattare il centro assistenza
! Qualsiasi intervento sull'apparecchio deve essere realizzato dal servizio tecnico autorizzato,
pena la nullità della garanzia. Dopo ogni intervento sul gruppo freddo, il tecnico deve
controllare la tenuta del circuito.
! Anomalie di breve durata, quali ad esempio la mancanza di corrente, non compromettono i
vini. Solo quando le anomalie di funzionamento vengono lasciate irrisolte per un lungo periodo
possono diventare dannose per i vini.
Solo per vendite all'interno della COMUNITÀ EUROPEA (UE)
Questo apparecchio è contrassegnato in conformità alla Direttiva Europea 2012/19/EU (WEEE). Il
simbolo sul prodotto indica che questo prodotto non deve essere trattato come riuto domestico.
Garantire che questo prodotto non venga immesso nell'ambito dei ussi dei riuti urbani ma
trattato come RAEE professionale.
User Guide CELLAR FRIDGE FOR WINES
BI 24 HOME PLUS
GB
Contents
Features, 2
Warnings
Technical data
Installation, 4
Positioning and connecting
Description of the device, 5
Overview
Control panel
Starting up and using, 6
Aging compartments
Manual temperature setting
Taking out the wooden shelves
Storing the bottles, 7
Storing
Maintenance and troubleshooting, 8
Maintenance and care
Troubleshooting
IGB F
Italiano, English, 1 Français,
DE
Deutsch, Espanol,
RU

GB
2BI 24 HOME PLUS_13-09-2017
I
Features
Notices
!Remember to keep this booklet so you
can refer to it at any time. In case of sale,
transfer or should you move, remember to
keep it together with the device.
!Read the instructions carefully: there is
important information about installation, use
and safety.
!To prevent danger stemming from instability
of the device, you must fasten it in place,
following the assembly instructions strictly.
!Whenever moving or transporting the
device, keep it in a vertical position.
!This appliance can be used by children
aged from 8 years and above and
persons with reduced physical,sensory or
mental capabilities or lack of experience
and knowledge if they have been given
supervision or instruction concerning use of
the appliance in a safe way and understand
the hazards involved.
!Children shall not play with the appliance.
Cleaning and user maintenance shall be
made by the user and not by children
without supervision!
!Young children should be supervised to
ensure that they do not play with the
appliance.
! After installing the device, ensure the
power cable and socket are easy to reach. If
it not possible to reach the power cable and
socket, ensure that the plug is connected to
a circuit breaker.
! Keep the ventilation openings on the
casing of the device free.
! Do not use mechanical devices, or any
means not suggested by the manufacturer,
to speed up defrosting.
! Do not damage the coolant circuit.
! Contact the after sales service to replace
the LEDs. Do not stare at operating lamp. It
may be harmful to the eyes.
! The cable must not be bent or crushed.
! The cable must be checked on a routine
basis and replaced only by authorised
technicians.
! The power supply cable is of a Y type.
Contact the after sales service to replace it.
! Do not use electrical equipment inside the
food compartments, unless they are of a
kind suggested by the manufacturer.
!Do not store explosive substances such as
aerosol cans with a flammable propellant in
this appliance.
! The Manufacturer shall not be liable if any
of the above rules are not complied with.
! Keep ventilation openings, in the appliance
enclosure or in the built-in structure, clear of
obstruction.
! Do not use mechanical devices or other
means to accelerate the defrosting process,
other than those recommended by the
manufacturer.
! Do not damage the refrigerant circuit.
! Do not use electrical appliances inside the
food storage compartments of the appliance,
unless they are of the type recommended
by the manufacturer.
! Do not store explosive substances such as
aerosol cans with a flammable propellant in
this appliance.
! Risk of re and electrical shock or re.
GB
3
BI 24 HOME PLUS_13-09-2017
! Be careful not to cause damage to the
refrigerant circuit. it contains isobutane
(R600a), a natural gas with a high level
of environmental compatibility. This gas is
flammable.
! If damage occurs to the refrigerant circuit,
make sure that there are no flame and
sources of ignition in the room. Ventilate the
room.
! Do not let hot items to touch the plastic
parts of the appliance
! Do not store flammable gas and liquid in
the appliance.
! Do not put flammable products or items
that are wet with flammable products in,
near or on the appliance.
! Do not touch the compressor or the con-
denser. They are hot.
! Do not touch the compressor or the con-
denser. They are hot.
! The device is a wine cellar. It is only
intended for storing wine.
! Only store wine in unopened bottles.
! The wine cellar is not suitable for cooling
foods.
! Do not store any perishable food in the
wine cellar.
! The fridge is not intended to be brought
into contact with food.
! The fridge is not intended for the storage
of medicines.

GB
4BI 24 HOME PLUS_13-09-2017
Attention! label located next to lamp.
DATA SHEET
Model BI 24 HOME PLUS
Temperatures 1 Zona
Dimensions
width cm 56
height cm 44,8
depth cm 55,5
Weight**
Weight 36,6 kg
42 kg
Power 62 W
Current 0,3 A
Lamp 3 W
Consumption 0,38 kWh / 24h
Voltage* 220-240V
Frequency Hz* 50 or 50/60
* These values may change in different countries. In order to find the specific
features of your device, check the product features plate.
** When the device is empty.
Features
GB
5
BI 24 HOME PLUS_13-09-2017
Positioning and connection
Unpacking
1 Unpack the device immediately and make
sure it has not been damaged during
transport. Should it be damaged, do not
connect, and get in touch with the Dealer.
2 Carefully remove the protections and the
adhesives, open the door and make sure
all the components are present.
3 Take out the power supply cable.
Positioning
1 Position the device in a well ventilated area,
not damp and free (avoid cabinets with
closed walls).
2 Keep the device away from heat sources.
3 Make sure the minimum distances between
the device and the walls of the room where
it is placed are kept, in order to ensure
perfect ventilation of the device.
See figure.
Wiring connection
After transport, stand the device vertically, and
wait for at least 3 hours before connecting it to
the wiring system. Before putting the plug into
the power socket, make sure that:
• the socket is earthed and according to legal
regulations;
• the socket is able to hold up to the maximum
power load of the machine, indicated on
the Data Sheet table or on the feature plate
to the bottom right (see Description of the
device);
• the power supply voltage falls within the
range indicated on the Data Sheet table or
on the feature plate to the bottom right (see
Description of the device);
• the power socket is compatible with the plug
of the device. Otherwise, replace the socket
or the plug; do not use extensions or multiple
sockets.
Installation
189A0431
189A0432
189A0433
587
460
448
Ventilation space:
at least 50 mm
560
555
Furniture side area
560 min.
450 min.
560
min.
Dimensions
of the compartment
Dimensions
of the cellar

GB
6BI 24 HOME PLUS_13-09-2017
Product Description
Interior Parts
Control Panel
CONTROL
PANNEL
LEAF
GLASS
BOTTLE AGEING
COMPARTMENT
SHELVES
DATA PLATE
DISPLAY
REDUCE
TEMPERATURE
INCREASE
TEMPERATURE
TEMPERATURE
SETTING
BUTTON
WARNING LAMP
FOR LIGHT ON
OPERATION
WARNING LAMP
LIGHT
ON/OFF
BUTTON
WARNING LAMP
FOR POWER
SUPPLY ON

GB
7
BI 24 HOME PLUS_13-09-2017
Using the wine cellar
Bottle ageing compartment
The ageing compartment's main function
is that of guaranteeing that your wines are
preserved in optimal conditions.
The wine cellar's temperature was factory
pre-set at 15° C, a temperature that is
considered optimal for most wines.
Wine has a complex nature and it derives
from a long and slow process. In order to
best express its attributes, very specific
conditions are necessary.
All wines are preserved at the same
temperature, but, depending on their
different characteristics, wines are served
and tasted at very different temperatures.
Therefore, just as for manufacturers' wine
cellars, for your new appliance, the absolute
temperature value is not important for
preserving your wine. Rather, the constant
temperature through time is important. Wine
preservation is ideal at any temperature, as
long as that temperature does not vary.
Manual temperature control
Should you need to adjust the temperature
inside the wine cellar, follow the instructions
below:
1. When you plug in your wine cellar, the
display shows the temperature that has
been set
2. Press the button (see Control Panel)
for one second. The temperature will begin
to blink.
3. Press the or buttons until you
reach the desired temperature.
4. Wait 5 seconds for the temperature to
stop blinking.
5. Wait until the wine cellar reaches its
temperature before you place the wine
bottles inside.
The inside light does not go on (or it goes
off temporarily) when the inside temperature
goes over 24° C. This allows you to reach
the pre-set temperature more quickly.
Taking out the wooden shelves
WARNING:
The wooden shelves are not sliding. Do not
take them out when loaded with bottles, to
prevent the risk of the bottles breaking.
You can take the shelves out for cleaning
only when they are not loaded with any
bottles.

GB
8BI 24 HOME PLUS_13-09-2017
Stocking the wine bottles
Standard 24-bottle stock
The 24-bottle stock (for standard, mixed,
and renana bottles) is recommended for
wines that need to be visible and easily
removed.
Position each bottle into the slots on the 3
wooden shelves. 6 bottles can be placed on
the bottom of the wine cellar.
We suggest placing the longer bottles (Rhine
wine type) at the cellar base. The base is
suitable for hosting larger bottles.
! The wooden shelf
can safely hold up
to 22 bottles.
Champagne bottle stock
Champagne bottles are larger than standard
bottles. They must be placed onto the base
of the wine cellar, which can hold up to 5.
If you want to stock more than 5 Champagne
bottles in your wine cellar, remove the 3th
shelf and stock the bottles in two rows
(placing the bottles in the second row
between those on the bottom row). This will
hold up to 9 bottles.
Some stocking configurations
STANDARD
24 Bottles
(100% lying down)
3 shelves
PRESERVATION
28 Bottles
(100% lying down)
1 shelf

GB
9
BI 24 HOME PLUS_13-09-2017
Maintenance and
troubleshooting
Care and maintenance
Disconnecting the wine cellar
During cleaning and maintenance, it is imperative that you unplug the wine cellar
Troubleshooting
If you notice that your wine cellar is not working properly, check with the following list before
you call your Service Centre.
PROBLEM POSSIBLE CAUSES/SOLUTIONS
The compressor does not work • The plug is not plugged into the wall-outlet or not
enough to make contact. Or, there could be a
power failure in your home.
• The wall-outlet is not in working order. Plug the
wine cellar into another wall-outlet to check.
The compressor never stops • Contact the Service Centre
! Any work that is done to the wine cellar should be performed by your authorized local
Service Centre.
! Short term faults, such as power failure, will not compromise the wines. It is only when
working faults are left unsettled for a long time that the wine may suffer.
ONLY FOR SALES WITHIN THE EUROPEAN COMMUNITY (EU)
This appliance is marked according to the European Directive 2012/19 / EU (WEEE). The
symbol on the product indicates that this product should not be treated as household waste.
Ensure that this product is not entered as part of the flows of municipal waste but treated as
professional WEEE.
Table of contents
Languages:
Other Indel B Wine Cooler manuals


Popular Wine Cooler manuals by other brands


Wine Guardian
Wine Guardian Through-the-Wall Installation, operation and maintenance guide

La Sommeliere
La Sommeliere CTV85 use instructions

Magic Chef
Magic Chef MCWC45A instruction manual

WineEnthusiast
WineEnthusiast 12-Bottle Silent Wine Refrigerator instruction manual

Avantgarde
Avantgarde LWC-29S2 instruction manual

OEM Tools
OEM Tools 27066 Operating instructions and parts manual