Independence eXCalibur User manual

Owner´s manual eXCalibur paraglider
19.04.05
gliders for real pilots
independence
www.independence-world.com
Fly market GmbH & Co. KG
Am Schönebach 3
D-87637 Eisenberg
Tel.: +49 (0) 8364 9833-0
Fax: +49 (0) 8364 9833-33
Email: info@independence-world.com

Table of Contents:
1. Dear Independence Pilot
2. Important information
3. Target group
4. The eXCalibur´s construction and development
5. Material specification
6. Technical specification
7. How to check your paraglider
8. How to adjust the steering lines
9. In flight
9.1 The harness
9.2 Take-off preparation
9.3 Take-off run
9.4 Level flight
9.5 Accelerated flight
9.6 Using the Speed Bar
9.7 Turning
9.8 Landing
10. Towing
11 Paramotoring
12. Flying manoeuvres
12.1 Asymmetric collapse
12.2 Cravats
12.3 Symmetric or Front tuck
12.4 Parachutal stall
12.5 B-line stall
12.6 Steep spirals
12.7 Big Ears
12.8 Full stall
12.9 Negative spins
12.10 Wingovers
12.11 Emergency steering
13 Summary
14 Care and storage
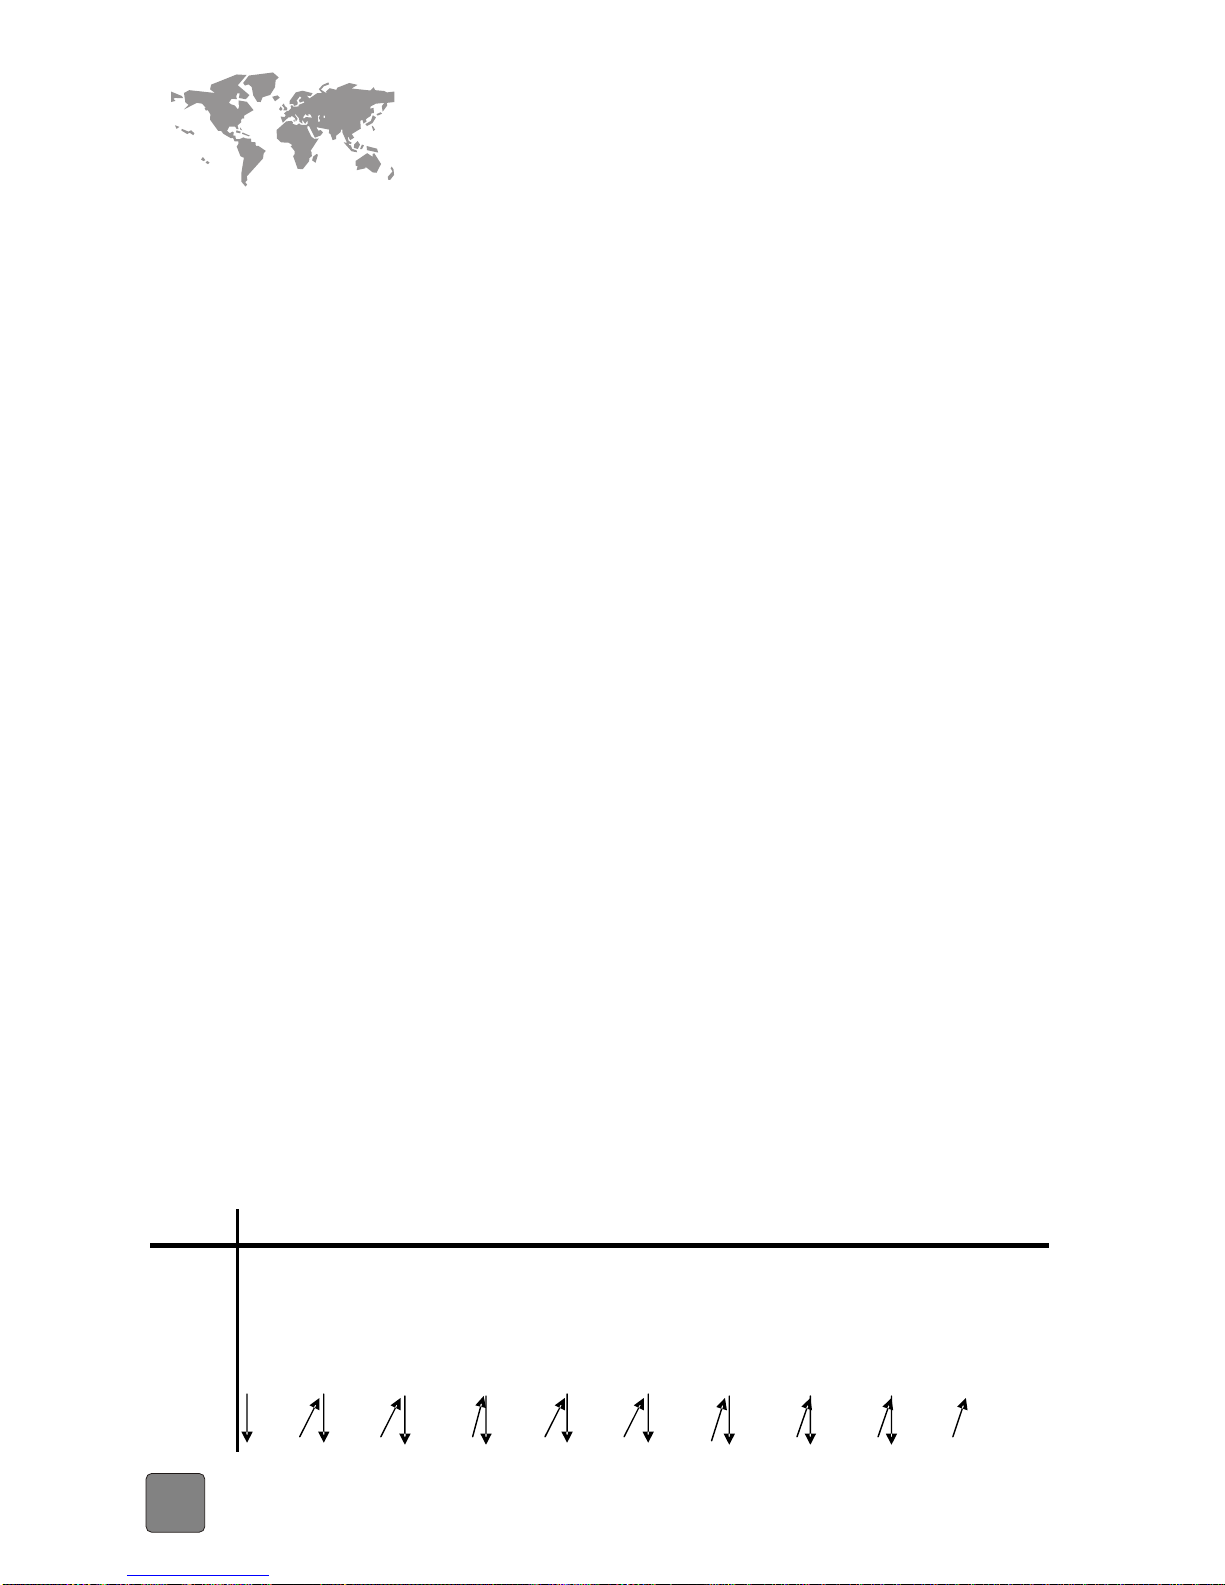
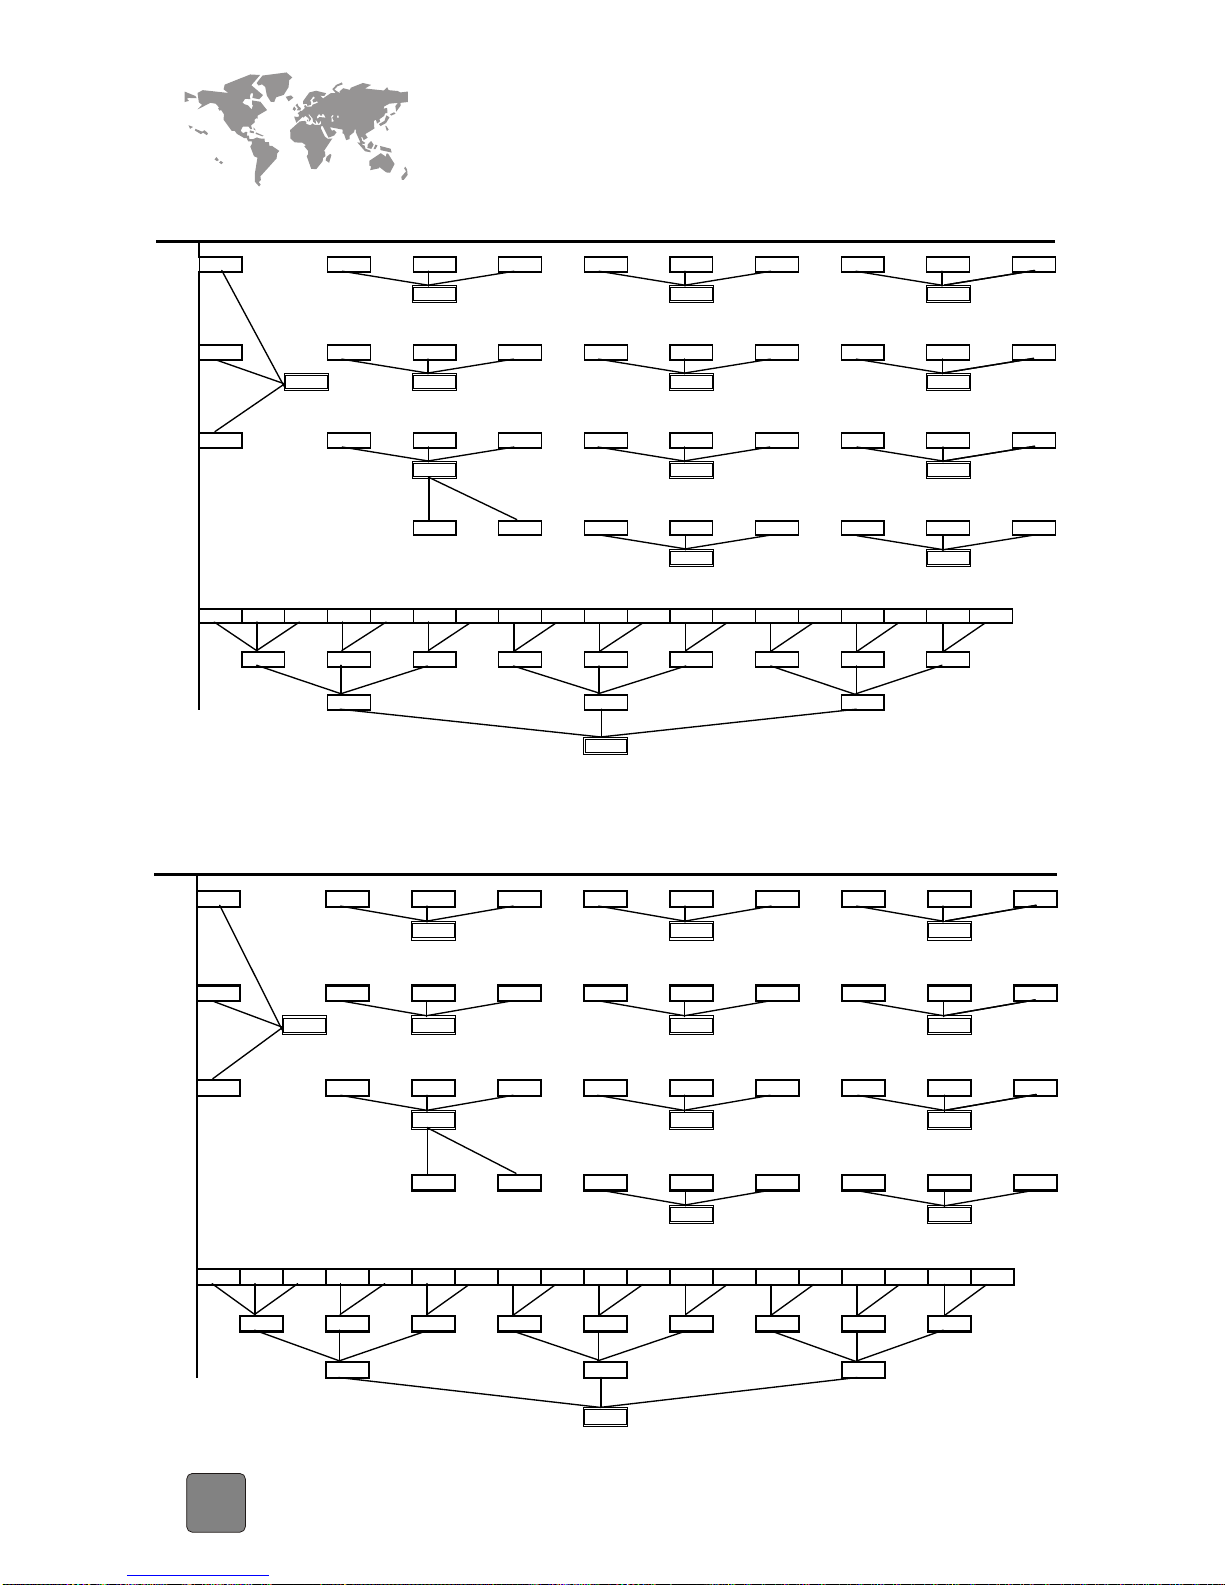
15.1 Total line length eXCalibur small
15.2 Total line length eXCalibur medium
15.3 Total line length eXCalibur large
16.1 Single line length eXCalibur small
16.2 Single line length eXCalibur medium
16.3 Single line length eXCalibur large
17.1 DHV certification eXCalibur small
17.2 DHV certification eXCalibur medium
17.3 DHV certification eXCalibur large
2
1. Dear Independence Pilot
It is our pleasure to welcome you to the world of Independence pilots. The new eXCalibur paraglider
was developed to suit pilots that enjoy superior performance, high speed and agility, but still want
a high level of security. The eXCalibur distinguishes itself through its unique handling and
performance. Like every paraglider the eXCalibur has its own characteristics. To ensure your best
possible flying experience we provide this manual.
2. It is most important that you read this manual before flying your new eXCalibur!
We are not liable for misuse of your paraglider
New paragliders must be flown by the seller first. This flight must be acknowledged in the protocol
by signature and date.
The eXCalibur must only be flown in combination with an authorised rescue system and
harness. The pilot is responsible for pre-flight checks and condition of his/her equipment.
Fly market GmbH & Co. Kg is not liable for any compensation resulting from breach of these articles.
3. Target Group
The eXCalibur has been rated DHV class 2-3 GH accelerated. It is suitable for pilots who are looking
for a high performance glider, XC-pilots and Competition-pilots, who have already experience with
gliders of higher classes. We recommend that every pilot should play with the paraglider on the
ground (ground handling) as much as possible. Attending an over water safety clinic (SIV) is also
advisable. Perfect control of the paraglider on the ground and in the air is the key to flying fun and
the best way to ensure accident free flying.
4. Construction and development of the eXCalibur
The eXCalibur consists of 57 cells, of which every second one is attached to a line. The V-bands
ensure that the load on the line attachments is spread onto the adjoining ribs. This results in fewer
lines without loss of airfoil shape, whilst maintaining profile integrity, and canopy stability. The
resistance of the lines in the air is thus reduced as well as providing easier sorting of the lines
before take off.
We have used the best and up to date technical equipment to develop the eXCalibur. 3D models
were built on the computer and tests were simulated before production. All parts are tailored by
computerised cutting machines and printed with inscriptions. Our development team has more than
15 years of experience in developing and producing paragliders and are supported by experienced
test pilots.
For computer freaks: We use a P3 multiprocessor workstation with two monitors. The cutting
plotters are controlled by a SGI workstation. Our FlyCAD2000 program was specially developed for
paraglider construction, is written in C++/Arx and is updated regularly. It is now used by nearly all
other manufacturers. The eXCalibur is a new milestone in its class. The different eXCalibur sizes are
symmetrically scaled achieving the same performance for the equivalent weight load and a nearly
identical inflight behaviour. 3
gliders for real pilots
independence
www.independence-world.com
gliders for real pilots
independence
www.independence-world.com
G:WARNIN
Pgi aeaty t n ft n d srusnr o d h eie
araglidins an extremely d ng rous ctivi tha ca and oe oe es lt in erious i ju yreat . Th des gn r,
m n ct ,i b o e teo n i t g n eyo s ft h s a ea ufa urer d stri utor,wh lesal r and re ail r cann t adw ll nouara t e ura e y wen usingthi par glid r. You
a m d f yid o,cg h , i n s n a n d d n e o yo f ylone ust ju ge the l ngcon iti ns in ludin weater w nd, co getio , lunchi gareas,anlani g area b f re u l.
Pr l re a d s e re o d i,rt d , g,a,w n , s s o ha ag iders quire careful n con ist nt ca .Overtime, s lar ra iat on di , ust rease w ter i dtres , and ter
va l ld h r o a t eg d ,t e n s i u e . a e wnriab eswil egradet epe f rm nceandsafetyof hil er hrebyicreasingtheri kofnj ryord ath Redth oer's
nloep ra l e f re yo . l a l t n o gh n a i rma ua f th a g id r be o u fly A w ys weara he me a d protective cl thinw enflyiga p ragl de.

Table of Contents:
1. Dear Independence Pilot
2. Important information
3. Target group
4. The eXCalibur´s construction and development
5. Material specification
6. Technical specification
7. How to check your paraglider
8. How to adjust the steering lines
9. In flight
9.1 The harness
9.2 Take-off preparation
9.3 Take-off run
9.4 Level flight
9.5 Accelerated flight
9.6 Using the Speed Bar
9.7 Turning
9.8 Landing
10. Towing
11 Paramotoring
12. Flying manoeuvres
12.1 Asymmetric collapse
12.2 Cravats
12.3 Symmetric or Front tuck
12.4 Parachutal stall
12.5 B-line stall
12.6 Steep spirals
12.7 Big Ears
12.8 Full stall
12.9 Negative spins
12.10 Wingovers
12.11 Emergency steering
13 Summary
14 Care and storage
15.1 Total line length eXCalibur small
15.2 Total line length eXCalibur medium
15.3 Total line length eXCalibur large
16.1 Single line length eXCalibur small
16.2 Single line length eXCalibur medium
16.3 Single line length eXCalibur large
17.1 DHV certification eXCalibur small
17.2 DHV certification eXCalibur medium
17.3 DHV certification eXCalibur large
2
1. Dear Independence Pilot
It is our pleasure to welcome you to the world of Independence pilots. The new eXCalibur paraglider
was developed to suit pilots that enjoy superior performance, high speed and agility, but still want
a high level of security. The eXCalibur distinguishes itself through its unique handling and
performance. Like every paraglider the eXCalibur has its own characteristics. To ensure your best
possible flying experience we provide this manual.
2. It is most important that you read this manual before flying your new eXCalibur!
We are not liable for misuse of your paraglider
New paragliders must be flown by the seller first. This flight must be acknowledged in the protocol
by signature and date.
The eXCalibur must only be flown in combination with an authorised rescue system and
harness. The pilot is responsible for pre-flight checks and condition of his/her equipment.
Fly market GmbH & Co. Kg is not liable for any compensation resulting from breach of these articles.
3. Target Group
The eXCalibur has been rated DHV class 2-3 GH accelerated. It is suitable for pilots who are looking
for a high performance glider, XC-pilots and Competition-pilots, who have already experience with
gliders of higher classes. We recommend that every pilot should play with the paraglider on the
ground (ground handling) as much as possible. Attending an over water safety clinic (SIV) is also
advisable. Perfect control of the paraglider on the ground and in the air is the key to flying fun and
the best way to ensure accident free flying.
4. Construction and development of the eXCalibur
The eXCalibur consists of 57 cells, of which every second one is attached to a line. The V-bands
ensure that the load on the line attachments is spread onto the adjoining ribs. This results in fewer
lines without loss of airfoil shape, whilst maintaining profile integrity, and canopy stability. The
resistance of the lines in the air is thus reduced as well as providing easier sorting of the lines
before take off.
We have used the best and up to date technical equipment to develop the eXCalibur. 3D models
were built on the computer and tests were simulated before production. All parts are tailored by
computerised cutting machines and printed with inscriptions. Our development team has more than
15 years of experience in developing and producing paragliders and are supported by experienced
test pilots.
For computer freaks: We use a P3 multiprocessor workstation with two monitors. The cutting
plotters are controlled by a SGI workstation. Our FlyCAD2000 program was specially developed for
paraglider construction, is written in C++/Arx and is updated regularly. It is now used by nearly all
other manufacturers. The eXCalibur is a new milestone in its class. The different eXCalibur sizes are
symmetrically scaled achieving the same performance for the equivalent weight load and a nearly
identical inflight behaviour. 3
gliders for real pilots
independence
www.independence-world.com
gliders for real pilots
independence
www.independence-world.com
G:WARNIN
Pgiaesatytnftndsreunsonrodheie
araglidinsanextremelydngrouctivithacaandoeoesltierius ijuyreat.Thdesgnr,
mnct,iboeteonwitgneyosfthisaieoa ufaurerdstriutor, whlesalrandreailrcanntadllnouarateuraey w enusngthipargldr.Yu
amdhfyido,clgh,insnanddneoyofy
loneust jugetelngconitinsinudinweaterwnd,cogetio,lunchigareas, anlanigareabfreul.
Pralreadsereodi,drtd,g,a,wn,ssnoh
agidersquirecarefulnconist ntca.Overtime,slarraiatoni,ust rease wteridtres,adter
valldrhroategd,teynsiue.aewn
riabeswileg adetepefrmnceandsafetyofhilerhrebicreasingtherikofnjryordathRedtho er's
nloepralefreyol.laltnohgwhnair
ma uafthagidrbeoufyAwyswearahemeadprotectivecltinenflyigapraglde.

5. Material Data
The canopies of our paragliders are made of Porcher Marine Skytex Ripstop Nylon material with an
E77 coating. A filament net is woven into this material which prevents ripping and increases the
tensile strength along the seams. The polyurethane coating makes the material water proof and UV-
resistant. The material used for the lines is Edelrid HMA Aramid, these are made of a special Aramid
formula and have been tried by the DHV and ourselves in multiple snapping and load tests.
6. Technical Data
Size L M S
Scalefactor % 103 100 93
Surfaceareaflat m² 27,73 26,14 23,59
Wingspanflat m 12,93 12,55 11,92
Aspectratio A/R 6,03 6,03 6,03
Weight kg 6,9 6,5 6,1
Numberofcells No 57 57 57
Takeoffweightmin. Kg 90,0 75,0 60,0
Takeoffweightmax. Kg 115,0 100,0 85,0
Sinkdatamin m/sec 1,0 1,0 1,0
V-Trimm Km/h 37 37 37
V-Max. Km/h >52 >52 >52
DHV Kat. 2-3GH 2-3GH -
7. How to check your paraglider
Every paraglider delivered is tested and measured by us. Nevertheless we advise you to check your
paraglider for the following criteria. You should also follow these instruction after a long intensive
flight or an accident on landing, eg: tree landing.
Check:
the seams where the lines attach, and the canopy for any damage.
that all the lines have been sewn correctly and are free of damage
that all the line locks have been screwed up properly and the plastic inlets are tight
that all ribs and V-attachments are free of rips
Every fault no matter how small must be checked and repaired by a professional. A damaged
paraglider is not air-worthy.
8. Steering/brake lines
The two steering/brake lines lead up to a line cascade which is fixed to the trailing edge. On the
risers the steering lines run through a pulley and are connected to a handle. These handles are fixed
to the risers with a push button when not in use. The length of the steering lines is set correctly at
the factory. They have to have at least 5cm of free play and must only be adjusted by a qualified
flying instructor or the dealer. The improper adjustment of the steering lines can cause severe
changes to inflight behaviour.
9. Inflight
The following pages are not intended to describe how to fly a paraglider. Rather we want to show
you the eXCalibur's specialities and give you important information regarding in-flight behaviour.
9.1 The Harness
The eXCalibur has been developed and authorised with the GH harness. Nearly all harnesses
recently produced are type GH harnesses. They differ from the GX harness due to their low
suspension and not very effective (if at all included) cross straps. Cross straps have not proven
themselves in combination with new paragliders. The last authorisation of a GX harness by the DHV
was in 1997. The use of a fixed cross fixture is inadmissible. The easiest way to check the harness is
via the DHV website. Here the GH or GX harness type is stated.
9.2.Take off preparation
Before every take off the paraglider must be checked visually for possible damage.
The easiest way to take off with the eXCalibur is to lay it out in an arc so all A-lines are under the
same tension. We generally advise using just the middle A-risers, but using all risers is not a
problem. In flat take off areas you may need to take two steps before the lines come under tension.
In other circumstances we advise tensioning the A-lines lightly. The most important issue whilst
launching the glider is not the force used, but applying a constant pull. The eXCalibur is very easy to
launch, but you may need to brake slightly in stronger wind conditions or steep take off areas to
prevent the wing over-flying.
9.3 Take off run
During take off the eXCalibur shows no peculiarities. When launching in stronger winds, you can
avoid a premature take off by moving under the paraglider whilst launching it. The best way to
train for taking off in strong wind conditions is by regular ground handling practice.
9.4 Level flight
With loose steering lines, depending on the wing loading, the eXCalibur reaches a flying speed of 35
to 40 km/h. In calm conditions the eXCalibur flies at minimum speed if the pull is approx. 45-50 cm.
In turbulent air we advise flying with the brakes pulled down 5 - 15 cm. The angle of attack is
higher and this makes the wing more stable.
All measurements are relative to the brake lines under no tension
45
gliders for real pilots
independence
www.independence-world.com
gliders for real pilots
independence
www.independence-world.com

9.5Acceleratedflight
When using the speed system with your feet, the angle of attack is reduced and the eXCalibur flies
up to 16 km/h faster. Due to the increased speed the reaction of the canopy is more dynamic in
collapses. For your own safety you should only accelerate in calm wind conditions with ample ground
clearance. Sharp reactions during accelerated flight must be avoided, as the low angle of attack
increases the chance of a collapse.
9.6 Using the Speed bar
9.7 Turning
The eXCalibur reacts immediately to the first 15cm pullon the brake. That is why you do not have to
pullheavily when attempting tight turns, wingovers orspirals. Our test pilots agree that the
eXCalibur is best flown without alteration to the factory brakeline length.
9.8 Landing
The eXCalibur is easy to land. With a little training you will find landing on the spot easy. We
recommend you slow the paraglider down steadily rather than “pumping” it, should you come in too
high. Be careful not to stall the paraglider, and do allow space to correct possible turbulence and a
lack of wind near the ground.
10.Winch launching (Towing )
The eXCalibur is certified for tow launches. You shouldhowever discuss the requirements of towing
with aflying instructor or the person in charge of the winch. Towing is only permitted when the
person incharge of the winch has a valid winch license. The equipment needed for the tow must also
be certified.
11. Using a motor
Please refer to the paramotor manufacturer to ensur the paramotor is suitable for the paraglider.
12. Flying manoeuvres
12.1 Asymmetric Collapse
Should one side of the eXCalibur's wing collapse in turbulent conditions there is no need to panic. Its
good natured flying behaviour in extreme situations will ensure that it reopens quickly. To minimise
height loss and amount of turn, move your weight to the open side and pull the steering line down
to the height of the main carabiner. Big collapses will re-opened quicker by steady pumping of the
collapsed side of the paraglider. But don't forget to release pressure on the brakes as soon as the
canopy is open.
12.2 Cravats
Extreme situations can cause the wing to cravat, the collapsed cells getting caught up in the lines.
Should this happen, you must immediately stop the inevitable rotation. This is done by opposite
braking. Should the rotation happen near the ground, and continue despite heavy steering you must
use your reserve parachute. If you have managed to stop the rotation but are nearing the ground,
try to pull out the cravat by energetically pulling on the brake lines on the folded side to try to
reopen the glider. Should this be unsuccessful pull the folded side in even further using the outer A-
riser. The last possibility to handle bad cravats is to pull the stabilo line, attached to the eXCalibur's
B-riser. If you have considerable height, a full stall will also usually release the cravat.
12.3 Symmetric or Front tuck (Frontals)
A fold of the complete leading edge might look spectacular however it is not dangerous. No
rotations occur and the paraglider quickly reopens unassisted, to return to normal flight again.
Braking evenly on both sides will speed up the opening of the leading edge.
12.4 Parachutal Stalls!
Letting go of the B-risers too slowly exiting a B-stall with old porous material , damaged lines or
ribs, pulling the C or D-riser or incorrect take off weight can result in the glider going parachutal
falling vertically but still holding its shape. You can tell whether or not your paraglider is
parachutal, as the flying noise can hardly be heard even though the brakes are free and you are
sitting in your unusual position under the canopy. Normally, letting up on the steering lines will
allow the glider to resume normal flight.
If the canopy and the lines are in good working condition, the eXCalibur will speed up again
automatically after 2-3 seconds. Should this fail to happen you must pull the A-risers down approx.
5cm.
If the paraglider goes parachutal repetitively, have it checked by your dealer.
6
7
Position accelerated flight
Position normal flight
gliders for real pilots
independence
www.independence-world.com
gliders for real pilots
independence
www.independence-world.com

12.5 B-line stalls
A B-line stall with the eXCalibur is easy and performed as a normal descent technique. The pulling
down of the B-risers takes a lot of effort for the first 10cm, however the B-stall is easy to hold once
started. When ending the B-line stall you just have to let go of the risers quickly to avoid the glider
going parachutal.
12.6 Spiralling
Spiralling is the most efficient way to descend quickly. However, this causes a lot of strain for the
paraglider as well as the pilot. Please be aware that, according to your fitness, outside temperature
(cold) and descent rate, you could loose consciousness. Many pilots lower their breathing rate or
start hyper ventilating, both of which heighten the risk of loosing control.
With the first signs of sickness, weariness or blurred eye sight you must stop spiralling immediately.
Nearly every paraglider reaches the point where the canopy's leading edge points down (rolls over)
and may remain in this position even if the steering lines are let go deep spiralling.
The descent rate of the eXCalibur is 14m/sec as recorded by the DHV. You can achieve a higher
descent rate through slight braking of the outside wing without the eXCalibur rolling over. On rare
occasions a glider can drop into a deep spiral from a slow descent. The reason may be that the
pilot's weight is still focused on the inside of the turn after releasing the inner steering line.
A deep spiral can be stopped by shifting your weight to the middle and applying some counter
braking.
12.7 Big Ears
Big Ears is a simple, but not too effective way of descending. It is more suitable for reducing the
glider's performance. Too severe pull down of both sides reduces the speed but increases the risk of
a stall. You can increase the descent to approx. 5m/sec and halve the gliding performance.
Much greater stability, a higher sink rate and more forward speed will be obtained by also using
the accelerator. This can be a very useful and important strategy in some difficult situations.
DANGER: Please note. You must never induce Big Ears when already on speed bar (accelerated), as
a front collapse is almost inevitable due to the already low angle of attack. Always apply Big Ears
first followed by the speed bar.
Please note: Never attempt tight turns or spirals with Big Ears, as the A-lines will be over stressed.
12.8 Full stall
You can only induce a full stall by pulling the steering lines down by more than 65 cm and remaining
in this position for more than one second. When stall speed is reached the canopy will empty itself
at once, the pilot is hurled forward and the impression is given that the canopy falls backwards.
It is vital to keep the brakes pulled down until the empty canopy is above the pilot again (this will
take 3-6 seconds). If you let go of the steering lines with the paraglider still behind you, the glider
will shoot forward and dive in front. Not until the glider is above the pilot can the steering lines be
let go quickly and symmetrically. The perfect ending to a full stall should take place in two steps:
1) slow refilling of canopy (slow loosening of brakes, approx. up to the shoulder) until the canopy is
reopened completely, then
2) slowly releasing the brakes altogether
12.9 Negative Spins
Pulling down hard on one brake can cause the air stream to break away on that half of the wing. A
reversion of the air-stream direction can occur. The slowed half flies in the opposite direction. The
paraglider then turns around its vertical axis.
Please only attempt to induce negative spins under the instructions of an experienced trainer and
above water.
12.10 Wingovers
During severe so called wingovers the glider can be up to 90 degrees of angle (ie pilot out
horizontally). This is an illegal acrobatic flight manoeuvre and is prohibited. At up to 60 degrees of
angle the eXCalibur will not collapse if properly handled.
12.11 Emergency steering
In the event of loosing control of the steering lines, the eXCalibur can be flown easily with the rear
risers (D lines). A stall happens quicker when steering with the rear risers as opposed to steering
with the brake lines, being an average of approx. 20cm with the eXCalibur. Light turns can be flown
using the stabilo lines or by shifting your weight.
13. Summary
For a quick descent the best ways are B-stalls, spiralling and Big Ears. All other flight manoeuvres
are considered as artistic flying and just as dangerous. Full stall and spins are only to be flown over
water.
14. Care and storage
Your safety in the air depends on the condition of your paraglider. A maintained and properly used
paraglider will last a long time, In order to maintain your eXCalibur’s condition for a long time we
89
gliders for real pilots
independence
www.independence-world.com
gliders for real pilots
independence
www.independence-world.com
would like to give you the following advice:
In time the UV rays will damage the material of the paraglider. Therefore don't leave the
eXCalibur out in the sun unnecessarily.
When you pack your paraglider make sure that it is not always folded in the same way.
Put the cloth bag that comes with the glider underneath it when folding it up to ensure that
the material of the glider is not damaged.
Curl up the lines as little as possible with no sharp kinks.
Store your glider in a dry place. In case it gets wet lay it out to dry as soon as possible (but
not in the sun).
Store the paraglider well away from chemical gases or fumes.
Clean your paraglider only with clean water and do not use brushes or hard rubbing.
Do not use chemical detergents.
Small cuts in the material, if they are not anywhere along the seams, can be mended
provisionally with sticky material. Other damage like large cuts, cuts along the seam, ripped
line loops, torn or damaged lines must only be repaired by an authorised dealer.
Insects in the cells should be removed alive, not just for animal care reasons, but the insect
secretion is acid and can damage the fabric.
Every alteration of the canopy, unless authorised by the DHV or the dealer, results in the
glider's certification expiring.
The eXCalibur has to be checked by an authorised dealer every two years or after 300 flying
hours, whichever comes first.
15.1.TotallinelengtheXCalibur Small
!
!
!
!
!
!
!
!
!
!
!
!
10
15.2. Total line length eXCalibur Medium
15.3. Total line length eXCalibur Large
11
16.1 Single line length eXCalibur Small
gliders for real pilots
independence
www.independence-world.com
gliders for real pilots
independence
www.independence-world.com
in cm Stabi 1 123456789
A6760 7070 7180 7380 7425 7395 7495 7515 7475 7570
B6730 7025 7120 7320 7365 7335 7425 7430 7390 7485
C6735 7040 7145 7340 7420 7390 7480 7500 7460 7550
D7190 7385 7495 7465 7555 7580 7540 7625
Bremse 7600 7675 7780 7900 7855 7865 8020 8100 8260 8515
Bremse 7610 7695 7845 7885 7820 7925 8075 8155 8375
in cm Stabi 1 Stabi 2 12345678
A6960 7280 7415 7615 7645 7615 7720 7740 7700 7795
B6930 7235 7335 7540 7585 7555 7645 7650 7610 7710
C6935 7235 7360 7560 7640 7610 7705 7725 7685 7775
D7375 7605 7720 7690 7780 7805 7765 7855
Bremse 7820 7910 8030 8180 8150 8160 8315 8400 8560 8825
Bremse 7845 7930 8110 8170 8110 8215 8375 8455 8680
12
16.3 Single line length eXCalibur Large
13
gliders for real pilots
independence
www.independence-world.com
gliders for real pilots
independence
www.independence-world.com
16.2 Single line length eXCalibur Medium
Profil Nr. 10e 987654321
A - Ebene 74,5 205,5 216,5 236,5 241 238 248 250 246 255,5
Stammleine 500 500 500
B - Ebene 71,5 201 210,5 230,5 235 232 241 241,5 237,5 247
Stammleine 600 500 500 500
C - Ebene 72 202,5 213 232,5 240,5 237,5 246,5 248,5 244,5 253,5
Stammleine 500 500 500
D - Ebene 217,5 237 248 245 254 256,5 252,5 261
Stammleine 500 500
Bremse oben 72 73 79,5 73 81,5 78 83,5 78 75 71,5 76 74 83,5 78 80,5 81 91,5 89,5 103,5
Bremse mitte 145,5 154 164 160,5 160,5 168,5 165 170 183,5
Bremse Griff 233 240,5 255
315+25
Profil Nr. 10e 987654321
A - Ebene 76,5 211,5 225 245 248 245 255,5 257,5 253,5 263
Stammleine 515 515 515
B - Ebene 73,5 207 217 237,5 242 239 248 248,5 244,5 254,5
Stammleine 618 515 515 515
C - Ebene 74 207 219,5 239,5 247,5 244,5 254 256 252 261
Stammleine 244 515 515
D - Ebene 221 244 255,5 252,5 261,5 264 260 269
Stammleine 515 515
Bremse oben 67,5 70 76,5 70 80 77,5 84,5 79,5 77,5 73,5 78,5 76 86 80,5 83 83,5 94 92 106,5
Bremse mitte 150 158,5 169 165,5 165,5 173,5 170 175 189
Bremse Griff 240 247,5 262,5
324,5+25
17.3 DHV certification eXCalibur Large
17.2 DHV certification eXCalibur Medium
Table of contents
Other Independence Aircraft manuals

Independence
Independence Voyager Biplace User manual

Independence
Independence Innovation B User manual

Independence
Independence Spider User manual

Independence
Independence Garuda User manual
Independence
Independence Logo! Easy User manual

Independence
Independence Duke User manual

Independence
Independence Airtaxi2 User manual


