INDIWORK A-LINK For V-sensus User manual

Instruction Manual
High-Denition Link for VOLVO
A-LINK For V-sensus
Model Name
Latest Firmware Date
Manual Version
Language
A-LINK FOR V-sensus
2018 - 07 - 04
Rev. 1.3
English
Release Date: 2018 – 07 - 15
www. .co.kr
FOR V-sensus
POWER/CAN DEBUG KEYPAD LVDS OUT LVDS IN AV IN 1 AV IN 2 GPS WIFI
SD SLOT HDMI IN RESET DIP SWITCH USB 1 USB 2
5V USB
POWER

Main Specications
Warranty : One years from the original date of purchase.(12 months)
Thank you for purchasing our product.
We offer the warranty for 1 year from the date of purchase.
This product has been tested and have passed under our strict and qualified control. If the
failure occurred due to the carelessness of workmanship within one year after the purchase, we
are responsible to repair free of charge.
• Free service : Manufacturing defects, When naturally occurring failures within the warranty
period.
* When the warranty period has elapsed, Failure the caused by customer’s mistake, Failure the
caused by natural disasters.
Product Warranty
OS Android 5.1.1 (Lollipop)
CPU NXP5430Q-64bit Cortex-A53 Octa Core@1.6Ghz Mali-400 MP4 GPU
Internal Memory 2GB DDR3 @800Mhz
NAND 16GB eMMC
USB USB2.0 High Speed Port x 2
Signal 802.11 b/g/n WiFi, Bluetooth 4.0
GPS Ublox7
Touch Resistor and Capacitive touch support
RGB OUT 800x480 or 480x234, Including RGB scaling function
LVDS OUT Digital 800x480 LVDS OUT
Speaker 2W
FM Transmitter 88.0Mhz~108.0Mhz
I/O AV IN(Only Video), Stereo Audio Out, UART(Only Smart Drive)
Voltage DC 12V ~ 24V
Temperature Storage -20 C ~ +80 C/ Operating -15 C ~ +70 C

Contents
Car Compatibility Chart
Precautions
Dimension & Exterior
Components & Optional Parts
Body Connector specifications
Body Connector specifications
Full Installation Diagram
DIP Switch Settings
Activation by original buttons
Around View Script
Rear View Script
DVB-T Connection Diagram
Settings HDMI
Settings (How to use KEYPAD)
Settings HDMI, NAVIGATION
Settings REAR
Settings REAR
Settings FRONT, (OEM Carmera Delay time setting)
Settings DVB-TV
Firmware Upgrade

Precautions
A-LINK for VOLVO- related
You should check the names and colors of each wires exactly, before you connect the wires.
ex) CAN HIGH: White wires / CAN LOW: Blue wires
The ‘POWER / CAN Cable’ should always be connected last and be disconnected first.
The 'Mode Switch' is an optional part to change modes forcibly without CAN-BUS.
Generally, the CAN-BUS wires are connected for changing modes by original buttons.
When the reverse gear is not detected by CAN-BUS,
the 'REVERSE 12V IN wire’ should be spliced with 1 2V power of reverse light.
HDMI Device-related
HDMI mode accepts general-screen resolution of HDMI devices.
Generally, '5V 1A Power output(5V USB POWER)' is a standard voltage for charging smartphone.
If you need higher voltage than 5V, you should add a separate power supply.
● This product is assistive devices that help the driving safely. Do not drive by rely solely on
● The rated voltage of this product is DC 12. And it requires the correct wiring connections and mounting.
Please install only by a qualified technician.
● GPS Satellite reception may be unstable in a particular area or some vehicles that have the
special tinted windows and electromagnetic interference.
● Please read the manual prudently before using this product. And then use this product correctly.
● To avoid any risk of electric shock or other injuries, please never disassemble and reassemble this product.
● This product yourself Installing or servicing this product and its connecting cables may
expose you to the risk of electric shock or other hazards, and can cause damage to this product.
● Do not cut the GPS antenna cable to shorten it or use an extension to make it longer.
Altering the antenna cable could result in a short circuit or malfunction.
● Any function that requires your prolonged attention should only be performed after coming to
a complete stop. Always stop the vehicle in a safe location before performing these functions.
● Company can not be held responsible for incidental damages of the driver caused as a result of using the product.

Car Compatibility Chart
2016 -Volvo S90
2016 -
2017 -
2017 -
Volvo V90
Volvo XC90
Volvo XC60
Specific Models
Production
Year
Car Models
2016~ New Volvo Sensus Infotainment
VOLVO S90 VOLVO V90
VOLVO XC60 VOLVO XC90
Go to contents page
Click

Dimension
Exterior
A
B
C
D
E
F
G
USB PORT
USB PORT
DIP SWITCH
RESET SWITCH
5V USB POWER
HDMI IN
SD CARD SLOT
H
I
J
K
L
M
N
O
POWER / CAN
DEBUG
KEYPAD
LVDS IN
AV IN 1
AV IN 2
GPS
WIFI
P
LVDS OUT
A
H I J K L M N O P
B C D E F G
ON 1 2 3 4 5 6
FOR V-sensus
POWER/CAN DEBUG KEYPAD LVDS OUT LVDS IN AV IN 1 AV IN 2 GPS WIFI
SD SLOT HDMI IN RESET DIP SWITCH USB 1 USB 2
5V USB
POWER
Go to contents page
Click
167 mm
22 mm
105 mm

Components
Optional Parts (sold separately at the indiwork)
Go to contents page
Click
Brackets
Power Cable
KEYPAD For setupIR IN SenserMIC External Speaker External GPS Antenna HDMI Cable
WIFI Antenna
Sub Power Cable AV 1 CableGVIF Cable AV 2 Cable
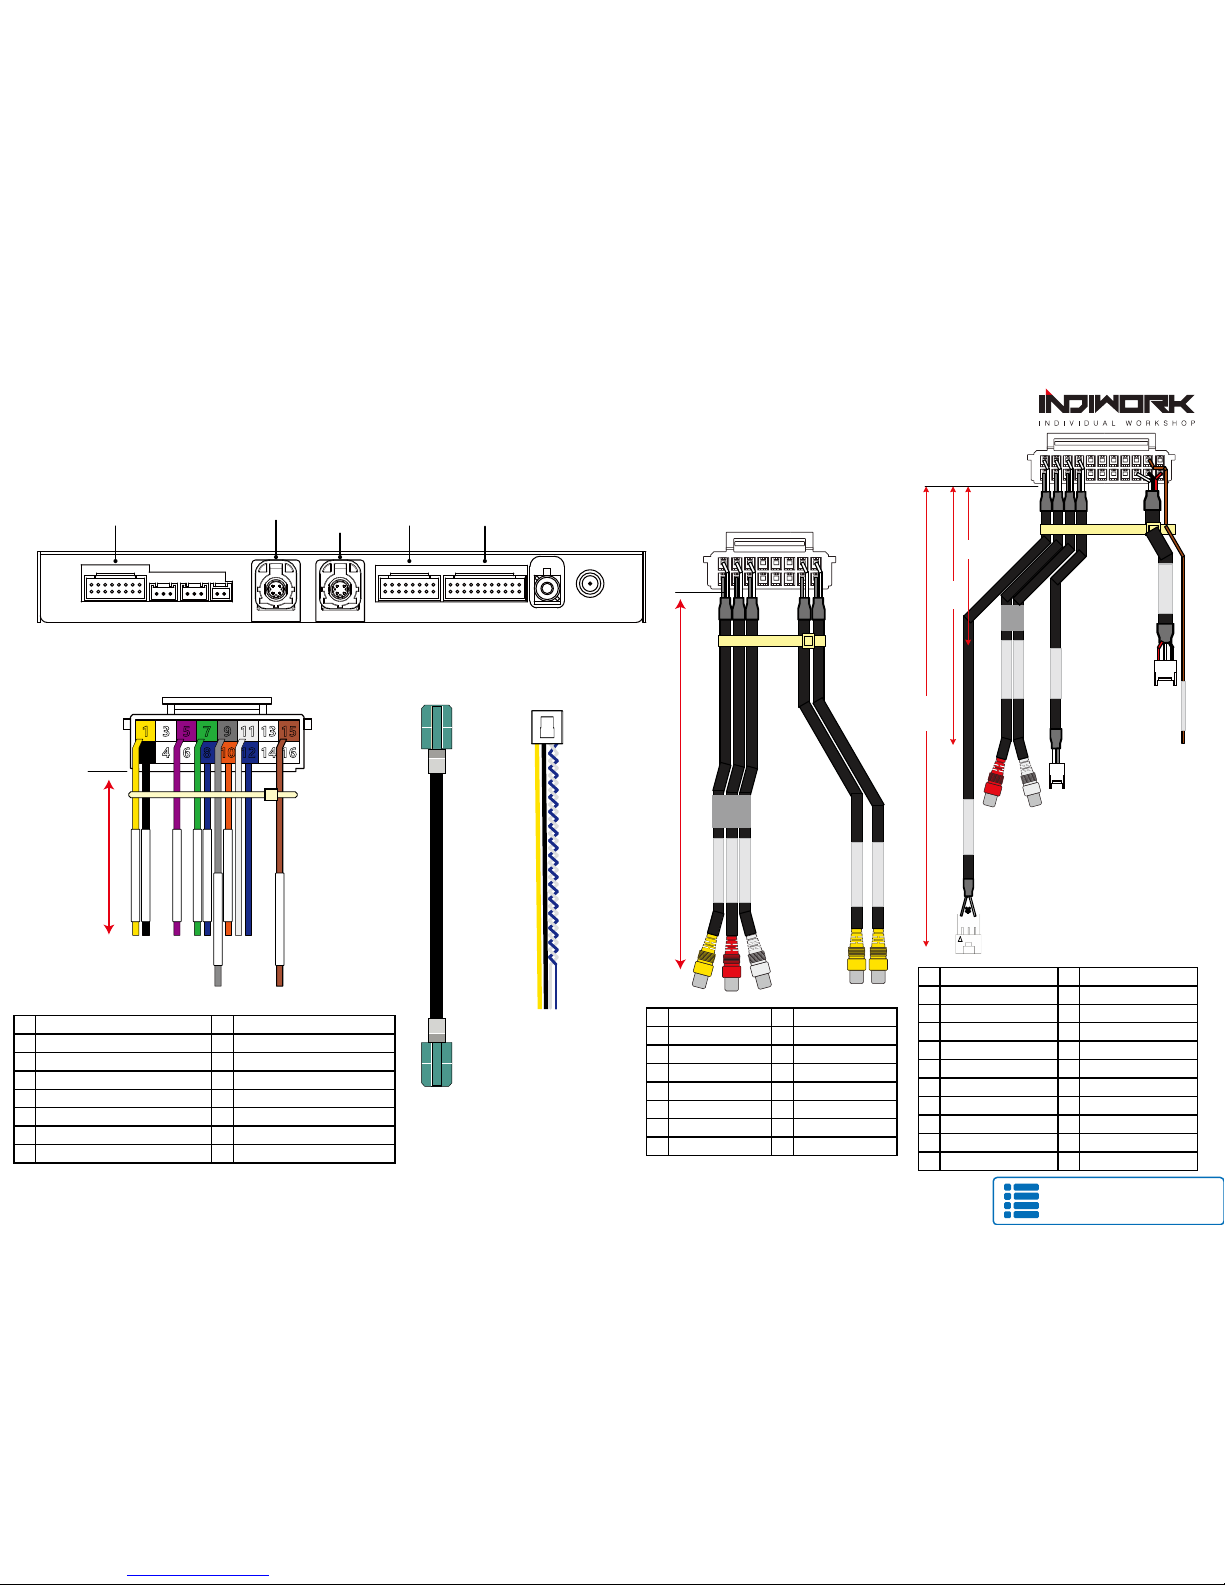
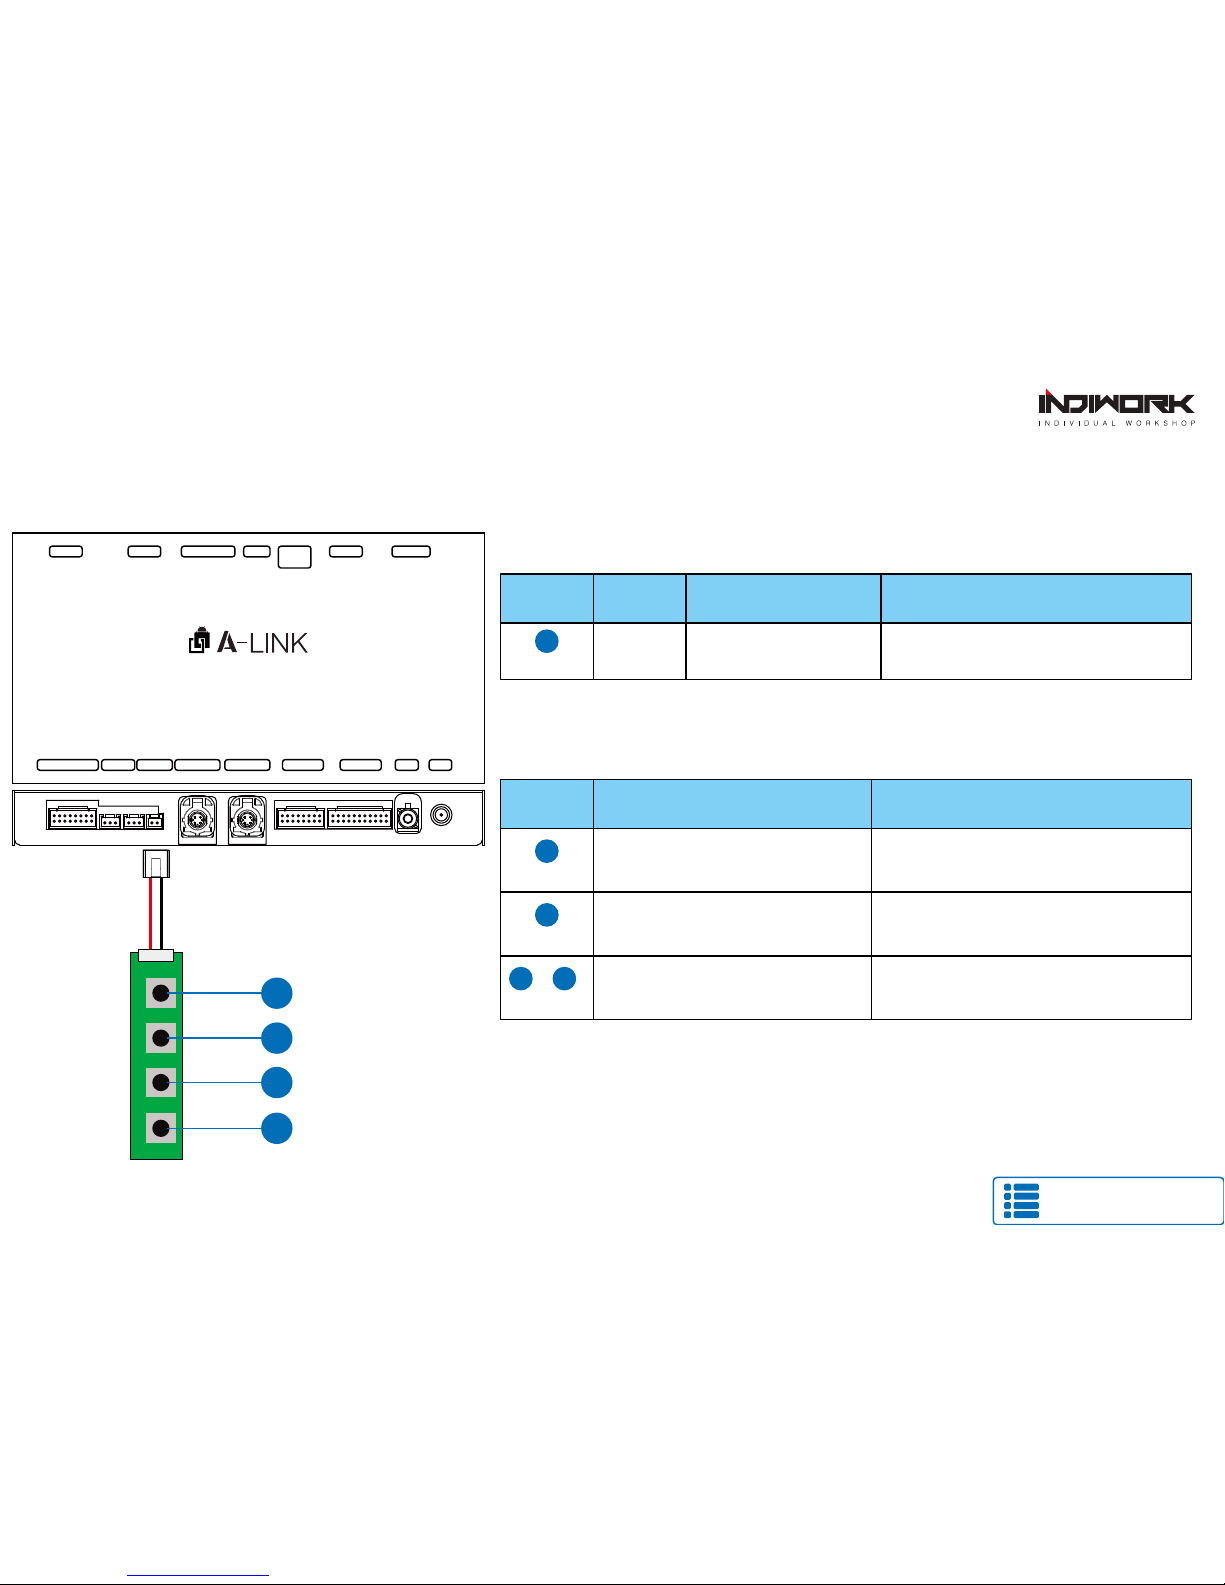
Body Connector specications
1 BATTERY POWER INPUT
3
5 12V(ACC) OUT
7 REVERSE DETECTION
9 BUTTON KEY
11 CAN HIGH
13
15 MON 5V IN
2 GROUND INPUT
4
6
8 RV-CAM POWER OUT
10 OMNI KEY
11 CAN LOW
12
14
LVDS OUT
CABLE
Sub Power
CABLE
1 DVB_IN_V
3 DVB_IN_R
5 DVB_IN_L
7 N.C.
9 N.C.
11 N.C.
13 FRONT_IN
15 REAR_IN
2 GND
4 GND
6 GND
8 N.C.
10 N.C.
12 N.C.
14 GND
16 GND
1 SPK +
3 AUX_OUT_R
5 AUX_OUT_L
7 MIC +
9 N.C.
11 N.C.
13 N.C.
15 N.C.
2 SPK -
4 AUX_GND
6 AUX_GND
8 MIC -
10 N.C.
12 N.C.
14 N.C.
16 N.C.
17 N.C. 18 IR_IN
19 DVB-T IR 20 IR_GND
21 N.C. 22 IR_POWER
AV IN 2
AV IN 1
POWER / CAN AV IN 1
LVDS OUT
LVDS IN AV IN 2
150mm
DVBT IN AUDIO R
DVBT IN AUDIO L
DVBT IN VIDEO
1
2
15
16
REAR IN
FRONT IN
AUX OUT R
AUX OUT L
SPEAKER
MIC
1 2
DVB-T IR
1
2
21
1 3
300mm
IR IN
1 3
22
800mm
150mm
POWER / CAN
CABLE
1 3 5 7 9 11 13 15
2 4 6 8 10 12 14 16
BAT +
GND
12V OUT
REVERSE 12V IN
REAR 12V
BUTTON KEY
OMNI KEY
MON 5V IN
500mm
Go to contents page
Click
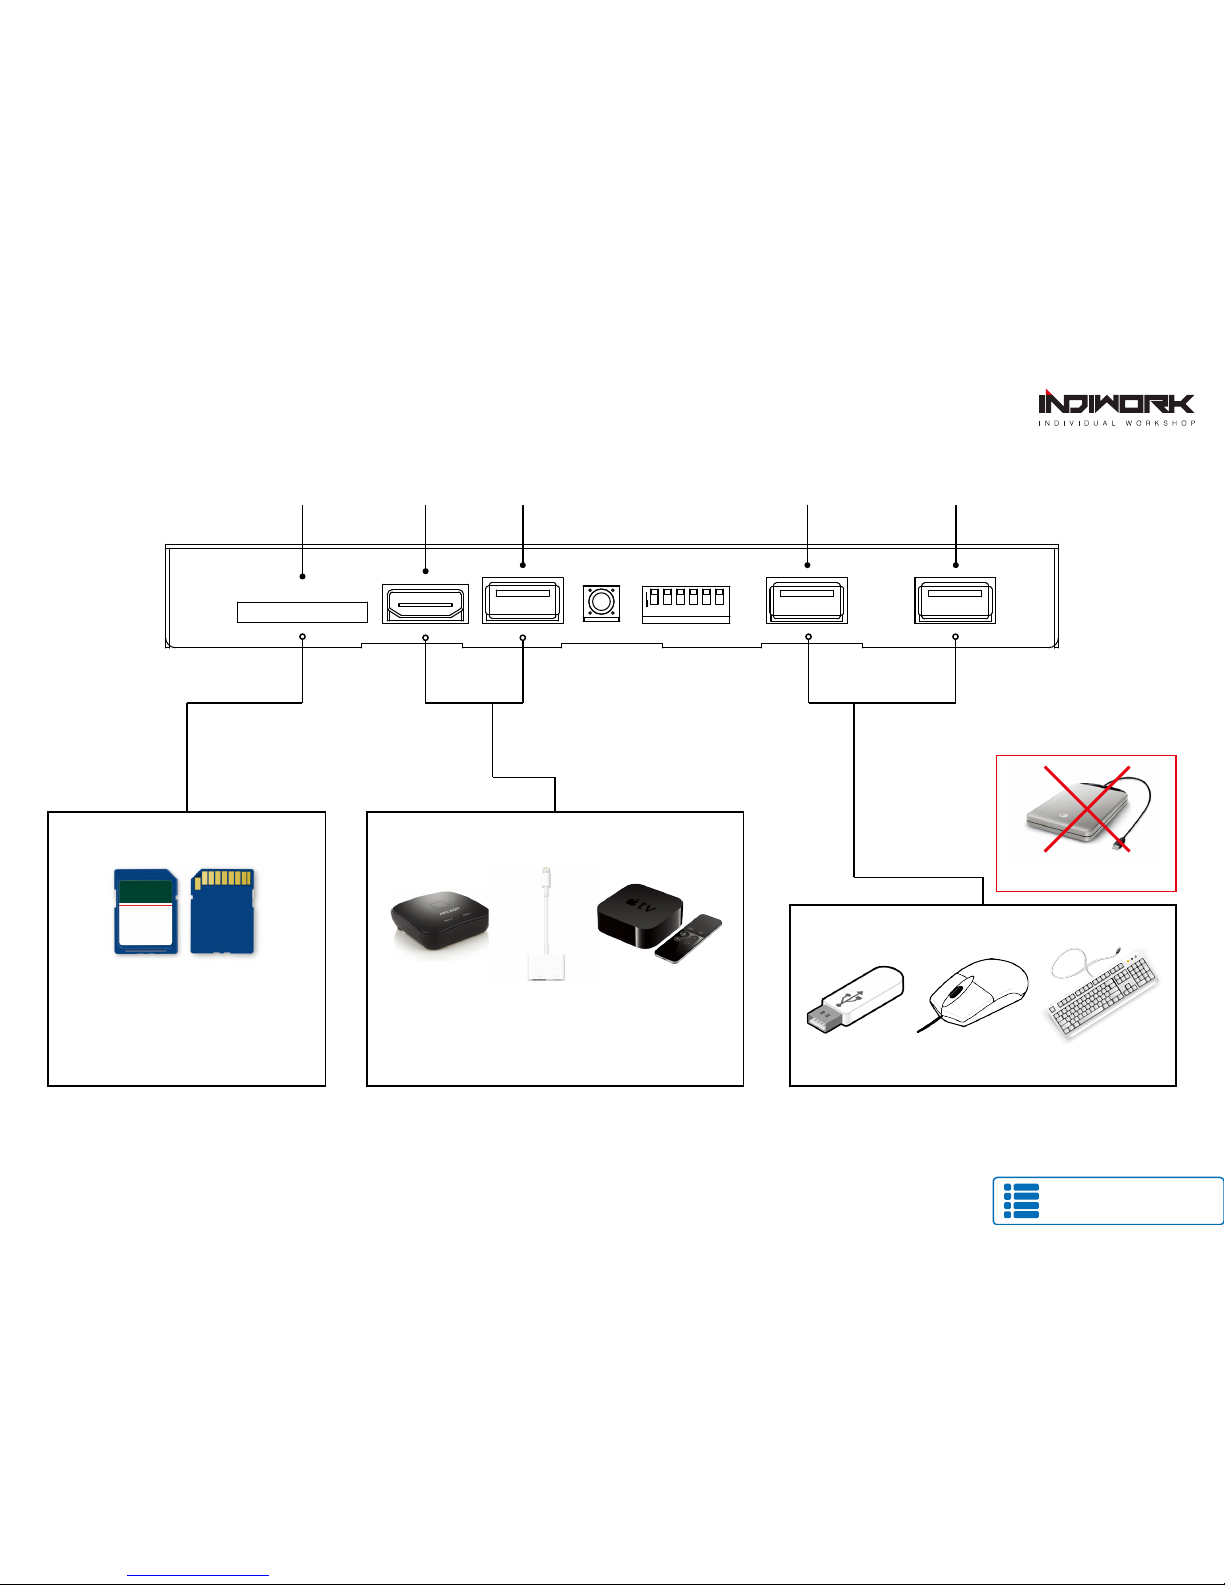
Body Connector specications
Speed Class : Class10
Max Storage Capacity : 32GB
FORMAT : FAT32 USB2.0 Port
Compatibility Spec
SD SLOT
SD CARD HDMI DEVICE
USB DEVICE
USB PORT 2
HDMI IN 5V POWER USB PORT 1
Does NOT External Storage
Supports Only 720P
Does Not Supports 4K, 1080P,
Compatibility Resolution
ON 1 2 3 4 5 6
Go to contents page
Click

Full Installation Diagram
VOLVO OEM SCREEN
(Provided LVDS Cable)
KEYPAD
(OEM LVDS Cable)
12V OUT (ACC 12V OUT)
12V POWER OUT FOR BACKUP CAMERA
Rear 12V
Reverse Signal Detection
Reverse 12V IN
OMNI KEY
DVBT AUDIO IN L
DVBT AUDIO R
DVBT IN VIDOE
FRONT IN
REAR IN
AV DEVICE
FRONT CAMERA
AV IN 1 CABLE
REAR CAMERA
MIC
SPEAKER
AUX IN
AUX OUT L
AUX OUT R
AV IN 2 CABLE
MIC
Omni View Switch
(External Aound View Camera)
ON 1 2 3 4 5 6
MON 5V IN
BUTTON KEY
VOLVO OEM SCREEN
※It might be colors different
PIN
#
= 9MON 5V IN(Brown)
PIN
#
BUTTON KEY(Light Purple) = 11
16
12 7
911
DOWN UP SEL MANU
Go to contents page
Click
FOR V-sensus
POWER/CAN DEBUG KEYPAD LVDS OUT LVDS IN AV IN 1 AV IN 2 GPS WIFI
SD SLOT HDMI IN RESET DIP SWITCH USB 1 USB 2
5V USB
POWER
Behind Side Door Cover
(Passenger)
Ground(Black Mint)
B+(Red)
Can Low(Purple Mint)
Can High
=
=
=
=(Purple White)
SAME

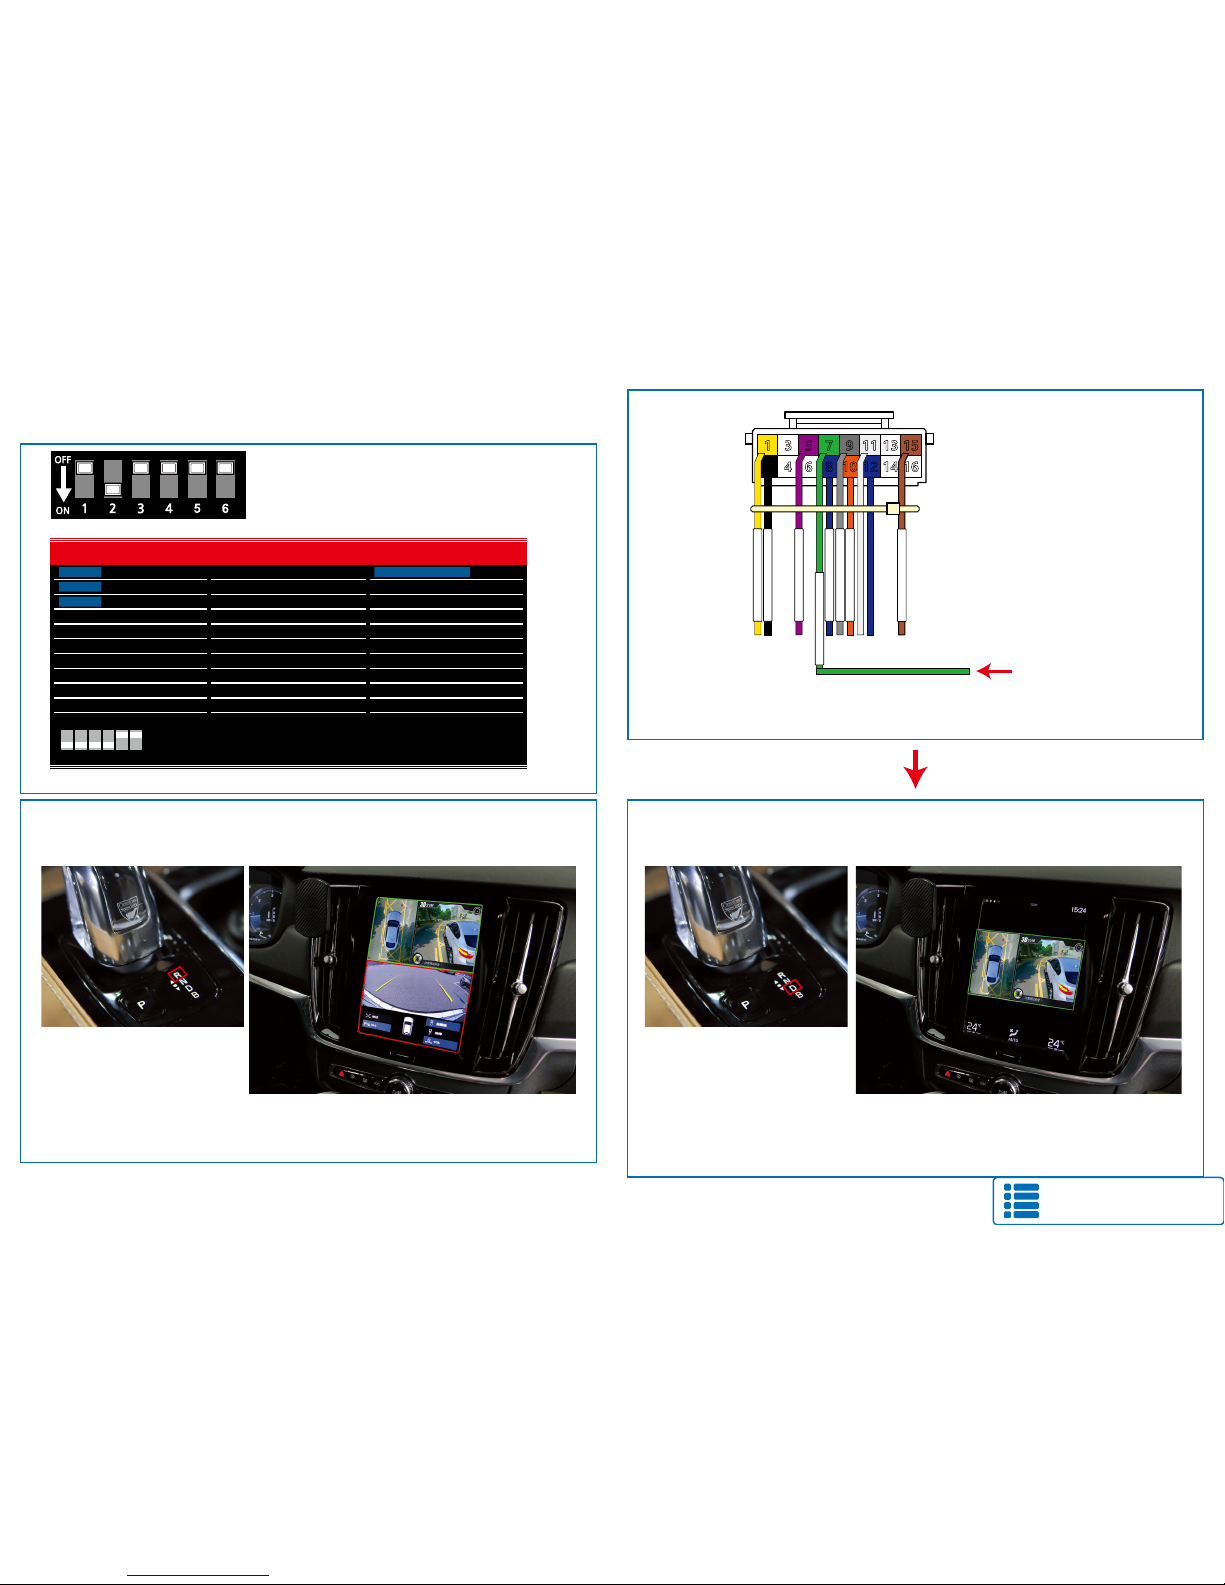
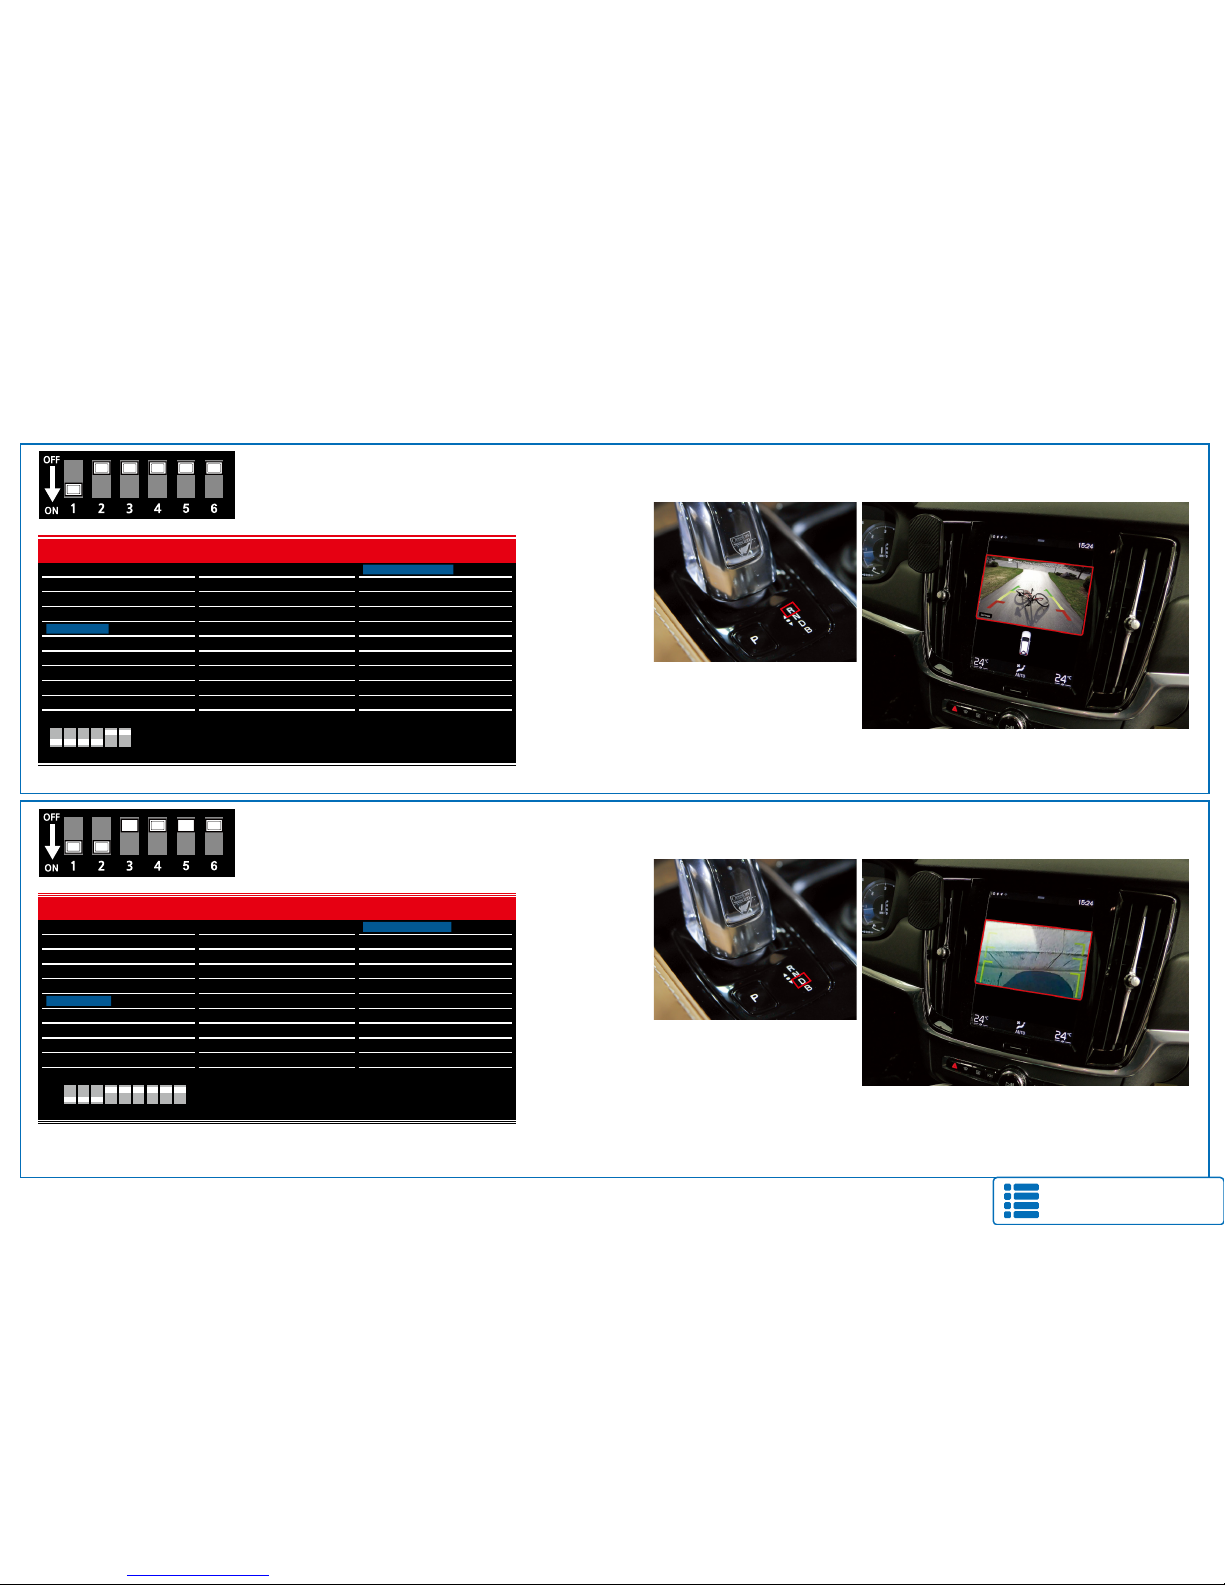
DIP Switch Settings
OFF
ON
OFF :ON :
OFF (▲) OFF (▲) OFF (▲)
ON (▼)
2016~ V90
2016~ S90
2016~ XC90
2016~ XC60
2018~ XC60
No.3 No.4 No.5 No.6 Car Model
ON (▼)
External Rear Camera OEM Rear Camera
External Front View
Selection of car model
(AV1 Mode)
Skip External Front View
(AV1 Mode)
PIN OFF(▲)
1
2
3
4
5
6
Go to contents page
Click
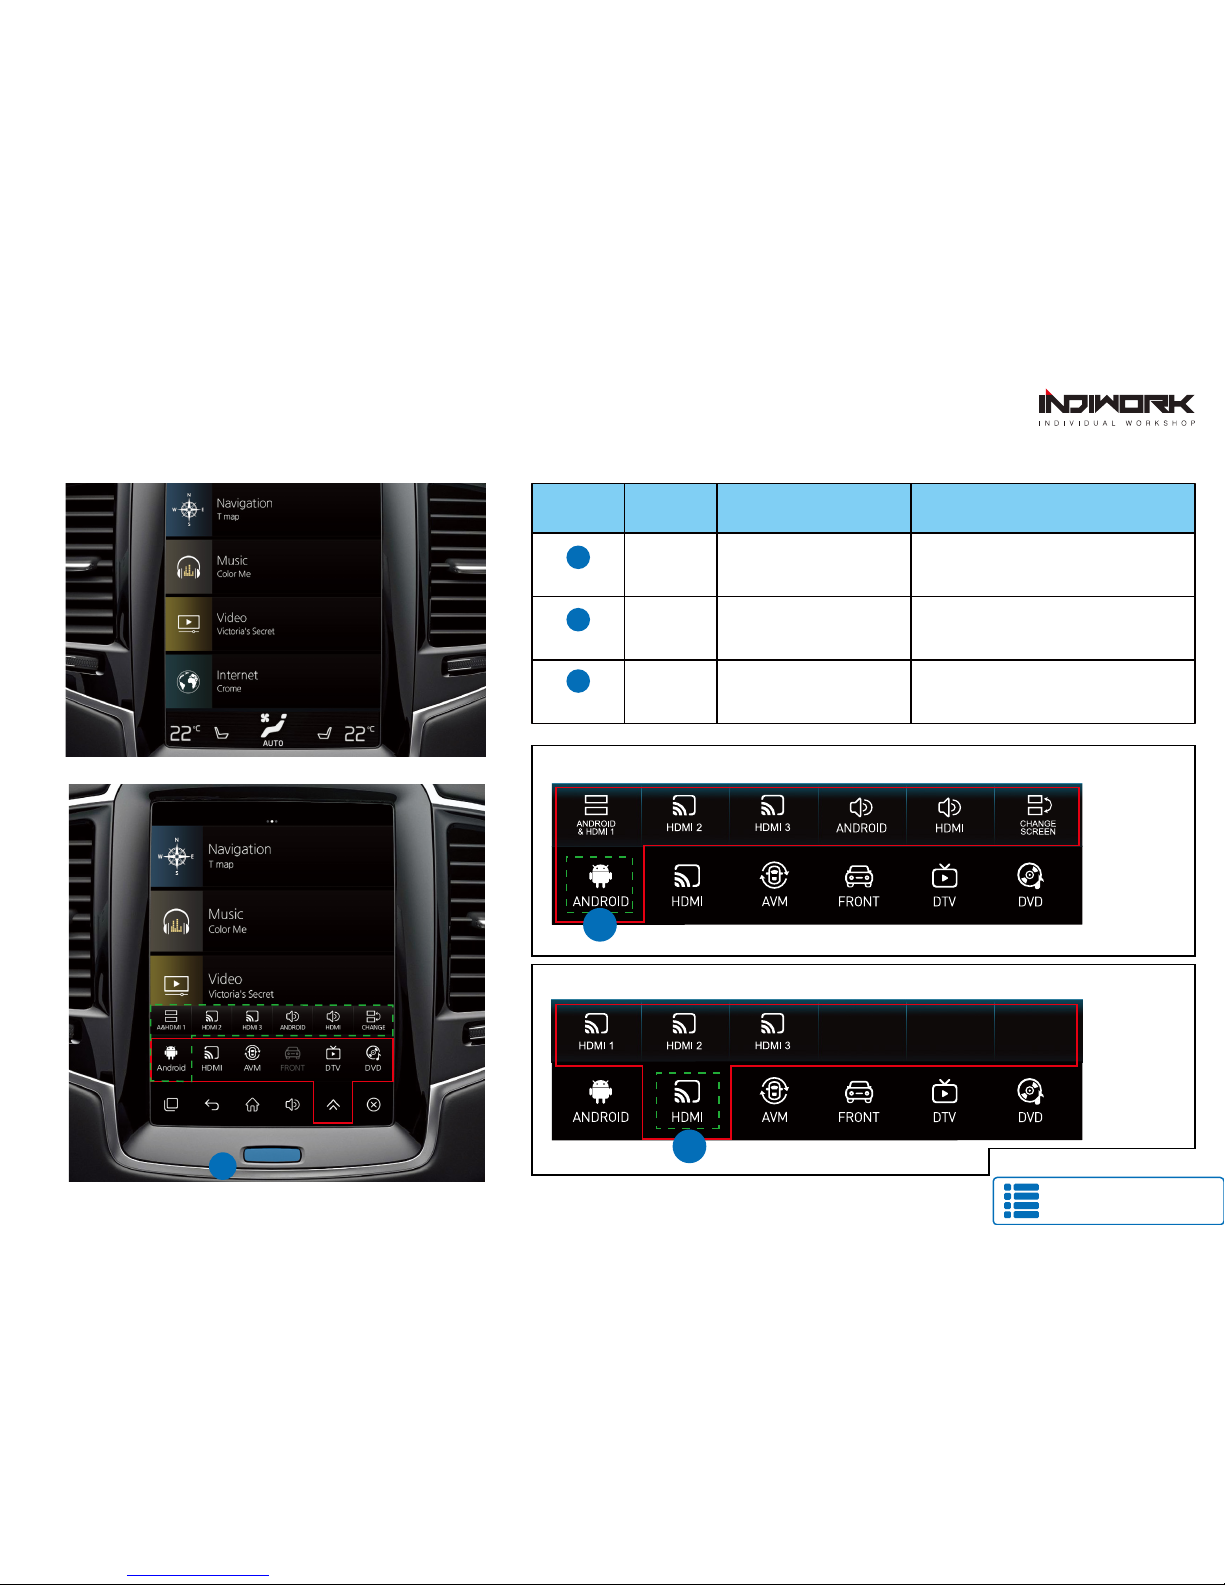
Activation by original buttons
Go to contents page
Click
Screen Button
1Changing
Modes Press the button 2 times Order : OEM → A-LINK
Screen Button
1Changing
Modes Return to the OEM mode in any modesPress the button short time
Screen Button
1Reset You can use this function
when you get in trouble
Press the button 10 times
Button Function Operation Remarks
VOLVO OEM SCREEN
1Touch the android button 2seconds
2
Extend HDMI LINK (Need Option Device)
Touch the android button 2seconds
HDMI PIP FUNCTION
2
Around View Script
HDMI 1
HDMI 2
HDMI 3
NAVIGATION
REAR VIEW
FRONT VIEW
CVBS 1 - DVBT
CVBS 2 - DVD
CUSTOM
EXIT
DIP SWITCH INFO : FIRMWARE DATE :
2018-03-02MAIN :
2018-03-02SUB :
2018-03-02TW23 :
128
AVM KEEPING TIME R → D 7 Sec
AVM KEEPING TIME P → D 7 Sec
PGS ON / OFF OFF
ADJUST - HORIZONTAL 128
INPUT SOURCE AVM ( AROUND VIEW)
BRIGHT 128
CONTRAST RED 128
CONTRAST GREEN 128
CONTRAST BLUE
ADJUST - VERTICAL 128
M259-VOLVO-A50
Shift Gear Reverse
How to setting
When you shift gear reverse
It screen will be working to PIP <TOP: AVM> <Bottom : OEM Rear Camera>
Shift Gear Drive
When you shift gear ‘from reverse to drive’ or ‘from parking to drive’,
It screen will be working <Center: AVM>
※ it just works automatically during the activation time you selected.
AVM KEPPING TIME
Go to contents page
Click
OEM Camera
AVM Camera
AVM Camera
If it connected 12V to 'REVERSE 12V IN wire"
The screen will be change to “AVM mode”
POWER / CAN
CABLE
1 3 5 7 9 11 13 15
2 4 6 8 10 12 14 16
BAT +
GND
12V OUT
REVERSE 12V IN
REAR 12V
BUTTON KEY
OMNI KEY
MON 5V IN
12V IN
Rear View Script
Go to contents page
Click
How to setting
HDMI 1
HDMI 2
HDMI 3
NAVIGATION
FRONT VIEW
CVBS 1 - DVBT
CVBS 2 - DVD
CUSTOM
EXIT
DIP SWITCH INFO : FIRMWARE DATE :
2018-03-02MAIN :
2018-03-02SUB :
2018-03-02TW23 :
128
PGS ON / OFF OFF
ADJUST - HORIZONTAL 128
ADJUST - VERTICAL 128
INPUT SOURCE DEFAULT
INPUT SOURCE
BRIGHT 128
CONTRAST RED
CONTRAST GREEN 128
CONTRAST BLUE
INPUT SOURCE DEFAULT
REAR VIEW
EXTERNAL CAMERA
128
M259-VOLVO-A50
Shift Gear Reverse
When you shift gear reverse
It screen will be working <Center: External Rear>
External Rear
Camera
How to setting Shift Gear Drive
When you shift gear Drive
It screen will be working <Center: External Front Camera>
External Front
Camera
HDMI 1
HDMI 2
HDMI 3
NAVIGATION
REAR VIEW
FRONT VIEW
CVBS 1 - DVBT
CVBS 2 - DVD
CUSTOM
EXIT
DIP SWITCH INFO : FIRMWARE DATE :
2018-03-02MAIN :
2018-03-02SUB :
2018-03-02TW23 :
128
FRONT CAM KEEPING TIME R → D 7 Sec
FRONT CAM KEEPING TIME P → D 7 Sec
PGS ON / OFF OFF
ADJUST - HORIZONTAL 128
INPUT SOURCE EXTERNAL CAMERA
BRIGHT 128
CONTRAST RED 128
CONTRAST GREEN 128
CONTRAST BLUE
ADJUST - VERTICAL 128
M259-VOLVO-A50
※ it just works automatically during the activation time you selected.
Front CAM KEPPING TIME

FOR V-sensus
POWER/CAN DEBUG KEYPAD LVDS OUT LVDS IN AV IN 1 AV IN 2 GPS WIFI
SD SLOT HDMI IN RESET DIP SWITCH USB 1 USB 2
5V USB
POWER
DVB-T Diagram
WIRE TO DVB-T IR (OUT)
IR SIGNAL IN
DOWN UP SEL MANU
Go to contents page
Click
HOW TO SETTING
Click
DVB-T DEVICE
HDMI
OR
CVBS
POWER
SIGNAL
GROUND
DVB-TV IR Sensor
Red
White
Black
IR IN
AUX OUT R
AUX OUT L
SPEAKER
MIC
DVB-T IR
1
2
21
IR IN
22
Go to contents page
Click
Settings (How To Use KEYPAD)
DOWN UP SEL MANU
1
2
3
4
MENU
1Changing
Modes Press the button short Order : HDMI → HDMI2 → HDMI3
→ NAVI → DVB-T →DVD → OEM
Button Function Operation Remarks
Button Function Operation
Select the setting menu
and setting values. Press the button short
SEL
2
Move the menu-pointer
and adjust the setting values Press the button short
UP
3
DOWN
4
Back to previous menu
When press the button short. Press the button short
MANU
1
KEYPAD - Function #1
KEYPAD - Function #2
FOR V-sensus
POWER/CAN DEBUG KEYPAD LVDS OUT LVDS IN AV IN 1 AV IN 2 GPS WIFI
SD SLOT HDMI IN RESET DIP SWITCH USB 1 USB 2
5V USB
POWER

Go to contents page
Click
NAVIGATION
REAR VIEW
FRONT VIEW
CVBS 1 - DVBT
CVBS 2 - DVD
CUSTOM
EXIT
DIP SWITCH INFO :
Settings
FIRMWARE DATE :
2018-03-02MAIN :
2018-03-02SUB :
2018-03-02TW23 :
DEFAULT
INPUT SOURCE DEFAULT
INPUT SOURCE DEFAULT
INPUT SOURCE DEFAULT
INPUT SOURCE DEFAULT
INPUT SOURCE DEFAULT
BRIGHT AVM
CONTRAST RED DVB TV
CONTRAST GREEN DEFAULT
CONTRAST BLUE
INPUT SOURCE DEFAULT
HDMI - DEFALUT
- BRIGHT and CONTRAST
Adjust the values of brightness and contrast
- INPUT SOURCE ( Hdmi device model select )
DEFALUT
AVM
DVB TV ( Digital Video Broadcasting )
( 360° Around View Camera )
HDMI INPUT - AVM
- BRIGHT and CONTRAST
Adjust the values of brightness and contrast
- AVM KEEPING TIME
When you shift gear ‘from reverse to drive’ or ‘from parking to drive’,
it just works automatically during the activation time you selected.
- PGS (Parking Guide System)
Adjust position of parking guide lines and
select the lines ‘ON or OFF’.
HDMI 1
HDMI 2
HDMI 3
NAVIGATION
REAR VIEW
FRONT VIEW
CVBS 1 - DVBT
CVBS 2 - DVD
CUSTOM
EXIT
DIP SWITCH INFO : FIRMWARE DATE :
2018-03-02MAIN :
2018-03-02SUB :
2018-03-02TW23 :
128
AVM KEEPING TIME R → D 7 Sec
AVM KEEPING TIME P → D 7 Sec
PGS ON / OFF OFF
ADJUST - HORIZONTAL 128
INPUT SOURCE AVM ( AROUND VIEW)
BRIGHT 128
CONTRAST RED 128
CONTRAST GREEN 128
CONTRAST BLUE
ADJUST - VERTICAL 128
M259-VOLVO-A50
M259-VOLVO-A50
HDMI 1
HDMI 2
HDMI 3
Go to contents page
Click
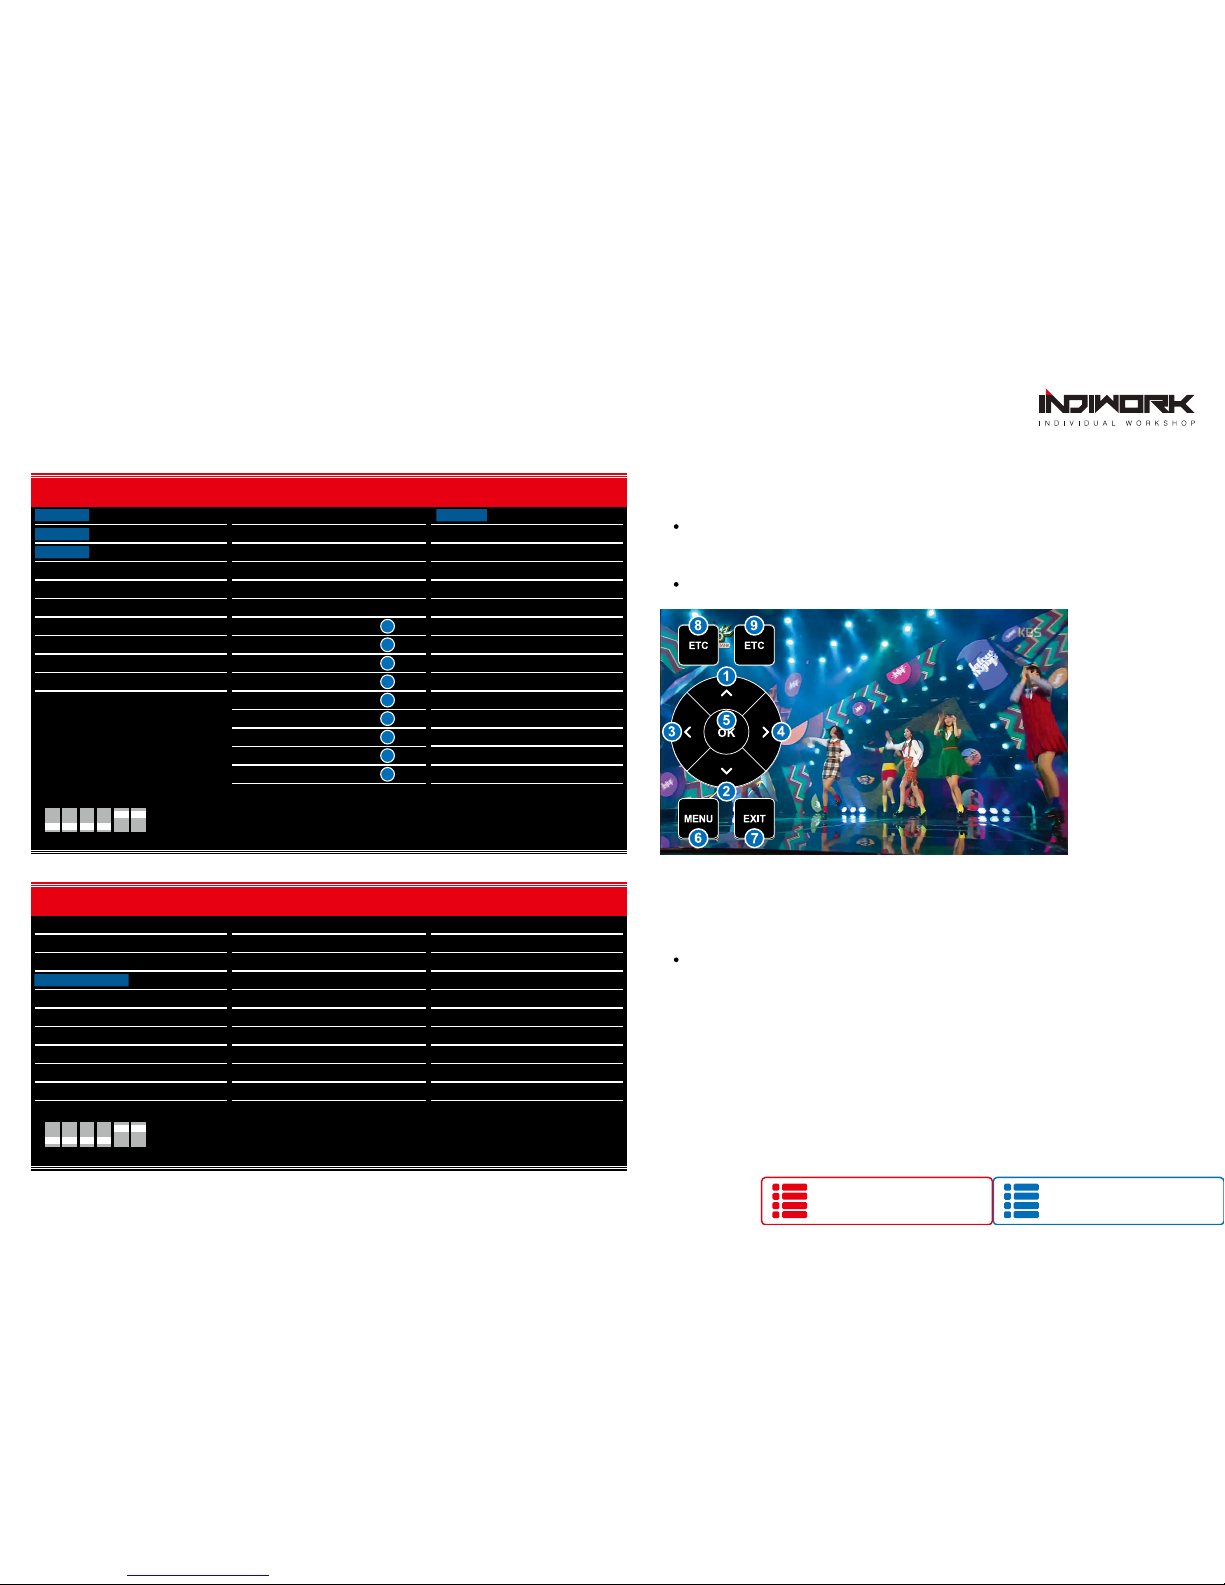
Settings HDMI INPUT - DVB TV
- BRIGHT and CONTRAST
Adjust the values of brightness and contrast
- REMOTE OSD ON / OFF
You can control to some of function on DVB-T remote control by OSD UI
HDMI 1
HDMI 2
HDMI 3
REAR VIEW
FRONT VIEW
CVBS 1 - DVBT
CVBS 2 - DVD
CUSTOM
EXIT
DIP SWITCH INFO : FIRMWARE DATE :
2018-03-02MAIN :
2018-03-02SUB :
2018-03-02TW23 :
DEFAULT
INPUT SOURCE DEFAULT
INPUT SOURCE DEFAULT
INPUT SOURCE DEFAULT
INPUT SOURCE DEFAULT
BRIGHT 125
CONTRAST RED 125
CONTRAST GREEN 125
CONTRAST BLUE 125
CONTRAST BLUE
INPUT SOURCE DEFAULT
NAVIGATION
- BRIGHT and CONTRAST
Adjust the values of brightness and contrast
NAVIGATION
M259-VOLVO-A50
FIRMWARE DATE :
2018-03-02MAIN :
2018-03-02SUB :
2018-03-02TW23 :
128
REMOTE OSD ON / OFF ON
REMOTE MEMORY UP 0x807f807f
REMOTE MEMORY DOWN 0x807f807f
REMOTE MEMORY LEFT Lorem ipsum dolor sit amet,
0x807f807f
HDMI 1 INPUT SOURCE DVB TV
HDMI 2 BRIGHT 128
HDMI 3 CONTRAST RED 128
NAVIGATION CONTRAST GREEN 128
REAR VIEW CONTRAST BLUE
FRONT VIEW
CVBS 1 - DVBT
CVBS 2 - DVD
CUSTOM
EXIT REMOTE MEMORY RIGHT
REMOTE MEMORY OK
REMOTE MEMORY MENU
REMOTE MEMORY EXIT
REMOTE MEMORY ETC1
0x807f807f
0x807f807f
0x807f807f
0x807f807f
0x807f807f
DIP SWITCH INFO :
1
2
3
4
5
6
7
8
REMOTE MEMORY ETC2 0x807f807f
9
M259-VOLVO-A50
HOW TO CONTNECT
Click
Go to contents page
Click
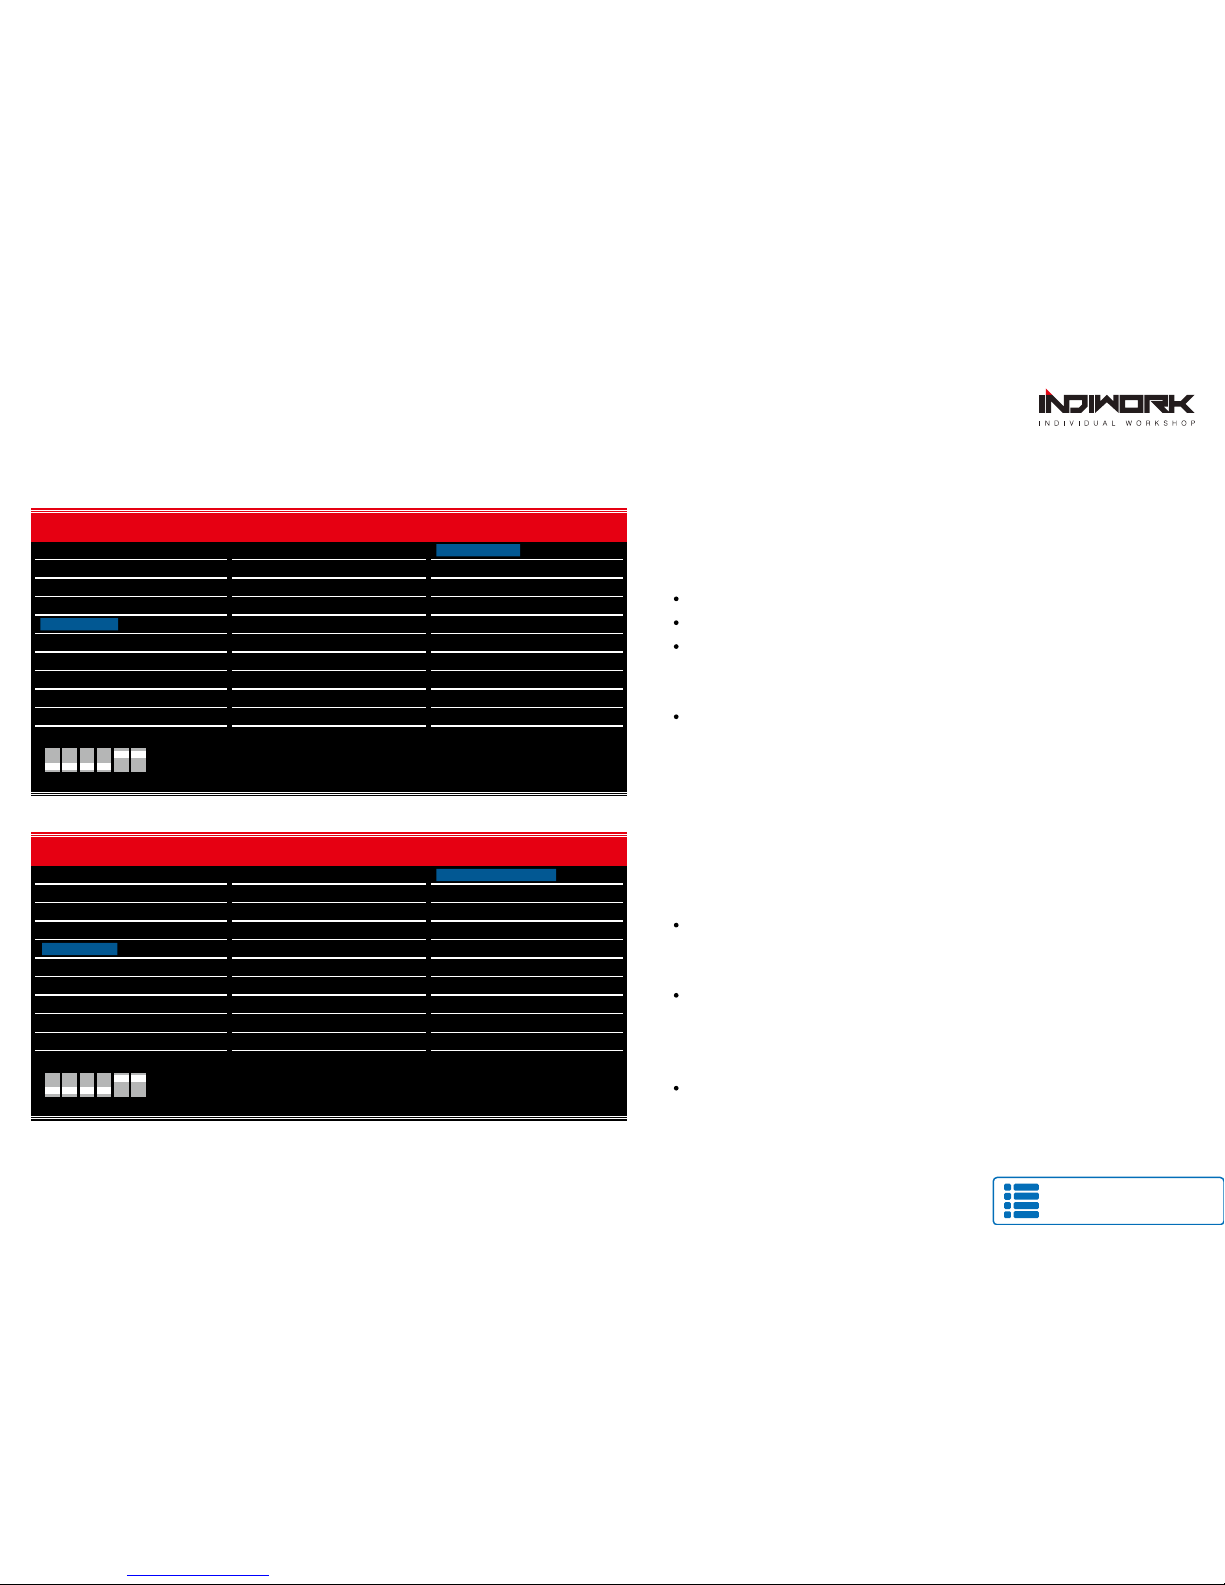
Settings
REAR VIEW INPUT - AVM
- BRIGHT and CONTRAST
Adjust the values of brightness and contrast
- AVM KEEPING TIME
When you shift gear ‘from reverse to drive’ or ‘from parking to drive’,
it just works automatically during the activation time you selected.
- PGS (Parking Guide System)
Adjust position of parking guide lines and
select the lines ‘ON or OFF’.
REAR VIEW INPUT - OEM CAMERA
- BRIGHT and CONTRAST
Adjust the values of brightness and contrast
- INPUT SOURCE ( Hdmi device model select )
OEM CAMERA
AVM
EXTERNAL CAMERA
( 360° Around View Camera )
HDMI 1
HDMI 2
HDMI 3
NAVIGATION
FRONT VIEW
CVBS 1 - DVBT
CVBS 2 - DVD
CUSTOM
EXIT
DIP SWITCH INFO : FIRMWARE DATE :
2018-03-02MAIN :
2018-03-02SUB :
2018-03-02TW23 :
DEFAULT
INPUT SOURCE DEFAULT
INPUT SOURCE DEFAULT
INPUT SOURCE DEFAULT
INPUT SOURCE DEFAULT
INPUT SOURCE
BRIGHT AVM (AROUND VIEW)
CONTRAST RED EXTERNAL CAMERA
CONTRAST GREEN DEFAULT
CONTRAST BLUE
INPUT SOURCE DEFAULT
REAR VIEW
OEM CAMERA
M259-VOLVO-A50
HDMI 1
HDMI 2
HDMI 3
NAVIGATION
REAR VIEW
FRONT VIEW
CVBS 1 - DVBT
CVBS 2 - DVD
CUSTOM
EXIT
DIP SWITCH INFO : FIRMWARE DATE :
2018-03-02MAIN :
2018-03-02SUB :
2018-03-02TW23 :
128
AVM KEEPING TIME R → D 7 Sec
AVM KEEPING TIME P → D 7 Sec
PGS ON / OFF OFF
ADJUST - HORIZONTAL 128
INPUT SOURCE AVM ( AROUND VIEW)
BRIGHT 128
CONTRAST RED 128
CONTRAST GREEN 128
CONTRAST BLUE
ADJUST - VERTICAL 128
M259-VOLVO-A50
Go to contents page
Click
Settings
- PGS (Parking Guide System)
Adjust position of parking guide lines and
select the lines ‘ON or OFF’.
REAR VIEW INPUT - EXTERNAL CAMERA
- BRIGHT and CONTRAST
Adjust the values of brightness and contrast
HDMI 1
HDMI 2
HDMI 3
NAVIGATION
FRONT VIEW
CVBS 1 - DVBT
CVBS 2 - DVD
CUSTOM
EXIT
DIP SWITCH INFO : FIRMWARE DATE :
2018-03-02MAIN :
2018-03-02SUB :
2018-03-02TW23 :
128
PGS ON / OFF OFF
ADJUST - HORIZONTAL 128
ADJUST - VERTICAL 128
INPUT SOURCE DEFAULT
INPUT SOURCE
BRIGHT 128
CONTRAST RED
CONTRAST GREEN 128
CONTRAST BLUE
INPUT SOURCE DEFAULT
REAR VIEW
EXTERNAL CAMERA
128
M259-VOLVO-A50
Table of contents
Other INDIWORK Car Video System manuals


