INDIWORK A-LINK2-NTG6 User manual
Instruction Manual
All in One Type Android System
Release Date: 2019 – 08 - 27
A-LINK2-NTG6
Model Name A-LINK2-NTG6
Latest Firmware Date 2019 - 04 - 23
Manual Version Rev. 1.0
Language English
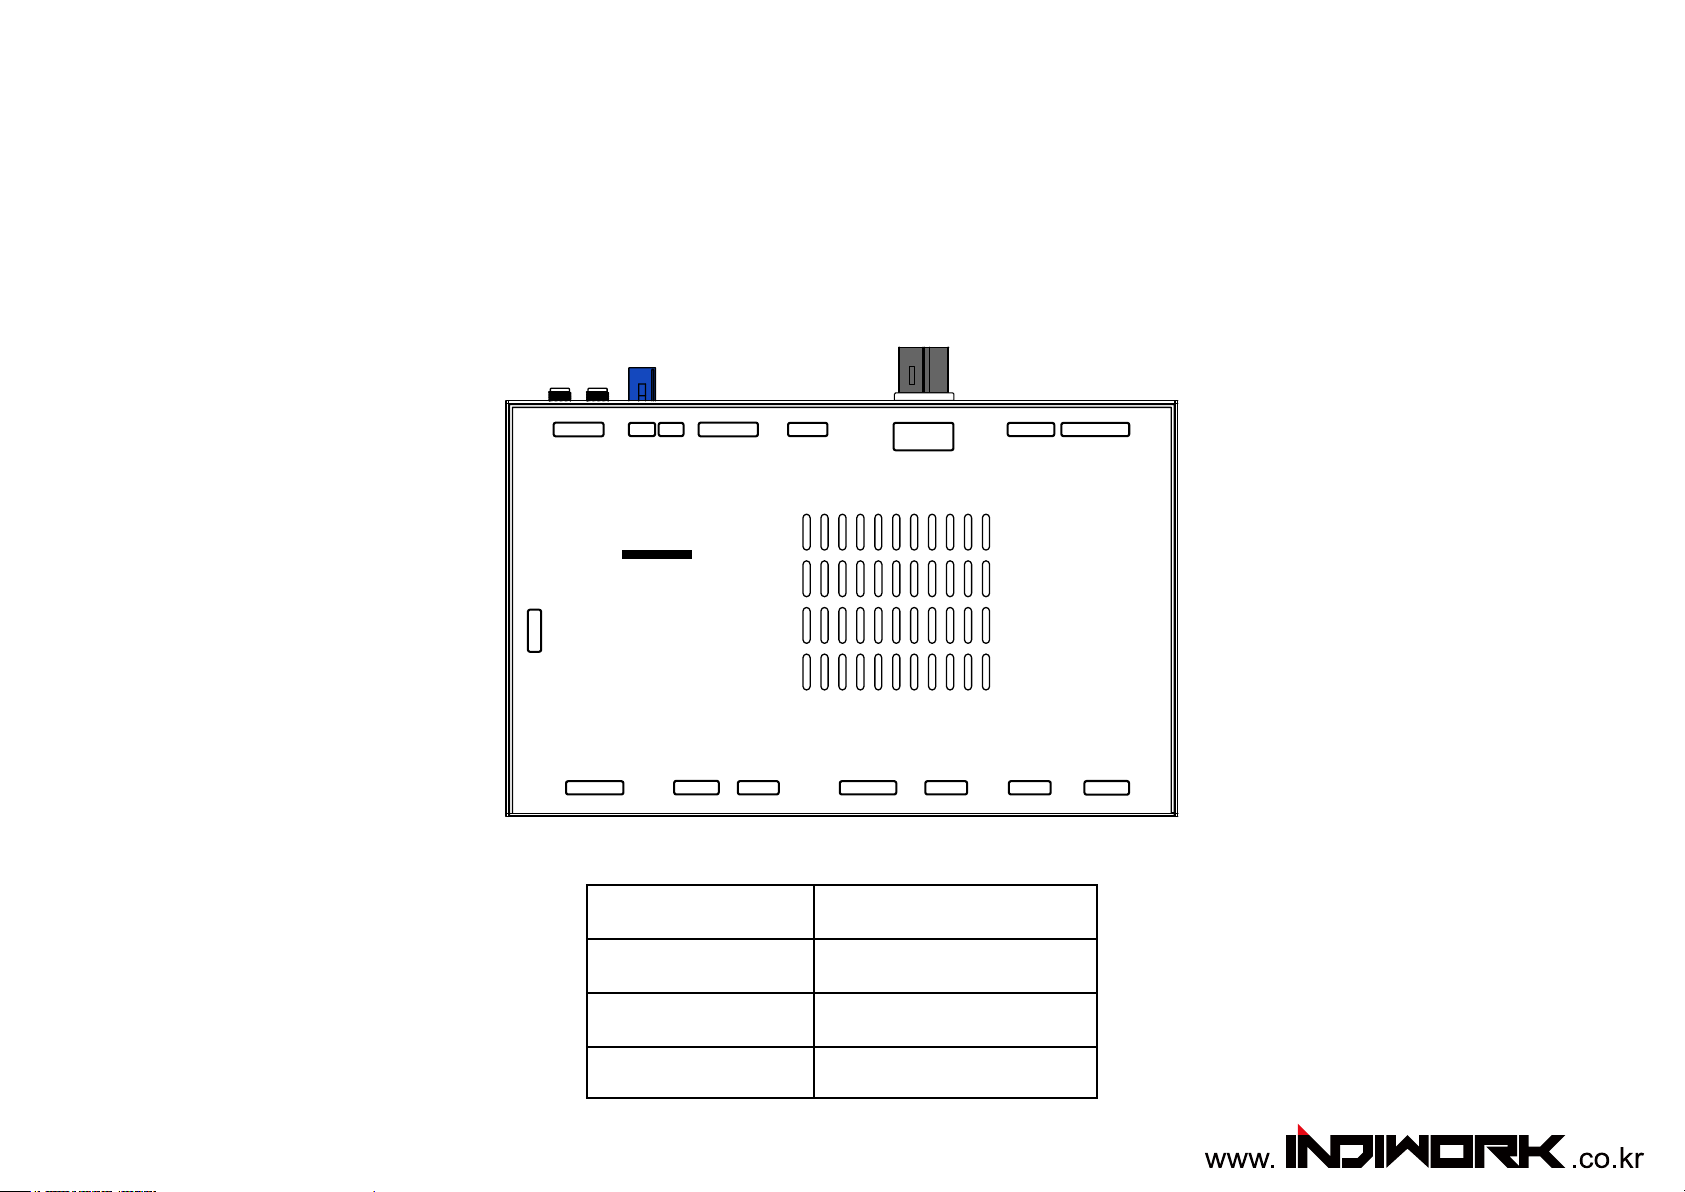
POWER/CAN
LVDS
IN/OUT
KEYPAD AV IN AV IN/OUT SW GPS WIFI / BT
DEBUG
DIP SW HDMI IN R-KEY HDMI OUT USB 3.0 USB 2.0 MicroSD
ANDROID
INTERFACE

Car Compatibility Chart
Mercedes NTG5.5 <10.2 inch> Mercedes NTG6 MB-UX <10.25 inch>
2019 C-Class
*facelift
2019 A-Class
Car Models Specic
Models
Production
Year Specic Models Screen
Size
C-CLASS W205 2018 - - Mercedes Comand APS NTG 5.5
* facelift
7 inch
10.25 inch
E-CLASS W213 2016 - - Mercedes Comand APS NTG 5.5 12.3 inch
CLS-CLASS C257 2018 - - Mercedes Comand APS NTG 5.5 12.3 inch
S-CLASS
(facelift) W222 2018 - - Mercedes Comand APS NTG 5.5 12.3 inch
G-CLASS W463 2018 - - Mercedes Comand APS NTG 5.5 12.3 inch
Comand NTG 5.5
Comand NTG 6 <MB-UX> E-Class 2019 CLS-Class
2019 G-Class
2019 S-Class
*facelift 2019 Sprinter
Car Models Specic
Models
Production
Year Specic Models Screen
Size
A-Class W177
V177 2018 - - Mercedes Comand APS MB-UX
7 inch
10.25 inch
Sprinter VS30 2018 - - Mercedes Comand APS MB-UX
7 inch
10.25 inch

Components
Quadlock Main Harness
Only
NTG5.5
Main Power Cable LVDS Cable AV IN / OUT Cable AV Cable
Optional Parts (sold separately at the indiwork)
Capacitive Touch Cable
BT / WIFI Antenna
External GPS
External Speaker
KEYPAD MicroPhone IR Sensor
Main Harness
Only
NTG6

Body Connector specications
LVDS OUT
CABLE
AV CABLE
1 DVBT VIDEO INPUT
2DVBT AUDIO R
3DVBT AUDIO L
4 DVD VIDEO INPUT
5DVD AUDIO R
6DVD AUDIO L
7 FRONT-CAM VIDEO INPUT
8 RV-CAM VIDEO INPUT
9 GND_DVBT VIDEO
10 GND_DVBT AUDIO R
11 GND_DVBT AUDIO L
12 GND_DVD VIDEO
13 GND_DVD AUDIO R
14 GND_DVD AUDIO L
15 GND_FRONT-CAM VIDEO
16 GND_RV-CAM VIDEO
POWER/CAN
CABLE
NTG6
POWER CABLE
POWER / CAN CABLE
1 BATTERY POWER INPUT 9
2 GROUND 10 OMNI KEY
311 ECU CAN H
4 12 ECU CAN L
5 12V(ACC) OUT 13 PAD CAN IN H
6 REVERSE 12V IN 14 PAD CAN IN L
7 REAR 12V POWER OUT 15 PAD CAN OUT H
8 16 PAD CAN OUT L
1 3 5 7 9 11 13 15
2 4 6 8 10 12 14 16
12V OUT
REVERSE 12V IN
REAR 12V
ACC IN
GND
OMNI KEY
ECU CAN H
PAD CAN IN H
PAD CAN IN L
PAD CAN OUT H
PAD CAN OUT L
ECU CAN L
DVBT IN VIDEO
DVBT IN AUDIO R
DVBT IN AUDIO L
DVD IN AUDIO R
DVD IN VIDEO
DVD IN AUDIO L
FRONT IN
REAR IN
1
9
8
16
PAD CAN IN L
PAD CAN IN H
PAD CAN OUT L
PAD CAN OUT H
AV CABLE
1 EXTERNAL_SPEAKER + 12 GND (EXTERNAL_SPEAKER)
2AUX AUDIO L 13 GND (AUX AUDIO L)
3AUX AUDIO R 14 GND (AUX AUDIO R)
4 MIC + 15 GND (MIC)
5 CAPACITIVE_SCL 16 CAPACITIVE_GND
6 CAPACITIVE_SDA 17 CAPACITIVE_VDD
7 CAPACITIVE_INT 18 CAPACITIVE_RST
8 UART_RX 19 UART_GND
9 UART_TX 20 IR_SIGNAL
10 DVB-T_IR 21 IR_GND
11 DVD_IR 22 IR_POWER
IR IN
CAP-TOUCH
MIC
DVB-T IR
UART
DVD IR
AUX OUT R
AUX OUT L
SPEAKER
IR IN
111
2212
ON 1 2
Power/Can
Keypad
LVDS
IN / OUT
AV IN SW
GPS WIFI BT
AV IN/OUT

POWER/CAN
LVDS
IN/OUT
KEYPAD AV IN AV IN/OUT SW GPS WIFI / BT
DEBUG
DIP SW HDMI IN R-KEY HDMI OUT USB 3.0 USB 2.0 MicroSD
ANDROID
INTERFACE
DVBT IN VIDEO
DVD IN VIDEO
Does Not Use
Full Installation Diagram <NTG6 MB-UX>
DOWN UP SEL MANU
LVDS Cable
OEM LVDS Cable
12V ACC Power Out
Reverse IN
Rear 12V
OMNI KEY
MBUX 7inch Head Unit
LVDS Connector
MBUX 10.25 inch Head Unit Main Connector
(Red) B+
(Brwon) Ground
Pas Can Low
(Purple)
Pas Can High
(Purple/Whaite)
Pin # 14 =
Pin # 1 =
Pin # 20 =
Pin # 7 =
12
15 17
20
23
4
7
10 12
25
14
13
26
6 7 8 9 10
1 2 3 4 5 11
18
25 31
2422
15 17
MBUX 7inch Head Unit Main Connector
(Red) B+
(Brwon) Ground
(Purple/Whaite)
Pas Can High
(Purple)
Pin # 1 =
Pin # 6 =
Pin # 22 =
Pin # 15 =
Pas Can Low
11 4
9
21
6
7
25
15
22
29
AV IN Port
DTV and DVD Front Camera Rear Camera
REAR IN
FRONT IN
DVB-T IR
DVD IR
IR IN
Does Not Use
UART
DVB-T , DVD
PAD CAN OUT L
PAD CAN OUT H
PAD CAN IN L
PAD CAN IN H
CUTTING
PAD CAN IN/OUT
MBUX 10.25 Head Unit
LVDS Connector
12V ACC Power Out
For external device (Front Cam, DVD,DTV,Etc..) Power
REAR 12V
For the external rear view camera power
When the shift gear to reverse. the power will be "ON"
REVERSE IN
When the reverse gear is not detected by CAN-BUS,
the 'REVERSE 12V IN wire’
should be spliced with 12V power of reverse light.

POWER/CAN
LVDS
IN/OUT
KEYPAD AV IN AV IN/OUT SW GPS WIFI / BT
DEBUG
DIP SW HDMI IN R-KEY HDMI OUT USB 3.0 USB 2.0 MicroSD
ANDROID
INTERFACE
Does Not Use
12V ACC
Power Out
Reverse IN
Rear 12V
OMNI KEY
Full Installation Diagram <NTG5.5>
AV IN Port
DTV and DVD Front Camera Rear Camera
REAR IN
FRONT IN
DVB-T IR
DVD IR
IR IN
Does Not Use
UART
DVB-T , DVD
Mercedes NTG5.5
Head Unit
DOWN UP SEL MANU
If there is Optical harness
It should be moved to
provided main connector
!Important
OEM
Main Harness
LVDS Cable
OEM LVDS Cable
GPS FAKRA
12V ACC Power Out
For external device (Front Cam, DVD,DTV,Etc..) Power
REAR 12V
For the external rear view camera power
When the shift gear to reverse. the power will be "ON"
REVERSE IN
When the reverse gear is not detected by CAN-BUS,
the 'REVERSE 12V IN wire’
should be spliced with 12V power of reverse light.
(Red) B+ Pin # 15 =
(Brwon) Ground Pin # 12 =
(Purple) Pas Can Low Pin # 31 =
(Black) CMD CAN OUT L Pin # 22 =
(Purple/Whaite) Pas Can High Pin # 37 =
(Black/Whaite) CMD CAN OUT H Pin # 28 =
NTG5.5 Main Connector
3417
15
12
23 4037
31
28
22
B+
GND
Pas Can High H
Pas Can High L
CMD CAN IN H
CMD CAN IN L
PAD CAN OUT L
PAD CAN OUT H
PAD CAN IN L
PAD CAN IN H
Does Not Use
DVBT IN VIDEO
DVD IN VIDEO

HDMI,NAVI,DVB-T,DVD,
External Rear Camera & AV1 (FRONT CAMERA) Script
NTG6 "7inch" OEM Screen Type
※ It is the xed. Can not change screen from left to right
OEM PDC Sensor
External Rear Camera
Area
Area
NTG6 "10.25inch" OEM Screen Type
HDMI,NAVI,DVB-T, DVD
Area External Camera
AV1 (Front Camera)
OEM PDC
Sensor
Area
OEM Rear Camera
AV1 (Front Camera)
Area
Area HDMI,NAVI,DVB-T,DVD
OEM Screen
Area
Area

DIP Switch Settings
OFF
ON
OFF:ON:
PIN ON (▼) OFF(▲)
1HDMI Mode Skip HDMI Mode
2External Rear View Camera Original Rear View Mode
(OEM CAMERA)
3External Front View
Camera(AV1 Mode)
Skip External Front View
Camera(AV1 Mode)
4AV2(DVBT) Mode Skip AV2(DVBT) Mode
5AV3(DVD) Mode Skip AV2(DVD) Mode
6
Select car model
7
8
9
10
No.7 No.8 No.9 No.10 Car Model Code Name Screen Size
OFF(▲) OFF(▲) OFF(▲) OFF(▲) A-Class W177
V177 10.25 inch
OFF(▲) OFF(▲) ON (▼) OFF(▲) A-Class W177
V177 7 inch
OFF(▲) OFF(▲) OFF(▲) ON (▼)
C-Class *facelift W205
10.25 inch
E-Class W213
Sprinter VS30
OFF(▲) OFF(▲) ON (▼) ON (▼) C-Class *facelift W205 7 inch

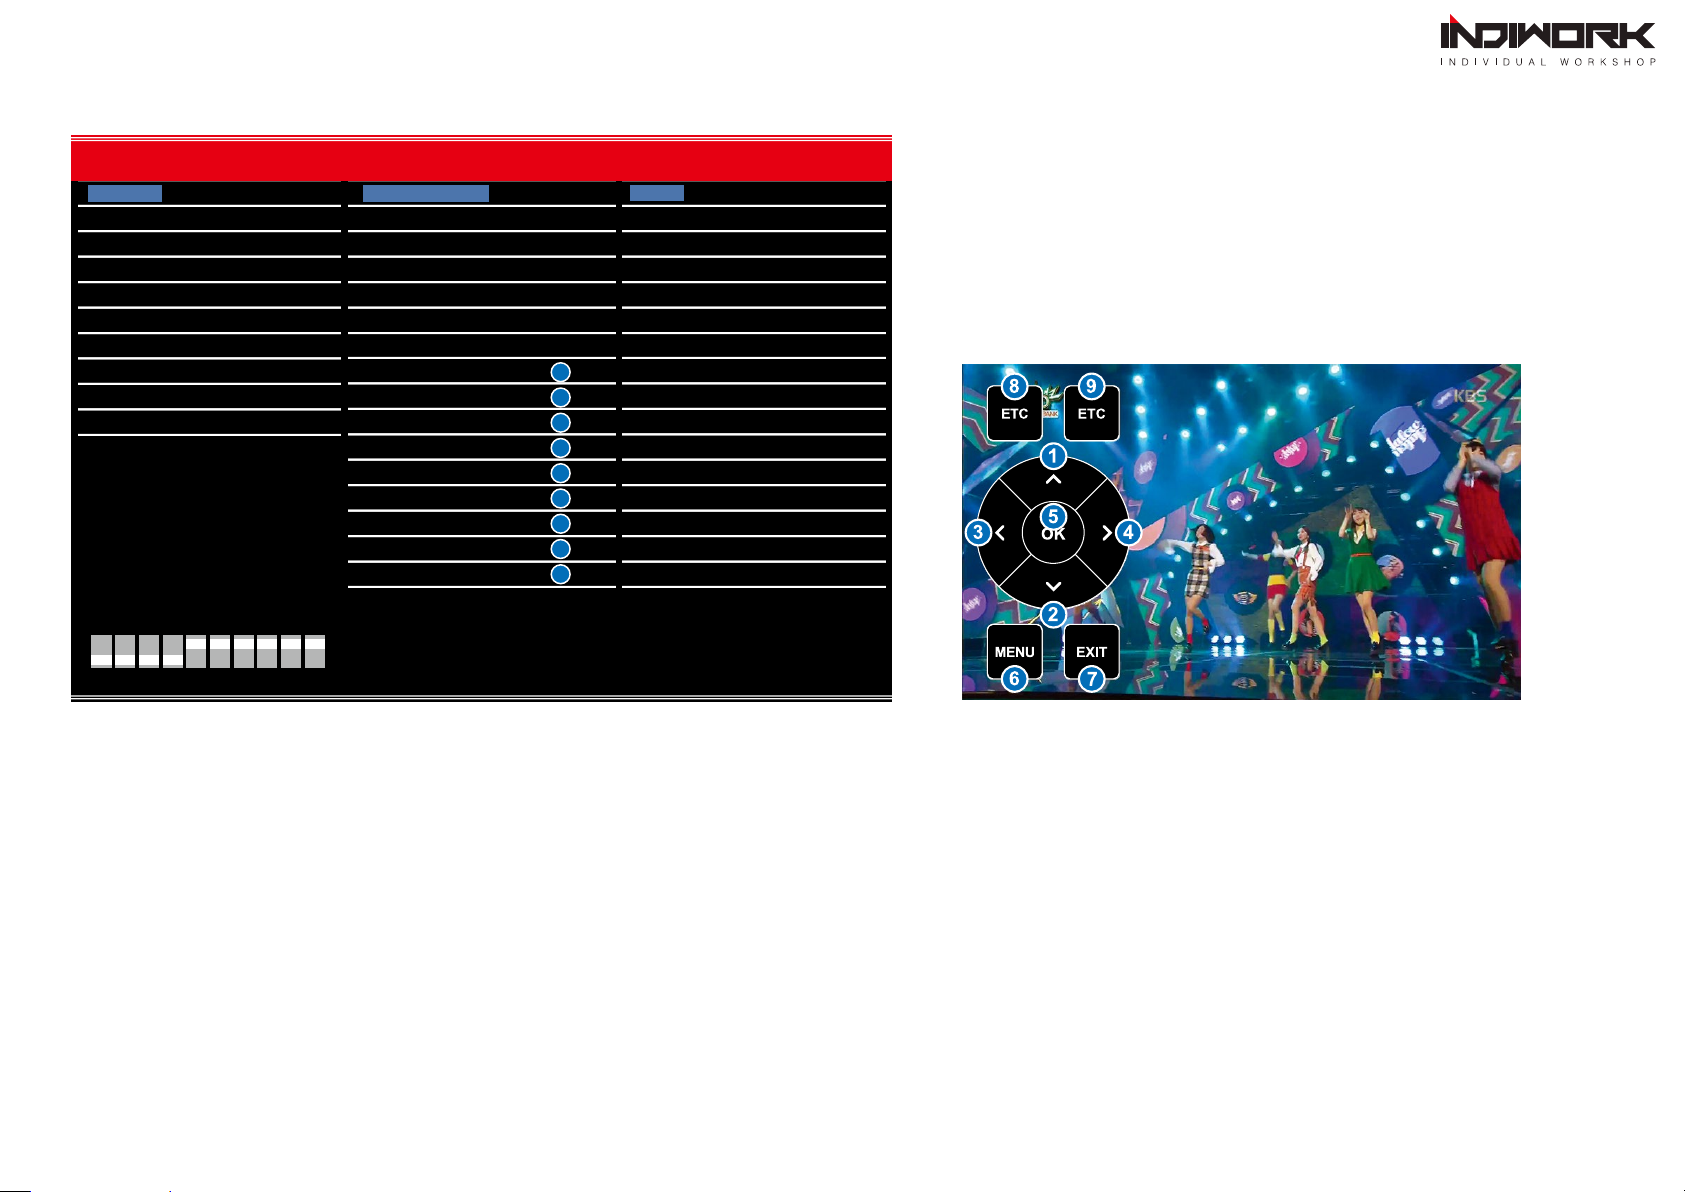
Activation by original buttons <NTG6>
1
Touchpad and Buttons
1Button Function Operation Remarks
NAVI
MAP
Changing
Modes
Press the button 2 seconds Order : HDMI → NAVI → DVB-T → DVD → OEM
Press the button short time Return to the OEM mode in any modes.
Back
Changing
Modes
(Front Cam)
Press the button 2 seconds Order : AV1 (Front View Camera)
Press the button short time Order : AV1 → Previous screen
Hang up
Changing
Modes
(Front Cam)
Press the button 1 seconds Order : HDMI → NAVI → DVB-T → DVD → OEM
Press the button short time Return to the OEM mode in any modes.
CAR
Changing
Modes Press the button 1 seconds Return to the OEM mode in any modes.
1
3
2
4
4
Steering Wheel Buttons
2
3
Button Function Operation Remarks
Next,Previous
track Press the button short time You can control DVB-T and DVD
after connection and setting
5
5

Activation by original buttons
421
Drag
21
<NTG6>
Button Operation Function
Back
Press the button shot time Back to previous menu
Home
Press the button shot time Back to Home Main page
Drag
Drag the Area Back to previous menu
2
1
Select, Enter
Touch two times
Documents,Websites
Scroll
Slide two ngers
Up or Down the touchpad
Swipe to Navigate
Touch one time and
sliding

Button Function Operation Remarks
Changing
Modes
Press the button 2 seconds Order : HDMI → NAVI → DVB-T → DVD → OEM
Press the button short time Return to the OEM mode in any modes.
Changing
Modes
(Front Cam)
Press the button 2 seconds Order : AV1 (Front View Camera)
Press the button short time Order : AV1 → Previous screen
Dial Up
Changing
Modes Press the button 1 seconds Return to the OEM mode in any modes.
Button Function Operation Remarks
Dial Up
Next
track Press the button 1 seconds
You can control DVB-T and DVD
after connection and setting
Dial Down
Previous
track Press the button 1 seconds
1
2
Activation by original buttons
1
Mercedes NTG5.5 Controller
<NTG5.5>
4
4
5
4
5
2
2
W213 Steering Wheel Buttons
Mercedes NTG5.5 Radio Buttons
1
1
1
1

Select, Enter
Touch two times
Documents,Websites
Scroll
Slide two ngers
Up or Down the touchpad
Swipe to Navigate
Touch one time and
sliding
421
5
7
9
9
8
3 4
21
10
10
Drag
Button Operation Function
Back
Press the button shot time Back to previous menu
Home
Press the button shot time Back to Home Main page
Back
Press the button shot time Back to previous menu
Press the button 2 seconds Google assistant "OK Google"
Next Track
Press the button shot time Task-Manager
Press the button 2 seconds Picture In Picture "PIP"
Home
Press the button shot time Back to Home Main page
Dial
Turn the dial Left, Right Move Left,Right
Dial
Move the dial Left or Right Next or Previous page
Dial
Move the dial UP or Down Move Up,Down
Move the dial 2 seconds
UP or Down
Zoom In, Zoom Out,
(Should using in a GPS application)
Drag
Drag the Area Back to previous menu
5
3
4
2
1
9 10
7 8
<NTG5.5>
Activation by original buttons

Android Firmware
A-LINK DEVICE SETTING
THERE ARE TWO WAYS FOR START THE FIRMWARE.
2. Copy the "system_roik10"folder to
the sd card root directory
* USB format type = FAT32
- Push hold “Recovery Key” and turn on (re-connect power cable),
It will start upgrade
- Select the ‘setting > system update’, and press the OK button.
It will start upgrade
- Copy the ‘system_roik10’ folder to the root of the SD card.
* Update Time will 4~5 min, and rst booting time will be 4~5 min.
* Should be factory reset. when it done rmware
ON
USB 2.0Recovery Key
Only USB2.0 port supports for Android Firmware
!
http://indiwork.co.kr/a-link-rmware-update-international/
1. Download rmware in "indiwork" website
system_roik10 system_roik10
system_roik10

DVB-T IR
DVD IR
IR IN
DVB-T Diagram
POWER
SIGNAL
GROUND
DVB-TV IR Sensor
Red
White
Black
IR IN
IR SIGNAL IN
CVBS
DVD IR
Wire To DVB-T IR
DVB-T OR DVD DEVICE
AV CABLE
1
1
2
2
3 4
KEYPAD - Function #1
KEYPAD - Function #2
DOWN UP SEL MENU
iw-evo-n23
digital multi interface
for evo id5,id6
1
2
3
4
Settings (How To Use KEYPAD)
Button Function Operation Remarks
MENU
Changing
Modes Press the button short time Order : HDMI → NAVI → DVB-T → DVD → OEM
SEL
Enter into the
setting menu Press the button short time
Button Function Operation
MENU
Back to previous menu
When press the button short. Press the button short time
SEL
Select the setting menu
and setting values. Press the button short time
UP DOWN
Move the menu-pointer
and adjust the setting values Press the button short time
POWER/CAN
LVDS
IN/OUT
KEYPAD AV IN AV IN/OUT SW GPS WIFI / BT
DEBUG
DIP SW HDMI IN R-KEY HDMI OUT USB 3.0 USB 2.0 MicroSD
ANDROID
INTERFACE

NBA
DIP SWITCH INFO : FIRMWARE DATE :
2018-03-02MAIN :
2018-03-02SUB :
2018-03-02TW23 :
DEFAULT
INPUT SOURCE DEFAULT
INPUT SOURCE DEFAULT
INPUT SOURCE DEFAULT
INPUT SOURCE DEFAULT
DEFAULT
INPUT SOURCE DEFAULT
NAVIGATION
CONTRAST GREEN
INPUT SOURCE DEFAULT
HDMI
REAR VIEW
CONTRAST BLUE
BRIGHT AVM
AV1 (FRONT VIEW)
CONTRAST RED DTV
AV2 (DTV)
NONE
CUSTOM
EXIT
NBA
DEFAULT
INPUT SOURCE DEFAULT
INPUT SOURCE DEFAULT
INPUT SOURCE DEFAULT
INPUT SOURCE DEFAULT
DEFAULT
INPU
INPU
T
T
SOURCE
SOURCE
DE
DE
FA
FA
UL
UL
T
T
DIP SWITCH INFO : FIRMWARE DATE :
2018-03-02MAIN :
2018-03-02SUB :
2018-03-02TW23 :
NAVIGATION
CONTRAST GREEN 128
AVM ( AROUND VIEW)
HDMI
REAR VIEW
CONTRAST BLUE 128
BRIGHT 128
AV1 (FRONT VIEW)
AVM KEEPING TIME R → D 7 Sec
CONTRAST RED 128
AV2 (DTV)
AVM KEEPING TIME P → D 7 Sec
NONE
PGS ON / OFF OFF
CUSTOM
PGS - HORIZONTAL 128
EXIT
PGS - VERTICAL 128
PDC ON / OFF OFF
Settings
HDMI - DEFALUT
- INPUT SOURCE ( Hdmi device model select )
- BRIGHT and CONTRAST
Adjust the values of brightness and contrast
· DEFALUT (Basic HDMI Device)
· AVM ( 360° Around View Camera )
· DTV ( Digital Television )
HDMI INPUT - AVM
- BRIGHT and CONTRAST
Adjust the values of brightness and contrast
- PGS (Parking Guide System)
· Adjust position of parking guide lines and
select the lines ‘ON or OFF’.
- AVM KEEPING TIME
· When you shift gear ‘from reverse to drive’ or ‘from parking to drive’,
it just works automatically during the activation time you selected.
INPUT SOURCE
HDMI INPUT - DTV
- REMOTE OSD ON / OFF
· You can control to some of function on DTV remote control by OSD UI
- BRIGHT and CONTRAST
Adjust the values of brightness and contrast
Settings
- REMOTE TYPE
·ALPINE - TUE-T500 ·Pionner - GEX909 ·HIT7700
NBA
DIP SWITCH INFO : FIRMWARE DATE :
2018-03-02MAIN :
2018-03-02SUB :
2018-03-02TW23 :
NAVIGATION
CONTRAST GREEN 128
INPUT SOURCE DTV
HDMI
REAR VIEW
CONTRAST BLUE 128
BRIGHT 128
AV1 (FRONT VIEW)
REMOTE OSD ON / OFF ON
MEMORY OK 0x807f807f
CONTRAST RED 128
AV2 (DTV)
MEMORY UP
REMOTE TYPE
0x807f807f
ALPINE
MEMORY MENU 0x807f807f
NONE
MEMORY DOWN 0x807f807f
MEMORY EXIT 0x807f807f
CUSTOM
MEMORY LEFT 0x807f807f
MEMORY ETC1 0x807f807f
EXIT
MEMORY RIGHT 0x807f807f
MEMORY ETC2 0x807f807f
1
2
3
4
5
6
7
8
9

REAR VIEW INPUT - OEM CAMERA
REAR VIEW INPUT - AVM
- INPUT SOURCE
· OEM CAMERA
· AVM ( 360° Around View Camera )
· EXTERNAL CAMERA
- BRIGHT and CONTRAST
Adjust the values of brightness and contrast
- PGS (Parking Guide System)
· Adjust position of parking guide lines and
select the lines ‘ON or OFF’.
- PDC (Graphic Sensor Image)
· Sensor Image ‘ON or OFF’.
- AVM KEEPING TIME
· When you shift gear ‘from reverse to drive’ or ‘from parking to drive’,
it just works automatically during the activation time you selected.
- BRIGHT and CONTRAST
Adjust the values of brightness and contrast
Settings
NBA
DIP SWITCH INFO : FIRMWARE DATE :
2018-03-02MAIN :
2018-03-02SUB :
2018-03-02TW23 :
NAVIGATION
CONTRAST GREEN 128
INPUT SOURCE AVM ( AROUND VIEW)
HDMI
REAR VIEW
CONTRAST BLUE 128
BRIGHT 128
FRONT VIEW
AVM KEEPING TIME R → D 7 Sec
CONTRAST RED 128
DTV
AVM KEEPING TIME P → D 7 Sec
DVD
PGS ON / OFF OFF
CUSTOM
PGS - HORIZONTAL 128
EXIT
PGS - VERTICAL
PDC ON / OFF
128
OFF
NBA
DIP SWITCH INFO : FIRMWARE DATE :
2018-03-02MAIN :
2018-03-02SUB :
2018-03-02TW23 :
NAVIGATION
CONTRAST GREEN
INPUT SOURCE OEM CAMERA
HDMI
REAR VIEW
CONTRAST BLUE
BRIGHT AVM (AROUND VIEW)
FRONT VIEW
CONTRAST RED EXTERNAL CAMERA
DTV
DVD
CUSTOM
EXIT

REAR VIEW INPUT - EXTERNAL CAMERA
- BRIGHT and CONTRAST
Adjust the values of brightness and contrast
- PGS (Parking Guide System)
· Adjust position of parking guide lines and
select the lines ‘ON or OFF’.
Settings
- PDC (Graphic Sensor Image)
· Sensor Image ‘ON or OFF’.
NBA
DIP SWITCH INFO : FIRMWARE DATE :
2018-03-02MAIN :
2018-03-02SUB :
2018-03-02TW23 :
NAVIGATION
CONTRAST GREEN 128
INPUT SOURCE EXTERNAL CAMERA
HDMI
REAR VIEW
CONTRAST BLUE 128
BRIGHT 128
FRONT VIEW
PGS ON / OFF
PDC ON / OFF
OFF
OFF
CONTRAST RED 128
DTV
PGS - HORIZONTAL 128
DVD
PGS - VERTICAL 128
CUSTOM
EXIT

FRONT VIEW INPUT - EXTERNAL CAMERA
FRONT VIEW INPUT - OEM CAMERA
- CAM KEEPING TIME
Settings
· When you shift gear ‘from reverse to drive’ or ‘from parking to drive’,
it just works automatically during the activation time you selected.
- BRIGHT and CONTRAST
Adjust the values of brightness and contrast
- FRONT CAM KEEPING TIME
· When you shift gear ‘from reverse to drive’ or ‘from parking to drive’,
it just works automatically during the activation time you selected.
- PDC (Graphic Sensor Image)
· Sensor Image ‘ON or OFF’.
NBA
DIP SWITCH INFO : FIRMWARE DATE :
2018-03-02MAIN :
2018-03-02SUB :
2018-03-02TW23 :
NAVIGATION
CONTRAST GREEN 128
INPUT SOURCE EXTERNAL CAMERA
HDMI
REAR VIEW
CONTRAST BLUE 128
BRIGHT 128
FRONT VIEW
CONTRAST RED 128
DTV
DVD
CUSTOM
EXIT
NBA
DIP SWITCH INFO : FIRMWARE DATE :
2018-03-02MAIN :
2018-03-02SUB :
2018-03-02TW23 :
NAVIGATION
INPUT SOURCE OEM CAMERA
HDMI
REAR VIEW
CAM KEEPING TIME R → D
CAM KEEPING TIME R → D
7 Sec
7 Sec
FRONT VIEW
CAM KEEPING TIME P → D
CAM KEEPING TIME P → D
7 Sec
7 Sec
DTV
DVD
CUSTOM
EXIT
Table of contents
Other INDIWORK Car Video System manuals


Popular Car Video System manuals by other brands

Boss Audio Systems
Boss Audio Systems BV12.1F user manual

Pyle
Pyle PLVHR75 user manual

Blaupunkt
Blaupunkt ALICE SPRINGS 500 Operating and installation instructions

Toyota
Toyota HEADREST DVD REAR SEAT ENTERTAINMENT SYSTEM owner's manual

Pyle
Pyle PLDAND110 user manual

Kia
Kia Car Multimedia System user manual


