INDU+ 740-3008-US User manual

GAS GRILL ASSEMBLY INSTRUCTIONS

USE OUTDOORS ONLY.
PLEASE READ INSTRUCTIONS CAREFULLY BEFORE ASSEMBLY.
RETAIN THIS MANUAL FOR FUTURE REFERENCE.
WARNING
•Hazardous fire or explosion may result if instructions are ignored.
•It is the consumer’s responsibility to see that the barbecue is properly assembled, installed,
and taken care of. Failure to follow instructions in this manual could result in bodily injury
and/or property damage.
•Read the instructions before using the appliance.
•Retain this manual for future reference.
•Use outdoors only.
•Warning accessible parts may be very hot. Keep young children away.
•Do not move the appliance during use.
•Turn off the gas supply at the gas cylinder after use.
•Do not modify the appliance.
•This appliance must be kept away from flammable materials during use.
•The regulator and hose must be connected correctly to the appliance. A spanner must be used
to tighten the nut onto the connection thread.
•Do not keep any gas cylinder inside the barbecue trolley when using. It’s forbid to insert / put
gas cylinder in to the appliance.
FOR YOUR SAFETY IF YOU SMELL GAS:
•Turn off gas supply at gas cylinder.
•Extinguish all naked flames; do not operate any electrical appliances.
•Ventilate the area.
•Check for leaks as detailed in this manual.
•If odour persists, contact your dealer or gas supplier immediately.
PRECAUTIONS:
•Leak test all connections after each cylinder refill or before each use.
•Never check for leaks with a match or open flame.
•Do not store of use gasoline or other flammable vapours and liquids in the vicinity of this or
any other appliance.
•Any LP cylinder not connected for use shall not be stored in the vicinity of this or any other
appliance.
ASSEMBLY
WARNING:
Whilst every effort has made in manufacture of your barbecue to remove any sharp edge, you
should handle all components with care to avoid accidental injury.
TOOLS REQUIRED:
Either a Philips crosshead or flat-bladed screwdriver and either a spanner (we have supplied a
multifunction spanner) or a pair pliers.
Please read all instructions thoroughly before proceeding. Find a large, clean area in which to
assemble your trolley barbecue. Please refer to the parts list and assembly diagram as
necessary. Assembly of the barbecue involves many large components, it is advisable to have
two people assemble the unit.
NOTICE: Make sure all the plastic protection rip off before assembling!
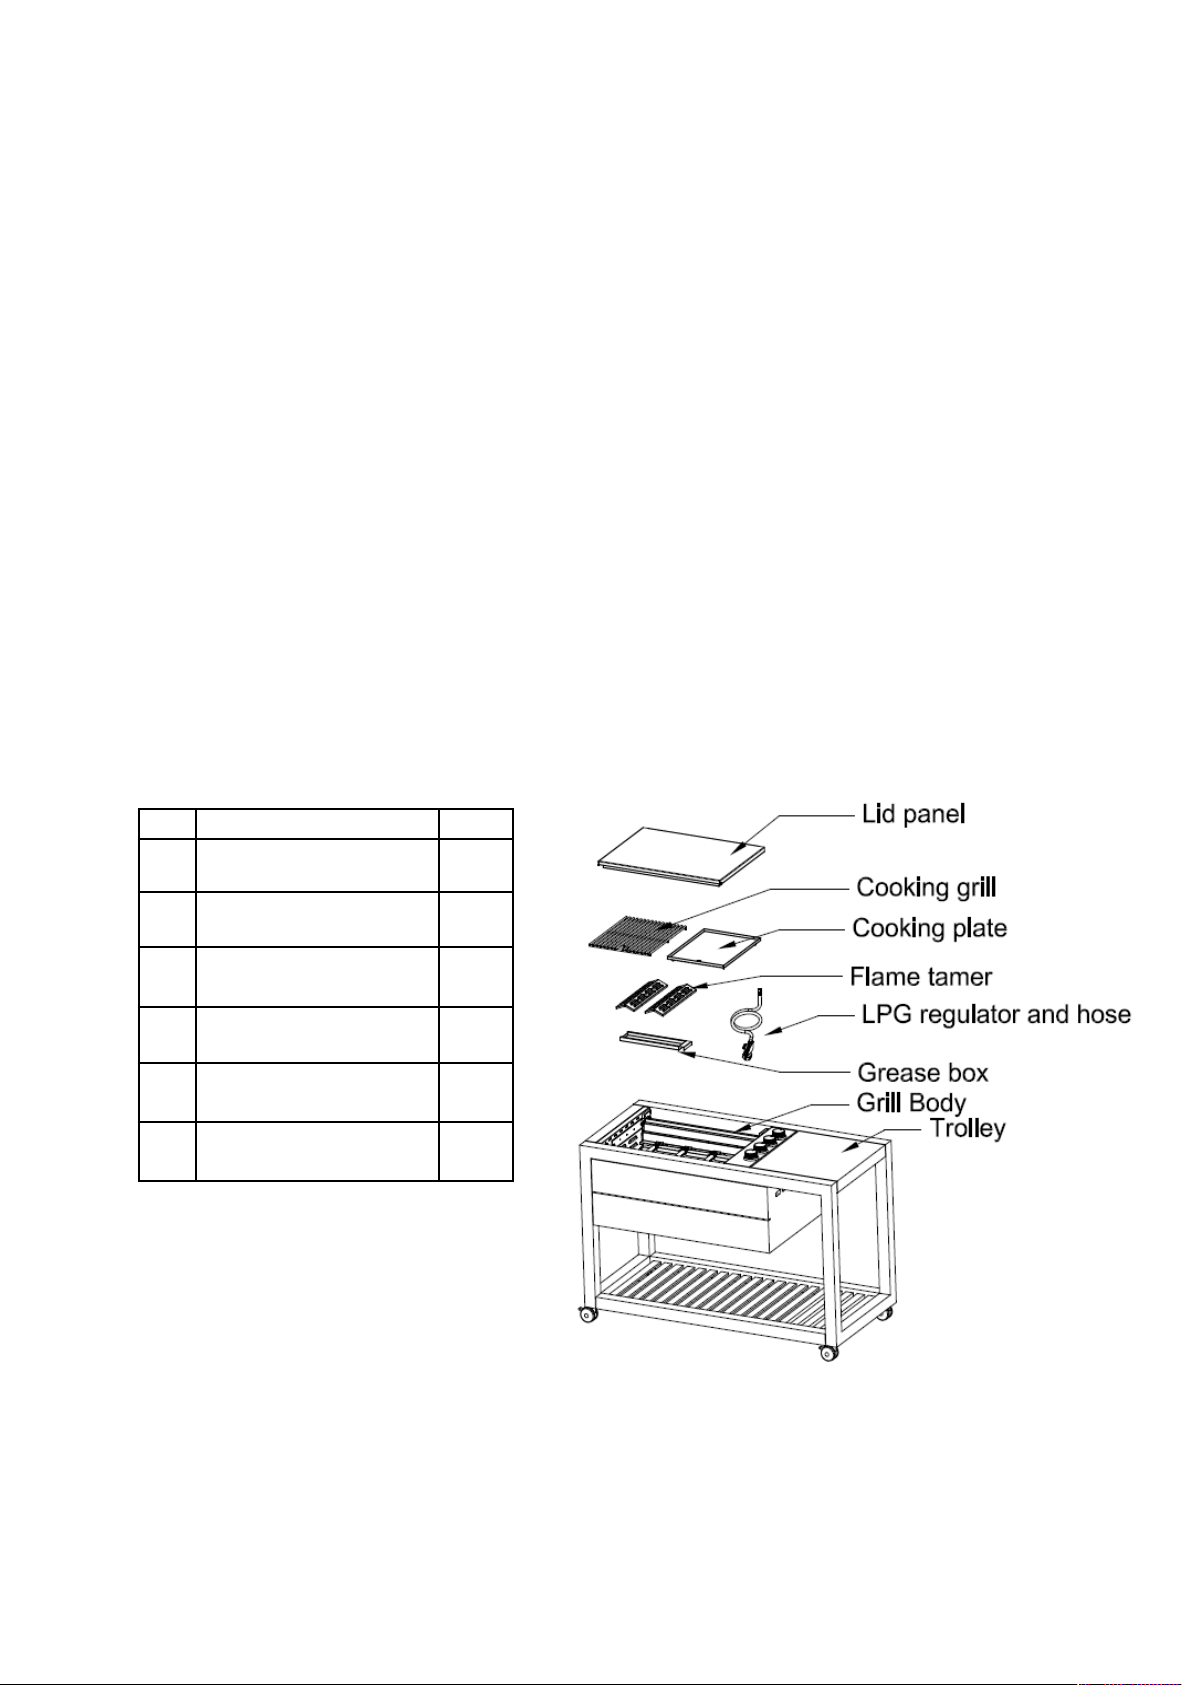
EXPLODED VIEW & PART LIST
NO.
Description QTY
1 Lid panel 1
2 Cooking grill 1
3 Cooking plate 1
4 Flame tamer 2
5 Grease box 1
6 LPG regulator and hose 1
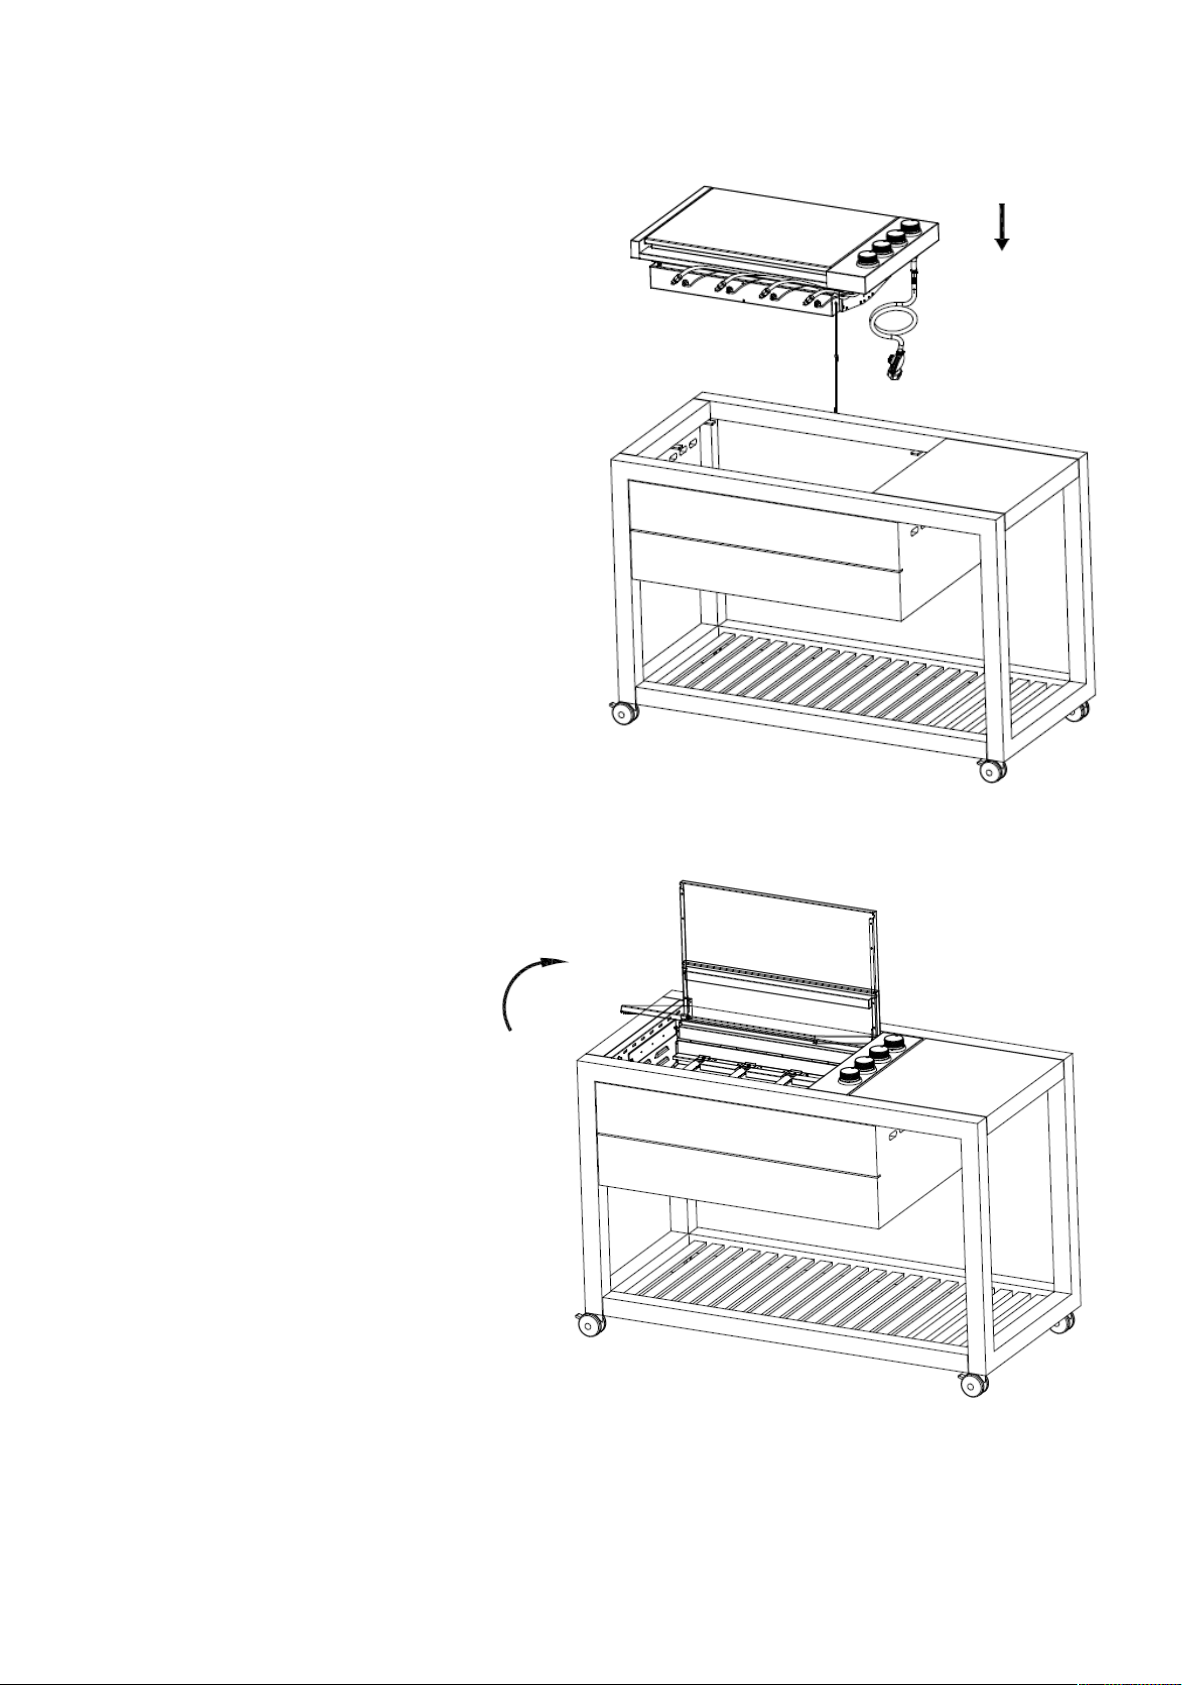
ASSEMBLY
1. Install cooking grill into the trolley.
2. Open the lid panel.

4. Install cooking grill and
cooking plate.
Each 1pc.
3. Install flame tamer 2pc.

5. Open the back panel install the grease box.
APPLIANCE CODE:
740-3008-US
TOTAL HEAT INPUT:
40000BTU
GRILL BURNERS HEAT INPUT
10000BTU ×4
GAS CONSUMPTION
Propane:834g/h
Natural gas:1.22m3/h
GAS CATEGORY:
Propane (11" ) Natural gas(8")
GAS TYPE AND PRESSURE:
Propane at 28 mbar Natural gas at
20mbar
GRILL BURNER INJECTOR SIZE:
0.91mm 1.28mm
P.I.N CODE
USE OUTDOORS ONLY.
WARNING:ACCESSIBLE PARTS MAY BE VERY HOT. KEEP YOUNG CHILDREN AWAY.
READ THE INSTRUCTION BEFORE USING THE APPLIANCE.
USE THE APPLIANCE IN WELL VENTILATED AREAS.
ANY MODIFICATION OF THE APPLIANCE MAY BE DANGEROUS.
TURN OFF THE GAS SUPPLY AT THE GAS CYLINDER AFTER USE.

Built-in Outdoor Grill Enclosure Ventilation Requirements(see picture 1)
Any enclosure is to be ventilated by openings at both the top and lower levels of the enclosure.
The following information is the minimum for proper ventilation of your island construction.
There should be a minimum of 1⁷⁄₈” (4.4 cm) of clearance from the bottom of the grease tray
and the front wall of the island for proper ventilation.
NOTE: There should be no solid surface underneath the firebox portion of the grill. A minimum
of 3” (7.6 cm) is required between the back of the grill and noncombustible materials should
be used. (see picture 2)
Any enclosure for built-in installation is to have at least below 2 openings:
-Hole A: (see picture 1)
-Top openings:
At least two equally sized ventilation openings shall be provided in the side
walls of the enclosure, located within 5 in of the top of the enclosure, spaced at a minimum of
90 degrees and unobstructed. The openings shall have a total free area of not less than 20 in2.
-Hole B: (see picture 1)
-Floor level openings:
At least two equally sized ventilation openings shall be provided in the
side walls of the enclosure, the bottom of the openings shall be 1 inch or less from the floor
level and the upper edge no more than 5 inches above the floor level, spaced at a minimum of
90 degrees and unobstructed. The openings shall have a total free area of not less than 10 in2.
Every opening shall have a minimum dimension so as to permit the entrance of a 3.2mm rod.
Proper ventilation is a required based on the above mentioned specifications for your grill to
operate properly.
Picture 1 Picture 2

WARNINGS INFORMATION
IMPORTANT:
Read the following instructions carefully and be sure your barbecue is properly installed,
assembled and cared for. Failure to follow these instructions may result in serious bodily injury
and/or property damage.
If you have any questions concerning assembly or operation, consult your dealer or LPG Gas
Company.
When used on the ground always place the appliance and cylinder on flat level ground.
Never light the GRILL with the HOOD in the closed position.
Your barbecue can be used with gas cylinders between 11 kg and 15 kg. The maximum
size of the gas cylinder should be: Dia. 320mm, Height: 600 mm. Follow the technical
information as stated in the instruction manual and Check with your local gas supplier to
have a suitable gas cylinder for your barbecue.
Hotplate burner pan: The max. pan Dia. is 220 mm, the min Dia. should be 120 mm.
NOTE FOR CONSUMER: Retain for future Reference
CONNECTING THE GAS CYLINDER TO THE APPLIANCE
This appliance is only suitable for use with low-pressure butane or propane gas or LPG
mixtures, fitted with the appropriate low-pressure regulator via a flexible hose.
The hose should be secured to the regulator and the appliance with hose clips.$Make sure the
flexible hose could not come in contact with hot surface and avoid twisting.
Use a suitable regulator that is certified to BSEN 12864 or EN 16129. Make sure the
regulator and flexible hose comply with local code.
Please consult your LPG dealer for information regarding a suitable regulator for the gas
cylinder.

Regulator and Hose
Use only regulators and hose approved for LP Gas at the above pressures. The life expectancy
of the regulator is estimated as 2 years.
The use of the wrong regulator or hose is unsafe; always check that you have the correct
items before operating the barbecue.
The hose used must conform to the relevant standard for the country of use. Worn or
damaged hose must be replaced. Ensure that the hose is not obstructed, kinked, or in contact
with any part
of the barbecue other than at its connection.
For Flexible hose:
Avoid twisting the flexible tube when the appliance is in use. The length of flexible hose
shall not exceed 1.5m. In Finland, the length shall not exceed 1.2m. The hose should
certified according to applicable EN Standard and comply with local code.
Storage of Appliance
Storage of an appliance indoors is only permissible if the cylinder is disconnected and
removed from the appliance. When the appliance is not to be used for a period of time it
should be stored in its original packaging and stored in a dry dust free environment.
Gas Cylinder
The gas cylinder should not be dropped or handled roughly! If the appliance is not in use, the
cylinder must be disconnected. Replace the protective cap on the cylinder after
disconnecting the cylinder from the appliance. The gas cylinder must be sited outside the
body of the appliance.
Always connect or replace the cylinder in a well-ventilated area and away from any
source of ignition, never in the presence of a flame, spark or heat source.
Cylinders must be stored outdoors in an upright position and out of the reach of children. The
cylinder must never be stored where temperatures can reach over 50°C. Do not store the
cylinder near flames, pilot lights or other sources of ignition. DO NOT SMOKE.
This barbecue is designed for use outdoors, away from any flammable materials. It
is important that there are no overhead obstructions and that there is a minimum
distance of 1 m from the side or rear of the appliance. It is important that the
ventilation openings of the appliance are not obstructed. The barbecue must be
used on a level, stable surface. The appliance should be protected from direct draughts and
shall be positioned or protected against direct penetration by any trickling water (e.g. rain).
Make sure that the gas cylinder compartment (if any) is not obstructed, keep it ventilated
and clean.
Parts sealed by the manufacturer or his agent must not be altered by the user. No
modifications should be made to any part of this barbecue and repairs and maintenance
should only be carried out by a CORGI registered service engineer.

Connection to Appliance
Before connection, ensure that there is no debris caught in the head of the gas cylinder,
regulator, burner and burner ports. Spiders and insects can nest within and clog the
burner/venturi tube at the orifice. A clogged burner can lead to a fire beneath the appliance.
Clean burner holes with a heavy-duty pipe cleaner.
Fit the hose to the appliance using a spanner to tighten it onto the connection thread. If the
hose is replaced it must be secured to the appliance and regulator connections with hose
clips. Disconnect the regulator from the cylinder (according to the directions supplied with
the regulator) when the barbecue is not in use.
The Barbecue must be used in a well ventilated area. Do not obstruct the flow of
combustion air to the burner when the barbecue is in use. ONLY USE THIS BARBECUE
OUTDOORS.
BEFORE USE CHECK FOR LEAKS
Never check for leaks with a naked flame, always use a soapy water solution
TO CHECK FOR LEAKS
Make 2-3 fluid ounces of leak detecting solution by mixing one part washing up liquid with 3
parts water.
Ensure the control valve is “OFF”.
Connect the regulator to the cylinder and ON/OFF valve to the burner, ensure the connections
are secure then turn ON the gas.
Brush the soapy solution onto the hose and all joints. If bubbles appear you have a leak,
which must be rectified before use.
Retest after fixing the fault
Turn OFF the gas at the cylinder after testing.
If leakage is detected and cannot be rectified. Do not attempt to cure leakage but consult
your gas dealer.

Lighting Instructions for barbecue
1. Open the hood of the barbecue before attempting to light the burners.
2. Turn all the control knobs clockwise to “OFF” position.
3. Connect the regulator to the gas bottle. Turn the gas supply “ON” at the regulator.
Check with the use of soapy water for any gas leakage between the bottle and the
regulator.
4. Push down the front left control knob and keep pressing whilst turning anti-
clockwise to the “HIGH” position (a clicking sound is heard), this will light the left
hand burner
.
Observe if the burner has lit. If not repeat this process.
5. If the burner has not lit after retrying wait 5 minutes and repeat step 4.
6. Adjust the heat by turning the knob to the High/Low position.
7. If the burner does not light. Light the appliance with a match using the lighting hole I
n the side of the appliance. Consult your gas dealer to rectify the ignition.
8. To light the remaining burners in sequence from left to right, and repeat 4 above. The
crosslighting channel between the burners will light the burner adjacent to it.
9. To turn the barbecue ‘OFF’ turn the cylinder valve or regulator switch to the ‘OFF’
position and then turn the control knob on the appliance clockwise to the ‘OFF’
position.
Warning: If the burner fails to ignite, turn the control knob off (clockwise) and also turn the cylinder
valve off. Wait five minutes before attempting to relight with ignition sequence.
Before cooking for the first time, operate the barbecue for about 15 minutes with the lid closed and
the gas turned on LOW. This will “heat clean” the internal parts and dissipate odour from the painted
finish.
Clean your barbecue after each USE. DO NOT use abrasive or flammable cleaners, as it will damage
the parts of the product and may start a fire. Clean in warm soapy water.
WARNING: Accessible parts may be very hot. Keep young children away from the hot appliance at all
times (even while cooling down!).
It is recommended that protective gloves (eg oven gloves) be used when handling particularly
hot components.

CLEANING AND CARE
CAUTION:All cleaning and maintenance should be carried out when the barbecue is cool and with
the fuel supply turned OFF at the gas cylinder.
CLEANING
“Burning off” the barbecue after every use (for approx 15 minutes) will keep excessive food
residue to a minimum.
OUTSIDE SURFACE
Use mild detergent or baking soda and hot water solution. Non-abrasive scouring powder can be
used on stubborn stains, then rinse with water.
If the inside surface of the barbecue lid has the appearance of pealing paint, baked on grease build-up
has turned to carbon and is flaking off. Clean thoroughly with strong hot soapy water solution. Rinse
with water and allow to completely dry. NEVER USE OVEN CLEANER.
INTERIOR OF BARBECUE BOTTOM
Remove residue using brush, scraper and/or cleaning pad then wash with a soapy water solution.
Rinse with water and allow to dry.
WOODEN SURFACES
Wash with a soft cloth and hot soapy water solution. Rinse with water. Do not use abrasive cleaners,
degreasers or a concentrated barbecue cleaner on wooden parts.
COOKING GRID
Use a mild soapy water solution. Non-abrasive scouring power can be used on stubborn stains then
rinse with water.
CLEANING THE BURNER ASSEMBLY
CAUTION:All cleaning and maintenance should be carried out when the barbecue is cool and with
the fuel supply turned OFF at the gas cylinder.
•Turn the gas OFF at the control knob and disconnect the cylinder.
•Remove cooling grate.
•Clean the burner with a soft brush or blow clean with compressed air and wipe with a cloth.
•Clean any clogged ports with a pipe cleaner or stiff wire (such as an opened paper clip).
•Inspect burner for any damage (cracks or holes). If damage is found, replace with a new burner.
Reinstall the burner, check to ensure that the Gas valve orifices are correctly positioned and secured
inside the burner inlet (venturi).

PROBLEM POSSIBLE CAUSE SOLUTION
Burners will not light using the
ignition system
1
.LP gas cylinder is empty
2
.faulty regulator
3
.obstructions in burner
4
.obstructions in gas jets or gas hose
5
.electrode wire loose or disconnected
on
electrode or ignition unit
6
.electrode or wire is damaged faulty
pushbutton
igniter
1
.replace with full cylinder
2
.have regulator checked
or
replace
3
.clean burner
4
.clean jets and gas hose
5
.reconnect wire
6
.change electrode and wire
change igniter
Burner will not light with a match
1
.LG gas cylinder is empty
2
.Faulty regulator
3
.Obstructions in burner
4
.Obstructions in gas jets or gas hose
1
.Replace with full cylinder
2
.Have regulator checked
or
replace
3
.Clean burner
4
.Clean jets and gas hose
Low flame or flashback (fire in
burner tube
-a hissing or roaring
noise may be heard)
1
.LP gas cylinder too small
2
.Obstructions in burner
3
.Obstructions in gas jets or gas hose
4
.Windy conditions
1
.Use larger cylinder
2
.Clean burner
3
.Clean jets and gas hose
4
.Use BBQ in amore
sheltered
position
TO CHECK FOR LEAKS
If you smell gas:( In the event of gas leakage found)
•Turn of f the gas supply at the gas cylinder valve.
•Ensure the control valve is “OFF”.
•Connect the regulator to the cylinder and ON/OFF valve to the burner, ensure
the connections are secure then turn ON the gas.
•Brush the soapy water onto the hose and all joints. If bubbles appear you
have a leak, which must be rectified before use. Retest after fixing the fault
•Turn off the gas supply at the gas container after use
•If leakage is detected again and cannot be rectified. Do not attempt to cure
leakage but consult your gas dealer
SERVICING
Your gas barbecue should be serviced annually by a competent registered person.
TROUBLE SHOOTING
OUTDOOR GRILL SAFETY
Your safety and the safety of others are very important.
We have provided many important safety messages in this manual and on your appliance. Always read and obey all safety messages
This is the safety alert symbol.
This symbol alerts you to potential hazards that can kill or hurt you and others.
All safety messages will follow the safety alert symbol and either the word “DANGER” or “WARNING.”
These words mean:
DANGER
WARNING
Failure to comply with these instructions could result in a fire or
explosion that could cause serious bodily injury, death, property
damage.
You can be killed or seriously injured if you don’t follow
Instructions.
All safety messages will tell you what the potential hazard is, tell you how to reduce the chance of injury, and tell you what will happen if the
instructions are not followed.
DANGER
If you smell gas:
1. Shut off gas to the appliance.
2. Extinguish any open flame.
3. Open lid.
4. If odor continues, keep away from the
appliance and immediately call your
gas supplier or your fire department.
WARNING
1. Do not store or use gasoline or other
flammable liquids or vapors in the
vicinity of this or any other appliance.
2. An LP cylinder not connected for use
shall not be stored in the vicinity of
this or any other appliance.
WARNING: The combustion by products produced when using this product contains chemicals known to the State of California to cause
cancer, birth defects, or other reproductive harm.
In the State of Massachusetts, the following installation instructions apply:
■Installations and repairs must be performed by a qualified or licensed contractor, plumber, or gas fitter qualified or licensed by
the State of Massachusetts.
11
CSA requires the conversion must be performed by a qualified installer or gas supplier in
accordance with the manufacturer
jurisdiction. Failure to follow ALL instructions could result in serious injury or property damage. The
qualified agency performing this work assumes ALL responsibility and liability for this conversion.
Warning:
s
'instructions and all codes and requirements of the authority having

IMPORTANT SAFETY INSTRUCTIONS
WARNING: To reduce the risk of fire, electrical shock,
injury to persons, or damage when using the outdoor cooking
gas appliance, follow basic precautions, including the
following:
■
■
■
■
■
■
■
■
■
■
■
Do not install built-in outdoor cooking gas
appliances in or on a recreational vehicle, portable trailer,
boat or in any other moving installation.
Always maintain minimum clearances from combustible
construction, see “Location Requirements” section.
The outdoor cooking gas appliance shall not be located
under overhead unprotected combustible construction.
This outdoor cooking gas appliance shall be used only
outdoors and shall not be used in a building, garage, or any
other enclosed area.
Keep any electrical supply cord and fuel supply hose away
from any heated surfaces.
Keep outdoor cooking gas appliance area clear and free
from combustible materials, gasoline and other flammable
vapors and liquids.
Do not obstruct the flow of combustion and ventilation air.
Keep the ventilation openings of the cylinder enclosure free
and clear from debris.
Inspect the gas cylinder supply hose before each use of the
outdoor cooking gas appliance. If the hose shows
excessive abrasion or wear, or is cut, it MUST be replaced
before using the outdoor cooking gas appliance. Contact
your dealer and use only replacement hoses specified for
use with the outdoor cooking gas appliance. the replacement hose
assembly shall be that specified by the manufacturer
Visually check the burner flames. They should be blue or slightly
yellow.
Check and clean burner/venturi tube for insects and insect
nest. A clogged tube can lead to fire under the outdoor
cooking gas appliance.
The installation of this grill must conform with local codes or, in the
absence of local codes, with either the National Fuel Gas Code,
ANSI Z223.1/NPFA 54, Natural Gas and Propane Installation Code,
CSA B149.1, or Propane Storage and Handling Code, B149.2.
■
■
■
■
■
■
■
For LP Unit:
LP gas grill models are designed for use with a standard 20 lb. Liquid
Propane Gas tank. A 20lb tank of approximately 12 inches in diameter
by 18-1/4 inches high.
The LP gas supply cylinder to be used must be:
constructed and marked in accordance with the
Specification for LP Gas Cylinders of the U.S. Department
of Transportation (DOT) or the National Standard of
Canada, CAN/CSA-B339, Cylinders, Spheres, and Tubes
for Transportation of Dangerous Goods; and Commission.
-providedwithalistedoverfillingpreventiondevice.
-providedwithacylinderconnectiondevicecompatible
with the connection for outdoor cooking gas appliances.
Always check connections for leaks each time you connect
the LP gas supply cylinder. See “Installation Instructions” section.
When the outdoor cooking gas appliance is not in use, the
gas must be turned off at the supply cylinder.
Storage of an outdoor cooking gas appliance indoors is
permissible only if the cylinder is disconnected and
removed from the outdoor cooking gas appliance.
Cylinders must be stored outdoors and out of the reach of
children and must not be stored in a building, garage, or
any other enclosed area.
The pressure regulator and hose assembly supplied with
the outdoor cooking gas appliance must be used. A
replacement pressure regulator and hose assembly must be to
specified by the outdoor cooking gas appliance manufacturer .
Gas cylinder must include a collar to protect the cylinder
valve. :
Place a dust cap on cylinder valve outlet whenever the
cylinder is not in use. Only install the type of dust cap on
the cylinder valve outlet that is provided with the cylinder
valve. Other types of caps or plugs may result in leakage
of propane.
If the following information is not followed exactly, a fire
causing death or serious injury may occur.
■
■Do not store a spare LP gas cylinder under or near this
outdoor cooking gas appliance.
Never fill the cylinder beyond 80 percent full.
SAVE THESE INSTRUCTIONS FOR
FUTURE REFERENCE
4

INSTALLATION REQUIREMENTS
Tools and Parts
Gather the required tools and parts before starting installation.
Read and follow the instructions provided with any tools listed
here.
Tools Needed
■
■
■
■
■
Tape measure ■
Small, flat-blade screwdriver ■
#2 and #3 Phillips screwdriver
■
Level
Wrench or pliers
Pipe wrench
Scissors or cutting pliers
(to remove tie-downs)
Noncorrosive leak-detection
solution
Location Requirements
WARNING
Parts Supplied
■
■
■
Gas pressure regulator/hose assembly set for 11” WCP LP
gas.
1-“A
A
”sizealkalinebatter
y
Hardware packet
Explosion Hazard
Do not store fuel tank in a garage or indoors.
Do not store grill with fuel tank in a garage or indoors.
Failure to follow these instructions can result in death,
explosion, or fire.
WARNING
Fire Hazard
Do not use grill near combustible materials.
Do not store combustible materials near grill.
Doing so can result in death or fire.
Select a location that provides minimum exposure to wind and
traffic paths. The location should be away from strong draft
areas.
Do not obstruct flow of combustion and ventilation air.
Clearance to combustible construction for outdoor grills:
■
■
A minimum of 24” (58.0 cm) must be maintained between the
front of the grill hood, sides and back of the grill and any
combustible construction.
A 24” (58.0 cm) minimum clearance must also be maintained
below the cooking surface and any combustible construction.
*See “Assistance or Service” section to order.
5
Screws:W 3/32-32*2/5" 4pcs used to install the door

Gas Leakage Testing
After install the gas supply system, and the Gill is well fixed to the enclosure:
1,Beforelightingthegrill,testallconnectionsbybrushingonan
approved non-corrosive leak-detection solution. Bubbles will
show a leak.
2.Ifaleakisfound,turnthetankvalveoffanddonotusethe
grill. Contact a qualified gas technician to make repairs.
Install The Batter
y
1. The igniter battery is not factory installed. A “AA” size alkaline
battery is located in the accessory box on the grill grate.
Install battery at this time following the instructions in
“Replacing the Igniter Battery” section.
2. After above procedure then go to “Check and Adjust the Burners”
section.
Check and Adjust the Burners(See page 15)
Grill Use( See page 16,17)
Disconnecting The Grill.
Disconnect 20 lb LP gas fuel tank (if present) and remove the 20 lb LP gas
fuel tank from the grill cabinet.
1. check that the 20 lb LP gas fuel tank is in the “Off” position. If not, turn
the valve clockwise until it stops.
2. Using your hand, turn the gas pressure regulator/hose assembly
counter- clockwise to disconnect to the 20 lb LP gas fuel tank.
Warning:
Storage of an outdoor cooking gas appliance indoors is permissible only if
the cylinder is disconnected and removed from the outdoor cooking gas
appliance.
11

Check and Adjust the Burners
The burners are tested and factory-set for most efficient
operation. However, variations in gas supply and other conditions
may make minor adjustments to air shutter or low flame setting
necessary. If Chang LP gas to NG, please adjust the burners.
It is recommended that a qualified person make burner
adjustments.
NOTE: The rotisserie burner cannot be adjusted.
Checking and adjusting the grill burner flames requires removing
the grates and flame tamers.
Burner Flame Characteristics
The flames of the grill burners and side burners (on some models)
should be blue and stable with no excessive noise or lifting (LP
gas flames will have a slightly yellow tip). A yellow flame indicates
not enough air. If flame is noisy or lifts away from the burner, there
is too much air. Some yellow tips on flames when the burner is
set to HI setting are acceptable as long as no carbon or soot
deposits appear. The flames should be approximately 1” (2.5 cm)
high.
1” (2.5 cm)
Check that burners are not blocked by dirt, debris, insect nests,
etc., and clean as necessary. If they are clean, adjust air shutters
as needed.
15

BURNERS
Cleaning Method:
■
■
■
■
Clean the exterior of the burner with a wire brush.
Clear any clogged burner ports with a straightened paper
clip.
Do not use a toothpick as it may break off and clog the port.
Check and clean burner/venturi tubes.
1. Remove grill grates and flame tamers.
2. Remove the 2 screws that hold the burner in place.
Remove gas burner from the grill.
A
DRIP TRAY
IMPORTANT: The drip tray should only be removed when grill is
completely cool.
The full-width drip tray collects grease and food particles that fall
through the grill. Clean often to avoid grease buildup.
Cleaning Method:
■
■
■
■
Remove tray and set on a flat surface.
Wipe excess grease with paper towels.
Mild detergent and warm water. Rinse and dry thoroughly.
Replace tray.
KNOBS AND FLANGE AREA AROUND KNOBS
A. 2 screws
3. Use a flashlight to inspect into the burner through the
burner inlet to ensure there is no blockage. If any
obstruction is seen, use a metal coat hanger that has
been straightened to clear them.
4. After inspecting the inside of burner for blockage,
reassemble burner by sliding the middle tube of the gas
burner over the gas orifice.
A
IMPORTANT: To avoid damage to knobs or flange area around
knobs, do not use steel wool, abrasive cleaners, or oven cleaner.
Do not soak knobs.
Cleaning Method:
■
■
Mild detergent, a soft cloth and warm water.
Rinse and dry.
CONTROL PANEL GRAPHICS
IMPORTANT: To avoid damage to control panel graphics, do not
use steel wool, abrasive cleaners or oven cleaner.
Do not spray cleaner directly onto panel.
Cleaning Method:
■
A. Burner/orifice connection
5. Reattach gas burner using 2 screws.
■
■
Clean around the burner labels gently; scrubbing may remove
printing.
Mild detergent, soft cloth and warm water.
Rinse and dry.
23

TROUBLESHOOTING
Grill will not light
Is the 20 lb LP gas fuel tank valve turned off?
Turn the 20 lb LP gas fuel tank on.
Is the grill properly connected to the gas supply?
Contact a trained repair specialist or see Installation
Instructions.
Is there gas in the 20 lb LP gas fuel tank?
Check the gas level.
Is the igniter working?
Check that the igniter battery is properly installed or check to
see if the battery needs to be replaced. See the “Replacing
the Igniter Battery” section.
Check to see if the grill will match-light. See “Manually
Lighting the Main Grill” in the “Outdoor Grill Use” section.
Check for loose wire connections to the igniter or electrodes.
Check to see if debris is blocking the electrodes.
If a spark occurs anywhere but the igniter tip, replace the
igniter.
Burner flame will not stay lit
Is the gas supply fully turned on?
Check that the 20 lb LP gas fuel tank valve is fully open.
Is the gas supply in the 20 lb LP fuel gas tank low?
Check the gas level.
Is the burner properly installed and in good condition?
Check that the burner is installed properly. Check for defects
in the burner.
Flame is noisy, low or erratic
Is the gas supply fully turned on?
Check that the 20 lb LP gas fuel tank valve is fully open.
Is the gas supply in the 20 lb LP fuel gas tank low?
Check the gas level.
Does only one burner appear low?
Check and clean the burner ports if clogged or dirty. See
“General Cleaning” section.
Is the gas supply hose bent or kinked?
Straighten the gas supply hose.
Is the flame noisy or lifting away from the burner?
Burner may be getting too much air. Check the air shutter
adjustment, see “Check and Adjust Burners” section.
Is the burner flame mostly yellow or orange?
Grill may be in an area that is too windy, or not receiving
enough air. Check the burner air inlets for obstructions.
Check the air shutter adjustment, see “Check and Adjust
Burners” section.
■
■
■
■
■
■
■
ASSISTANCE
Before calling for assistance, please check “Troubleshooting.” If
you still need help, follow the instructions below.
When calling, please know the purchase date and the complete
model and serial number of your appliance. This information will
help us to better respond to your request.
I
f
you need replacement parts
If you have questions or need to order replacement parts, contact
Customer Service Center at1-888-909-8818.
Please direct all correspondence to:
17018 Evergreen place,
City of Industry
,
CA91745
Please include a daytime phone number in your correspondence.
■
■
■
■
■
■
■
Excessive flare-ups
Is there excessive fat in the food being grilled?
Keep flame on low or turn one burner off.
Keep the hood up when grilling to avoid excessive flare-ups.
Move food to the warming rack until flames subside.
To avoid damage to the grill, do not spray water on gas
flames.
Low heat
LP Gas:
For outdoor grills using a 20 lb LP gas fuel tank, slowly open the
tank valve.
NOTE: If flow limiting device activates, your grill may not light. If
your grill does light, the flames will be low and will not heat
properly.
1. Turn tank valve and all control knobs off and wait 30 seconds.
2. After shutting off the tank, very slowly open the tank valve
and wait 5 seconds before lighting.
3. Light the burners one at a time. See “Lighting the Main Grill”
section.
Natural Gas:
Gas pressure is affected by size and length of the gas line from
the house to the grill. Contact a qualified gas technician to
provide the Natural gas supply to the selected grill location in
accordance with the National Fuel Gas Code ANSI Z223.1/
NFPA54 - latest edition, and local codes.
24
LIMITED WARRANTY
DURO warrants to the original consumer-purchaser only that this product (Model #740-3003-BI) shall be free from defects in
workmanship and materials after correct assembly and under normal and reasonable home use for the periods indicated below
beginning on the date of purchase. The manufacturer reserves the right to require photographic evidence of damage, or that defective
parts be returned, postage and or freight pre-paid by the consumer, for review and examination.
Stainless steel tube burners: 1yearLlMlTEDwarrantyagainstperforation;Other burners (Searing & rotisserie): 1yearLIMITED
warranty against perforation.
Cooking grids: 1YearLIMITEDwarranty;doesnotcoverdropping,chipping,scratching,orsurfacedamage.
Stainless steel parts: 1YearLIMITEDwarrantyagainstperforation;doesnotcovercosmeticissueslikesurfacecorrosion,scratches
and rust.
All other parts: 1YearLIMITEDwarranty(Includes,butnotlimitedto,valves,frame,housing,cart,controlpanel,igniter,regulator,
hoses); does not cover chipping, scratching, cracking surface corrosion, scratches or rust.
Upon consumer supplying proof of purchase as provided herein, Manufacturer will repair or replace the parts which are proven
defective during the applicable warranty period. Parts required to complete such repair or replacement shall be free of charge to you
except for shipping costs, as long as the purchaser is within the warranty period from the original date of purchase. The original
consumer-purchaser will be responsible for all shipping charges of parts replaced under the terms of this limited warranty. This limited
warranty is applicable in the United States only, is only available to the original owner of the product and is not transferable.
Manufacturer requires reasonable proof of your date of purchase. Therefore, you should retain your sales receipt and/or invoice. If the
unit was received as a gift, please ask the gift-giver to send in the receipt on your behalf, to the below address. Defective or missing
parts subject to this limited warranty will not be replaced without registration or proof of purchase. This limited warranty applies to the
functionality of the product ONLY and does not cover cosmetic issues such as scratches, dents, corrosions or discoloring by heat,
abrasive and chemical cleaners or any tools used in the assembly or installation of the appliance, surface rust, or the discoloration of
stainless steel surfaces. Surface rust, corrosion, or powder paint chipping on metal parts that does not affect the structural integrity of
the product is not considered a defect in workmanship or material and is not covered by this warranty. This limited warranty will not
reimburse you for the cost of any inconvenience, food, personal injury or property damage. If an original replacement part is not
available, a comparable replacement part will be sent. You will be responsible for all shipping charges of parts replaced under the terms
of this limited warranty.
ITEMS MANUFACTURER WILL NOT PAY FOR:
■
■
■
■
■
■
■
■
■
■
Service calls to your home.
Repairs when your product is used for other than normal, single-family household or residential use.
Damage resulting from accident, alteration, misuse, lack of maintenance/cleaning, abuse, fire, flood, acts of God, improper
installation, and installation not in accordance with electrical or plumbing codes or use of products not approved by the
manufacturer.
Any food loss due to product failures.
Replacement parts or repair labor costs for units operated outside the United States or Canada.
Pickup and delivery of your product.
Postage fees or photo processing fees for photos sent in as documentation.
Repairs to parts or systems resulting from unauthorized modifications made to the product.
The removal and/or reinstallation of your product.
Shipping cost, standard or expedited, for warranty/non warranty and replacement parts.
DISCLAIMER OF IMPLIED WARRANTIES; LIMITATION OF REMEDIES
Repair or replacement of defective parts is your exclusive remedy under the terms of this limited warranty. Manufacturer will not be
responsible for any consequential or incidental damages arising from the breach of either this limited warranty or any applicable implied
warranty, or for failure or damage resulting from acts of God, improper care and maintenance, grease fire, accident, alteration,
replacement of parts by anyone other than Manufacturer, misuse, transportation, commercial use, abuse, hostile environments
(inclement weather, acts of nature, animal tampering), improper installation or installation not in accordance with local codes or printed
manufacturer instructions.
THIS LIMITED WARRANTY IS THE SOLE EXPRESS WARRANTY GIVEN BY THE MANUFACTURER. NO PRODUCT PERFORMANCE
SPECIFICATION OR DESCRIPTION WHEREVER APPEARING IS WARRANTED BY MANUFACTURER EXCEPT TO THE EXTENT SET
FORTH IN THlS LIMITED WARRANTY. ANY IMPLIED WARRANTYPROTECTIONARISINGUNDERTHELAWSOFANYSTATE,
INCLUDING IMPLIED WARRANTY OF MERCHANTABILITY OR FITNESS FOR A PARTICULAR PURPOSE OR USE, IS HEREBY
LIMITED IN DURATION TO THE DURATION OF THIS LIMITED WARRANTY.
27
Table of contents
Other INDU+ Grill manuals

Popular Grill manuals by other brands


Breville
Breville Gourmet Health Grill TG400XL Instructions for use and recipe book

Char-Broil
Char-Broil Professional Core 468863021 operating instructions

Weber
Weber 55545 owner's guide

Southern Pride
Southern Pride SRG-400 owner's manual

BLUE EMBER GRILLS
BLUE EMBER GRILLS FGQ65079 Assembly manual and use and care

Char-Broil
Char-Broil 463230510 Product guide