Infostream X5 Assembly instructions

X5 User Reference Manual
102-1050M
Date: 5 July 2010
© 2008 Copyright Infostream Pty Ltd
No part of this document may be reproduced in any form, stored in a retrieval system or
transmitted ithout the prior ritten permission of Infostream.
This document is classified Commercial in Confidence. It is subject to a confidentiality agreement
bet een Infostream and its customers and partners.
Its contents must not be divulged to third parties
Doc No.102-1050M - X5 User Reference Manual 1 of 60

Table of Contents
Table of Contents.............................................................................................................2
Table of Figures................................................................................................................4
Introduction.......................................................................................................................
1.1 Scope ..................................................................................................................... 6
1.2 Audience ................................................................................................................6
1.3 Important Information..............................................................................................6
1.4 Maintenance...........................................................................................................7
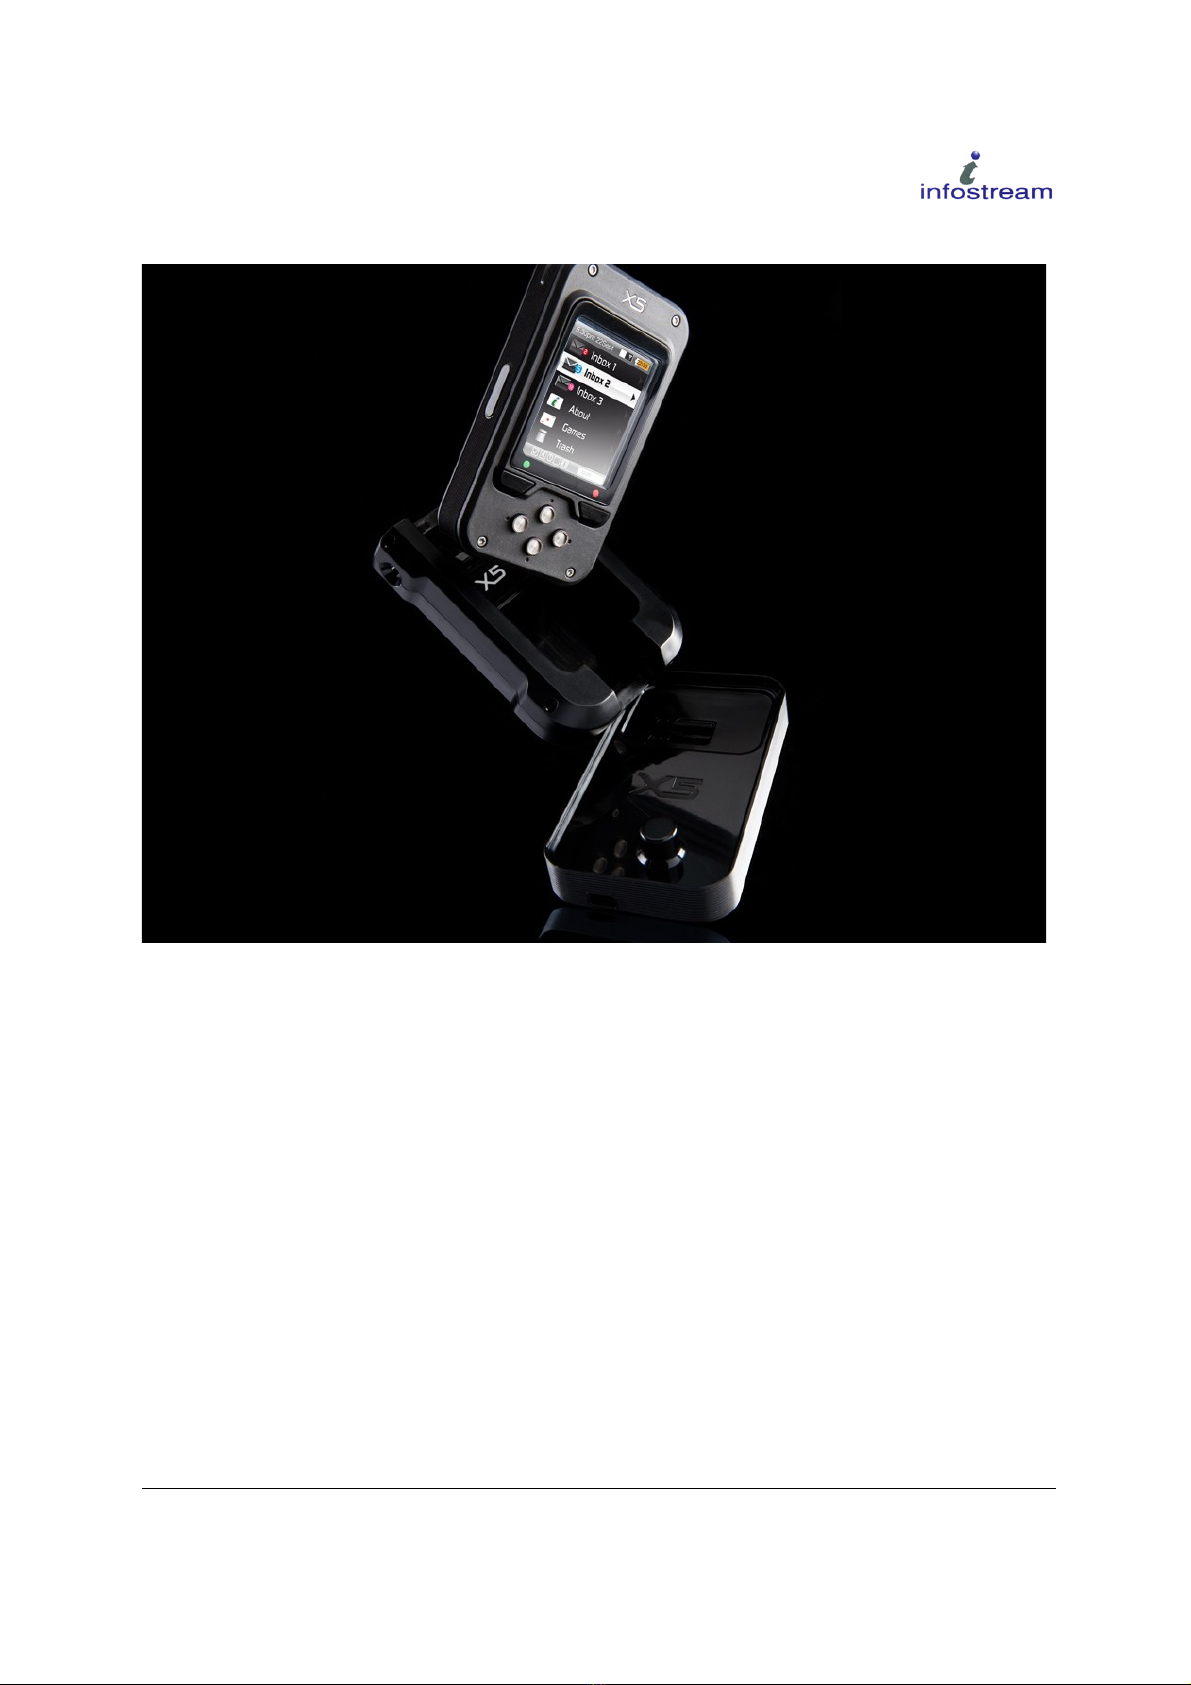
1.5 Deliverables What's in the Box?............................................................................7
Charging the Pager..........................................................................................................9
1.6 Charger Clip..........................................................................................................10
Buttons and Turning Pager On / Off............................................................................11
1.7 MENU Button (Green)...........................................................................................11
1.8 CANCEL Button (Red)..........................................................................................12
1.9 DIRECTIONAL Buttons.........................................................................................12
1.10 Turning the Pager On..........................................................................................13
1.11 Turning the Pager Off..........................................................................................14
Understanding the Home Screen................................................................................1
1.12 Elements of the Home Screen.............................................................................16
1.13 Inbox Page.......................................................................................................... 17
1.14 Folders Page.......................................................................................................21
1.15 Trash View..........................................................................................................23
1.16 Clock Page..........................................................................................................24
1.17 About Page.........................................................................................................27
1.18 User Profiles.......................................................................................................29
1.19 Service functions.................................................................................................30
Games........................................................................................................................... 33
1.20 Puzzle.................................................................................................................33
1.21 Quadris............................................................................................................... 33
1.22 Serpents..............................................................................................................34
Main Menu..................................................................................................................... 35
1.23 Off…....................................................................................................................35
1.24 Screen Settings...................................................................................................36
1.25 Alert Type............................................................................................................36
1.26 Alert Duration......................................................................................................37
1.27 Button Sound......................................................................................................37
1.28 Holster Lock........................................................................................................37
1.29 Advanced............................................................................................................37
Incoming Messages......................................................................................................39
1.30 Normal Messages...............................................................................................39
1.31 Fixed Messages..................................................................................................39
1.32 Repeat Messages...............................................................................................39
1.33 OTA/OAP (Over The Air/Over Air Programming) Messages..............................40
Doc No.102-1050M - X5 User Reference Manual 2 of 60

1.34 Reading Messages.............................................................................................40
1.35 Multiple Alerts......................................................................................................41
1.36 Other Alerts.........................................................................................................42
Other Features..............................................................................................................44
1.37 Managing Capcodes...........................................................................................44
1.38 Blocked Actions...................................................................................................45
1.39 Features, Settings and Options...........................................................................46
Pager Care ....................................................................................................................53
Appendix – X5 Menu Structure.....................................................................................54
Appendix – Default Settings.........................................................................................57
Appendix – Technical Specifications...........................................................................58
Doc No.102-1050M - X5 User Reference Manual 3 of 60

Table of Figures
Figure 1: X5 Deliverables.................................................................................................8
Figure 2: Charging screen...............................................................................................9
Figure 3: Wall charging..................................................................................................10
Figure 4: The Buttons on the X5....................................................................................11
Figure 5: System Menu..................................................................................................12
Figure : PIN lock login..................................................................................................13
Figure 7: Pager permanently locked.............................................................................13
Figure 8: Home Page View.............................................................................................14
Figure 9: Turn-Off Dialogue...........................................................................................14
Figure 10: Flight mode...................................................................................................15
Figure 11: Home Page in Detail.....................................................................................1
Figure 12: Inbox Pop-up Menu......................................................................................18
Figure 13: Message Sub-menu......................................................................................18
Figure 14: Alerts Menu...................................................................................................19
Figure 15: Alert Tune Selection.....................................................................................20
Figure 1 : On-Screen Keyboard....................................................................................21
Figure 17: Folder Selection Menu.................................................................................22
Figure 18: Folder Message Menu..................................................................................22
Figure 19: Folder Tools..................................................................................................23
Figure 20: Trash pop-up menu......................................................................................24
Figure 21: Clock page....................................................................................................24
Figure 22: Setting Alarm Time Dialogue.......................................................................25
Figure 23: Setting the Clock..........................................................................................2
Figure 24: About Page....................................................................................................27
Figure 25: About Page Menu.........................................................................................27
Figure 2 : Battery Chart.................................................................................................28
Figure 27: X5 home page with Profiles enabled and shown.......................................29
Figure 28: Profile selection menu on the pager...........................................................30
Figure 29: Signal Strength indicator (RSSI)..................................................................30
Figure 30: Oscilloscope.................................................................................................31
Figure 31: Receiver Status Page...................................................................................31
Figure 32: Flex block info..............................................................................................32
Figure 33: Flex error display..........................................................................................32
Figure 34: New and Solved Puzzle Games...................................................................33
Figure 35: Quadris..........................................................................................................34
Figure 3 : Serpents........................................................................................................34
Figure 37: Main Menu Structure....................................................................................35
Figure 38: PC connection..............................................................................................38
Figure 39: PC Link mode................................................................................................38
Figure 40: Bootloader mode..........................................................................................38
Figure 41: Message Alert...............................................................................................41
Doc No.102-1050M - X5 User Reference Manual 4 of 60

Figure 42: The Alert Queue............................................................................................41
Figure 43: Low Battery Alert..........................................................................................42
Figure 44: Capcodes with Check Boxes.......................................................................45
Figure 45: Blocked Menu Items.....................................................................................4
Figure 4 : Home Screen menu......................................................................................54
Figure 47: Main menu.....................................................................................................55
Figure 48: About Menu...................................................................................................5
Doc No.102-1050M - X5 User Reference Manual 5 of 60

Introduction
1.1 Scope
The new X5 pager from Infostream is especially designed with Emergency Services workers in mind.
The X5 pager has a simple, six b tton control panel, which enables sers to organise their messages
and config re the pager with ease. The screens have been designed in conj nction with Emergency
Service Organisations so that they are easy to read and se in critical sit ations. The pager alerting
options are s ch that the pager can provide a different alert for each type of message.
An expanded memory allows retention of a large n mber of messages on the pager itself, so sers are
able to refer to an extended history of messages.
1.2 Audience
This man al is intended as a detailed ser reference g ide for the X5 pager. It is aimed at s pervisors
or gro p leaders. It can, however, be sed by the general end- ser of the pager in conj nction with the
X5 Getting Started G ide.
1.3 Important Information
The X5-I device complies with the reg lation of the R&TTE E ropean Directive (99/05/EU).
For explosive prevention reasons, no anti-scratch plastic film may be placed on the display.
WARNING: Changes or modifications not expressly approved by the party responsible for compliance
co ld void the ser’s a thority to operate the eq ipment.
The X5-I has been certified to Ex II 2 G Ex ibIIC T4. (QAN Certificate n mber: ITS08ATEXQ5900)
Note: T e battery in t is pager CANNOT be replaced by t e user.
Do not open t e device.
Do not use t e product if it is faulty.
Do not c arge in a azardous area.
Only use Infostream-issued power plug and cables to c arge t e pager.
Doc No.102-1050M - X5 User Reference Manual 6 of 60
II 2 G Ex ib IIC T4

1.4 Maintenance
This prod ct m st be ret rned to Infostream or yo r distrib tor for any servicing.
Infostream Address: Distrib tor Details:
Infostream Pty Ltd
7 Narabang Way
Belrose, Sydney
NSW 2085
Australia
Note: Do not open device or remove labels!
1.5 eliverables - What's in the Box?
The pager is delivered with a charging nit, a USB cable for the charging nit, an AC-Adaptor with an
appropriate AC connector for the co ntry of shipment, a holster, the X5 Getting Started G ide and the
X5 pager. The programming software can be accessed thro gh the following link:
http://login.infostream.com.a
The on-board lithi m-ion re-chargeable battery has a memory back- p shelf life span of approximately
125 days if the pager is t rned off. After this period the pager may lose any stored messages nless the
pager is re-charged.
Doc No.102-1050M - X5 User Reference Manual 7 of 60

It is therefore recommended that the pager not be stored for long periods of time witho t se.
Figure 1: X5 Deliverables
Doc No.102-1050M - X5 User Reference Manual 8 of 60

Charging the Pager
The pager req ires recharging after several days of contin o s operation. Ideally, place the pager on
the charger d ring the periods when the pager is not in se. This will ens re the pager remains f lly
charged at all times. The pager's battery is of the Lithi m-Ion type and has no noticeable memory
effect. Over time, however, the capacity of the battery will grad ally red ce as the battery ages.
When the pager is first placed on the powered charger it will display the charger screen showing the
c rrent battery capacity. If the pager was t rned on before it was placed on the charger and a b tton is
pressed, the screen will show the Home Page. If the pager was t rned off before it was placed on the
charger, it will display the charging screen when a b tton is pressed. If the pager is t rned off while
charging and the green b tton is held for more than 2 seconds, the pager will t rn on.
Figure 2: Charging screen
If the pager is t rned on, placed on the charger and no b tton activity or alert activity occ rs, and after
the screen time-o t period, the X5 will display the charging screen for two min tes before t rning its
display off. If any b tton is pressed or a new message arrives while the pager's screen is t rned off, the
X5 will t rn the screen on and display the charging screen. To activate the home page press any b tton
while the charger screen is shown. After the screen time-o t has expired the charging screen will again
be displayed and the screen t rned off after an additional two min tes.
When the pager is on the charger the red LED on the top left side of the pager flashes to indicate the
charging state of the pager. The flashes indicate:
• once every second - the battery is recharging
• once every 2 seconds - the battery is f lly charged
• twice per second - the battery is <2% capacity, the nit will operate ntil the battery has more
charge
Doc No.102-1050M - X5 User Reference Manual 9 of 60

If the Wall Charger option has been ticked in the Screen Settings men , the screen will be inverted and
the navigation b ttons reversed while the pager is on the wall charger. Note that the Wall Charger
option is only available when the Screen Orientation Feature is enabled. The pager can still be
operated in a normal way, j st pside down. The screen will revert to the normal orientation when the
pager is removed from the charger.
When charged via the AC-Adaptor the pager sho ld f lly re-charge (from a completely discharged
state) in approximately 3 - 4 ho rs. When charging via the USB interface from an average comp ter it
will take 4 - 6 ho rs for a f ll re-charge. If the battery is f lly discharged it may take some min tes for
the pager to start p after being placed on the charger.
Note: If an alarm time or auto-on time as been set and t e pager is turned off and placed on
t e c arger, t e pager will automatically turn on w en t e alarm time or auto-on time is
due.
1.6 Charger Clip
The charger can operate horizontally on a flat s rface or vertically mo nted on the wall. When the
charger is wall mo nted the lock switch in the centre of the charger sho ld be set to locked. The pager
will click into the charger and be locked, th s preventing it from falling o t. The charger has been
designed to be wall-mo ntable with the power cable connected to the bottom of the nit and with the
cable handing down. Affix the charger to the wall by sliding it down onto 2 screws (not s pplied)
65mm apart.
If the charger is operated on a horizontal s rface the lock switch sho ld be set to nlocked so that the
pager easily lifts off the nit.
Doc No.102-1050M - X5 User Reference Manual 10 of 60
Figure 3: Wall charging

Buttons and Turning Pager On / Off
There are a total of six b ttons on the X5 pager. The directional b ttons are located at the bottom of
the pager. The MENU / SELECT b tton is located to the left above the directional b ttons and there is
a raised green dot above the b tton. It is in f t re th s referred to as the “green b tton”. The
CANCEL b tton is located to the right above the directional b ttons and there is a raised red dot above
the b tton. It shall be referred to as the “red b tton” henceforth.
Figure 4: The Buttons on the X5
1.7 MENU Button (Green)
The MENU b tton is sed in any sit ation where more information is req ired on a selected object or
an action is performed. For example, pressing the MENU b tton in the Inbox, Folder or Trash view
shows a pop- p men with specific men items for the men item that is c rrently selected. Pressing
the MENU b tton whilst in the main men view will make the System Men pop- p appear.
Doc No.102-1050M - X5 User Reference Manual 11 of 60

Figure 5: System Menu
1.8 CANCEL Button (Red)
The CANCEL b tton will abort the c rrent f nction and will close an open pop- p men witho t
selecting the c rrently highlighted option. It will take yo back to the main men view if pressed
repeatedly.
1.9 IRECTIONAL Buttons
The directional b ttons UP, DOWN, LEFT or RIGHT will navigate the men s. The UP or DOWN
b tton will move the men selector bar to the req ested option, the RIGHT b tton will select the men
while the LEFT b tton will exit the selected men or s b-men .
When a directional b tton is held down in one direction for more than one second, the b tton a to-
repeats at a rate of approximately one press every ¼ second to enable q ick scrolling thro gh lists and
options.
All s bseq ent references to the se of the directional b ttons are referred to as the UP, DOWN, LEFT
or RIGHT b ttons.
Doc No.102-1050M - X5 User Reference Manual 12 of 60

1.10 Turning the Pager On
The green MENU b tton is sed to t rn the pager on. Hold down the green MENU b tton for 3
seconds to t rn the pager on.
1.10.1 Pin lock security (optional)
The X5 pager has a 4 digit Personal Identification N mber (PIN) lock sec rity option. If this option is
enabled, a 4 digit code m st first be entered before the pager t rns on and can be sed. This prevents
na thorised persons from accessing messages on the X5 pager.
To enter the 4 digit PIN se the directional keys to select the digit in between the bl e arrow c rsor and
scroll thro gh the digits 0...9 sing the p or down keys. Use the left and right keys to select the digit to
change. Once the correct PIN is “dialled in”, press the MENU b tton to accept the PIN. If the PIN was
entered correctly, the pager t rns on. If the PIN was entered incorrectly, the pager will t rn off and the
PIN-Lock error co nt will be incremented. If a PIN has been entered incorrectly for 10 times, the pager
will permanently lock and can only be nlocked by reprogramming the pager sing the programming
software. Press the MENU b tton to p t the pager into reprogramming mode. A s ccessf l login will
reset the PIN lock co nter.
The PIN login process is omitted, if a PIN has not been set d ring programming the pager with the
programming software. A PIN val e of 0 will bypass the login process.
Note: Pressing t e CANCEL button during t e login process will turn t e pager off wit out
incrementing t e login error counter.
Note: If an alarm time or auto-on time as been set and t e pager is configured wit a PIN, t e
login process is bypassed w en t e pager automatically turns on at t e set time.
Doc No.102-1050M - X5 User Reference Manual 13 of 60
Figure 6: PIN lock login Figure 7: Pager permanently
locked.

1.10.2 Starting the X5 pager application
Yo will see the display light p with a “Starting...” message. The pager will then so nd the t rn-on
alert and the home screen will be displayed.
Figure 8: Home Page Vie
1.11 Turning the Pager Off
While in the main men view press the green MENU b tton to pop- p the system men . Select the
Off... men f nction by moving the selection bar with the UP or DOWN b tton ntil the word “Off...”
is highlighted and then press the RIGHT b tton. Yo have the option to either t rn the pager off or
place the pager into “Flight mode”. Select “Turn off” and press the RIGHT b tton. The “Turn off”
Doc No.102-1050M - X5 User Reference Manual 14 of 60
Figure 9: Turn-Off Dialogue

warning dialog e will pop p. Pressing the green MENU b tton will confirm the dialog e and the
pager will be t rned off.
Note: W en t e pager is turned off t e pager will no longer receive any messages!
Placing t e pager on t e powered c arging unit will display t e c arging screen but t e
pager will remain turned off.
Note: T e pager cannot be turned off w ilst t e Key Lock is on. If t e pager is set to Holster
Key Lock Enabled, t en t e pager cannot be turned off w ilst in t e olster.
For more information on Key Lock see 6.6 Holster Lock.
1.11.1 Activating Flight mode
The X5 pager has a special mode where the receiver circ itry is completely t rned off b t all other
f nctionality remains on. This is sef l when sing the pager on a plane to read or organise stored
messages or se the pager's clock or alarm f nctionality or simply to play one of the games available
on the pager if made accessible. The battery live of the pager is also extended in Flight mode, however,
the pager will not receive any messages while set to Flight mode. So make s re to deactivate Flight
mode when disembarking the plane.
From the main page press the MENU b tton to pop- p the system men . Select the Off... men
f nction by moving the selection bar with the UP or DOWN b tton ntil the word “Off...” is
highlighted and then press the RIGHT b tton. Select Flight mode and press the RIGHT b tton.
A little plane icon will be shown instead of the aerial icon to indicate that the pager is now in flight
mode. The pager will remain in flight mode ntil it is taken o t of flight mode by pressing the MENU
b tton, selecting Off... and then Cancel flight mode.
Warning: T e pager will not receive any messages w ile in Flig t mode!
Doc No.102-1050M - X5 User Reference Manual 15 of 60
Figure 10: Flight mode

Understanding the Home Screen
When the pager is t rned on, the first screen that appears is the “Home” screen.
Figure 11: Home Page in Detail
1.12 Elements of the Home Screen
The Home Screen is divided into three sections, the stat s icon display and battery level indicator, the
date and time display and the main men with scrollbar and selector.
1.12.1 Status Icons and Battery Level Indicator
The stat s icons show the c rrent state of the receiver stat s, alerting set p, alarm clock or charger
stat s. The battery level shows the remaining capacity of the re-chargeable battery.
POCSAG/FLEX-Signal present indicator
So nd Alert enabled
Vibrating Alert enabled
Alarm clock enabled
Pager is placed on charger
Flight mode active (pager receiver permanently switched off)
Doc No.102-1050M - X5 User Reference Manual 16 of 60

A battery icon with 6 discrete levels, ranging from almost empty to f ll, indicates the battery level. The
pager alerts yo when the battery drops to a level (<15%) where message reception is compromised,
and prompts yo to re-charge the battery. For optim m message reliability, re-charge the battery as
soon as the low battery alert is received.
1.12.2 ate and Time isplay
The date and time display shows the c rrent date and time of the real-time clock of the pager. Its format
can be changed to display the time in 12-ho r or 24-ho r format in the Clock men .
1.12.3 Home Page Navigation List
The home page navigation list consists of the following options:
Inbox (special message folder), Folders, Trash (special message folder), the Clock men and the Abo t
men .
A list item is selected by sing the UP and DOWN b ttons of the pager. The selected item is activated
by pressing the RIGHT b tton.
1.13 Inbox Page
Entering the Inbox view by selecting the Inbox item and pressing the RIGHT b tton will enter the
message view of the Inbox folder. The Inbox folder is a special folder and all messages that have not
been assigned a specific folder by their capcode will appear here by defa lt. The received messages in
the Inbox are shown with the latest message at the top of the screen. Using the DOWN b tton the
message can be paged down or if the message was displayed entirely on the screen the DOWN b tton
will j mp to the next message. The c rrently selected message is shown in black on a white
backgro nd while other messages are shown light grey. The UP b tton will scroll the message view to
the next newer message.
Pressing the green MENU b tton will open the Inbox pop- p men .
Doc No.102-1050M - X5 User Reference Manual 17 of 60

Figure 12: Inbox Pop-up Menu
• The Inbox pop- p men provides f nctionality to organise the messages in the Inbox folder.
Go to top will scroll to the very top of the display and display the most recently received
message of the Inbox folder.
• Message men will open a s b-men to organise the c rrently highlighted message.
Figure 13: Message Sub-menu
• Move to will move the c rrently selected message to a different folder
• Delete will move the c rrently selected message to the Trash folder
• Protect. This option will protect the c rrent message from accidental deletion. A protected
message cannot be deleted or moved to another folder. A tick in the Protect box will show that
the c rrent message is protected. F rthermore a protected message shows the word SAFE in
the right corner of the message heading.
Doc No.102-1050M - X5 User Reference Manual 18 of 60

• Delete all... will move all messages except the protected messages to the Trash folder.
• Alerts men will open the Alert s b-men for the Inbox folder.
Figure 14: Alerts Menu
• Alert on all. If this option is ticked the pager will generate an alert on every received message
that is destined for the Inbox folder.
• Key ords... men . With this men a list of keywords can be created and the pager will only
alert if a message is received that contains one of the keywords in the Keywords list.
Note: T e Alert on all option must be disabled (unticked) for t is.
For details on how to enter keywords with the X5 On-Screen keyboard see 1.13.1 Using the X5
On-Screen Keyboard
• Tone... men . The Tone... men selects the alert t ne that is played when a message for the
Inbox folder is received. To select a t ne, highlight the req ested t ne sing the UP and
DOWN b ttons, then press the RIGHT b tton to select the t ne. Pressing the LEFT or red
CANCEL b tton will abandon selection of the alert t ne and will leave the c rrently selected
alert t ne nchanged.
Doc No.102-1050M - X5 User Reference Manual 19 of 60

Figure 15: Alert Tune Selection
• The Capcodes men allows the ser to enable or disable a capcode, provided it has not been
programmed as locked. If a capcode can be enabled or disabled it is shown with a small
selector box in front of the capcode. To toggle the state of the capcode, select the capcode with
the UP or DOWN b tton and then press the RIGHT b tton to change its state. A disabled
( nticked) capcode will not receive any messages! Only nlocked capcodes can be modified
via OTA capcode programming. A locked capcode can not be disabled or deleted via OTA
capcode programming or by the ser.
• Large font will select a larger (15-point) font for the message display than the standard (12-
point) font.
Note: T is setting affects message text font size in all folders.
1.13.1 Using the X5 On-Screen Keyboard
The X5 incorporate a powerf l On-Screen Keyboard to enter text into the pager. This keyboard is sed
to edit folder names, keywords, etc. The top line of the display shows the created word with a red
c rsor. Using the UP, DOWN, LEFT and RIGHT b ttons select the character to be entered, then press
the green MENU/SELECT b tton to enter the desired character. The Shift key will toggle between
pper and lower case characters. The keyboard will a tomatically revert back to lower case characters
once an pper case character has been entered, nless the keyboard has been locked in the c rrent shift
state with the Lock b tton.
Select the Alt b tton to access special keys. The keyboard will change to display p nct ation and
special characters, for example with mla ts. The set of characters will depend on the lang age version
of the pager software).
Once the word had been completely entered, select the Enter key and confirm with the green
MENU/SELECT b tton.
Doc No.102-1050M - X5 User Reference Manual 20 of 60
Table of contents
Popular Pager manuals by other brands

Blackbe;rry
Blackbe;rry SKYTEL Service instructions

Embedded Processor Designs
Embedded Processor Designs The InfoCube operating guide

EKOTEK
EKOTEK 2WPAG Quick instructions

DynaFine
DynaFine Legend Installation and operating instruction manual

pagertec
pagertec TRACKSTAFF V3 user guide

Sun Telecom
Sun Telecom Flex T5 user manual