Ingersoll 4018 User manual

COMPACT TRACTORS
4018, 4021, 4023
4218, 4221, 4223
Operator’s Manual 8-61220
Ingersoll Tractor Co. Portland, Maine 04103
casecoltingersoll.com
2
casecoltingersoll.com

3
TABLE OF CONTENTS
SAFETY MESSAGES ............................................................................................4-9
TO THE OWNER.....................................................................................................10
PRODUCT IDENTIFICATION (PIN) OR SERIAL NUMBERS (S/N).......................11
OPERATING INSTRUCTIONS..........................................................................12-20
Operating Controls and Instruments ...............................................................12-15
Prestarting Check List ..........................................................................................16
Break-in Procedure...............................................................................................16
Starting Procedure................................................................................................17
Stopping Procedure..............................................................................................18
Operating Procedure.......................................................................................19-20
TROUBLESHOOTING GUIDE................................................................................21
PREVENTIVE MAINTENANCE .........................................................................22-36
Maintenance Chart...............................................................................................23
Capacities.............................................................................................................23
Specifications .......................................................................................................24
Over All Measurements........................................................................................25
Wiring Diagram................................................................................................26-27
Storage Battery.....................................................................................................28
Jumper Cables and Booster Battery ....................................................................28
Headlights.............................................................................................................29
Fuse......................................................................................................................29
Attachment Drive Clutch Break-in Procedure ......................................................29
Brake ....................................................................................................................30
Fuel.......................................................................................................................31
Hydraulic Oil.........................................................................................................32
Hydraulic Oil Cooler..............................................................................................33
Hydraulic Oil Filter................................................................................................33
Seat ......................................................................................................................34
Transaxle..............................................................................................................34
Chassis Lubrication..............................................................................................35
Steering Adjustment.............................................................................................36
Toe-in Adjustment ................................................................................................36
MANUAL ORDERING PROCEDURE.....................................................................37
casecoltingersoll.com

4
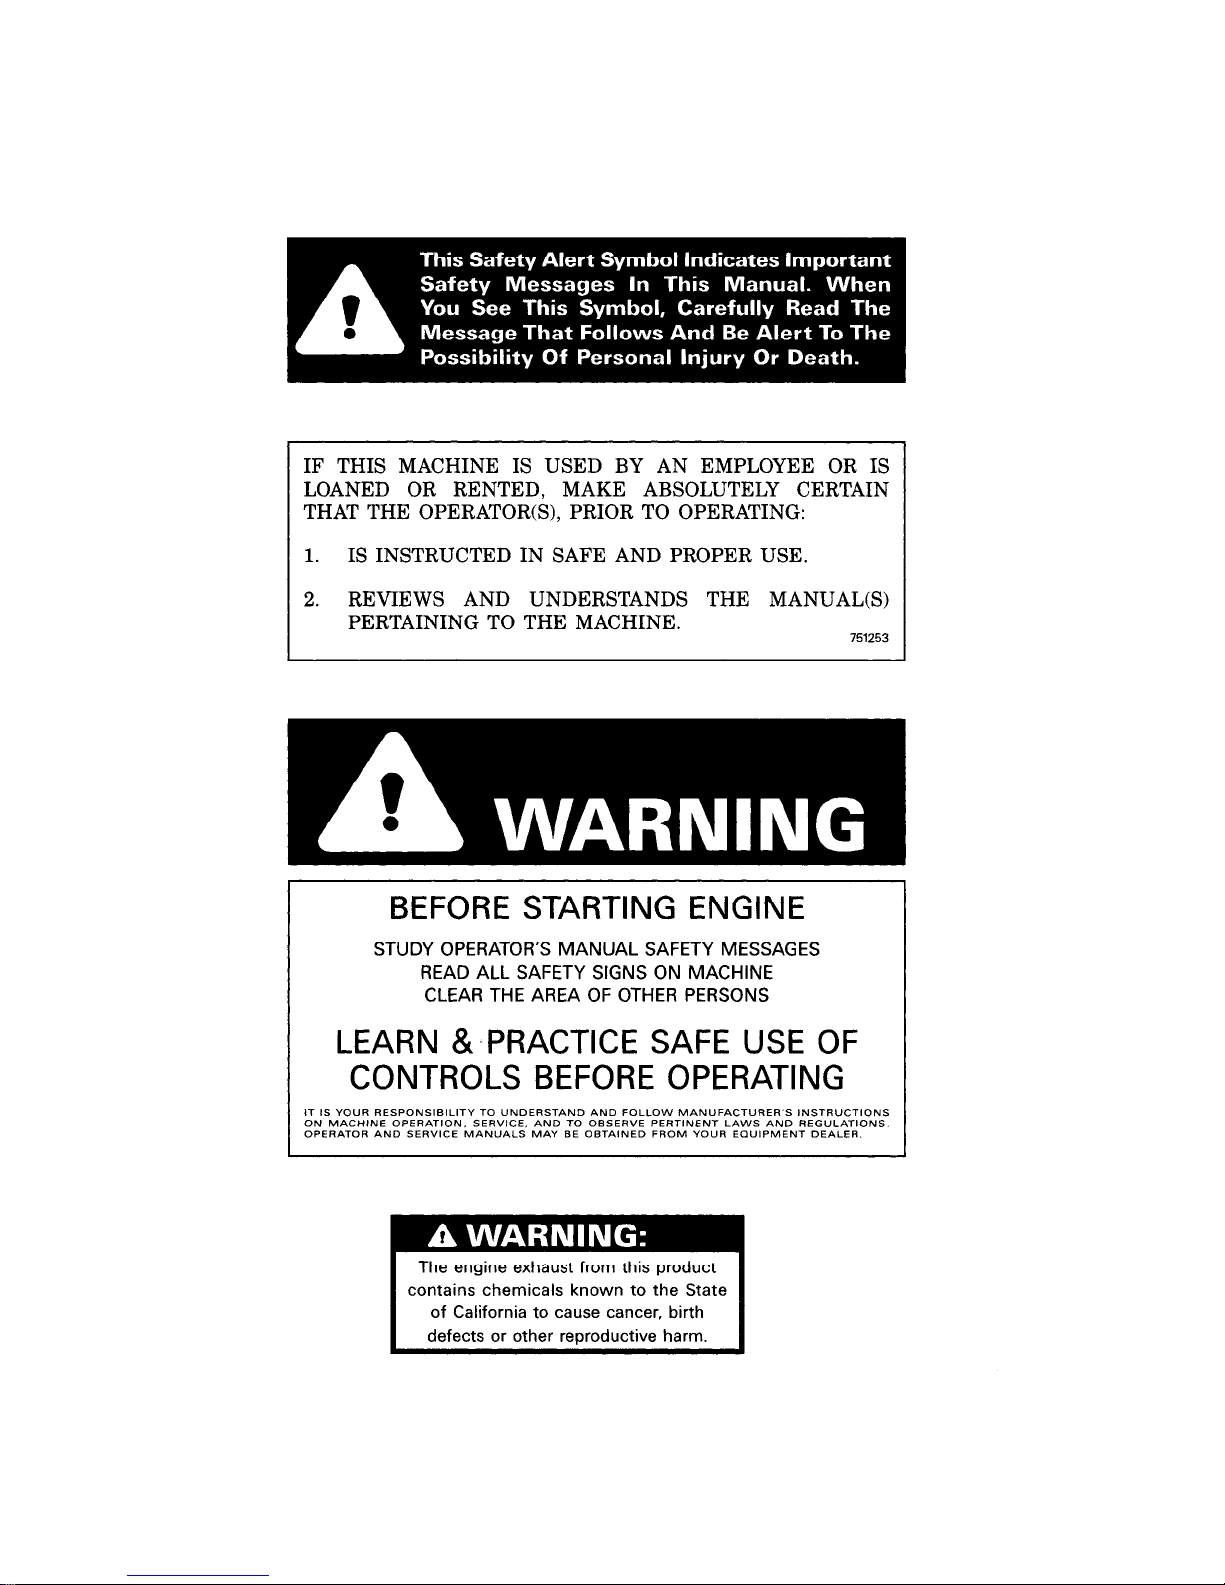
SAFETY MESSAGES
The first twenty-five safety messages which follow are
provided by the American National Standards Institute
*(ANSI). Safety rules to supplement those provided by
ANSI also appear on the following pages.
Study these rules carefully before starting and
operating your tractor.
Separate Operator’s Manuals are
provided with the attachments
purchased with your tractor. Refer
to the appropriate attachment
operator's manual for specific
operating instructions and safety
messages that apply to the
attachment.
CAUTION: Know the controls and
how to stop quickly. READ THE
OWNER’S MANUAL and
instructions furnished with
attachments.
CAUTION: Do not allow children
to operate the vehicle. Do not allow
adults to operate it without proper
instruction.
CAUTION: Do not carry
passengers. Do not mow when
children and others are around.
CAUTION: Clear the work area of
objects (wires, rocks etc.), which
might be picked up and thrown.
CAUTION: Disengage all attach-
ment clutches and shift into
neutral before attempting to start
the engine (motor).
CAUTION: Disengage power to
attachment(s) and stop the engine
(motor) before leaving the
operator’s position.
CAUTION: Disengage power to
attachment(s) and stop the engine
(motor) before making any repairs
or adjustments.
CAUTION: Disengage power to
attachment(s) when transporting
or not in use.
CAUTION: Take all possible
precautions when leaving the
vehicle unattended, such as
disengaging the power take-off,
lowering the attachment(s),
shifting into neutral, setting the
parking brake, stopping the
engine, and removing the key.
CAUTION: Do not stop or start
suddenly when going uphill or
downhill. Mow down the face of
steep slopes; never across or up
the face. (This ANSI rule modified)
CAUTION: Reduce speed and
exercise extreme caution on
slopes and in sharp turns to pre-
vent tipping or loss of control. Be
especially cautious when
changing direction on slopes.
CAUTION: Stay alert for holes
rocks and roots in the terrain and
other hidden hazards. Keep away
from drop-offs.
CAUTION: Use care when pulling
loads or using heavy equipment.
a.Use only approved drawbar
hitch points.
b.Limit loads to those you can
safely control.
c.Do not turn sharply. Use care
when backing.
d.Use counterweights or wheel
weights when suggested in the
owner’s manual.
CAUTION: Watch out for traffic
when crossing or near roadways.
casecoltingersoll.com

5
CAUTION: When using any at-
tachments, never direct discharge
of material toward bystanders nor
allow anyone near the vehicle while
in operation.
CAUTION: Handle gasoline with
care—it is highly flammable.
a. Use approved gasoline container.
b. Never remove the cap of the fuel
tank or add gasoline to a running
or hot engine, or fill the fuel tank
indoors. Wipe up spilled
gasoline.
c. Open doors if the engine is run in
the garage—exhaust fumes are
dangerous. Do not run the
engine (motor) indoors.
CAUTION: Keep the vehicle and
attachments in good operating
condition, and keep safety devices
in place and in working condition.
CAUTION: Keep all nuts, bolts
and screws tight to be sure the
equipment is in safe working
condition.
CAUTION: Never store the
equipment with gasoline in the tank
inside a building where fumes may
reach an open flame or spark. Allow
the engine to cool before storing in
any enclosure.
CAUTION: To reduce fire
hazard, keep the engine free of
grass, leaves, or excessive grease.
CAUTION: The vehicle and at-
tachments should be stopped and
inspected for damage after striking
a foreign object, and the damage
should be repaired before restarting
and operating the equipment.
CAUTION: Do not change the
engine governor settings or over
speed the engine.
CAUTION: When using the vehicle
with mower, proceed as follows:
(1) Mow only in daylight or in
good artificial light.
(2) Never make a cutting height
adjustment while the engine
(motor) is running if the
operator must dismount to do
so.
(3) Shut the engine (motor) off
when removing the grass
catcher or unclogged chute.
(4) Check the blade mounting
bolts for proper tightness at
frequent intervals.
CAUTION: Under normal usage,
the grass catcher bag material is
subject to deterioration and wear.
Check bag frequently for deterio-
ration and wear and replace worn
bags. Check that replacement
bags comply with the original
manufacturer’s recommendations
or specifications.
CAUTION: Set parking brake, shut
off engine, remove key and wait
until all engine and attachment
motion has stopped before
dismounting from the operator’s
seat.
CAUTION: Do not wear loose
clothing, which may catch in
moving parts.
CAUTION: Do not smoke when
working near fuel.
CAUTION: Drive at a speed slow
enough to insure safety and
complete control at all times.
casecoltingersoll.com

6
WARNING: Highway travel should
be avoided. If necessary, use SMV
safety emblem and lights for
adequate warning to the operators
of other vehicles. Check local
government regulations.
CAUTION: Read operator’s
manual.
Know location and function of all
controls.
Keep all shields and safety
switches functional.
Before starting engine: disengage
attachment drive and place travel
control in neutral.
Remove objects from the terrain
that could be thrown by the
attachment.
Keep people and pets a safe
distance away.
Never carry passengers.
Always look behind tractor before
backing.
On any incline that the tractor can
be safely operated use low
range/gear.
Front end tip over can occur
when operating on loading ramps
or hills, back up ramps or hills.
Drive forward going down ramps
or hills.
To park tractor: place travel
control in neutral, set parking
brake, disengage attachment drive,
shut engine off and remove key.
Park tractor before servicing or
making adjustments to tractor or
attachments.
Failure to observe these
precautions could result in serious
injury or death.
CAUTION: Place the transmission
in neutral, set the parking brake
and stop the engine before
standing between the tractor and
attachment when hitching.
Become thoroughly familiar with
all tractor and attachment controls
before operating.
WARNING: Improper operation
of your tractor on hillsides and
slopes can be dangerous. Avoid
improper operation! Read and
follow the instructions given in
the section titled “Hillside
Operation” in this manual before
operating your tractor.
CAUTION: If necessary to move
tractor on a trailer, always back up
onto the trailer and drive off the
trailer
CAUTION: Hydraulic systems are
highly pressurized. Escaping
hydraulic oil, even an invisible
pinhole leak, can penetrate body
tissues causing serious injury.
Use a piece of wood or cardboard
when looking for leaks— never
use the hands or other parts of the
body.
Relieve hydraulic pressure before
disconnecting circuits. When
reassembling, make absolutely
certain that all connections are
tight
If injured by hydraulic oil escaping
under pressure, see a doctor
immediately. Serious complica-
tions may arise if medical atten-
tion is not given at once.
CAUTION: Too much air pressure
in the tires can cause tire or rim
failure. Never put more air
pressure in a tire than specified in
the operator’s manual or on the
sidewall of the tire. If the tire or rim
explodes because of too much
pressure, injury can result.
CAUTION: When removing a
battery, always disconnect the (-)
negative ground cable first. When
installing the battery, always
connect the (-) negative ground
cable last.
CAUTION: Storage areas for
batteries must be well ventilated to
prevent accumulation of hydrogen
gas from newly recharged
batteries.
DANGER: Batteries produce ex-
plosive charges. Keep sparks,
flame and cigarettes away. Ven-
tilate when charging or using in
enclosed space. Always shield
eyes when working near batteries.
casecoltingersoll.com

7
CAUTION: When working
around storage batteries,
remember that all of the expos-
ed metal parts are “live”. Never
lay a metal object across the
terminals as a spark or short
circuit may result. Sparks,
lighted matches and exposed
flames must be kept away from
the battery due to the presence
of explosive gas in the battery.
The liquid in the batteries is
acid. Use care not to spill it on
hands or clothing.
POISON: Batteries contain
sulfuric acid, which can cause
severe burns. Avoid contact
with skin, eyes or clothing. An-
tidote: EXTERNAL, flush with
water; INTERNAL, drink large
quantities of water or milk.
Follow with milk of magnesia,
beaten egg or vegetable oil.
Call physician immediately;
EYES, flush with water for 15
minutes and get prompt
medical attention. Keep out of
reach of children.
WARNING: To jumpstart this
machine, connect positive
jumper cable to battery
terminal on starter solenoid
and connect negative jumper
cable to good engine ground.
Start engine only when seated
in operator’s seat. Stop engine
before leaving machine.
Disconnect jumper cables. Any
other method would result in
uncontrolled machine
movement.
CAUTION: Never wear rings or
metal watchbands when work-
ing with the tractor electrical
system or battery as you may
ground a live circuit.
CAUTION: Operate tractor
from proper seat position only.
Any other method could result
in a serious injury.
CAUTION: Before attempting
to service the attachment drive
clutch, be sure to remove
tractor key and spark plug
wire(s).
Remember, a careful operator is
always the best insurance against
an accident. Give complete and
undivided attention to the job at
hand.
Never operate machine while
under the influence of drugs or
alcohol.
CAUTION: Disengage power to
mower before backing up. Do not
mow in reverse unless absolutely
necessary and then only after
observation of the entire area
behind the mower.
CAUTION: When adjusting
steering wheel free play, make
certain that some free play
remains between the sector gear
and pinion gear. A tight fit, with no
clearance between the two gears,
may cause binding and tooth
failure.
IMPORTANT: Always install
new decals whenever the old
decals are destroyed, lost, painted
over or illegible. When individual
parts are replaced that have
decals attached, be sure to install
a new decal with the new part.
Replacement decals are available
from your dealer.
CAUTION: Do not drive in reverse
unless completely necessary while
your attachment is operating.
casecoltingersoll.com

8
HILLSIDE (SLOPE) OPERATION
WARNING: Improper operation of
your tractor on hillsides and slopes
can be dangerous. Avoid improper
operation! Read and follow the
instructions given in the section titled
“Hillside Operation” in this manual
before operating your tractor.
Avoid operating tractor on hillsides and slopes. To
minimize the possibility of accidents while operating on
hills and/rough terrain, obey a combination of rules,
practices and good common sense.
These include:
1. Reading, understanding, and obeying all written
safety messages appearing on decals on the
machine and in operator’s manuals.
2. Learning from your operator’s manual and carefully
from EXPERIENCE how to operate your tractor
correctly. Know your tractor’s limitations.
3. Knowing the terrain on which you are operating
your tractor. There are terrain conditions on which
your tractor cannot be operated!
4. Learning to expect changes in operating con-
ditions. Adding or removing attachments or weight
to your tractor will make your tractor perform
differently. Rain, snow, loose gravel, wet grass,
etc., change the tractive conditions of the terrain
requiring changes in your operating technique or
not to operate on that terrain.
The following paragraphs will cover these practices
one at a time. Read and study them. The examples
provided are not all inclusive but will give you a firm
understanding of the requirements for avoiding ac-
cidents while operating your tractor.
THE OPERATOR IS THE SOLE JUDGE AS TO THE
DEGREE OF SLOPE ON WHICH THIS TRACTOR
CAN BE SAFELY OPERATED. IF IN DOUBT THAT
THIS TRACTOR CAN BE SAFELY OPERATED ON A
PARTICULAR SLOPE, DO NOT OPERATE ON THAT
SLOPE! COMMON SENSE MUST PREVAIL.
Read, Understand, Obey:
Safety messages are found on the tractor and in the
operator’s manuals. These must be understood by the
tractor operator to be of value. Be sure that these
messages are studied before starting and/or operating
the tractor by an operator not familiar with this
particular tractor.
Learn to Operate:
Learn your tractor’s controls from decals on the tractor
and from instructions in the operator’s manual. Practice
how to properly manipulate these controls. Practice
must be done in a flat area, clear of obstacles and
bystanders. Learn your tractor’s operating
characteristics and limitations. These include:
a. amount of engine power available
b. engine governor response
c. tractive ability
d. steering characteristics
e. braking characteristics
f. movement of travel lever
g. forward and reverse ground speeds
h. speed of attachment lift
I. and others
Attempting any operation, which approaches or ex-
ceeds the tractor’s limitation is risking an accident.
Know the Terrain:
Know the terrain on which you are working. Find hidden
obstacles by walking through and inspecting the area
prior to operating your tractor on it. Mark obstacles,
such as, rocks, ruts or holes with a 6 ft. long pole and
red flag and stay well clear of these obstacles when
operating.
Operate your tractor at a ground speed slow enough to
insure complete control at all times.
Place the transmission in low gear and regulate the
throttle control lever slowly and smoothly to maintain
this safe speed. Do not stop on a hill or slope to change
gears.
Always drive in a forward direction when proceeding
downhill. Never drive up a hill. If necessary, back up a
hill to the desired position. Always back up loading
ramps and tilt bed trailers. If necessary to turn while on
a hill, always turn downward.
Your judgment, based on operating experience is the
final word in deciding if you should negotiate any given
hill or slope. If you are in doubt about safety, STAY OFF
THE SLOPE.
Under no circumstances should an inexperienced
operator attempt to use your tractor on slopes or
hillsides.
casecoltingersoll.com

9
You may encounter some terrain on which your tractor
cannot be operated even if a different piece of
equipment has operated there in the past.
Learn to Compensate for Changes in Operating
Conditions:
Adding or removing attachments or ballast (such as
wheel weights or fluid) change the weight and weight
distribution of your tractor and, therefore, changes your
tractor’s operating characteristics.
Be alert to these changes. Practice operating the
tractor after each change has been made.
Adding an attachment (weight) to the rear of the tractor
reduces the weight on the front axle. Adding an
attachment (weight) to the front of the tractor reduces
weight on the rear of the tractor. You must add
counterweight to the front if rear mounted attachment
is installed. You must add counterweight to the rear if a
front mounted attachment is installed.
Tractive conditions will vary with weather and terrain
and equipment.
Areas wet with dew or rain will be more slippery than
when dry. Areas covered with loose gravel are more
slippery than firm dry ground. Greater stopping
distances are required in these slippery areas.
Spinning rear wheels tend to move the tractor
sideways. The addition of tire chains will provide more
traction to the rear wheels in the forward-reverse
direction but less stability in the sideways direction.
Chains will cause more abrupt starting and stopping.
The final word in safe tractor operation rests on your
judgment.
If in doubt of your safety, STAY OFF THE SLOPE.
casecoltingersoll.com

10
The words “Right, Left, Front and Rear” as used in
this manual indicate directions when you are in the
o
p
erator’s seat in the normal o
p
eratin
g
p
osition.
TO THE OWNER
The Maintenance you give your new tractor is impor-
tant. Use this manual as your guide. Follow these
instructions and tips to make sure your tractor oper-
ates efficiently for many years.
We are a factory authorized dealer. We have replace-
ment parts which are the same as the original equip-
ment.
If you need additional aid or information, contact us.
Your Authorized Dealer
NOTE: Ingersoll Tractor Co., reserves the right to
make improvements in design or changes in
specifications at any time without incurring
any obligation to install them on units
previously sold.
IMPORTANT: This manual covers many different
model tractors. The illustrations used
in this manual may not be of your
tractor.
NOTICE
A spark arrester or spark arrester muffler must be
used on some machines. Check the laws in your area.
Some states have regulations for the use of this ma-
chine in agriculture, forestry and construction. These
laws control the maintenance of spark arrester equip-
ment. These laws also control the installation of spark
arrester equipment on the exhaust system of naturally
aspirated engines (engines without a turbocharger).
RADIO INTERFERENCE REGULATIONS OF
CANADA
Tractors taken into Canada after September 1, 1976
must have resistor spark plugs.
Resistor spark plugs and resistor wires for the spark
plug must be used for replacement.
RIGHT HAND AND LEFT HAND IDENTIFICATION
FIGURE 1
casecoltingersoll.com
11
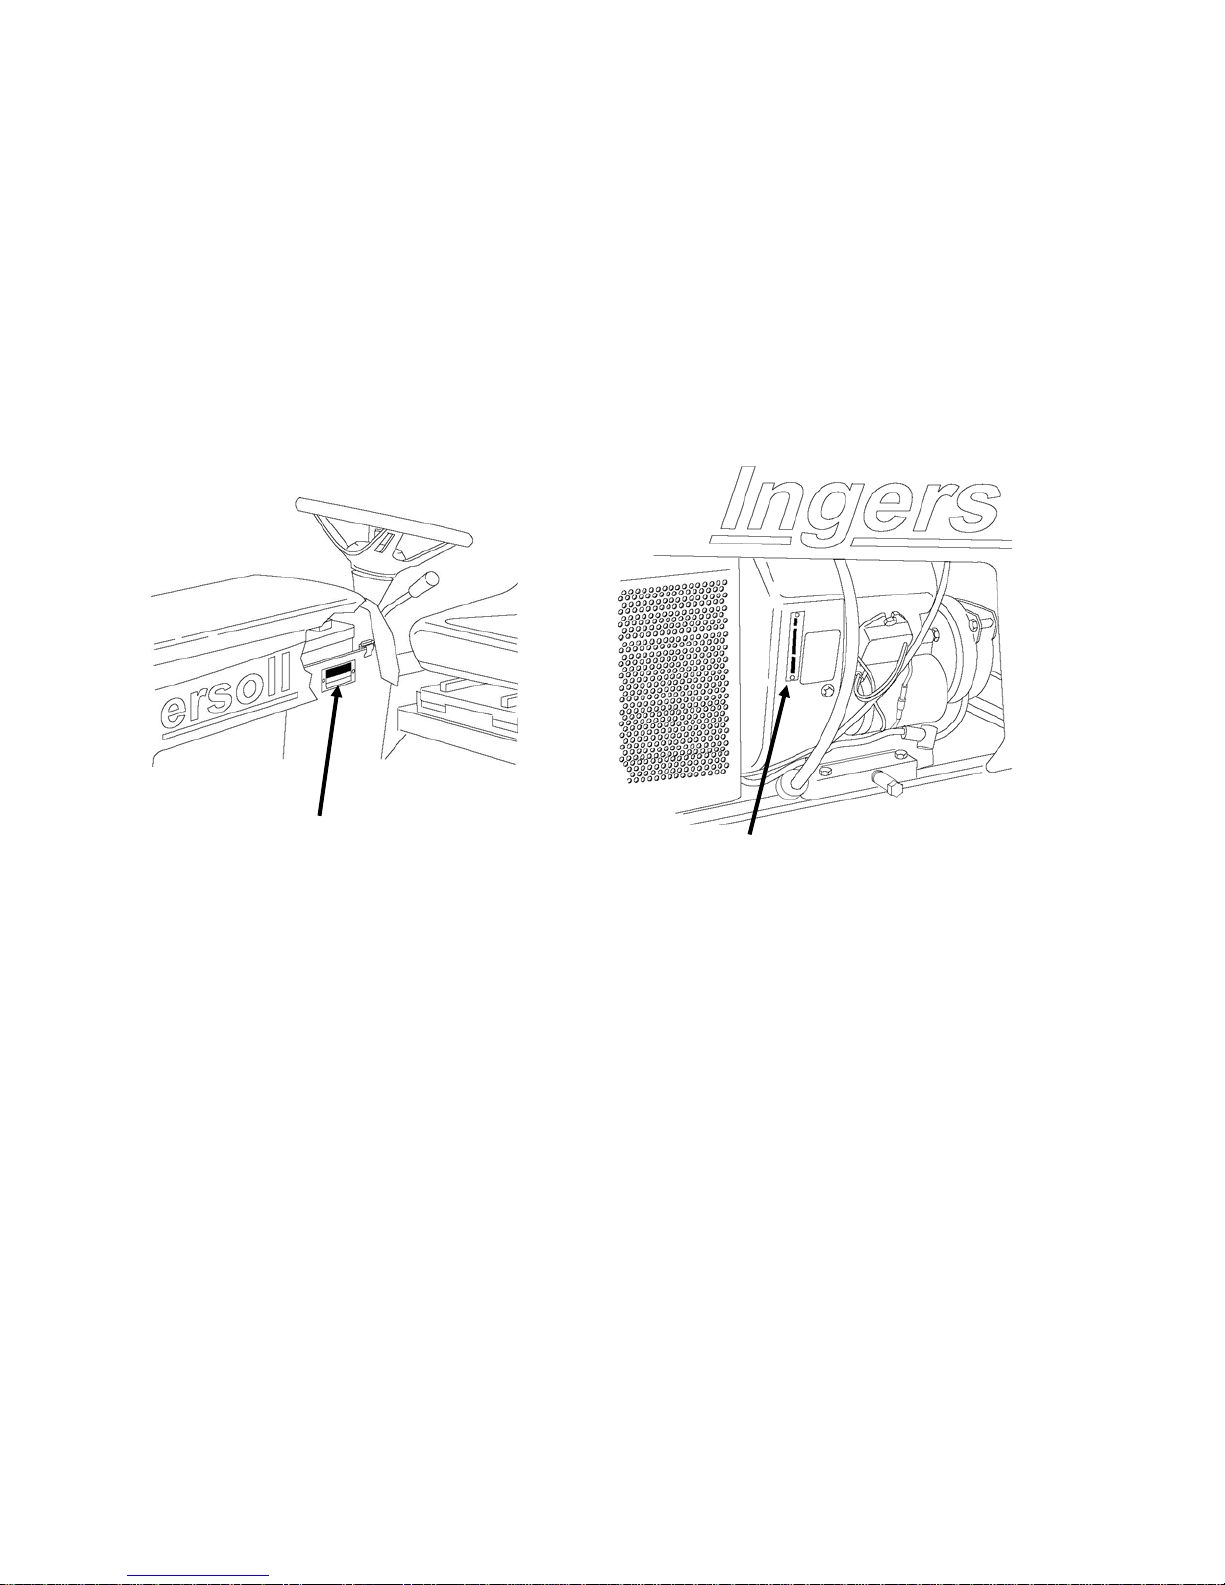
PRODUCT IDENTIFICATION NUMBER (P.I.N.)
OR SERIAL NUMBER
When you need parts or information, or when you
write to your authorized dealer, always give the: For reference, write the numbers below
1. Tractor Model Number -----------------------------------------------------------
2. Tractor Product Identification Number (P.l.N.) -----------------------------------------------------------
3. Engine Model Number -----------------------------------------------------------
4. Engine Serial Number -----------------------------------------------------------
5. Engine Specification Number -----------------------------------------------------------
TRACTOR MODEL AND
PRODUCT IDENTIFICATION
NUMBER
FIGURE 2 BRIGGS & STRATTON ENGINE
FIGURE 3
ENGINE MODEL,SERIAL AND
SPECIFICATION NUMBERS
casecoltingersoll.com

12
OPERATING INSTRUCTIONS
CAUTION: Operate tractor from
proper seat position only. Any
other method could result in a
serious injury.
Become thoroughly familiar with all
tractor and attachment controls
before operating.
CAUTION: Know the controls and
how to stop quickly. READ THE
OWNER’S MANUAL and
instructions furnished with
attachments.
Never operate machine while under
the influence of drugs or alcohol.
1. IGNITION KEY AND STARTER SWITCH
TO START: Turn the key to the right and hold in
the “START” position.
TO RUN: Release the key to the “RUN” position
when the engine starts.
TO STOP: Turn the key to the left to the “OFF”
position.
2. CHOKE
TO CLOSE THE CHOKE: Push the choke lever
forward. Close the choke to start a cold engine.
TO OPEN THE CHOKE: Pull the choke lever
rearward. Open the choke slowly after the
engine starts.
The choke must be open during normal
operation or when you start a warm engine.
3. THROTTLE
ENGINE LOW IDLE: Pull the throttle lever
rearward. Put the throttle in the “SLOW” position
when starting and when stopping the engine.
This permits a warming and cooling period.
TO INCREASE ENGINE SPEED: Push the
throttle lever forward until the needed engine
speed is reached.
Decrease the engine speed during operation for
maximum fuel efficiency. Do not cause engine
lugging. Lugging will cause too much heat and
damage to the engine.
CAUTION: Do not change the engine
governor settings or over speed the
engine.
4. HEADLIGHTS
TO ILLUMINATE: Press the switch to illuminate
the headlights.
TO TURN OFF: Press the switch to turn off the
headlights
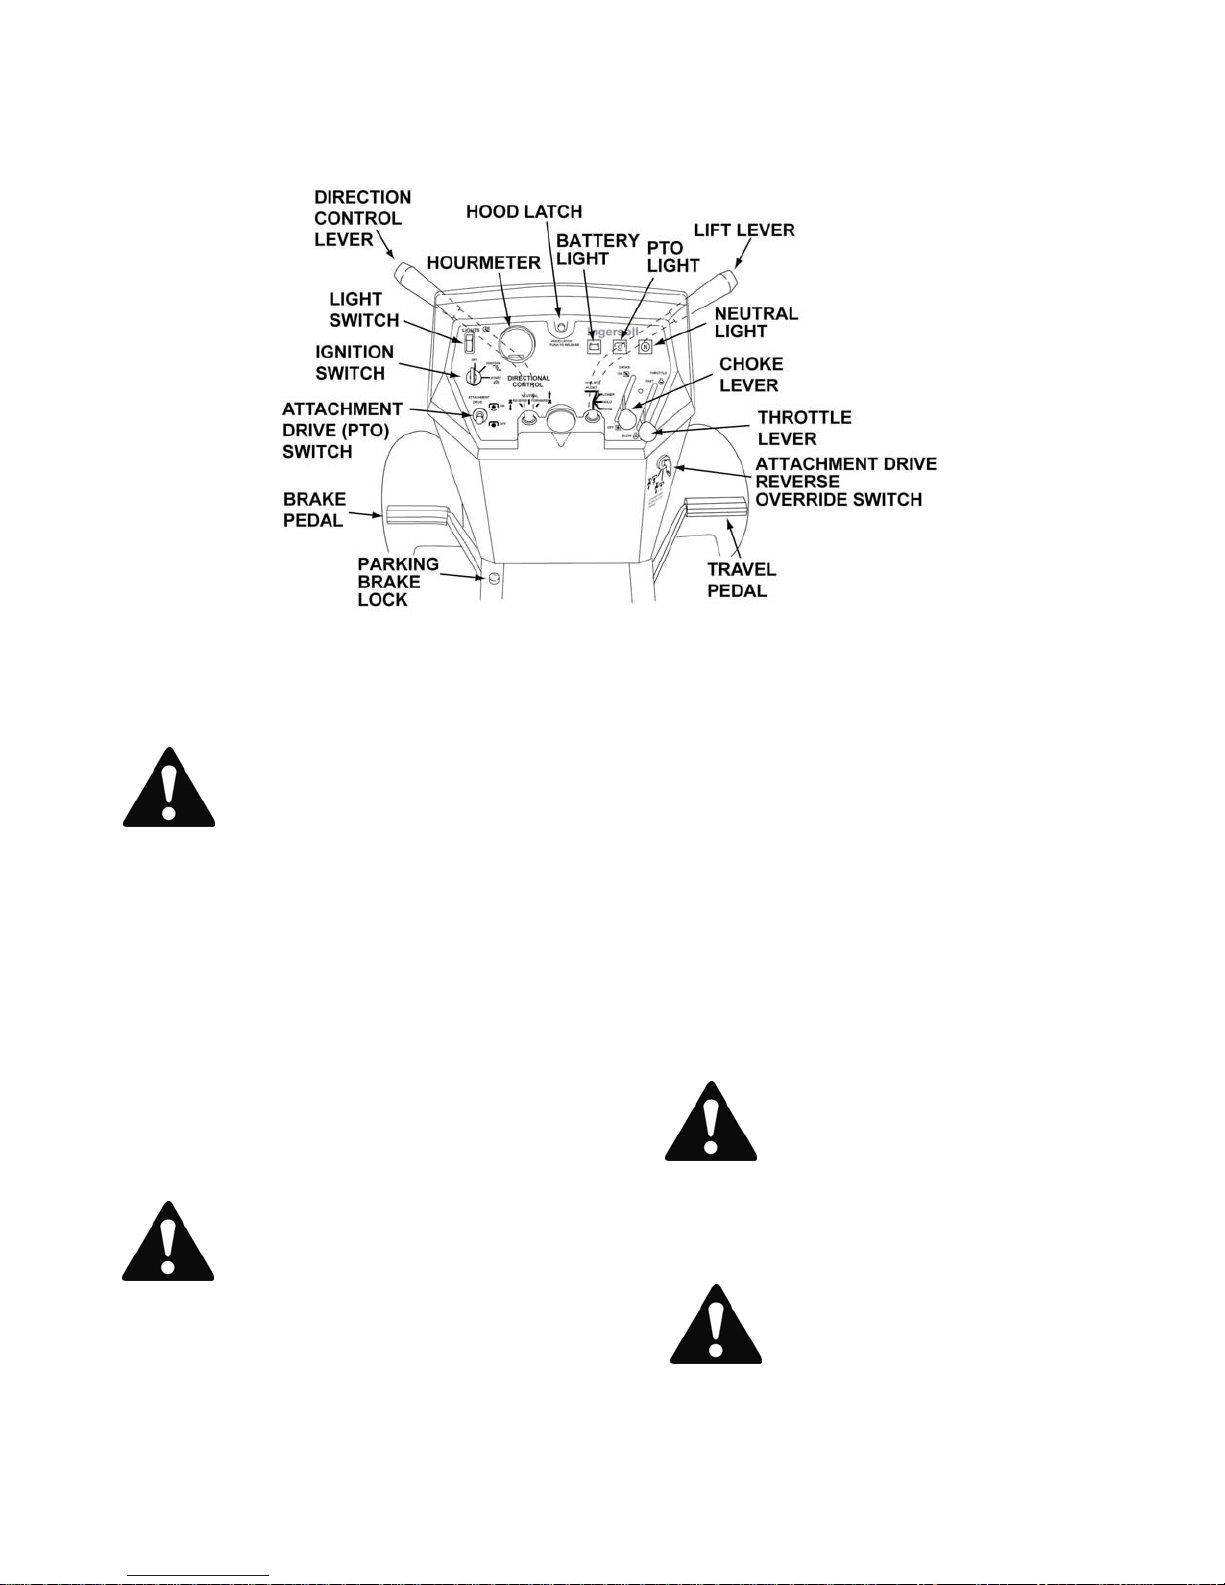
OPERATING CONTROLS AND INSTRUMENTS
FIGURE 4
casecoltingersoll.com

13
5. BATTERY VOLTAGE INDICATOR LIGHT
The battery voltage indicator light will illuminate
when the battery voltage is low and will go out
when the battery voltage is acceptable.
It is normal for the tight to illuminate when the
tractor is first started after a period of non-use and
to glow when the tractor engine is operated at low
idle speed.
Stop the engine and have the problem corrected if
the indicator light does not go out after running the
engine at normal operating speed after a few
minutes of operation.
It is normal for the Battery Voltage Indicator Light
to remain out if the engine is stopped when the
battery is fully charged and the ignition key is
turned to the “run” position.
6. HOUR METER
The electric hourmeter records hours of operation
whenever the key is in the “RUN” position.
Utilize the hourmeter to meet the required
maintenance schedule.
7. BRAKE PEDAL
TO ACTUATE THE BRAKE: Push the brake pedal
fully down.
This action will return the travel control lever to the
“NEUTRAL” position on 4000 series tractors. The
tractor will come to a quick stop.
NOTE: Do not use the above method if possible.
The tractor can be stopped smoothly by slowly
returning the travel control lever to the “NEUTRAL”
position on 4000 series tractors or slowly raising
the TRAVEL PEDAL on 4200 series tractors.
Actuate the brake fully if you can not stop the trac-
tor with the travel control lever (4000 series) or
travel pedal (4200 series).
See the Operating Procedure Section of this
manual for a more complete description of
stopping travel.
8. PARKING BRAKE LOCK
TO ENGAGE: Push the brake pedal fully down.
Push down on the parking brake lock.
TO DISENGAGE: Push the brake pedal a small
amount and release.
A spring will disengage the parking brake lock.
9. HYDRAULIC ATTACHMENT LIFT LEVER
TO LIFT: Run the engine
Pull the lever rearward.
Release the lever when the needed height is
reached.
TO LOWER: Run the engine.
Push the lever forward a small amount.
Release the lever when the needed height is
reached.
When you release this lever, a spring will auto-
matically return the lever to the “NEUTRAL”
position.
THE “FLOAT” POSITON: Push the lever fully for-
ward.
A detent holds the lever in the “FLOAT” position.
The lever must be manually returned to the
“NEUTRAL” position from the “FLOAT” position.
The “FLOAT” position allows the attachment lift
arms to move with the attachment. This position is
not recommended for mowing operations as a poor
cut can result.
See the instructions included with each attachment
for correct attachment lift lever use.
10. ATTACHMENT DRIVE (PTO) SWITCH
TO ENGAGE: Pull switch toggle out and push up-
ward. See Attachment Drive Clutch Break-in pro-
cedure in maintenance section in this manual
before operating your attachment.
The center dash panel indicator light will
illuminate when the attachment drive switch is on.
TO DISENGAGE: Push switch down.
The center dash panel indicator light will go out
when the attachment drive switch is off.
NOTE: The attachment drive switch must be off
before you can start the engine.
casecoltingersoll.com

14
11. ATTACHMENT DRIVE REVERSE OVERRIDE
SWITCH
Your tractor is equipped with a safety device that
shuts off clutch operated attachments, such as
the mower and snowblower, when the tractor is
driven in reverse.
TO OVERIDE THIS DEVICE: Turn the key to the
left “ON” position.
TO ACTIVATE THIS DEVICE: Turn the key to
the right “OFF” position.
12. DUAL RANGE TRANSAXLE
TO SELECT LOW RANGE: Put travel control
lever in the “NEUTRAL” position.
Stop tractor.
Push range shift lever down and to the left.
Release lever up into “LOW RANGE” notch.
TO SELECT NEUTRAL: Put travel control lever in
“NEUTRAL” POSITION.
Stop tractor.
Push range shift lever down and move lever to
align with the “NEUTRAL” notch and release.
TO SELECT HIGH RANGE: Put travel control
lever in the “NEUTRAL” position.
Stop tractor.
Push range shift lever down and to the right.
Release lever up into the “HIGH RANGE”
notch.
FIGURE 6
FIGURE 5
CAUTION: Do not drive in reverse
unless completely necessary while
your attachment is operating.
casecoltingersoll.com
15
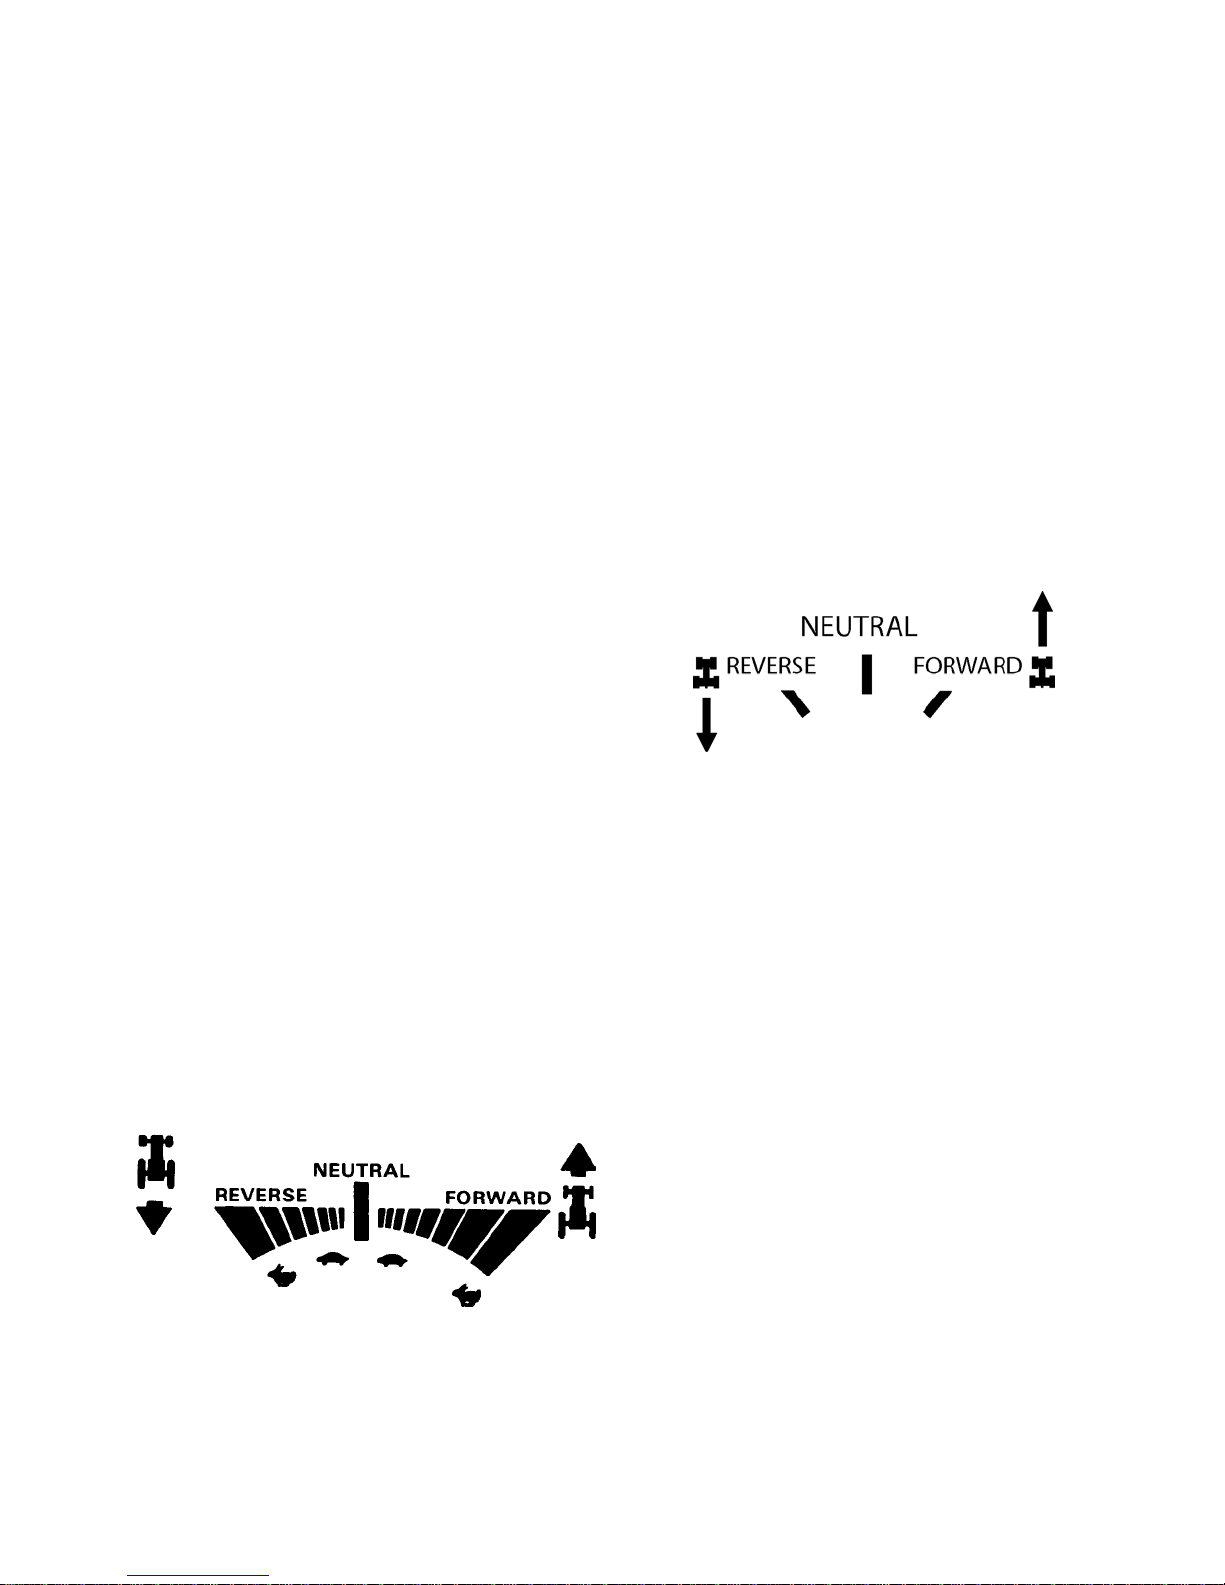
13.DIRECTION CONTROL LEVER
TRAVEL CONTROL LEVER
(4000 SERIES)
TO STOP TRAVEL: Put the travel control lever in
the “NEUTRAL” position.
TO START FORWARD TRAVEL: Depress the
travel control lever slightly. Slowly and in small
amounts move the travel control lever forward.
Speed and power will increase as the lever is
moved toward the full forward position.
TO START REVERSE TRAVEL: Depress the
travel control lever slightly. Slowly and in small
amounts move the travel control lever rearward.
Speed and power will increase as the lever is
moved toward the full reverse position.
DO NOT USE FULL SPEED IN REVERSE.
Depress the travel control lever whenever you
change the lever position to have smoother
operation and control.
The travel control lever automatically returns to
the “NEUTRAL” position when the brake is ac-
tuated. You must hold the travel lever in the
needed position to maintain travel while the
brake is actuated.
A neutral start switch is actuated by the travel
control lever. The lever must be in the
“NEUTRAL” position before you can start the
engine.
The right hand dash panel indicator light will
illuminate when the travel control lever is in the
“Neutral” position. The indicator light will go out if
the travel control lever is moved from the
“Neutral” position into either forward or reverse.
DIRECTION CONTROL LEVER
(4200 SERIES)
TO STOP TRAVEL: Slowly release the travel
pedal to the fully raised position. Put the
direction control lever in the “NEUTRAL”
position.
TO START FORWARD TRAVEL: Put the
direction control lever into the “FORWARD”
position. Slowly press the travel pedal down
with your right foot.
Speed and power will increase as the travel
pedal is pressed down.
IMPORTANT: The travel pedal must be fully
raised and the tractor must come to a complete
stop before you move the direction control lever
between “FORWARD” and “REVERSE”
TO START REVERSE TRAVEL: Put the
direction control into the “REVERSE” position.
Slowly press the travel pedal down with your
right foot.
Speed and power will increase as the travel
pedal is pressed down.
DO NOT USE FULL SPEED IN REVERSE.
A neutral start switch is actuated by the
direction control lever. The lever must be in
the “NEUTRAL” position before you can start
the engine.
The right hand dash panel indicator light will
illuminate when the travel control lever is in
the “NEUTRAL” position. The indicator light
will go out if the travel control lever is moved
from the “NEUTRAL” position into either
forward or reverse.
FIGURE 6 TRAVEL CONTROL LEVERFIGURE 7 TRAVEL CONTROL LEVER
FIGURE 8 DIRECTION CONTROL LEVER
casecoltingersoll.com

16
PRESTARTING CHECK LIST
CAUTION: Handle gasoline with care—
it is highly flammable.
a. Use approved gasoline container.
b. Never remove the cap of the fuel
tank or add gasoline to a running or
hot engine, or fill the fuel tank
indoors. Wipe up spilled gasoline.
c. Open doors if the engine is run in
the garage—exhaust fumes are
dangerous. Do not run the engine
(motor) indoors.
CAUTION: Do not smoke when
working near fuel.
1. Use only clean fuel, oil, container and funnel.
2. Apply oil or grease to all the specified points
shown in the Lubrication Chart.
3. Check the oil level in the engine and add oil as
required.
4. Check the engine air cleaner and air intake
screen for dirt or obstructions. Clean as required.
5. Fill the fuel tank with clean fuel. Clean the area
around the fuel cap before you remove the cap.
The requirements are listed in the Fuel Specifica-
tions Section of this manual.
6. Check the ventilation hole in fuel tank cap and
clean as required.
7. Check all operating controls and instruments for
correct function before using the tractor
BREAK-IN PROCEDURE
Controlled break-in is the ideal fitting of all internal
moving metal parts. Using the proper oil and apply-
ing a conscientious maintenance program during
this period helps assure satisfactory service from
your engine.
Maintain the proper cooling and lubrication during
break-in. Run the engine at half load for the first
three hours with intermittent periods of full load to
control engine break-in.
Check the oil level at least every five operating
hours. Add oil to keep it at the proper level, but
never overfill as overfilling may cause the oil to foam
and enter the breather system, resulting in high oil
consumption and oil accumulation in air cleaner
housing.
CAUTION: Read operator’s manual.
Know location and function of all
controls.
Keep all shields and safety switches
functional.
Before starting engine: disengage
attachment drive and place travel
control in neutral.
Remove objects from the terrain that
could be thrown by the attachment.
Keep people and pets a safe distance
away.
Never carry passengers.
Always look behind tractor before
backing.
On any incline that the tractor can be
safely operated use low range/gear.
Front end tip over can occur when
operating on loading ramps or hills,
back up ramps or hills.
Drive forward going down ramps o
r
hills.
To park tractor: place travel control in
neutral, set parking brake, disengage
attachment drive, shut engine off and
remove key.
Park tractor before servicing or making
adjustments to tractor or attachments.
Failure to observe these precautions
could result in serious injury or death.
CAUTION: Disengage power to
attachment(s) and stop the engine
(motor) before making any repairs o
r
adjustments.
CAUTION: Do not wear loose
clothing, which may catch in moving
parts.
casecoltingersoll.com

17
STARTING PROCEDURE (Operating the Tractor)
NOTE: Your tractor is equipped with an ignition
interlock switch under the seat.
The tractor engine will stop if you get off the
seat when the attachment drive clutch is in
the “ON” position, or the travel control lever is
in “FORWARD” or “REVERSE” position.
DO NOT operate your tractor and have this
interlock repaired if it does not function
correctly.
1. Put the travel control lever in the “NEUTRAL”
position.
2. Put the attachment drive switch in the “Off” posi-
tion.
3. Push the choke lever forward to close the choke.
The choke setting will change according to the air
temperature, engine temperature, and grade of
fuel.
4. Push the throttle lever forward approximately 1/3 of
the way between the “SLOW” and “FAST”
positions.
5. Turn the ignition key to the right and hold in the
“START” position. Release the key to the “RUN”
position when the engine starts running.
NOTE: Release the key immediately when the
engine starts. If you hold the key in the
“START” position after the engine is running
damage can occur. Release the key after 30
seconds if the engine does not start running.
Wait 3 minutes before you try again.
6. Pull the choke lever rearward slowly after the
engine starts running.
7. Permit the engine to warm before applying a load.
NOTE: The hydraulic system must be warm before
you use the tractor when air temperatures
are less than 32°F (0°C). Use the following
procedure:
a.Set the throttle 1/3 of the way between the
“SLOW” and “FAST” position.
b.Select the “NEUTRAL” position of the dual
range transaxle.
c.Move the (travel) direction control lever to the
full “FORWARD” position. Press the foot travel
pedal fully down on 4200 series tractors.
d.Run for several minutes before operating the
tractor. A noise can occur when the hydraulic
system is cold.
IMPORTANT: DO NOT TRY TO START THE
TRACTOR BY PUSHING OR
TOWING. SERIOUS DAMAGE
WILL RESULT TO THE DRIVE
SYSTEM.
CAUTION: Operate tractor from
proper seat position only. Any other
method could result in a serious
injury.
CAUTION: Do not wear loose
clothing, which may catch in moving
parts.
CAUTION: Do not allow children to
operate the vehicle. Do not allow
adults to operate it without proper
instruction.
CAUTION: Do not carry passengers.
Do not mow when children and
others are around.
CAUTION: Disengage all attachment
clutches and shift into neutral
before attempting to start the engine
(motor).
Separate Operator’s Manuals ar
e
provided with the attachment
s
purchased with your tractor. Refer t
o
the appropriate attachment operator'
s
manual for specific operating instruc
-
tions and safety messages that appl
y
to the attachment.
Remember, a careful operator is
always the best insurance against an
accident. Give complete and undivided
attention to the job at hand.
casecoltingersoll.com
18
STOPPING PROCEDURE (Operating the Tractor)
1. (4000 series) Slowly move the travel control lever
to the “NEUTRAL” position.
(4200 series) Slowly release the travel pedal to
the fully raised position. Put the direction control
lever in the “NEUTRAL” position.
2. Completely stop the tractor. Actuate the brake
pedal if necessary.
3. Engage the parking brake lock.
4. Pull the throttle lever rearward to the “SLOW”
position.
5. Permit the engine to cool. Run the engine at idle
for several minutes if the work load was severe.
6. Turn the key to the left to the “OFF” position.
NOTE: Muffler after bang can be prevented by
closing the choke at the same time the key
switch is turned to the “OFF” position. This
action prevents the entry of air into the
muffler as the engine comes to a stop and
therefore prevents combustion within the
muffler.
7. Remove the ignition key.
CAUTION:Know the controls and
how to stop quickly. READ THE
OWNER’S MANUAL and instructions
furnished with attachments.
CAUTION: Take all possible
precautions when leaving the
vehicle unattended, such as
disengaging the power take-off,
lowering the attachment(s), shifting
into neutral, setting the parking
brake, stopping the engine, and
removing the key.
CAUTION: Set parking brake, shut of
f
engine, remove key and wait until all
engine and attachment motion has
stopped before dismounting from the
operator’s seat. CAUTION: Disengage power to
attachment(s) when transporting or
not in use.
FIGURE 9
casecoltingersoll.com

19
OPERATING PROCEDURE (Operating the Tractor)
Operate the tractor for the first time on a flat area
clear of obstructions and persons. Learn the
operating characteristics of your tractor before trying
the first job.
1. Select the correct gear range for the job.
2. “LOW” range is for all working operations and
hillside use. Always use “LOW” range on hillsides
or inclines.
3. “HIGH” range is for transport only, “HIGH” range
must not be used for hillside operation.
4. If the range shift does not move easily, rotate the
gears.
To rotate the gears:
a. Move the (travel) direction control lever a small
amount into the “FORWARD” position. Press
the foot travel pedal slightly (4200 series).
b. Return the travel control lever to the
“NEUTRAL” position.
IMPORTANT: Completely stop the tractor motion
before changing the range. The
range shift lever must be completely
seated in the “LOW” or “HIGH” range
notch. Gear damage can occur if the
lever is not in the correct position.
5. Push the throttle lever forward until you get the
needed engine speed.
Decrease engine speed during operation for
maximum fuel efficiency. Do not cause engine
lugging. Lugging will cause more than normal heat
and damage to the engine.
6. TO USE FORWARD TRAVEL:
a. Depress the (travel) direction control lever
slightly and move it from the “NEUTRAL”
position toward the “FORWARD” position. Press
the foot travel pedal down for desired speed
(4200 series).
b. When you reach the correct speed, release the
travel lever (4000 series).
c. Release the foot travel pedal to stop (4200
series). Return the travel control lever to the
“NEUTRAL” position to stop (4000 series).
d. Actuate the brake pedal if the tractor does not
stop.
7. TO USE REVERSE TRAVEL:
a. Depress the (travel) direction control lever
slightly and move it from the “NEUTRAL”
position toward the “REVERSE” position. Press
the foot travel pedal for desired speed (4200
series). Do not travel at full speed in reverse.
b.Release the travel foot pedal to stop (4200
series). Return the travel control lever to the
“NEUTRAL” position to stop (4000 series).
c. Actuate the brake pedal if the tractor does not
stop.
Always be careful and look behind when you drive
in reverse.
Do not travel in reverse down a hill or ramp. Use
reverse travel to move up a hill or ramp. Always
use forward travel when you come down a hill or
ramp.
CAUTION: Use care when pulling
loads or using heavy equipment.
a. Use only approved drawbar hitch
points.
b. Limit loads to those you can safely
control.
c. Do not turn sharply. Use care
when backing.
d. Use counterweights or wheel
weights when suggested in the
owner’s manual.
CAUTION: Do not stop or start
suddenly when going uphill or
downhill. Mow down the face of
steep slopes; never across or up the
face. (This ANSI rule modified)
FIGURE 10
FIGURE 11
casecoltingersoll.com

20
8. TO ACTUATE BRAKES - Hillside Operation
(4000 series only)
Hold the travel control lever in the needed
position, then push on the brake pedal.
When you actuate the brake, the travel control
lever will return to the “NEUTRAL” position unless
you hold the lever in the needed position.
The travel control lever can be moved (but the
lever must be held) while the brake is actuated.
IMPORTANT: Keep the brakes in good repair and
correctly adjusted at all times. See the preventive
maintenance section of this manual or see your
dealer for brake repair.
9. (4000 series) Do not move the travel control lever
from “REVERSE” to “FORWARD” while the
tractor is moving. This can cause the front of the
tractor to raise off the ground. Stop reverse travel
completely before you start forward travel. This is
especially important while on a hill or slope.
(4200 series: You cannot move the direction
control lever unless the foot travel control pedal is
fully released)
10. The rear wheels can slip or spin and an engine
overload can occur while you go up a small
slope. Turn the front wheels toward the bottom of
the hill before the loss of all traction or power.
Do not permit the tractor to move rearward down
any slope or hillside.
a. A return to forward travel will cause too
much torque at the rear wheels. The front
wheels can rise off the ground and cause
severe injury to the operator.
b. Turning the front wheels can cause too
much thrust to the side. The tractor can roll
over and cause severe injury to the
operator.
Always use reverse travel to move up a hill or
slope. Always use forward travel to move down
a hill or slope.
11. Decrease the travel speed before you turn the
tractor.
12. Engage the attachment drive before you put a
load on the attachment.
IMPORTANT: To prevent clutch damage, do not
engage the attachment drive clutch
with engine throttle in “FAST”
position.
Actuate the lawnmower over an area of thin
grass or an area that has been cut.
CAUTION: Disengage power to mower
before backing up. Do not mow in
reverse unless absolutely necessary
and then only after observation of the
entire area behind the mower.
Actuate the tiller while in the transport position.
Then lower the tiller into the soil to the needed
depth.
Actuate the snowcaster before you make
contact with the snow.
13. Read your attachment manual for complete
attachment operation information.
WARNING: Improper operation of
your tractor on hillsides and slopes
can be dangerous. Avoid improper
operation! Read and follow the
instructions given in the section
titled “Hillside Operation” in this
manual before operating your
tractor. CAUTION: Reduce speed and exercise
extreme caution on slopes and in
sharp turns to prevent tipping or loss
of control. Be especially cautious
when changing direction on slopes.
CAUTION: Do not drive in reverse
unless completely necessary while
your attachment is operating.
CAUTION:When using an
y
at-
tachments, never direct discharge of
material toward bystanders nor
allow anyone near the vehicle while
in operation.
casecoltingersoll.com
This manual suits for next models
5
Table of contents
Other Ingersoll Tractor manuals


