InHand EC900 Series User manual

EC900 User Manual
1. Product Introduaction
2. Device Configuration
2.1 Access the Gateway
2.2 User Account Management
2.2.1 Registered and delete account
2.2.2 Disable default account
2.3 Network Management
2.3.1 Static IP address setting
2.3.2 Dynamic IP address setting
2.4 System Management
2.4.1 Time setting
2.4.2 Time zone setting
2.5 View Free Disk Space
2.6 Shut Down
2.7 View Firmware Version
3. Development and Debugging
3.1 Serial Port
3.2 USB
3.3 HDMI
3.4 Cellular Network

1. Production Introduction
The EC900 series edge computer(EC900) is a high performance edge computer developed for
industrial IoT applications. With powerful edge computing capabilities, comprehensive security
protection and wireless services, EC900 can support device networking of up to 10,000 levels,
providing high-speed data channels in the true sense of device informatization. EThe EC900 is
2GB of RAM and 16GB of eMMC FLASH. Based on Debian, the EC900 provides a secondary
development platform with support for C/C++/Java/Python/.Net/JavaScript,etc, which is easy for users
to develop and port applications.The EC900 supports Secure Boot, TPM,etc, to ensure the security of
user software and data. In addition, the EC900 provides uninterrupted Internet access for machines
over ubiquitous the globally deployed LTE wireless network and a variety of broadband services.
2. Device Configuration
2.1 Access the Gateway
The default IP address of LAN1 port of EC900 is 192.168.3.100, and the default IP address of LAN2
port is 192. 168.4. 100. Set the IP address of PC in the same network segment with LAN1 port, select
"Use the following IP address", enter the IP address (default is 192. 168.3.2 - 192. 168.3.254 in any
value); subnet mask (default 255.255.255.0); default gateway (default 192.168.3.100) and DNS server
address, click <OK>.

Using SSH commands to access the EC900 ( Port 22 )
Plain Text copy
1 ssh edge@192 .168 .3 .100
Enter the SSH password. The default factory username is edge, and the password is
security@edge.

The factory setting of EC900 has created root by default, but it is not available to log in. If you need to
use the root account, please modify the system configuration manually. The edge user is in the sudo
user group, so you can use the sudo command to execute system-level commands.
Note: For security reasons, it is strongly recommended that you disable the default user and create
your own user account.
2.2 User Account Management
Use sudo -i (or sudo su) command to switch to the root account. For security reasons, do not operate all
commands under the root account (More about sudo commands, please visit
https://wiki.debian.org/sudo).
2.2.1 Registered and delete account
You can use the useradd and userdel commands to create and delete user accounts. Please refer to the
main page of these commands to set the access rights for the account. The following example shows
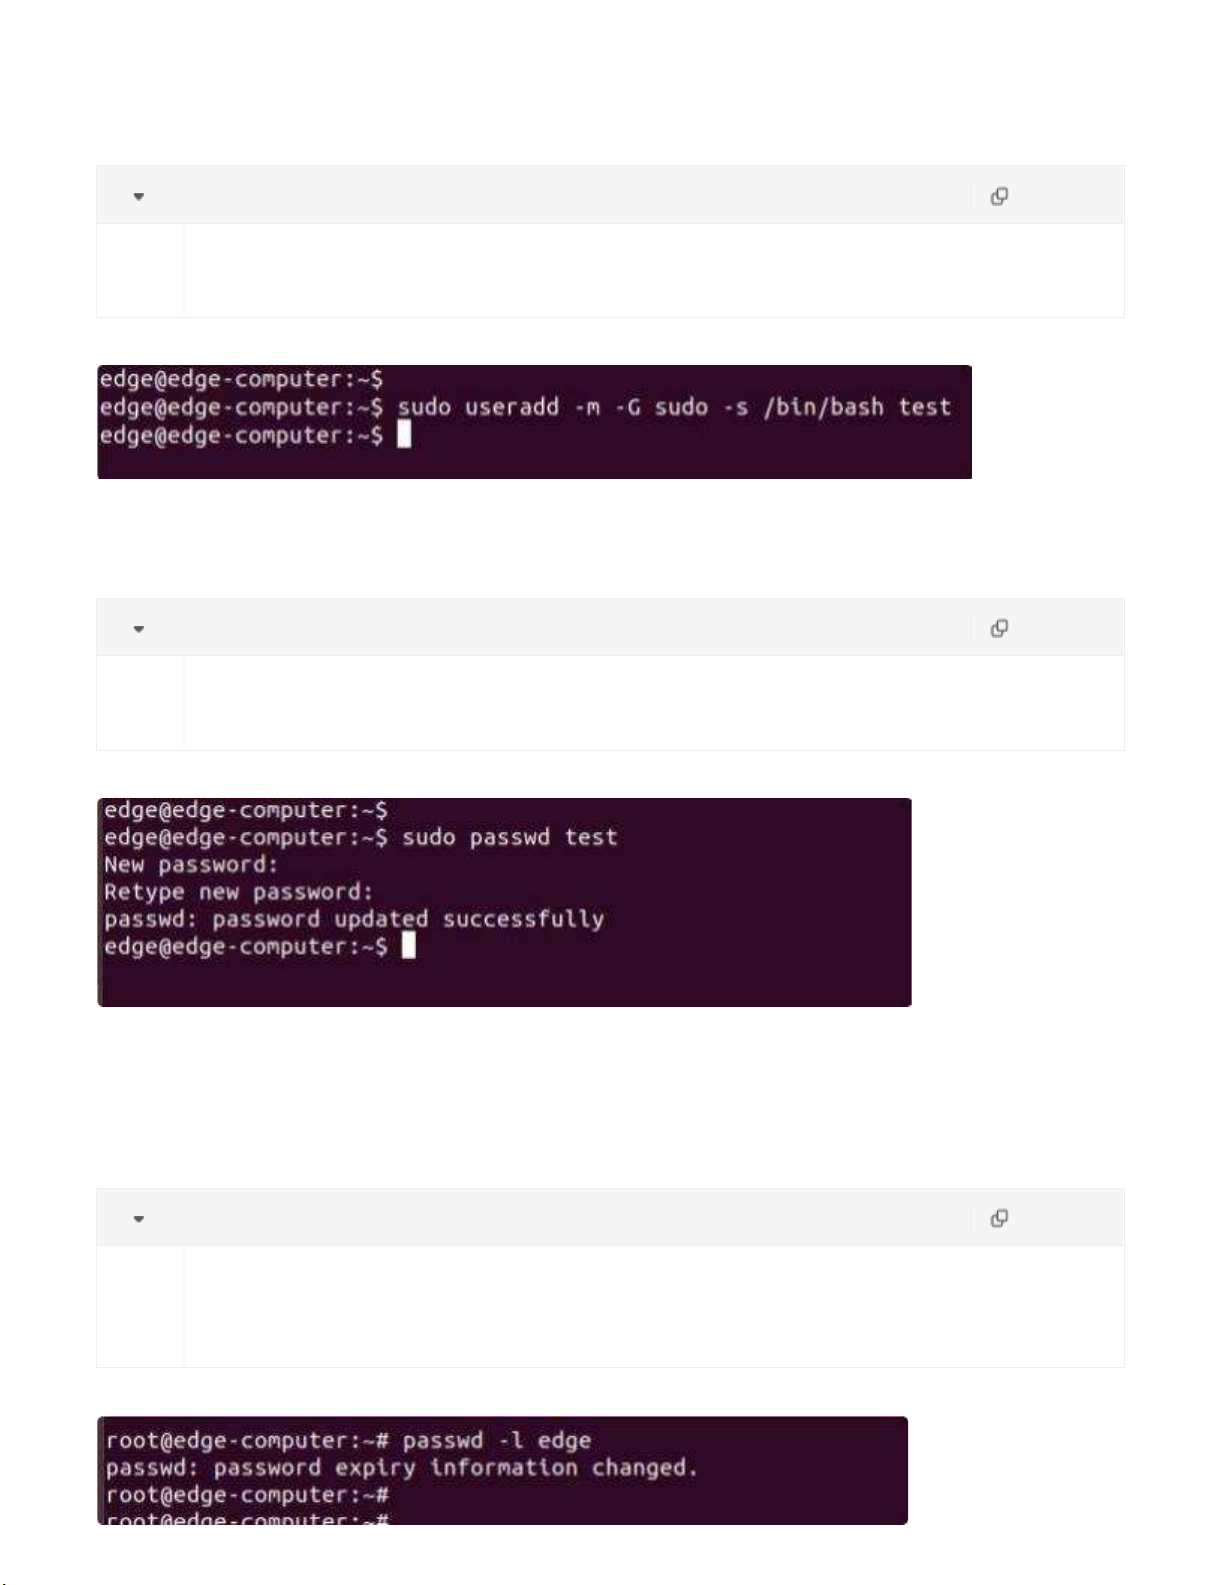
how to create a test user in a sudo group with a default login shell of bash and a home entry of
/home/test.
Plain Text copy
1
sudo useradd -m -G sudo -s /bin/bash test
To change the password for the user name(test), use the passwd command and enter the new password,
then confirm the change by re-entering the password as shown below.
Plain Text copy
1
sudo passwd test
2.2.1 Disable default account
Use the passwd command to lock the default user account so that users edge cannot log in.
Plain Text copy
1
2
sudo -i
passwd -l edge

Unlock user edge:
Plain Text copy
1
passwd -u edge
2.3 Network Management
Input cd /etc/network/interfaces .d command to change destination .
Plain Text copy
1
cd / etc/ network/ interfaces. d
Input sudo vim eth1 or sudo vim eth2 to edit the network configuration file. You can
configure the Ethernet port of the EC900 to use a static IP address or to obtain an IP address
dynamically(DHCP).
2.3.1 Static IP address setting
To set a static IP address for the eth1 port of the EC900, use the iface command to modify the default
grid gate, address, and network mask of the Ethernet port, as shown in the following figure.

2.3.2 Dynamic IP address setting
To configure one or two ports to request IP addresses dynamically, please use the dhcp option instead of
the static option in the iface command, as shown below.
2.4 System Management
2 4 1 Time setting
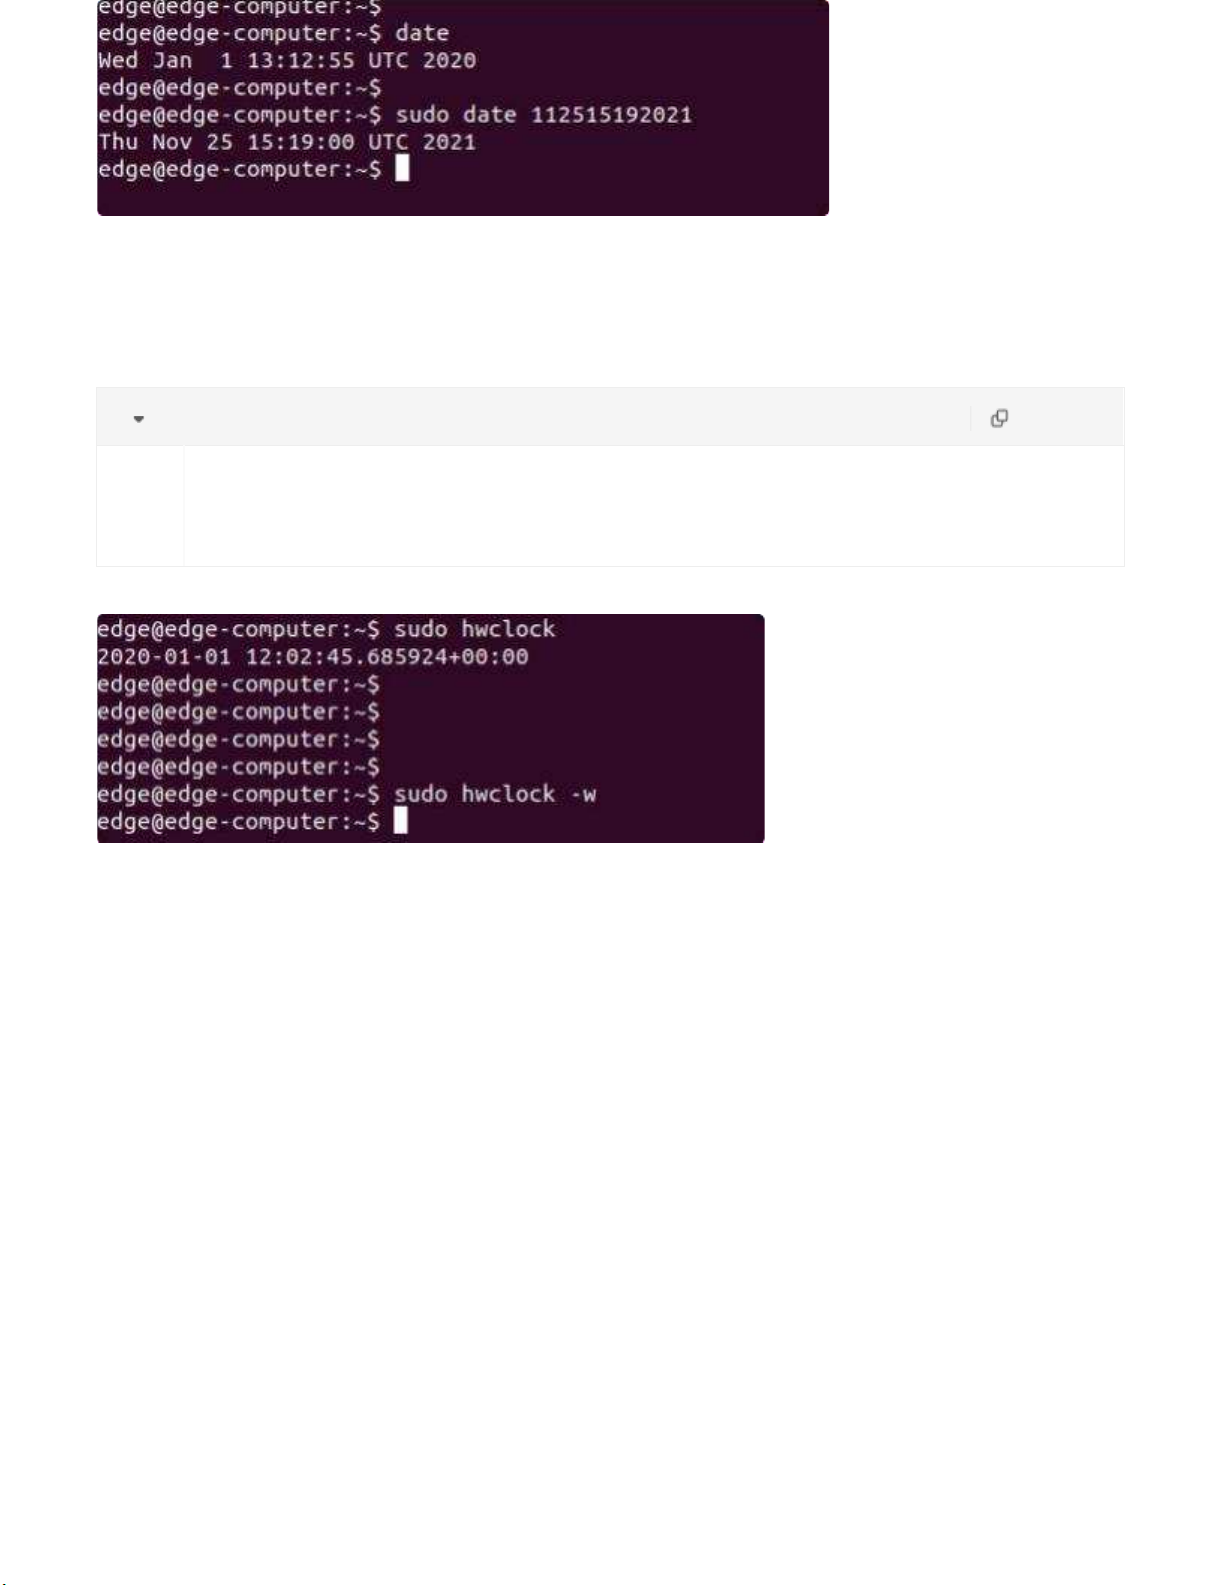
There are two kind of time of EC900 that can be set. One is the system time, the other is the RTC
(RealTime Clock) time saved by the EC900 hardware. Use the date command to query the current
system time or set a new time. Use the hwclock command to query the current RTC time or set a new
RTC time.
Use date MMDDhhmmYYYY command to set system time.
MM = Month
DD = Day
hhmm = Hour, minute. For example.
Plain Text copy
1
2
date
sudo date 112515192021
b . TZ=EST0EDT
c . TZ=EST0
Set the RTC time to system time using the following command .
Plain Text copy
1
2
sudo
sudo
hwclock
hwclock -w
More about time setting, please visit
https://www.debian.org/doc/manuals/system-administrator/ch-sysadmin-time.html
https://wiki.debian.org/DateTime
2.4.2 Time zone setting
There are two ways to configure the time zone of the EC900. One is to use the TZ environment variable,
the other is to use the /etc/localtime configuration file.
There are two ways to configure the time zone of the EC900. One is to use the TZ environment variable.
The other is to use the /etc/localtime configuration file.
●Use the TZ environment variable
TZ=<Value>HH[:MM[:SS]][daylight[HH[:MM[:SS]]][,start date[/starttime], enddate[/endtime]]] e.g.
Possible settings for the Eastern Time Zone in North America
a . TZ=EST5EDT

In the case a, the reference time is GMT, and the stored time values are correct worldwide. The
simple change in the TZ variable allows the local time to be printed correctly in any time zone.
In the case b, the reference time is Eastern Standard Time, and the only conversion performed is
daylight saving time(DST). Therefore, it is not necessary to adjust the hardware clock for daylight
saving time(DST) twice a year.
In the case c, the reference time is always the reported time. You can use this option if the
hardware clock on your machine automatically adjusts for daylight saving time(DST), or you want to
manually adjust the hardware time twice a year.
Plain Text copy
1
2
TZ=EST5EDT
export TZ
If you want the time zone setting to be valid after rebooting the EC900, please ensure including the
TZ setting in the /etc/rc.local file. The following table lists other possible values for the TZ
environment variable.
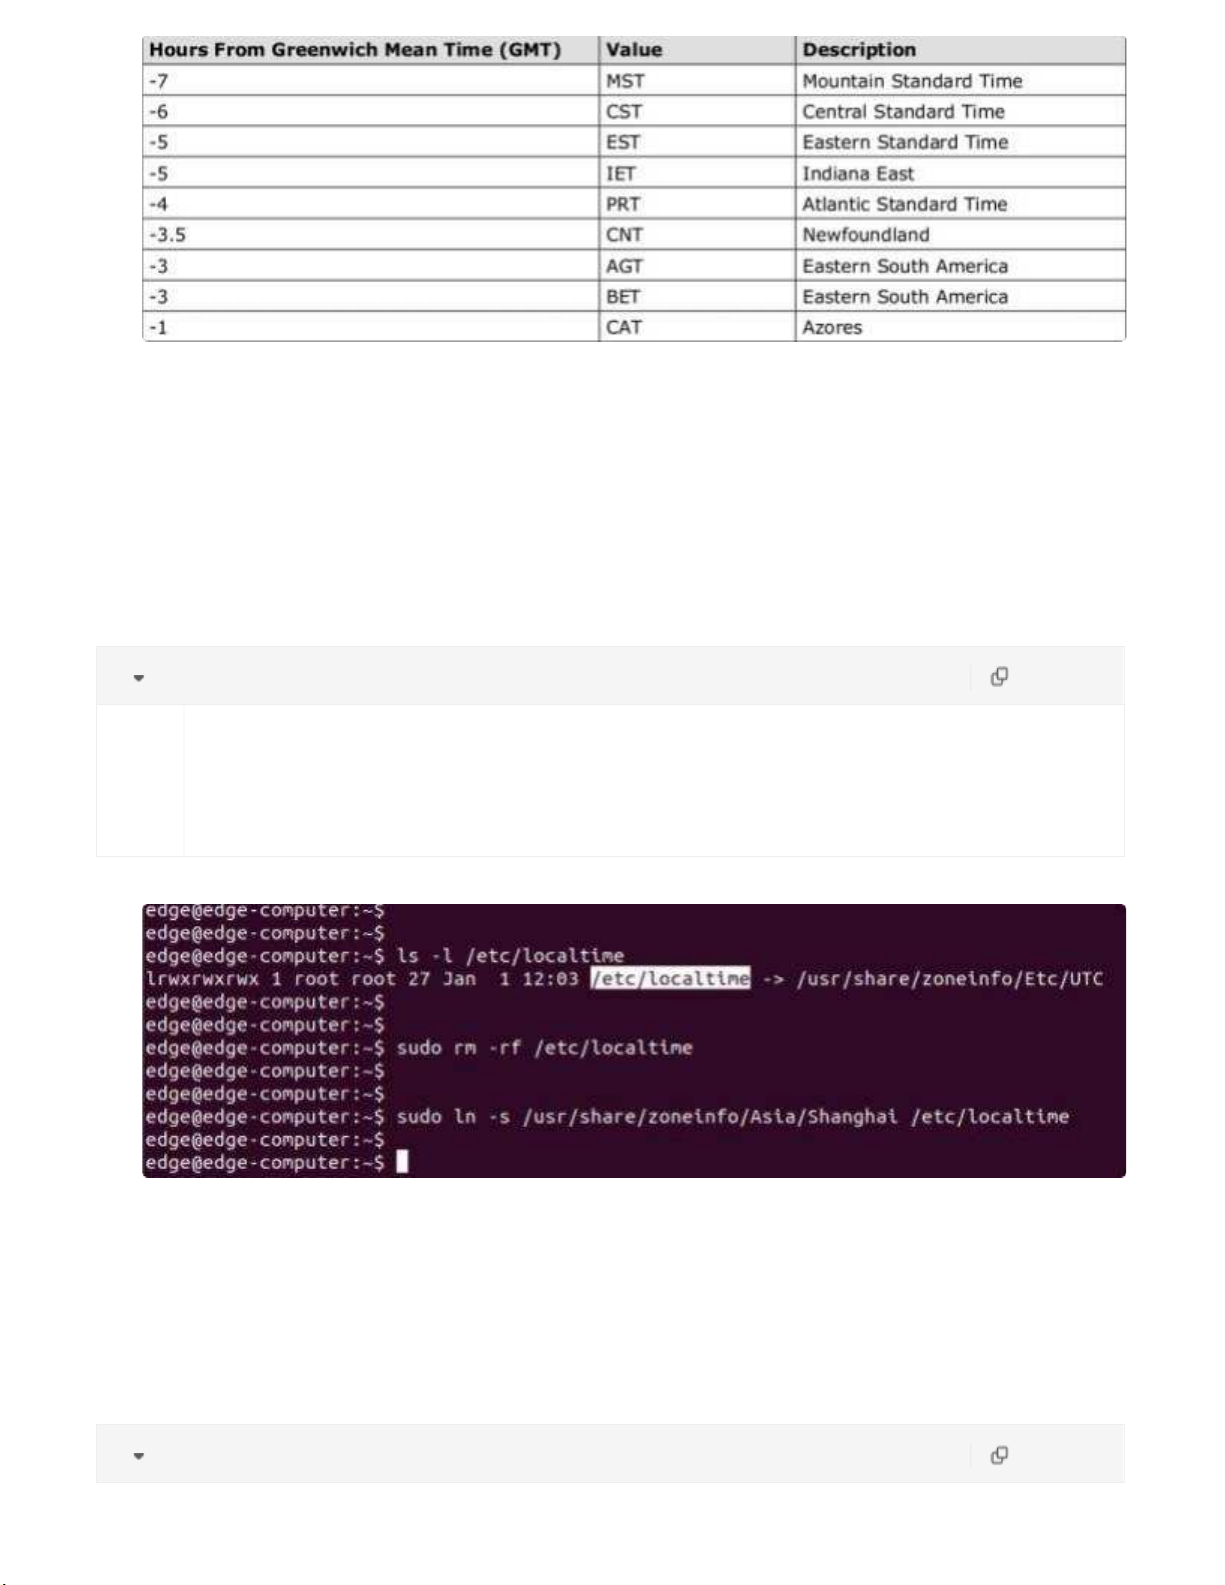
●Use the /etc/localtime
The local time zone is stored in the /etc/localtime file.
If the "TZ" environment variable is not set, the Glibc library will use the time zone configuration in
the /etc/localtime file.This file is a symbolic link to the /usr/share/zoneinfo/ file, please find a suitable
time zone information file and overwrite the original /etc/localtime file in the EC900, as shown in the
following figure.
Plain Text copy
1
2
3
ls -l /etc/localtime
sudo rm -rf /etc/localtime
sudo ln - s / usr/ share/ zoneinfo/ Asia/ Shanghai /etc/localtime
2.5 View Free Disk Space
To view the free disk drive space, use the df command with the - h option. The system will return the
amount of disk space by file system divided.
Plain Text copy

1
df -h
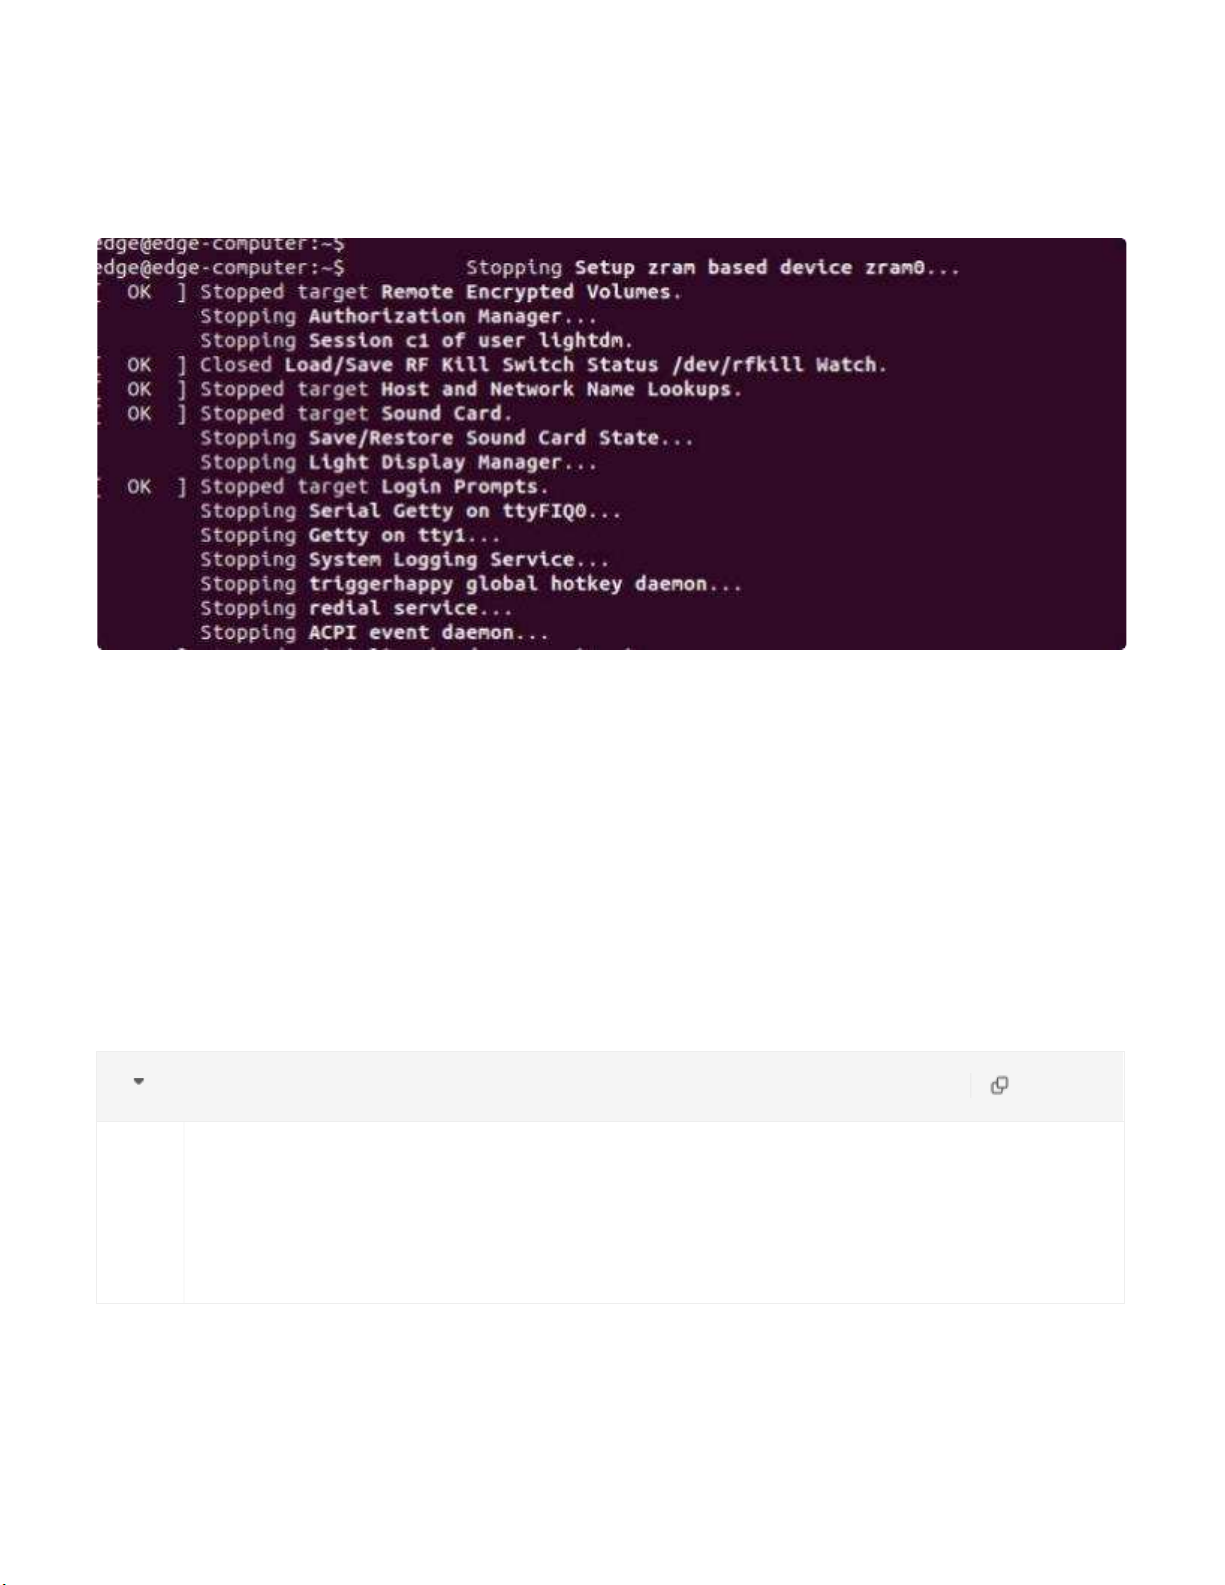
2.6 Shut Down
You can shut down all software running on the device and stop the system by using the Linux command
"shutdown" or by pressing the power button. However, after running this command, major components
such as the CPU, RAM, and storage devices will continue to be powered, as shown in the following figure.
Plain Text copy
1
sudo shutdown -h now
Pressing the power button:
For the full shut down of the EC900, please disconnect the power to the EC900. When the EC900 is
powered off, major components such as the CPU, RAM and memory devices will be shut down, but the
internal clock may retain battery power.
2.7 View Firmware Version
The ecversion command is used to query the firmware version number, and the parameter "-a" can be
used to view the version details.
Shell copy
1
2
3
4
root@edge-computer :~# ecversion
EC902 version 1.0 .1
root@edge-computer :~# ecversion -a
EC902 version 1.0 .1 Build 2022223
3
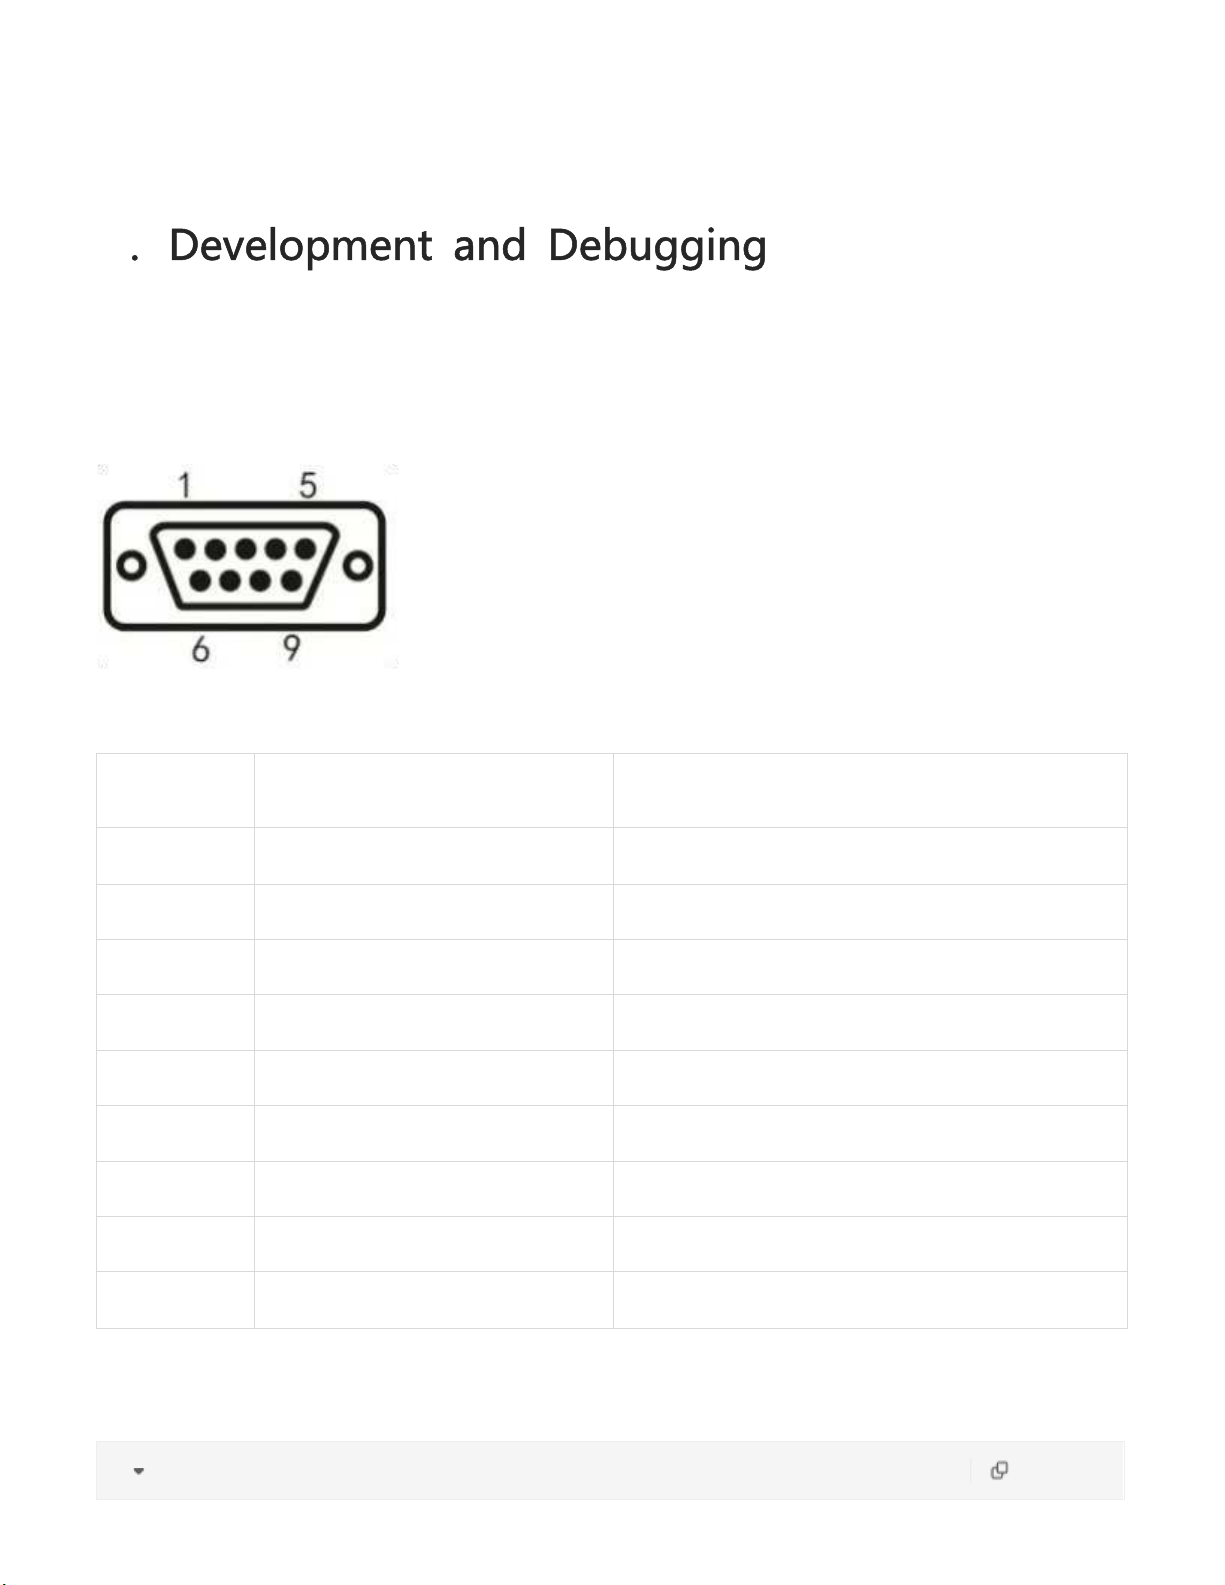
3.1 Serial Port
The EC900 provides two serial ports, both of which support RS232 or RS485 or RS422 communication
(only one of the three can be used at any one time).
PIN
Definition
Description
1
2
232 Rx D/422 TxD +
232 receive/422 send+
3
232 Tx D/485 B/422 Rx D-
232 send/485 signal B/422 receive-
4
5
GND
232 signal ground
6
7
A/RxD +
485 signal A/422 receive+
8
Tx D -
422 send-
9
The commands to set the COM port are as follows:
Plain Text copy

3.3 HDMI
1
ih-uart-ctl -p 0 -m 0
The parameter 0 after -p indicates COM1, parameter 1 indicates COM2. The serial port name of COM1 is
ttyS3, and the serial port name of COM1 is ttyS4. The parameter 0 after -m indicates RS232, 1 indicates
RS485, 2 indicates RS422, and the default baud rate is 9600.
The stty command can be used to view and modify the configuration of the serial port. More about stty
command, please visit https://www.gnu.org/software/coreutils/manual/coreutils.html#stty-
invocation
I. View serial port configuration
Plain Text copy
1
stty -a -F /dev/ttyS3
II.Modify the serial port configuration
Plain Text copy
1
stty -F /dev/ttyS3 ispeed 115200 ospeed 115200 cs8
3.2 USB
Currently, USB only supports mounting USB flash drives. After the USB drive is successfully mounted,
you can view the drive files in /mnt/sd destination.

After connecting the display with the HDMI cable, the Linux login screen is displayed and the login is
completed by entering the user name and password.
3.4 Cellular Network
I.Enable/disable redial
Shell
copy
1
systemctl enable redial
2
sys
temctl start redial
3
sys
temctl restart redial
4
sys
redi
temctl stop redial // If need to enable redial ,
al will occur after rebooting the device .
automatic
5
sys
temctl disable redial
II.Check if the redial is successful
Shell copy
1
sudo ifconfig
If ppp0 is connected in the output, then the dial-up is successful.
III. Check signal quality, grid status, etc.
Shell copy

1
sudo nvram show
IV. Switching sim cards
Default sim card 1
Shell copy
1
sudo
nvram set cur sim=0
2
sudo
this
this
nvram set wan1_ppp_apn=sim1_apn // If
command and replace sim1_apn with the
command if there is no apn .
need to set
actual apn .
an apn , execute
Do not execute
3
sudo
systemctl restart redial
If switching sim card 2, need to open the dual card function.
Shell copy
1
sudo nvram set cur sim=1
2
sudo nvram set wan1_ppp_sim2_apn=sim2_apn // If need to set an apn, execute this
command and replace sim2_apn with the actual apn. Do not execute this command if
there is no apn.
3
sudo nvram set dual_ sim_ enable=1
4
sudo systemctl restart redial
V. Enable/disable redial log
Shell copy
1
2
3
4
5
6
7
8
9
Enable redial log:
touch /tmp/ .debug_systools
systemctl restart redial
tail -f /var/ log/messages
Disable redial log:
rm -f /tmp/ .debug_systools
systemctl restart redial
tail -f /var/ log/messages

FCC STATEMENT
This device complies with Part 15 of the FCC Rules. Operation is subject to the following two
conditions:
(1) This device may not cause harmful interference, and
(2) this device must accept any interference received, including interference that may cause
undesired operation.
NOTE 1: This equipment has been tested and found to comply with the limits for a Class B
digital device , pursuant to part 15 of the FCC Rules. These limits are designed to provide
reasonable protection against harmful interference in a residential installation. This equipment
generates, uses and can radiate radio frequency energy and, if not installed and used in
accordance with the instructions, installed and used in accordance with the instructions, may
cause harmful interference to radio communications. However, there is no guarantee that
interference will not occur in a particular installation. If this equipment does cause harmful
interference to radio or television reception, which can be determined by turning the equipment
off and on, the user is encouraged to try to correct the interference by one or more of the
following measures:
- Reorient or relocate the receiving antenna.
- Increase the separation between the equipment and receiver.
-Connect the equipment into an outlet on a circuit different from that to which the receiver is
connected.
-Consult the dealer or an experienced radio/TV technician for help.
NOTE 2: Any changes or modifications to this unit not expressly approved by the party
responsible for compliance could void the user's authority to operate the equipment.
RF Exposure
The equipment complies with FCC radiation exposure limits set forth for an uncontrolled
environment. This device should be installed and operated with minimum distance 20cm
between the radiator & your body.
This transmitter must not be co-located or operating in conjunction with any other antenna or
transmitter. The availability of some specific channels and/or operational frequency bands is
country dependent and firmware programmed at the factory to match the intended destination.
The firmware setting is not accessible by the end user.

IC STATEMENT
This device complies with Industry Canada license-exempt RSS standard(s): Operation is
subject to the following Two conditions:
(1) this device may not cause interference, and
(2) This device must accept any interference, including interference that may cause
undesired operation
of the device.
Le present appareil est conforme aux CNR d'Industrie Canada applicables aux appareils radio
exempts de licence. L'exploitation est autorisée aux deux conditions suivantes :
(1) l'appareil ne doit pas produire de brouillage, et
(2) l'utilisateur de l'appareildoit accepter tout brouillage radioélectrique subi, même si le
brouillage est
susceptible d'en compromettre le fonctionnement.
CAN ICES-3 (B)
Avis d’Industrie Canada
Le présent appareil est conforme aux CNR d'industrie Canada applicables aux appareils radio
exem pts de licence L'exploitation est autorisée aux deux conditions suivantes:
1) I'appareil ne doit pas produire de brouillage; et
2) I'utillsateur de I'appareil doit accepterbrouillage radioélectrique subi meme si le brouillage
est susceptible d'encompromettre le fonctionnement. mauvais fonctionnement de I'appareil.
Cet appareil numériquie de la classe B est conforme à la norme NMB-003 du Canada.
CAN NMB-3 (B)
Radiation Exposure Statement:
This equipment complies with IC radiation exposure limits set forth for an uncontrolled
environment. This equipment should be installed and operated with minimum distance 20cm
between the radiator & your body.
Déclaration d'exposition aux radiations:
Cet équipement est conforme aux limites d'exposition aux rayonnements IC établies pour un
environnement non contrôlé. Cet équipement doit être installé et utilisé avec un minimum de
20cm de distance entre la source de rayonnement et votre corps.
Other manuals for EC900 Series
1
Table of contents
Other InHand Desktop manuals


 user guide")


