INKPOT INKPOT-I06 User manual

2.4G REMOTE CONTROL DRONE
AGE 14+
After-sales email:[email protected]
INKPOT-I06
*Please read this manual carefully before operation and keep it properly
for future reference.

CONTENTS
Package List
Battery Charging
Battery Installation
Know Your Drone
Flight Environment
Know the Remote Controller
Functions in Operation Level 1
Start up
Pairing
One Key Start
Basic Control
Altitude Hold
Fine-tuning Mode
Re-calibration
Low Power Warning
One Key Landing/Emergency Stop
Function Enabled in Level 2
How to Activate Operation Level 2
Self Rotation
Functions Enabled in Level 3
How to Activate Level 3
Speed Switch
360° Flip & Roll
Headless Mode
Battery Instructions
Trouble Shooting
1
1
2
3
4
5
6
6
6
6
7
7
7-8
8
8
9
9
9
9
10
10
10
11
11-12
13
14
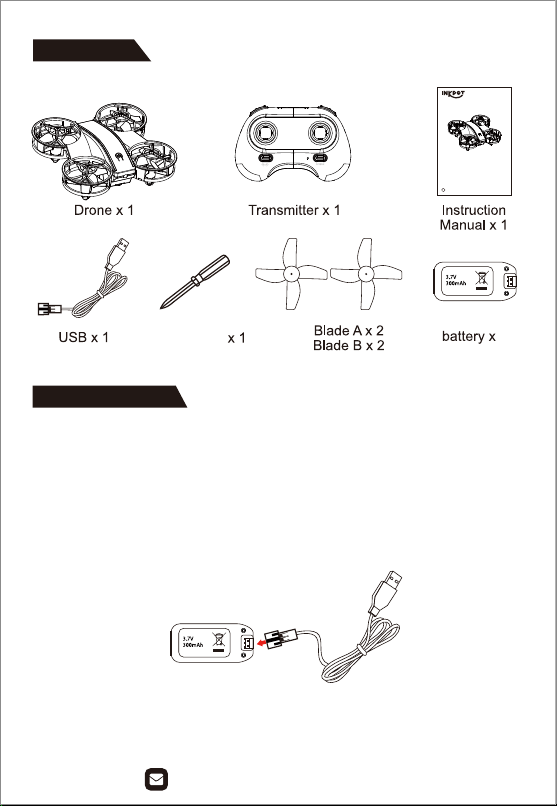
Package List
Battery Charging
Screwdriver
①Connect the USB charger with adapter (output: 5V/0.5~2.0A), LED on
the charger glows red;
②When the battery is connected with the charger, LED on the charger
lights off;
③The LED glows red again when charging is completed;
④It takes roughly 80 minutes to fully charge the battery.
Note: Never use fast charger or any adapter with output over 5V, as it may
damage the charger and battery.
-1-
2.4G REMOTE CONTROL DRONE
AGE 14+
After-sales email:[email protected]
INKPOT-I06
*Please read this manual carefully before operation and keep it properly
for future reference.
Spare
Spare 2
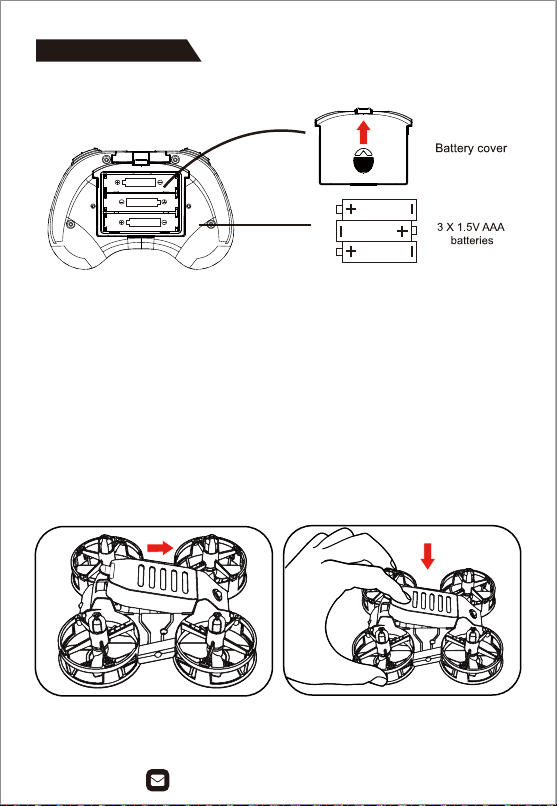
Battery Installation
Push up the battery slot cover and install 3*AAA batteries (not included)
Note:
①Slide the battery’s rear (the side without holder) in the battery slot, then
press the head down to install the battery.
1. Install Batteries in Remote Controller
2. How to Install/Uninstall Drone Battery
①Always pay attention to battery polarity when installing battery;
②Do not mix old and new batteries;
③Never use different types of batteries together.

Know Your Drone
②Keep pushing in the holder on the battery and pull the battery up to
take it out.
Propeller B
Upper Shell
Propeller A Power Switch
Lower Shell
Battery

Flight Environment
Please select an optimal flying environment.
Indoor: Spacious spaces away
from barriers, crowds or pets
are preferred.
The drone is supposed to be
used indoors, do not fly it
outdoors unless there’s no wind.
Please keep the drone insight
during the flight and keep it
away from barriers,
high-tension cables, trees
and people.
Do not fly in extreme environment,
such as hotness, coldness,
strong wind or heavy rain.
Place the drone on flat surface before taking off.
Never take off on rugged surface.
Notes:
Notes:

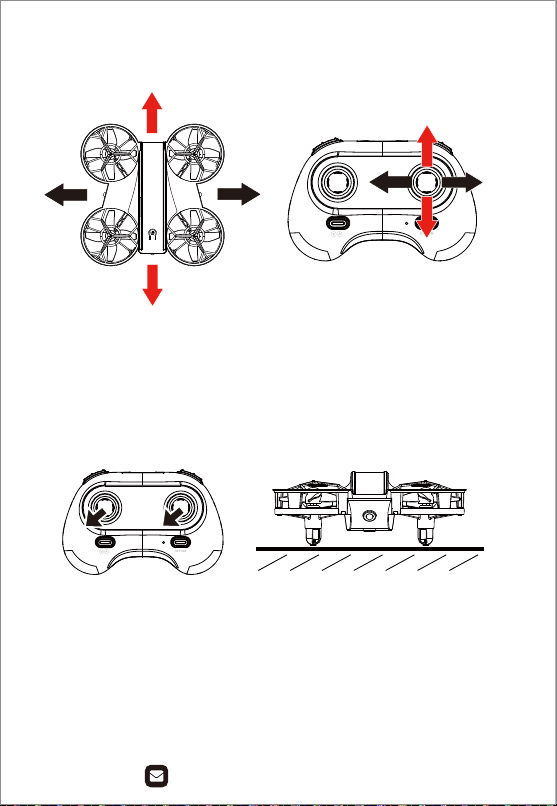
Know the Remote Controller
The drone has 3 levels of operation modes:
Level 1: for newbie to learn basic operations;
(the remote controller beeps one time when
it's paired in this mode)
Level 2: for competent, some stunt functions
are unlocked; (remote controller beeps 2
times). Function unlocked in level 2 will be
marked with yellow color below
Level 3: senior only, functions of this drone are
all available now. (remote controller beeps 3
times). Functions unlocked in level 3 will be
marked with red color below
Short press: Speed Switch
Keep
Pressing
Keep
Pressing
Short press: Self Rotation
Short press: Flip & Roll
Long press: Headless Mode
Short press: One Key Start/Landing
Long press: Emergency Stop
Power Switch
Pull the joysticks down-left to re-calibrate
Short press: Light Switch
Long press: Fine-tuning Mode

Functions in Operation Level 1
Pull the left joystick up and down to attempt pairing, the remote controller
beeps one time in each pulling, and the drone's flashing indicator lights
become constant when it’s paired successfully.
②Press power switch on the remote controller, the remote controller
beeps one time indicates it's turned on in operation level 1 (for newbie).
①Keep pressing the Power Switch until indicator lights start flashing,
then place the drone on horizontal surface with it facing to the front.
(1) Start Up
(2) Pairing
Short press the One Key Start button, propellers on the drone will be
unlocked and start spinning. Pull up left throttle to take off.
(3) One Key Start

This drone has altitude hold function. Player can release the left joystick
in flight to let the drone hovers at current altitude.
③The Fine-tuning Mode ends automatically when player stopped operating
for more than 2 seconds, or manually by long pressing the Light Switch
button again.
②Long press the Light Switch button until the remote controller beeps
and indicator light starts flashing, which indicates the drone is in
Fine-tuning Mode. Tip right joystick to opposite side of the sliding direction
to adjust, until the drone appears hovering still.
(4) Basic Control
(5) Altitude Hold
①If the drone appears sliding to a direction when hovering, please adjust
it in Fine-tuning Mode.
If the drone slides severely on takeoff and could not fly properly, please
place the drone on a horizontal position and pull joysticks down-left to
re-calibrate it. Indicator lights on the drone start flashing quickly and then
become constant again indicates the drone is re-calibrated.
(7) Re-calibration
When the drone is in low-power, indicator lights on it will start flashing
quickly. Player needs to maneuver the drone back, or it would descend
automatically soon when power is extremely low.
(8) Low Power Warning
Fine-tuning Direction

Function Enabled in Level 2
Short press the One Key Landing button, the drone will descend slowly,
and motors will stop spinning when the drone has landed.
If there's any emergency happens in flight, long press the same button for
Emergency Stop. Motors will shut down when Emergency Stop is triggered.
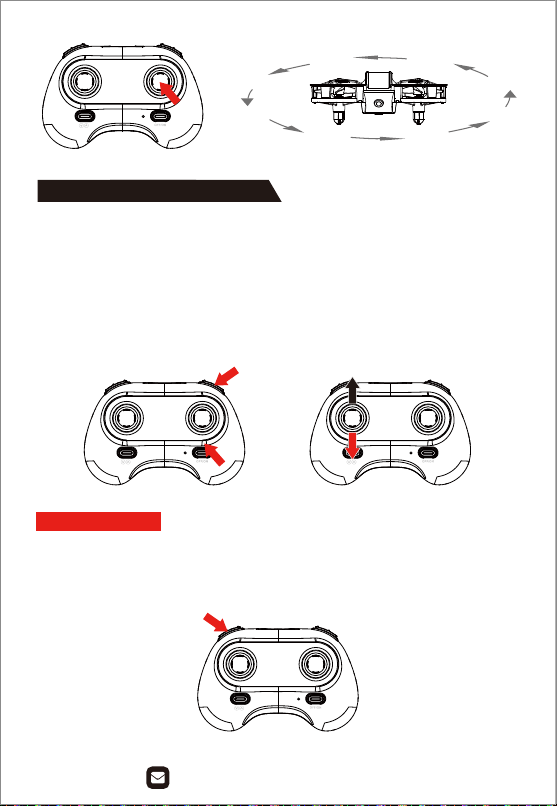
Press down the right joystick, the drone will start self rotation. Press again
to stop.
(9) One Key Landing/Emergency Stop
①Keep pressing the Speed Switch button (left shoulder button) and press
down the Power Switch, the remote controller beeps 2 times indicates it's
in Level 2.
②Turn on the drone and place it on horizontal surface, push the left
joystick up and down to pair.
(1) How to Activate Operation Level 2
(2) Self rotation
Keep Pressing
Short press the Speed Switch to change speed between low, middle and
high speed. The remote controller beeps one time when changed to low
speed, 2 times in middle speed and 3 times in high speed.
Functions Enabled in Level 3
①Long press the Light Switch button (right shoulder button) and press
down the Power Switch, the remote controller beeps 3 times indicates
it's in Level 3.
②Turn on the drone and place it on horizontal surface, push the left
joystick up and down to pair.
(1) How to Activate Level 3
(2) Speed Switch
Keep Pressing

Press down the left joystick, the remote controller beeps one time indicates
it's ready to flip. Tap the right joystick to any direction to make the drone flip.
The function is not available in low power
(3) 360° Flip & Roll
①Put the drone in front of the remote controller, ensure that it's facing
forward and then calibrate them horizontally.
②After taking off, keep pressing down the right joystick for about 2
seconds, the remote controller keeps beeping slowly and indicator lights
on the drone also blink slowly.
③To quit Headless Mode, keep pressing down the right joystick again
until the remote controller stops beeping, and indicator lights on the drone
also stop blinking.
(4) Headless Mode
Before performing a Flip trick, please make sure there’s enough
space around the drone (no obstacle within 1.5 meters).
Please make sure that the player is always facing the same direction when
the drone has taken off.
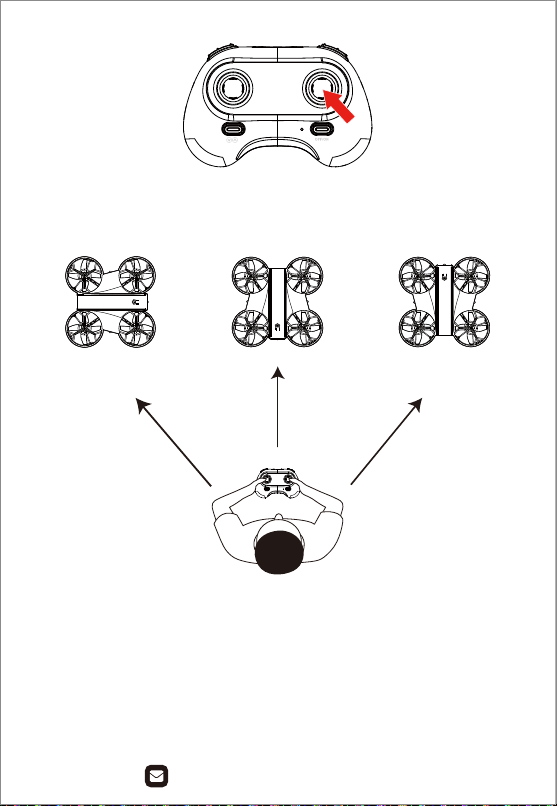
In Headless mode, no matter what direction the drone turns to during flight,
its control will always bases on the direction when it was paired. Re-pairing
the drone will reset the direction in headless mode
FRONT
FRONT
FRONT
REAR
REAR
REAR
×
×
√

1.There is a certain risk when using battery that may cause body
injury or property loss. Users must be aware of the risks and take full
responsibility of using battery improperly.
2.lf battery leakage occurs, please avoid contacting your eyes or skin
with electrolyte. Once it happens, please wash your eyes with clean
water and seek medical care immediately.
3.Please remove the plug immediately if you sense any peculiar smell,
noise or smog.
1.Please use the charger from original factory to ensure your safe
usage.
2.Do not charge dilatant or outworn battery.
3.Do not over charge the battery. Please unplug the charger once
fully charged.
4.Do not charge the battery next to inflammables, such as carpet,
timber floor or wood furniture or on the surface of electro-conductive
objects. Please always keep an eye on the battery when charging.
5.Do not charge battery which not cooled down yet.
6.The charging temperature should be between 0℃to 40℃.
BATTERY INSTRUCTIONS
BATTERY CHARGING
This product contains electronic components and battery. Please
dispose it according to the special requirement of your local garbage
disposal method.
RECYCLING
!

Problem
The drone slides in
flight
Drone and remote c
ontroller do not pair
Propellers spin but
do not take off
The drone’s reaction
delays or out of
control
Trouble Shooting
1.Land the drone and re-calibrate it on
horizontal surface
2.Attempt Fine-tuning through the remote
controller
3.Make sure there’s no wind in the area
1.Place the drone on horizontal surface and
try again
2.Make sure batteries are not in low power
Trouble Shooting
1.Recheck whether propellers are installed
correctly or not
1.Low power, player needs to maneuver the
drone back and exchange battery
2.Out of controllable range, need to make
sure the drone is within 20 meters
INKPOT TECHNICAL SUPPORT
Dear customer:
Thanks for choosing INKPOT products. If there’s any question or problem in
use, please contact INKPOT after-sales mailbox for more information.
Table of contents


