WATTS INNOVATIONS Prism QUADCOPTER User manual

PRISM QUICK START GUIDE

SCAN TO
DOWNLOAD FULL
PRISM USER MANUAL
www.WATTSINNOVATIONS.com
THANK YOU FOR PURCHASING
We have designed PRISM to be the most versatile aircraft possible. We understand the
challenges that professional Drone Operators face on a daily basis, so we created this aircraft
with the pilots in mind. We hope that it serves you and your organization well in all of your future
endeavors.
Please feel free to reach out any time with critical feedback, feature requests and suggestions.
Thank you for your support and trust in our products.
Bobby Watts
WATTS INNOVATIONS

PRISM QUICK START GUIDE
COAXIAL X8
QUADCOPTER
QUADCOPTER AND COAXIAL MASS TABLE
DRY WEIGHT 15.6 lbs (7.08 kg) 20.3 lbs (9.21 kg)
WEIGHT WITH BATTERIES See values scaled for battery weights, below
Tattu 6s 8,000mAh x 4 (10.6lbs)
Tattu 6s 8,000mAh x 4 (10.6lbs)
26.2 lbs (11.88 kg)
10.8 lbs (4.89 kg)
30.9 lbs (14.02 kg)
24.0 lbs (10.88 kg)
Tattu 6s 10,000mAh x 4 (13.75lbs)
Tattu 6s 10,000mAh x 4 (13.75lbs)
29.4 lbs (11.29 kg)
7.6 lbs (3.44 kg)
34.1 lbs (15.47 kg)
20.8 lbs (9.43 kg)
39.3 lbs (17.83 kg)
15.6 lbs (7.07 kg)
41.8 lbs (18.96 kg)
13.1 lbs (5.94 kg)
MTOW 37 lbs (16.78 kg) 54.9 lbs (24.9 kg)*
Tattu PLUS 6s 16,000mAh x 4 (19 lbs)
Tattu PLUS 6s 16,000mAh x 4 (19 lbs)
Tattu PLUS 12s 16,000mAh x 2 (21.5lbs)
Tattu PLUS 12s 16,000mAh x 2 (21.5lbs)
34.6 lbs (15.69 kg)
2.4 lbs (1.08 kg)
N/A
N/A
MAXIMUM USER PAYLOAD See values scaled for battery weights, below
*The PRISM X8 configuration is technically capable of an MTOW of 55 lbs or more, but may not operate at an MTOW of 55 lbs or greater by law
while remaining in its weight and performance category.
3

4
FLIGHT MODE EXPLANATIONS
ALT HOLD mode is the base flight mode of this PRA, and provides the most manual control over the
aircraft. In this flight mode, the aircraft uses the onboard sensors to only stabilize its attitude and altitude.
Pitch and roll are commanded by manipulating the respective control sticks.At neutral control input (center
pitch and roll stick position) the RPA will remain level and not increase or decrease altitude.
Altitude rate of change is controlled by the amount of deviation from center point of the throttle stick. The
higher the throttle stick position, the faster the climb. Conversely, the lower the throttle stick position, the
faster the RPA will descend.
This flight mode uses GPS inputs to maintain position during flight. Pilot inputs via the pitch/roll sticks
command changes in ground speed. Pitch and roll stick deflection will command fore/aft and left/right
ground speeds respectively. Controlling altitude in POSHOLD mode is the same as in ALTHOLD. With pitch
and roll controls centered, the RPA will attempt to hold its current position and altitude. The aircraft will
self-correct for disturbances that may force it from the desired position.
Auto mode instructs the RPA to follow the waypoint mission plan uploaded to the autopilot system.
The pilot will only have manual control of the RPA heading while the mission is being carried out. The
autonomous mission can be paused at any time by toggling the flight mode switch on the
RPS. To exit AUTO mode, the user can simply flip the switch into either ALTHOLD or
POSHOLD.
POSITION HOLD
AUTO MODE
ALTITUDE HOLD

PRISM QUICK START GUIDE
5
This mode can be selected in an emergency situation, and will command the aircraft to automatically
return to home and land. The home position is recorded automatically when the aircraft is armed and the
aircraft will return to this exact original takeoff position. For this reason, ensure that the drone may safely
be landed in extreme circumstances, especially operating from a moving platform (such as a truck, boat,
etc).
As part of the preflight planning, the pilot should identify the height of all tall objects in the flight
operations area. The RTL ALTITUDE should be set to a height that is greater than that of the tallest object
with a comfortable margin of error (10-20%). This is done to ensure that the aircraft can always maintain
separation from all objects while autonomously returning to land. This is set in the SAFETY menu of
WattsQGC.
Once the RPA has arrived above the home position, it will automatically descend and perform a landing.
This situation is described in detail in the Emergency Procedures section.
The RTL altitude and behaviour can be set via the GCS prior to flight.
RTL MODE (RETURN TO LAND)

ASSEMBLY FOR FLIGHT
1. Remove the main aircraft body from its transport container and place it on a flat, level surface.
2. Slot the T-shaped landing gear into their receptacles on the underside of the central airframe and turn
the cam lock until it is in the locked position.
3. Depress the release pin on each of the collapsible GPS masts and tug gently on the GPS disk to extend
the masts until they lock in their extended positions.
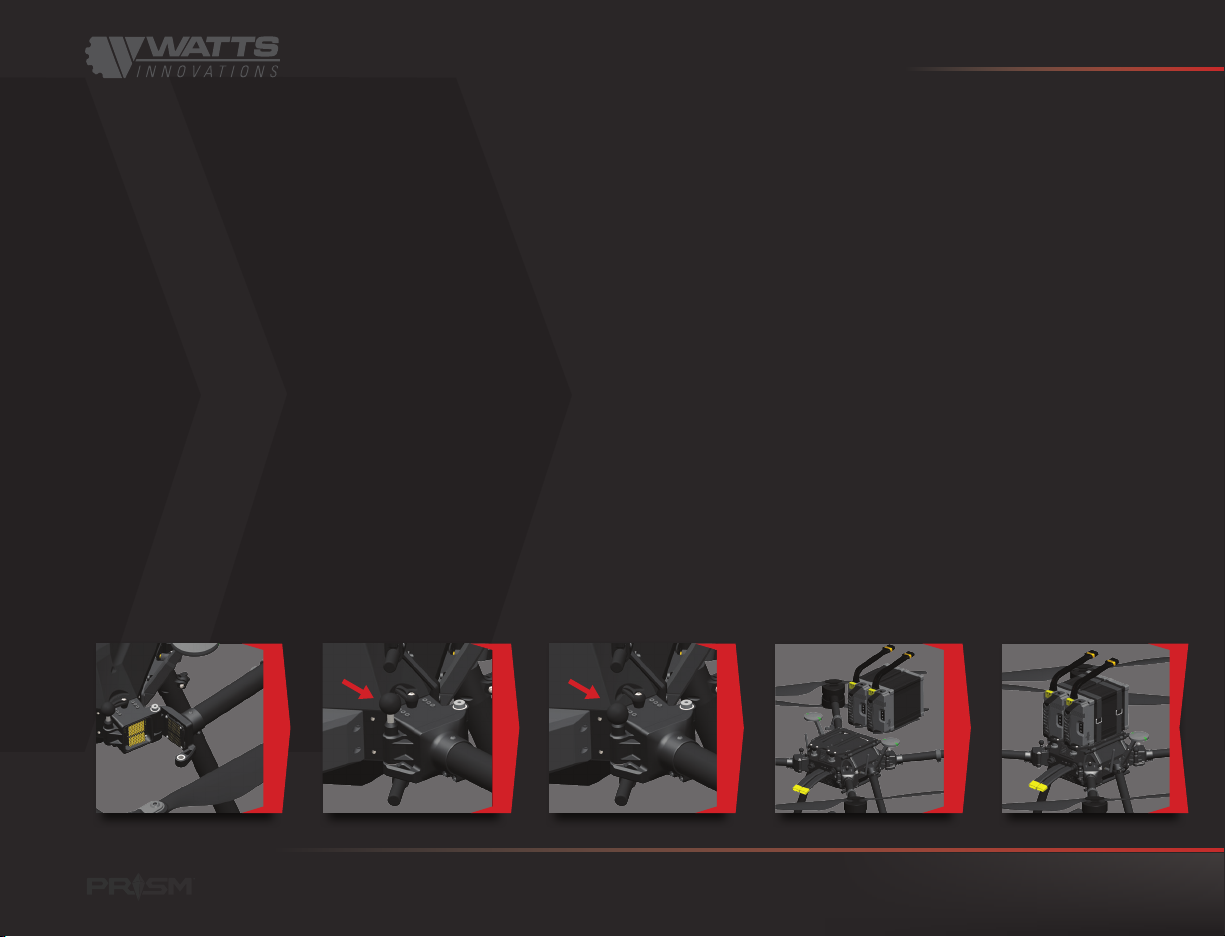
4. Remove the four red plastic arm protectors at the four corners of the aircraft body where the booms
attach. This will expose the data and power pins that make up the Propulsion ID system, so do not
leave these pins exposed for a long time, particularly in dusty or wet environments. Store the red
plastic protectors where they will not become dirty or lost.
5. Release the arm-locking pins by lifting the knob to the left of each corner of the airframe. Swing each
arm outward into the extended flight position, one at a time, until the Propulsion ID power pins are
fully engaged with the contact points at the bases of the arms, and the arm is flush against the central
airframe. Ensure each arm is correctly locked into flight position and the bolts are firmly set by pressing
down on each locking knob.
PRISM QUICK START GUIDE
6
PRISM QUICK START GUIDE
6. Ensure the data uplink/downlink antennas on the left and right sides of the aircraft are positioned
outward and up at about a 45-degree angle.
7. Remove the protective cloth covers from each of the motors and set the covers aside where they will
not be blown away by the propwash during operations. Unfold the propellers on the motors.
8. On the battery tray receptacle, pull the locking pin away from the battery tray and rotate a quarter turn
to allow the pin to lock in the extended position. Slide the battery tray into the battery tray receptacle,
ensuring that the battery leads are facing the power distribution plugs emerging from the side of the
main aircraft body, and that the locking holes in the battery tray are lined up with the locking knobs
on the airframe. Release the locking knobs by rotating each one clockwise a quarter turn so that the
springs push the bolts through the holes in the battery tray. This will ensure the battery tray is properly
secured. Test the battery tray by pulling forcefully on the battery to ensure it is properly secured.
9. Continue assembly of PRISM by attaching the payload, first performing the physical installation, then
connecting the data and power connectors.
7

OPERATING PROCEDURES
POWER UP FINAL CHECKS BEFORE TAKE OFF ARM AIRCRAFT & TAKE OFF
1. Power up payload and
ensure it is functioning
correctly.
2. Power on the ground
control station.
3. Connect each battery plug
to the aircraft.
4. Open the WattsQGC
application.
5. Verify no errors in the
overall system status.
6. Verify the RTL failsafe
altitude & ensure that the
aircraft will clear any obstacles.
7. Ensure the Low Voltage
RTL warnings are set for your
particular application, flight
envelope & payload.
1. Observe the RPA is has
acquired GPS lock.
2. Verify sufficient RPAS
battery voltages.
3. Observe the wind
conditions have not changed
significantly and are still within
operational limits.
4. Observe VMC for the
intended area of operation.
5. Verify the launch area and
pad is level, totally clear and
secure.
6. Position RPA nose into
wind, PIC standing behind
RPA.
1. Select either ALTHOLD or
POSHOLD flight mode with the
three position switch. Complete
the pre-flight checklist in
WattsQGC application.
2. Arm the RPA (Throttle stick
DOWN, yaw to the RIGHT).
The WattsQGC application will
audibly announce “Armed”.
3. Observe all motors spool up
correctly.
4. Apply power to lift off and
ascend quickly out of ground
effect (1-2 meters).
5. Confirm RPA is stable and
reacting correctly to stick
inputs.
6. Enter POSHOLD mode and
confirm the RPA holding its
current position.
7. Observe battery voltage has
not dropped significantly under
load. Verify RPAS ready to
commence flight operations.
8

FLIGHT DESCENT AND LANDING SHUT DOWN
1. Check battery voltage on
the display at regular intervals.
2. Ensure both video
telemetry & control link
signal strengths are within
acceptable levels.
3. Ensure RPA is within
predetermined flight
boundaries.
4. Be aware of any
meteorological changes during
the flight.
5. Be aware of any aircraft
entering the operations area.
6. Ensure sufficient battery
capacity remaining to return
safely to base.
1. Ensure landing area is clear.
2. Payload operator to prepare
payload for landing.
3. Command a steady, angled
flight path towards the landing
area.
4. Bring the RPA to a hover
roughly 15 ft (3 m) above
landing area.
5. Slowly lower RPA to touch
down, ensuring minimal
horizontal movement after
landing gear has made contact
to avoid dynamic rollover.
6. “Disarm RPA (Throttle stick
DOWN, yaw to the LEFT). The
WattsQGC application will
audibly announce “Disarmed”.
7. Observe all propellers
stationary before approaching.
1. Power down RPA by
disconnecting the battery
plugs.
2. Remove the battery tray
from RPA. Aircraft is now
“safe”.
3. Power down RPS.
4. Power down Payload.
1. Inspect each motor for
excessive heat buildup.
2. Inspect each propeller for
damage or play.
3. Inspect each boom for flex,
displacement, or play.
4. Inspect each battery for
excessive heat or swelling.
5. Log the flight time and
observations.
AFTER EACH FLIGHT
9

PRISM QUICK START GUIDE
10
>>>
>>>
WATTS QGC EXPLANATION
1 2 3 4 5 6 7 9
8
18
10
11
12
13
14
15
16
17

PRISM QUICK START GUIDE
11
>>>
[1]: WattsQGC Application Settings [10]: Artificial Horizon & Heading Indica-
tor (magnetic)
[2]: PRISM Vehicle Settings [11]: Real-Time Telemetry Values
[3]: Automated Flight Setup [12]: Camera Input Source Selector
[4]: Main Fly Screen / Fly Menu [13]: Picture-in-Picture
[5]: MAVLink warnings/notifications [14]: RTL/Land button
[6]: GPS Satellite Status [15]: Takeoff button
[8]: Battery % remaining [17]: Pre-flight Checklist
[7]: RSSI for RC/Video Link [16]: Arm Motors button
[9]: Flight Mode [18]: Warning text

DISASSEMBLY AFTER FLIGHT
1. After operations are complete, power down and remove the payload.
2. Before folding the arms of PRISM, the propellers should be folded and secured, and the motors covered
with their dust covers. Fold the arms by pulling up on the round release knob on the left side (as-facing) of
the attachment point, then folding the boom arm against the side of the main airframe. Lift the attaching pin
at the point of contact and allow the arm to lock in place in its folded position. At this time the arm socket
covers may be installed to prevent dirt and other particulates from entering into the arm socket.
3. Remove the landing gear by loosening the cam locks on each of the landing gear tube clamps. Set the
airframe on a flat and level surface.
4. When not in use, the aircraft should be stored inside its case in a climate-controlled environment at room
temperature. The covers should remain in place over the arm sockets as well as the propellers, and the
arms should be folded in and locked in storage position. The case should be stored upright.
5. Batteries should be serviced and stored separately according to their manufacturer specifications. They may
be kept secured to the carbon-fiber battery tray as a set.
Pull up on pin
Release pin into the arm locking ring to ensure the arms are locked in place
for storage and transport.
All four arms are locked into place with arm covers
installed. View from below the aircraft.
12

PRISM’s compasses are calibrated from the factory and should not require an additional calibration
before flight. It is important to note however that periodically, a user may wish to calibrate the
compasses for the best performance possible. In order to calibrate the onboard compasses, simply
enter the Settings -> Sensors -> Compass menu. Then click OK to begin compass calibration.
While the calibration is underway, hold the drone in the air and spin it around on all axes slowly in a
circular motion. The aircraft can be rotated at random. It is important that the aircraft be rotated so that
all axes are rotated during the calibration process. This may take up to a few minutes to complete, so
please be patient. During the compass calibration, a status bar will be displayed. Once the calibration is
complete, a readout will be shown to show the health of all three compasses.
PRISM’s accelerometers are calibrated from the factory and should not require an additional calibration
before flight. It is important to note however that operations in extreme temperatures may require an
additional accelerometer calibration. In order to calibrate the accelerometer, simply enter into Sensors ->
Accelerometer, then follow the instructions. After placing the vehicle in each position, hold the aircraft still
and press “Next”, until complete. Once this is finished, a vehicle reboot must be completed in order to fly.
ACCELEROMETER CALIBRATION
COMPASS CALIBRATION
NOTE: Because Compass #3 is located inside the flight controller and surrounded by EMF, it is not
uncommon for Compass #3 health to be in the RED after a calibration. This is not unusual and will not
cause any in-flight issues.
PRO-TIP: Because the aircraft can be configured with a heavy flight battery, during a compass
calibration it may be easier for the operator to only plug in 1 battery in an effort to save weight. In
addition, this may be performed with two people to make the process easier.
13

UPDATING PRISM FIRMWARE WITH THE ECHOSKY MOBILE HANDSET
1. Ensure the aircraft and RPS are powered on with sufficient power for the duration of the update.
2. Connect PRISM’s onboard companion computer to a wireless network. This is done by entering the network
SSID and password into the Network Access fields in PRISM menu of the Vehicle Settings, and tapping
“Connect.” The SSID and the word “Connected” in green will display upon successful connection.
3. Select “Check for updates” under the Update Utility. The system will prompt the user to power off the
EchoSky Mobile to prevent interference with the WiFi data download.
4. Power off the EchoSky Mobile by tapping the power button, then tapping it and holding it until the handset
powers off.
5. Restart the EchoSky Mobile. During the rebooting process, the companion computer will download the
update and cache it for transfer to PRISM. Restart the WattsQGC application and allow it to fully connect to
the RPA (about 30 seconds).
6. Access the Aircraft Settings and PRISM menu again. Verify that the new firmware version shows in the
drop-down menu under the Update Utility.
7. Select the new firmware version from the drop-down menu and tap on “Update,” then slide the slider to
confirm. This will now begin the updating process.
8. The update will take approximately 5 minutes to install and initiate the new firmware. During this process, it
will disconnect from the EchoSky Mobile RPS. Do not disconnect the power from PRISM during the update
process! Once the process is complete, the drone will restart and the vehicle will become connected again.
Now verify that the new firmware is active by verifying the PRISM Version on the same menu screen.
14

UPDATING WATTSQGC
Watts Innovations will frequently release new
versions of the WattsQGC Application for the EchoSky
Mobile handset. These updates will include new
feature implementations, improvements and bug
fixes. It is highly recommended that users continually
update both WattsQGC as well as the onboard PRISM
firmware to ensure optimal performance and the best
user experience possible.
Updating the WattsQGC app will not cause any
information such as cached maps, automated
missions, or telemetry data to be erased.
Upon opening the WattsQGC application, a pop-up
will appear asking the operator if he would like to
update the application. Simply press “YES” and the
application will begin to update.
NOTE: The EchoSky Mobile handset must be
connected to a WiFi network in order to update.
You may see the current version of the WattsQGC
App by accessing the General Settings tab of the App
Settings
Automatic Update - Updating from general settings
page
15

PRISM QUICK START GUIDE
16
NOTES

© 2021 Watts Innovations Watts All Rights Reserved
This manual suits for next models
1
Table of contents
Other WATTS INNOVATIONS Drone manuals


