Inland DB-100 User manual

Page 1
DB-100™ Wet/Dry Band Saw
User Guide
Thank you for buying this Inland product. Please take time to read all the instructions to understand the correct components,
set up, and use of the model you purchased.
Safety
• It is extremely important to wear proper eye protection when using any saw. We highly recommend that you wear safety
goggles rather than safety glasses.
• DO NOT wear loose clothing or any accessories (long necklaces, bracelets, shirts with long fringes, and similar) that
might get caught by the saw during operation.
• Use only in a properly grounded and tested outlet. Under NO circumstances should you override the grounding system or
modify the plug.
• Set up your machine on a sturdy, level work surface that is water tolerant and a comfortable height to work on.
Parts
ThefollowingaremodelspecicpartsforallmodeleofDB-100Bandsawsanddependingonthemodelyoupurchased,the
parts and the degree of assembly will vary. Check to make sure that you have all the parts listed for your particular machine
before beginning assembly.
Part No. Part Name Qty. Color 91010 91040 91030
90007 DiamondCut™ Blade * silver 2 no 1
90001 WoodCut™ Blade * silver no 1 no
90033 Molded Work Table 1 black yes yes yes
65829172 10-24x1/2″PhillipsScrew 4 silver yes yes yes
90022 BladeSert™ 2 black yes yes yes
78824055 5/64″LongArmAllenWrench 1 black yes yes yes
65809114 Coolant Reservoir 1 gray yes yes yes
65809118 Coolant Reservoir Cover 1 gray yes yes yes
65829184 DB-100 Coolant Tubing 1 clear yes yes yes
65829114 10-24x1/2″NylonThumbScrew 1 white yes yes yes
90016 BladeDripGuide 1 gray yes yes yes
65829113 10-24x3/8″BrassThumbScrew 2 gold yes yes yes
65829119 DB-100 Drain Hose 1 clear yes yes yes
90014 LeatherBladeWiper 1 brown yes yes yes
*Dependant upon model purchased
Assembly Instructions
Assembly will take about 5 minutes and only requires a Phillips screwdriver. Use the exploded drawing on the following page
to reference parts and their placement during the assembly process.
NONE of the saws listed in this guide are suitable for use as a Frag Saw. Use with or in a salt
water environment will ruin the machine and doing so in any manner will void the warranty!
Aquarists and similar, please use the Inland DFS-100 ReefKeeper™ saw, Inland no. 91060.
Page 2
Installing the Blade
1. Open the front cover of the saw. If you have a toothed blade, make
sure to mount it with the teeth pointing downward, in the direction
of sawing. Diamond blades are positioned with the diamond surface
facing the saw front.
2. Position the blade around the lower wheel and into the right and left
guide channels. DO NOT bend or twist the blade at any time during
installation or use.
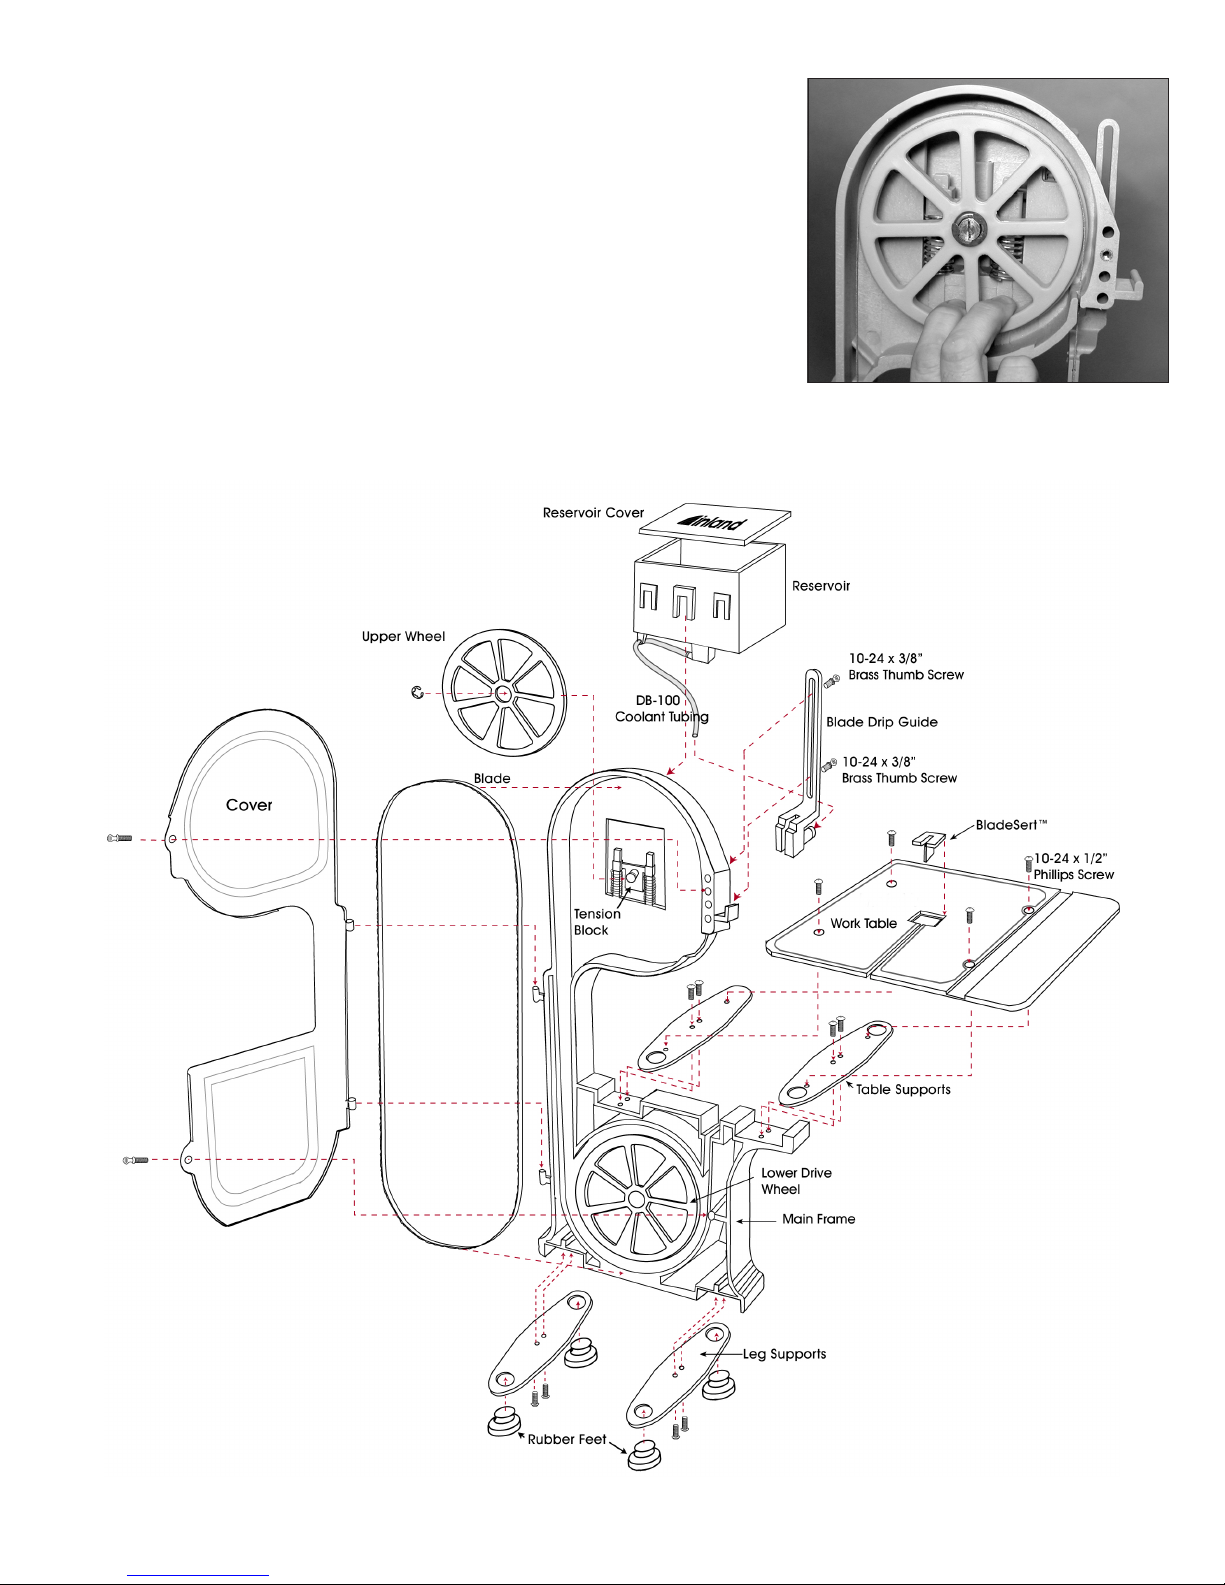
3. Use one hand to grasp the bottom of the upper wheel between two spokes
andpullthebottomofthewheeltowardsyou(approximately3/8″,but
you should feel it move easily initially and then “hit” and not want to go
further without forcing), then, while the wheel is tilted towards you, pull
the wheel down enough to place the blade around the wheel using your other hand.
4. Slowly release the wheel as you make sure the blade remains on both wheels and passes through the right and left
channels.

Page 3
5. Tracking, the position of the blade on the wheels, is controlled by adjusting the tilt of the upper wheel. Check the
tracking by rotating the lower drive wheel several revolutions by hand while watching the position of the blade on
the wheels. The blade should remain centered on both wheels. If the blade isn’t centered or comes off either wheel,
you will need to adjust the tracking and alignment as outlined in the next sections. If the blade rides centered on the
wheels skip to Installing the Work Table.
Adjusting Blade Tracking and Alignment
The wheels are factory aligned so that the position of the blade is controlled by
adjusting the upper wheel tilt. On the back of the upper housing is the tension
devicewithanylontiltadjustmentscrewinthemiddle.Beawarethatanychanges
made to the blade position on the upper wheel will have the opposite effect on the
blade’s position on the lower wheel. Read through the possible problems below to
ndtheonethatbestdescribeswhatishappeningwhenyouhandturnedthewheel
andfollowtheinstructionsforxingit.Makealladjustmentsinsmallincrements.
1. If the blade “walks” off the front of the upper wheel: Tilt the top of the
upper wheel backward by turning the nylon tilt adjustment screw to the
right(clockwise).Make1/2turnadjustmentsandtesttheeffectontracking
by hand turning the lower wheel. Repeat as necessary until the blade
remains in the correct position.
2. If the blade “walks” to the back of the upper wheel: Tilt the top of the
upper wheel forward by turning the nylon tilt adjustment screw to the
left(counter-clockwise).Make1/2turnadjustmentsandtesttheeffecton
tracking by hand turning the lower wheel. Repeat as necessary until the
blade remains in the correct position.
3. If the blade “walks” off the lower wheel: This indicates that the upper and
lowerwheelsarenotinalignmentwitheachother.Thelower(xed)wheel
is closer to the back of the frame than the upper (adjustable) wheel. The
lowerwheelshouldbe1/2”fromtheinsideoftheframe.Youcancheckthis
with a ruler or scale. The lower wheel can be moved in or out by inserting
the 5/64” long arm Allen wrench through the hole in the lower left side of the saw’s frame and loosening the set screw
onthebrassarbor.Movethewheeltothecorrectposition,checkwiththerulerorscale,andsecurethesetscrew.
Blade Tension
Proper blade tension is important for cutting ease and obtaining maximum blade life. The tension springs lessen the stress
that twists and pulls put on the blade to maximize blade life. All Inland saws have tension springs preset for a blade 37.7" in
circumference(+or-.005")-theexactdimensionofInlandbrandblades.IfyouuseanInlandbladeyoushouldneverhave
problems with tension. Some competitors make blades that are only 37.2" and so will
have too much tension on them which could shorten blade life. We highly recommend the
use of Inland brand blades for all Inland brand saws. We are the only saw manufacturer
thatmanufacturesitsowndiamondproductsmakingourdiamondbladessignicantlyless
expensive and designed to give you the best performance.
Installing the Work Table and BladeSert™
Place the molded table on the table supports with the split facing the front of the
saw.UseaPhillipsscrewdrivertoattachthetableusingthefour(4)10-241/2″
phillips screws. Take care not to overtighten.
PlacetheBladeSertintotheworksurfacemakingsuretheslotfacesthesawfront
andthebladedbladepassesthroughtheslot.OurpatentedBladeSerteliminatesthe
need for upper blade guides by providing blade support where it is most crucial: at
the point of sawing.
IMPORTANT NOTE: TheBladeSertwillwearwithsawuse.Theslotthatthebladepassesthroughwillwidenovertime.Using
awornBladeSertallowsforexcessplayinthebladeandthebladebecomesmorelikelytobreak.Howfastthishappenswill

Page 4
dependonuseandyoursawingstyle.YoushouldchecktheBladeSertforweareachtimeyouusethesaw.Youcanusethe“X”
behindtheslotasawearguide;whentheslothaswornoutbeyondthereachofthelegsofthe“X″(enhanced detail) replace it. It
isalsoagoodpracticetouseanewBladeSertwheneveryouinstallanewblade.
Installing the Coolant Reservoir and Blade Drip Guide
TheCoolantReservoirandBladeDripGuidemust be installed when using a
diamond saw blade to supply coolant to the blade. Using coolant with a diamond
blade is imperative to maintaining the cutting ability and life of the blade.
1. AttachoneendofthesmalldiameterDB-100CoolantTubingtothestem
on the underside of the Coolant Reservoir. NOTE: Soaking the tubing in
warm water makes it easier to insert onto the stem.
2. Feed the other end through the tunnel that runs through the middle of the
coolantowadjustmentnestonthereservoirundersideandpullmostof
the tubing through.
3. Screwthe10-24x1/2″MetalThumbScrew,whichisthecoolantow
adjustment, into the brass threading on the front. Turn until it just holds in
place.
4. Install the Coolant Reservoir by sliding it onto the supports located on the
back of the saw, just above the tension unit. Put the Coolant Reservoir Cover in place.
5. InstalltheBladeDripGuidebyplacingitagainsttheupperbackoftheframewiththebladepassingthroughthe
verticalslotintheholderfront.Secureinplaceusingthetwo(2)brass10-24x3/4"thumbscrews.Theguideis
adjusted by loosening the screws and sliding the guide up or down as needed.
6. AttachtheotherendofthesmalldiameterDB-100CoolantTubingtothestemonthebackoftheBladeDripGuide
NOTE: Soaking the tubing in warm water makes it easier to insert onto the stem.
Installing DB-100 Drain Hose
Whenusingadiamondblade,thelargediameterDB-100DrainHosemustbe
installed. Straighten the hose before using by soaking it in warm water a few
minutesandthenpulltoremoveanykinks.SlidetheDrainHoseontothelarge
stem located at the bottom front of the saw. Put the opposite end of the hose into
a collection container placed below the saw. Position the saw to the front edge of
yourworkbenchwiththeDrainHoselayingatandextendingstraightoutand
then down off the work bench into the collection container NOTE: Periodically remove the hose and ush out any cutting
residue to keep it working correctly.
Optional Leather Wiper
The leather wiper functions to help reduce the amount of over spray that might be carried from the blade to the upper wheel
chamber.Werecommendinstallingthewiperrunningadiamondblade.IfyouareusingaWoodCut™orMetalCut™blade
the wiper is not needed and you may omit this step.
Installing the Wiper:
1. Use a pair of pliers to compress one end of the leather wiper,
clamping down hard.
2. Apply a small amount of common bar soap to the crimped end.
3. Use your pliers to push the crimped end into the slot so that
theedgeoftheleatherjustbrushesagainsttheblade.Make
sure the wiper does not push the blade out of its normal path.

Page 5
Using the Diamond Blade
If you have purchased a saw with a diamond blade or are installing a diamond blade for use on your saw, please follow the
instructionsoutlinedbelowforitsproperuse.Yoursawmustbeconvertedforwetsawingbeforeuse.
1. Beforesawingwithadiamondblade,checktomakesuretheCoolantReservoir,BladeDripGuide,andDrainHose
are installed on the saw (see the Installing Coolant Reservoir section).
2. Makesurethatthecoolantowadjustmentscrewonthebackofthereservoirisclosedshutandthenllthereservoir
withwater.YoucanllthereservoirwithplainwateroraddacapfullofInlandDiamondCoolant(Inlandno.50011).
3. Plug the saw into a grounded electrical outlet.
4. Makesureyouhavepropereyeprotectiononbeforeoperatingthesaw.
5. Adjusttheowofcoolantontothebladebyslowlyturningthecoolantowadjustmentscrew.Coolantowrate
shouldbeaboutonedropofcoolantevery4-5seconds.Watershouldnotowexcessively.Increasethewaterow
rate ONLY if a dry powder forms on the tip of the material being sawed.
6. Turn on the saw. The black control knob is located on the left side of the saw. Please note the saw has a variable
speedmotor.Youneedtoturntheknobslowlyuntilyoureachyourdesiredsawingspeed.Itisnotnecessarytorun
your saw at full speed does not increase its cutting ability.
7. Withthesawnowrunning,placeascrappieceofmaterialatontheworktableinfrontoftheblade.Usinglight
pressure, guide the material into the blade. It is important not to force or push material into the diamond blade . Once
you have the right “feel”, the blade will seem like it is pulling material into it. Pushing into the blade will not increase
cutting speed and is more likely to bog it down. Use the speed control to adjust the sawing speed to the material being
cut and intricacy involved. The tighter the cut, the slower the speed needed to maintain control and not twist the blade.
8. Yourbladewilllastlongerifyoudonotletthemotorrunidly.Thecontinuousbendingandunbendingthatthemetal
experiences as it moves over the wheels causes the blade to work harden and become brittle over time. A properly
used blade will often fail from this work hardening before the diamonds wear out. To maximize the value of your
blade, make sure you are using the diamonds every time you make that metal bend and unbend.
9. Frequentlycheckthereservoirlevelwhilesawingandllasneeded.Shutoffthecoolantowafteruse.
Using the WoodCut™ or MetalCut™ Blade
IfyouhavepurchasedasawwithaWoodCutbladeorareinstallingaWoodCutorMetalCutbladeontoyoursaw,followthe
instructions outlined here for proper use.
1. Ifyoursawwassetupforwetsawingusingadiamondblade,makesuretheowadjustmentscrewthatcontrolsthe
waterdriprateiscompletelyturnedoff.DraintheCoolantReservoir.RemovetheDrainHoseandthendryoutthe
interior of the saw.
2. Installthebladewiththeteethpointingdownward.RefertotheInstallingtheBladesection.
3. Plug the saw into a grounded outlet.
4. Makesureyouhavepropereyeprotectiononbeforeoperatingthesaw.
5. Turn the saw on. The black control knob is on the left of the saw. Please note that the saw has a variable speed motor.
When turning the saw on, turn the speed up slowly to your desired sawing speed. It is not necessary to run the saw
at full speed to cut. In fact, running the saw at full speed on a continual basis will cause extra stress on the blade and
does not increase its cutting ability.
6. Withthesawnowrunning,placeascrappieceofmaterialatontheworktableinfrontoftheblade.Usinglight
pressureatrst,slowlyguidethematerialintotheblade.Itisimportantnottoforcematerialintotheblade.Allowthe
blade to do the work. As you get the right “feel”, the blade will seem to pull the material into it.
7. Pushing too hard will not increase cutting speed. It will actually slow it down. Use the speed control to adjust sawing
speed to the material being cut and intricacy involved. For tight inside curves and intricate work, operate at a slower
speed to maintain control and not twist the blade.
8. If the blade seems limp, loose or slips on the wheels as you saw, adjust the blade tension or tracking as outlined on
page3andchecktheBladeSertforwear,replaceasneeded.
Sawing Tips For All Blades
Sawingeffectivelyisanacquiredskill.Justremembertoletthebladedothework.Beawarethatsawingwithadiamond
blade is quite different than sawing with toothed blades. The diamond in the blade is actually wearing away the material being
cutratherthanrippingberslikeawoodblade.

Page 6
1. Wear safety eye protection while operating your saw.
2. Never leave the saw running when not in use to prolong blade life and turn off and unplug your saw when not in use.
3. Guidethematerialstraightintotheblade.Neverpushorforcethecuttingaction.
4. Use lighter pressure and slower speeds when starting a cut and then increase speed to the desired cutting level.
Slower speeds and lighter pressure are recommended for intricate cuts, tight curves, when completing a cut or when
backing out of a cut.
5. Never twist or bend the blade.
6. If a dry powder appears on the cutting surface or in the air when wet sawing with the diamond blade, more coolant
(water)isneeded.Checkthereservoirlevelrst.Ifthereisplentyofcoolant,increasethedripratebyslowlyturning
the coolant adjustment screw on reservoir.
7. If excess coolant (water) is spraying off the blade or coolant puddles on the work surface when wet sawing, check the
driprate.Youmayalsowanttoinstalltheleatherwipertohelpcontrolexcesswaterontheblade.(Seeinstallingthe
Leather Wiper section)
8. YoucanusetheWoodCutorMetalCutblade“wet”whensawingplasticsandberglasstoreduceheatandmelting.
9. Keep out of the reach of children.
Maintenance
Maintenancetoyoursawisminimalbutimportanttoprolongingthelifeandperformanceofthemachine.
1. Saw Frame: The main components of your saw are virtually maintenance free. Periodically clean the interior of your
saw. Either rinse clean with water or wood and metal cutting residues can be vacuumed out.
2. The Motor:Theunitissealedandrequiresnointernalmaintenance.Makesuretokeeptheentireunitcleananddry.
3. Upper Drive Wheel:Theupperdrivewheelneedlebearingshouldbeoiledaboutevery10hoursofrunningtime.
Dothisbyrstemptyingthecoolantreservoirifneedbe.Tiltthesawbackwardata45°angle.Place4to6dropsof
generalpurposeoil(notWD-40™)intothebearingarea.
4. BladeSert Blade Guide:TheBladeSertwillwearwithsawuse.Theslotthatthebladepassesthroughwillwiden
overtime.ChecktheBladeSertforweareachtimeyouusethesawandimmediatelyreplacewhenitbeginstoshow
signsofwideningandwear.Youcanusethe"X"behindtheslotasawearguide.RefertotheInstallingtheWork
TableandBladeSertsection.
5. Leather Wiper: The wiper does wear as the blade brushes against it. As the end wears, move the wiper back up
against the blade, referring to Installing the Leather Wiper section.
6. Work Table: Periodically wipe down or rinse the table to remove accumulated cutting residue.
7. Large Drain Hose:Periodicallyremovethehoseandrinseittoremovecuttingresidueandkeepitfreeowing.
Replacement Parts
Part Name Inland no. Part Name Inland no. Part Name Inland no.
DiamondCutBlade™ 90007 BladeSert™ 90022 TensionBlock 65809116
WoodCut™Blade 90001 MoldedWorkTable 90033 UpperWheelw/Bearing 65809001
MetalCut™Blade 90003 LeatherWiper 90014 UpperWheelArbor 65809002
BladeDripGuide 90016 MotorUnit-115V 65839110
SpeedController-115V 95846020
Service
So that we can offer you the highest level of service possible, please take a moment to register your product by going to
www.inlandcraft.com or mailing in the registration card.
Questions about your machine can be answered by visiting the Inland Craft web site at www.inlandcraft.com, watching our
online videos at www.inlandcraft.com/videos, by emailing Customer Service at [email protected] or by calling
InlandCustomerServiceat1-800-521-8428MondaythroughFriday,9:00amto5:00PMEST.
Inland Craft Products, Co.
32052 Edward Drive
Madison Heights MI 48071
www.inlandcraft.com
Rev 10 - 03/16/2015 Stock No. 68861555
www.facebook.com/inlandcraft
@inlandcraft
Other manuals for DB-100
2
Table of contents
Other Inland Saw manuals


