Inland DFS-100 ReefKeeper User manual

Page 1
DFS-100 ReefKeeper™ Saw
User Guide
Thank you for buying this Inland product. The DFS-100 ReefKeeper saw is designed for fragging corals. You will nd it works well with
both large polyp and small polyp stony corals, zooanthids, mushrooms, soft corals and live rock too. You will nd that the blade tends to
slice through soft tissue rather than crushing it like scissors, nippers, and shears, thus aiding in the recovery process. Please read all the
instructions for set up and use of your DFS-100.
Safety
• It is extremely important to wear proper eye protection and rubber gloves as some corals, especially zooanthids, are toxic! We
highly recommend that you wear safety goggles rather than safety glasses.
• DO NOT wear loose clothing or any accessories (long necklaces, bracelets, shirts with long fringes, and similar) that might get caught
by the saw during operation.
• Use only in a properly grounded and tested outlet. Under NO circumstances should you override the grounding system or modify the plug.
• Set up your machine on a sturdy, level work surface that is water tolerant and at a comfortable height.
Parts and Assembly
Check to make sure that you have all the parts listed before beginning assembly. Assembly will take about 5 minutes and only requires a
Phillips screwdriver. Use the exploded drawing below to reference parts and their placement during the assembly process.
Qty-Part No. / Part Name
1-90007
DiamondCut™ Blade
1-65829119
Band Saw Drain Hose
1-65809114
Coolant Reservoir
1-65809118
Coolant Reservoir Cover
1-65829184
Band Saw Coolant Tubing
4-65829173
10-24 x 1/2″ Nylon Screw
1-90033
Molded Work Table
2-90022
BladeSert™
1-90016
Blade Drip Guide
1-78824055
5/64″ Long Arm Allen Wrench
3-65829114
10-24 3/4″ Nylon Thumb Screw
1-90014
Leather Blade Wiper

Page 2
Installing the Blade
When setting the saw up the rst time, follow the instructions as outlined below.
1. Open the front cover. Position the diamond blade around the lower wheel and into
the right and left guide channels with the diamond surface facing the saw front. DO
NOT bend or twist the blade at any time during installation or use.
2. Use one hand to grasp the bottom of the upper wheel between two spokes and
gently pull the bottom of the wheel towards you (approximately 3/8″ - you should
feel it move easily initially and then “hit” and not want to go further without
forcing), then pull the wheel down enough to place the blade around the upper
wheel using your other hand.
3. Slowly release the wheel, making sure the blade remains on both wheels and passes
through the right and left channels.
4. Tracking, the position of the blade on the wheels, is controlled by adjusting the tilt
of the upper wheel. Check the tracking by rotating the lower drive wheel several revolutions by hand while watching the position
of the blade on the wheels. The blade should remain centered on both wheels. If the blade isn’t centered or comes off either
wheel, you will need to adjust the tracking and alignment as outlined in the next section. If the blade rides centered on the wheels
skip to Installing the Work Table.
Adjusting Blade Tracking and Alignment
The wheels are factory aligned so that the position of the blade is controlled by adjusting
the upper wheel tilt. On the back of the upper housing is the tension device with a nylon tilt
adjustment screw in the middle. Be aware that any changes made to the blade position on the
upper wheel will have the opposite effect on the blade’s position on the lower wheel. Read
through the possible problems below to nd the one that best describes what is happening
when you hand turned the wheel and follow the instructions for xing it. Make all adjust-
ments in small increments.
1. If the blade “walks” off the front of the upper wheel: Tilt the top of the upper
wheel backward by turning the nylon tilt adjustment screw to the right (clockwise).
Make 1/2 turn adjustments and test the effect on tracking by hand turning the lower
wheel. Repeat as necessary until the blade remains in the correct position.
2. If the blade “walks” to the back of the upper wheel: Tilt the top of the upper wheel
forward by turning the nylon tilt adjustment screw to the left (counter-clockwise).
Make 1/2 turn adjustments and test the effect on tracking by hand turning the lower
wheel. Repeat as necessary until the blade remains in the correct position.
3. If the blade “walks” off the lower wheel: This indicates that the upper and lower
wheels are not in alignment with each other. The lower (xed) wheel is closer to the
back of the frame than the upper (adjustable) wheel. The lower wheel should be 1/2”
from the inside of the frame. You can check this with a ruler or scale. The lower
wheel can be moved in or out by inserting the 5/64” long arm Allen wrench through
the hole in the lower left side of the saw’s frame and loosening the set screw on the
brass arbor. Move the wheel to the correct position, check with the ruler or scale, and
secure the set screw.
Blade Tension
Proper blade tension is important for cutting ease and obtaining maximum blade life. The tension springs lessen the stress that twists and
pulls put on the blade to maximize blade life. All Inland saws have tension springs preset for a blade 37.7" in circumference (+ or - .005")
- the exact dimension of Inland brand blades. If you use an Inland blade you should never have problems with tension. Some competitors
make blades that are only 37.2" and so will have too much tension on them which could shorten blade life. We highly recommend the use
of Inland brand blades for all Inland brand saws. We are the only saw manufacturer that manufactures its own diamond products making
our diamond blades signicantly less expensive and designed to give you the best performance.
Installing the Work Table and BladeSert™
Place the molded table on the table supports with the split facing the front of the saw. Use a
at blade screw driver to attach the table using the four (4) 10-24 1/2″ Nylon Screws. Take
care not to over tighten.
Place the BladeSert into the work surface making sure the blade passes through the slot and
the split faces the saw front. Our patented BladeSert eliminates the need for upper blade
guides by providing blade support where it is most crucial: at the point of sawing.
Page 3
IMPORTANT NOTE: The BladeSert will wear with saw use and the slot that the blade passes through will widen over time. How fast this
happens depends on use and your sawing style. Using a worn BladeSert allows for excess play in the
blade and the blade becomes more likely to break. Check the BladeSert for wear each time you use the
saw and replace the when it begins to show signs of widening and wear. You can use the "X" behind the
slot as a wear guide; when the slot has worn out beyond the reach of the legs of the "X″(enhanced
detail) replace it. It is also a good practice to use a new BladeSert whenever you install a new blade.
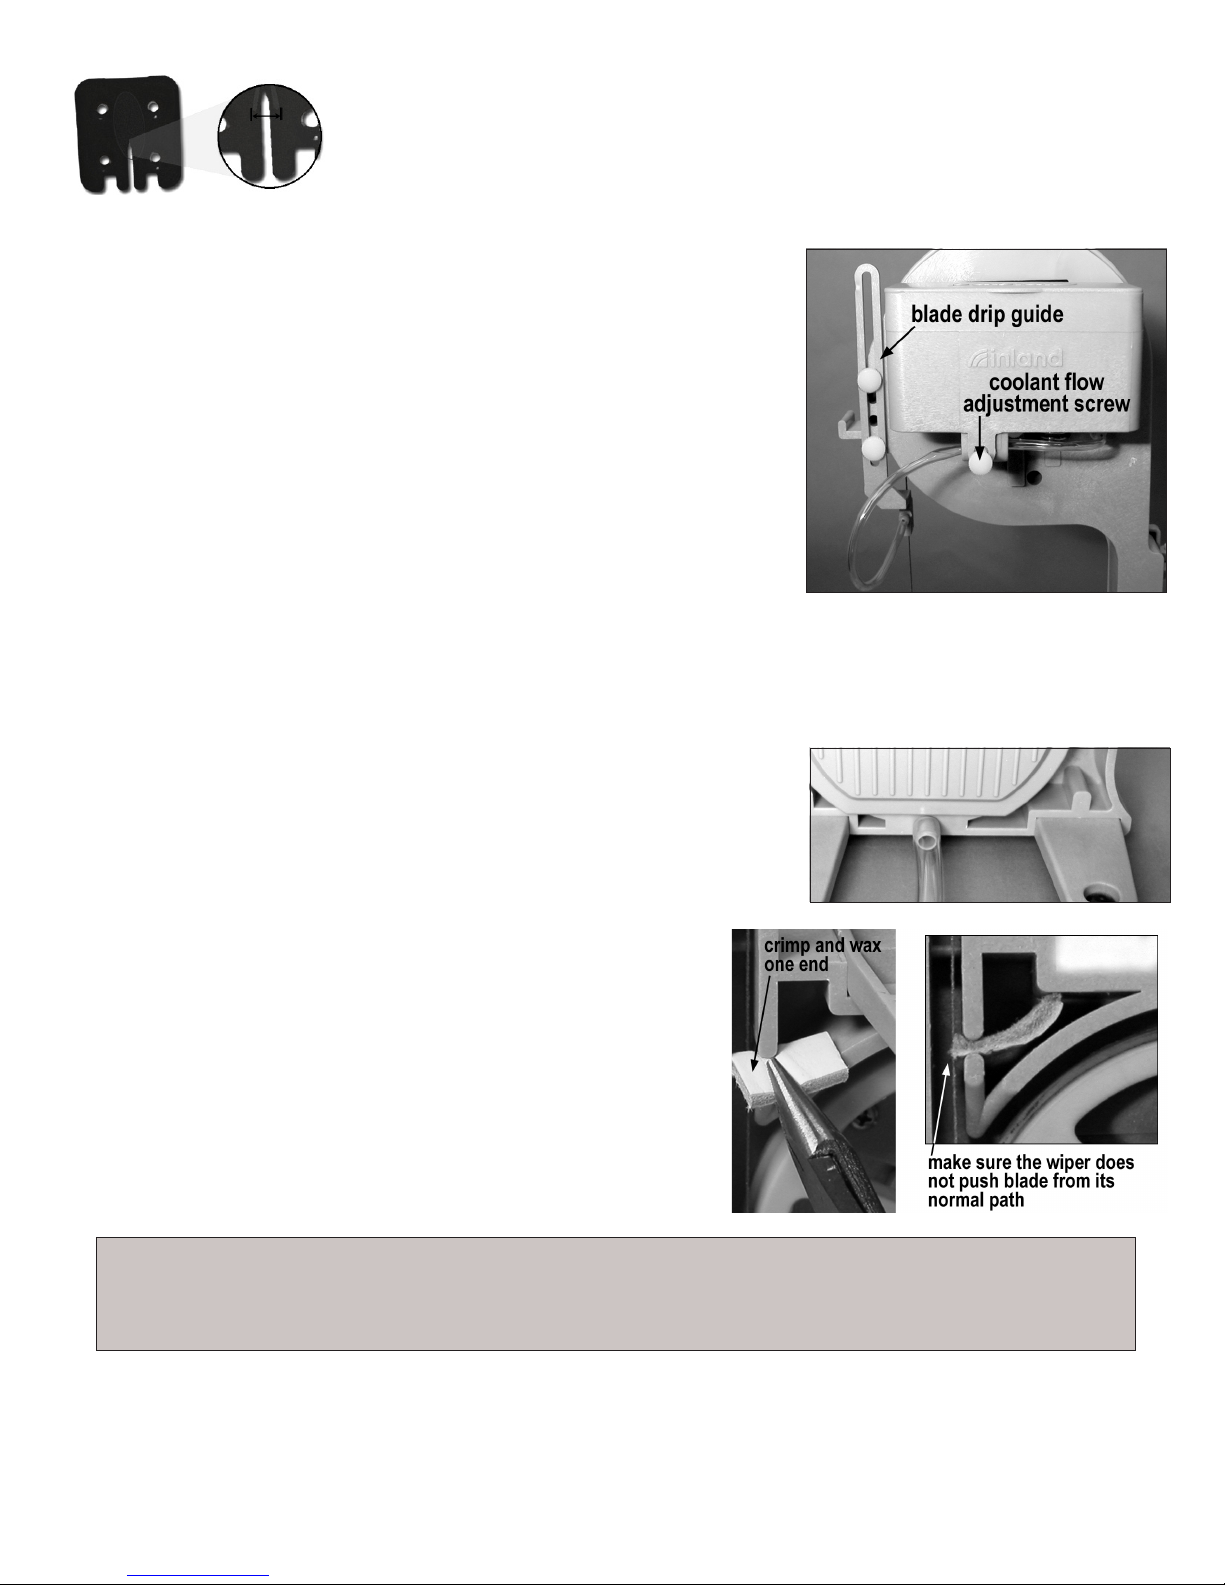
Installing the Coolant Reservoir and Blade Drip Guide
The Coolant Reservoir and Blade Drip Guide must be installed when using a
diamond saw blade to supply coolant to the blade. Using coolant with a diamond blade is
imperative to maintaining the cutting ability and life of the blade.
1. Attach one end of the small diameter Band Saw Coolant Tubing to the stem on
the underside of the coolant reservoir. NOTE: Soaking the tubing in warm water
makes it easier to insert onto the stem. Feed the other end through the tunnel
that runs through the middle of the coolant ow adjustment nest on the reservoir
underside and pull most of the tubing through.
2. Screw a 10-24 x 3/4″ Nylon Thumb Screw, which serves as the coolant ow
adjustment, into the brass threading on the front. Turn until it just holds in place.
3. Install the Coolant Reservoir by sliding it onto the supports located on the back of
the saw, just above the tension unit. Put the Coolant Reservoir Cover in place.
4. Install the Blade Drip Guide by placing it against the upper back of the frame with
the blade passing through the vertical slot in the holder front. Secure in place using
the two (2) 10-24 x 3/4″Nylon Thumb Screws. The guide is adjusted by loosening
the screws and sliding the guide up or down as needed.
5. Attach the other end of the Band Saw Coolant Tubing to the stem on the back of the Blade Drip Guide. NOTE: Soaking the
tubing in warm water makes it easier to insert onto the stem.
Installing the Drain Hose
When using a diamond blade, the Band Saw Drain Hose must be installed. This is the large
diameter plastic tube (about 48” long). Straighten the hose before using by soaking it in
warm water a few minutes and then pull it to remove any kinks. Slide the Drain Hose onto
the large stem located at the bottom front of the saw. Put the opposite end of the hose into a
collection container (not included) placed below the saw. Position the saw to the front edge
of your work bench with the Drain Hose laying at and extending straight out and then down
off the work bench into the collection container. NOTE: Periodically remove the hose and
ush out any cutting residue to keep it working correctly.
Optional Leather Wiper
The leather wiper functions to help reduce the amount of over spray that might be
carried from the blade to the upper wheel chamber. To install:
1. Use a pair of pliers to compress one end of the leather wiper, clamping
down hard.
2. Apply a small amount of candle wax to the crimped end.
3. Use your pliers to push the crimped end into the slot so that the edge of
the leather just brushes against the blade. Make sure the wiper does not
push the blade out of its normal path.
Using the Diamond Blade
1. Make sure that the coolant ow adjustment screw on the back of the reservoir is closed shut and then ll the reservoir with water.
2. Plug the saw into a grounded electrical outlet.
3. Make sure you have proper eye protection on before operating the saw.
Corrosion brought on by salt is the #1 threat to your band saw. Use clean RO/DI water in the saw for coolant. Use clean fresh
water on your saw for clean up. The amount of water present and the amount of time that it makes contact with the coral will
not harm the animal. In fact, casual evidence suggests that fresh water may even be an advantage as it will help osmotically to
destroy bacteria and other microorganisms.

Page 4
4. Adjust the ow of coolant onto the blade by slowly turning the coolant ow adjustment screw. Coolant ow rate should be about
one drop of coolant every 4-5 seconds. Water should not ow excessively. Increase the water ow rate ONLY if a dry powder
forms on the tip of the material you are sawing.
5. Turn on the saw. The black control knob is located on the left side of the saw. The saw has a variable speed motor. You need to turn
the knob slowly until you reach your desired sawing speed. It is not necessary to run your saw at full speed to achieve maximum
cutting ability. In fact running the saw at full speed on a continual basis places extra stress on the blade and does not increase its
cutting ability.
6. With the saw now running, place the coral (or rock) to be cut on the work table in front of the blade. Using light pressure, guide the
piece into the blade. It is important not to force or push anything into the diamond blade. Once you have the right feel, the blade
will seem like it is pulling material into it. Pushing into the blade will not increase cutting speed and is more likely to bog it down.
Use the speed control to adjust the sawing speed to the material being cut and intricacy involved. The tighter the cut, the slower the
speed needed to maintain control and not twist the blade.
7. Your blade will last longer if you do not let the motor run idly. The continuous bending and unbending that the metal experiences
as it moves over the wheels causes the blade to work harden and become brittle over time. A properly used blade will often fail
from this work hardening before the diamonds wear out. To maximize the value of your blade, make sure you are using the
diamonds every time you make that metal bend and unbend.
8. Shut off the coolant ow after use. Frequently check the reservoir level while sawing and ll as needed
Maintenance
Maintenance to your saw is minimal but important to prolonging the life and performance of the machine.
1. Saw Frame: After each use rinse the interior of the saw with clean, fresh (no salt) water.
2. The Motor: The unit is sealed and requires no internal maintenance. Make sure to keep the entire unit clean and dry.
3. Upper Drive Wheel: Greasing the Upper Wheel bearings liberally with petroleum jelly at least every 5 hours of use will help
keep salt out of the needle bearings. Do this by rst emptying the coolant reservoir if need be. Tilt the saw backward at a 45°
angle. and apply a generous amount of petroleum jelly to the bearing area.
4. BladeSert Blade Guide: The BladeSert will wear with saw use. The slot that the blade passes through will widen over time.
Check the BladeSert for wear each time you use the saw and immediately replace when it begins to show signs of widening and
wear. You can use the "X" behind the slot as a wear guide. Refer to the BladeSert Section.
5. Leather Wiper: As the end wears, reposition it, referring to Leather Wiper Section for proper placement.
6. Work Table: Periodically rinse the table with clean fresh water (no salt) to remove accumulated cutting residue.
7. Large Drain Hose: Periodically remove and rinse the drain hose and the tting with clean, fresh water (no salt) to remove
cutting residue and keep it free owing.
Replacement Parts
Part Name Inland no. Part Name Inland no. Part Name Inland no.
DiamondCut Blade™ 90007 Tension Block 65809116 Motor Unit - 115V 65839110
BladeSert™ 90022 Upper Wheel Arbor 65809002 Speed Controller - 115V 95846020
Molded Work Table 90033 Upper Wheel w/ Bearing 65809001 Leather Wiper 90014
Blade Drip Guide 90016
Service
So that we can offer you the highest level of service possible, please take a moment to register your product by going to
www.inlandcraft.com or mailing in the registration card. The DFS-100™ ReefKeeper™ Band Saw is covered by a 90 Day Warranty. This
warranty is granted by INLAND CRAFT PRODUCTS, CO. for 90 days from the original date of purchase. If your Inland machine fails
under appropriate use during the warranty period, Inland Craft will repair or replace it at our discretion. If you feel that this product is not
performing properly and needs to be serviced, contact INLAND CRAFT help desk for a Return Authorization Number.
Questions about your product can be answered by visiting the Inland Craft web site at www.inlandcraft.com, watching our online videos at
www.inlandcraft.com/videos, by emailing Customer Service at [email protected] or by calling Inland Customer Service at 1-800-
521-8428 Monday through Friday, 9:00 am to 5:00 PM EST.
Inland Craft Products, Co.
32052 Edward Drive
Madison Heights MI 48071
www.inlandcraft.com
Rev. 7 - 3/16/2015 Stock No. 65869160
www.facebook.com/inlandcraft
@inlandcraft
Table of contents
Other Inland Saw manuals


