Innomax Perfection Series User manual
SETTING UP YOUR FLOTATION SLEEP SYSTEM
1. Unpack the Box
Take all of the components out of the box. You should have the following items:
•Power Edge Support Rail System Includes:
-Attached Head/Foot Rails
-Attached Side Rail Assembly
•The Head Rail Is Marked & Has Exit Slits For
The Power Cords
•Fluid Support Chamber(s) or Tubes
•Low Watt (120 Watts or Less) Waterbed
Temperature Control System
•Vinyl Safety Liner
•Mattress Cover/Pillow Top Enclosure
•Kor Q Split or Single T/F Foundation (Optional)
•9Point Center Support Metal Bed Frame (Optional Purchase)
NOTE: It is extremely important you use the proper structural base for your new
fluid support system. Do not attempt to use a standard bed frame. Using any support
frame that does not have a minimum of 9 points of contact with the floor will result
in damage to your sleep system and can cause personal injury. Only use an
approved 9 Leg metal bed frame, Versaleg™support system or a platform pedestal
with center cross supports.
2. Your entire Fluid Support System can be easily assembled. First step,
determine where your bed will be positioned. If you are
using a headboard, make sure you have enough room
between the wall and the frame before you begin to fill
your mattress. Assemble the support base you intend to
use. This can be a center support metal bed frame, a
platform pedestal or light weight Versaleg™system.
Assemble the metal frame or pedestal in the desired
location and place your foundation in the frame with the
open side down. Many platform pedestals don’t require
the use of a foundation. For VersaLeg™assembly, place
the foundation halves on the floor with the open side up.
Position the Versaleg™plates on all four corners of each foundation half and then
place one plate on each side approximately half way between the head and foot
plates. Use four of the provided screws to attach each plate to the foundation.
Repeat this process for the second foundation piece. Once the plates have been
secured, twist the threaded end of the Versaleg™into each plate. Once all have
been inserted, simply flip the foundation over so the (CONTINUED)
FLUID SUPPORT ASSEMBLY INSTRUCTIONS
WARNING: Do Not Use A Standard Full Watt Heater With A Softsided Mattress. This Can
Result In Severe Damage To Your Sleep System And Void All Warranties.
1
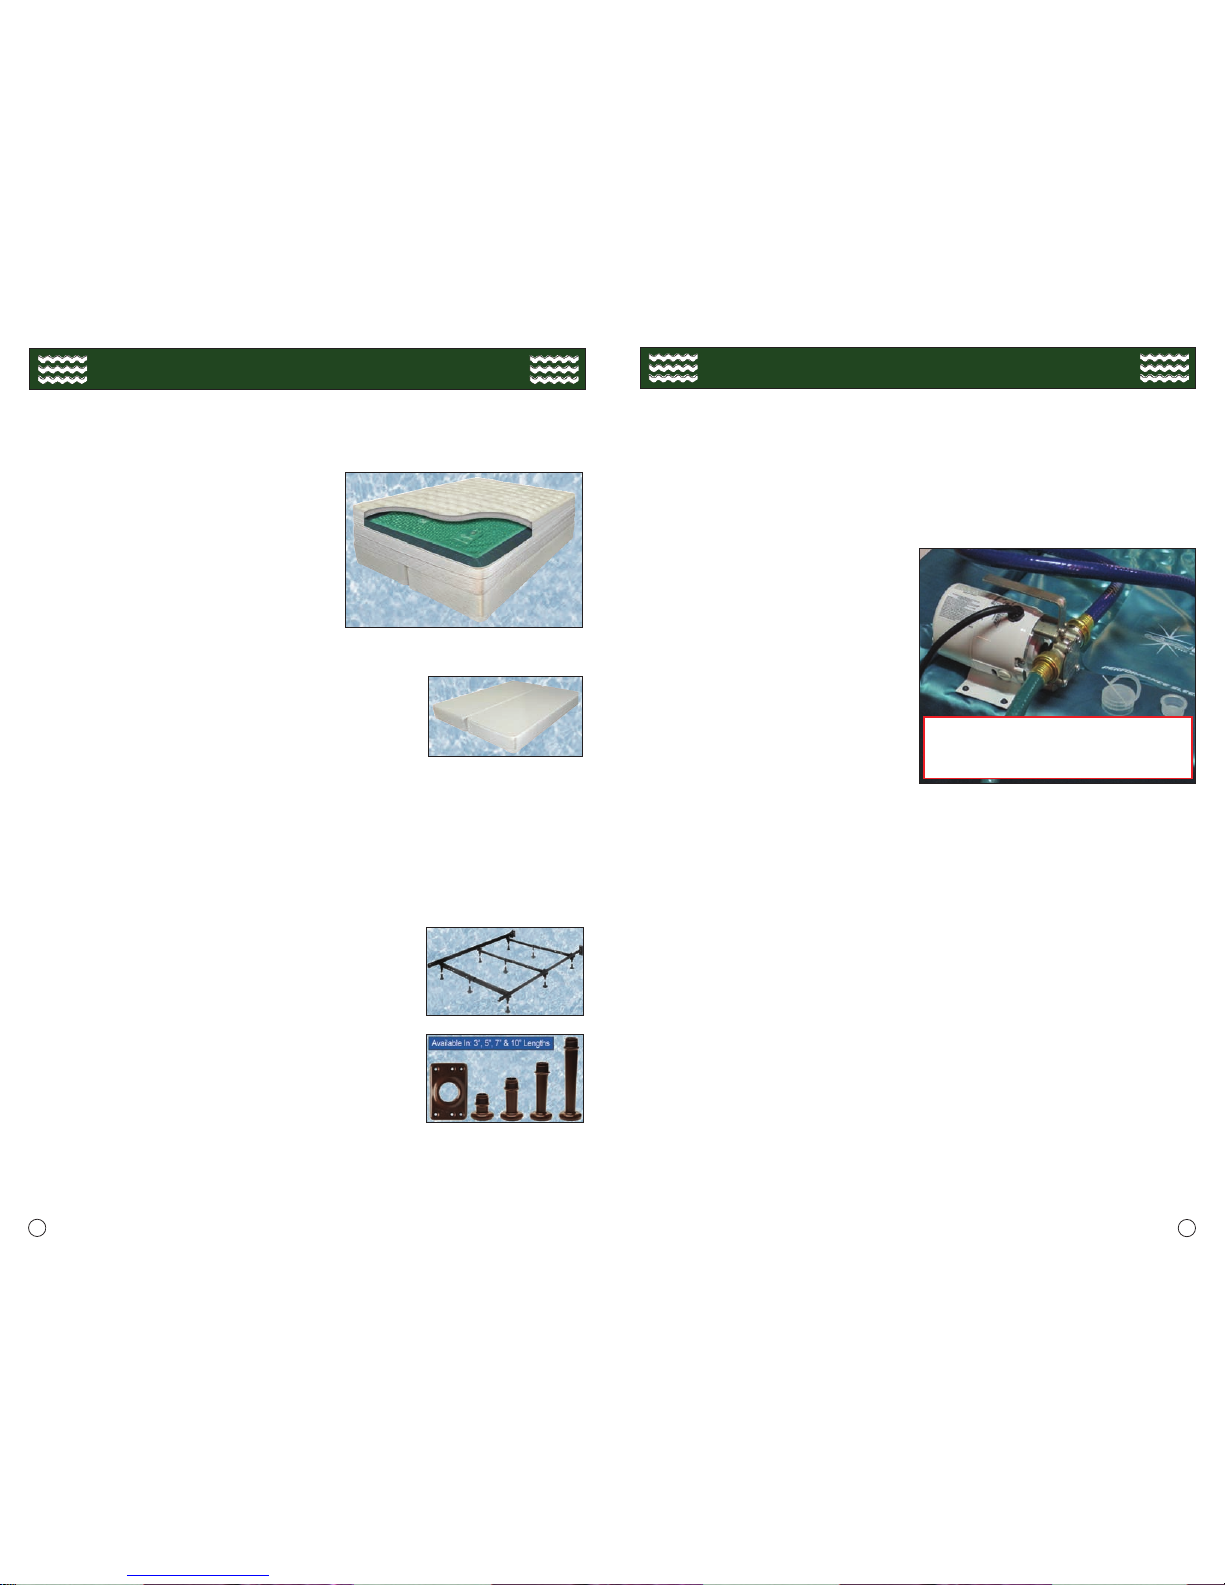
Electric Pump Usage/Draining Instructions: Unplug Heater Before Draining!
If interested in using an electric pump, please ask your dealer for more information.
1. Remove all of the air from your mattress.
2. Attach the “perfect union” connector on the
end of the clear hose on the pump to the valve
in your mattress. Make sure all washers are
used and the connections are tight to maintain
proper suction.
3. Connect your exit hose to the discharge port
on the pump. Ensure the exit hose is in the
desired location. The force of the water can
actually cause the hose to flop about and come
out of a normal bathtub. Do not leave the hose
unattended while indoors. Place the pump on
atowel or cardboard piece to prevent possible
damage to the floor or other surface.
4. Plug the pump into a grounded electrical
outlet. Note: There is no on/off switch and
the pump will begin to operate immediately.
5. Allow the pump to run until the water
slows to a trickle. The pump will remove
nearly all of the water & the mattress will
become “vacuum-sealed” to ensure all
internal support features remain in their
proper location. Do not lift the head of the
mattress until the mattress is vacuum
packed, as this could damage the mattress.
6. Immediately unplug the pump. Do not run
the pump without water for an extended period
of time, as this can severely damage the pump.
7. Disconnect the perfect union connector
from the mattress and immediately insert
the cap and seal to ensure the mattress
remains vacuum packed.
If the mattress is still too heavy to move, you can utilize a shop (wet/dry) vacuum to get the remainder of the water out
6
It is strongly recommended that an electric drain pump be utilized to prevent damage
to the internal support structure of your mattress. A typical electric pump will remove
nearly all of the water in a king sized mattress in 45 minutes or less. If no electric pump is
available, the use of a standard fill & drain kit will assist in removing the water from the
mattress. Attach the faucet adapter to the sink, taking care not to cross thread the adapter.
Screw the siphon pump to the adapter and attach the hose to the siphon. Using the hose
adapter, attach the opposite end of the hose to the valve on the mattress. To start the siphon
action, turn on the faucet to a moderate level.
If your siphon is self priming, the pump will
soon begin to remove water. If it is not self
priming, turn the bottom of the pump to the
“fill” setting and allow water to go into the
mattress. Once the hose is free of air, twist
the bottom of the pump to the “drain” setting
to create a siphon to remove water. Continue
this until the mattress is completely vacuum
sealed and is free from water.Firmly grab the
top, internal fiber, and the bottom to prevent
shifting when folding the mattress. Once the
process is complete, remove the hose
adapter and quickly insert the cap & seal to
maintain a vacuum inside the mattress. This
will hold all of the internal components of the mattress in their desired location. When moving
the mattress, do not drag it across the floor as this can cause a friction burn in the vinyl. If the
mattress is to be stored for more than 7 days before reinstalling, it is recommended that a
bottle of Fiber Bed Conditioner be placed inside to prevent odor and bacterial growth. Do not
store the mattress in conditions below 32 degrees Fahrenheit, as this can cause the vinyl to
crack. If it is stored in cold temperatures, gently place mattress in a warm room for up to 24
hrs prior to unfolding & filling with water to minimize the possibility of a cold crack.
Contact Your Dealer For Rental Info.
or ToPurchase The Drain Hero™ -
10 Piece Maintenance Kit.
Unplug The Waterbed Heater Before Draining The Mattress
DRAINING INSTRUCTIONS
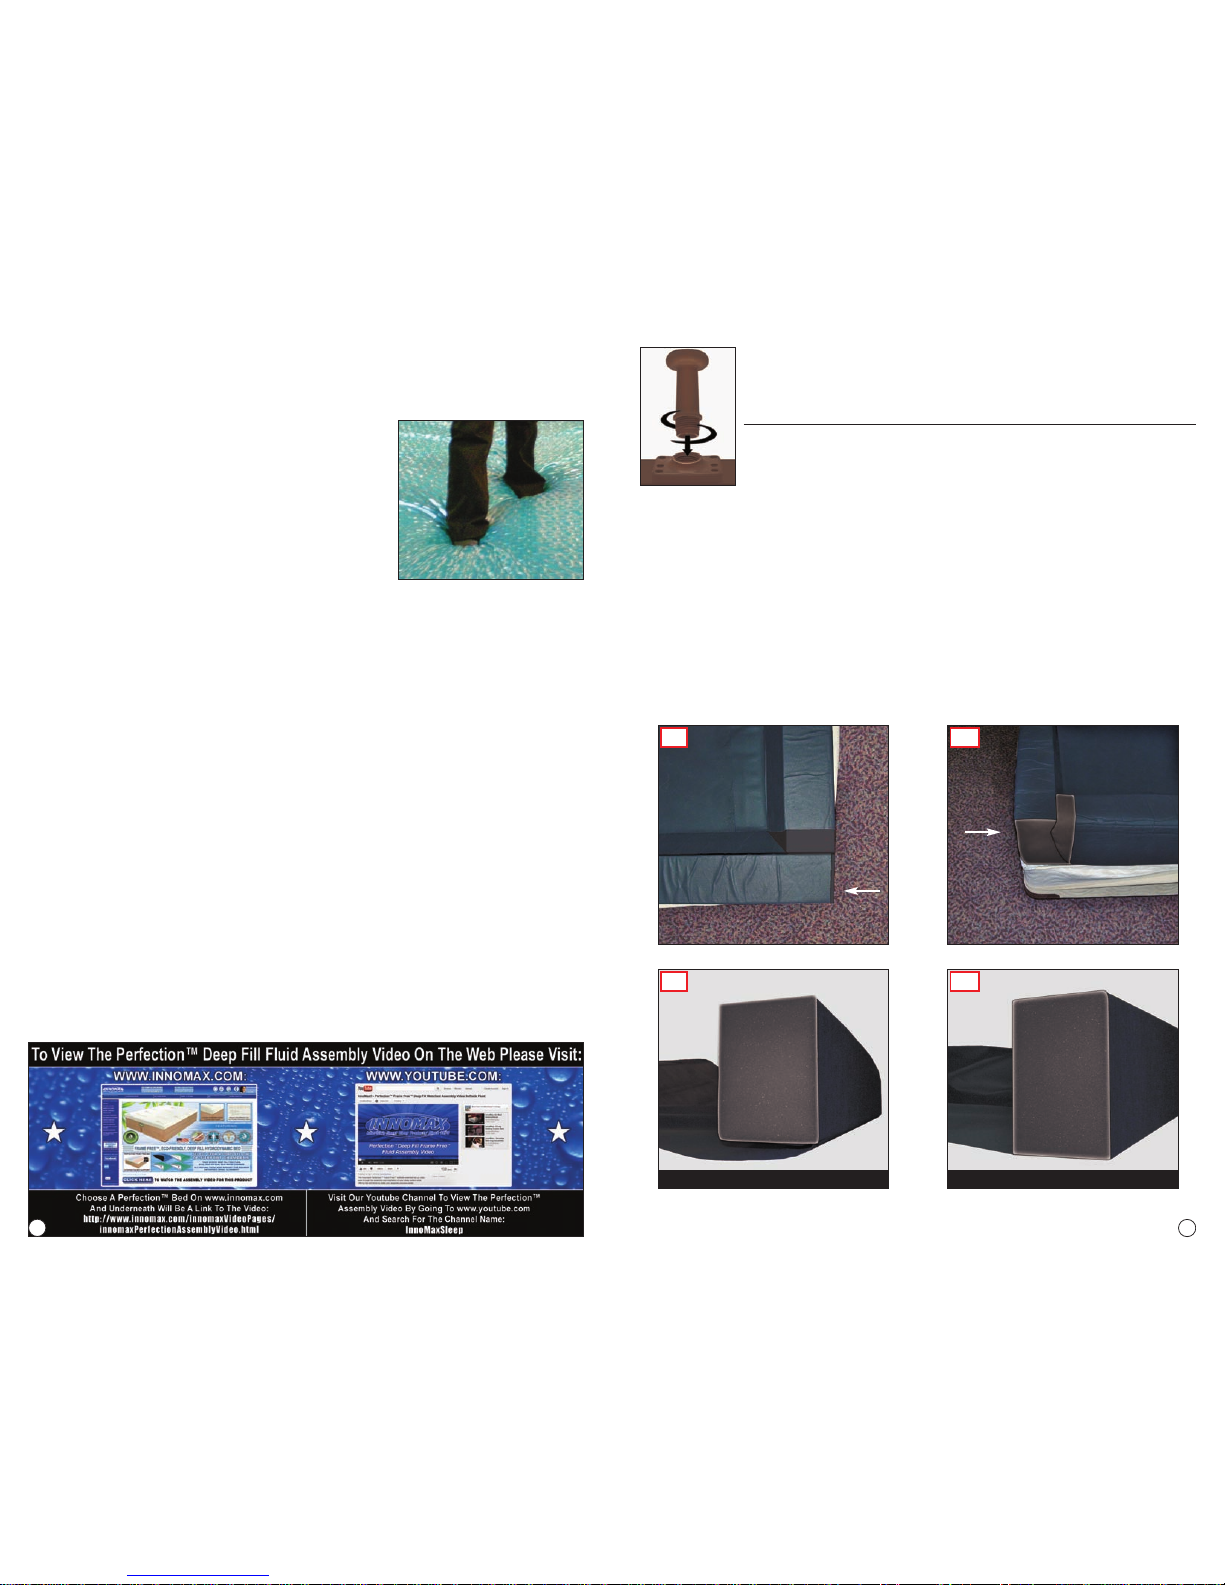
3. Unfold the mattress enclosure and completely unzip the cover. Insert the
head and foot rail inside the cover. The head of the bed should be stamped and
will have two slits in the black webbing material.This is for the exit of your temperature
control sensor and heater pad power cord. The side rails are inserted in between
the head and foot rails with the webbing as smooth as possible. The rails are
correctly installed when the webbing material is completely unrolled and is at the
bottom of the rail (see DIAGRAM B2). The rail should be approximately 6” in
height and 4” in width. Exception: The Perfections®Sponge Bed™is a full depth
flotation style system and is designed with the “M Rail System” which is
approximately 8” in depth and has interlocking slanted rails (see DIAGRAM A2).
The black webbing is also to be at the bottom of the rail (see DIAGRAM B2).
legs rest upon the ground and you have the firm, flat side of the
foundation is facing up. You are now ready to begin the bed
assembly.
For the assembly video of this product please visit: www.innomax.com
or www.youtube.com under the channel name InnoMaxSleep
2
5
B1
INCORRECT
Black Webbing Running Under Rails B2
CORRECT
Black Webbing Running Straight Out
From Rails
A1
Perfection Rails Top View
Foot
Of Bed
A2
Perfection Rails Side View
Foot
Of Bed
4. Install the heater pad(s) directly on the black webbing material in head to
toe position. Ensure that the entire pad is on a solid (CONTINUED)
all of the trapped air. Use the Air Extractor to remove the excess air.
10. Several of InnoMax’s®firmer water chambers feature a high level of fiber,
closed cell and/or sponge support sheets. These layers need to become fully
saturated with water to provide the desired comfort
levels. This process may take several days and may
require you to walk or roll on the mattress many times
during this period to extract as much air as possible.
While this early portion of the mattresses life may be
somewhat inconvenient, you will off set the extra
effort with the enhanced comfort you will enjoy for
years to come. The mattress may not feel as it did in
the showroom until you have finished this process. It
is recommended that you do not adjust fill levels to change firmness levels during
this process. Most sleepers find that following the “break end” period, the initial fill
level is the preferred setting.
11. Plug the heater pad into the heater control. Plug the control into a 110 volt
wall outlet and then set the temperature to the desired level. It is recommended to
be set between 80-87 degrees Fahrenheit depending upon your personal comfort
level. If you have a dual heating system, repeat this step for the other side of the
mattress.
12. Zip up the cover/pillow top. Install the new mattress pad and sheets. Enjoy
agreat night’ssleep on your new fluid support system!
13. Maintenance of your fluid support sleep system. Toreceive the maximum
comfort, enjoyment and longevity from your new fluid system, it is important to
perform periodic maintenance. In addition to the use of quality waterbed conditioner
on an annual basis, it is recommended to use Blue Magic®Vinyl Cleaner on the outside
of your water chamber(s) and vinyl safety liner at least 2-3 times per year to
prevent plasticizer migration which dries vinyl and can cause brittleness, and in
some cases, cracking of the surface. Also, vinyl is a porous surface and over time,
air molecules can pass through into the chamber requiring the use of the Air
Extractor to remove the trapped air bubbles. This small amount of maintenance
will allow you to benefit from the amazing comfort and support of your fluid
system for many years to come.

5. Place the vinyl safety liner over the heater pad(s) and tuck around the
Power Edge Rail System. Making sure the corners of the fitted liner are matching
the corners of the rail system. Smooth the vinyl away from the center of the mattress
area and toward the edge rails.
surface and not over the crack between foundation halves or plywood pieces in a
platform. It is best to place the pad as far down the
bed as possible to avoid constant pressure of sitting
on the pad. Push the pad power cord through the
slits in the black webbing and cover. The temperature
sensor on the control can be pulled through from the
outside. Make sure the sensor is a minimum of 12”
away from the pad and is not tucked under any
portion of the Power Edge Rail System to ensure
proper temperature readings. Repeat the process
on the opposite side if using a dual system.
Note: Do Not Plug In The Heater Until The Flotation Mattress Is Completely Filled With Water!
3
6. Please note that if the chambers have been in very cold conditions, you
must allow them to attain room temperature before handling the chamber to
avoid cracking the vinyl. Unfold the fluid support
chamber(s) and place on top of vinyl safety liner. The
valves on the water chamber(s) should be located at
the foot of the bed. Open both valves on the chamber(s)
to allow the vacuum sealed water mattress(es) to
begin to expand. Square the corners of the mattress(es)
with the inside corners of the Power Edge Support
Rail System. This is CRITICAL and must be done
before filling the chamber(s) with water. To assist in
the process you may fill the chamber(s) with air using a shop vac or a hair dryer
with a cool setting. Inflate the mattress(es) until it is approximately 18”-24” above
the foam rails. Place the caps back on the valves and push down on the center of
the mattress(es). This will pop out the corners so they can be easily adjusted to
align with the rail system. Once the mattress is centered, open the valves to
release the air.The shop vac can be used to expedite this step. If you are using a
dual support chamber system, place the “T” shaped thermal divider between the
two fluid chambers, with the “T” in an inverted position so that the flaps are slightly
under each chamber and the “leg” of the “T” is standing vertically between the chambers.
7. Begin the filling process. The first step is to pour one 8 ounce bottle of
Multipurpose Fiber Bed conditioner into the water
chamber (or 4 ounces into each half of a dual system)
to provide proper water treatment and to prevent
algae growth. This should be done every 12-18
months. Next, open both valves on the mattress and
screw the blue Perfect Union™adaptor onto the male
end of the hose. This adaptor is then attached to
either fill valve. Applying a (CONTINUED)
small amount of petroleum jelly to the rim of the valve will ensure a tight seal and
lessen the amount of air going into the mattress. This is also helpful after the entire
mattress is filled when the cap & seal on both valves are closed for the final time.
The second valve remains open during the filling process to allow air to escape.
The female end of the garden hose is attached to
your water supply. For best results, the mattress
should be filled using lukewarm water. The use of a
faucet adaptor will generally allow you to use the
bathroom sink, shower head or kitchen sink to fill the
water mattresses. This method of filling will offer the
proper temperature for better sleep and can control the
flow more easily. Generally, most household water
heaters will run out of hot water during the fill process.
Monitor the water temperature for this drop. Turn off both hot and cold valves and
wait for the tank to replenish the supply of hot water (Approximately 1 hour) and
then restart the lukewarm fill. While this method may require a longer filling time,
the end result is a more comfortable sleeping environment from the first night on.
Using an outside faucet to fill the bed results in a cold fill and can require up to 7-
10 days for the bed to attain optimal sleeping temperature. The normal operation
of the heater will raise the bed temperature approximately 1/4 to 1/2 degree
Fahrenheit per hour. The time required to heat a cold water filled mattress does
not indicate a problem with your heater.
8. Proper Fill Depth is approximately 1/2” to 1” below the top edge of the
support rail. For a firmer feel, lower the water level
slightly. For a softer feel, add a small amount of water.
Never fill the mattress so that it is above the side rail.
All of the InnoMax®water chambers, both mid-fill and
deep fill are manufactured using overcut vinyl allowing
the sleepers to rest gently in the bed instead of on top
of it. This creates positive spinal alignment and
improves overall comfort. Do not attempt to take the
wrinkles out of the vinyl by overfilling the mattress!
Overfilling the mattress will result in the bowing of the side rails and will greatly
reduce the comfort level of the bed. Remove the Perfect Union™adaptor and the
hose from the fill valve. Attach the Air Extractor to the fill valve and close the Ez
Burp Air Release (secondary valve) by inserting the seal and twisting the cap in
place. Adding the small amount of petroleum jelly to this air release valve will help
to create a more air tight seal.
9. Carefully use the Air Extractor to remove as much surplus air as possible.
Some air will be trapped under the closed cell float layers or in the
fiber layers inside the mattress. This air can only be removed
when it is pushed to the outer edges of the mattress. Before starting
this step, please make sure the heater is still unplugged. Remove
your shoes and stand in the middle of the mattress and walk to
any edge pushing trapped air out of the support layers and letting
it rise to the top of the mattress. Repeat this step, walking in a
different part of the mattress to release (CONTINUED) 4
Other Innomax Medical Equipment manuals


