INNOVASON M.A.R.S. User manual

M.A.R.S.
User Guide
Version:
Edition: 19-Jan-2010

Copyright
All rights reserved. Permission to reprint or electronically reproduce any document or graphic in
whole or in part for any reason is expressly prohibited, unless prior written consent is obtained
from Innovason.
All trademarks and registered trademarks belong to their respective owners. It cannot be
guaranteed that all product names, products, trademarks, requisitions, regulations, guidelines,
specifications and norms are free from trade mark rights of third parties.
All entries in this document have been thoroughly checked; however no guarantee for
correctness can be given. Innovason cannot be held responsible for any misleading or incorrect
information provided throughout this manual.
Innovason reserves the right to change specifications at any time without notice
© Innovason, 2009

Table of Contents
M.A.R.S. User Guide
Table of Contents
TABLE OF CONTENTS 3
M.A.R.S. (MULTITRACK AUDIO RECORDING SYSTEM) 5
Introduction 5
About this User Guide 5
Audio Routing 7
Connecting M.A.R.S. 9
Checking Communication 11
Playing Back the Demo Project 12
Transport Control 17
Recording 29
Advanced Functions 37
Project Management in M.A.R.S. 47
Ethersound Configurations 61
Troubleshooting 63
Replacing the M.A.R.S. Hard Disk 67
INSTALLING M.A.R.S : System and software 68

M.A.R.S. (Multitrack Audio Recording System)
Introduction
M.A.R.S. User Guide 5 / 69
M.A.R.S. (Multitrack Audio Recording
System)
Introduction
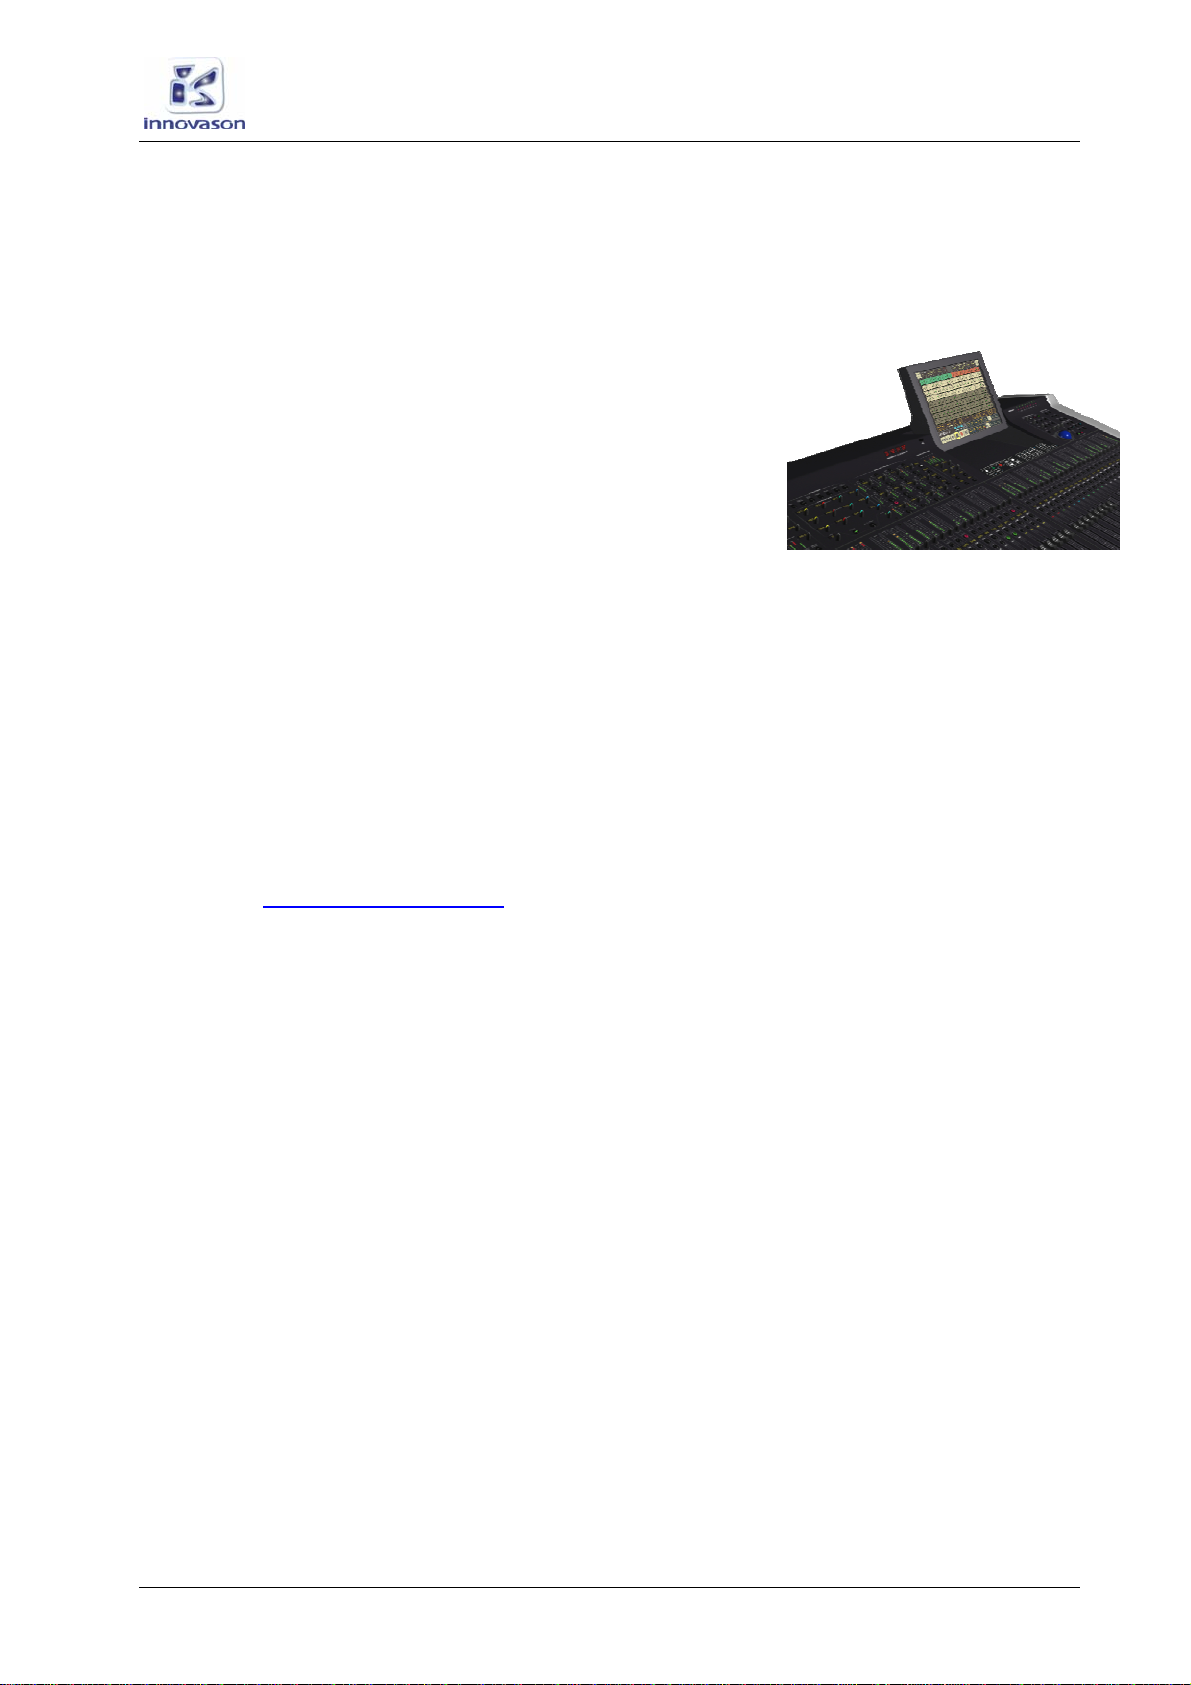
M.A.R.S. is an integrated 64-track hard disk recorder which is
fitted as standard to every Eclipse mixing console. A dedicated
control panel under the console touch-screen provides rapid
access to recording and playback functions. Additional functions
are accessible from the touch-screen display.
M.A.R.S. is designed for recording and playing back audio in
preparation for a live show or production. The most common
application is to record the sound check so that it can be
replayed later as a “virtual sound check”.
About this User Guide
M.A.R.S. exists in its own right as a stand-alone hard disk
recorder. When integrated into Eclipse, the system is known as
M.A.R.S. (Multitrack Audio Recording System). When used with
other systems, the recorder is called MT128.
This manual describes the operation of M.A.R.S. with Eclipse, and
concentrates on common tasks such as recording and playing
back a sound check. For details on all the functions provided by
the MT128 recording system, please refer to the documentation
provided at http://www.vb-audio.com
M.A.R.S. (Multitrack Audio Recording System)
About this User Guide
6 / 69 M.A.R.S. User Guide
Overview
M.A.R.S. provides 64 tracks of hard disk recording and playback
onto a removable hard disk which slots into the rear panel of the
Eclipse frame. The system is handled by a second computer which
runs separately from Eclipse’s Nova software.
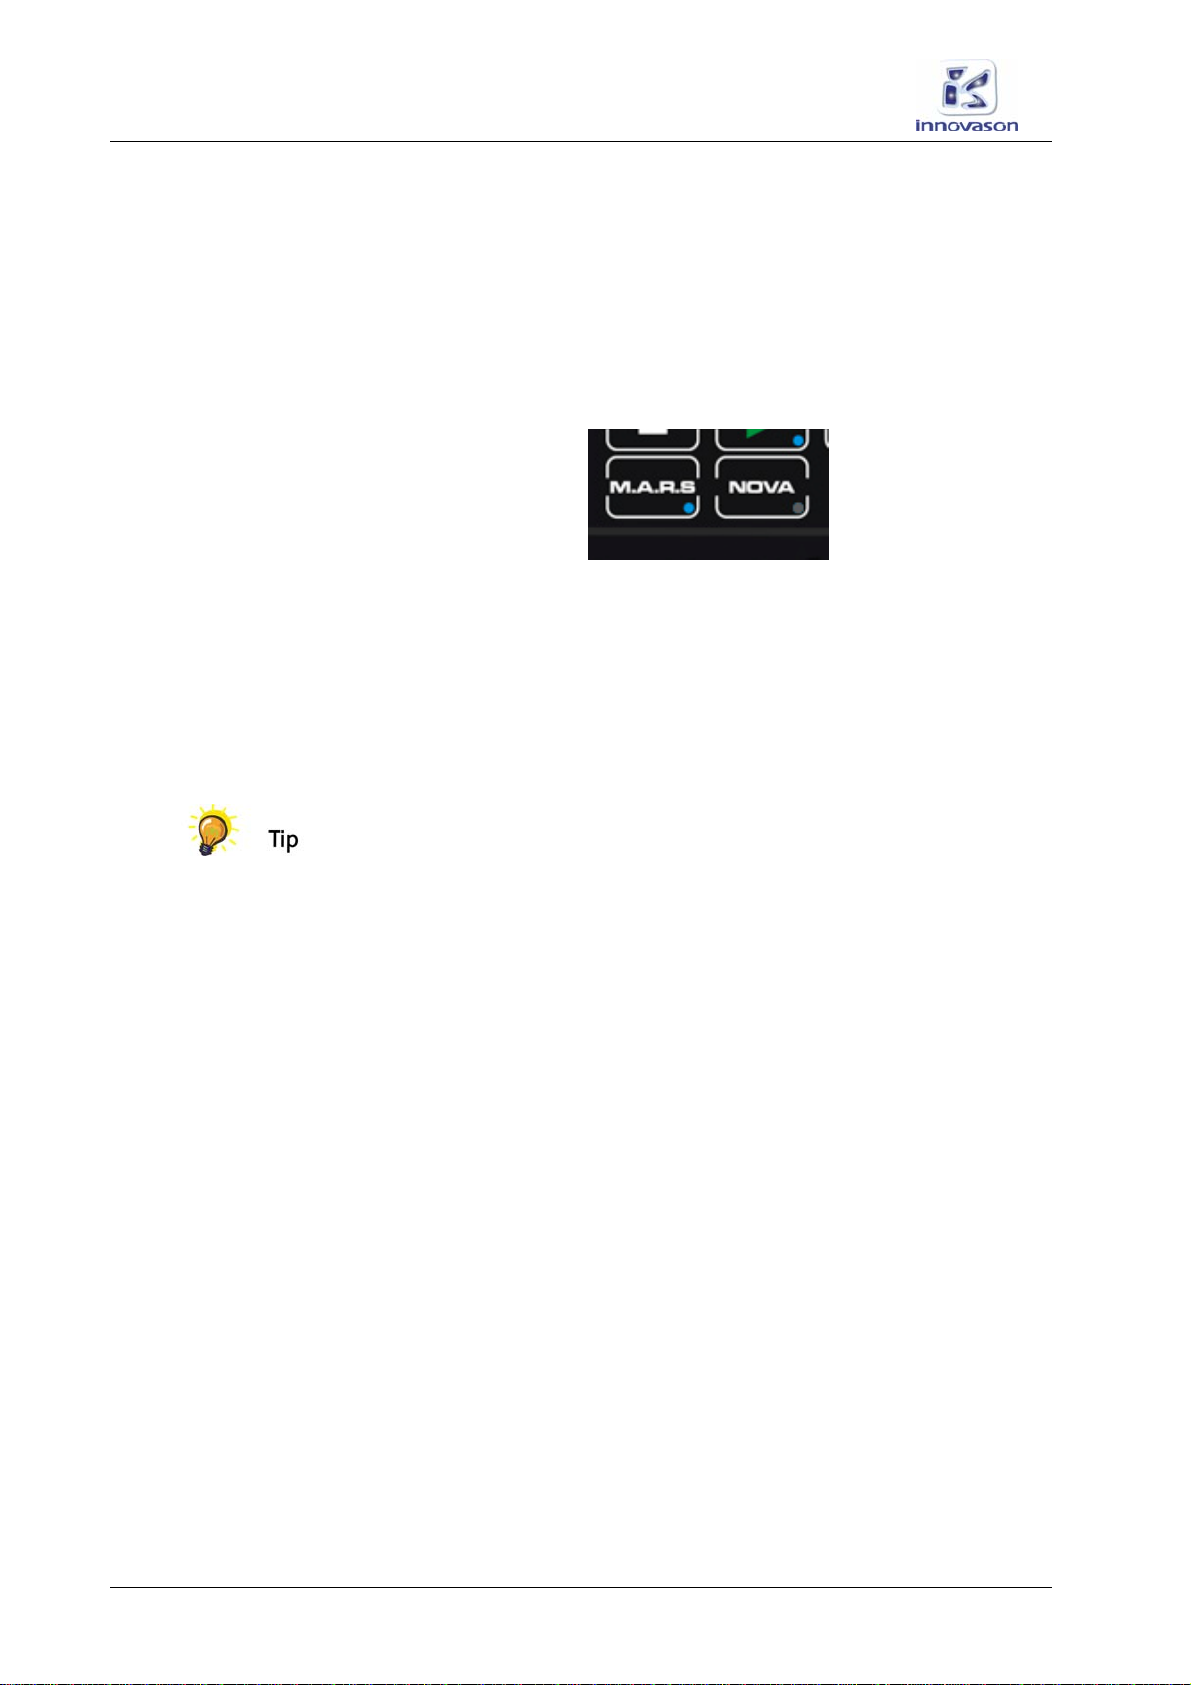
To switch the console’s touch-screen between the two control
computers:
1. Press the M.A.R.S. or NOVA buttons on the TRANSPORT
control panel:
•NOVA – accesses the Nova mix management software
described within the main Eclipse user guide. Nova controls
the console and stores/recalls mix settings.
•M.A.R.S. – accesses the hard disk recorder displays. All
audio recording is managed by the M.A.R.S. control
computer. All audio files are stored on the M.A.R.S. hard
disk which slots into the rear panel of the frame.
When working within the M.A.R.S. displays, all functions are
selected either by touching an on-screen button, or using the
trackball and keyboard. As most buttons are large, the quickest
method of operation is to reach out and touch a button!
M.A.R.S. (Multitrack Audio Recording System)
Audio Routing
M.A.R.S. User Guide 7 / 69
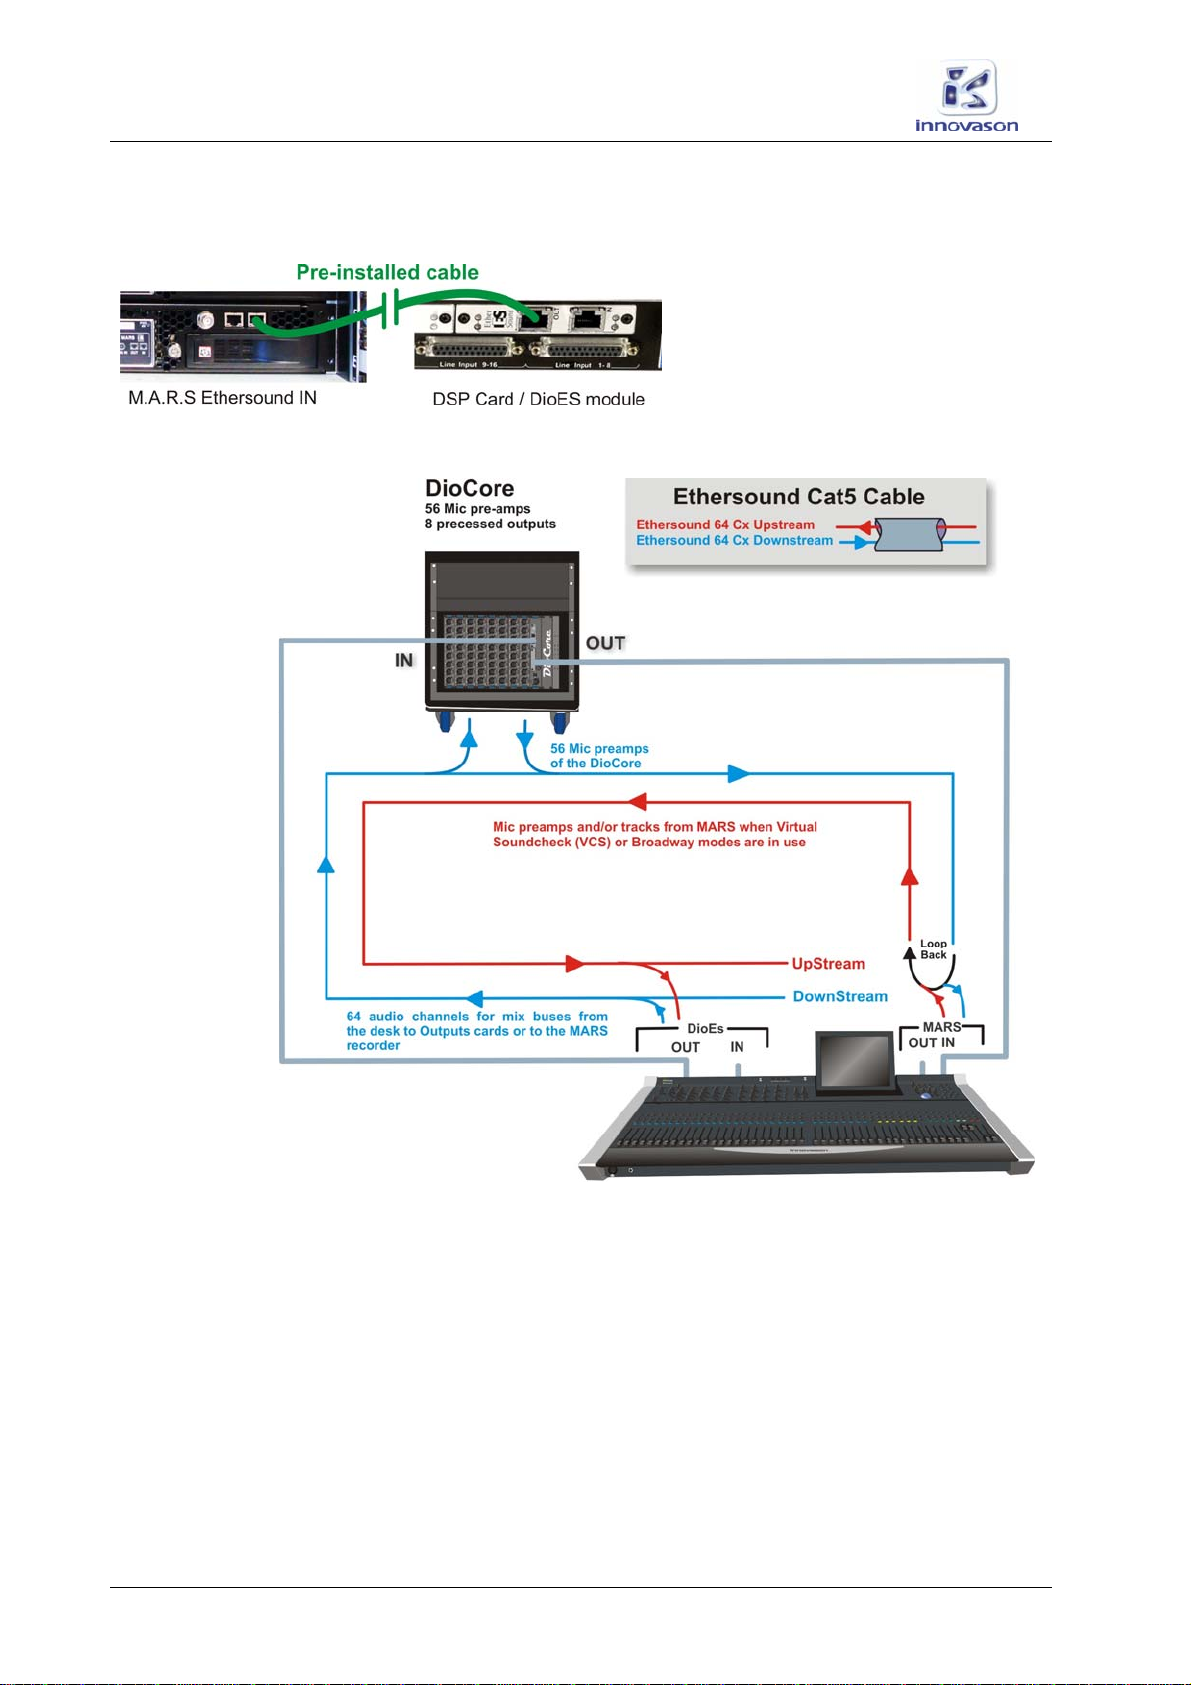
Audio Routing
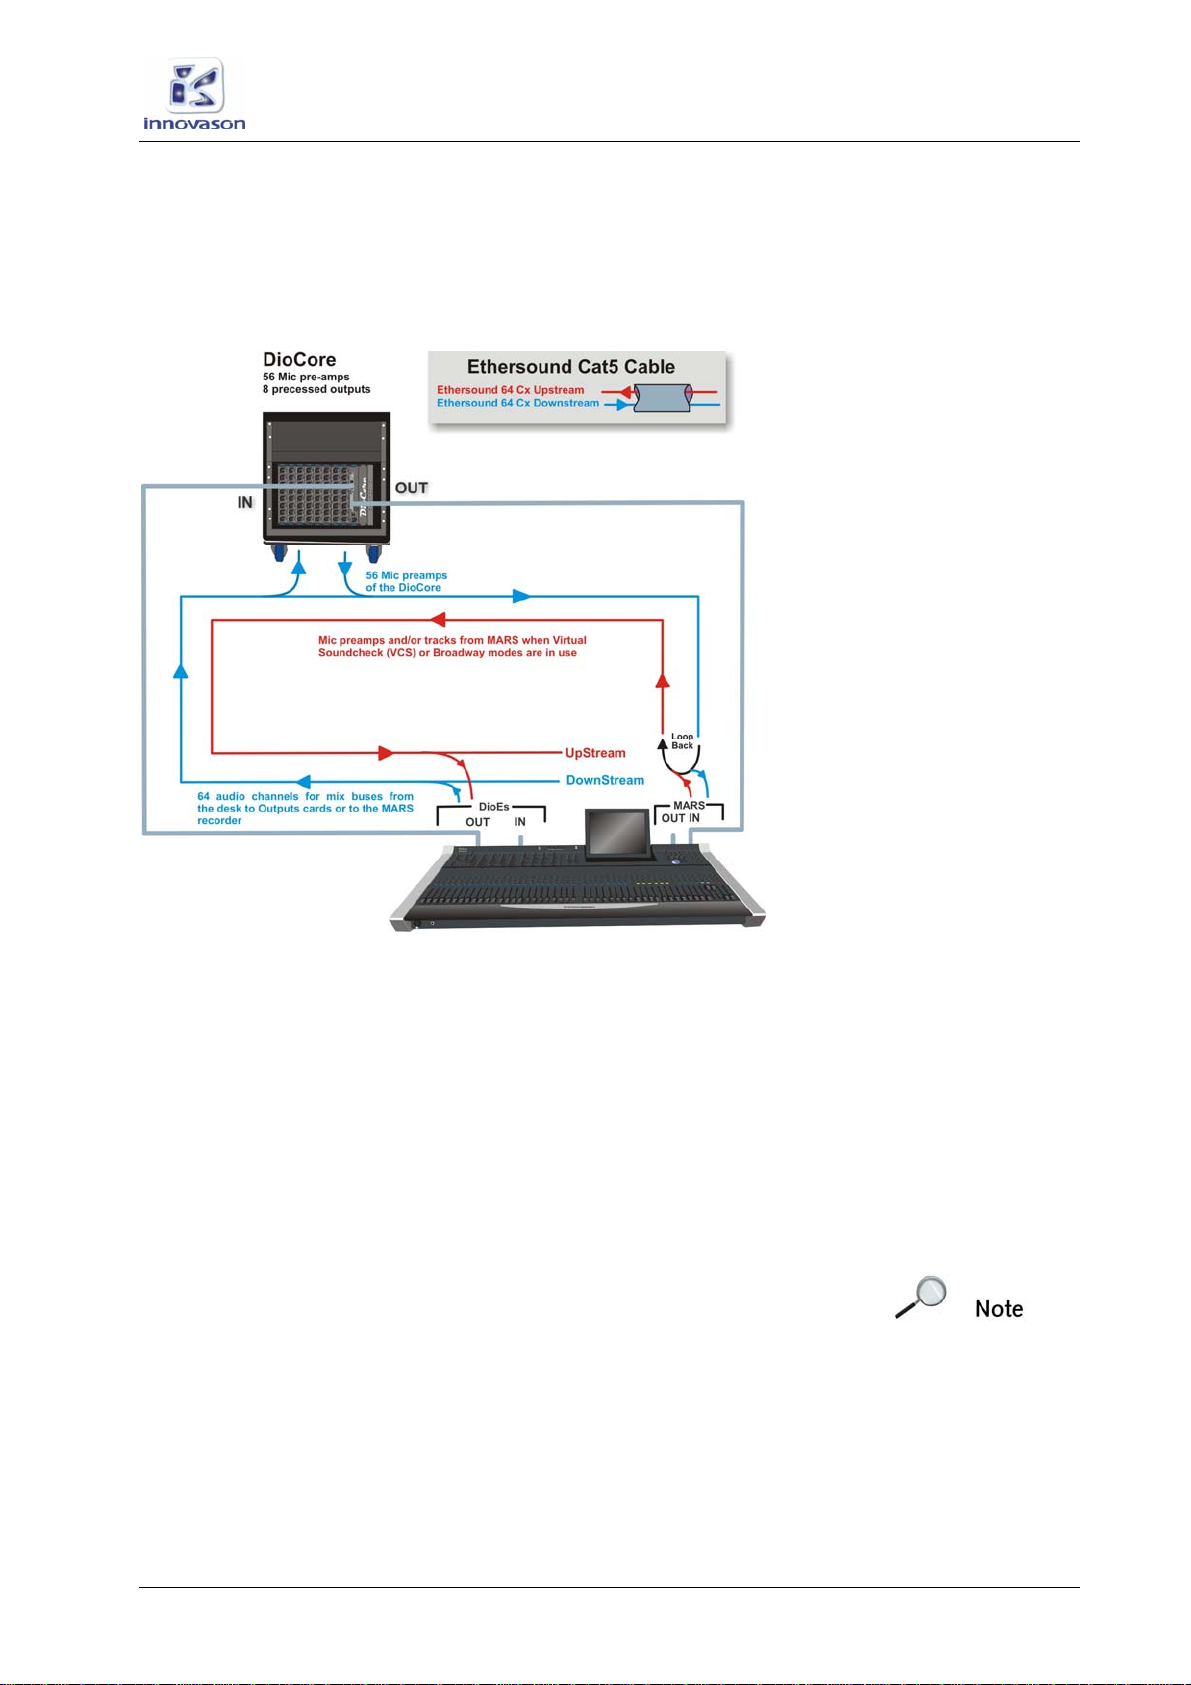
Audio is transferred to and from M.A.R.S. via Ethersound. The
diagram below shows the Ethersound connections and audio
streaming for a standard Eclipse configuration:
Recording
M.A.R.S. always records the downstream Ethersound channels it
receives (shown in blue), with Ethersound channel 1 recorded to
track 1, Ethersound channel 2 to track 2 and so on. With standard
patching, the result is:
•Tracks 1 to 56 = DioCore Mic Inputs 1 to 56
•Tracks 57 to 64 = are freely available and can be used to
record mix busses from the console.
Audio routing is controlled by the Ethersound channel patching
within the PATCH INPUT and PATCH OUTPUT grids. See Page
37 for details.
M.A.R.S. (Multitrack Audio Recording System)
Audio Routing
8 / 69 M.A.R.S. User Guide
Playback
In normal live operation, the upstream Ethersound channels
feeding the console (shown in red) are fed from the DioCore (Mic
inputs 1 to 56) – i.e. the Loop Back (in black) is active.
By enabling VSC mode (Virtual Sound Check), the DioCore mic
inputs, are replaced by the corresponding M.A.R.S. tracks. This
allows the engineer to instantly switch between live mic inputs from
the stage and M.A.R.S playback at the touch of a button.
Alternatively, using BDWY mode (Broadway), individual channels
can be switched between the live mic and replay track using the
console’s CUE buttons. This is great if, for example, the drummer
is late for the rehearsal and you have him pre-recorded!
Note that when your Ethersound network consists of more than
one Eclipse, you can connect the Ethersound network in different
ways. See Page 61 for more details.
M.A.R.S. (Multitrack Audio Recording System)
Connecting M.A.R.S.
M.A.R.S. User Guide 9 / 69
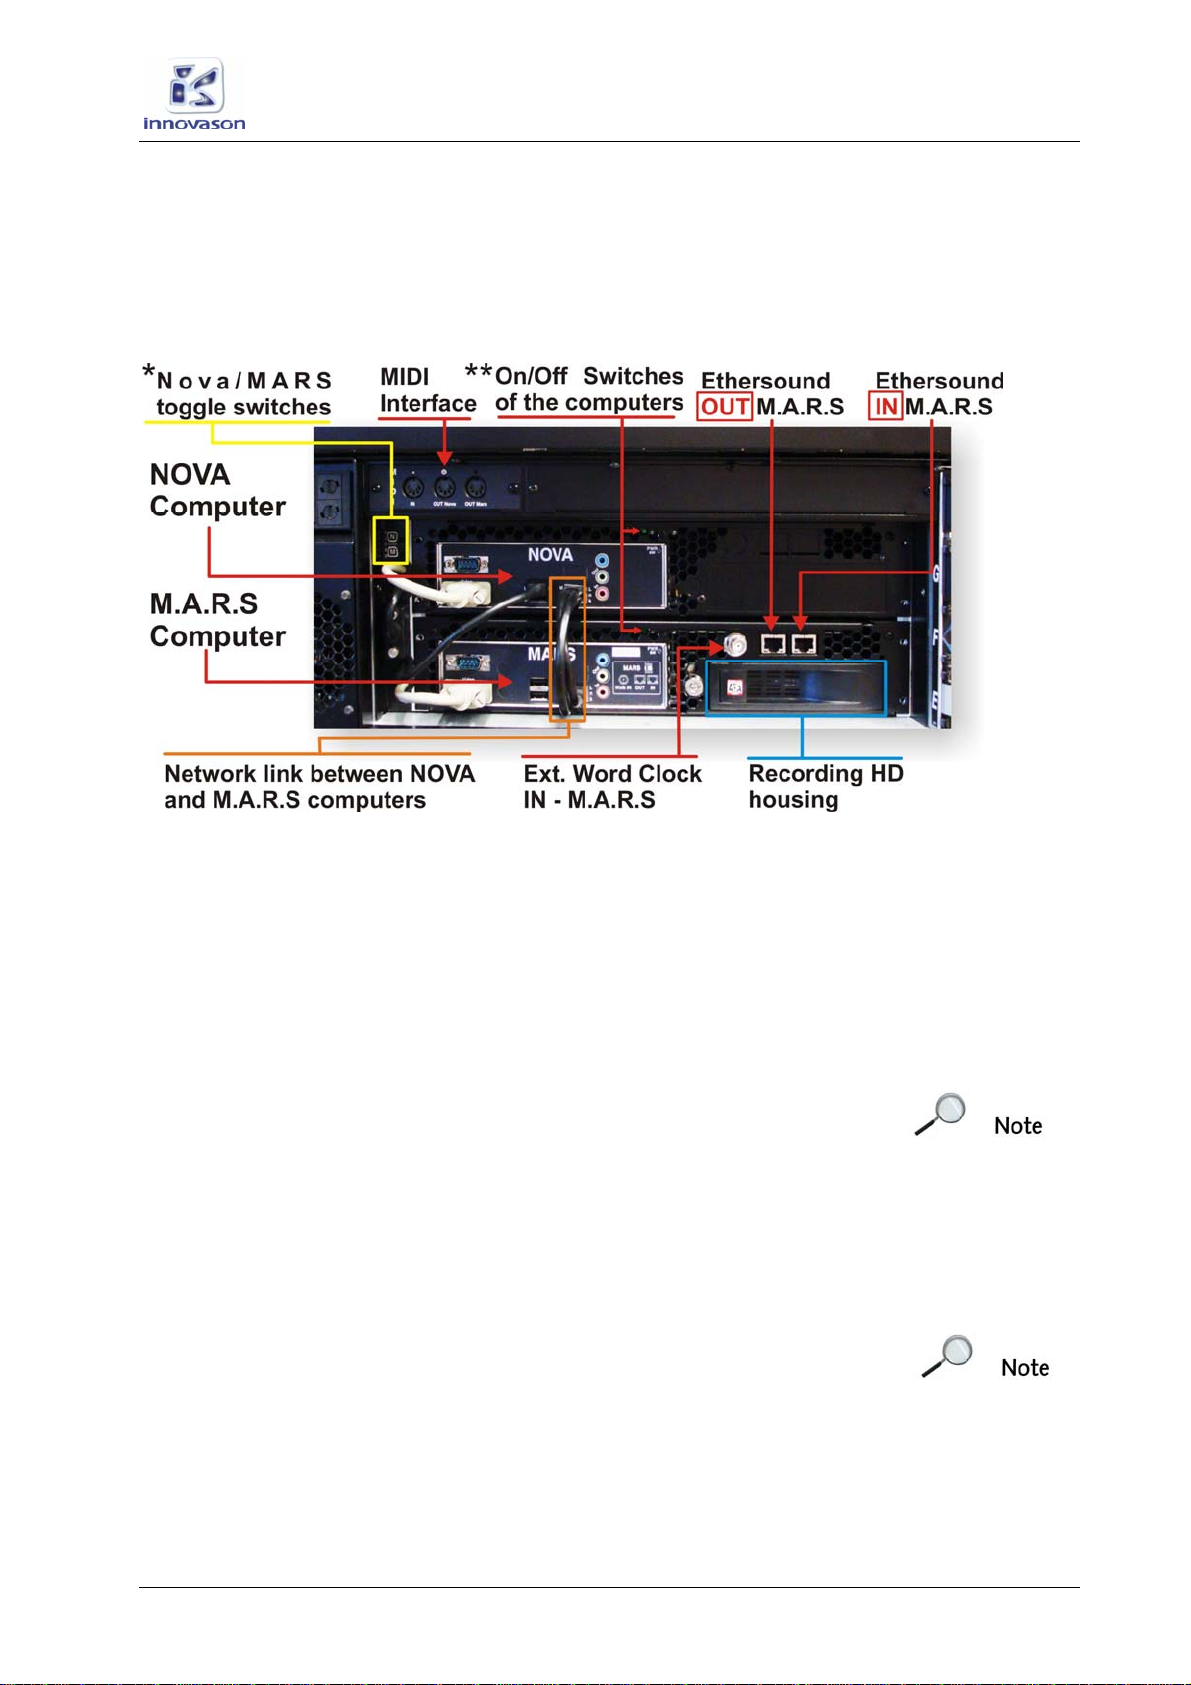
Connecting M.A.R.S.
The M.A.R.S. computer and hard drive are fitted to the rear of the
Eclipse frame:
*The Nova/MARS toggle switches are used to force the KVM into
a specified position.
**The ON/OFF switches are useful is case of a re-boot is
necessary on one of the computer without disturbing the passing
audio and the other computer.
For a “soft” system reboot on the M.A.R.S computer, press “ALT +
INS” when MARS is displayed on the Eclipse screen.
For a “soft” system reboot on the NOVA comuter, press “ALT +
DEL” when NOVA is displayed on the Eclipse screen.
The system ships with some connections pre-installed:
•Network link between the Nova and M.A.R.S. control
computers (Ethernet).
•Screen connections (VGA) to the touch-screen.
•Ethersound link between the console (OUT of the DioEs
module) and M.A.R.S IN (this allows to play the demo song
immediately).
M.A.R.S. (Multitrack Audio Recording System)
Connecting M.A.R.S.
10 / 69 M.A.R.S. User Guide
Ethersound interconnection of the complete system:
1. Remove the pre-installed Ethersound cable
form Eclipse (the OUT on the DioES
module) to the MARS (IN).
2. Connect the Ethersound OUT from
Eclipse (the OUT on the DIOEs
module) to the IN of the DioCore.
3. Connect the Ethersound OUT from the DioCore to the IN of
M.A.R.S.
Using standard CAT5 cables, the length may be up to 100m.
When the connections are correctly made, and the receive and
transmit devices powered, the 2 LEDs beside the Ethersound
connector flash synchronously.
By leaving the console’s Ethersound IN connection free, the
console becomes the Ethersound Primary Master device; this
enables it to detect DioCores automatically and assign channels
and data flow onto the Ethersound network. Please see the main
Eclipse User Guide for more details.
M.A.R.S. (Multitrack Audio Recording System)
Checking Communication
M.A.R.S. User Guide 11 / 69
Checking Communication
You can check the Ethersound connection to M.A.R.S. from the
Nova Main Mix display:
1. Press NOVA on the TRANSPORT panel to switch the
touch-screen to the Nova displays.
2. Look at the colour of the MARS hardware indicator on the
Main Mix display:
The LED will be green if MARS is booted and connected correctly.
If the status LED is red, then there is a problem with the
Ethersound connection. Please see Page 63 for advice on
troubleshooting.
M.A.R.S. (Multitrack Audio Recording System)
Playing Back the Demo Project
12 / 69 M.A.R.S. User Guide
Playing Back the Demo Project
To get started quickly with M.A.R.S. and Eclipse, every system is
shipped with demo audio. This section describes how to play back
the demo. To learn more about recording your own sound check,
then please skip to Page 29.
To use the demo project, you must perform two operations:
1. Open the M.A.R.S. project called “Walking” – this loads 64
tracks of pre-recorded audio onto the M.A.R.S. system.
2. Load the Nova file called “Walking” – this configures the
console so that the demo (which is 44 tracks) will replay
across pre-configured fader strips, with user labels and a mix
to match.
Loading a Project in M.A.R.S.
1. Press the M.A.R.S. button on the TRANSPORT panel to
switch the touch-screen to the M.A.R.S. control computer.
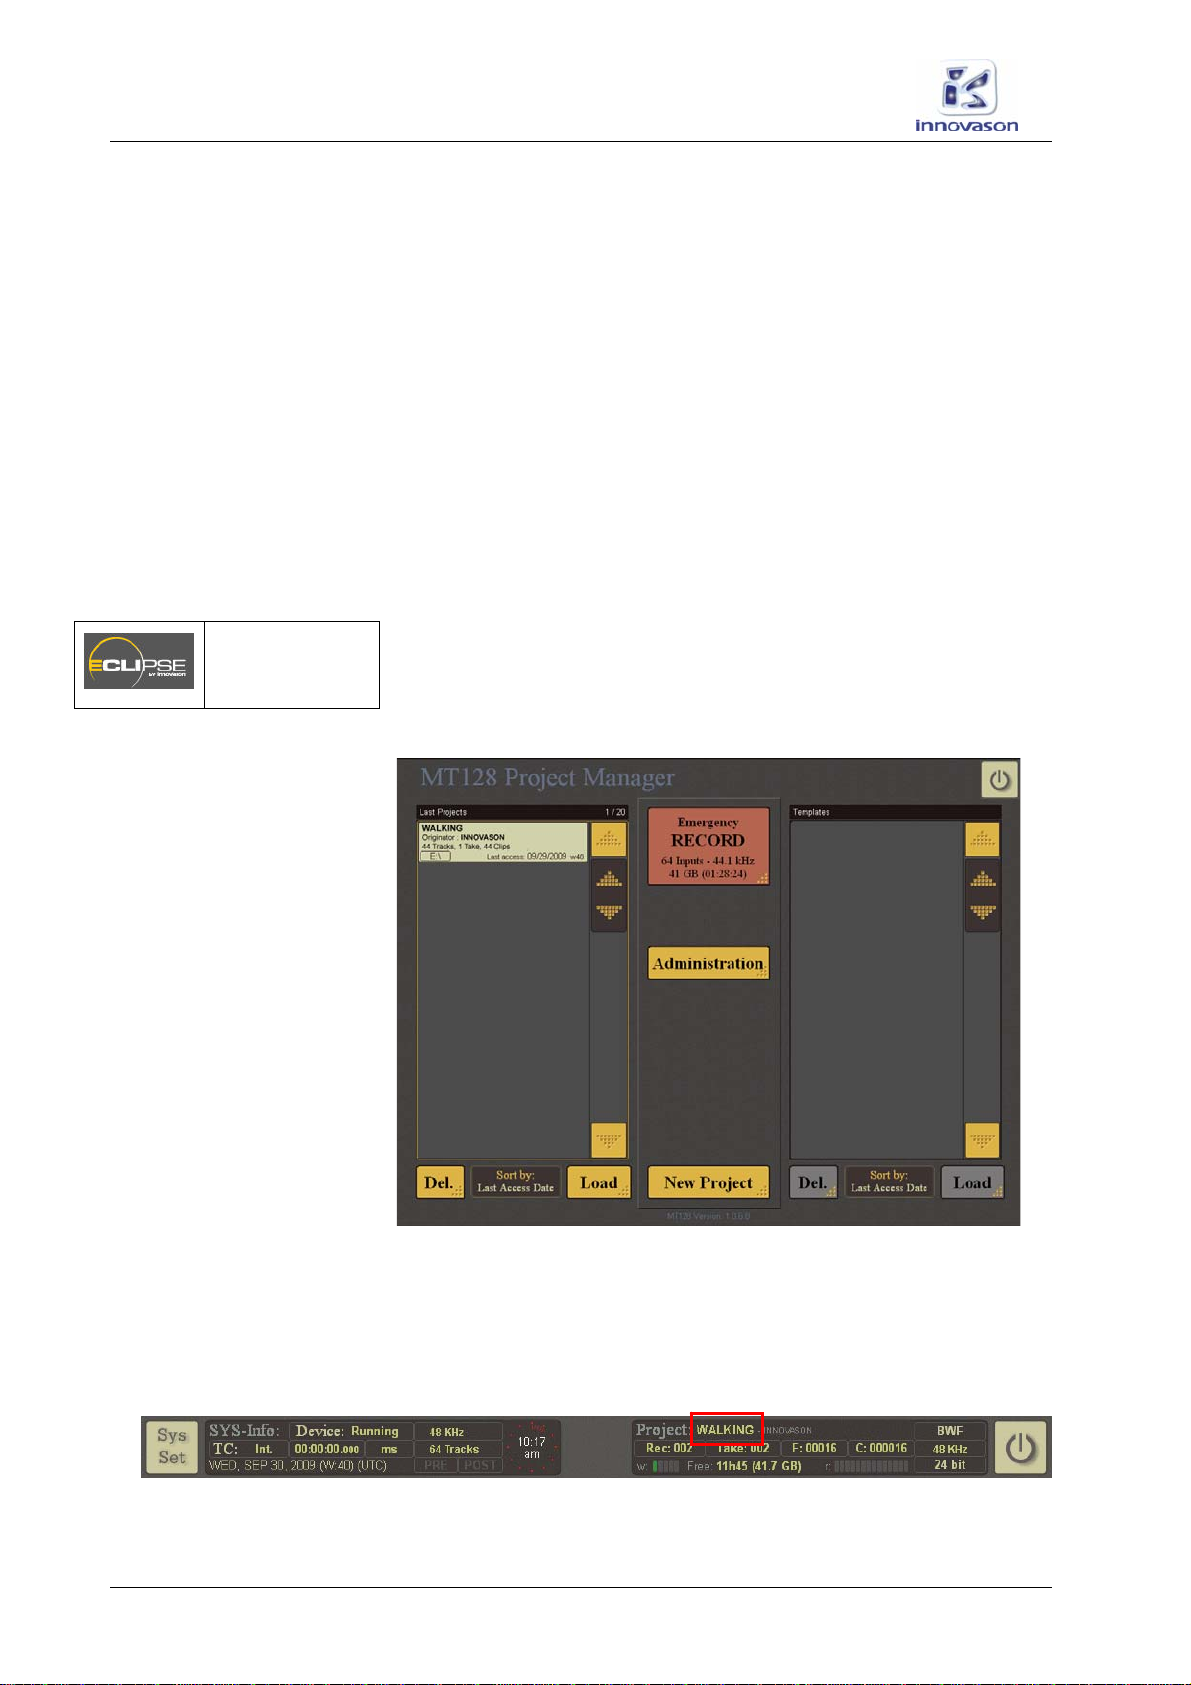
If you have just started the system, then the MT128 Project
Manager window is in view:
If you do not see this window, then a project has already been
loaded or created. To return to the MT128 Project Manager:
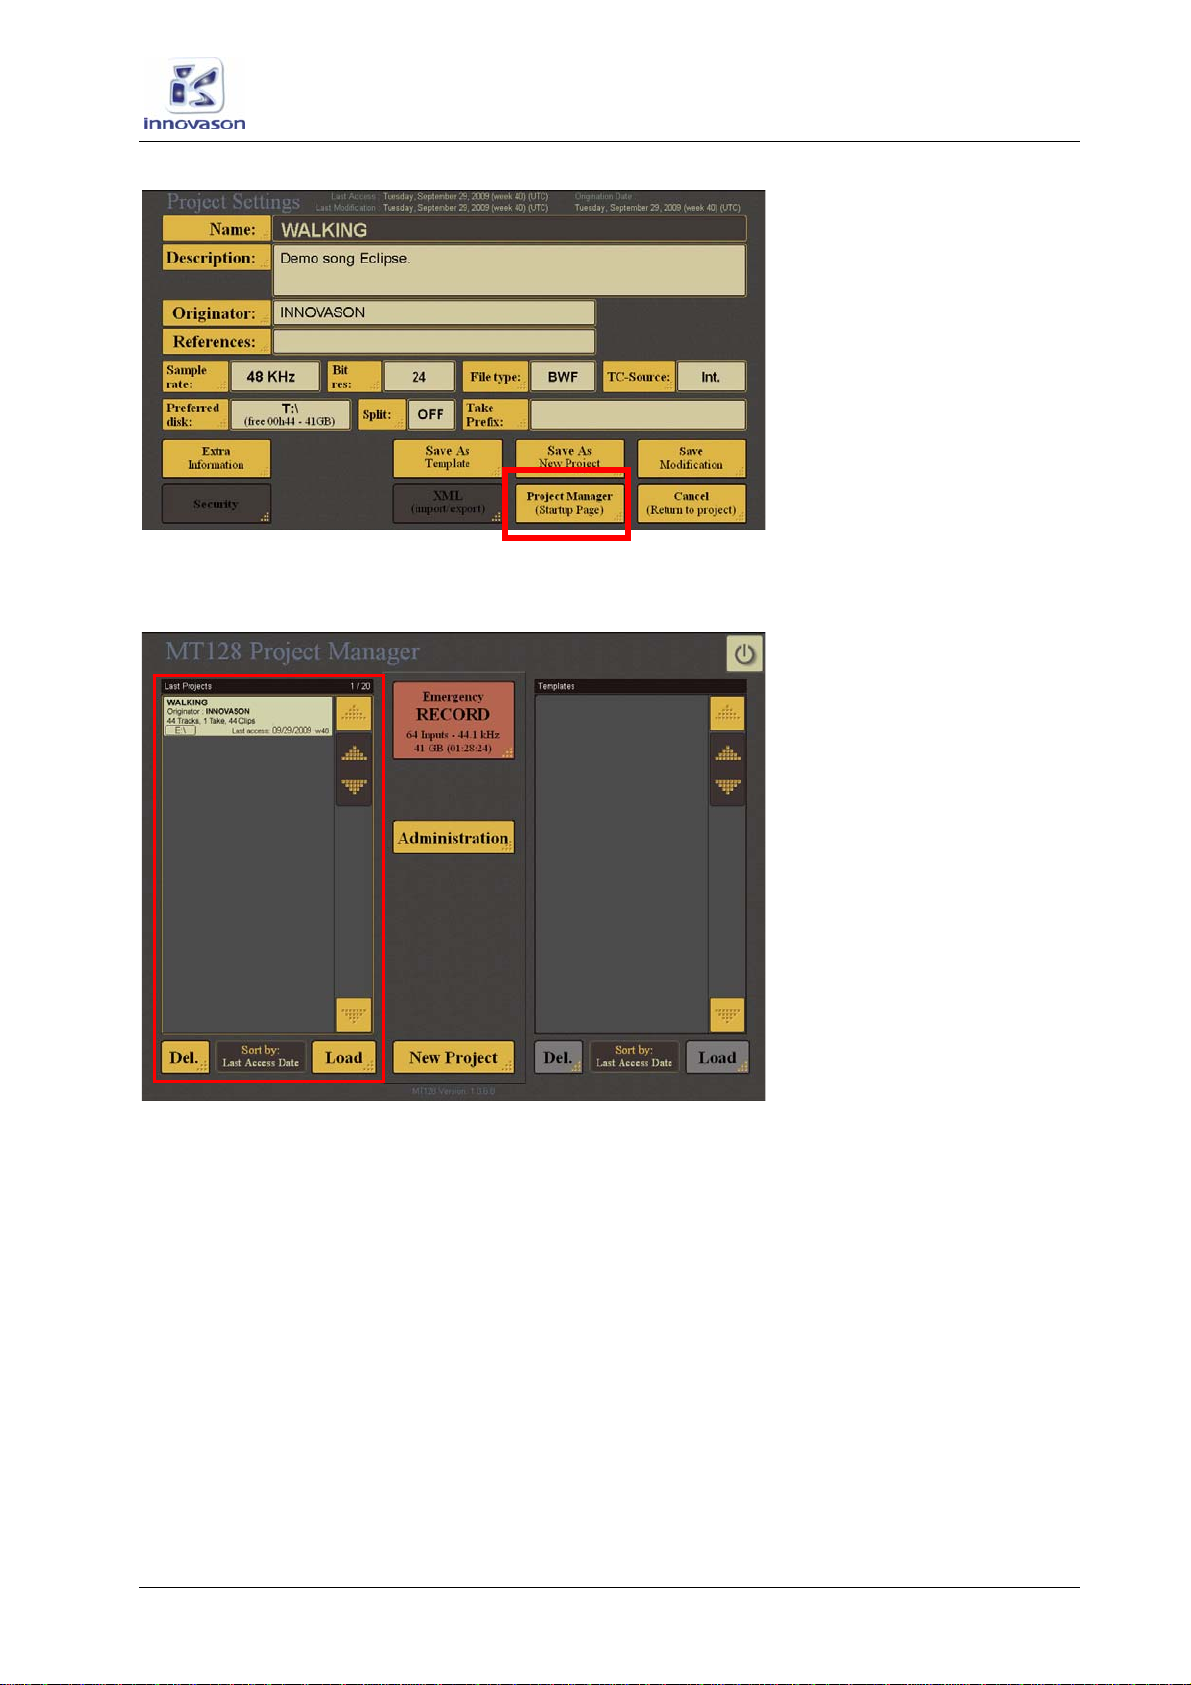
2. Select the current Project name from the bar running
across the top of the display – in our example, touch or click
on WALKING:
M.A.R.S.
(TRANSPORT)
M.A.R.S. (Multitrack Audio Recording System)
Playing Back the Demo Project
M.A.R.S. User Guide 13 / 69
This opens the Project Settings page:
3. Select the Project Manager (Startup Page) button.
The MT128 Project Manager opens.
4. Select the project you wish to load from the Last Projects
list on the left – e.g. “Walking”.
5. Then select Load.
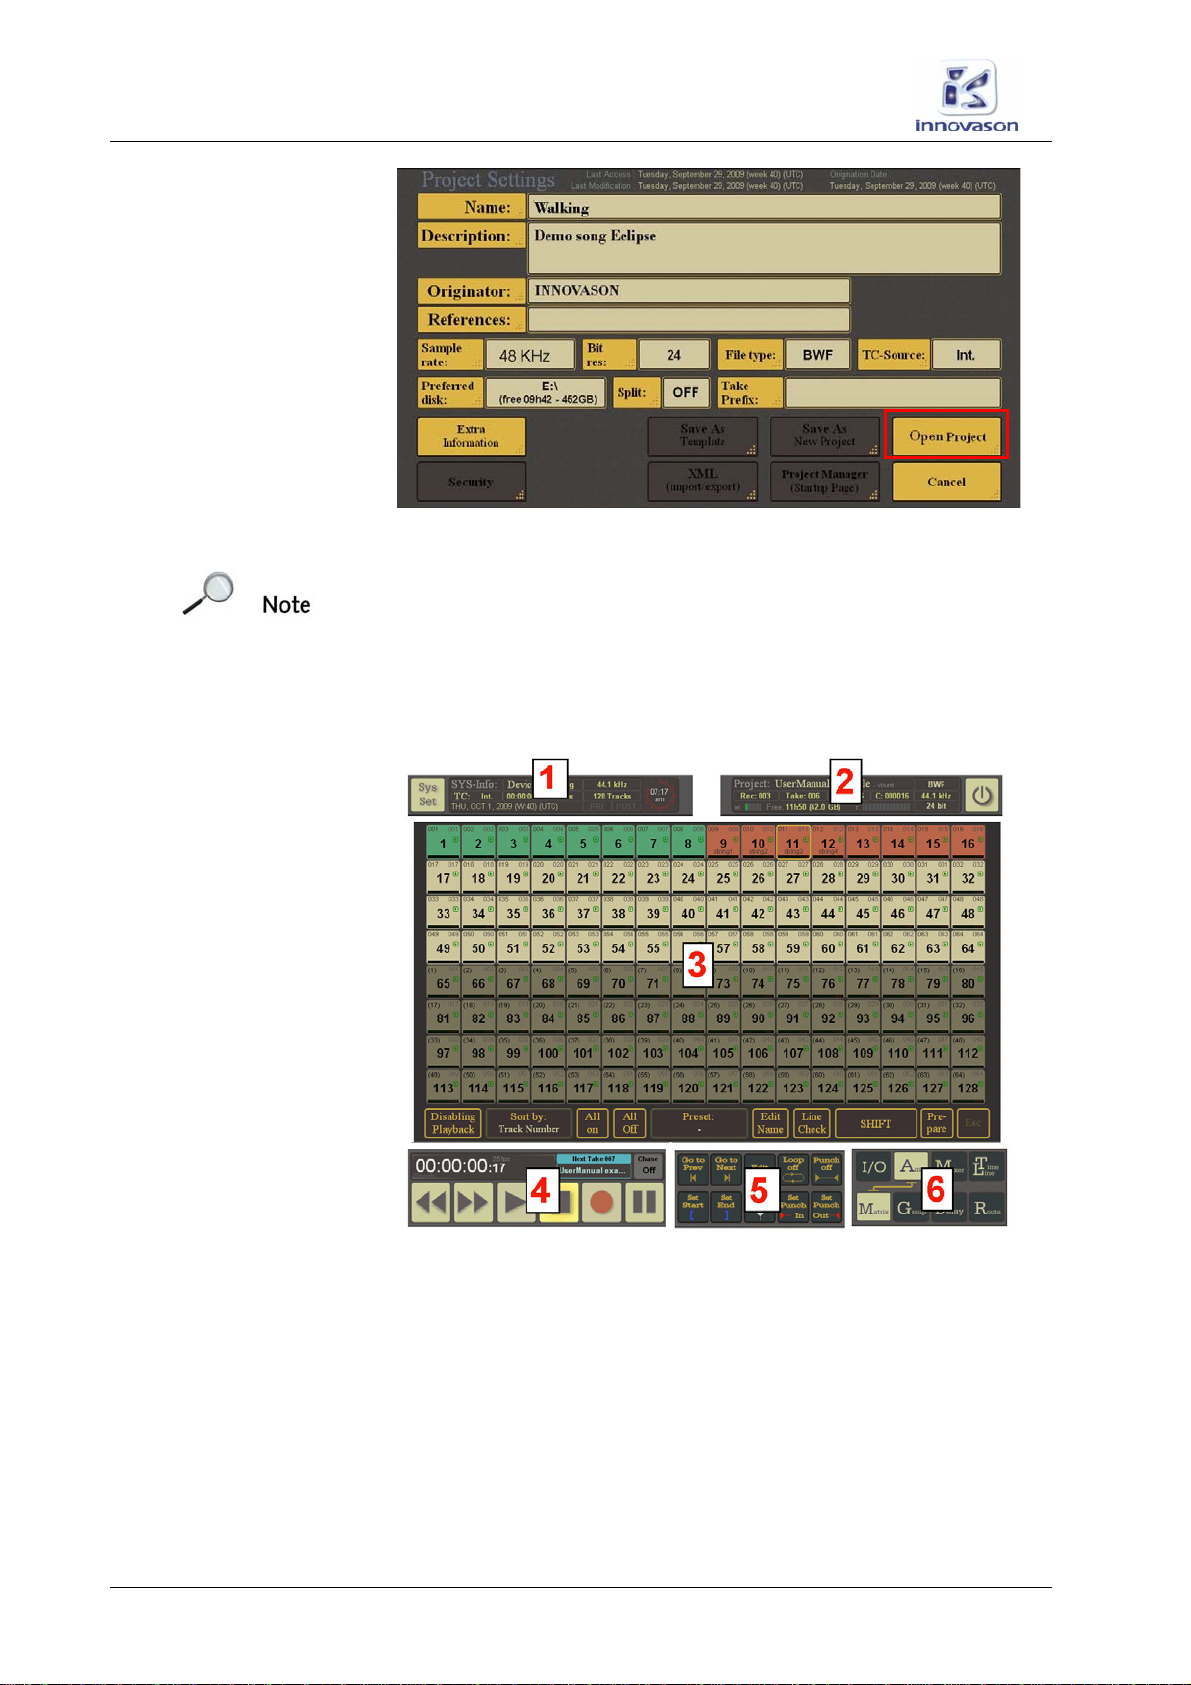
The Project Settings for “Walking” opens:
M.A.R.S. (Multitrack Audio Recording System)
Playing Back the Demo Project
14 / 69 M.A.R.S. User Guide
This page provides more information about the selected project –
for example, the sample rate, bit rate, file type, etc.
Note that you at this stage, you have not loaded any audio!
6. Select the Open Project button to open the project.
The details of the project are checked, the audio files are loaded
and the current project window opens:
If the project has loaded correctly:
•In the SYS-Info area (1), you should see Device:
Running. This indicates that M.A.R.S. is ready.
•In the Project info area (2), you should see the name of the
loaded project – e.g. Walking.
•The M.A.R.S. touch-screen transport controls (4) should be
lit to show that they are now active.
Note that the main part of the display (3) varies depending on the
Page selection (6). For more details see Page 52.
M.A.R.S. (Multitrack Audio Recording System)
Playing Back the Demo Project
M.A.R.S. User Guide 15 / 69
Loading a File in Nova
1. Press the NOVA button on the TRANSPORT panel to
switch back to the Nova control computer.
2. Select “File -> Load” from the main menus.
3. And load the demo file called Walking.
You can find more details on loading Nova files in the main Eclipse
User Guide.
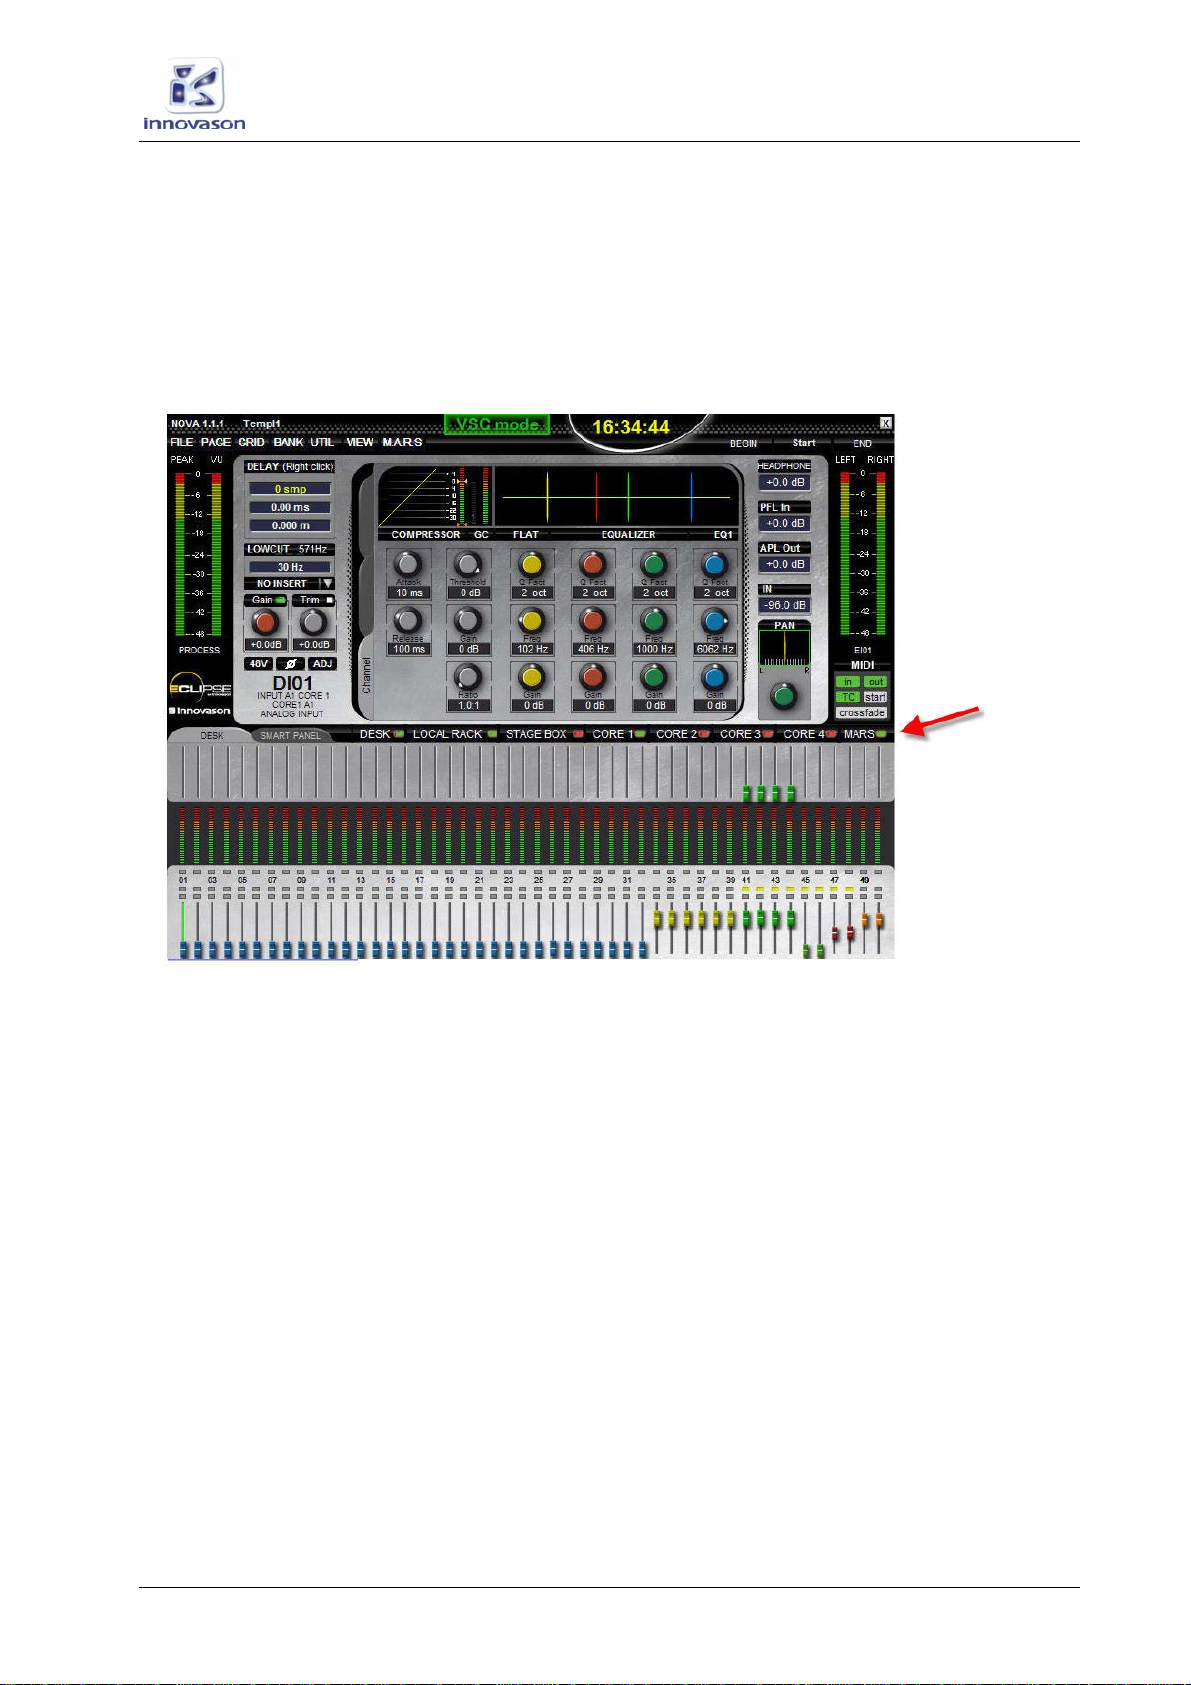
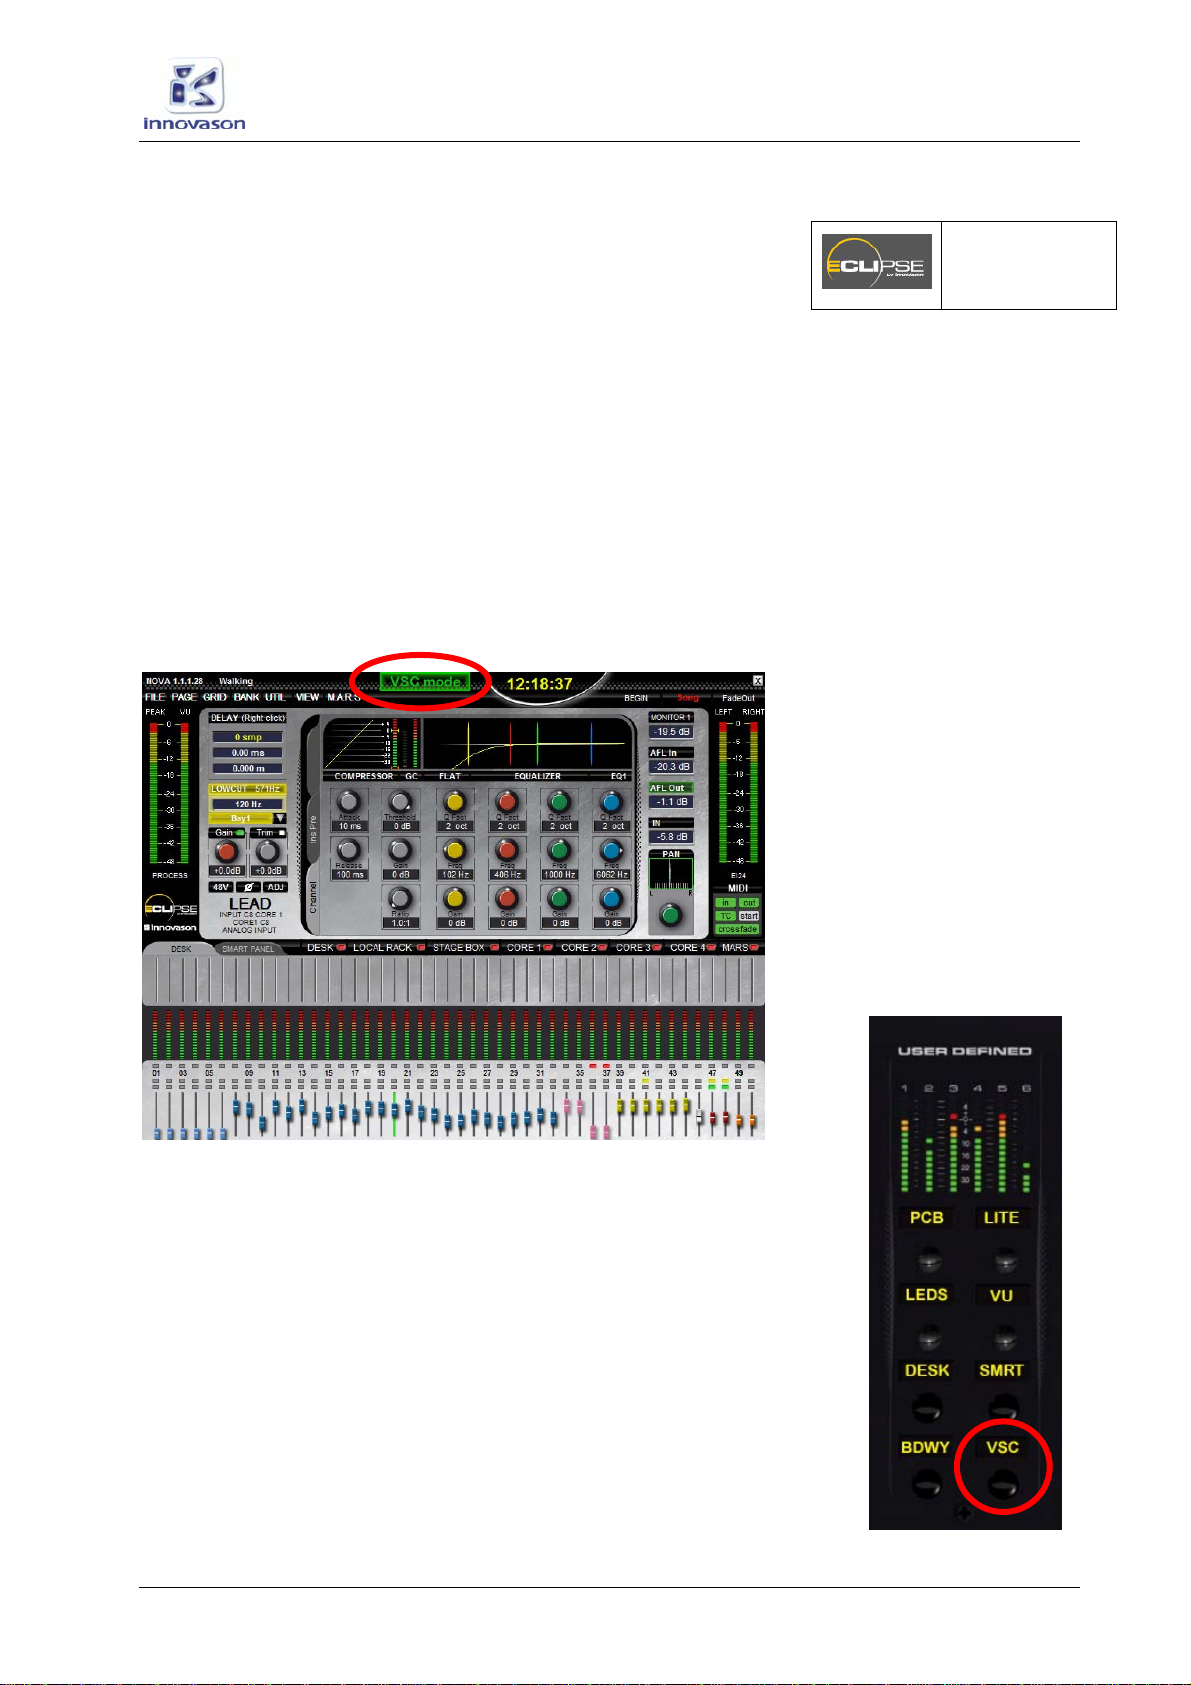
Look across the console, and you will see that each fader is now
labelled according to the tracks of the demo project. Notice that
some input faders (blue IDs) are Smart VCAs, while others are
dedicated inputs. Notice that some Groups (pink IDs), VCAs
(yellow IDs) and mix Masters (red IDs) have also been configured.
4. Check that Eclipse is running in VSC mode (Virtual Sound
Check) at the top of the Main Mix display:
This mode switches the channels to receive audio from M.A.R.S.
(tracks 1 to 64), instead of the DioCore mic inputs.
VSC mode should have been recalled by the Nova File “Walking”,
but if not:
5. Press the VSC button (on the USER DEFINED panel) or
activate the VirtualSoundCheck in the M.A.R.S menu of
NOVA.
A confirmation pop-up appears.
6. Press OK to confirm.
NOVA
(TRANSPORT)

M.A.R.S. (Multitrack Audio Recording System)
Playing Back the Demo Project
16 / 69 M.A.R.S. User Guide
Playing Back the Demo
1. Test the audio playback by pressing the Play button on
either the Eclipse TRANSPORT panel or M.A.R.S. touch-
screen.
The Play button lights, and you will see timecode running both on
the Eclipse front panel display and M.A.R.S. touch-screen if it is in
view:
The demo song “Walking” starts at 00:00:00:00 so you should now
be hearing audio.
2. Press Stop, either on the TRANSPORT panel or M.A.R.S.
touch-screen to stop the play back.
3. To locate the 00:00:00:00 song position, from NOVA, on
the CUE memories area of the transport bar, press”A” and the
CUE point “1”. This should locate the 00:00:00:00 time code
address.

M.A.R.S. (Multitrack Audio Recording System)
Transport Control
M.A.R.S. User Guide 17 / 69
Transport Control
Once a project has been loaded, or a new project created,
M.A.R.S. can be controlled using the transport buttons on the
Eclipse TRANSPORT control panel, or the M.A.R.S. touch-screen
display.
The Eclipse TRANSPORT Panel
The dedicated TRANSPORT buttons may be used while viewing
any NOVA or M.A.R.S. touch-screen display:
1. Press Play to replay audio from the current timecode
position.
Timecode is displayed on the Eclipse front panel:
Note that this display can be switched between Internal (M.A.R.S.)
and MIDI timecode within the Nova software. See Page 66 for
details.
2. Whilst in Play, press the Play button again to pause the
playback.
The green LED on the button flashes when M.A.R.S. is paused.
3. Press Stop to stop playback.
4. Press Rewind or Fast Forward to run the audio backwards
or forwards at different speeds:
•On the first press, audio runs at 0.5 x normal speed.
•On the second press, audio runs at 1.5 x normal speed.
•On the third press, audio runs at 2.5 x normal speed.
Note that these speeds can be adjusted from M.A.R.S. Please see
the MT128 documentation at www.vb-audio.com for details.
5. Press Play twice to cancel and return to normal playback.
For details on Recording, please see Page 29.
M.A.R.S. (Multitrack Audio Recording System)
Transport Control
18 / 69 M.A.R.S. User Guide
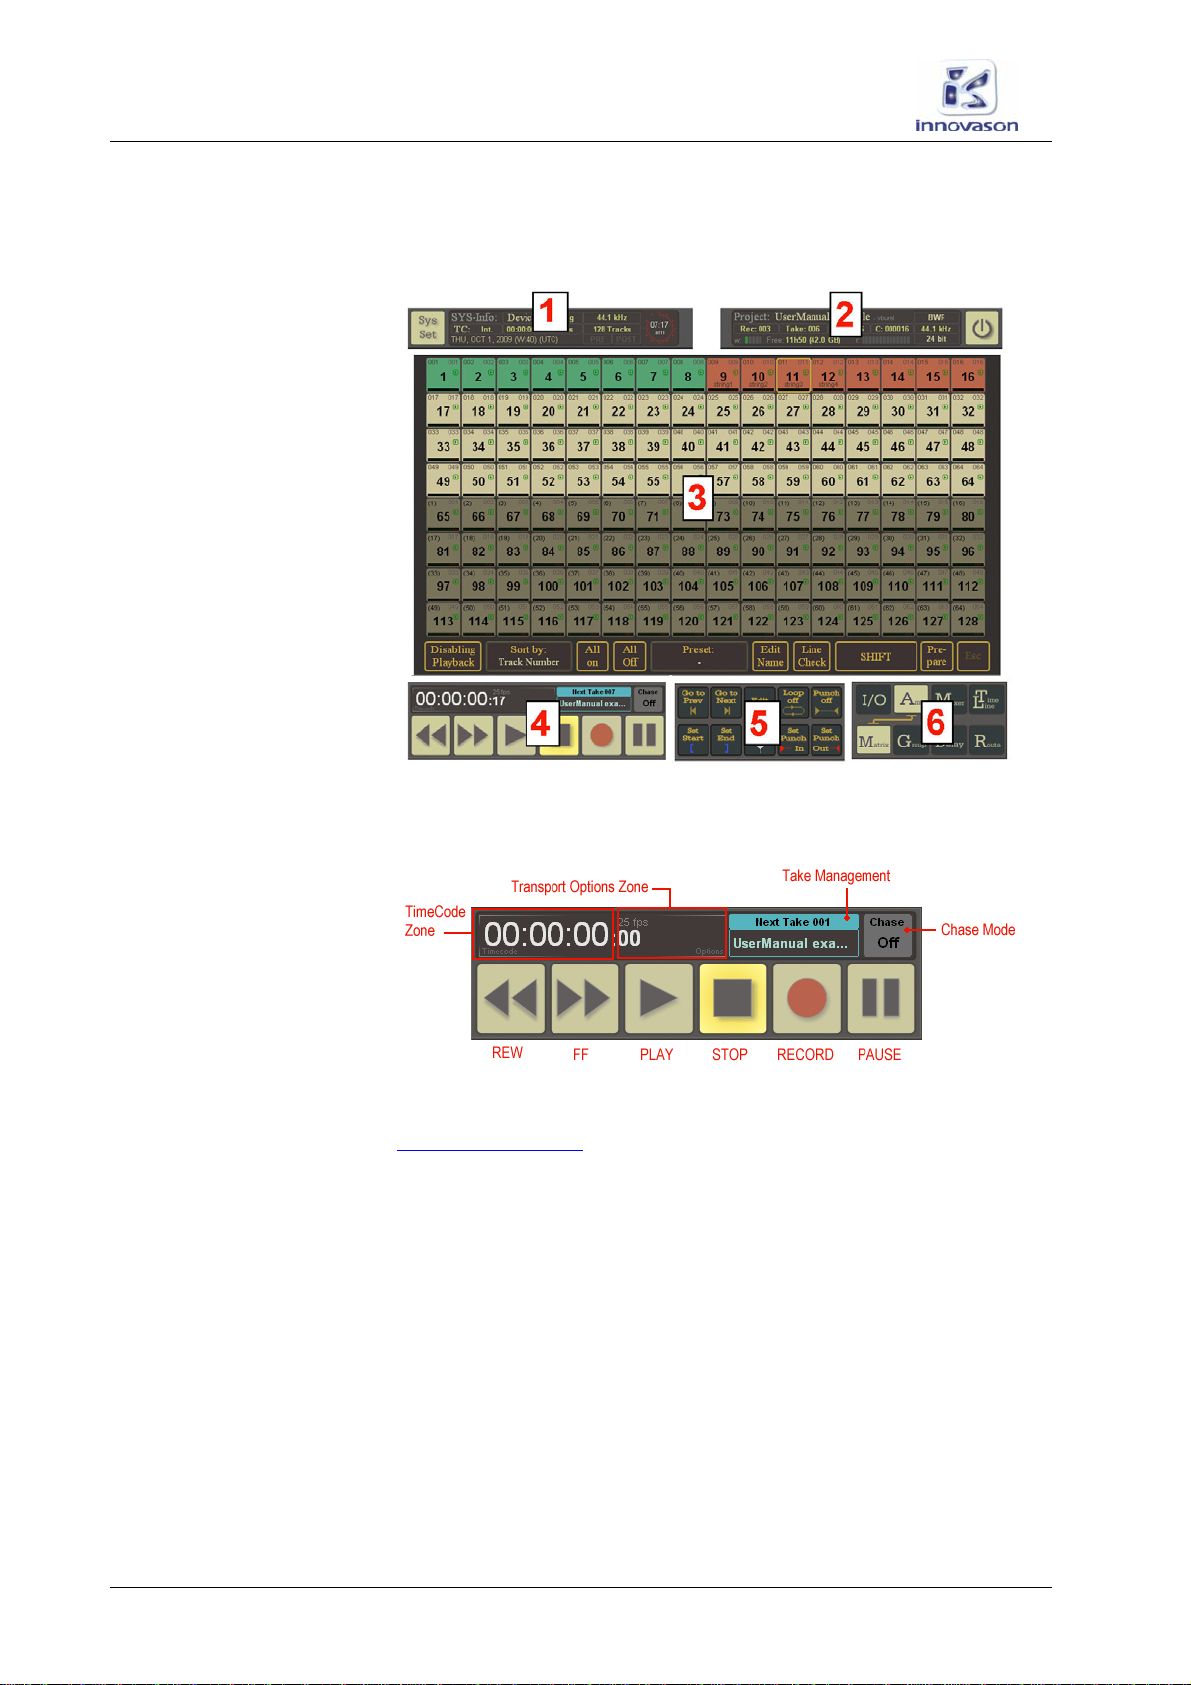
Touch-screen Transport Control from M.A.R.S.
Transport control is also available from touch-screen buttons within
the M.A.R.S. displays (4):
These buttons work in parallel with those on the TRANSPORT
front panel. Here is an overview of their operation:
For more details, please refer to the MT128 documentation at
www.vb-audio.com

M.A.R.S. (Multitrack Audio Recording System)
Transport Control
M.A.R.S. User Guide 19 / 69
Cues
To locate to different points within the audio project, you can
either:
•Create Cue points using the Nova Cue List and
TRANSPORT front panel:
•Or create and recall Markers from the M.A.R.S. touch-
screen displays:
Note that the two systems are independent; you cannot recall
Nova cues from M.A.R.S. or M.A.R.S. markers from the Eclipse
front panel. Therefore we are going to concentrate on the Nova
Cue List, as this can be used while viewing any NOVA or M.A.R.S.
display.
M.A.R.S. (Multitrack Audio Recording System)
Transport Control
20 / 69 M.A.R.S. User Guide
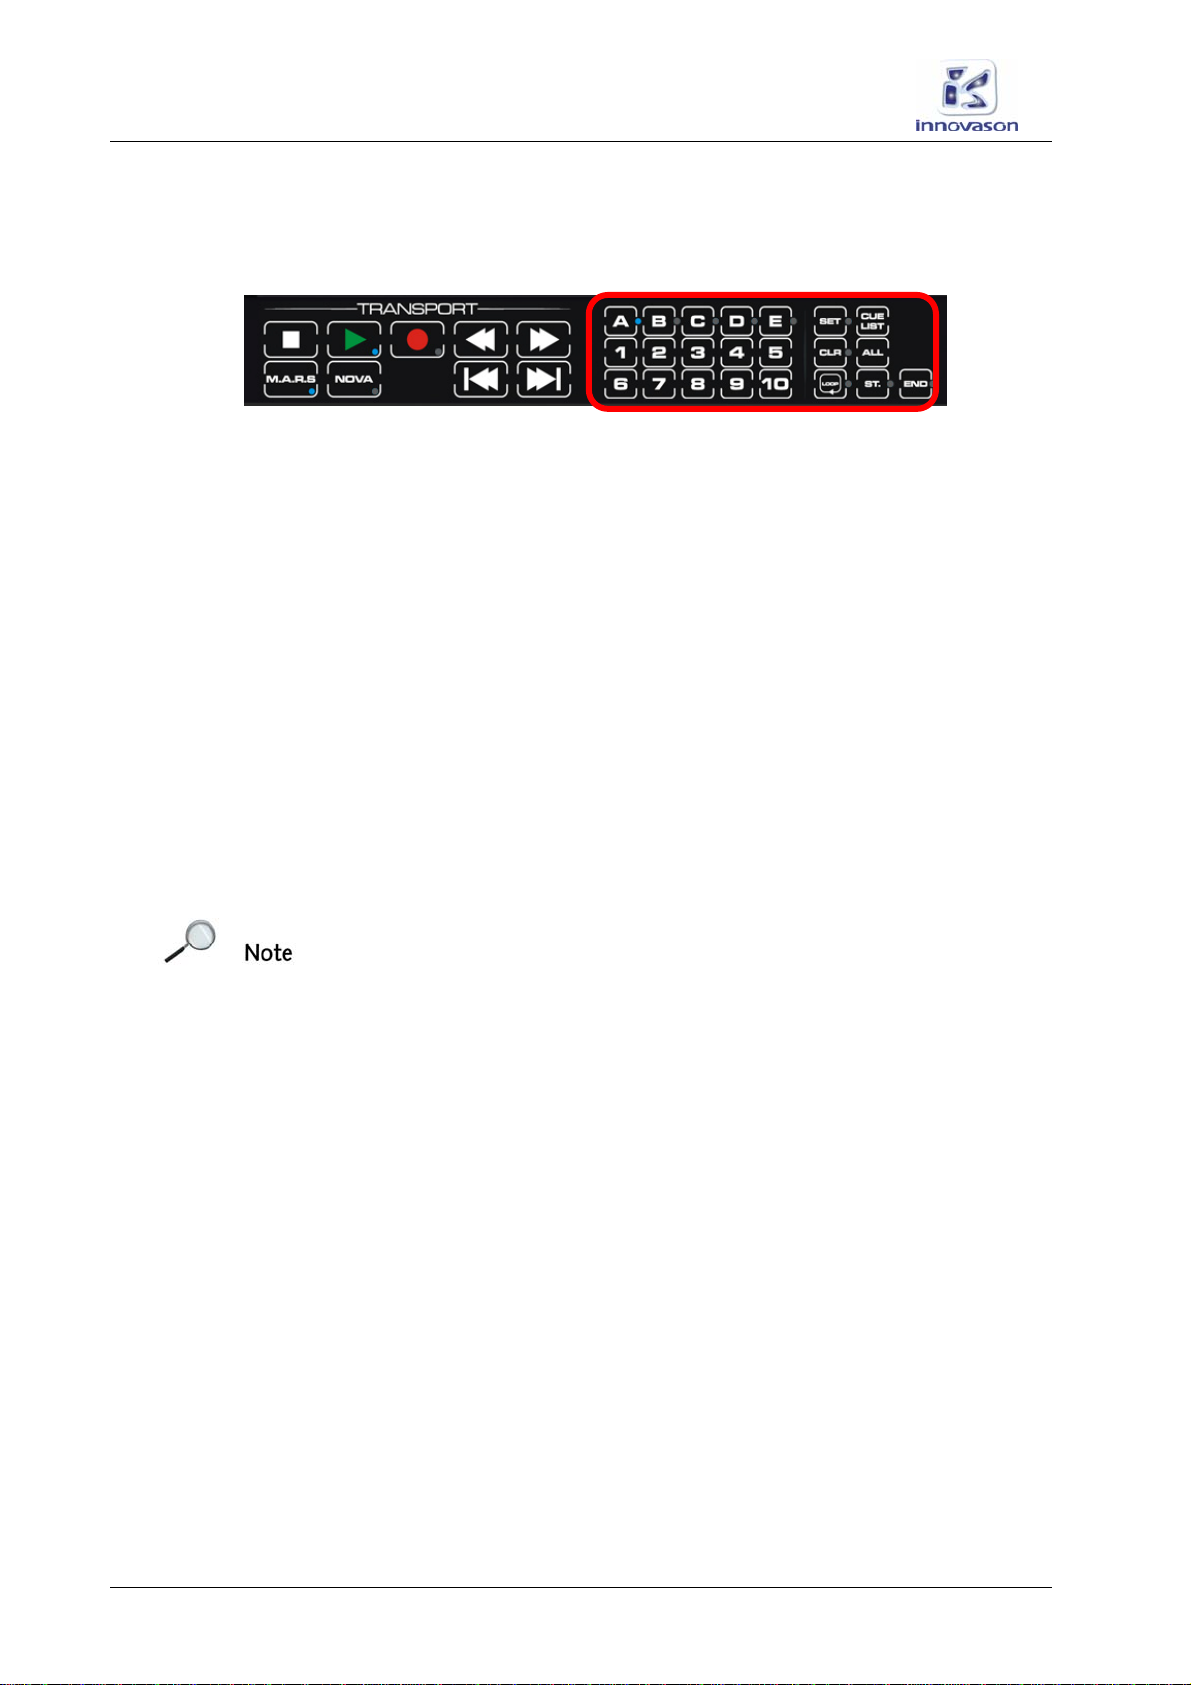
The Eclipse Cue List
Eclipse’s Nova software includes a Cue List which is controlled
from the TRANSPORT panel:
Cues are arranged in five banks (Ato E) of 10 cues (1to 10)
providing a total of 50 cue memories.
Storing Cues
Cue points can be stored in Stop or in Play.
1. Press SET.
The button flashes (green).
2. Select a bank – e.g. press A.
The button lights (green).
Note that a bank must be selected (lit) before you can choose a
number
3. Select a number – e.g. press 1.
The current timecode is stored in cue memory A1. This is
confirmed by a temporary pop-up which appears on the Nova
display.
Note that if the cue memory has already been used, you will be
asked if you wish to replace it.
4. Select OK to overwrite an existing cue memory or Cancel
to quit the operation.
Note that if timecode is moving when you store a cue, the
timecode is captured at the point when you choose the memory
number (in step 3).
Table of contents
Other INNOVASON Recording Equipment manuals


