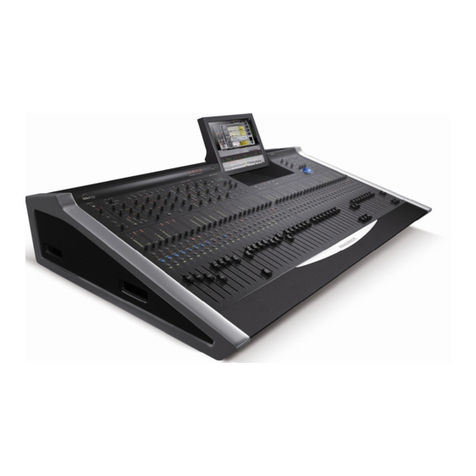
INNOVASON Eclipse User manual

Eclipse
User Guide
Version: 2.0
Edition: Sept 2010

Copyright
All rights reserved. Permission to reprint or electronically reproduce any document or graphic in
whole or in part for any reason is expressly prohibited, unless prior written consent is obtained
from Innovason.
All trademarks and registered trademarks belong to their respective owners. It cannot be
guaranteed that all product names, products, trademarks, requisitions, regulations, guidelines,
specifications and norms are free from trade mark rights of third parties.
All entries in this document have been thoroughly checked; however no guarantee for
correctness can be given. Innovason cannot be held responsible for any misleading or incorrect
information provided throughout this manual.
Innovason reserves the right to change specifications at any time without notice
© Innovason, 2010

New in Nova 2
Eclipse User Guide 2.0
New In Nova 2
Nova Version 2.0 software introduces a number of new and improved features. If you are
familiar with Eclipse, then use this list to locate more information on each topic. You can find
instructions on how to install the new version of Nova software on Page 503.
Shelving and High/Low Pass Filters for Parametric EQ
The upper and lower bands of parameteric EQ can now be switched to a shelf or a high/low
pass filter, see Page 141.
New Stereo Channel Operation
Configuration of mono and stereo input channels and mix busses is now very simple:
Any input channel may be mono or stereo LR. This decision is made when you patch inputs
to the control surface (from the PATCH IN grid) allowing you to decide “on the fly” whether
input channels are mono or stereo, see Page 238.
Any mix bus (including Matrices) may be mono, stereo LR or stereo LRC. This decision is
made when you assign channel types from the PERSONAL CONSOLE BUILDER, see Page
225.
Channels feature a true stereo dynamics section and Balance/Width control. The LR or LRC
components may be deployed to the Smart Panel in order to edit the left, right and centre,
see Page 184.
New Functionality for the Fader Strip Pots
The rotary control (pot) on the Fader strips can now be switched between one of the three
modes: Gain, Pan or User:
•Gain – can control either analogue Gain or digital Trim.
•Pan – adjusts left/right pan on mono channels and balance/width on stereo channels.
It can also switch between dependent panning (to all stereo busses) and independent
panning (to the selected bus) making it easy to setup independent pan for Aux sends.
•User – can be assigned to any variable parameter – for example, EQ Gain,
Compressor Threshold, etc.
For details on Pot. configurations and assigning the User pot, please see Page 120.
Personal Mix Memories for Auxes
A “Personal Mix” saves the send levels, panning and routing for a particular Aux. This allows
you to save a different monitor mix for each musician working on the show. For example, if
you have different drummers who work on different nights of the week, you can save a
Personal Mix for each performer, see Page 387.
New Linking Methods: Smart Link and Fast Link
Channel linking can now be configured from the console, using Smart Link mode, as an
alternative to the Link Channel display, see Page 411.
Fast Link creates a temporary link group in order to update a parameter across several
channels on the fly. This can be quicker than using Copy and Paste. See Page 418.

New in Nova 2
2.0 Eclipse User Guide
The Fast Configuration Window
This window allows you to set default parameters, such as EQ On, Dynamics On, Level to
0dB, bus routing, etc. for input, Aux, Group, Matrix, Master and VCA channels. You can
choose to apply your settings to the current mix, or use the settings for new channels
assigned to the surface from the Personal Console Builder. See Page 318.
Assignable Functions for the User Defined Panel
The six VU meters, four rotary controls and four switches on the USER DEFINED panel can
now be assigned from a variety of functions. These include short cuts to favourite menus;
selecting and sending MIDI program changes; grouped switch changes; access to functions
such as tap tempo. See Page 322.
Over Ram for Direct I/O
New OVERRAM buttons on the PATCH DIRECT display allow you to select a single
crosspoint, or an area of crosspoints, so that patching and IO parameters can be written into
other Pages in RAM. This allows you to modify settings for inputs or outputs which are not
assigned to the console surface, such as a talkback microphone. See Page 256.
Over Ram for Aux Sends
Two new options for Aux mixes exist within the Over Ram display, see Page 399:
•All Inputs to Aux Send – allows you to Over Ram all sends to an Aux (or Auxes) in
one operation.
•Selected Inputs to Aux Send – allows you to Over Ram selected sends to an Aux
(or Auxes). For example, if you just want to change the level of one instrument to a
monitor feed.
Multiple Copy and Paste
This operation copies settings from a range of channels, allowing you to paste them to a
different range. For example, if the same drummer plays in more than one song and you
wish to vary the channel layout between songs, you can copy the drum mix to a different set
of channels within each Page. See Page 394.
Integrated Control of Ethersound Devices including Aqonda, DM-8 and SR-16
I/O patching can now be controlled for any Ethersound device detected on the network. In
addition, the Nova software supports parameter control for specially supported Ethersound
devices. These include Digigram’s Aqonda 16, Innovason’s SR-16 and Neumann’s DMI-8.
See Page 273.

Table of Contents
Eclipse User Guide 2.0
Table of Contents
ECLIPSE 1
User Guide 1
NEW IN NOVA 2 3
TABLE OF CONTENTS 5
ABOUT THIS MANUAL 11
How to Use This Manual 11
Conventions 12
CHAPTER 1: OVERVIEW 13
Welcome 13
Control Surface Overview 13
System Overview 18
Signal Flow 23
Channel Types 25
Smart Faders (SFADs) 26
Nova Software 27
Internal Effects (FM-8VB Card) 29
Console Reset and Automation 30
The Standard Template 32
CHAPTER 2: INSTALLATION 33
Introduction 33
Before Installing This Device 34
The Standard Eclipse Package 35
Handling and Transportation 40
Dimensions and Weight 41
Ambient Conditions 43
Power 44
System Connections 45
Audio Connections 52
Switching on the Power 55
Checking the Hardware Status 56

Table of Contents
2.0 Eclipse User Guide
CHAPTER 3: OPERATING PRINCIPLES 57
Introduction 57
Fader Strips and the Smart Panel 58
Fader Strips 59
Smart Panel “Strips” 63
The Nova Touch-Screen 65
Routing, Sends and the SEL Button 74
Nova Operating Principles 81
CHAPTER 4: GETTING STARTED (THE STANDARD TEMPLATE) 88
Introduction 88
Loading a File 89
Interrogating the Fader Strips 92
Interrogating the Smart Panel 93
Signal In to Out 94
Default Patching 95
Default Bus Routing 99
Your First Mix 100
Saving Your Settings 118
CHAPTER 5: CONSOLE OPERATION 119
Introduction 119
Fader Strips and the Smart Panel 120
Fader Strips: User Pot Assignment 120
Fader Strips: Pot Configurations 123
Input Channels 131
Smart Faders (SFADs) 149
Mix Busses 159
Mix Bus Sends 163
Output Channels 173
Stereo Channels 184
VCAs 193
Assignable Delays 197
Labels 200
Monitoring 206
Talkback 218

Table of Contents
Eclipse User Guide 2.0
CHAPTER 6: CONSOLE CONFIGURATION220
Introduction 220
The Personal Console Builder 221
Digital Patching 230
The Patch Input Display 231
The Patch Output Display 247
The Patch Direct Display 256
Ethersound Networks 263
The Muxipaire Stagebox 285
Patch Grids: Input and Output Names 287
Default Patch Memories 288
Internal Effects (the FM-8VB Card) 289
Inserts 309
Fast Configuration 318
User Defined Panel 322
CHAPTER 7: RESET AND AUTOMATION 341
Introduction 341
Files and Pages 342
File Management 344
Page Management 356
Sequence Playout 363
The Play List (Automation) 364
Automation Enable Buttons 381
Processing Libraries 382
Personal Mixes 387
CHAPTER 8: UTILITIES & PREFERENCES 392
Introduction 392
FLAT (Parameter Reset) 393
Copy and Paste 394
Over Ram 399
Relax (Automation Isolate) 404
Request Mode 406
Pre/Pan 408
Link Cards 408
Linking 409
Offline Mode 423

Table of Contents
2.0 Eclipse User Guide
Test Signal (Oscillator) 425
Fader Start 427
General Preferences 428
Lock (Password Protection) 432
Help (Keyboard Shortcuts) 434
About 435
Console Shutdown (Quit) 436
CHAPTER 9: OFFLINE CONFIGURATION437
Introduction 437
Saving and Importing to the Console 438
Mouse and Keyboard Operation 439
Building a Configuration 441
Adjusting Mix Parameters 442
CHAPTER 10: M.A.R.S. 444
Introduction 444
Overview 445
Connecting M.A.R.S. 445
Audio Routing 446
Playing Back the Demo Project 448
Transport Control 453
Recording 465
Advanced Functions 473
Project Management in M.A.R.S. 482
Troubleshooting 496
Replacing the M.A.R.S. Hard Disk 501
CHAPTER 11: TECHNICAL PROCEDURES 502
Using M.A.R.S as a Backup for Nova 502
Installing a New Release of Nova Software 503
Resolving Communication Issues 506
The System Setup Window 507
APPENDICES 508
Appendix A: The Standard Template 508
Appendix B: Plug-in Effects 512

About This Manual
Eclipse User Guide 2.0 11/ 526
About This Manual
How to Use This Manual
Before we guide you through the operation of the Eclipse, first
a few words about this manual.
Chapter 1 introduces the console. Read this chapter to learn
more about the system’s concepts and capabilities.
Chapter 2 deals with installing and connecting a console
supplied with the standard Eclipse I/O and M.A.R.S. package.
Chapter 3 covers the basic operating principles of the console
surface and Nova management software.
Chapter 4 provides a “Getting Started” guide to loading and
working from the standard template File. If you have limited
time to learn the console, then these two chapters are for you!
Chapters 5 to 8 cover each area of operation in greater detail.
Chapter 9 deals with the operation of the Nova software from
an offline PC.
Chapter 10 describes the operation of M.A.R.S., Eclipse’s
integrated hard disk recorder.
Chapter 11 provides information on technical procedures: how
to use M.A.R.S as a backup computer for Nova; how to install
new NOVA software; resolving communication issues; and the
System Setup window.
Use the Table of Contents at the beginning of the manual or
Index Directory (Page 523) to locate help on a particular topic.
Appendices, Technical data, a Glossary of terms and the Index
Directory are provided at the end of the manual.
You will find additional installation and service information for
the Eclipse in the “Eclipse Technical Manual”.
You can also access more information on the Innovason
website at http://www.innovason.com. Here you may download
any additional documentation on the latest releases for your
product.

About This Manual
12/ 526 2.0 Eclipse User Guide
Conventions
Throughout this manual we will be using a number of
conventions:
Action Buttons
To help distinguish explanatory text from the text referring to
items on the console:
Silk screened text on the console’s front panel is referred to in
UPPERCASE and button cap engravings are written in bold –
for example, press the 48V button located on the INPUT control
panel to enable or disable phantom power.
On-screen buttons and descriptive text within the Nova touch-
screen displays are both referred to in bold.
Console keyboard keys are referred to inside [] marks - for
example, press the [F11] key to access the PATCH INPUT grid.
Menu paths are referred to as a string of selections – for
example, select “GRID -> Patch Input” from the main menus:
Also look out for the tables shown opposite which summarise
how to select a display or option from a front panel button,
trackball/mouse or keyboard short-cut key.
Screenshots
Please note that most of the Nova screenshots used in this
manual have been taken offline. As a result, meters may be
shown at full scale rather than at normal operating levels.
Patch IN
(UTILITIES)
“GRID ->
Patch Input”
[F11]

Chapter 1: Overview
Welcome
Eclipse User Guide 2.0 13/ 526
Chapter 1:Overview
Welcome
Eclipse is a powerful live mixing and recording console with the
flexibility to adapt to Front of House (FOH), Monitors or OB van
applications.
Control Surface Overview
Fader Strips
The lower half of the Eclipse control surface features 48 Fader
strips each with its own VU meter, rotary control (gain, pan or
user), Label, ID, MUTE, CUE and fader select (SEL) button.
Faders are touch-sensitive and motorised. Each is clearly
labeled with a 4-character user name and colour-coded ID. The
IDs enable you to glance across the console and easily
distinguish inputs (blue) from Auxes (green), VCAs (yellow),
Masters (red), Matrix outputs (violet), etc.

Chapter 1: Overview
Control Surface Overview
14/ 526 2.0 Eclipse User Guide
Smart Panel “Strips”
Above Fader strips 14 to 20 you will find the SMART PANEL.
This provides 48 additional control strips available in 4 layers:
A, B, C and D.
Each Smart Panel strip features the same functionality as a
Fader strip, except level and cue are adjusted by a rotary
control, and there is no Gain/Trim/Pan control.
Selected Channel Control
To the left of the SMART PANEL are the INPUT, DELAY,
DYNAMIC, PARAM EQ and PAN sections. Together these form
a “channel strip” for the selected Fader or Smart Panel strip:
Once a SEL button is active (flashing), these panels offer direct
control of all settings – gain, insert switching, low cut filter,
delay, dynamics, equalisation and panning. The controls work
in conjunction with the Main Mix display which provides
graphical feedback on the selected channel:

Chapter 1: Overview
Control Surface Overview
Eclipse User Guide 2.0 15/ 526
Utilities
Above the PARAM EQ is a UTILITIES panel with access to a
range of functions:
•Flat – resets the Gate, Compressor, Parametric EQ or
Graphic EQ section on the selected (SEL) channel.
•Copy Paste – used to copy and paste channel
parameters.
•Over Ram – writes parameters from the selected
channel into other Pages (snapshots). For example, to
overwrite a new mic gain into all the Pages for a show.
•Relax – isolates parameters so that they are not reset
by a Page load. For example, if you are using Pages to
recall a different mix for each song, you might Relax the
vocal faders so that there are no sudden jumps in level.
•Rqst – turns the channel select (SEL) buttons into on/off
buttons for a requested parameter. For example, to turn
EQ on or off across multiple channels.
•Pre/Pan – provides an overview of bus routing from the
selected channel (or to the selected output), with options
to configure pre-fader or independent pan sends.
•Link Cards – links I/O parameters on an input or output
card. For example, to link mic preamp gain on input
cards, or to link output processing on output cards.
User Defined Panel
The USER DEFINED panel provides six VU meters, four rotary
controls and four switches. Functions are assigned to each
control from the “UTIL -> User defined assignment” menu.

Chapter 1: Overview
Control Surface Overview
16/ 526 2.0 Eclipse User Guide
Touch-Screen
The console screen is a touch-screen display which can be
switched between two control computers:
•NOVA – Eclipse’s management software. Nova controls
the console and stores/recalls mix settings.
•M.A.R.S. (Multitrack Audio Recording System) –
Eclipse’s integrated 64-track hard disk recorder.
M.A.R.S. Control Panel
Below the touch-screen, the M.A.R.S. control panel provides
transport and cue control for recording and playback:
Trackball and Keyboard
A trackball is situated to the right of the touch-screen and the
console keyboard, with its own trackball, pulls out from the front
drawer. Many functions can be selected either by touching the
screen, using the trackball, or pressing a keyboard shortcut key.

Chapter 1: Overview
Control Surface Overview
Eclipse User Guide 2.0 17/ 526
USB Ports and Timecode Display
To the left of the touch-screen are two USB ports for importing
and exporting data. The timecode display can show timecode
from either the M.A.R.S. hard disk recorder or Nova’s external
MIDI input.
Power Status Indicators
To the right of the touch-screen are a row of LEDs indicating
the status of power supplies (A and B) and internal voltages.
TB/Monitoring
Below the Power indicators are the console’s talkback,
monitoring and headphone controls.
Eclipse includes a stereo monitor bus which may be switched to
three different monitor outputs. In addition, a headphone output
is provided at the front of the console (1/4” jack).
The console’s CUE buttons may operate as AFL, PFL or Solo-
in-Place (SIP).
Talkback may be switched to three different outputs. A talkback
microphone input is provided at the front of the console (XLR).
Utilities
A second UTILITIES panel provides access to:
•Off Line Mode – use this mode to load Pages to the
console to check or modify settings without affecting the
current mix.
•Play List – the Play List manages Page automation. For
example, to change the order of Pages for the show, to
set crossfade times between Pages, etc.
•Test – routes the Oscillator test tone to the selected
channel.
•D I/O – displays the PATCH DIRECT grid.
•Patch IN – displays the PATCH IN grid.
•Patch OUT – displays the PATCH OUT grid.
Files/Auto
The FILES/AUTO panel provides buttons for saving settings
(Files) and managing console automation (Pages).

Chapter 1: Overview
System Overview
18/ 526 2.0 Eclipse User Guide
System Overview
Unlike an analogue console, Eclipse consists of much more
than just the operating surface; a system may incorporate three
physical components:
•Console – houses the console’s DSP processing and
master control, six slots for local i/o and internal effects
cards, and an internal PC running the Nova software.
Note that the console frame also houses a second PC
and removable hard disk for M.A.R.S., Eclipse’s
integrated hard disk recorder.
•DioCore – an external unit connected to the console via
Ethersound, offering up to eight slots for input and
output cards. The DioCore may be located up to 100m
from the console on coax (CAT5) connection.
•Muxipaire Stagebox (optional) – an external unit
connected to the console via Innovason’s Muxipaire
interface (coax or fibre). This Stagebox works in parallel
with the six i/o and effects slots in the rear of the
console, providing a way to remote additional i/o onto
the stage if required.

Chapter 1: Overview
System Overview
Eclipse User Guide 2.0 19/ 526
I/O and FX Cards
The six slots at the rear of the console (or in a Muxipaire
Stagebox) and the eight slots in a DioCore may be fitted with
any combination of the following I/O:
•SI-8D3 – 8 mic/line inputs (on 8 balanced XLRs).
•DI-8S – 4 AES inputs (8 mono channels on 4 balanced
XLRs).
•DI-8Src – 4 AES inputs with sample rate conversion (8
mono channels on 4 balanced XLRs accepting sample
rates from 32kHz to 56kHz).
•UM-8PO - 8 analogue line outputs (on 8 balanced
XLRs). Each pair of outputs may be switched to AES. All
8 outputs are also available as ADAT via a TOSlink
connector. Each output has its own signal processing
(Compressor, Gate, 8-band Parametric EQ, 31-band
Graphic EQ and Delay.) (Note that the UM-8PO is not
recognised in a Muxipaire Stagebox; use the MO-8D3
card instead.)
The internal effects card can be fitted only in the rear of the
console:
•FM-8VB – 8 channels of internal effects. Each pair of
channels may be linked for stereo operation. Each
channel has 4 effects engines which may operate a VB
Audio plug-in (Reverb, Echo, Chorus, Flanger, De-
esser, Compressor, Gate, Multiband Compressor, etc.)
Note that all cards operate at 24-bit, 48kHz. (If the system is
synchronised to an external clock signal, then the sampling
frequency may operate from 43-49kHz).
The Standard Eclipse I/O Package
So that you know what to expect, particularly when arriving to
work on a rental console, Eclipse is delivered with a standard
package of i/o and internal effects cards which consists of:
•1 DioCore – remote stage i/o with:
o7 SI-8D3 cards = 56 Mic Preamps
o1 UM-8PO card = 8 Outputs (Line/AES/ADAT)
•Console - local desk i/o of:
o1 SI-8D3 card = 8 Mic Preamps
o2 UM-8PO cards = 16 Outputs (Line/AES/ADAT)
o2 FM-8VB = 16 mono effects bays
o16 Line Inputs and 16 Line Outputs
You can find more details in Chapter 2: Installation.

Chapter 1: Overview
System Overview
20/ 526 2.0 Eclipse User Guide
M.A.R.S.
Every standard Eclipse includes M.A.R.S. (Multitrack Audio
Recording System),the name of Eclipse’s integrated hard disk
recorder. The system provides 64 tracks of recording allowing
playback of sound checks at different venues without the band
being present.
M.A.R.S. connects to the rest of the system via the Ethersound
network. Consoles ship with a pre-installed Ethersound cable
allowing you to play back the demo song instantly.
Audio recording is managed by the M.A.R.S. control computer
(separate from Nova), and audio files are stored on the
removable hard disk at the rear of the Eclipse frame.
A dedicated control panel switches the touch-screen between
M.A.R.S. and Nova, and provides rapid access to recording and
playback functions:
Additional functions are accessible from the M.A.R.S. touch-
screen displays:
For more details on M.A.R.S. please see Page 444.

Chapter 1: Overview
System Overview
Eclipse User Guide 2.0 21/ 526
Ethersound Options
Ethersound is an open protocol offering 64-channels of
bidirectional I/O via a CAT5 network cable (up to 100m).
Multiple DioCores and other Ethersound devices may be
connected to the Ethersound network in order to distribute I/O
to different physical locations.
Up to 4 DioCores may be active on each console at any one
time plus an unlimited number of other Ethersound devices.
The console operator may then select which 64-channels of I/O
they wish to use from the Ethersound network and patch inputs
and outputs accordingly.
I/O patching can be controlled for any Ethersound device on the
network.
In addition, the Nova software supports parameter control for
specially supported Ethersound devices. These include
Digigram’s Aqonda 16, Innovason’s SR-16 and Neumann’s
DMI-8. For these devices, parameters such as analogue input
gain can be controlled remotely from Eclipse:
Other manuals for Eclipse
1
Table of contents
Other INNOVASON Recording Equipment manuals

