Innovative Technology ITVS-325 User manual

Retro 4-in-1 Wooden Music Center
MODEL: ITVS-325
IMPORTANT SAFETY INSTRUCTIONS .......................................................................................... 2
PRODUCT OVERVIEW ................................................................................................................. 4
SETUP / BASIC OPERATION......................................................................................................... 6
LISTENING TO A VINYL RECORD ................................................................................................. 6
LISTENING TO A CD .................................................................................................................... 7
LISTENING TO THE RADIO .......................................................................................................... 8
LISTENING TO AN EXTERNAL AUDIO DEVICE (AUX MODE) ........................................................ 8
MAINTENANCE / PROPER HANDLING ........................................................................................ 8
SPECIFICATIONS ....................................................................................................................... 10
TROUBLESHOOTING GUIDE...................................................................................................... 11
FCC STATEMENT ....................................................................................................................... 12

2
CAUTION: To reduce the risk of fire or electric shock, do not expose this appliance to rain or moisture.
WARNING: To prevent electric shock, do not use this (polarized) plug with an extension cord, receptacle
or other outlet unless the blades can be fully inserted to prevent blade exposure
WARNING: Invisible laser radia on when open and interlock failed or defeated. Avoid direct
exposure to laser beam.
PRODUCT COMPLIES WITH DHHS RULE 21 CFR SUBCHAPTER J IN EFFECT AT DATE OF
MANUFACTURE
IMPORTANT SAFETY INSTRUCTIONS
1. Read these instru ons.
2. Keep these instruc ons.
3. Heed all warnings.
4. Follow all instruc ons.
5. Do not use this apparatus near water. This apparatus shall not be exposed to dripping or splashing, and
no objects filled with liquids, such as vases, shall be placed on the apparatus.
6. Clean only with a dry cloth.
7. Do not block any ven l openings. Install in accordance with the manufacturer’s instru ons. The
apparatus should not be situated on a bed, sofa, rug or similar surface that may block the ven l n
openings. The apparatus must not be placed in a built-in installa on, such as a closed bookcase or
cabinet that may impede the flow of air through the ven l on openings. Ven la on should not be
impeded by covering the openings with items such as newspapers, tablecloths, curtains, etc.
8. Do not install near any heat sources such as radiators, heat registers, stoves, or other apparatus
(including amplifiers) that produce heat. Extended exposure to temperatures higher that 170 degrees
Fahrenheit, for example inside a closed vehicle during the summer, may result in damage to your
product.
9. No open flame sources, such as lighted candles, should be placed on the apparatus.
10. Do not defeat the safety purpose of the polarized or grounding-type plug. A polarized plug has two
blades with one wider than the other. A grounding type plug has two blades and a third grounding
prong. The wide blade or the third prong is provided for your safety. If the provided plug does not fit
into your outlet, consult an electrician for the replacement of the obsolete outlet.
11. Protect the power cord from being walked on or pinched – par cularly at plugs, convenience
receptacles, and the point where they exit from the apparatus.
12. Do not install in an area which impedes the access to the power plug. Disconne the power plug is
the only way to completely remove power to the product and must be readily accessible at all mes.
13. Power source – Use only power supplies of the type specified in the opera ng instruc ons or as
marked on the appliance. If a separate power supply is included with this apparatus, do not subs tute
with any other power supply – use only manufacturer-provided power supplies.
14. Unplug this apparatus during lightning storms or when unused for long periods of me.

3
15. Iftheunitwillbeunusedforlongperiodsoftime,thebatteriesshouldberemoved.
16. Donotplacethisproductonanunstablesurface.Theproductmayfall,causing
seriousinjurytoachildoradultandseriousdamagetotheproduct.Useonlywitha
stand,bracket,ortablerecommendedbythemanufacturer,orsoldwiththeproduct.
Anymountingoftheproductshouldfollowthemanufacturer’sinstructions,and
shoulduseamountingaccessoryrecommendedbythemanufacturer.
17. Movetheappliancewithcaretoavoiddamageorinjury.
18. Referallservicingtoqualifiedservicepersonnel.Servicingisrequiredwhentheapparatushasbeen
damagedinanyway:thepower‐supplycordorplugisdamages,liquidhasbeenspilledorobjectshave
fallenintotheapparatus,theapparatushasbeenexposedtorainormoisture,doesnotoperate
normally,orhasbeendropped.
19. Forproductswhichincorporatebatteries,pleaserefertolocalregulationsforproperbatterydisposal.
FCCWARNING:Changesormodificationstothisunitnotexpresslyapprovedbythepartyresponsiblefor
compliancewillvoidtheuser’sauthoritytooperatetheequipment.
NOTE:ThisequipmenthasbeentestedandfoundtocomplywiththelimitsforClassBdigitaldevice,
pursuanttoPart15oftheFCCRules.Thoselimitsaredesignedtoprovidereasonableprotectionagainst
harmfulinterferenceinaresidentialinstallation.Thisequipmentgenerates,usesandcanradiateradio
frequencyenergyand,ifnotinstalledandusedinaccordancewiththeinstructions,maycauseharmful
interferencetoradioortelevisionreception.Ifthisequipmentdoescauseharmfulinterference,whichcanbe
determinedbyturningtheequipmentoffandon,theuserisencouragedtotrytocorrecttheinterferenceby
oneormoreofthefollowingmeasures:
- Reorientorrelocatethereceivingantenna.
- Movethetransmittertoadifferentphysicallocation.
- Increasetheseparationbetweentheequipmentandreceiver.
- Connecttheequipmentintoanoutletonacircuitdifferentfromthattowhichthereceiveris
connected.
- Consultthedealeroranexperiencedradio/TVtechnicianforhelp.
- Ifyoucannoteliminatetheinterference,theFCCrequiresthatyoustopusingyourheadphones.
ACCESSORIESINCLUDED
•3.5MMTO3.5MMAUXCABLE
•INSTRUCTIONMANUAL
•WARRANTY(BACKOFMANUAL)
•45RPMADAPTER

4
(CD/PHONO/FM/AM).
track. Press and hold to fast rewind.
Side View
16. AUX IN jack
For audio sources with 3.5mm jack, plug one end of the audio
cable into the jack and the other into the audio source. Once
the AUX IN jack is occupied, all the other working fun on
will be de vated.
Rear View
17. FM wire antenna
While tuned to a sta on in FM mode,
extend the wire and repos on to
adjust for best recep on.
18. AC Power Cord
Plugs into a wall outlet.
PRODUCT OVERVIEW
Front View
1. PLAY/PAUSE Press to start playback.
During playback, press again to pause.
2. STEREO SPEAKERS
3. STOP Press to stop playback or recording.
4. OPEN/CLOSE In CD mode, use to open
and close the disc tray.
5. CD DISPLAY
6. RADIO TUNER KNOB In FM or AM mode, turn
10. FUNCTION KNOB
Rotate the knob to select a fun on
14. NEXT TRACK /FF
In CD Mode, press once to skip to the next
track. Press and hold to fast forward.
15. RADIO TUNER DISPLAY
11. “VOLUME” KNOB Turn to adjust volume.
12. PLAY MODE In CD mode press to set a
repeat/program playback.
13. PREVIOUS TRACK /REWIND
In CD Mode, press once to skip to the previous
to tune in a on
7. 3.5mm HEADPHONE JACK
Accepts headphone/earphone plugs.
8. DISC TRAY
9. “POWER ON/OFF” Press to turn the unit on
or off.

5
Parts of the Turntable
A. Turntable.
B. Safety Screw (for transport) Before using the unit, turn the screw
clockwise using a coin or screwdriver.
Important: When you transport the unit, turn the screw counterclockwise to secure the turntable.
The silver screw on the back of the turntable is a balancer for both the turntable as well as for
the tone arm.
Please turn this screw with a coin to either the leor right and test by moving your tone arm to the
middle of the spindle. Please note that this screw is a balancer and will have to be adjusted unl
the tone arm moves freely to the end of the record (middle of the spindle) without any resistance
before using the turntable phonograph.
C. Tone Arm holder.
D. Speed Selector.
E. Tone Arm. Before use, completely loosen the fixed rope on the tone arm and uplitone arm.
F. 45 RPM adaptor.
Remove the white plasc
needle guard before use.
Keep it in a safe place and
put it on when the unit is
not in use.

6
SETUP/BASICOPERATION
Setup
1.Removewhiteprotectiveneedlecoverbygentlypullingtowardsfrontofunit.
2.Removeanypackagingmaterialsfromtheunit.
3.ConnecttheACpowercord
toawalloutlet.
Note:Topreventinterference,avoidbundlingaudiosignalcablestogetherwiththeACpowercord.
BasicOperation
1.PushthePOWERbuttontoturntheuniton.
2.SelectthesourcebyrotatingtheFUNCTIONknobtothecorrespondingposition
(CD/PHONO/FM/AM).
3.RotatetheVOLUMEknobtoadjusttothe
desiredsoundlevel.
ListeningthroughEarphones/Headphones(notincluded)
Forprivatelistening,firstreducethevolumeleveltominimum.
Insertyourheadphones’plugintothe3.5mmHEDAPHONEJACKonthe
frontoftheunit,thenadjustthevolumeupbyturningtheVOLUMEknob.
Note:Thespeakerswillautomaticallybedeactivatedwhile
headphonesarepluggedin.
CONDENSATIONWARNING:
Whentheunitismovedfromacoldorwarmplace,orisusedfollowingasuddentemperaturechange,thereisthedanger
thatwatervaporintheairmaycondenseontheunit,preventingproperoperation.Insuchcases,leavetheunitfor1‐2hours
afterpluggingitintoanACoutlettoallowittostabilizeatthetemperatureofitssurroundings.
LISTENINGTOAVINYLRECORD
1. RotatetheFUNCTIONknobtothe“PHONO”position.
2. Gentlyopenthetopcover.
Note:Becarefulnottopinchyourfingerwhen
opening/closingthetopcover.
3. Placeavinylrecordontheturntable(3).
Whenplayinga45RPMrecord,
usetheincludedadaptor.
4. Selecttheappropriatespeed(4).
5. Gentlypushtonearmclip(5)
totherighttoreleasethetonearm.
6. Liftthetonearmoffthetonearmsupportandmovethetonearmgentlytotheedgeoftherecord(or
thestartingpointofatrack).
Theturntablewillbegintoturn.
7. Gentlylowerthetonearmslowlyontotherecord.
8. Whenplaybackisfinished,thetonearmwillstopatthecenteroftherecordandtheturntablewillstop.
9. Afteruse,liftthetonearmbacktothetonearmsupportandrelockthetonearm.

7
Important:
‐Closingthetopcoverwillhelppreventdustfromsettlingontheturntable.
‐Alwaysrelockthetonearmclipbeforetransportingtheunit.
‐Donotplaceanythingontopoftheturntablecover,especiallywhileplayingarecord.
LISTENINGTOACD
1. RotatetheFUNCTIONknobtothe“CD”position(1).
“‐‐”willblinkforafewseconds.
Note:Whennodiscisset,“NO”willappearon
thedisplay.
2. PresstheOPEN/CLOSE()button(2).
3. Placeadisconthetraywiththeprintedlabel
faceup.
4.PresstheOPEN/CLOSE()buttontoclosethetray.
5.PressthePLAY/PAUSEbutton()tobeginplayback.
6.Totemporarilypauseplayback,pressthePLAY/PAUSEbutton().Pressagaintoresume.
7.Toskiptracksforwardorbackward,pressthecorrespondingskipbutton(or).Pressing
onewillrestartthecurrenttrack.Pressingtwiceinsuccessionwillreturntothebeginningofthe
previoustrack.
8.Tofastforward/rewindwithinatrack,pressandholddownthecorrespondingskipbuttonuntilthe
desiredpositionisreached.
9.Tostopplayback,presstheSTOPbutton
Note:CDplaybackwillautomaticallybeginifaCDisalreadyinthedisctraybeforetheunitisswitchedto
theCDfunction.
Important:
‐ Neverplacemorethanonedisconthetray.
‐ Thediscmustbeplacedinthecenterofthedisctray.Anincorrectlyloadeddisccanpermanentlydamage
thetraydoormechanism.
‐ DonotpushtheCDtray–alwaysusetheOPEN/CLOSEbutton.
‐ Ittakesamomentfortheunittoloadadisc,duringwhichallbuttonswillbetemporarilydeactivated.
RepeatPlayback/ProgrammedPlayback
EachtimethePLAYMODEbuttonispressed,therepeatmodewillcyclethroughthefollowingoptions:
REPEAT1(Repeatonetrack)
Thecurrenttrackwillbeplayedrepeatedly.Ifyoupressthe(or)buttontoselectanothertrack,
thetrackyouselectwillbeplayedrepeatedly.
REPEATALL(RepeattheentireCD)
TheentireCDwillbeplayedrepeatedly.
Notes:
‐Ifoneofthefollowingbuttonsispressed,therepeatmodewillbecancelled.
OPEN/CLOSE,POWER,orrotatetheFUNCTIONknobtoFM,AMorPHONOposition.
‐Repeatplaybackworkswithfinalizeddiscsonly.
ProgrammedPlayback
Upto20trackscanbeprogrammedtoplayinthedesiredorder.
Note:Programmedplaybackworkswithfinalizeddisconly.

8
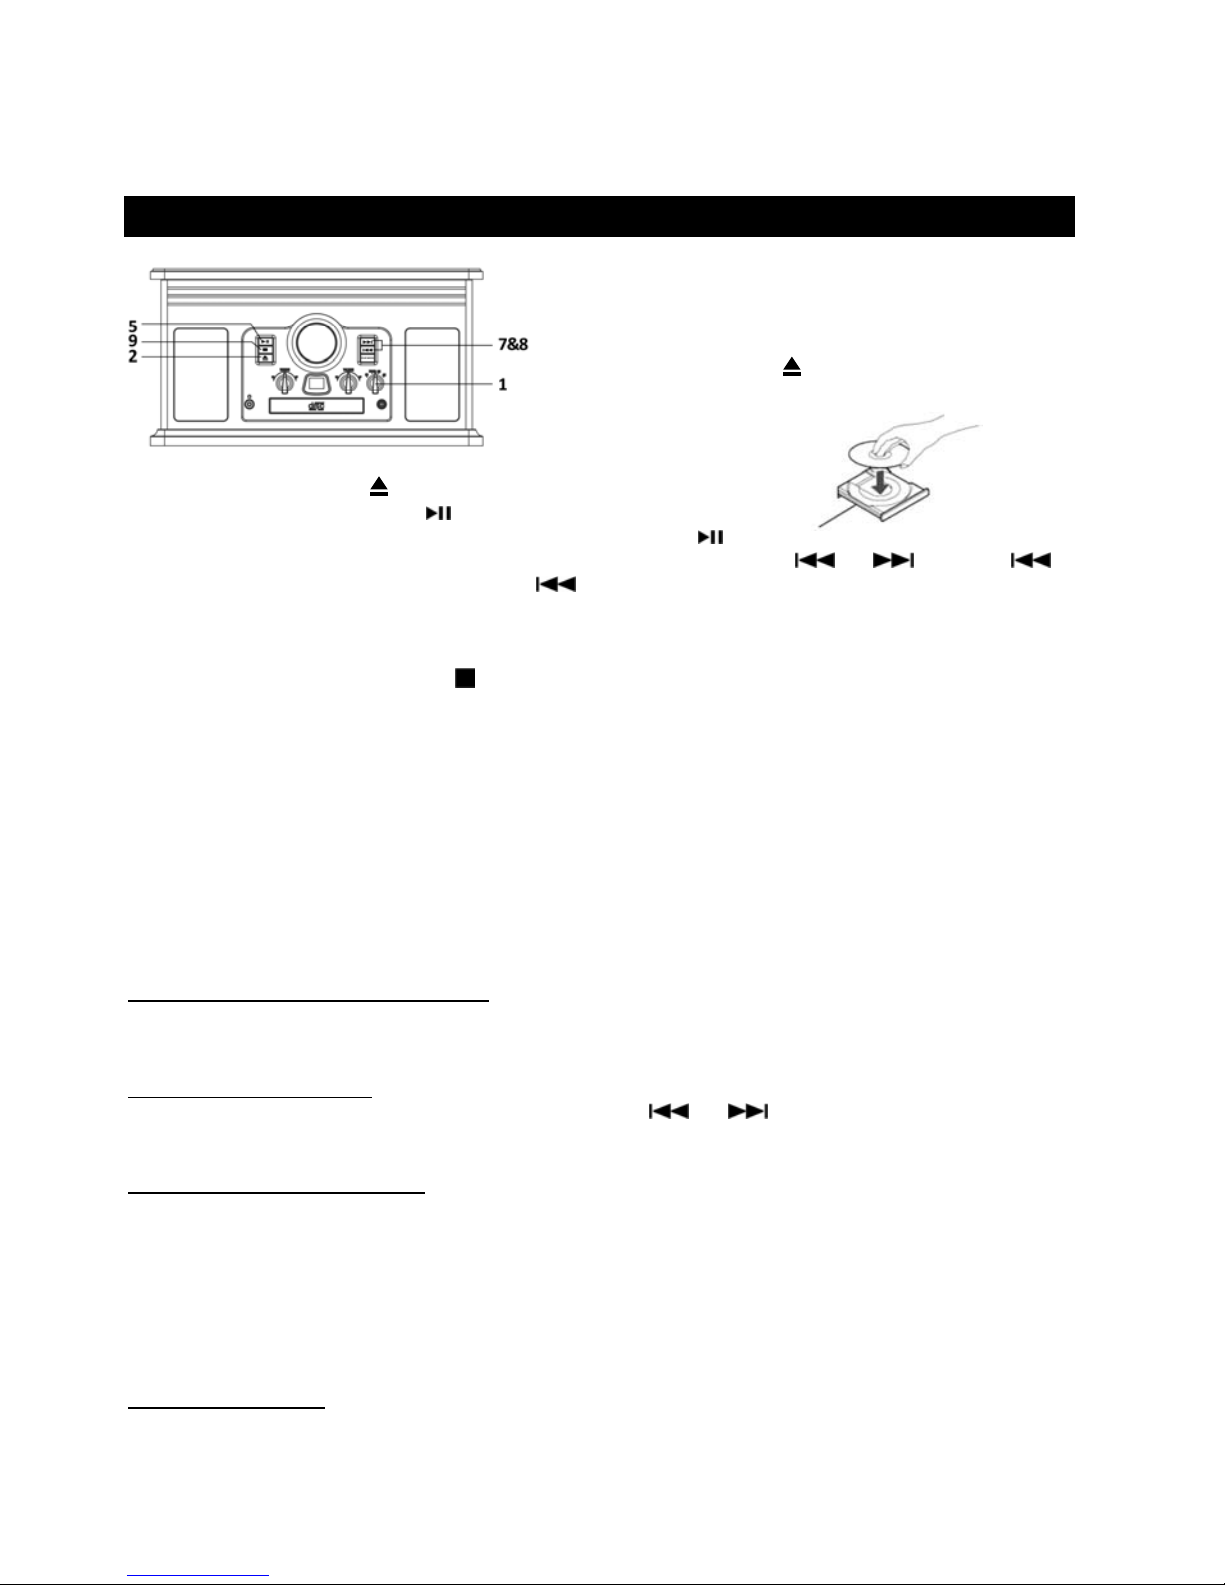
1.RotatetheFUNCTIONknobtothe“CD”positiontoenterCDmode,thenloadaCD.
2.WhiletheCDisstopped,pressthePLAYMODEbutton.
3.“PROG”indicatorblinks,and“01”appearsonthedisplay.
4.Press(or)toselectatracknumber.
5.PressthePLAYMODEbuttonagaintosetthecurrenttrack.
6.“02”isdisplayed.Repeatsteps4thru5toprogramtheadditionaltracks.
7.Whentheselectionoftracknumbershasbeenfinished,pressthePLAY/PAUSEbutton()tostart
programplayback.
8.Tostoptheplayback,presstheSTOP().
Tochecktheprogrammedorder
Inthestopmode,press(or)repeatedlytoshowthetracknumbersthathavebeenprogrammed.
Toaddatracktotheendoftheprogrammedorder:
Inthestopmode,pressthePLAYMODEbutton.
Selectatracknumberbypressing(or),thenpressthePLAYMODEbutton.
Thecurrenttrackwillbeaddedtotheendoftheprogram.
Tocleartheprogrammedorder:
PressSTOP()whentheCDisalreadystopped,orpressOPEN/CLOSE,POWER,orrotatetheFUNCTION
knobtoFM,AMorPHONOposition.
LISTENINGTOTHERADIO
1.RotatetheFUNCTIONknobtoeither“FM”or“AM”position.
2.TunetothedesiredstationusingtheRadioTunerKnob.
AdjustingforBestReception
AMbroadcast:Rotatetheunittofindthebestposition.
FMbroadcast:ExtendandrepositiontheFMantenna.
LISTENINGTOANEXTERNALAUDIODEVICE(AUXMODE)
InAUX(auxiliary)mode,thisunitcanplayaudiofromanexternalaudiosource(iPod,MP3Player,PortableCD
Player,etc.)
1.PlugoneendoftheAUXINcable(included)intotheAUXINjack(attheside
oftheunit).
2.Plugtheotherendofthecableintotheheadphonejackoftheexternal
audiosource.
3.Otherworkingfunctionwillbedeactivated.
4.Turnonexternalaudiosourceandsetitplay.
5.Adjustthesoundontheexternalaudiosourceifpossible.
6.Thenadjustthesoundontheunitaccordingly.
MAINTENANCE/PROPERHANDLING
CompactDiscHandling
•Alwaysplacethedisconthedisctraywiththelabelsidefacingupward(compactdiscscanbeplayedonlyononeside)
•Toremoveadiscfromitsstoragecase,pressdownonthecenterofthecaseandliftthediscupward,holdingitcarefully
byitsedges.
•Tocleanadisc,wipethesurfacefromthecenterholeoutwardtowardstheouteredgewithasoft,drycloth.
•Neverusechemicalssuchasrecordspray,antistaticspraysorfluid,benzineorthinnertocleandiscs;theywill
irreparablydamagethedisc’splasticsurface.
•Discsshouldbereturnedtotheircasesafterusetoprotectfromdustandscratches.

9
•Donotexposediscstodirectsunlight,highhumidity,orhightemperatureforextendperiodsoftime.
•PrintableCD‐RandCD‐RWdiscsarenotrecommended,asthelabelsidemaybecomestickyanddamagetheunit.
•Useasoftoil‐basedfelt‐tippedpentowritetheinformationonthelabelside.Neveruseaball‐pointorhard‐tippedpen,
asdoingsomaydamagetherecordedside.
•Donotuseirregularly‐shapedCDs(octagonal,heartshaped,businesscardsize,etc),astheywilldamagetheunit.
•ReadallprecautionssuppliedwithanyCD‐RorCD‐RWdisc
•Neverhandleadiscwithdirtyfingers.
•Neverinsertadiscthathasacrackonthesurface.
HandlingVinylRecords
•Donottouchtherecord’sgrooves.Onlyhandlerecordsbytheedgesorthelabelwithcleanhands.Touchingtherecord
surfacewillcauseyourrecord’squalitytodeteriorate.
•Tocleanarecord,useasoftanti‐staticclothtogentlywipetherecordsurface.
•Keeprecordsintheirprotectivesleeveswhennotinuse.
•Alwaysstorerecordsuprightontheiredges
•Avoidplacingrecordsindirectsunlight,closetoaheatsource(radiators,stoves,etc.),orinalocationsubjectto
vibration,excessivedust,heat,coldormoisture.
GeneralCare
•Whenremovingthepowerplugfromthewalloutlet,alwayspulldirectlyontheplug.
Neverpullthecord.
•Tokeepthelaserpickupclean,donottouchit,anddonotforgettoclosethedisctray.
•Donotattempttocleantheunitwithchemicalsolventsasthismightdamagethefinish.
•Forcleaning,onlyuseaclean,drycloth.
•Inordertoshutoffthepowertothisproductcompletely,unplugthepowercordfromthewalloutlet.Besuretounplug
theunitifyoudonotintendtouseitforanextendedperiodoftime.
HowtoReplacetheTurntableStylus
Thestylusshouldlastabout50hoursundernormaluse.However,itisrecommencedthatthestylusbe
replacedassoonasyounoticeachangeinsoundquality.Prolongeduseofaworn‐outstylusmaydamage
therecord.Thehighestspeedof78RPMrecordswouldwearoutthestylusmorequickly.
Removingtheoldstylus:
1.Setascrewdriveratthetipofthestylusandpushdownward(A).
2.Removethestylusbypullingitsimultaneouslydownwardandforward.
Installinganewstylus:
1.Holdthefronttipofthestylusandinsertitsrearedge(B)first.
2.Pushthestylusupwards(C)untilthetiplocksintoplace.
Caution:
zDonotbendthestylus.
zDonottouchtheneedletoavoidinjuryyourhand.
zTurnofftheunit’spowerbeforeyoureplacethestylus.
zKeepoutofreachofchildren.

10
SPECIFICATIONS
GENERAL
Power Requirements AC 120 V~ 60 Hz
Power Consumpon 19W
Dimensions (W x H x D) 460x250x340mm(approx.)
Weight 8.56 kgs (approx.)
AMPLIFIER
Output Power 2W + 2W
Frequency Response 60 to 20, 000 Hz
SPEAKER SYSTEM
Type 1-way
Impedance 8 ohms
Input Power Max. 5W
FM Radio
Range 88 to 108 MHz
AM Radio
Range 530 to 1710 KHz
CD PLAYER
Frequency Response 60 to 20, 000 Hz +/-4 dB
Signal-to-Noise Rao 55 dB (IEC-A)
RECORD PLAYER
Motor DC servo motor
Drive System Belt Drive
Speeds 33-1/3 rpm, 45 rpm and 78 rpm
S/N Rao More than 50 dB
Cartridge Type Ceramic Stereo Cartridge
Stylus ITRRS-300

11
TROUBLESHOOTINGGUIDE
Forfurtherassistancewithyourproduct,callInnovativeTechnologyat
TOLLFREE#1‐877‐ITECH‐97(1‐877‐483‐2497).
GENERAL
SymptomPossibleCauseSolution
•Unitwillnotpoweron. •Unitisunplugged. •ConnecttheunittotheAC
powersupply.
•Nosoundoutputfrom
speakers.
•Thevolumelevelissettoolow.
•Theinputselectordoesnot
matchtheplaybacksource.
•Adjustthevolume.
•Selectthecorrectinput
source.
•Noise/Distortioninsound
output.
•TheunitistooclosetoaTVsetor
otherinterferingdevice.
•TurnofftheTVorother
appliance,andrelocatethe
unit.
•Unitfailstorespond. •Mayresultfromexternalfactors
suchasESD(Electro‐static
discharge).
•Disconnectthepowercord
andexternalaudiodevice.
Re‐plugthepowercordafter
oneminute.
FM/AMRADIO
•Cannotlistentoany
station,orsignalappears
weak.
•Thestationisnottuned‐in
properly.
•ATVsetisbeingusednearbyand
isinterferingwiththeradio
reception.
•Properlytune‐inthedesired
station.
•Turn‐offtheinterferingTV
set.
•Thesoundisdistorted.
•Theantennaisnotoriented
properly.
•Re‐positiontheantennauntil
receptionimproves.
CDPLAYER
•CDstopsimmediately
afterstarting,orunit
pausesorstopsduring
play.
•TheCDisinsertedupsidedown.
•TheCDisdustyordirtyorthereis
condensationontheCD.
•InserttheCDwiththe
printedsideright‐sideup.
•Carefullycleananddrythe
CD.
•Nosound.•TheCDplayerispaused.•PressthePLAY/PAUSE
button.
•CDplaybackisnoisy,or
playbackstopsorskips.
•TheCDisscratched,damagedor
warped.
•Thediscisverydirty.
•ReplaceCDwithan
undamagedone.
•CarefullycleantheCD.
•CDtraywillnotopen •CDmodeisnotselected.•SelectCDmodewiththe
FUNCTIONknob.
•Buttonsarenot
functioningcorrectly.
•Theunitisprocessinginformation
(“‐‐”isdisplayed).
•Theunitneedstoberestarted.
•Waituntiltheunitfinished
processing.
•Turntheunitoff,thenon
again.
PHONO
•Declineinturntableaudio
performance
•Theturntablestylusiswornout •Replacethestylus
AUX
•Nosoundoutputwith
externalaudiodevice
pluggedintotheAUXin
jack.
•Theexternalaudiosourceis
pausedoroff.
•Thesoundisnotloudenoughoris
muted.
•Settheexternalaudiosource
toplayorturniton.
•Adjustthevolumelevelon
theexternalaudiosourceor
un‐mutetheexternalaudio
source.

12
FCCSTATEMENT
Warning:Changesormodificationstothisunitnotexpresslyapprovedbythepartyresponsible
forcompliancecouldvoidtheuserauthoritytooperatetheequipment.
NOTE:ThisequipmenthasbeentestedandfoundtocomplywiththelimitsforClassBdigital
device,pursuanttopart15oftheFCCRules.Theselimitsaredesignedtoprovidereasonable
protectionagainstharmfulinterferenceinaresidentialinstallation.Thisequipmentgenerates,
usesandcanradiateradiofrequencyenergyand,ifnotinstalledandusedinaccordancewiththe
instructions,maycauseharmfulinterferencetoradioortelevisionreception,whichcanbe
determinedbyturningtheequipmentoffandon,theuserisencouragedtotrytocorrectthe
interferencebyoneormoreofthefollowingmeasures:
‐Reorientorrelocatethereceivingantenna.
‐Increasetheseparationbetweentheequipmentandthereceiver.
‐Connecttheequipmentintoanoutletonacircuitdifferentfromthattowhichthereceiveris
connected.
‐Consultthedealeroranexperiencedradio/TVtechnicianforhelp.
CALIFORNIAPROP65WARNING
"WARNING"ThisproductcontainschemicalsknowntotheStateofCaliforniatocausebirth
defectsorotherreproductiveharm.Formoreinformationontheseregulationsandalistof
chemicals,logonthefollowingwebsiteaddress:
http://www.oehha.ca.gov/prop65.html

13
InnovativeTechnologyElectronicsCorp.
LimitedWarranty:90DaysLabor,OneYearParts
InnovativeTechnologyElectronicsCorp.(IT)warrantstheproducttobefreefrom“Defects”inmaterials
undernormaluseforaperiodof“OneYear”fromthedateoftheoriginalpurchase.TheWarrantyis“Not”
transferable.ITagrees,withintheinitial“90Day”period,torepairorreplacetheproductifitisdetermined
tobedefectiveat“NoCharge”.ItisfurtheragreedthatITwillcoverthecosttorepairorreplacedamaged
“Parts”onlyforatotalperiodof“OneYear”fromthedateoftheoriginalpurchase.Thewarrantydoesnot
covercosmeticdamage,antennas,ACcords,cabinets,headbands,ear‐pads,ordamageduetolinepower
surges,connectiontoimpropervoltagesupplyorsettings,misuse,mishandling,accident,actsofGodor
attemptedrepairbyanunauthorizedserviceagent.
Toobtainservice,thepurchaserMUSTpresentanoriginalsalesreceipt/proofofpurchase.Pleasecontact
usatwww.ithomeproducts.comtorequestanRMA(ReturnMaterialAuthorization)numbertoreturn
productsforserviceorreplacement.ReturnswithoutanRMAnumberonthepackagewillberefusedand
returnedtosender.Uponreceiptofthereturningitemandourfullinspection(IT)mayissueareplacement
tocustomerforthesameitemorofonethathasequivalentvalueandfeatures.Toreturnanitem,supply
fullname,returnaddress,phonenumber,itempurchased,receiptofpurchaseandreasonforreturnto
obtainRMAnumber.
Allreturnsmustbeintheoriginalpackagingorreasonablesubstitutetopreventdamage.
Customer“Must”includefullname,shippingaddressandtelephonenumberinsideofpackage.Noreturn
willbeshippedbacktoaPOBoxorAPOaddress.
Pleaseincludeyourcheckormoneyorderintheamountof
•USD$5.00foritems$10.00to$39.99(PricePaidPerUnit)
•USD$10.00foritems$40.00to$99.99.(PricePaidPerUnit)
•USD$16.00,foritems$100.00andup.(PricePaidPerUnit)
•Shippingfeesarenon‐refundable
tobepayabletoInnovativeTechnologyElectronicsCorp.(forhandlingandreturnshippingcharges)
(IT)willnotberesponsiblefordelaysorunprocessedclaimsresultingfromapurchaser’sfailuretoprovide
any/allofthenecessaryinformation.
SendallinquiriesorRMArequestviaourwebsitewww.ithomeproducts.com/support.
InnovativeTechnologyElectronicsCorp.
1ChannelDrive
PortWashington,NY11050
Tollfree:1‐877‐483‐2497
Websiteforsupport:www.ithomeproducts.com/support
Therearenoexpresswarrantiesexceptaslistedabove.
REPAIRORREPLACEMENTASPROVIDEDUNDERTHISWARRANTYISTHEEXCLUSIVEREMEDYOFTHE
CUSTOMER,(IT)SHALLNOTBELIABLEFORANYINCIDENTALORCONSEQUENTIALDAMAGESFORBREACHOF
ANYEXPRESSORIMPLIEDWARRANTYONTHISPRODUCTEXCEPTTOTHEEXTENTPROHIBITEDBY
APPLICABLELAW.ANYIMPLIEDWARRANTYOFMERCHANTABILITYORFITNESSFORAPARTICULARPURPOSE
ONTHISPRODUCTISLIMITEDINDURATIONTOTHEDURATIONOFTHISWARRANTY.
Somestatesdonotallowtheexclusionorlimitationofincidentalorconsequentialdamages,orlimitations
onhowlonganimpliedwarrantylasts,sotheaboveexclusionsorlimitationsmaynotapplytoyou.This
warrantygivesyouspecificlegalrightsandyoumayalsohaveotherrights,whichvaryfromstatetostate.

14
325120600E
Table of contents
Other Innovative Technology Stereo System manuals

Innovative Technology
Innovative Technology ITCDS-5000 User manual

Innovative Technology
Innovative Technology ITRR-301 User manual

Innovative Technology
Innovative Technology ITSB-350 User manual

Innovative Technology
Innovative Technology ITVS-200B User manual

Innovative Technology
Innovative Technology ITVS-750B User manual

Innovative Technology
Innovative Technology Victorola JPB-17016 User manual

Innovative Technology
Innovative Technology VTA80 User manual

Innovative Technology
Innovative Technology ITVS-750B User manual

Innovative Technology
Innovative Technology ITCDS-5000a User manual

Innovative Technology
Innovative Technology ITVS-750 User manual