Innovative Technology VTA80 User manual

Connect the plug to your AC 100-240V~5 Hz outlet
English Instruction Manual
1
PRE PAR ATION FOR USE
UNPACKING AND SET UP
Carefully remove the unit from the display carton
and remove all packing material from the unit.
Unwind the AC power cord and extend it to its full
length.
Place the unit on a stable level surface, which is
convenient to an AC outlet out of a strong
magnetic field.
Raise the lid to expose the phonograph. The
phonograph has been secured for shipment with
a transit screw. Use a coin or screwdriver to turn
the transit screw clockwise. This will allow the
turntable to “float”
Remove the opaque white plastic stylus cover
from the phonograph stylus by sliding it in the
direction of the arrow.
During this operation pay attention to the stylus,
because the stylus damage is not covered by
guarantee.
Remove the twist-tie that was used to secure the
tone arm during shipment.
Release the tone arm lock lever.
Unit Leg or Feet Assembly
1. Take out the unit and the legs, put them on a smooth surface.
2. Loosen the screws under the unit.
3. Insert the wooden leg into the hole and fix it with the screws
well.
4. Repeat to fix all of the 4pcs legs.
OR
If you want to place the unit on a shelf:
1. Remove the leg fixings from the bottom side and use instead
the short feet.
2. Repeat to fix all of the 4pcs feet.
2.按原孔位装上木腿,将用
拆下的螺丝固定即可。
1.
0-60

CD Door
CD Door OP/CL-Open / Close Button
MODE/STANDBY Button
USB Socket
3.5mm Phones Socket
3.5mm Aux in Socket
2
LOCATIONS OF CONTROLS
FRONT PANEL
1. Phonograph Lid 12. Stop Button
2. Phonograph Lid Support Bracket 13. DN F-R Button
UP F-F Button
3. Speakers 14.
4. 15. Play / Mode Button
5. 16. Record Button
6. 17. Rotary Volume Control (+/-) UP & down
Rotary TUNER/PRESET Control UP & down
7. Unit leg 18.
8. 19. LCD display
9. 20. Sensor
10. 21. Phonograph
11. Play / Pause Button
Back Panel
22. 75ohm FM Antenna Socket
23. AC Power Cord
English Instruction Manual
23
22
1
221
3
3
4
5
6
7
8 9102019 11
12
13
14
15 17 18
16

43
3
REMOTE CONTROL
24. RECORD
25. Open Close
26. EQ Sound settings
27.
28. P.MODE / MENU
29.
30.
31.
32. PRESET
33. - 10
+ 10
34. INFO Information
35. REPEAT
36.
37. MODE
38.
39. VOL +
40.
41. DELETE
42. MUTE
NOTE: All of the buttons on the remote control have same function as these buttons in the
unit.
TURNTABLE
43. Single 45 RPM Adaptor
44. Turntable Platter
45. Transit Screw
46. Cue Lever
47. Tone Arm Lock
48. Speed Selector (33&45 rpm)
49. Tone Arm with Stylus
English Instruction Manual
24
25 37
38
39
40
41
42
26
27
28
29
30
31
32
33
34
35
36
VOL –
Play/Pause
DN - Track backwards
STOP
RANDOM
UP - Track forwards
REPEAT
RANDOM
MODE
45
46
44
47 48
49

.ylnoCAzH0~V042-001lamronnoetarepootdengised
4
GETTINGSTARTED
POWER SOURCE
This system is
Attempting to operate from any other power source may cause
damage to the system, and such damage is not covered by your
warranty.
NOTE: If this plug will not fit into your
outlet
you probably have an
outdated non-polarized
AC outlet. You should
have
your outlet
changed by a
qualified licensed
electrician.
BATTERY INSTALLATION OF REMOTE CONTROL
BASIC OPERATIONS
Power ON / OFF
Press“MODE/STANDBY” button to enter the working mode.
Pressand hold“ ”button to turn off the unit in standy mode.
Adjusting Volume
Rotary the ‘VOL -/+’ knob to decrease / increase the volume.
Total 30 level volume and it displays Vol min to Vol max
ERP power management
If nobody presses and holds the button to turn OFF the unit after stopping
playing, the unit will power off automatically after around 10 minutes.
Press“ ” on the front to wake the device up from standby mode.
English Instruction Manual
The infrared remote control requires 1 pc CR -2025 (3V) Lithium Battery
size battery for operation.
MODE/STANDBY
MODE/STANDBY
MODE/STANDBY
650-

6
English Instruction Manual
For FM reception there is a 75ohm FM antenna socket (22)
move around to obtain the best reception signal.
1. Switch ON the MODE/STANDBY BUTTON (10). The Display (19) will light up.
PRESET MEMORY FM
1. When selected the desired station, press and hold the PRESET BUTTON for 2 seconds.
2. The display show “MEMORY P01”, press UP F.F or DN F.R button to select the desired
preset FM station, then press the TUNER/PRESET(18) or PRESET(32) to store the station.
2. Press sequentially the MODE/STANDBY BUTTON (9) to select the FM Radio.
Tune to the desired radio station by turning theTUNER/PRESET KNOB (17).
1. During FM working mode, press PLAY/PAUSE button on the unit or the remote will auto-
scan all of FM stations and will save automatically.
2. Press and hold UP F.F or DN F.R button for 2 seconds on the unit or the remote start auto scan
mode, if stereo FM station received, ‘Stereo’ will show on the LCD and will stop auto scan but enter
3. Move around the FM antenna(22) to get the best reception.
ANTENA
OPERATION
AUTOMATIC TUNING
MANUAL TUNING
FM RADIO OPERATION
and insert the antenna into the socket,
into the playing mode.
3. Repeat above step 1 and step 2 to save total 10 stations.
4. To play the preset stations, press UP F.F or DN F.R button or presse PRESET on the remote.
PHONES FUNCTION
1. During playing mode, insert the earphone (not include) into the phones jack(5) .
2. The built-in speakers will be disconnected when the earphone are plugged in.
3. Lower the volume during listening by the earphone to avoid damage your ears.
AUX IN FUNCTION
1. Press MODE/STANDBY(10) button to choose AUX mode.
2. Insert the 3.5mm Aux in cable (not include) into the AUX jack(6), connect the other end of the
cable to your device (like your mobile phone, MP3 play, etc).
3. Adjust the volume using the Volume control knob (17) and play your device as normal.
During playing mode, press the Remote Control MUTE BUTTON (42) one time, the sound will not
be heard from the speakers and “MUTE ON” will show on the display; press the MUTE BUTTON
(42) or rotate the VOLUME KNOB (17) to cancel mute function and the sound can be heard again
from the speakers. During playing mode, press the EQ BUTTON (26) to choose from different
sound effect among POP/ CLASSIC/ ROCK/ JAZZ / FLAT.
MUTE / EQ OPERATION

English Instruction Manual
TRANSIT
SCREW
LockLever StylusCover
TURNTABLE OPERATION
VERY IMPORTANT
PREPARATION
LISTENING TO RECORDS
VERY IMPORTANT!
To prevent damages from transportation , a transit screw is
located at the upper right side of the turntable platform
Before start playing use a screwdriver and turn the transit
screw in clockwise direction (screw going down) completely
In case of transportation, remember to clock again this screw
in counter-clockwise direction to prevent damages.
1. Open the Record Player Cover.
2. Release the Tonearm Clamp,and remove the stylus protector.
1. Press the MODE/STANDBY BUTTON ( ) to select thePHONO function.
2. Place a record on the turntable, over the central spindle. Place the EP adapter over the central
spindle when playing 17cm EP records.
3. Set the Speed Selector to 33 or 45 rpm according to the record.
4. Release the tonearm clamp,and remove the protective cap from the stylus.
5. Lift the Tonearm with the T onearm Lift Lever. 6. Move the tonearm to the beginning of the
record, or to the start of a particular track.
7. Gently lower the t one arm onto the record with the Tonearm Lift lever to start playing.
8. When the record is finished the t onearm will automatically stop. To stop manually, lift the
tonearm from the record and return it to the rest.
Notes: Do not stop or turn the platter manually. Moving or jarring the tur-ntable without
securing the Tonearm clamp could result in damage to the Tonearm. Replace the protective
cap on the stylus when not in use.
7
6. Move the tonearm to the beginning of the
10

8
PLAYING COMPACT DISCS
CD DISC PROGRAMMING
English Instruction Manual
To start
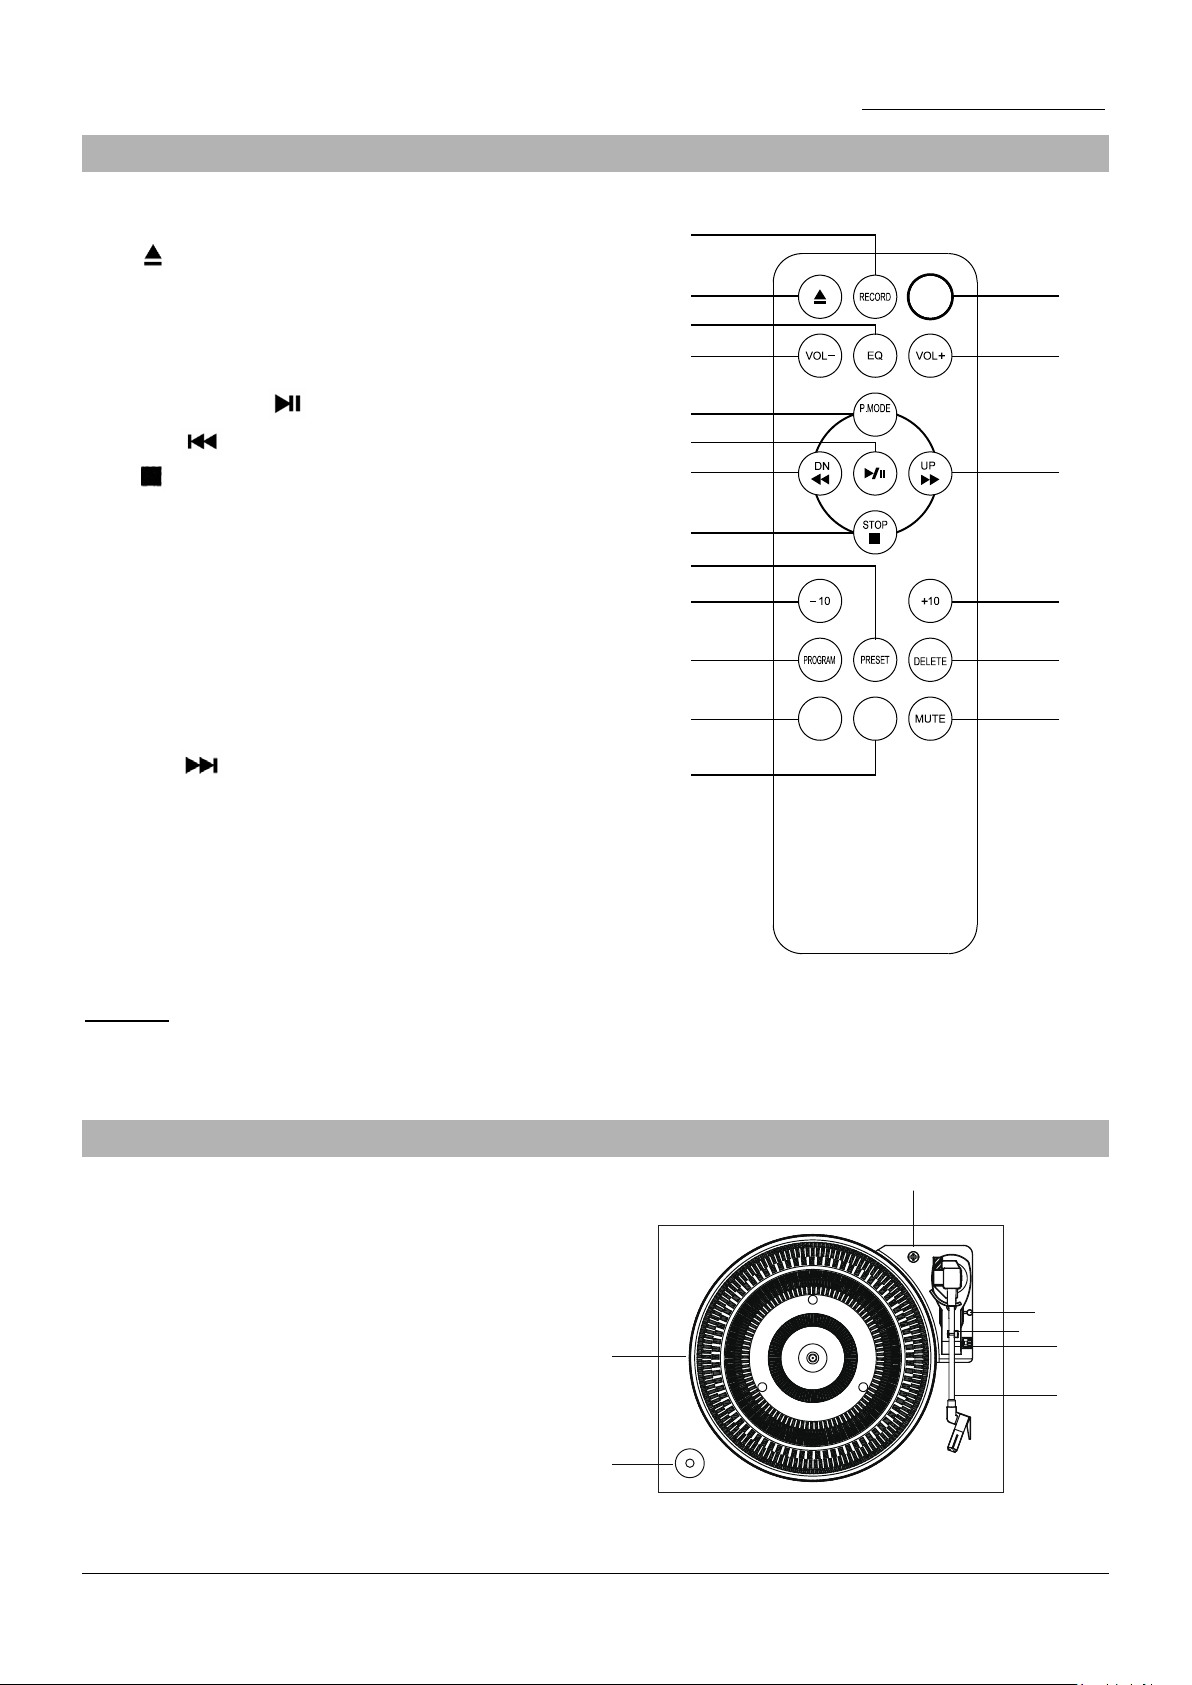
1. Press MODE/STANDBY BUTTON (10) to select “CD“ mode.
Up to 99 tacks can be programmed for MP3 (20 tacks in CD) and play in anyorder. before use
be sure the system is at stop mode before programming:
1. In CD mode and stop the cd playback.
2. Press the TUNER / PRESET (18) or press PROGRAM (34) on the remote, “MEMORY P01“ will
appear on LCD display (19).
3. Select a desired track by pressing UP F.F. DN F.R.BUTTON (13)/(14).
4. Press the TUNER/PRESET BUTTON (18) or PROGRAM (34) on the remote to store the trace
into memory.
5. Repeat steps 3 and 4 to enter additional tracks into the memory if necessary.
6. When all the desired tracks have been programmed, press PLAY/PAUSE BUTTON (11) to play
the disc in assigned order.
7. To cancel the programmed file, press STOP BUTTON (12).
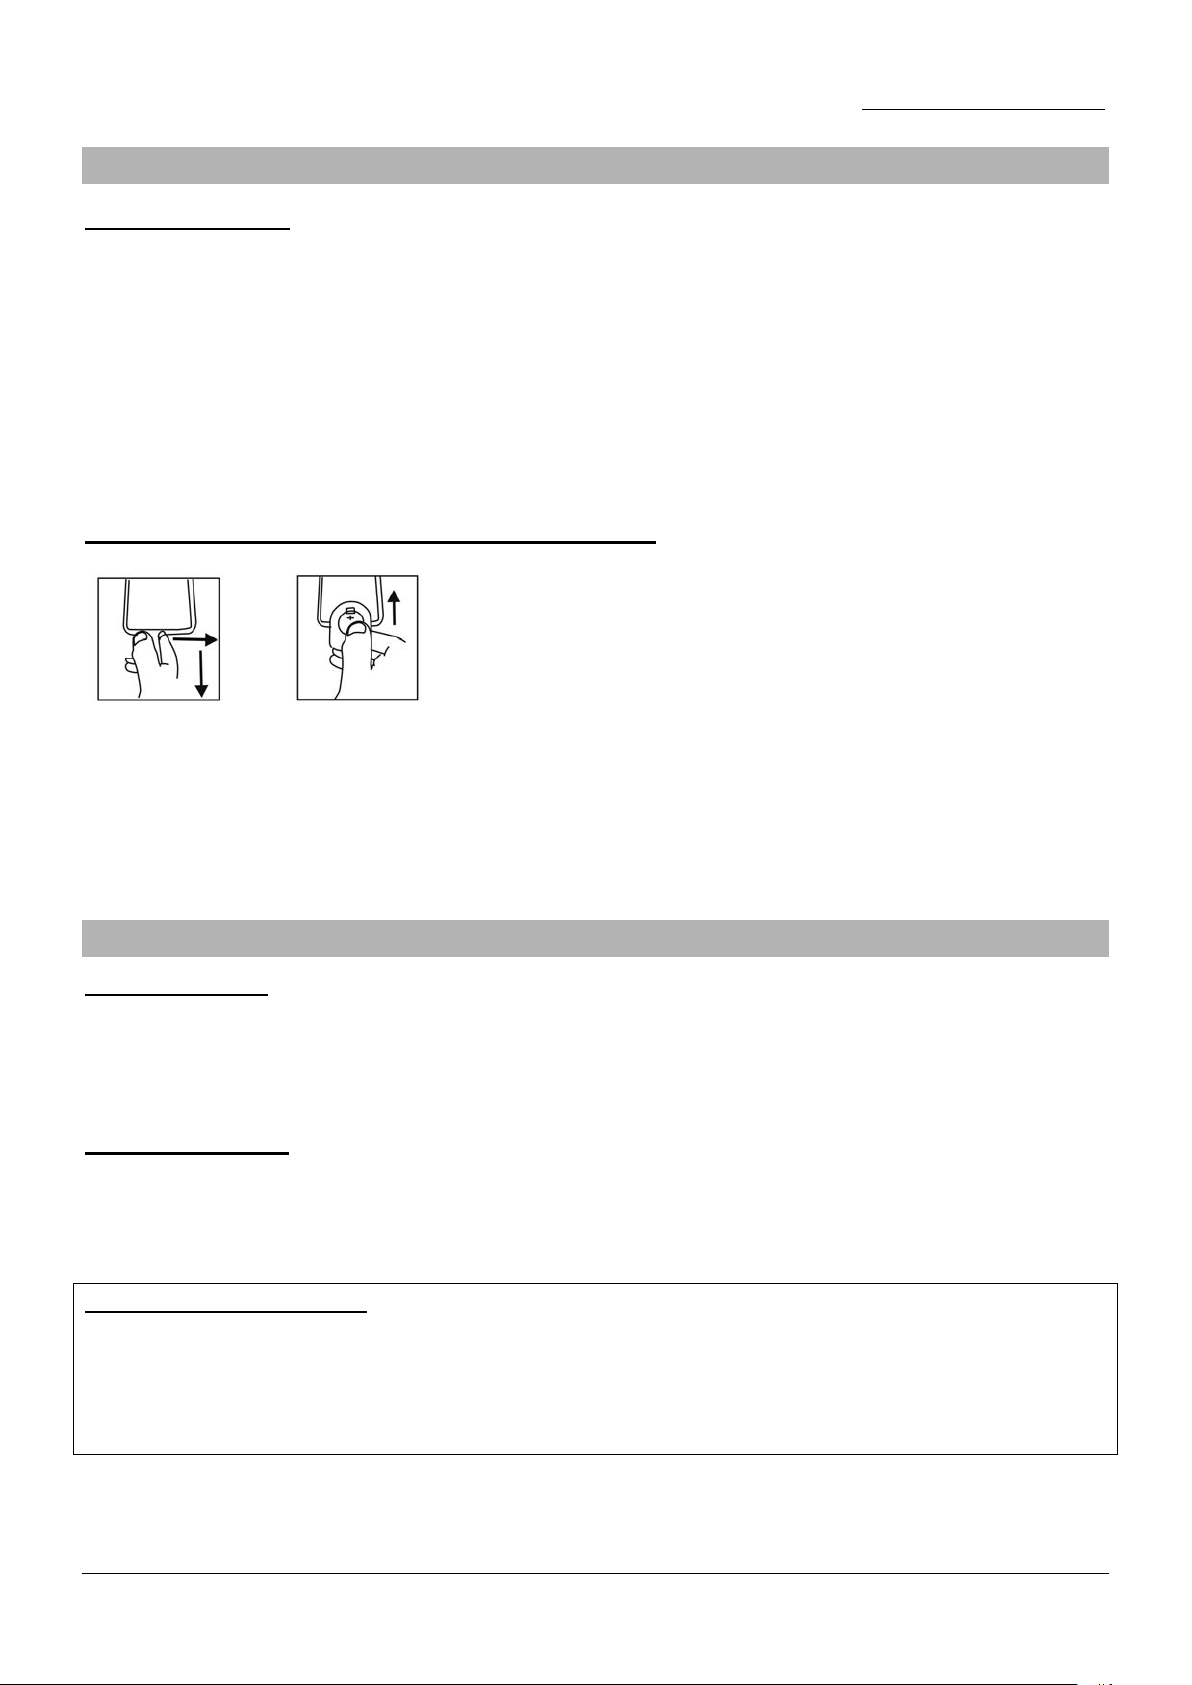
PLAYBACK OF MP3/WMA SONG VIA USB STORAGE MEDIA
The system is able to decode and playback all MP3 /WMA file which stored in the memory media
with usb connecting port.
1. Press MODE/STANDBY BUTTON (10) to select “USB“ mode.
2. Plug-in the usb plug with the face up & make sure it going into completely.
3. The system will start reading the storage media automatically after connecting, and LCD display
(19) will show the total number of MP3/WMA files
4. Repeat the same playback procedure as playing CD/MP3 disc as above.
REMARKS:
The system can detect and read the file under MP3 and WMA format only though the USB port.
If connect the system to MP3 player via the usb socket, due to variances in MP3 encoding format
some MP3 player may not be able to play via the USB socket. this is not a maulfunction of the system.
Connecting the USB upside down or backwards could damage the audio system or the
storage media (USB thumb drive). Check to be sure the direction is correct before connection.
2. Press “open/close” button (9) to open the CD door (8).
3. Place a CD with the printed side facing up inside the tray & then close the co door.
4. Focus search is performing, the first track will start playback.
5. To interrupt, press the STOP(12) once, the total number of tracks will show on the LCD
display (19). Press again PLAY/PAUSEBUTTON (11) to resume normal playback.
Skip/search mode (skip/search up / skip/search down)
During play or pause mode, if UP F.F BUTTON (14) is pressed. it will go to next track and
display the track no. and then remain the play or pause mode.
During play or pause mode, if DN F.R BUTTON (13) is pressed. it will go back to the
beginning of the track, original track number is display and remain the play or pause mode.
After step 2, press DN F.R BUTTON (13) again will go to the pre-vious track and remain
the play or pause mode.
If press and hold the UP F.F BUTTON (14) or DN F.R BUTTON (13) during CD/MP3
playabck, the playing track will go fast forward or backward ckward until the button being
released.
To skip 10 tracks UP or DOWN press the TRACK +10 or -10 TRACK button on Remote Control.

9
English Instruction Manual
BLUETOOTH OPERATION
ENCODING FROM CD
ENCODING FROM CD - MP3
ENCODING FROM PHONO
ENCODING FROM BLUETOOTH
1. Press MODE/STANDBY (10) button to select “BT” mode, the BT BLUE indicator will light up.
2. Select from your portable device (Smartphone, Tablet...) the ID Bluetooth tagged as “DL-P25”
then confirm connection.
3. Now you can transfer the music to the DL-P25.
Plug USB Disk into USB socket. During CD playing mode, press the RECORD BUTTON (16) one
time, “REC-ONE” will show on the display: press the RECORD BUTTON(16) secondly to record the
playing track; or press the UP F.F BUTTON (14) twice to choose to record whole file in the CD
and “REC-ALL” will show on the display.
Plug USB Disk into USB socket. During MP3 playing mode press the RECORD BUTTON (16) one
time, “REC-ONE” will show on the display; then press the RECORD BUTTON(16) secondly to confirm
“REC”” will flash and start to record after 5 seconds; or press the UP F.F.BUTTON (14) one time to
choose to record all the file in the playing folder and “REC-FOLD” will show on the display; or press the
UP F.F BUTTON (14) twice to record the file in the whole playing MP3 disc and “REC-ALL” will show
on the display.
Plug USB Disk into USB socket. During PHONO playing mode, press RECORD BUTTON (16) one
time, “USB” will show on the display, then press the RECORD BUTTON (16) twice to confirm, “USB”
will flash and start to record after 5 seconds; press PLAY/PAUSE BUTTON (11) one time to stop the
recording and “USB” will not flash; press PLAY/PAUSE BUTTON (11) again to resume to record and
“USB” will flash again.
Plug USB Disk into USB socket. During BLUETOOTH playing mode, press the RECORD BUTTON
(16) one time, “USB” will show on the display, then press the RECORD BUTTON (16) secondly to
confirm, “USB” will flash and start to record after 5 second’ s; press the PLAY/PAUSE BUTTON (11)
one time to stop the recording and “USB ” will not flash; press the PLAY/PAUSE BUTTON (11) again
to resume to resord and “USB” will not flash again.
NOTE: Press the STOP button to stop recording when you finish recording.
4. PLAY/PAUS, UP F.F. OR DN F.R. to control the bluetooth playing. You may also use your mobile
phone to control.
NOTE: Press and hold STOP 2 seconds to disconnect the bluetooth connection.

10
English Instruction Manual
DELETE USB
1. During USB mode, press DELETE BUTTON (36) one time from Remote Control,“ DEL-ONE”
will show on the display. You can delete the playing track.
2. Press UP F.F BUTTON (14) one time and “DEL-FOLD” will show on the display. You can
delete the current playing folder.
3. Press UP F.F BUTTON (14) twice. “DEL-ALL” will show on the display. You can delete all of
the tracks into the playing USB.
4. Finally press DELETE BUTTON (36) again once confirmed to choose
“DEL-1”, “DEL-F” or “DEL-A”.
AC: 100-240V ~ 50-60Hz, 4A
FM: 87.5 - 108MHz
Design and specifications are subject to change without notice.
SPECIFICATIONS

FCCCaution
Thisdevicecomplieswithpart15oftheFCCRules.Operationissubjecttothe
followingtwoconditions:(1)Thisdevicemaynotcauseharmfulinterference,and(2)
thisdevicemustacceptanyinterferencereceived,includinginterferencethatmay
causeundesiredoperation.
AnyChangesormodificationsnotexpresslyapprovedbythepartyresponsiblefor
compliancecouldvoidtheuser'sauthoritytooperatetheequipment.
Note: ThisequipmenthasbeentestedandfoundtocomplywiththelimitsforaClass
Bdigitaldevice,pursuanttopart15oftheFCCRules.Theselimitsaredesignedto
providereasonableprotectionagainstharmfulinterferenceinaresidentialinstallation.
Thisequipmentgeneratesusesandcanradiateradiofrequencyenergyand,ifnot
installedandusedinaccordancewiththeinstructions,maycauseharmfulinterference
toradiocommunications.However,thereisnoguaranteethatinterferencewillnot
occurinaparticularinstallation.Ifthisequipmentdoescauseharmfulinterferenceto
radioortelevisionreception,whichcanbedeterminedbyturningtheequipmentoff
andon,theuserisencouragedtotrytocorrecttheinterferencebyoneormoreofthe
followingmeasures:
-Reorientorrelocatethereceivingantenna.
-Increasetheseparationbetweentheequipmentandreceiver.
-Connecttheequipmentintoanoutletonacircuitdifferentfromthattowhichthe
receiverisconnected.
-Consultthedealeroranexperiencedradio/TVtechnicianforhelp.
ThisequipmentcomplieswithFCCradiationexposurelimitssetforthforan
uncontrolledenvironment.Thisequipmentshouldbeinstalledandoperatedwith
minimumdistance20cmbetweentheradiator&yourbody.

ICCaution:
ThisdevicecomplieswithIndustryCanadaslicence-exemptRSSs.Operation issubjecttothe
followingtwoconditions:
(1)Thisdevicemaynot causeinterference;and
(2)Thisdevicemustacceptanyinterference,includinginterferencethatmaycauseundesired
operation of thedevice.
Tomaintain compliancewithRFexposureguidelines,thisequipmentshould beinstalledand
operatedwitha minimum distanceof 20cm betweentheradiatorand yourbody.
Leprésentappareil estconformeauxCNRd'IndustrieCanada applicablesaux appareilsradio
exempts delicence.L'exploitation estautoriséeaux deuxconditionssuivantes:
(1) l'appareil nedoit pasproduiredebrouillage,et
(2) l'utilisateurdel'appareil doitacceptertoutbrouillageradioélectriquesubi,mêmesile
brouillageestsusceptibled'encompromettrelefonctionnement.
Pourmaintenirla conformitéaux directivesd'expositionaux radiofréquences, cet équipement
doit être installéetutiliséavecunedistanceminimalede20cm entreleradiateuretvotrecorps.
Table of contents
Other Innovative Technology Stereo System manuals

Innovative Technology
Innovative Technology ITCDS-5000 User manual

Innovative Technology
Innovative Technology ITVS-750B User manual

Innovative Technology
Innovative Technology ITRR-301 User manual

Innovative Technology
Innovative Technology ITVS-750B User manual

Innovative Technology
Innovative Technology ITVS-200B User manual

Innovative Technology
Innovative Technology ITVS-200B User manual

Innovative Technology
Innovative Technology ITCDS-5000a User manual

Innovative Technology
Innovative Technology ITVS-750 User manual

Innovative Technology
Innovative Technology ITVS-325 User manual

Innovative Technology
Innovative Technology ITVS-750 User manual