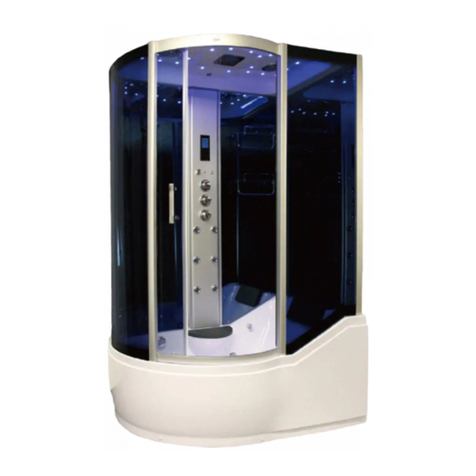
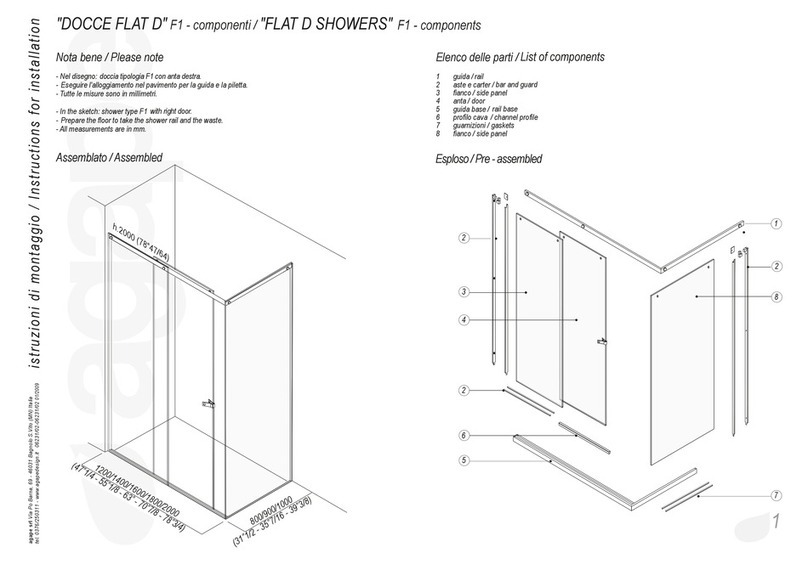
Inocal M-A6008 User manual

INSTALLTION MANUALFOR M-A6008
Makethemostofyourshower;makethebestforyourhome!

one
Thankyouforchoosingourcomputerizedsteamrooms. Ourbestwishesare
towarmyourlovelylifebyourelaboratedesign. Itissuchanhonortohave
youenjoyed. Foryourproperoperationandusing,pleasereadthisinstruction
andactaccordingly.Yoursatisfactionisourbestreward.
Warnings:
1Becarefulnottoslipdownintheunit.
2Pleasereadtheinstructionbeforetheproductisbeingused.Andoperateaccordingtothemanual.
3Thesenior, ament, less-ablepeopleandpregnantwomendonotusethisproduct.
4Childrencanusethisproductonlyundertheguidance ofadults.
5Userswithheartdiseaseorhighbloodpressureshallbecautioustousethisproduct.
6If youdon tfeelcomfortablewhileusing, turnoff thepower.
7Thegroundingwireneedstobeattachedtotheground.
M-A6008 installationinstructionofthesteamroom

two
Electricalparameters Dimension(mm/inch)
System Voltage Power
Frequency
Length Width Height
Type 220V 3.5KW
50~60Hz 1500/59 1000/40 2250/89
M-A6008 installationinstructionTechnicalparameters

three
M-A6008 installationinstructionTechnicalparameters

four
Theinstallationmethodofthesewerpipeisasfollows:
M-A6008 installationinstruction Plumbing andelectrical
Jackforthepower
HotWater-in
Cold Water-in

five
Type:M-A6008
InstallationInstruction:
A.Watersource:Twogalvanizedpipesforcoldandhotwaterrespectively.
B.Power:single-phasetrigram220Velectricalsource,whichareconnectedtothegroundfirmly.The
sectionofthewireshouldbebiggerthan5mm2. Theelectricalsource wireislongerthan1.5mwhichcan
bespecifiedtomeettherequirementoftheuser.
CDrainage:thediameterofthedraining holeshouldbebiggerthanφ40,andshouldbelocatedasis
showninthepicture,thedistance fromthespecifiedpositionshouldbe300-400mm.
caution:
(1)Thedistance fromthegroundtotheceilinghastobe10cmhigherthantheheightofthesteam
room.
1.thewaterpressureshouldbehigherthan3kg/cm2.Thepressureofthecoldwatershouldbeequaltothe
pressureofthehotwater.Theusershouldinstallaboosterwhenthepressurecannotmeetthe
requirement.
(3)pleaseinstallacreepageprotectingswitchatthechiefswitchofthescene.
(4)aftertheinstallation,adistance of40cmfromtheproducttothewallsshouldbeobligatedforthe
maintenanceinthefuture.
M-A6008 installationinstruction Plumbing andelectrical

six
Caution:please DO NOTpileup thingsinthesecurezone.Adistance fromtheproducttothewalls
shouldbeobligatedforthemaintenance andmovinginthefuture.
A6008 installationinstructionSecurezone
Room

seven
1. Whenyoureceivethegoods,checkthepackageandthegoods, especiallythevisibledamageonthe
package.Once thereisanydamage,workitoutwiththecarrierorthedelivererimmediately.The
manufacturerisnotresponsiblefortheproblemsduringtheshipment.
2. Ensuretherequiredwaterandelectricalconditionatthesceneoftheinstallation.
3.Theinstallationneedsthecooperationoftwopeopleatleast.
4.Thecontainingsinthepackageareasfollows:
A6008 InstallationinstructionInstruction
Roof
Backglass door
WaterproofWoodcabinet
Glass doorofwoodcabinet
Handle
Waterproofwoodenchair
Waterprooffootplate
FrontGlass Door
Handle
ShowerTray
Showerpanel
Sideglass door

eight
1.toolsneeded
ScrewdriverRubberhammerSpannerGradienterTapemeasureScrewdriverPencil
2.Fittingsneeded
a ST4X16 f.Connector
bST4X25
cST5X25
dM6X25
e Hoseclamp
M-A6008 installationinstructionToolsandfittings
d1
d2

nine
1.
Movethebottomtraytotheinstallationzoneat400-600 mmoutoftheoriginalposition. Use level
gauge to check if thebottom tray islevel ,adjustthegroundscrewtomakesurethebottomtray
islevel.
2.
Uplifttheactivedoorthatclosetothecounterontotheinstallationpositionofthebottombasin,and
connectwithST4X16 self-tappingscrews.
M-A6008 installationinstructionInstallationprocedure
Groundscrew

ten
3.
InsertthecornerAluminumfittingintotheprofileofmovabledoorthatclosetothecabinet,andthen
upliftthebackmovabledoorontotheinstallationpositionofthebottomtray.Insertitintothecorner
Aluminumfitting,fixatthemountingholesasshownwithST4X16 self-tappingscrews,andfastenwith
thebottomtraybytheST4X16 self-tappingscrews.
4.
Installtherightfixedglass doorframesameasstepthree.
M-A6008 installationinstructionInstallationprocedure
M
ovableglass doorofwoodcabinet
Backmovableglass door

eleven
5 .
Installthefrontglassdoorinthesayway.
6.
Upliftthewoodcabinetontothebottomtray,paying attentiontothedifference offrontandback,and
connectitwiththebottomtraywithST4X25 round-headself-tappingscrews.
M-A6008 installationinstructionInstallationprocedure

twelve
7.
Separatethecolumnasshowninthepicture, dividingintoA, Btwoparts.
8.
Install thepartBontothebottomtrayfirstly,alignthefixing blockasshowntothemountingholes
ofthebottomtray,fixitwiththeM6X25 self-tappingscrews,andfixtheAluminumcolumnwiththe
bottomtraywith ST5X25 screw.
M-A6008 installationinstructionInstallationprocedure
Showerpanel

thirteen
9.
Takeoutthehoseunderthebottomtrayout,andconnectittothewaterdrainageinterface asshownin
theFigure.
10.
Uplifttheroofontotheshowercabin,connecttheroofandeachglass doorwithST4X16 self-tapping
screws,connecttheroofandthewoodcabinetwithST4X25 self-tappingscrews,andconnectitwiththe
columnwithM6X15 hexagonalscrews.Takeoutthewiresontherooffromthecolumnoftheroof,and
connectthewireoflamp,thespeaker,andthefanaccordingtothelabelonthewire.Connectthetop
sprinklerandthehoseofoverheadshowerwiththefaucetontheside-backboard.
M-A6008 installationinstructionInstallationprocedure
Fastentheelbowasshowninthephoto

fourteen
11.
InsertthepartAaluminumcolumnintopartB,fastenwiththescrewsremovedfromthealuminum
columnpreviously, andcoverthedecoratedcapwell.
12.
Place thewoodpedalintothebottomtray.
M-A6008 installationinstructionInstallationprocedure

fifteen
13.
Installthehandlesoneachglassdoorasshowninabovepicture.
14.
Place thewoodchairinsidethesteamroom.
M-A6008 installationinstructionInstallationprocedure

sixteen
switch
Afteryouadjusttheproperwatertemperature,youmayrotatetheknob.Itwill beturnedonwhenyou
rotateittoclockwisedirection.Thewaterflowisadjustable.
converter
Switchtheshowerfunction,suchashandshower,footmassageorspoutforthetub,accordingtothe
signonthefaucet.
Watertemperatureadjustment◆:turnthecoldandhotwaterfaucettoleftandright.Itcanalsobe
turnedonoroff byturning up anddown.AsshowninfigureA.
◆Turntheconvertertowhateveryouneedaccording tothesigns.AsshownonfigureB.
M-A6008 installationinstructionUsageoffaucet
Waterinlet
Hand shower
Footmassage
Coldwater-inlet Hotwaterin-let

seventeen
phenomenon Malfunction
display
Failurepossiblereason Solution
Cannotstart Nodisplay
onthe
monitor
1.Powerlineunsuitablyconnectedorno
powersupply.
2.Insufficientpower
3.2Afusedamaged.
4. Currentleakageprotectionswitch
damaged.
1.Correctlyconnectorwait forhe
electricitysupplytoresume.
2.Thepowermustreachtherequired
standard
3.Replace the2Afuse.
4.Replacethecurrentleakage
protectionswitch.
Switchfailure Poweroff
rightafter
turnedon
1.Leakageprotection switchdampedor
damaged
2.shortcut
1.replace theswitch
2.recheckthecircuit
Indicating
lightison
1.inletoroutletvalvedamaged
2.thedrainageoftheoutletvalvegotstuck
1.replace theinletoroutletvalve
2.cleanoutthedrainingpipes
Shutoff
spontaneously
Indicating
lightisoff
1.electroniccomponentsdamaged
2.cableloosen
1.repairorreplacetherelevant
component
2.reconnectthecables
Nosteam
comesout
1.lackofwatersupply
2.waterpressuretoolow
3.heatingelementinthesteamgeneratoris
broke
4.nowatercominginthesteamgenerator
5.steampipeisstuckorbroke
6.haven treachedtherequiredheatingtime
7.theindoortemperatureishigherthanthe
settemperature
1.wait forthewaterbacktonormal
2.install boosteronthemainwaterpipe
3.replace withanewone
4.checktheinletvalve
5.removetheobstructionorreplace the
pipe
6.wait forawhile
7.setahighertemperatureorwait forit
tocooldown
Selfprotection
1.lackofwaterpressure
2.inletoroutletvalvegotstuck
3. drainingpipegotstuck
4. steampipegotstuck
1.install booster
2.cleanouttheobstruction
3.sameasabove
4.cleanthesteampipe
Saunafailsto
work
1.heatingelementdamaged
2.circuit boardorcomponentsdamaged
1.replace withnewone
2.sameasabove
Overheating 1.thesettemperatureistoohigh
2.temperaturesensorfailstowork
1.setalowerone
2.replace withnewone
Steamcutoff 1.Time sup.
2.settemperatureistoolow
3.electroniccomponent(heatingelement)
damaged
1.resetthetime
2.setahigherone(couldn tbelower
thenthetemperatureintheroom)
3.repairorreplace
Waterleaks
fromthesteam
outlet
1.floaterisoutofcontrol
2.thecircuit inchargeofcheckingthe
waterlevelisoutofcontrol
1.checkthefloater
2.checkthecomponentsinthatcircuit
将桑拿木顶盖放入左边的干蒸汽房上部,并调校其位置。
Attention:Withintheguaranteetime, DO NOTbreakthesealontheelectricalbox andthesteamgeneratoronyour
own. DO NOTrepairorreplace thecircuit onyourown. Ifanyproblemoccurred,pleasecontactthelocaldistributoror
themanufacturerforafter-saleservice.
A6008 installationinstructionTroubleshooting

eighteen
将桑拿木顶盖放入左边的干蒸汽房上部,并调校其位置。
Whenitcomestodailycleaning, basically,liquiddetergentandsoftclothshouldbeinvolved. DO NOT
EVERsterilize itbydetergentwithacetoneandammonia.DO NOTEVERusedetergentwith
formicacidorformaldehyde.
2Toapplywithsomewaxtopolishitwill bringyoutheglossysurfaceback.
3Theblotchonthesurface canbewipedawaybysoftclothwithtoothpaste.
4Thescaleonthesurface canbecleanedoutbysoftclothwithlemonadeorheatedvinegar.
5Todealwithslightscratchesorburnbycigarette, youshallrubitoff by1200 sandpaperwhichneeds
tobesoftenedbywaterfirst, thenpolishitbycertainamountpolishing paste.
6Afterevery20 timesofusing theunit,westronglysuggestyoutocleanthesteamgenerator.When
youstarttocleanit,makesomesolutionmixedwith1.5-1.7literofwarmwaterand5-10gramof
citricacid.Pourthesolutionintothesteamgeneratorthroughthewaterinlet.Switchitonafter8to
10 hours;waitforittobedischargedasgas.
7Whenthewateristoo hard,westronglysuggestyoutocleanthewhirlpooldevice twice ayear.The
wayisasfollows:
A Fill40℃hotwaterinthetubtothenecessarywaterlevel(righttothelevelthatcanensuretoget
thetubworking).
B Accordingtotheproportionofmixing 2gramofliquiddetergentinto1literofwater,putcertain
amountofdetergentintothewater,andswitchthesystemonfor5mins.
C Switchitoff, drainoutthewater.
D Fillcoldwaterinthetub, switchonthesystemandkeepitworkingfor3mins.
E Switchitoff, drainoutthewaterandcleanthetub.
A6008 installationinstructionCleaning andmaintenance
Popular Shower Cabin manuals by other brands

AFG
AFG KERMI LIGA LIG3L100201AK Cleaning and maintenance
Kinedo
Kinedo KINESPACE R installation instructions
Radaway
Radaway Arta KDS II Assembly instruction

glass 1989
glass 1989 NONSOLODOCCIA HOME Installation, operation & maintenance manual
Kinedo
Kinedo Horizon R90 CA118A12 installation instructions
American Bath Factory
American Bath Factory Sistine Stone Single Alcove-Hsf installation guide
