inogeni U-CAM User manual

INOGENI U-CAM
User guide
Version 1.5
September 25, 2023

1
VERSION HISTORY
CONTENTS
Version history ...........................................................................................................................................................................1
Typical application .....................................................................................................................................................................2
Device interfaces .......................................................................................................................................................................3
Leds behavior ............................................................................................................................................................................4
Specifications.............................................................................................................................................................................5
Serial communication protocol...................................................................................................................................................7
LAN communication protocol.....................................................................................................................................................8
CDC-NCM communication protocol...........................................................................................................................................8
Webpage....................................................................................................................................................................................8
REST API................................................................................................................................................................................ 14
INOGENI Control App............................................................................................................................................................. 17
Support.................................................................................................................................................................................... 18
Certifications ........................................................................................................................................................................... 18
Version
Date
Description
1.0
April 19, 2022
First release.
1.1
May 27, 2022
•Second release.
•Adding RS232 API.
•Adding REST API.
1.2
July 12, 2022
•Update image to support new hardware revision.
•Change REST API functions to have same name as RS232 API.
•Add HTTP to HTTPS redirection for webpage.
1.3
September 30, 2022
•Added audio input switching.
1.4
October 25, 2022
•Modified “disableSerialInterface” function description.
•Adding new functions over LAN interface.
1.5
September 25, 2023
•Adding new section for webpage.
•Updated specifications for firmware release v2.2.
•Elaborate on RS232 and RESTAPI commands.
2
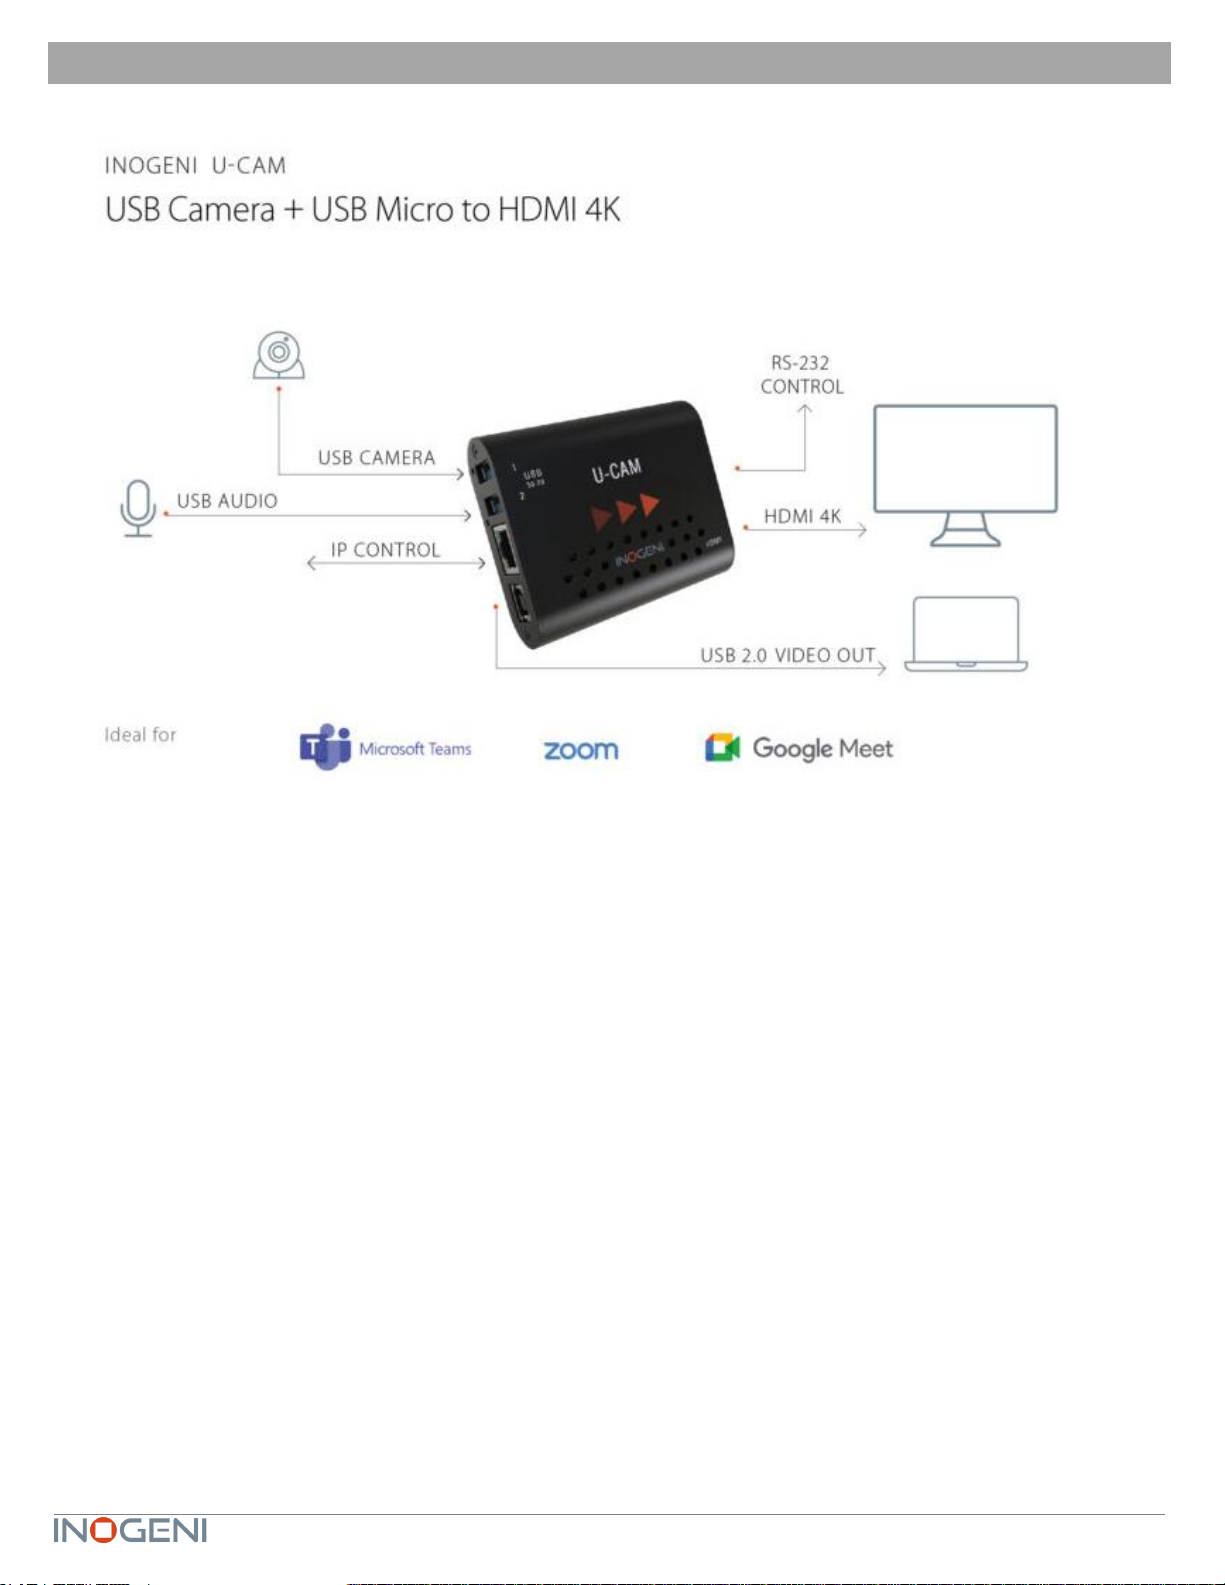
TYPICAL APPLICATION
Here is a typical connection diagram used for the U-CAM device in a videoconferencing setup.
3
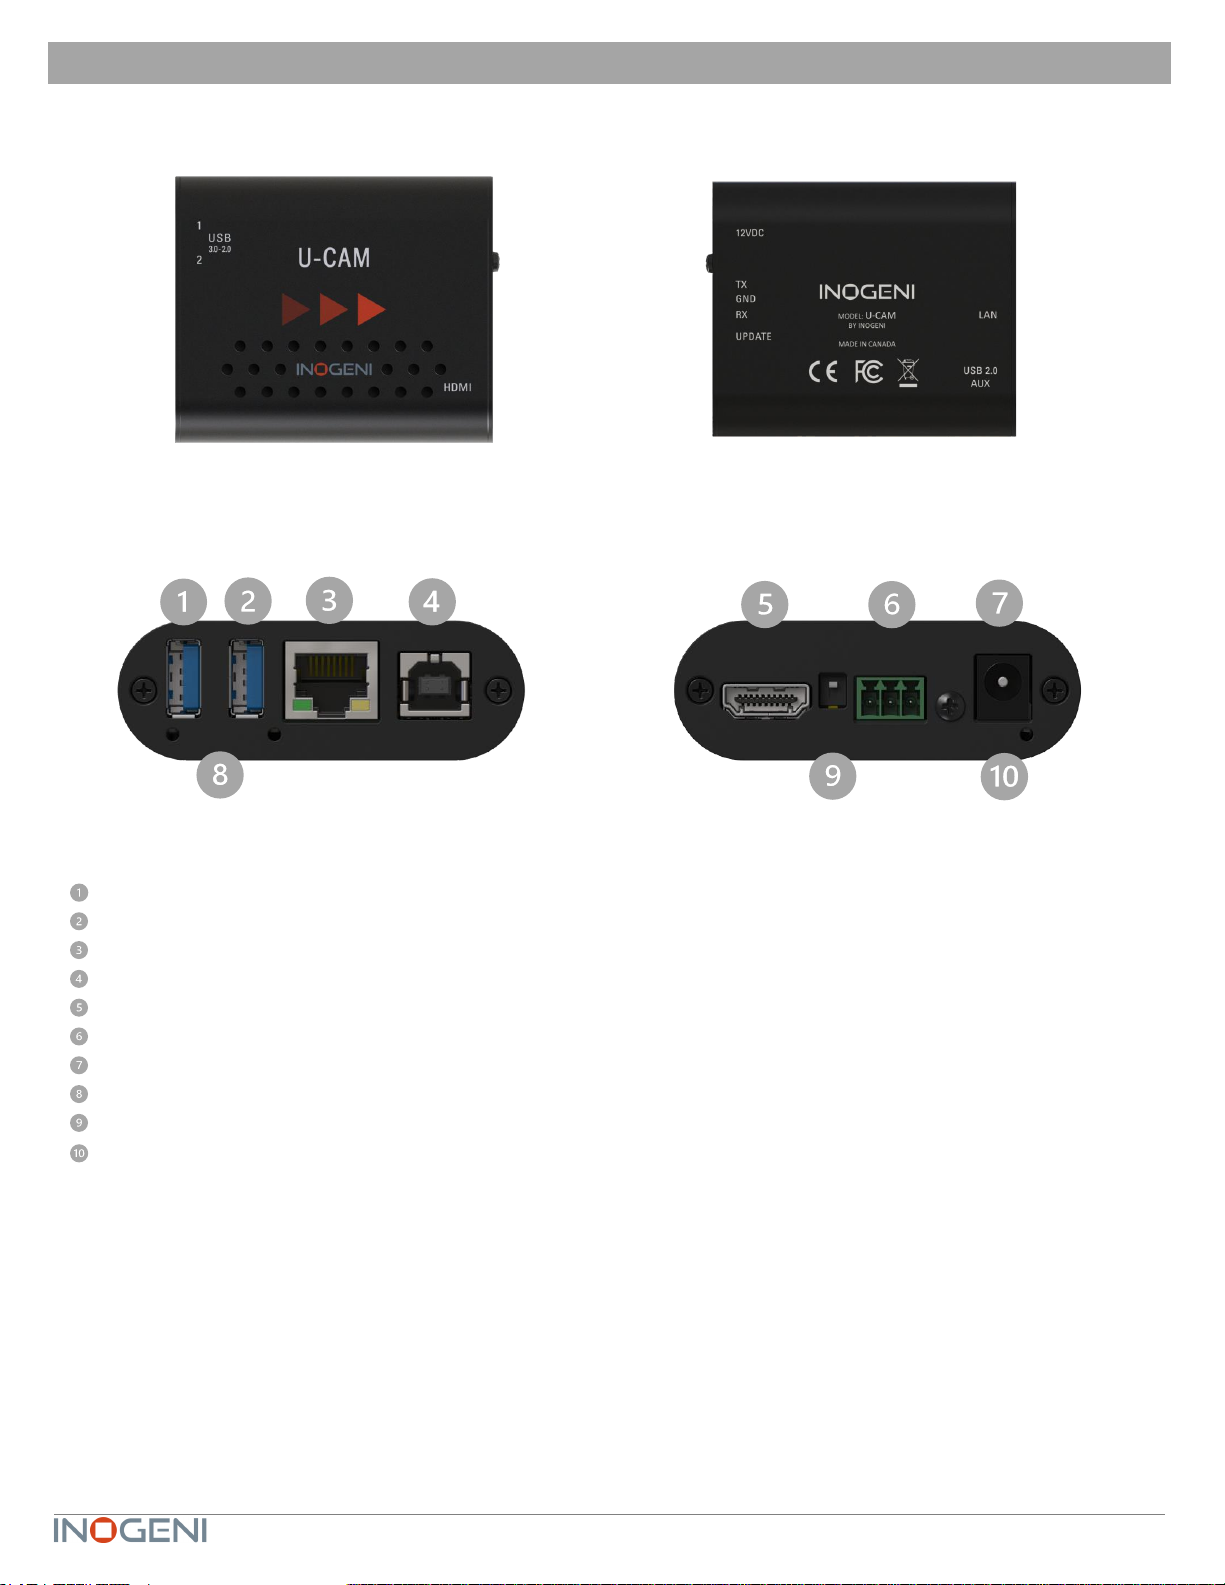
DEVICE INTERFACES
Here are the devices interfaces.
USB input #1
USB input #2
LAN port
USB 2.0 output
HDMI output
RS232 port
+12V power input
USB device detection leds
Factory upgrade switch
System activity led
4
LEDS BEHAVIOR
Here are the leds behavior:
USB input
OFF
No USB camera/device connected.
SOLID
USB camera/device connected.
System activity led
OFF
No power present on board.
BLINK
System firmware running correctly.
5
SPECIFICATIONS
Here is the complete specification.
Physical details
Dimensions (W x L x H)
70 x 83 x 23 mm
Power supply
12V
Power consumption
Up to 1.2A
Weight
136 g
Package content
1 x USB 2.0 Type-B to Type-A cable.
1 x terminal block connection.
1 x 12V power supply.
Operating temperature
0° to 45° C (32° to 113° F)
Storage temperature
-40° to 105° C (-40° to 221° F)
Origin
Canada
Warranty
2 years
USB inputs
2x USB 3.0 inputs
Capture video and audio from USB 3.0 and 2.0 cameras
Capture is done from a single camera à
Video capabilities
MJPEG: Up to 1080p30 using USB 2.0/3.0
YUYV: Up to 1080p60 using USB 3.0, 1080p10 using USB 2.0
Audio capabilities
Device will capture embedded audio from USB camera or external USB device and
will output through HDMI.
USB Power
Up to 1.2A shared between the USB ports
HDMI output
Resolution
3840x2160p23.98/24/25/29.97/30 fps, 1080p50/60 fps, 720p50/60 fps
Connector
HDMI
USB output
USB connector
1x USB 2.0 Type-B
UVC interface up to 1080p30 MJPEG.
UAC interface with audio I/O.
PTZ control supported.
Control
Control options
RS-232
LAN
USB
IP interface
100 Mbps half-duplex (autonegotiation not supported)
Supports DHCP or static IP addressing
RS232 interface
Baud rate: 9600
Data bits: 8
Stop bits: 1
Parity: None
Flow control: None

6
Certifications
HDCP compliant
The device does not decrypt BD/DVD movies, satellite/cable receivers or other
encrypted sources.
Certifications
FCC, CE, UKCA, RoHS, IEC62368, SoV, RCM
TAA-compliant
Yes
Compatibility
Operating system
NO driver installation necessary
Windows 7 and above (32/64-bit)
macOS 10.10 and above,
Cameras Supported
Cameras (or video Source) with an USB output
Software Compatibility
UVC-compliant. Runs with all software compatible to DirectShow/MediaFoundation,
V4L2, QuickTime and AVFoundation.

7
SERIAL COMMUNICATION PROTOCOL
Here is the complete list of commands provided through the serial connection. Pinout is indicated on the enclosure.
There must be a space character between command and arguments.
Typically, commands will return ACK in case of success and NACK in case of failure.
You need to add a carriage return character and a line feed “\r\n” at the end of the command string.
Note that if serial interface was disabled using REST API, commands will not be parsed, and no response will be provided.
Baud rate: 9600 // Data bits: 8 // Stop bits: 1 // Parity: None // Flow control: None
Command
Argument(s)
HELP
Return command list with description.
None
RSTR
Restore default settings.
None
RESET
Reset/reboot the device.
None
IP
Return IP address.
None
VERSION
Return firmware version.
None
QUIT
Restart application.
None
STATUS
Return device, video/audio inputs and
HDMI output status.
None
PAN
Relative pan.
1 argument (integer)
The sign specifies the direction.
We multiply the argument by the camera smallest step, and if the speed is too
fast, we go as fast as the camera allows. We recommend using values
between -10 and 10.
TILT
Relative tilt.
1 argument (integer)
The sign specifies the direction.
We multiply the argument by the camera smallest step, and if the speed is too
fast, we go as fast as the camera allows. We recommend using values
between -10 and 10.
ZOOM
Relative zoom.
1 argument (integer)
The sign specifies the direction.
We multiply the argument by the camera smallest step, and if the speed is too
fast, we go as fast as the camera allows. We recommend using values
between -10 and 10.
SETHDMI
Set HDMI output mode.
1 argument (integer)
Possible parameters:
0 => 1080P60
1 => 1080P50
2 => 720P60
3 => 720P50
4 => 4K24
5 => 4K25
6 => 4K30
SETVIDEOFORMAT
1 argument (integer)
0 => 1st preferred format
8
Set video input format.
1 => 2nd preferred format
2 => 3rd preferred format
3 => 4th preferred format
GETVIDEOFORMATS
Get video input format.
None
SETAUDIOINPUT
Set audio input.
1 argument (integer)
The argument specifies the index of the audio input. To see available inputs,
use STATUS command.
LAN COMMUNICATION PROTOCOL
You can access the device settings through its LAN interface. The LAN interface uses DHCP (default) and static IP
addressing. You can obtain the IP from the INOGENI Control App or from the serial port IP command. Note that LAN is set to
100Mbps half-duplex.
CDC-NCM COMMUNICATION PROTOCOL
The device can also be controlled through CDC-NCM interface exposed on the USB2.0 device port.
This interface has the same functions as the LAN interface, except the requests are done through USB to ease configuration.
CDC-NCM IP address: 169.254.10.10
WEBPAGE
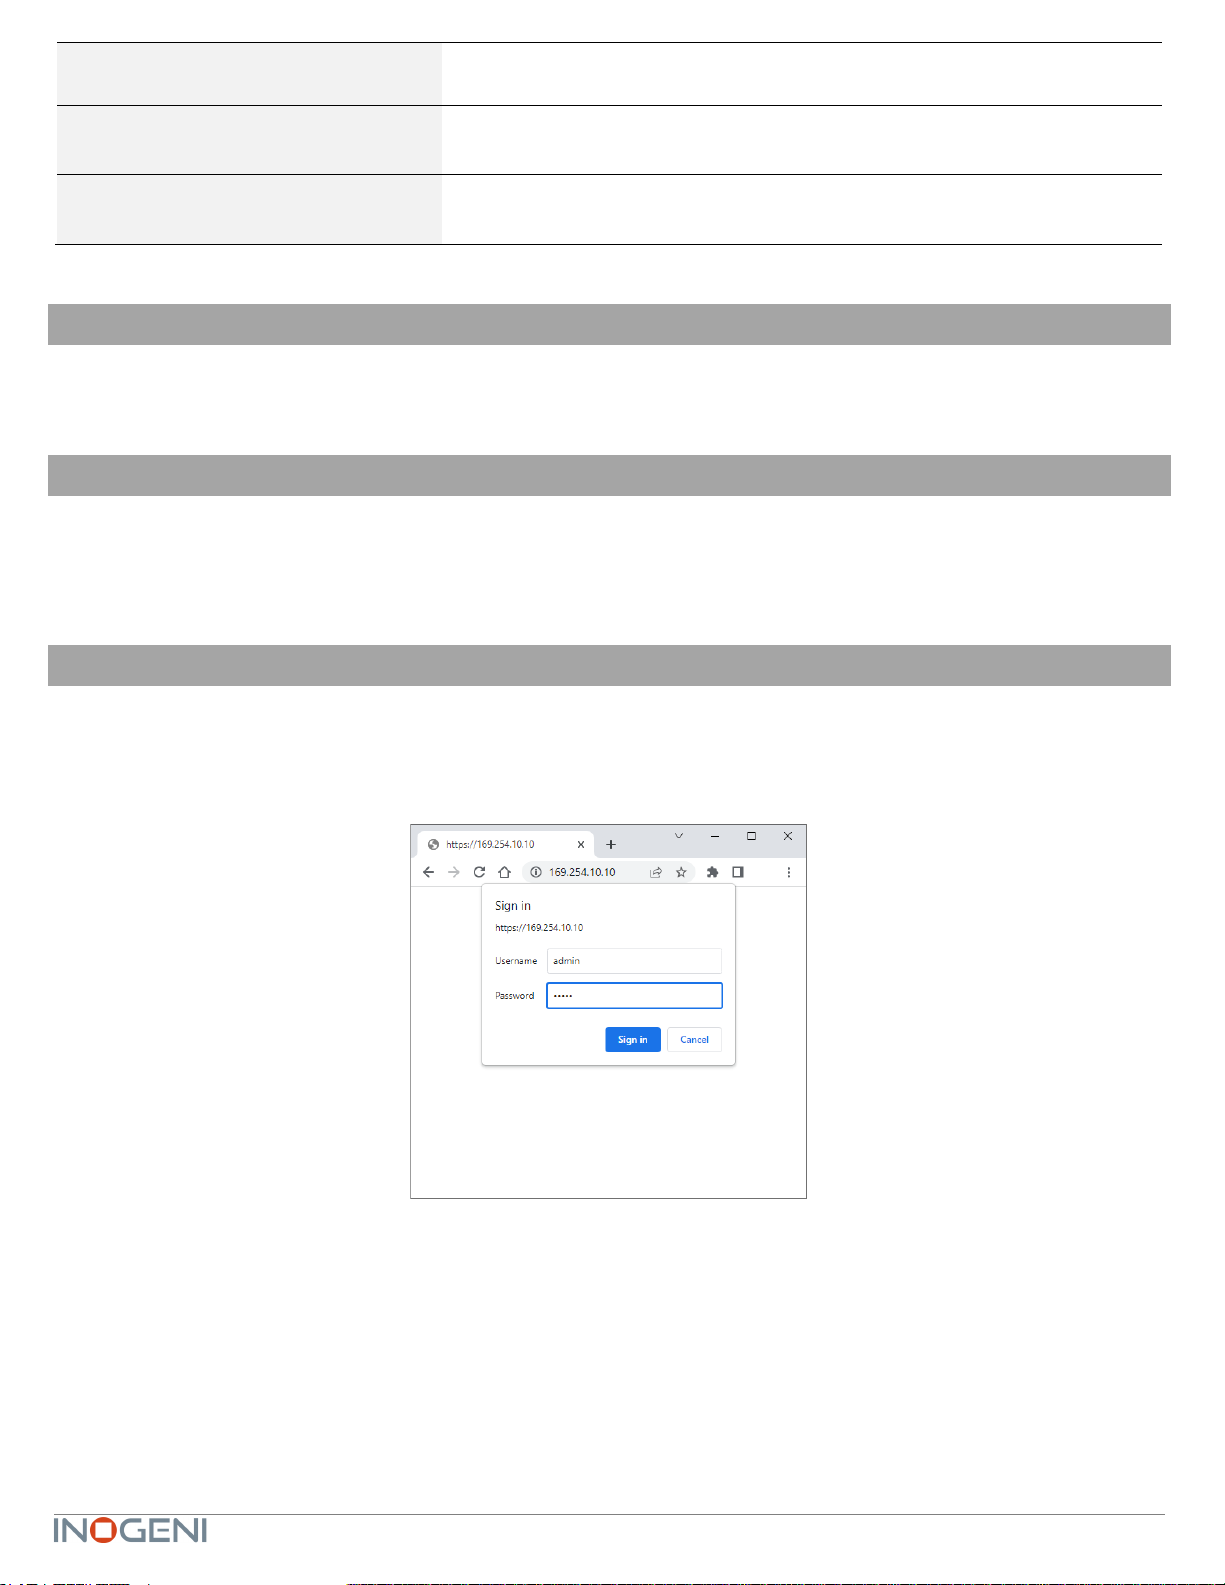
Here is the webpage that can be used to configure and upgrade the device. This webpage is accessible through IP or
through the CDC-NCM interface over USB2.0.
The username is “admin”, and the default password is “admin”.

9
The STATUS page will give you information about the firmware installed. video and audio devices that you can monitor.
Figure 1: Status preview
10
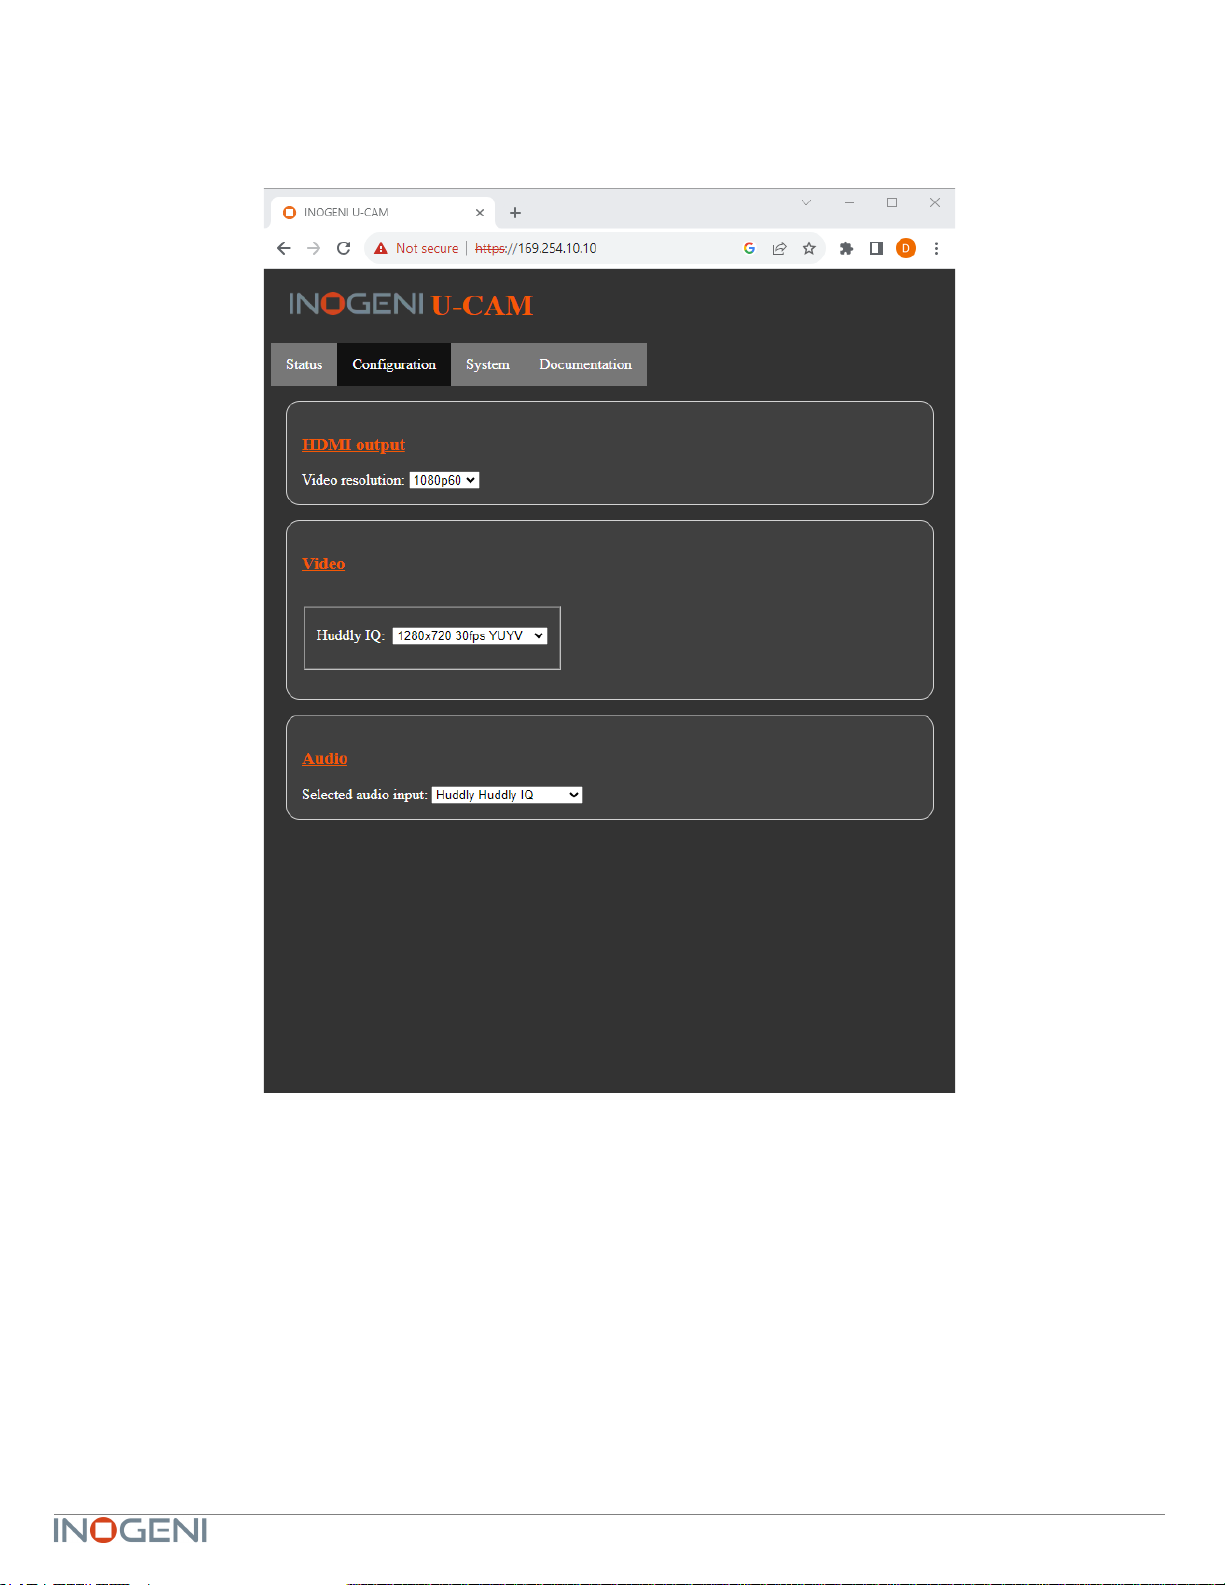
The CONFIGURATION tab will allow you to :
- Set the HDMI resolution over HDMI.
- Set the selected camera source.
- Set the audio input.
Figure 2: Configuration preview
11
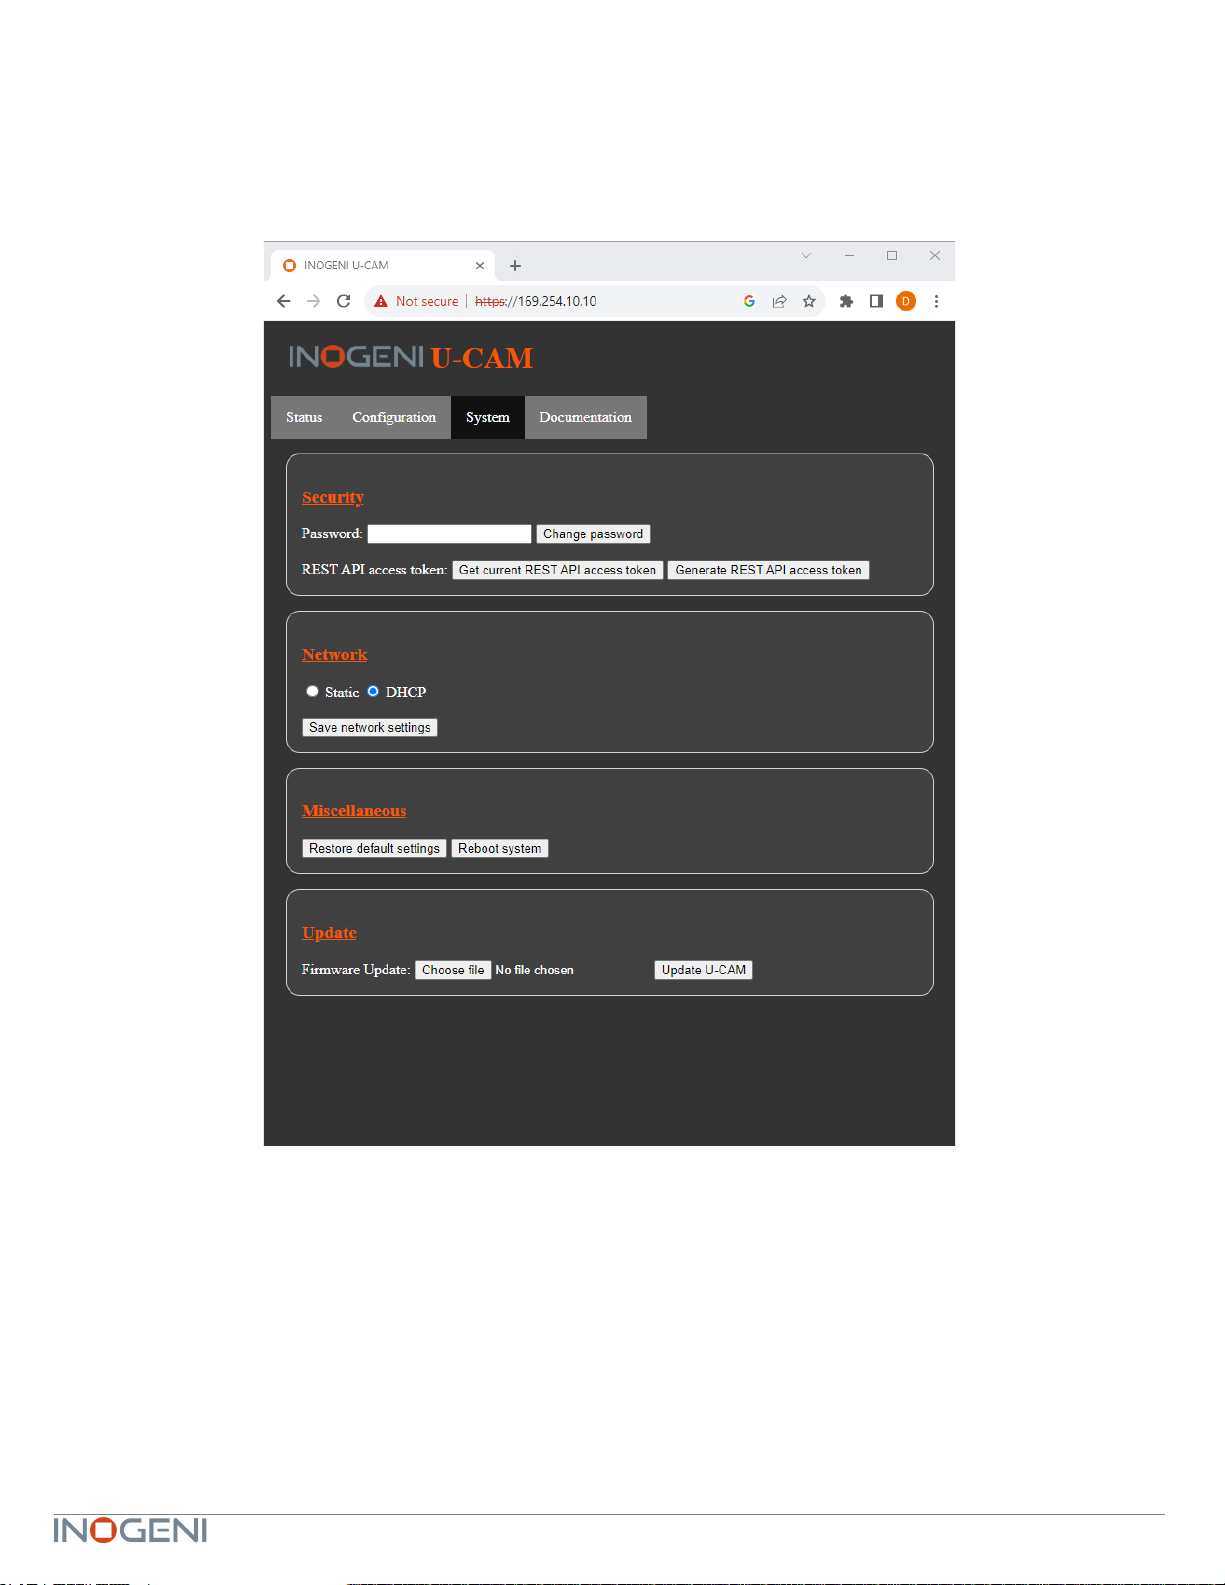
The SYSTEM tab will allow you to :
- Change the current password for accessing device settings.
- Get/Set REST API access token needed using REST API interface.
- Change network settings of your device.
- Restore default settings and reboot the system.
- Update your system.
Figure 3: System preview
12
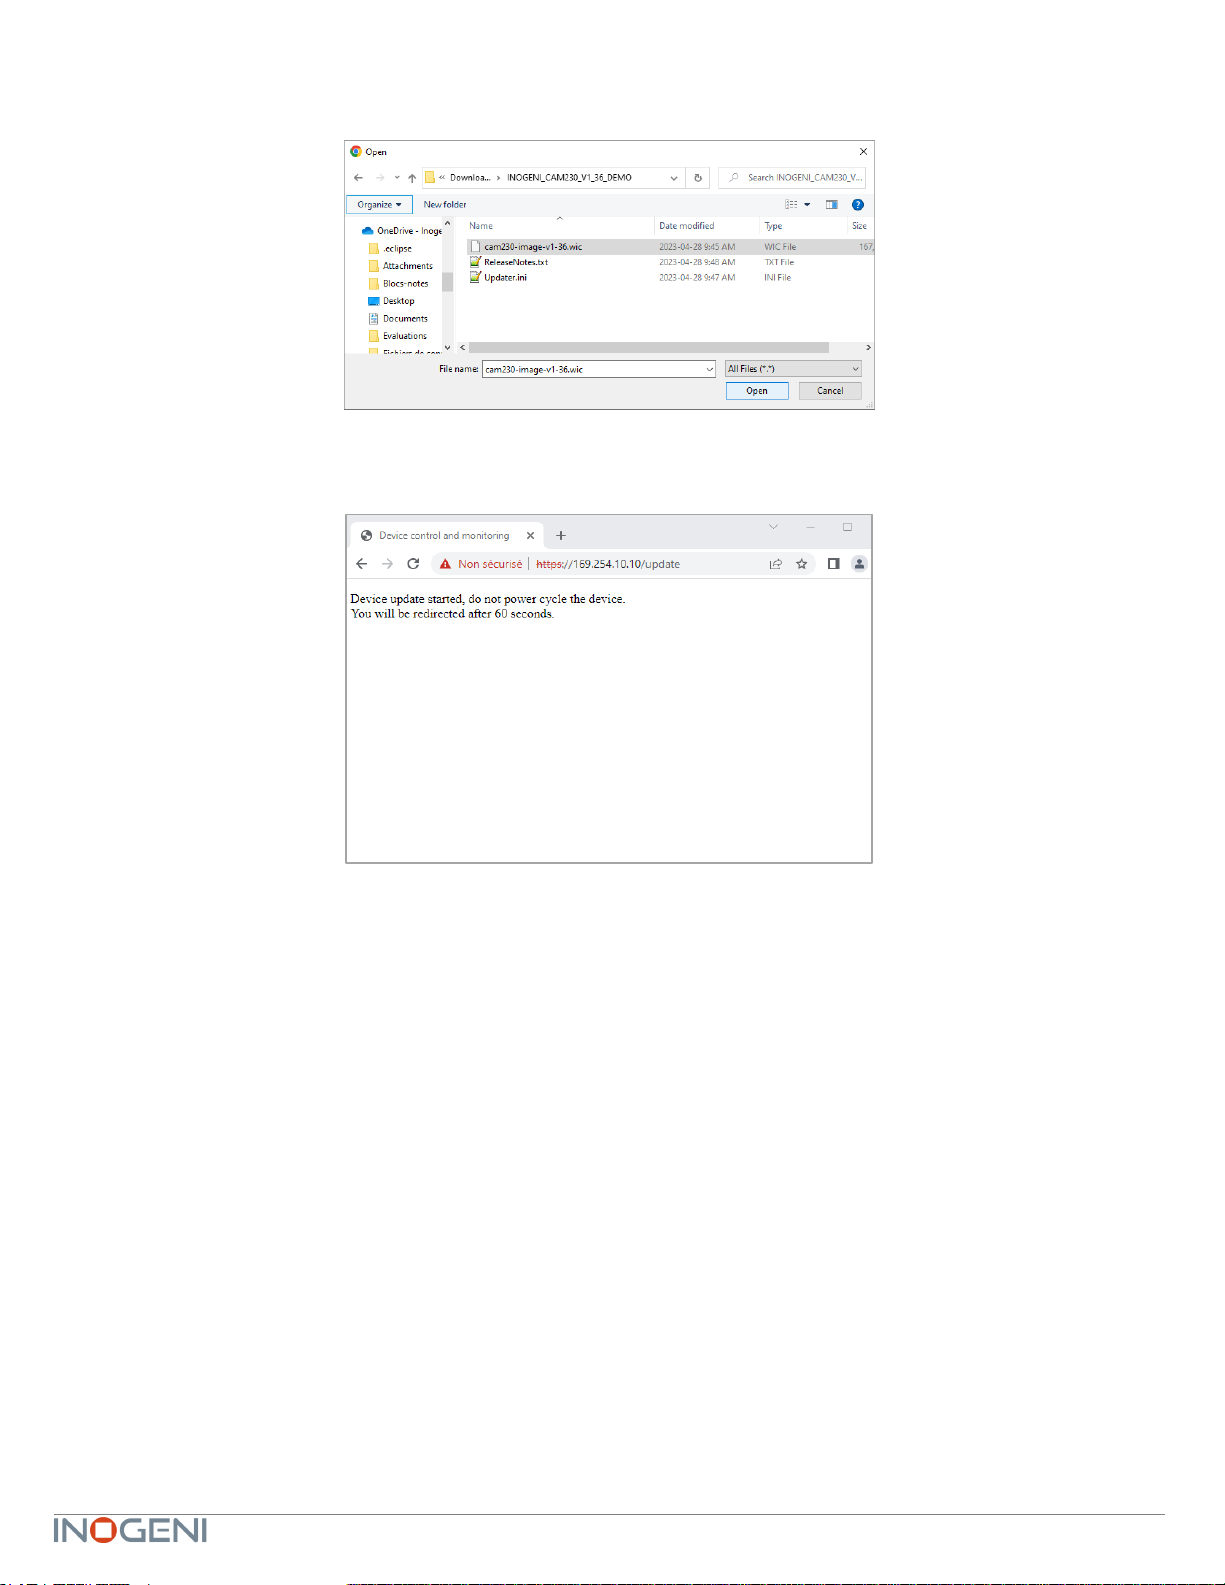
To update your system, please do the following :
- Click on the “Choose File” button and browse to the WIC file downloaded from our website.
- Click on “Update U-CAM” button to proceed to the update. The operation can take up to 1 minute. The device will
reboot and browser will be refreshed.
13
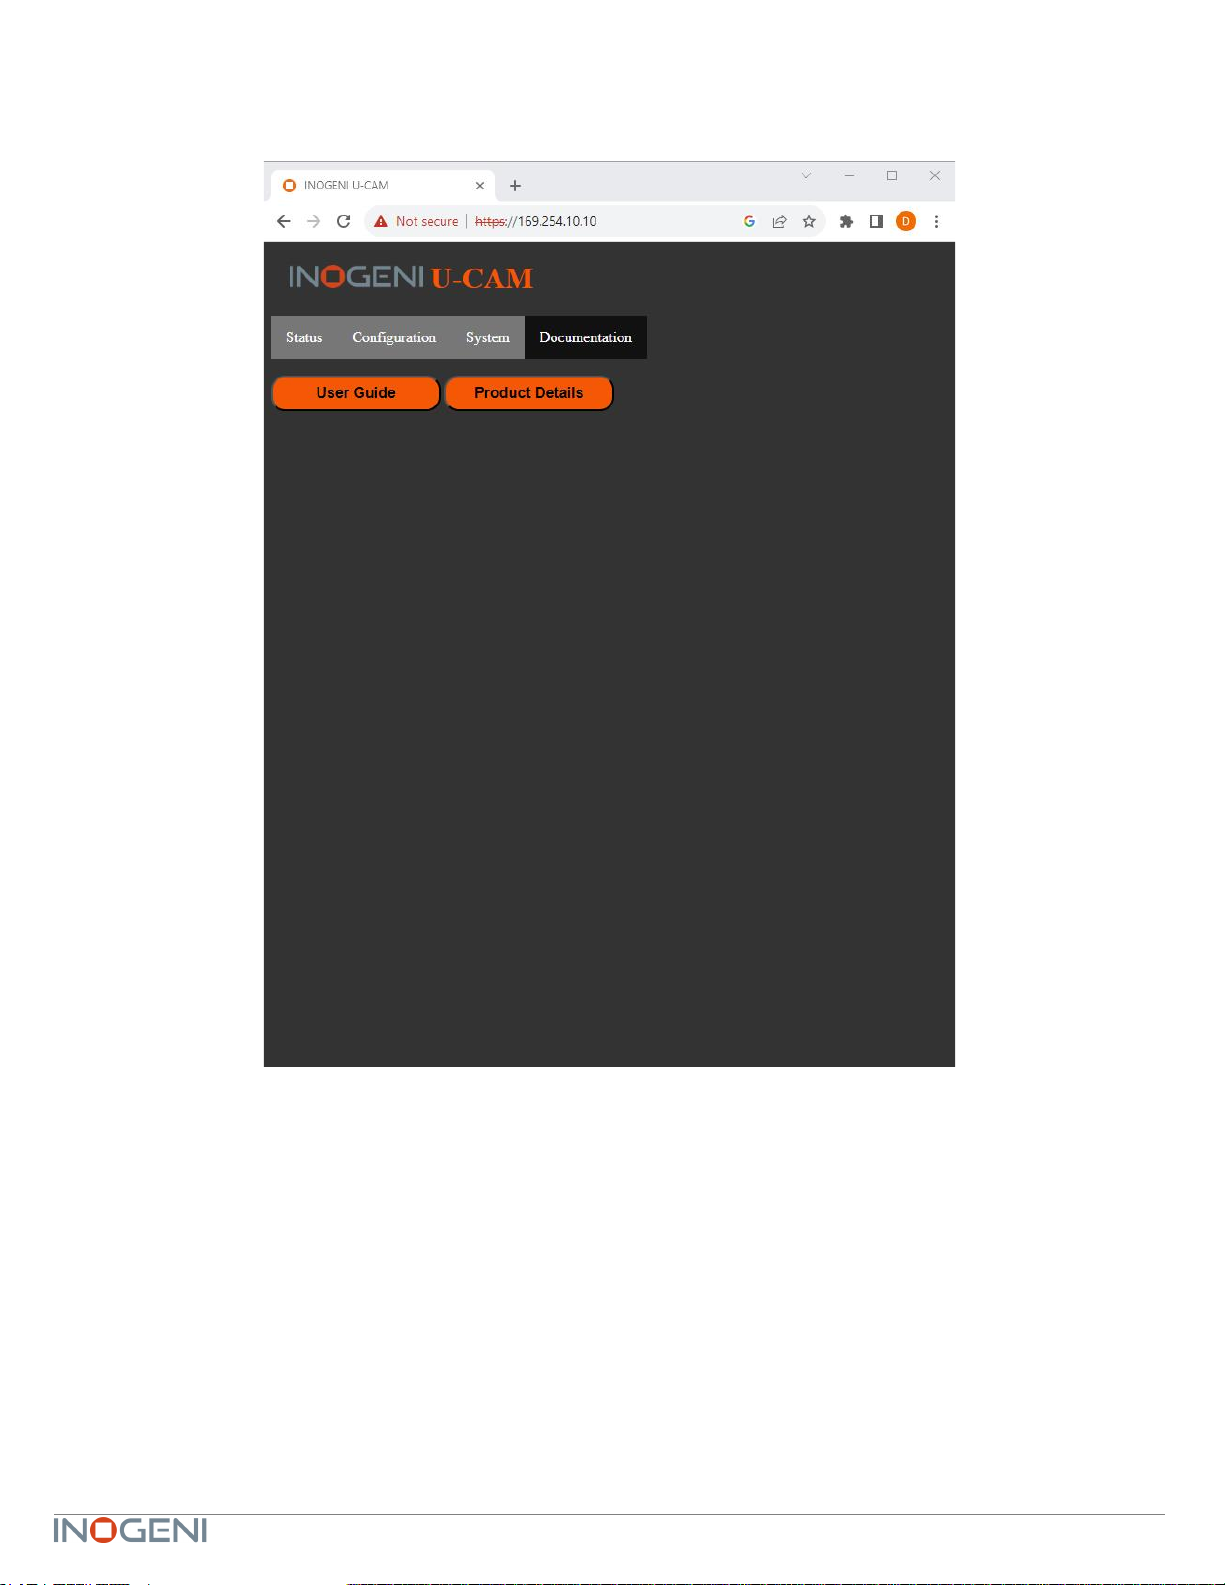
The DOCUMENTATION tab will allow you :
- Get to the latest user guide.
- Go to product webpage.
Figure 4: Documentation preview
The first time you access the webpage, your web browser is likely to complain that the connection is insecure. The reason for
this is because we are using self-signed HTTPS certificates, because certificate providers will not provide certificates for
addresses that are not globally accessible.
The webpage can set HDMI resolution, USB video input format, webpage password, or the REST API access token. Please
note that in the case of the REST API token, we can only ask for the device to generate a new randomly generated token. It
can also be used to upgrade the device firmware.

14
REST API
The response will usually be JSON formatted with a “message” field containing a JSON string explaining the cause of the
error or “success”in case of success. Note that we are using self-signed certificates.
You can enable a bearer authentication in the HTTP header (Authorization: Bearer <token>) through our configuration page
to increase security on the API.
There will be a return code to each call with the following commands:
200 => success
400 => error
401 => authorization error
Here is the complete list of commands supported through the REST API (excluding password change, firmware update,
bearer token get/set):
Command URL
Body arguments
Return body
HTTP GET/POST
https://<IP>/api/v1/rstr
Restore default settings.
{
"message": <String>
}
HTTP GET/POST
https://<IP>/api/v1/reset
Reset/reboot the device.
{
"message": <String>
}
HTTP GET/POST
https://<IP>/api/v1/version
Returns firmware version.
{
"message": <String>
}
HTTP GET
https://<IP>/api/v1/status
Return device, video/audio inputs and HDMI
output status.
JSON object with multiple fields
HTTP GET/POST
https://<IP>/api/v1/pan
Relative pan.
pan=<pan>
The sign specifies the direction.
We multiply the argument by the camera smallest
step, and if the speed is too fast, we go as fast as
the camera allow. We recommend using values
between -10 and 10.
{
"message": <String>
}
HTTP GET/POST
https://<IP>/api/v1/tilt
Relative tilt.
tilt=<tilt>
The sign specifies the direction.
We multiply the argument by the camera smallest
step, and if the speed is too fast, we go as fast as
the camera allow. We recommend using values
between -10 and 10.
{
"message": <String>
}
HTTP GET/POST
https://<IP>/api/v1/zoom
Relative zoom.
zoom=<tilt>
The sign specifies the direction.
We multiply the argument by the camera smallest
step, and if the speed is too fast, we go as fast as
the camera allow. We recommend using values
between -10 and 10.
{
"message": <String>
}
HTTP GET/POST
https://<IP>/api/v1/setHdmi
Set HDMI output mode.
mode=<mode>
<mode> options:
0 => 1080P60
1 => 1080P50
2 => 720P60
3 => 720P50
4 => 4K24
5 => 4K25
6 => 4K30
{
"message": <String>
}

15
HTTP GET/POST
https://<IP>/api/v1/setVideoFormat
Set video input format.
x-www-form-urlencoded
format=<formatIndex>
<formatIndex> options:
See getVideoFormats command for available
formats.
{
"message": <String>
}
HTTP GET
https://<IP>/api/v1/
getVideoFormats
Get video input format.
JSON array containing all formats
for input.
HTTP GET/POST
https://<IP>/api/v1/setAudioInput
Set audio input.
input=<Integer>
The argument specifies the index of the audio
input. To see available inputs, use “status”
command.
JSON object with message field
explaining error if any
HTTP GET/POST
https://<IP>/api/v1/
disableSerialInterface
Disable serial interface.
disable=<disable>
If <disable> is 1, will disable serial interface API to
give IP interface exclusive access to serial port,
otherwise serial interface API is enabled.
When IP interface has exclusive access to serial
port, user must use the “serialRead” and
“serialWrite” commands.
{
"message": <String>
}
HTTP GET
https://<IP>/api/v1/serialRead
Read serial data from RS232.
{
"message": <String>
}
Message field contains
characters read from RS232
HTTP GET/POST
https://<IP>/api/v1/serialWrite
Write serial data to RS232. Giving content to
write in URL is not supported.
<Content to write>
{
"message": <String>
}
HTTP GET/POST
https://<IP>/api/v1/setNetwork
Configure network settings.
x-www-form-urlencoded
<mode> options:
static => addressing is static
dhcp => use DHCP addressing
If mode is static, must provide following args:
<ip> option:
String defined IP address. Example: 192.168.0.20
<netmask> option:
String defined netmask address. Example:
255.255.0.0
<gateway> option:
String defined gateway address. Example:
192.168.0.1
{
"message": <String>
}
It is also possible to embed arguments to an API call inside the URL to ease configuration with some control systems with
the following topology:
GET https://<IP>/api/v1/<COMMAND>?<ARG1>=value&<ARG2>=value
where <COMMAND>, <ARG1> and <ARG2> are command and associated arguments.
For example, using the setVideoFormat command, you can issue the following request:
GET https://<IP>/api/v1/setVideoFormat?formatIndex=0
This request will set the input to format index 0.

16
The following commands allow to perform password management, bearer token management and firmware update. The
authentication used is basic auth, and we use the same user and password as the webpage (default user=admin
password=admin).
Command URL / Description
Body arguments
Return body
HTTP POST
https://<IP>/api/v1/
changePassword?
password=<newPassword>
Change the webpage password to
<newPassword>.
{
"message": <String>
}
HTTP GET
https://<IP>/api/v1/
getAccessToken
Return the bearer token.
{
"token": <String>
}
If no bearer token is set, the “token”
field will be null.
HTTP POST
https://<IP>/api/v1/
generateAccessToken
Generate random access token.
{
"message": <String>
}
HTTP POST
https://<IP>/api/v1/update
Sends update file to device.
Must use formdata body.
The key must be myFile, and the value is of
type file. We expect a .wic file that should be
present in our official update packages
{
"message": <String>
}
17
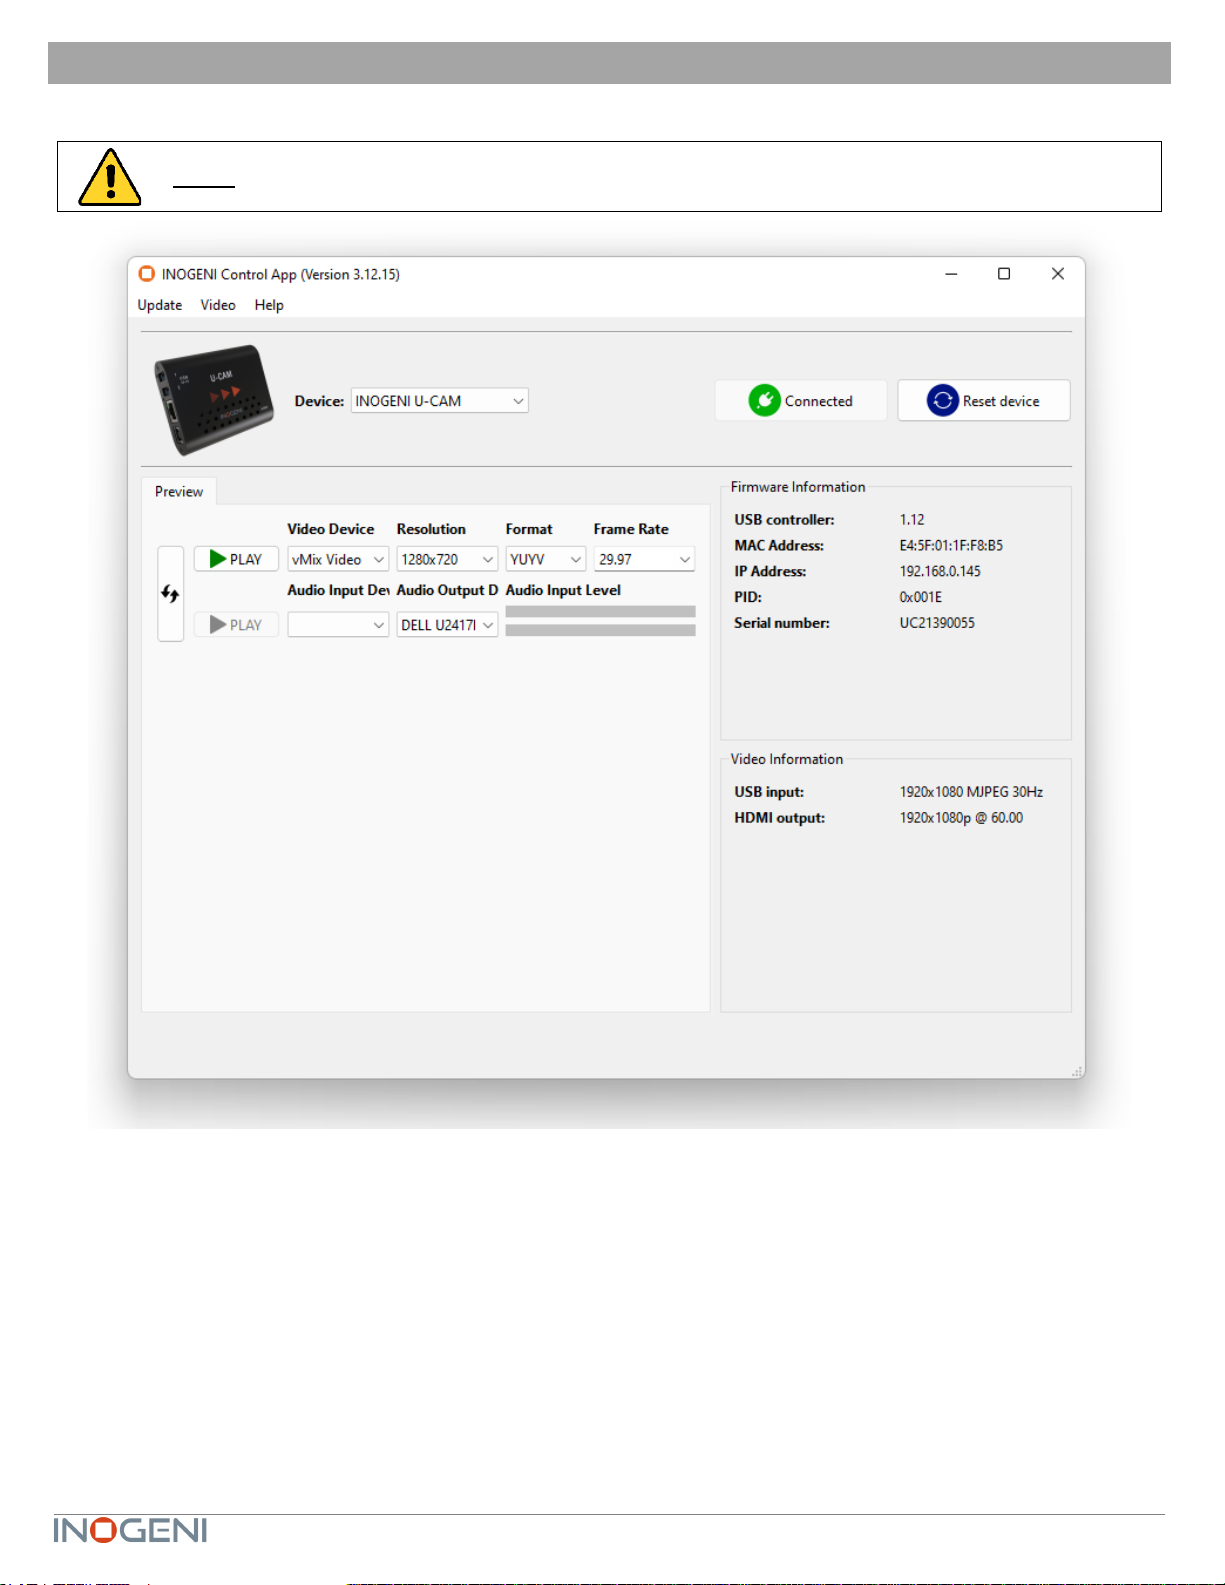
INOGENI CONTROL APP
You can use our Control App to monitor firmware information, upgrade and configure your unit.
NOTE: You need to use the USB-B to USB-A cable provided with the box for the Control App to detect the unit.

18
SUPPORT
Engineered by video professionals, for video professionals, it is your most compatible USB 3.0 device. INOGENI expertise at
your fingertips:
•Expert Technical Support team at supp[email protected]om for immediate help or if you have any technical question
about our products.
•Extensive Knowledge Base to learn from other customers’ experiences.
© Copyright 2023 by INOGENI INC. All Rights Reserved.
INOGENI name and logo are trademarks or registered trademarks of INOGENI. Use of this product is subject to the terms
and conditions of the license and limited warranty in effect at the time of purchase. Product specifications can change without
notice.
INOGENI, Inc.
1045 Avenue Wilfrid-Pelletier
Suite 101
Québec, QC, Canada, G1W0C6
(418) 651-3383
CERTIFICATIONS
FCC Radio Frequency Interference Statement Warning
This device complies with Part 15 of the FCC rules. Operation is subject to the following two conditions:
(1) this device may not cause harmful interference, and
(2) this device must accept any interference received including interference that may cause undesired operation.
IC Statement
This Class A digital apparatus complies with Canadian CAN ICES-3(A)/NMB-3(A).
CE Statement
We, INOGENI Inc., declare under our sole responsibility that the CAM230, to which this declaration relates, is in
conformity with European Standards EN 55032, EN 55035, and RoHS Directive 2011/65/EU + 2015/863/EU.
UKCA Statement
This device is compliant with the Electromagnetic Compatibility Regulations 2016 No. 1091 as part of the
requirements leading to the UKCA marking.
WEEE Statement
The European Union has established regulations for the collection and recycling of all waste electrical and electronic
equipment (WEEE). Implementation of WEEE regulations may vary slightly by individual EU member states. Please
check with your local and state government guidelines for safe disposal and recycling or contact your national WEEE
recycling agency for more information.
RCM Statement
This device is compliant with Regulator Compliance Mark (RCM) certification.
Other manuals for U-CAM
1
Table of contents
Other inogeni Media Converter manuals


