InovTech 466094 User manual

SMART CHARGE
IUOU Multi-stage Chargers
Ref.: 466094 – 15A
Ref.: 466095 – 25A
User’s manual
Please read this manual carefully
before installing and starting up this device.
SMART CHARGE IUoU Chargers
2

SMART CHARGE IUoU Chargers
3
SMART CHARGE IUoU Chargers
4

SMART CHARGE IUoU Chargers
5
SMART CHARGE IUoU Chargers
6
SMART CHARGE IUoU Chargers
7
SMART CHARGE IUoU Chargers
8
Dear customer,
Thank you for your preferred choice in purchasing
our charger. Our chargers series is designed to be
your best companion when travelling, outdoor
camping, at sea, etc.
For years of reliable service, you will have to install
and use charger properly, and according to our
operating procedures.
Please read the content of this Instruction Manual
carefully and file for future reference.
Sincerely yours.

SMART CHARGE IUoU Chargers
9
Contents:
1 GENERAL SAFETY AND INSTALLATION
INSTRUCTIONS
1.1
Operating the device safely
1.2
Safety instructions when installing the device
1.3
Electrical cables
1.4
Installation on boats
2 WARNING
3 APPLICATIONS AND DESCRIPTIONS:
4 SPECIFICATIONS OF THE UNIT VARIANTS
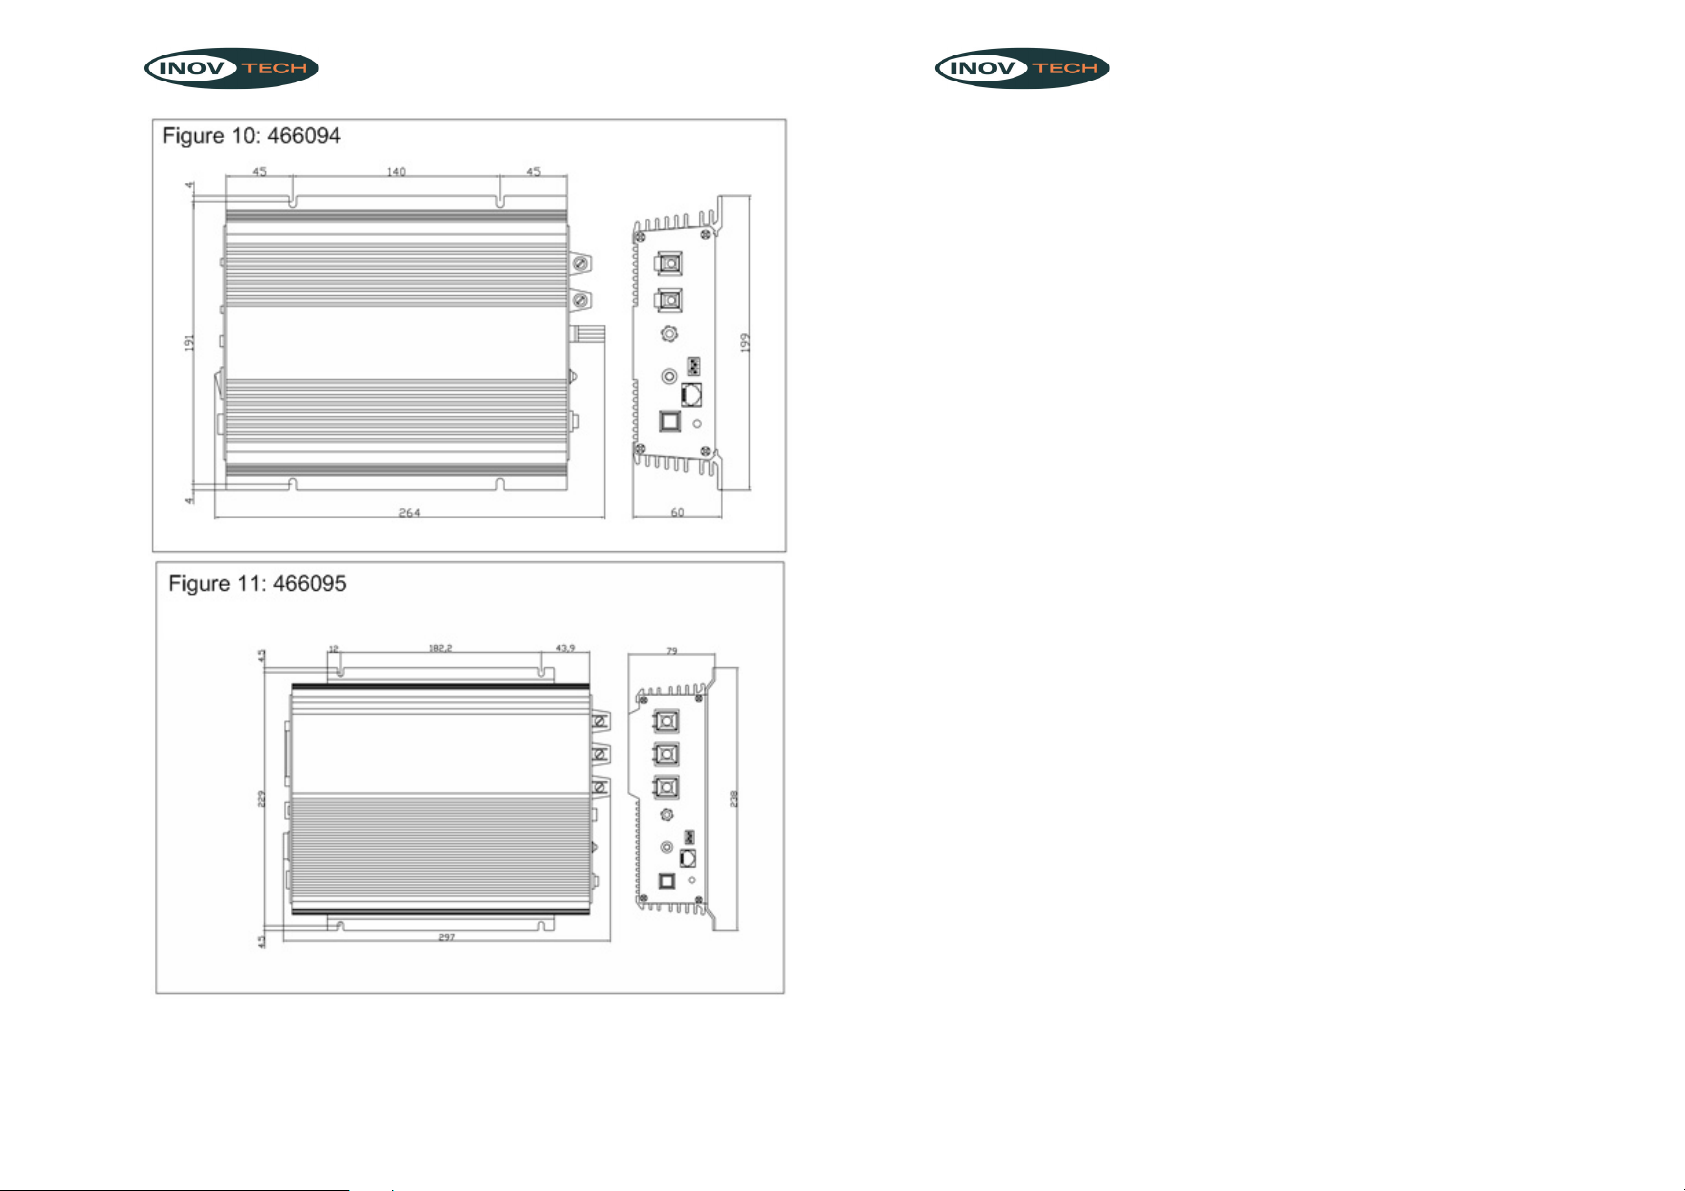
Front view 466094 (see figure 1, page 1)
Front view 466095 (see figure 2, page 1)
5 SETTINGS
5.1
Charging voltage and time
5.2
Half power mode
6 MOUNTING OF BATTERY CHARGER
7 MAKING CONNECTIONS
8 ACCESSORIES
8.1
The temperature sensor
8.2
Remote control
9 USING THE CHARGER
9.1
Normal using
9.2
Using the remote control
9.3
Charging characteristic
9.4
Functional check
10 TROUBLE SHOOTINGS
11 SPECIFICATIONS
CERTIFICATES APPLIED TO THE IU0U AUTOMATIC
CHARGER
CONSUMER INFORMATION
SMART CHARGE IUoU Chargers
10
1 General safety and Installation
instructions
1.1 Operating the device safely
Warning
Failure to observe this instruction can cause material damage,
device malfunction, or danger of bodily injuries.
Fundamental safety measures should be observed when using
electrical equipment to avoid the danger of:
– Electric shock
– Fire hazard
– Injury
1.2 Safety instructions when installing the device
oHandle the batteries with care; they contain strong acids.
oAvoid contact with the battery fluid agent.
oIf come in contact with battery fluid, one should rinse the affected parts of
the body or clothing with plenty of cold water and seek medical attention
immediately.
oBe sure that the device has a firm foundation.
oDo not use sharp or hard objects to clean the device; doing so may
cause device damage.
1.3 Electrical cables
oIf cables have to be fed through metal walls or other walls with sharp
edges, use ducts or wire bushings to prevent damage.
oLay the cables so that other people will not trip over them.
oDo not lay cables which are loose or bent next to electrically conductive
materials.
oDo not pull the cables.
oFasten the cables properly.
oLay the cables so that they cannot be easily damaged
oAlways use sockets that are grounded and secured by earth leakage
circuit breaker.
oOnly a specialist should make the electrical connections.
oDo not lay the 230V line and the 12 V direct current in the same cable
duct!
oKeep to the indicated minimum cable cross-section.
1.4 Installation on boats
Incorrect use or installation of the charger on boat may lead to corrosion of the
boat. Please allow qualified personnel to perform the installation of the charger.
SMART CHARGE IUoU Chargers
11
2 WARNING
Please read carefully about the following precautions. Damages
caused by failure to follow the instructions below will NOT be
covered by warranty.
Use the charge only as intended:
oDo not operate the charger if the housing or the cables are damaged.
oThe charger may not be used to charge any other type of batteries than
the ones indicated.
oDo not operate the device in a damp or wet environment.
oDo not charge a frozen battery; there is the danger of explosion.
oKeep this charger in a safe place, out of reach of children.
oOnly qualified personnel who are familiar with the risks involved and the
relevant regulations should carried out maintenance or repair work.
oThe device must be fixed and installed in such a way that it will not fall
over or fall down.
3 Applications and Descriptions:
The chargers regenerate power or recharge mobile batteries used onboard
vehicles or boats
The charger can continuously charge supply batteries or starter batteries,
enabling the batteries to maintain at a high capacity level.
The charger can be used for charging three types of batteries:
oGel batteries
oLead-acid starter batteries
oAGM batteries
oMaintenance-free batteries
Warning!
The IUOU automatic charger lay not be used in any case for
charging other kinds of batteries (e.g. NiCd, NiMH etc.)!
Please inquire your battery supplier about the maximum capacities of your
lead-acid batteries.
The charger is equipped with a polarity protection; this prevents the charger from
being damaged in case of incorrect polarity.
An optional remote control (model number 900-RC) can be obtained in order to
SMART CHARGE IUoU Chargers
12
provide remote access to the charger. Please connect the 900-RC plug in remote
control connection (figure 1 and 2).
An optional temperature sensor (model number TF-500) that is connected at the
battery being charged protects the battery against damage cause by varying
outside temperature by adapting the charging voltage of the temperature to the
battery. Please connect two ends of TF-500 as figure 9 – one end to “T.S.” jack
on rear panel and another end to battery.
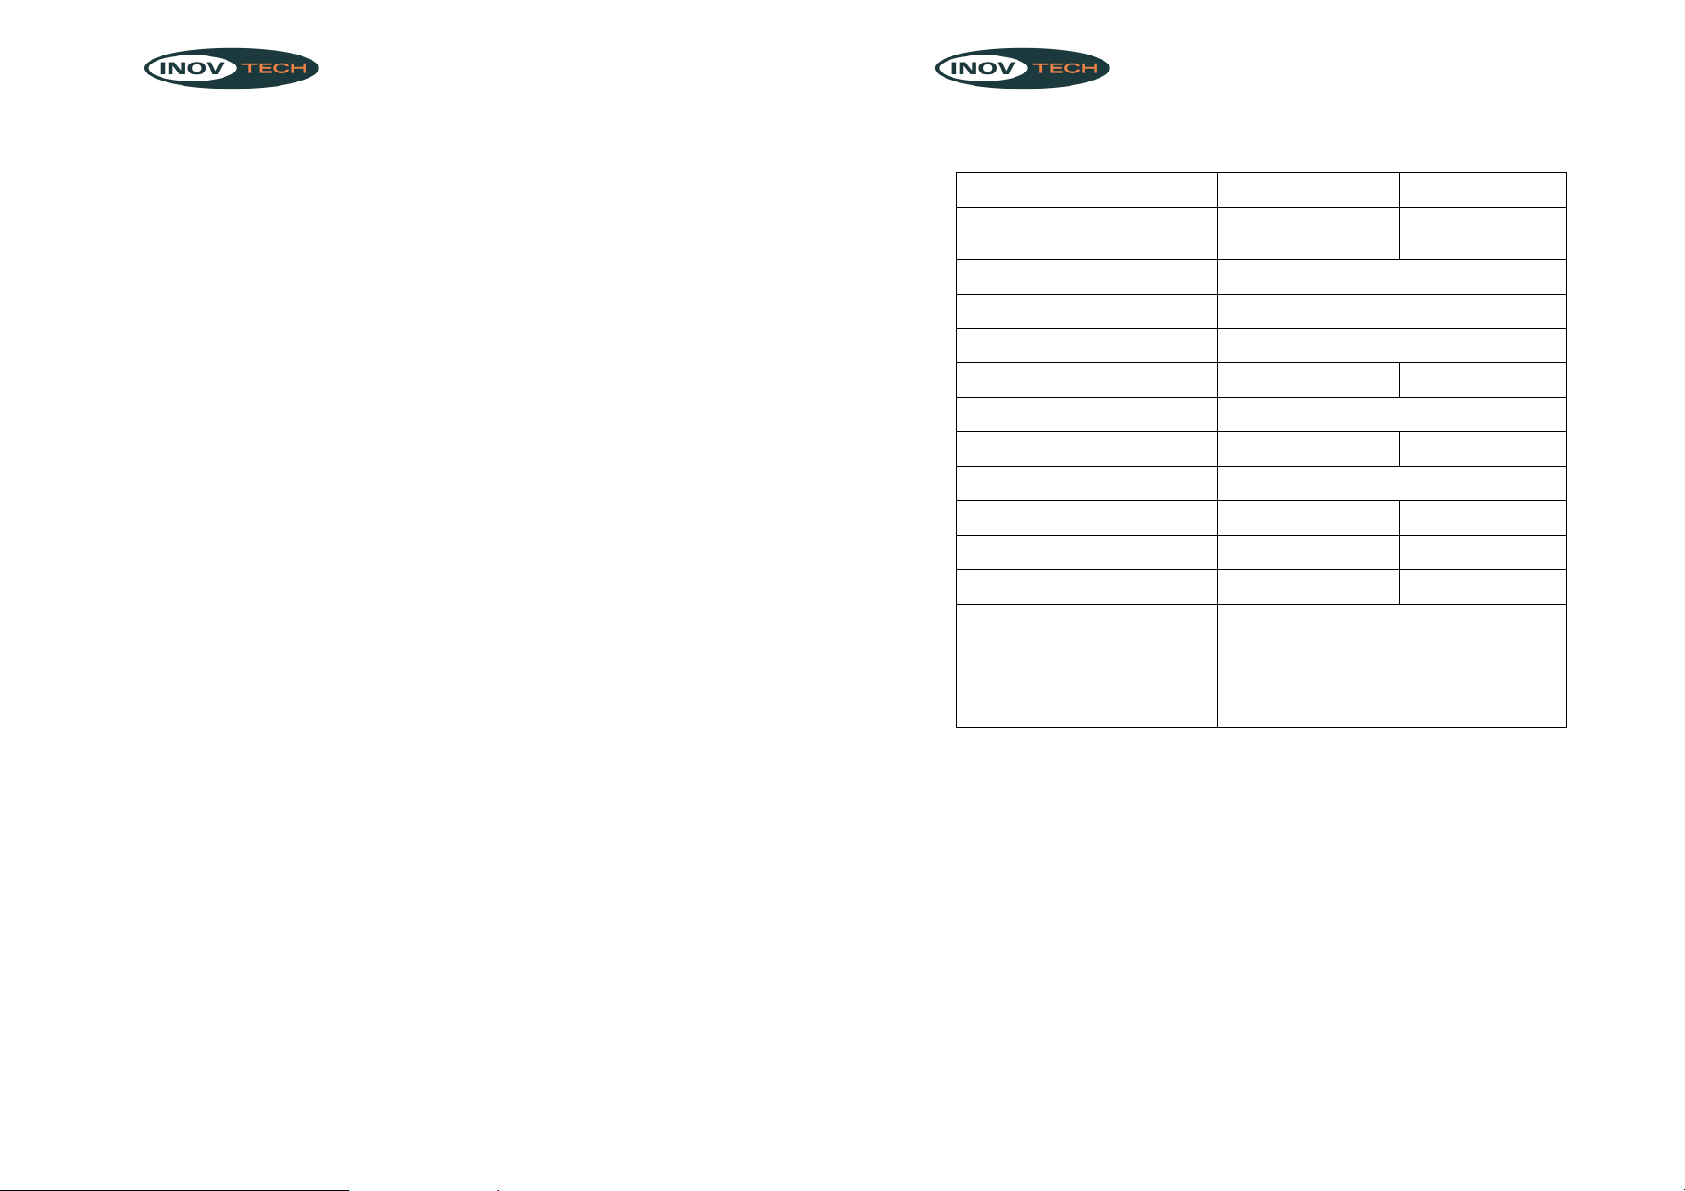
4 Specifications of the unit variants
The IU0U automatic charger can deliver different unit variants. It can charge
batteries up to the specified battery capacity as indicated in the specification
(section 11).
Regarding the identification of the specification of your unit, locate your model
number in the following tables.
Rear view (see figure 3-4)
No.
Description
1 Connection for the temperature sensor
2 Unit fuse
3 Power switch
4 Connection for 230 volts supply
5 Ventilation outlet
Front view 466094 (see figure 1)
The units can charge up to two supply batteries
No. Description
1 Half power mode button
2 Connection for remote control
3 Control lamp
4 Switch field for the selection of the charging voltage
and time limitation (figure 8)
5 “+“ (plus) terminal for the supply battery (1A Charge)
6 “+” (plus) terminal for the supply battery
7 “-“ (minus) terminal for the supply battery
SMART CHARGE IUoU Chargers
13
Front view 466095 (see figure 2)
The units can charge up to two supply batteries
No. Description
1 Half power mode button
2 Connection for remote control
3 Control lamp
4 Switch field for the selection of the charging voltage
and time limitation (figure 8)
5 “+“ (plus) terminal for the supply battery (1A Charge)
6 “+” (plus) terminal for the supply battery
7 “+” (plus) terminal for the supply battery
8 “-“ (minus) terminal for the supply battery
5 Settings
5.1 Charging voltage and time
A switch field can select the charging voltage and the period for the main
charging phase.
Warning!
Make sure that switch 1 and 2 or switch 3 and 4 are never switched
on simultaneously while operating the charger. Please follow the
table below to ensure correct operation of the charger
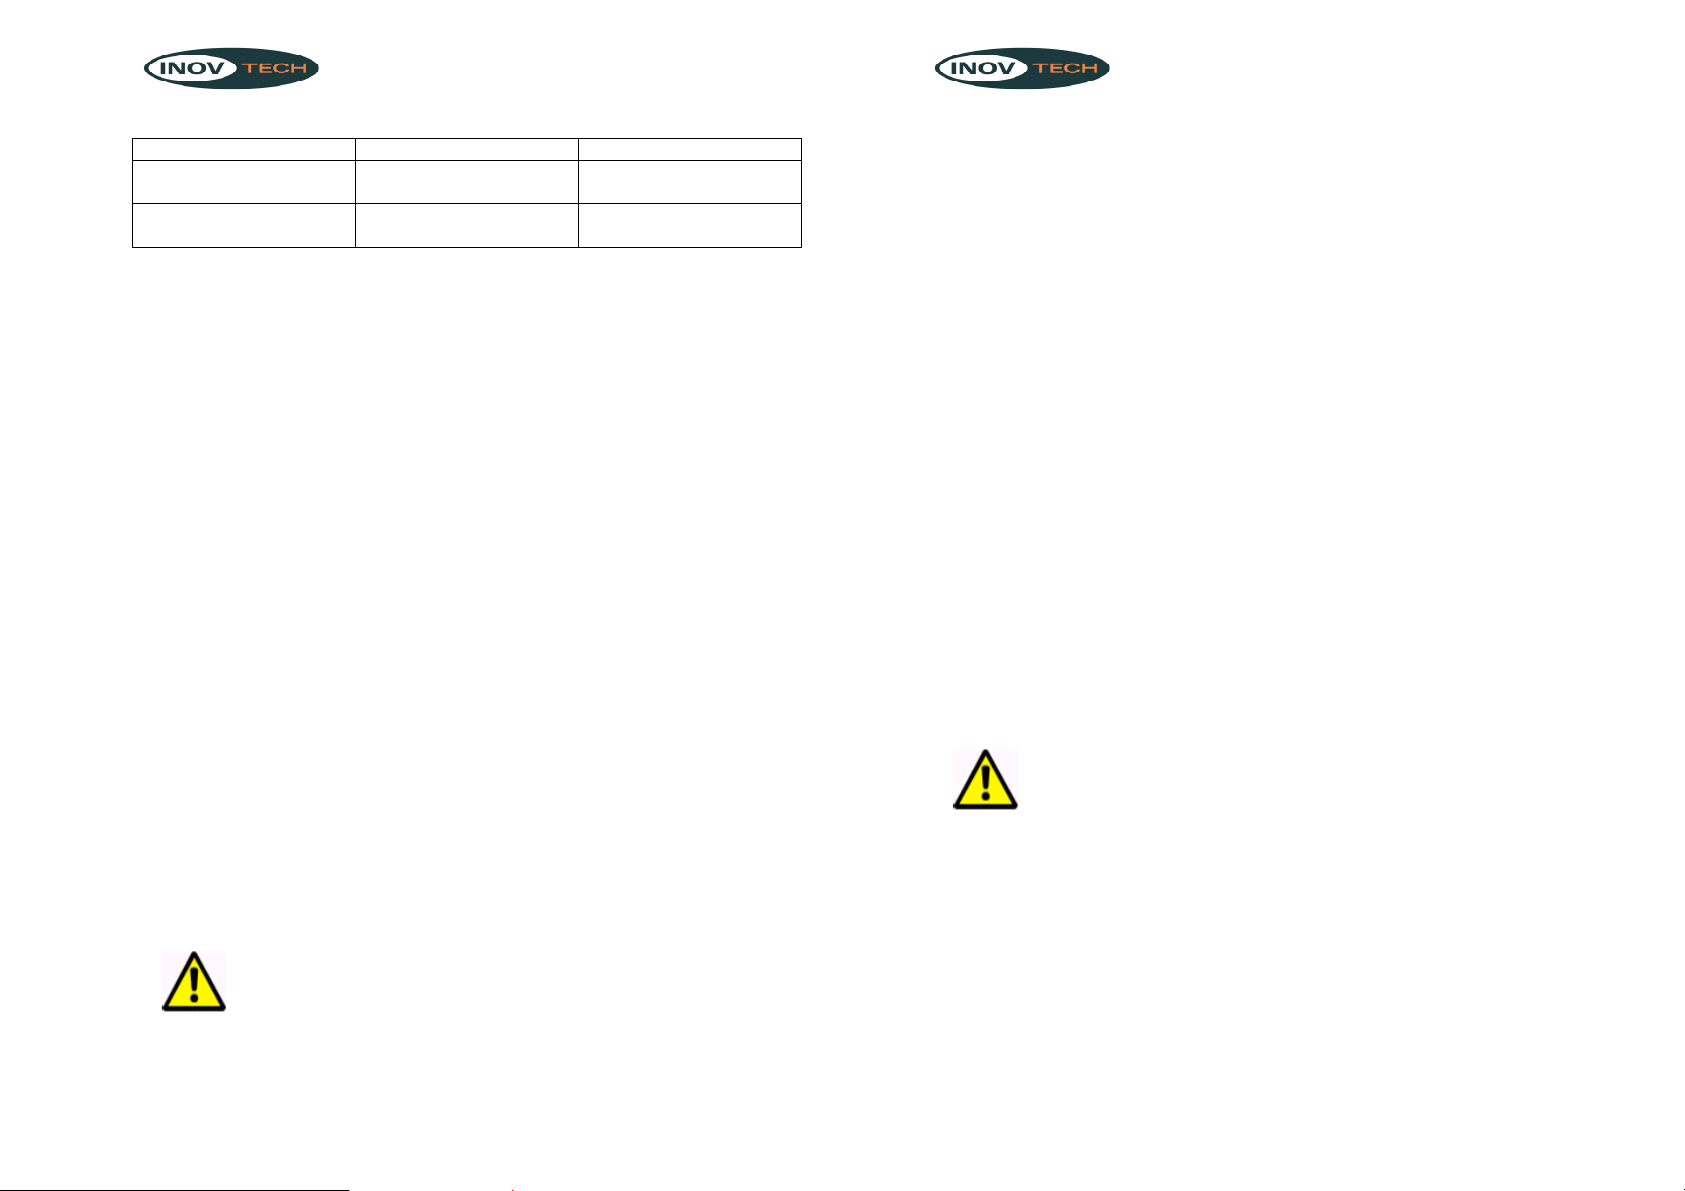
5.1.1 Settings for the charging voltage
Refer to figure 8:
Voltage Switch 1 Switch 2 Application range
13.8 V OFF OFF Starter batteries, or using as a
12V power supply
14.4 V ON OFF Lead acid and gel batteries
14.8 V OFF ON AGM batteries
5.1.2 Settings for the limitation of the period of the main charging
phase
Refer to figure 8:
SMART CHARGE IUoU Chargers
14
Time limitation of
the main
charging Switch 3 Switch 4 Application range phase
4 hrs. OFF ON Lead acid or Starter batteries
8 hrs ON OFF AGM batteries or Gel batteries
No timer function OFF OFF Using as a 12V power supply
5.2 Half power mode
If you push the button “Half Power Mode”, the output power will reduce to half
the chargers amp rating and a green “Half ON” LED will light. The Half Power
LED is located on the bottom left corner of the front panel.
6 Mounting of Battery Charger
For the mounting of battery charger on wall or flat places, please refer to figures
10 & 11 regarding size of housing and location of mounting holes for your
installation.
7 Making Connections
oPlace the charger in a dry, cool, clean, and ventilated space.
oSet the power switch to “0” (off) and pull out the main plug before
connection or disconnecting the direct current connection.
oConnect the “-“(minus) battery pole with a connecting cable to
the”-“(minus) terminal at the IU0U automatic charger (see figure 1 & 2).
oConnect the “+”(plus) battery pole with the connecting cable to the
“+”(plus) terminal at the IU0U automatic charger (see figure 1 & 2).
oLay all the cables from the batteries to the IU0U automatic charger (refer
to figure 6)
oFasten the cables ends with provided terminals (refer to figure 5).
oFor connection of starter batteries, please connect the terminal as our
drawing (see figure figure 7).
oEnsure correct polarity of the battery and the battery charger, otherwise
the internal flat-pin terminal will trigger with the wrong polarity.
Note
Only use cables with the prescribed wire cross sections fro the connection of the
IU0U automatic charger to the battery.

SMART CHARGE IUoU Chargers
15
Model No. Supply battery Starter battery
466094 6 to 10mm²
AWG #12 to #10 1 to 2,5mm²
AWG #16 to #14
466095 16 to 25mm²
AWG #10 to #8 1 to 2,5mm²
AWG #16 to #14
230 volts voltage supply
Connect the plug of the 230 volts voltage supply at the unit to a grounded socket
that is secured by an earth leakage circuit breaker.
8 Accessories
8.1 The temperature sensor
The temperature sensor measures the temperature of the battery or the
environment around the battery and transfers the data to the IU0U automatic
charger. With deviating temperatures, the charging voltage increases and
decreases accordingly.
oLay the cables from the batteries to the IU0U automatic charger.
oConnect the temperature sensor to the back of the IU0U automatic
charger via the socket.
oAttach the sensor head directly to the battery. Use e.g. double-sided
adhesive tape to attach the sensor to the top of the battery or in the
vicinity of the battery (see figure 9).
oSwitch the IU0U automatic charger “OFF“ and “ON“ again to activate the
temperature sensor.
8.2 Remote control
The remote control can switch the charger ON and OFF as well as be used for
functional check.
Note
Attach the remote control at a well accessible place to ensure easy access of the
IU0U automatic charger.
SMART CHARGE IUoU Chargers
16
Caution!
Be careful when attaching the remote control, for wiring harnesses,
cables and other components that are in the assembly range could
be damaged in the process!
oEnsure approximately 5,00cm width, 5,50cm height and 2,30cm depth
for the take-up of the remote control.
oConnect the remote control to the IU0U automatic charger. The
connection cable is equipped with two equivalent modular plugs.
oPlace the remote control into the opening created. Secure the remote
control with screws on the upper and bottom margin of the faceplate –
use the available drills.
Note
The power switch at the unit must be switched ON, so that the unit can be
switched ON and OFF with the remote control.
9 Using the Charger
9.1 Normal using
With the IUOU automatic charger you can either recharge batteries or supply full
batteries with a conservation charge.
Switch the unit on with the power switch on the rear side of the unit.
9.2 Using the remote control
The power switch at the back of the unit must be switched on “I” so that the
charger can be switched ON and OFF with the remote control.
Press the “ON/OFF” key on the remote control to switch on or off the unit.
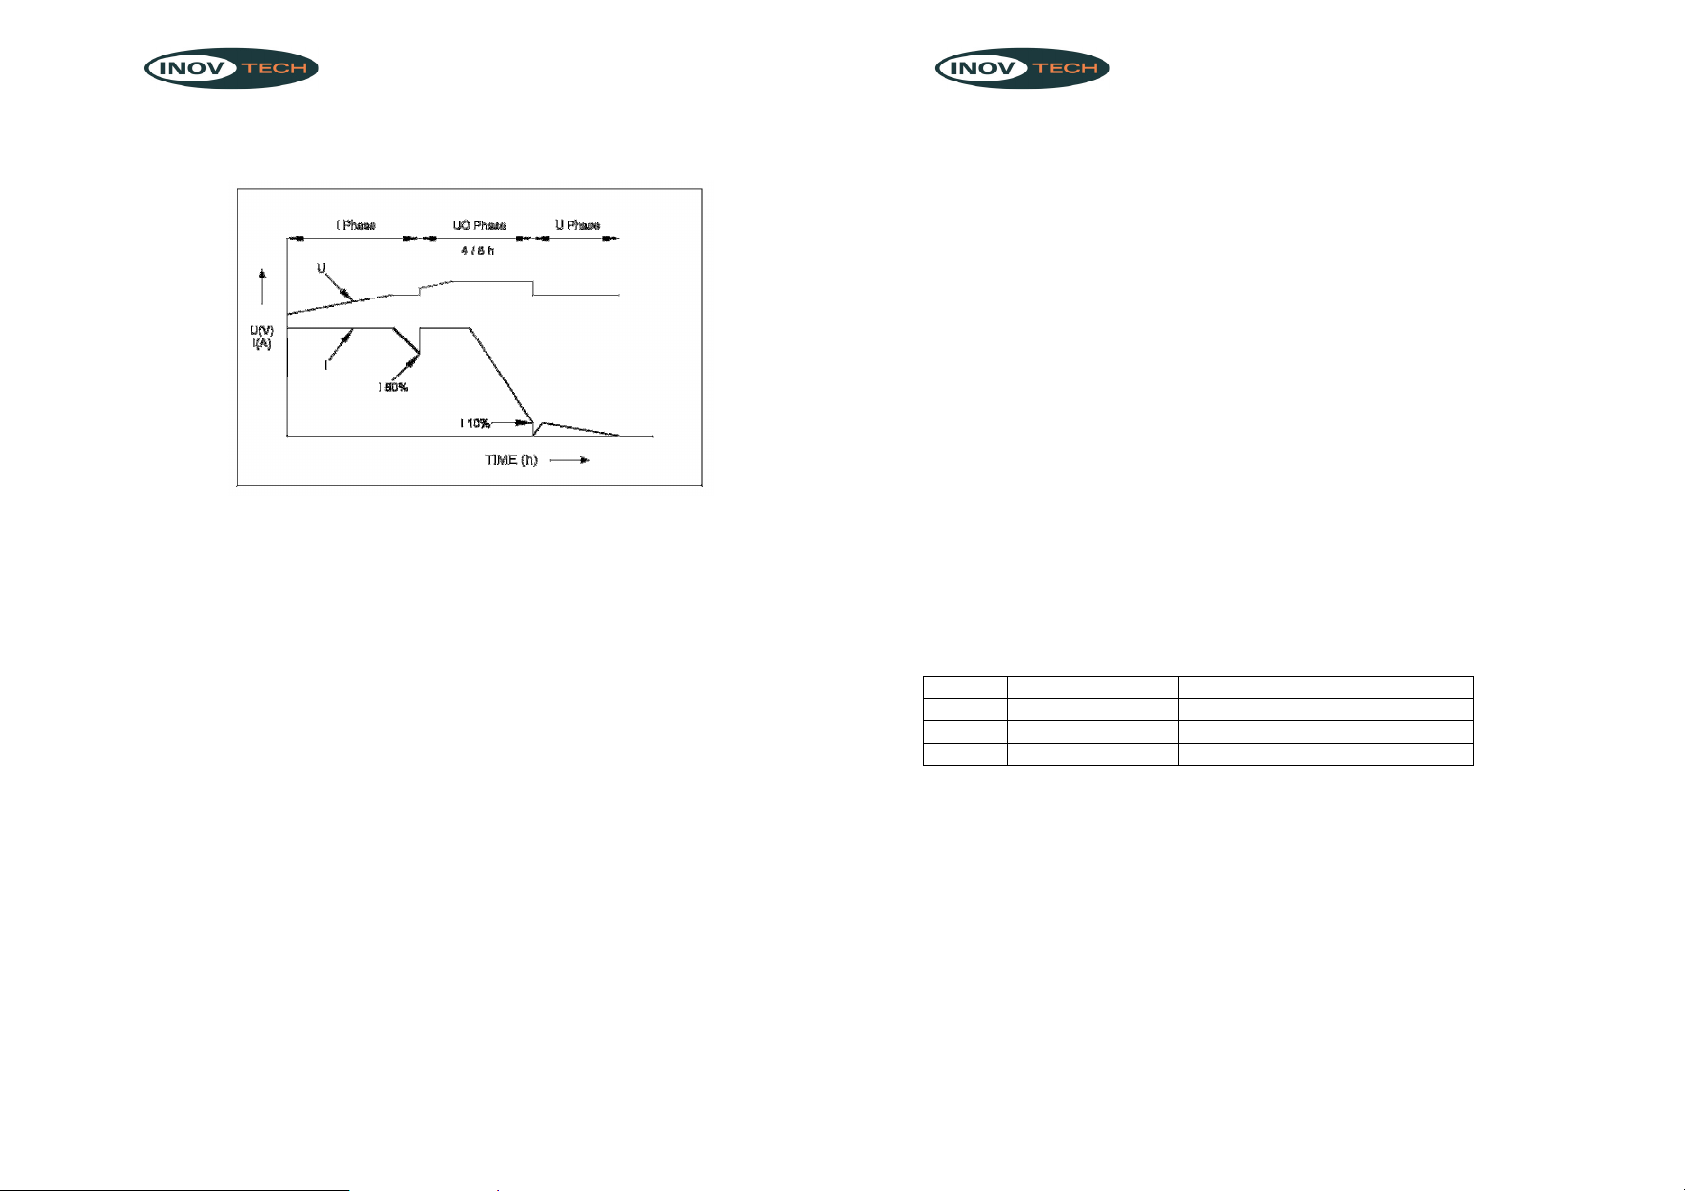
9.3 Charging characteristic
The charging characteristic is generally designated as a modified IU0U
Characteristic.
Attention
The maximum battery capacity should not exceed the specified
capacity, otherwise the functions of the individual charging phases
could be influenced.
SMART CHARGE IUoU Chargers
17
9.3.1 I phase (Boost)
In the first stage of the charging process, the depleted battery is charged
with a constant current until the battery voltage reaches 13.8 V. When the
battery reaches this voltage level, the charging current gradually drops.
When the current drops down to 80%, the charger switches over to the
higher charging voltage of 14.4 V/14.8 V.
Note: The charging voltage can be selected using the switch field (part
5.1.1)
9.3.2 U0 phase (Main charging)
This main charging phase is limited a maximum of 4/8 hours and the current
rises again to its maximum value. The current remains constant as long as
the battery voltage is below 14.4 V/14.8 V.
After reaching the maximum voltage, it remains constant. However, the
current drops again. Within this main charging phase, which is limited to 4/8
hours, the battery is fully charged.
Note: Time limitation of the main charging can be selected using the switch
field (part 5.1.2)
9.3.3 U phase (Floating)
If the current decreases to 10% or under the rated current or if the time limit
SMART CHARGE IUoU Chargers
18
of 4/8 hours is exceeded, then the charger switches over to economy
charging (13.8 V).
Note
Batteries may be charged separately from each other if the chargers have
double charging or three-fold charging connections. The outputs are
separated internally by diodes, thus the weaker battery is always first set to
the charging level of the stronger battery.
Units with temperature sensors
A temperature sensor can be connected in order to provide the optimum charging
functioning. The charging voltages are adapted on the battery temperature.
9.4 Functional check
Charging phases
The LED in the front of the unit can be used to check the status of the charging
process.
Note:
The optional remote control can also be used to check the status of the charging
process. The LEDs on the remote control indicate the different charging phases
with its respective colors.
LED
Charging phase
Charging status of the battery
red
I phase
between 10 % and 50 %
yellow
U0 phase
between 50 % and 90 %
green
U phase
over 90%
SMART CHARGE IUoU Chargers
19
10 Trouble Shootings
After connecting and charging the battery, the battery voltage
would not
increase.
If possible, measure with a suitable multimeter during the charging to
verify if the voltage at the battery terminals increases.
Determine whether the terminals are connected properly to the battery
poles. Clean the battery poles if necessary to ensure better connection.
After a charging time of approx. 20 hours, the battery is still
not fully charged
Disconnect the power to the IU0U automatic.
Remove the battery from the charging terminals and wait for a few
minutes.
Then, measure the voltage at the battery terminals with the multimeter.
If the multimeter displays a voltage of 10 V or less, this indicates that the
battery is defective and does not charge any longer.
The battery discharges after a short period of time without
usage.
Measure the voltage at the battery terminals with a suitable multimeter. If
the multimeter indicates a voltage below 12 V of a 12 V battery or a
voltage below 24 V of a 24 V battery, then the battery is too weak to retain
the charge.
SMART CHARGE IUoU Chargers
20
11 Specifications
Model Number: 466095 466094
Battery Connection Two plus 1A output for
starter battery One plus 1A output
for starter battery
Input Voltage range 207-253 V AC / 50 – 60Hz
Charging end voltage 14.4V/14.8V
Economic charging voltage 13.8V
Max. battery capacity 300Ah 150Ah
U0 phase limitation 4 h or 8 h
Max. charging current 25A 15A
Operating temperature 0 °C - 50 C°
Dimensions (mm) 240 X 77 x 310 200 x 60 x 260
Fuse: T4 A / 250 V T2A / 250V
Weight: 3.5 kg 2,4kg
Protection
1.Short circuit protection
2.Overload protection
3.Reverse polarity protection
4.Overtemperature protection
The following accessories are available for your IU0U automatic charger:
oRemote control (Model number: 900-RC)
oTemperature sensor (Model number: TF-500)
For any information, please contact your seller.

SMART CHARGE IUoU Chargers
21
Certificates applied to the IU0U automatic charger
EMC Standards of product series:
EN 55014-1:1993 / EN55014-2: 1995
EN 61000-3-2:1995 / IEC 61000-3-2
EN 61000-3-3:1995 / IEC 61000-3-3
EN 61000-4-2:1995 / IEC 61000-4-2
EN 61000-4-4:1995 / IEC 61000-4-4
EN 61000-4-5:1995 / IEC 61000-4-5
EN 61000-4-6:1996 / IEC 61000-4-6
EN 61000-4-11:1995 / IEC 61000-4-11
LVD Standards of product series:
EN 60335-2-29:2004 in conjunction with
EN 60335-1:2002+A1:2004+A11:2004+A2:
2006+A12:2006
Consumer information
Groupe NARBONNE ACCESSOIRES
Z.I. de Plaisance
11100 NARBONNE (France)
Tél : +33 (0)4 68 41 03 30
Web : www.narbonneaccessoires.fr
SMART CHARGE IUoU Chargers
22

SMART CHARGE
Chargeurs à phases multiples IUOU
Réf. 466094 – 15 A
Réf. 466095 – 25 A
Manuel d'utilisation
Lire attentivement le présent manuel
avant d'installer et de mettre en service l'appareil.
SMART CHARGE IUoU Chargers
24
Cher client,
Merci d'avoir choisi notre chargeur. Notre gamme
de chargeurs est conçue pour devenir votre
meilleure alliée en voyage, au camping, en bord de
mer, etc.
Pour des années d'utilisation en toute fiabilité, vous
devrez installer et utiliser le chargeur dans les
règles en respectant la présente notice.
Nous vous invitons à lire attentivement ce manuel
d'utilisation et à le ranger pour toute consultation
ultérieure.
Veuillez agréer, cher client, l'expression de nos
sincères salutations.
SMART CHARGE IUoU Chargers
25
Sommaire
1 GENERALITES SUR LA SECURITE ET L'INSTALLATION
1.1 Pour utiliser l'appareil en toute sécurité
1.2 Consignes de sécurité à respecter lors de l'installation de
l'appareil
1.3 Câbles électriques
1.4 Installation sur les navires
2 MISE EN GARDE
3 APPLICATIONS ET PRESENTATION
4 CARACTERISTIQUES TECHNIQUES DES VARIANTES DE L'APPAREIL
Façade avant 466094 (voir figure 1, page 1)
Façade avant 466095 (voir figure 2, page 1)
5 REGLAGES
5.1 Tension et temps de recharge
5.2 Mode "mi-puissance"
6 POSE DU CHARGEUR DE BATTERIES
7 ETABLISSEMENT DES BRANCHEMENTS
8 ACCESSOIRES
8.1 Capteur de température
8.2 Télécommande
9 UTILISATION DU CHARGEUR
9.1 Utilisation normale
9.2 Utilisation de la télécommande
9.3 Caractéristique de charge
9.4 Contrôle de bon fonctionnement
10 DIAGNOSTICS/DEPANNAGE
11 CARACTERISTIQUES TECHNIQUES
CERTIFICATS APPLICABLES AU CHARGEUR AUTOMATIQUE IU0U
INFORMATIONS CONSOMMATEURS
SMART CHARGE IUoU Chargers
26
1 Généralités sur la sécurité et
l'installation
1.1
Pour utiliser l'appareil en toute sécurité
Avertissement
Le non-respect de la présente notice peut entraîner un dommage
matériel, une panne de l'appareil ou un risque d'accidents corporels.
Les mesures de sécurité fondamentales devront être respectées lors de
l'utilisation des appareils électriques pour éviter les risques :
- d'électrocution,
- d'incendie,
- d'accident.
1.2
Consignes de sécurité à respecter lors de l'installation
de l'appareil
oManipuler les batteries avec précaution ; elles contiennent des acides forts.
oEviter tout contact avec le liquide de batterie.
oSi vous avez été en contact avec le liquide de batterie, il faudra rincer
abondamment à l'eau froide les parties du corps ou les vêtements touchés et
consulter immédiatement un médecin.
oVérifier que l'appareil repose sur un socle solide et stable.
oNe pas nettoyer l'appareil avec des objets pointus, tranchants ou durs ; ceci
risque de l'endommager.
1.3 Câbles électriques
oSi les câbles doivent passer au travers de parois métalliques ou autres
parois présentant des arêtes coupantes, utiliser des passages de câbles ou
des traversées de câbles pour éviter les détériorations.
oPoser les câbles de telle sorte que personne ne se prenne les pieds dedans.
oNe pas poser de câbles branlants ou pliés à proximité de matériaux
conducteurs.
oNe pas tirer sur les câbles.
oBien fixer les câbles.
oPoser les câbles pour qu'ils ne puissent pas facilement être endommagés.
oToujours utiliser des prises femelles à prise de terre et protégées par un
disjoncteur différentiel.
oLes branchements électriques devront être confiés à un spécialiste.
oNe pas poser le câble de secteur 230 V et le câble 12 V= dans le même
passage de câbles.
oBien respecter la section de câble minimale indiquée.
1.4 Installation sur les navires
L'utilisation ou l'installation erronée du chargeur sur un navire risque de provoquer
une corrosion du navire. Laisser aux techniciens qualifiés le soin d'effectuer
l'installation du chargeur.
SMART CHARGE IUoU Chargers
27
2 MISE EN GARDE
Lire attentivement les précautions suivantes. Les préjudices
occasionnés par le non-respect des consignes ci-dessous NE
SERONT PAS couverts par la garantie.
N'utiliser le chargeur que conformément à sa destination.
o
ne pas faire fonctionner le chargeur s'il présente un boîtier ou des câbles
endommagés,
ole chargeur ne doit pas être utilisé pour recharger un autre modèle de
batteries que ceux indiqués,
one pas faire fonctionner l'appareil dans une ambiance moite ou humide,
o
ne pas recharger une batterie gelée ; risque d'explosion !
o
conserver ce chargeur en lieu sûr, hors de portée des enfants,
o
seul un personnel qualifié bien informé des risques encourus et de la
réglementation en vigueur devra effectuer les interventions de maintenance
ou de réparation,
o
l'appareil doit impérativement être fixe, posé de manière à ne pas se
renverser ni tomber.
3 Applications et présentation
Les chargeurs servent à reconstituer l'énergie ou recharger les batteries mobiles
utilisées à bord des véhicules ou des navires.
Le chargeur peut recharger en continu les batteries d'alimentation ou les batteries de
démarrage, ce qui leur permet de conserver une capacité élevée.
Le chargeur peut servir à recharger trois types de batteries :
oles batteries GEL,
oles batteries de démarrage au plomb,
oles batteries à électrolyte fixé,
oles batteries sans entretien.
Avertissement !
Le chargeur automatique IUOU ne doit être utilisé en aucun cas
pour recharger d'autres types de batteries (par ex. NiCd, NiMH,
etc.).
N'hésitez pas à interroger votre revendeur de batteries sur les capacités maximales
de vos batteries au plomb.
Le chargeur est équipé d'une protection de la polarité qui empêche le chargeur d'être
endommagé en cas de polarité erronée.
Une télécommande en option (modèle 900-RC) peut être obtenue pour piloter à
distance le chargeur. La prise mâle du 900-RC se connecte à la prise femelle de la
télécommande (figure 1 et 2).
SMART CHARGE IUoU Chargers
28
En option, un capteur de température (modèle TF-500) relié à la batterie en cours de
recharge protège la batterie des dégâts occasionnés par les variations de
température extérieure en adaptant la tension de chargement à la température de la
batterie. Veuillez connecter les deux extrémités de TF-500 comme indiqué sur la
figure 9 – une extrémité au jack “T.S.” de la façade arrière et l'autre extrémité à la
batterie.
4 Caractéristiques techniques des
appareils
Le chargeur automatique IUOU existe en différentes variantes. Il est capable de
recharger des batteries jusqu'à la capacité de batterie indiquée dans les
caractéristiques techniques (paragraphe 11).
Pour connaître les caractéristiques techniques de l'appareil utilisé, repérer la
référence modèle dans les tableaux suivants :
Façade arrière (voir figure 3-4)
N° Désignation
1 Prise du capteur de température
2 Fusible de l'appareil
3 Interrupteur Marche/Arrêt
4 Prise d'alimentation 230 volts
5 Grille de ventilation
Façade avant 466094 (voir figure 1)
Ce modèle peut recharger jusqu'à deux batteries.
N° Désignation
1 Bouton de mode "Half-Power"
2 Prise de télécommande
3 Témoin LED
4 Micro switchs permettant de sélectionner la tension de
chargement et la limitation de durée (figure 8)
5 Borne “+“ (plus) batterie de démarrage (1 A d'intensité)
6 Borne “+“ (plus) batterie de service
7 Borne “-“ (moins) des batteries

SMART CHARGE IUoU Chargers
29
Façade avant 466095 (voir figure 2)
Cet appareil permet de recharger jusqu’à 3 batteries.
N° Désignation
1 Bouton de mode "Half-Power"
2 Prise de télécommande
3 Témoin
4 Micro switchs permettant de sélectionner la tension de
chargement et la limitation de durée (figure 8)
5 Borne “+“ (plus) batterie de démarrage (1 A d'intensité)
6 Borne “+“ (plus) batterie de service 1
7 Borne “+“ (plus) batterie de service 2
8 Borne “-“ (moins) des batteries
5 Réglages
5.1
Tension et temps de recharge
Des m
icros switchs
permettent de sélectionner la tension de chargement et la
durée de la phase de chargement principale.
Avertissement !
S'assurer que les switchs 1 et 2 ou les switchs 3 et 4 ne soient
jamais enclenchés simultanément pendant que le chargeur
fonctionne. Ne pas hésiter à suivre le tableau ci-dessous pour
garantir le bon fonctionnement du chargeur.
5.1.1 Réglages pour obtenir la tension de recharge
Cf. figure 8:
Tension
Switch 1
Switch 2 Domaine d'application
13,8 V
OFF OFF Batteries de démarrage ou
utilisation comme alimentation
12 V
14,4 V
ON OFF Batteries au plomb et batteries
GEL
14,8 V
OFF ON Batteries à électrolyte AGM
5.1.2 Réglages destinés à limiter la durée de la phase de chargement
principale
SMART CHARGE IUoU Chargers
30
Cf. figure 8:
Limitation de
durée de la
recharge
principale
Switch 3 Switch 4 Domaine d'application
4 h OFF ON Batteries au plomb ou batteries
de démarrage
8 h ON OFF Batteries à électrolyte AGM ou
batteries GEL
Pas de fonction
minuterie
OFF OFF Utilisation comme alimentation
12 V
5.2 Mode "Half Power"
En appuyant sur le bouton “Half Power Mode” (mi-puissance), le courant de sortie
diminuera à la moitié de l'ampérage nominal et un témoin LED vert “Half ON”
(mi-puissance enclenchée) s'allumera. Le témoin LED de mi-puissance se trouve
dans l'angle inférieur gauche de la façade avant.
6 Pose du chargeur de batteries
Pour poser le chargeur de batteries au mur ou sur des surfaces planes, voir figures
10 & 11 pour les dimensions du logement et l'emplacement des trous de fixation de
votre installation.
7 Etablissement des branchements
oDisposer le chargeur au sec, au frais, dans un espace propre et ventilé.
oPositionner l'interrupteur Marche/Arrêt sur “0” (Arrêt) et retirer la prise mâle
principale avant de brancher ou de débrancher l'alimentation en courant
continu.
oRelier le pôle “-“ (moins) de la batterie par un câble de liaison à la
borne ”-“ (moins) du chargeur automatique IUOU (voir figures 1 & 2).
oRelier le pôle “+“ (plus) de la batterie par un câble de liaison à la
borne ”+“ (plus) du chargeur automatique IUOU (voir figures 1 & 2).
oSerrer tous les câbles entre les batteries et le chargeur automatique IUOU
(cf. figure 6)
oSertir les extrémités de câbles avec les cosses fournies (cf. figure 5).
oPour raccorder des batteries de démarrage, relier la borne comme indiqué
sur notre schéma (voir figure 7).
o
Vérifier la bonne polarité de la batterie et du chargeur de batteries ;
sinon le fusible interne sera détruit par l’inversion de polarité.
Remarque
Ne prendre que des câbles présentant une section suffisante pour raccorder le
chargeur IUOU automatique à la batterie.
SMART CHARGE IUoU Chargers
31
Réf. modèle
Batterie d'alimentation
Batterie de démarrage
466094 6 à 10 mm²
AWG #12 à #10
1 à 2,5 mm²
AWG #16 à #14
466095 16 à 25 mm²
AWG #10 à #8
1 à 2,5 mm²
AWG #16 à #14
Alimentation par une tension de 230 volts :
Brancher la prise mâle à 230 V de tension de l'unité sur l'appareil à une prise
femelle reliée à la terre protégée par un disjoncteur différentiel.
8
Accessoires
8.1
Capteur de température
Le capteur de température mesure la température de la batterie ou
l'environnement au voisinage de la batterie et transfère les données vers le
chargeur automatique IUOU. S'il y a écart de températures, la tension de
chargement augmente et diminue en conséquence.
o
Poser les câbles entre les batteries et le chargeur automatique IUOU.
o
Relier le capteur de température au dos du chargeur automatique IUOU
en passant par la prise femelle.
o
Fixer la tête du capteur directement sur la batterie. Prendre par ex. un
ruban adhésif double face pour fixer le capteur en haut de la batterie ou
au voisinage de la batterie (voir figure 9).
oFaire passer le chargeur automatique IU0U sur “OFF“ ("ARRET"), puis à
nouveau sur “ON“ ("MARCHE") pour activer le capteur de température.
8.2
Télécommande
La télécommande peut mettre le chargeur en MARCHE et à l'ARRET et être utilisée
pour effectuer un contrôle de fonctionnement.
Remarque
Fixer la télécommande dans un endroit bien accessible pour faciliter l'accès au
chargeur automatique IUOU.
Attention !
Faire attention, en fixant la télécommande : les câblages électriques,
câbles et autres éléments situés à portée de l'ensemble risquent d'être
détériorés au cours du processus !
oPrévoir environ 5,00 cm de largeur, 5,50 cm de hauteur et 2,30 cm de
profondeur par l'accueil de la télécommande.
oRelier la télécommande au chargeur automatique IUOU. Le câble de liaison
SMART CHARGE IUoU Chargers
32
est équipé de deux prises mâles modulaires identiques.
oIntroduire la télécommande dans l'ouverture ainsi créée. Fixer la
télécommande au moyen de vis aux bords haut et bas de la façade avant ;
utiliser les forets existants.
Remarque
Mettre l'interrupteur Marche/Arrêt de l'appareil sur MARCHE ; on peut alors
mettre l'appareil en MARCHE et à l'ARRET grâce à la télécommande.
9
Utilisation du chargeur
9.1 Utilisation normale
Le chargeur automatique IUOU vous permet soit de recharger les batteries, soit
d'apporter aux batteries chargées une charge d'entretien.
Mettre l'appareil sous tension à l'aide de l'interrupteur Marche/Arrêt situé à l'arrière de
l'appareil.
9.2 Utilisation de la télécommande
L'interrupteur Marche/Arrêt situé au dos de l'appareil doit être mis sur "I" ; on peut
alors mettre le chargeur en MARCHE et à l'ARRET grâce à la télécommande.
Appuyer sur la touche “MARCHE/ARRET” de la télécommande pour mettre l'appareil
en marche ou à l'arrêt.
9.3 Caractéristique de charge
La caractéristique de charge est généralement désignée comme une caractéristique
IUOU modifiée.
Attention !
La capacité maximale de la batterie ne devra pas dépasser la capacité
spécifiée ; sinon, cela risque d'influer sur les fonctions des différentes
phases de chargement.

SMART CHARGE IUoU Chargers
33
9.3.1 Phase I (charge rapide)
Dans la première phase du processus de charge, la batterie déchargée se
recharge à intensité constante jusqu'à ce que la tension de batterie atteigne
13,8 V. Lorsque la batterie arrive à cette tension, le courant de charge diminue
progressivement. Lorsque le courant descend jusqu'à 80%, le chargeur passe
à la tension de charge supérieure de 14,4 V / 14,8 V.
Remarque : on peut sélectionner la tension de charge en utilisant les micro
switchs (§ 5.1.1).
9.3.2 Phase U0 (charge principale)
Cette phase de charge principale est limitée au maximum à 4/8 heures et
l'intensité remonte jusqu'à sa valeur maximale. L'intensité reste constante tant
que la tension de la batterie est au-dessous de 14,4 V/14,8 V.
Une fois arrivée à la tension maximale, elle reste constante. En revanche,
l'intensité redescend. À l'intérieur de cette phase de recharge principale, limitée
à 4/8 heures, la batterie est rechargée à fond.
Remarque : on peut sélectionner la tension de charge en utilisant les micros
switchs (§ 5.1.2).
9.3.3 Phase U (floating)
Si l'intensité du courant descend à une valeur inférieure ou égale à 10% du
courant nominal ou si la limite de durée de 4/8 heures est dépassée, le
chargeur passe en recharge économique (13,8 V).
Remarque
Les batteries peuvent être rechargées séparément si les chargeurs présentent
des branchements à double charge ou à triple charge. Les sorties sont
séparées à l'intérieur par des diodes ; la batterie la plus faible est ainsi toujours
remontée en premier au niveau de la batterie la moins déchargée.
SMART CHARGE IUoU Chargers
34
Sonde de température
On peut brancher un capteur de température pour offrir le fonctionnement optimum
en charge. Les tensions de chargement sont adaptées à la température de la batterie.
9.4
Contrôle de bon fonctionnement
Phases de chargement
Le témoin LED situé à l'avant de l'appareil peut servir à vérifier l'état du
processus de recharge.
Remarque :
La télécommande en option peut aussi servir à vérifier l'état du processus de
recharge. Les témoins LED de la télécommande signalent les différentes phases
de recharge en fonction de leurs couleurs respectives.
LED
Phase de charge
Etat de charge de la batterie
rouge
Phase I
entre 10% et 50%
jaune
Phase U0
entre 50% et 90%
vert
Phase U
plus de 90%

SMART CHARGE IUoU Chargers
35
10 Diagnostics/Dépannage
Après avoir branché et rechargé la batterie, la tension
n'augmente pas.
Si possible, vérifier avec un multimètre adapté pendant la recharge si la
tension aux bornes de la batterie augmente.
Vérifier les connections au chargeur et aux bornes de la batterie.
Contrôler l’état des câbles
Si nécessaire, nettoyer les pôles de la batterie pour assurer une meilleure
liaison.
Au bout d'env. 20 heures de temps de recharge, la batterie
n'est toujours pas à pleine charge.
Couper le courant alimentant l'IUOU automatique.
Retirer la batterie des bornes de recharge et attendre quelques minutes.
Ensuite, mesurer la tension aux bornes de la batterie avec un multimètre.
Si le multimètre affiche une tension inférieure ou égale à 10 V, c'est le
signe que la batterie est défectueuse et ne se recharge plus.
La batterie se décharge après une courte période de
non-utilisation.
Mesurer la tension aux bornes de la batterie avec un multimètre adapté.
Si le multimètre indique une tension inférieure à 12 V pour une batterie de
12 V, ou une tension inférieure à 24 V pour une batterie de 24 V, la
batterie est trop faible pour conserver la charge.
SMART CHARGE IUoU Chargers
36
11 Caractéristiques techniques
Réf. modèle
466095 466094
Branchement de la batterie
Deux sorties et plus de
1 A pour la batterie de
démarrage
Une sortie et plus de
1 A pour la batterie
de démarrage
Plage de tension d'entrée
207-253 V∼/ 50 – 60 Hz
Tension de fin de charge
14,4 V / 14,8 V
Tension de charge économique
13,8 V
Capacité maxi de la batterie
300 Ah 150 Ah
Limitation de phase U0
4 h ou 8 h
Courant de charge maxi
25 A 15 A
Température de fonctionnement
0°C - 50°C
Encombrement (mm)
240 x 77 x 310
200 x 60 x 260
Fusible
T4 A / 250 V
T2A / 250V
Poids
3,5 kg
2,4 kg
Protection
1. Dispositif de protection contre les
court-circuits
2. Protection contre les surintensités
3. Protection contre les polarités inverses
4. Protection contre les surtempératures
Les accessoires sont disponibles pour votre chargeur automatique IU0U :
o
télécommande (réf. modèle : 900-RC)
o
capteur de température (réf. modèle : TF-500)
Pour tous renseignements, n'hésitez pas à contacter votre revendeur.
SMART CHARGE IUoU Chargers
37
Certificats applicables au chargeur automatique IU0U
Références de compatibilité électromagnétique pour cette
gamme de produits :
EN 55014-1:1993 / EN55014-2: 1995
EN 61000-3-2:1995 / IEC 61000-3-2
EN 61000-3-3:1995 / IEC 61000-3-3
EN 61000-4-2:1995 / IEC 61000-4-2
EN 61000-4-4:1995 / IEC 61000-4-4
EN 61000-4-5:1995 / IEC 61000-4-5
EN 61000-4-6:1996 / IEC 61000-4-6
EN 61000-4-11:1995 / IEC 61000-4-11
Conformité à la Directive Basse Tension de cette gamme de
produits :
EN 60335-2-29:2004 associée à
EN 60335-1:2002 + A1:2004 + A11:2004 + A2:2006
+ A12:2006
Informations consommateurs
Groupe NARBONNE ACCESSOIRES
Z.I. de Plaisance
11100 NARBONNE (France)
Tél.: +33 (0)4 68 41 03 30
Site web : www.narbonneaccessoires.fr
SMART CHARGE IUoU Chargers
38

SMART CHARGE IUoU Chargers
39
SMART CHARGE
Cargadores multietapa IUOU
Ref.: 466094 – 15A
Ref.: 466095 – 25A
Manual del Usuario
Lea este manual cuidadosamente antes de instalar y utilizar este
dispositivo.
SMART CHARGE IUoU Chargers
40
Apreciado Cliente:
Gracias por adquirir nuestro cargador. Nuestra serie
de cargadores está diseñada para convertirse en su
mejor compañera durante sus viajes, acampadas,
excursiones marítimas, etc. Para obtener el máximo
rendimiento y durabilidad del aparato, deberá
instalarlo y utilizarlo adecuadamente, de acuerdo
con nuestros procedimientos de operación.
Le rogamos lea cuidadosamente el contenido de
este Manual y lo conserve como referencia futura.
Atentamente.
This manual suits for next models
1
Table of contents
Languages:


