inscabin W20A User manual

USER MANUAL
DAB RADIO W20A
PORTABLE WIRELESS SPEAKER

02
English
Important safety instructions 03
English operating instructions 04~09
French operating instructions 10~15
German operating instructions 16~21
Italian operating instructions 22~27
Spanish operating instructions 28~33
Dutch operating instructions 34~39
Russian operating instructions 40~45
Contents
03
English
WARNING: To reduce the risk of fire or electric shock, do not expose this apparatus to rain or moisture.
Thank you for purchasing this inscabin product. For generations, inscabin tries to provide powered speaker products
to satisfy the
need of our end customers, even the most demanding ones. This product can add to your home entertainment,
personal
computer, and mini home theater great sound performance. Please read this manual carefully to obtain the best of this
system.
Use only with the cart, stand, tripod, bracket, or table specified by the manufacturer, or sold with the
apparatus. When a cart is used, use caution when moving the cart/apparatus combination to avoid injury
from tip-over.
The lightning flash with arrowhead inside the triangle, is intended to alert the user to the presence
of uninsulated dangerous voltage within the product's enclosure that may be of a sufficient
magnitude to constitute a risk of electric shock.
The exclamation mark inside the triangle is intended to alert the user to the presence of
important operating and maintenance (servicing) instructions in the manual accompanying the
product.
To prevent the risk of electric shock, do not remove the cover (or back). No user-
serviceable Parts inside. Refer servicing to qualified Service personnel only.
1. Read these instructions.
2. Retain this manual.
3. Heed all warnings.
4. Follow all instructions.
5. Do not use this device in wet conditions.
6. Clean only with dry cloth.
7. Do not block any ventilation openings. Install in accordance to the manufacturer’s instructions.
8. Do not use near any heat sources such as radiators, heaters, stoves, or other devices (including amplifiers) that
produce heat.
9. Do not defeat the safety purpose of the polarized or grounding-type plug. A polarized plug has two blades with
one wider than the other. A grounding type plug has two blades and a third grounding prong. The wide blade or
the third prong are provided for your safety. If the provided plug does not fit into your outlet, consult an
electrician about the replacement.
10. Protect the power cord from being walked on or pinched particularly at plugs, convenience receptacles, and the
point connecting to the device.
11. Only use attachments/accessories specified by the manufacturer.
12. Unplug this device during lightning storms or when unused for long periods of time.
13. Refer all servicing to qualified service personnel.
14. The MAINS plug is used to disconnect the device. The disconnected device will remain in standby.
Correct Disposal of this product. This marking indicates that this product should not be disposed with other
household wastes throughout the EU. To prevent possible harm to the environment or human health from
uncontrolled waste disposal, recycle it responsibly to promote the sustainable reuse of material resources.
To return your used device, please use the return and collection systems or contact the retailerwhere the
product was purchased. They can take this product for environmental safe recycling.
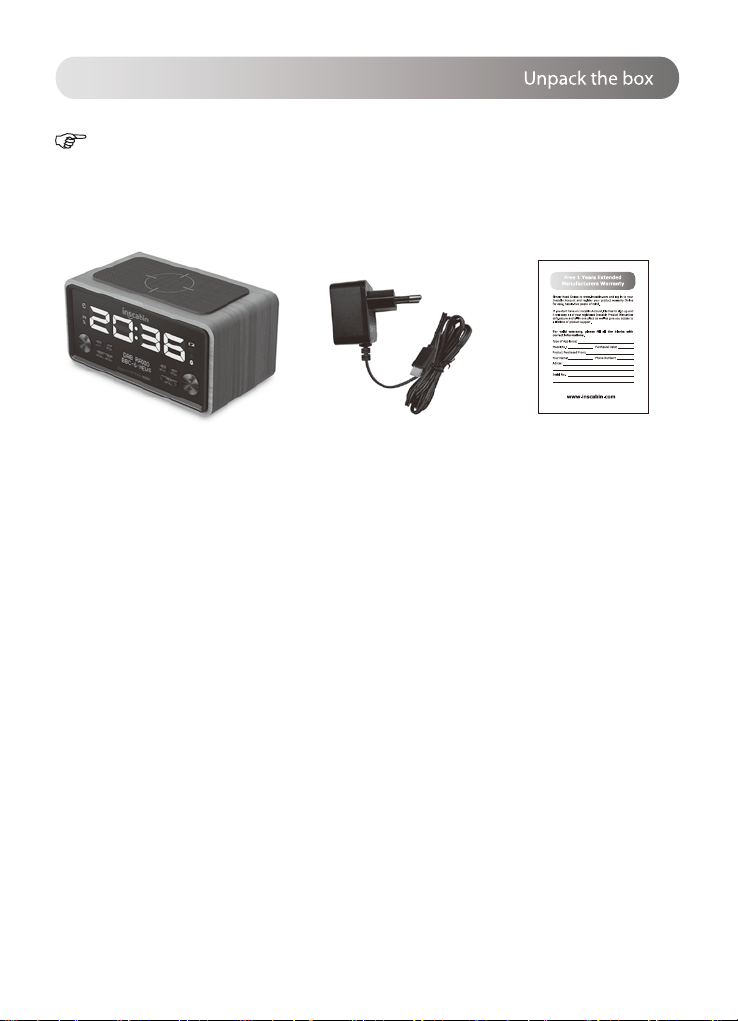
DAB Radio
04
English
Specifications
Function description
Packing List
Warranty Card
Charge lnstructions:
Use supplied AC adaptor (5V/2.5A) to connect the device with electrical socket to supply power.
Adaptor
● Audio output power: RMS 3W
● Signal to noise ratio: ≥70dBA
● Distortion: ≤ 1%
● Frequency response: 100HZ-18KHZ
● Audio input interface: DAB, FM, Bluetooth
● Adjustment form: Button
● Speaker: 53mm external magnetic (4 ohm 3W)
● Wireless charging output: 5W
● Input power: DC 5V/2.5A
● DAB receiving input sensitivity: -97dBm
● FM receiving input sensitivity: -105dBm
● Working environment temperature: -10ºC ~ 50 ºC
● Storage temperature: -20ºC ~ 70 ºC
● Product size: 166*95*92 mm
● Product Net weight: about 520g
● This product is a comprehensive digital alarm clock radio device, integrating DAB, FM, Bluetooth, and
Wireless charging.
● Supports Band III DAB/DAB+ digital signal reception
● Supports Band II 87.5-108 MHz FM reception with RDS function
● Supports 5.0 standard Bluetooth version
● With big LED display and small LCD display
● With real-time clock function and automatic time update through DAB
● Two sets of alarm clock function with optional DAB/FM/Buzzer alarm sound source
● Built-in Wireless Charging pad is compatible with all Qi-enabled phones.
● Supports multi-language (Nine languages) system operation

05
English
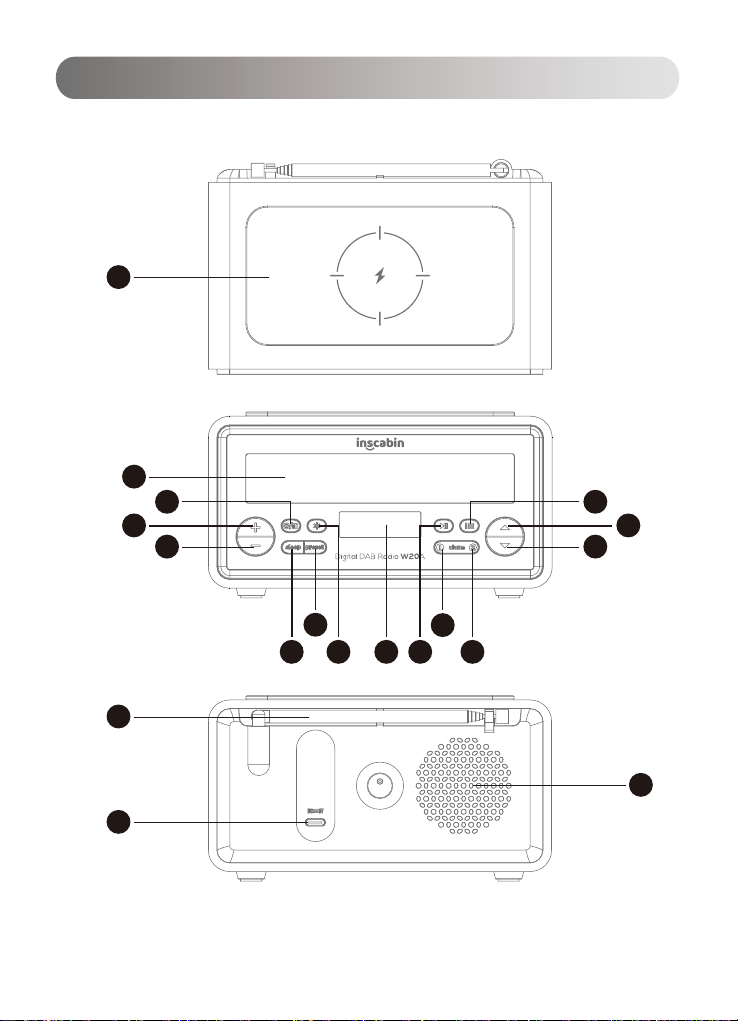
Product View
Product View
1
16
18
17
2
4
5
6 8 9
7
3
10 12
13
14
15
11

06
English
Wireless charging pad
LED display
Mode / Standby button
Short press -- Switch between DAB/FM/Bluetooth modes.
Long press to enter standby mode, then short press to exit standby mode.
Long press to enter standby mode, then long press again to power off the device.
VOL+
VOL-
Sleep button
Long press -- Enter Sleep timer set up interface
PRESET button
DAB/FM mode: Short press -- Recall preset radio station list.
Long press -- Add current radio station to preset radio list
Lum button
Short press -- Adjust the display brightness Level : Low / Medium / High
Small LCD display
Play/Pause button
DAB/FM mode: Long press -- Automatic searching radio stations.
Bluetooth mode: Short press -- Play/Pause
Menu set up: Short press -- Enter/Confirm
Alarm 1 button
Short press -- Turn on/off Alarm 1
Long press -- Enter Alarm 1 set up interface
Alarm 2 button
Short press -- Turn on/off Alarm 2
Long press -- Enter Alarm 2 set up interface
Menu.Info button
Short press -- Show DAB information
Long press -- Enter menu set up
Previous button
Next button
Antenna
Charging port
Speaker
01
02
03
04
06
05
07
09
08
10
11
12
13
14
15
16
17
18
Product View

English
07
lnstruction
Power ON/OFF
Use supplied AC adaptor (5V/2.5A) to connect the device with electrical socket to supply power.
Wireless charging Pad (Power supply by AC adaptor)
Inscabin with wireless charging features a Qi charging pad on the top that allows you to charge Qi enabled
phones wirelessly. Just put your phone on the top, it will give you a full charged phone when you wake up in
the morning.
Clock Radio Power ON/OFF
After connecting the power, Roxel Nod is powered on.
Long press the Mode/Standby button to enter Standby mode, then short press the Mode/Standby button to exit
Standby mode.
Long press the Mode/Standby button to enter Standby mode, then long press the Mode/Standby button again
to power off.
DAB Radio
1. Upon being powered on, the device will go to DAB mode automatically and will start searching for available
DAB stations, which will be stored after the search is completed. (If the device has already searched for
radio stations, you can also press and hold the Play/Pause button to perform automatic searching.)
2. Press the Prev/ Next button to select your desired DAB station(see small screen), then press the Play/Pause
button to play. Press the Vol-/Vol+ button to adjust volume.
3. Short press the Menu.Info button to view the current station information(see small screen): text information,
signal strength, program type, episode name, channel number/frequency, signal error rate, bit rate, time and
date, etc.
4. Saving stations into preset mode:
(1) Long press Play/Pause button ( if a full scan was previously done please move to step 2)
(2) Find the radio station by pressing the Prev/Next button.
(3) Select the channel you want to save, and press the Play/Pause button to enter.
(4) Press and hold the Preset button for 3 seconds.
(5) Pick one of the available (Empty) slots from the preset store screen(see small screen).
(6) Press the Play/Pause button to save the channel
5. Short press the Preset button to recall preset radio list. Press the Prev/ Next button to select DAB station,
then press the Play/Pause button to play.
Note: Please press the Preset button to access your preset radio stations in DAB mode, otherwise the stations
will display in automatically set order.

English
08
lnstruction
FM Radio
1. Press the Mode/Standby button to switch to FM mode.
2. Press and hold the Play/Pause button for 2~3 seconds to start automatic searching for FM radio channels.
Available channels will be stored after the search is completed.
Scan Setting: Press and hold the Menu.Info button for 2~3 seconds to enter menu set up(see small screen).
Press the Prev/Next button to select “Scan Setting”, press the Play/Pause button to confirm and enter. Press
the Prev/Next button to select All stations / Strong stations, and press the Play/Pause button to confirm. If
select All stations, all available channels will be stored after the search is completed. If select Strong stations,
only strong signal radio stations will be stored after the search is completed.
3. Press the Preset button to go to the Radio station list, then press the Prev/Next button to select the desired
station and press the Play/Pause button to play. Press the Vol-/Vol+ button to adjust volume.
4. Short press the Prev/Next button to adjust radio frequency by 0.05MHz at a time.
Long press the Prev/Next button for 3 seconds to start automatic searching for previous/next radio station.
5. Long press the Preset button to add current radio station to the radio list, press the Prev/Next button to
select list number you want to use, then press the Play/Pause button to confirm.
Bluetooth music play
1. Press the Mode/Standby button to switch to BT mode.
2. To use your Bluetooth enabled device, make sure the Bluetooth function is enabled, then search for “ DAB
W20 ” on the list and click on it to connect.
3. Play music or any audio files from your Bluetooth enabled device. Press the Prev/Next button to go to
previous/next track, press the Vol+/Vol- button to adjustvolume.
4. Press the Play/Pause button to play/pause music.
5. Long press the Play/Pause button to disconnect Bluetooth.
System Set up
Press and hold the Menu.Info button for 2~3 seconds to enter menu set up(see small screen). Press the
Prev/Next button to select sub-menu items, press the Play/Pause button to confirm and enter. If there is only
one sub-menu, press the Play/Pause button to confirm and enter. During operation, press the Menu.Info button
to return.
Time and Date Set up
A- In DAB radio mode, if DAB signal can be searched, the device will automatically setthe local time.
B- Manual Time Set up : Press and hold the Menu.Info button for 2~3 seconds to enter menu set up(see small
screen). Press the Prev/Next button to select <System>, then press the Play/Pause button to confirm and
enter System set up. Press the Prev/ Next button to select <Time/Date>, Press the Play/Pause button to
enter date and time set up interface, press the Prev/Next button to select <Set Time /Date>/<Set Hour
System>/<Set Date Format>/<Auto Update>.
1. Set Time /Date: Press the Play/Pause button to enter Time/Date set up: Date - Month - Year - Hour - Minute.
( press the Prev/Next button to select the numbers and press the Play/Pause button to confirm.)
2. Set Hour System: Press the Play/Pause button to enter 24h/12h set up, press the Prev/Next button to select,
and press the Play/Pause button to confirm.
3. Set Date Format: Press the Play/Pause button to enter Date Format setting, press the Prev/Next button to
select, and press the Play/Pause button to confirm.

English
09
lnstruction
Alarm clock Set up
This device can set 2 sets alarms.
1. Press and hold Alarm1 button to enter Alarm 1 set up interface (see small screen).
Press and hold Alarm2 button to enter Alarm 2 set up interface (see small screen)
2. Alarm set up: Alarm time - Alarm source - Repeat -Alarm volume - Alarm duration.
( Press the Prev/Next button to select, press the Play/Pause button to confirm and go to next. )
Alarm sound source: Buzzer / FM / DAB
Repeat: Once / Daily / Weekends / Workday
Alarm volume: Press the Prev/Next button to adjust the alarm volume.
Alarm duration: 15 Minutes / 30 Minutes / ... / 2 Hours
3. Press the Menu.Info button to return/exit Alarm set up.
Press Alarm1 button to turn on/off Alarm 1 .
Press Alarm 2 button to turn on/off Alarm 2 .
4. When alarm clock rings, press the Play/Pause or Sleep button to activate the snooze function. After 5 min ,
the alarm will rings again, press the Mode/Standby or Aarm1 /Alarm2 button to stop alarm.
Display Brightness Adjustment
Press the Lum button to adjust display brightness Level : Low / Medium / High
Sleep Timer
1. Long press the Sleep button to enter sleep timer set up interface (see small screen).
2. Press the Prev/Next button to select Sleep 15 minutes / …/ Sleep 1 Hour 30 minutes/ Sleep OFF. .
3. Press the Play/Pause button to confirm sleep timer setting.
4. The device will goes to standby mode after 15 minutes / 30 minutes/ …/ 2 Hours.
( if you select "OFF" and then press the Play/Pause button, sleep timer will be turned off ).

10
Français
Caractéristiques
Description de la fonction
Liste de colisage
Instructions de charge:
Utilisez l'alimentation fournie (5V / 2.5A) pour connecter le dispositif d'inscabine à la base électrique pour
fournir de l'électricité.
Déballer la boîte
Radio DAB Carte de garantie
adaptateur
● Ce produit est une radio numérique complète avec DAB, FM, Bluetooth et charge sans fil.
● Soutient le volume III DAB / DAB + réception du signal numérique
● prend en charge le volume II 87,5-108 MHz FM Reception avec fonction RDS
● Prend en charge la version Bluetooth standard 5.0
● Avec un grand écran LED et un petit écran LCD
● Avec la fonction de montre en temps réel et la mise à jour du temps automatique via DAB
● Deux ensembles de fonction d'alarme avec une source sonore DAB / FM / Summer en option
● Le bain de charge sans fil intégré est compatible avec tous les téléphones compatibles QI.
● Prend en charge le fonctionnement du système multipakers (Neuf langues)
● Performances de sortie audio: RMS 3W
● Ratio de ruée vers le signal: ≥70DBA
● Perturbation: ≤ 1%
● Réponse en fréquence: 100 Hz-18KHz
● Interface d'entrée audio: DAB, FM, Bluetooth
● Formulaire d'adaptation: bouton
● Haut-parleur: magnétique externe de 53 mm
( 4 ohms 3W )
● Édition de charge sans fil: 5W
● Performances d'entrée: DC 5V / 2.5A
● DAB reçoit la sensibilité à l'entrée: -97dbm
● FM Recevoir Sensibilité à l'entrée: -105 DBM
● Travailler la température environnementale: -10ºC ~
50 ºC
● Température de stockage: -20ºC ~ 70 ºC
● Taille du produit: 166 * 95 * 92 mm
● Poids net du produit: environ 520 g

11
Français
Vue de face du produit
1
16
18
17
2
4
5
6 8 9
7
3
10 12
13
14
15
11

12
Français
Oreiller de charge sans fil
Affichage LED
Clé Modus / Sembalby
Brève impression - Commutation entre les modes DAB / FM / Bluetooth.
En appuyant sur une longueur pour entrer en mode veille, puis appuyez brièvement pour
mettre fin au mode de veille.
Appuyez sur une longue appuye pour entrer en mode veille, puis appuyez à nouveau sur pour
faire fonctionner l'appareil.
Vol +
Vol-
Bouton de sommeil
Appuyez sur Long - Entrez la minuterie de sommeil, configurez l'interface
Par défaut
Mode DAB / FM: Press courte - facture de Preinschaffradio Strion.
Appuyez sur Long - Ajoutez la station de radio actuelle à la liste des radiolistes prédéfinis
Clé LUM
Brève pression - Ajustez le niveau de luminosité de l'écran: faible / moyen / élevé
Petit écran LCD
Bouton Play / Pause
Mode DAB / FM: Long Press - Stations radio de recherche automatique.
Mode Bluetooth: Impression courte - jeu / pause
Menu des paramètres
Bouton d'alarme 1
Impression courte - allumez / o • alarme 1
Appuyez à longue - Entrez l'alarme 1 qui configure l'interface
Bouton d'alarme 2
Impression courte - allumez / o • Alarme 2
Appuyez sur Long - Entrez l'alarme 2 qui configure l'interface
Menu.info Key
Presse courte - Afficher les informations DAB
Appuyez sur Long - Configurez le menu
Bouton précédent
Bouton Suivant
Antenne
Ladeport
Président
01
02
03
04
06
05
07
09
08
10
11
12
13
14
15
16
17
18
Vue de face du produit

Français
13
lnstruction
Allumer Eteindre
Utilisez l'alimentation fournie (5 v / 2.5a) pour connecter le dispositif d'inscabine à la base électrique pour
fournir de l'électricité.
Baignoire de chargement WLAN (alimentation selon l'adaptateur NAS)
L'inscabine avec des processus de charge sans fil a un coussin de chargement Qi en haut avec lequel vous
pouvez charger sans fil des téléphones à Qi. Mettez simplement votre téléphone sur le dessus. Lorsque vous
vous réveillez le matin, vous recevrez un téléphone entièrement chargé.
Radio Wheel Power / Off
Après avoir connecté les performances, l'inscabine est alimentée.
Pendant longtemps, appuyez sur le bouton MODE / SEMBLY pour entrer le mode de veille, puis appuyez sur le
bouton Mode / Sticky pour terminer le mode de veille.
Appuyez sur le bouton MODE / SOURTION pour entrer en mode veille, puis appuyez à nouveau sur le bouton
Mode / Sembly pour blâmer O.
Radio DAB
1. Après avoir activé, l'appareil s'applique automatiquement au mode DAB et commence à rechercher des
stations DAB disponibles qui sont enregistrées après la recherche. (Si l'appareil a déjà recherché des stations
de radio, vous pouvez également maintenir le bouton play / pause pour effectuer la recherche automatique.)
2. Appuyez sur le bouton avant / Suivant pour sélectionner la station DAB souhaitée (voir petit écran) et
appuyez sur la touche pour jouer / casser pour le jouer. Appuyez sur le bouton Vol / Vol + pour définir le
volume.
3. En bref, appuyez sur la touche menu.info pour afficher les informations actuelles de l'émetteur (voir petit
écran): informations de texte, force du signal, type de programme, nom d'épisode, numéro de canal /
fréquence, erreur de signal, débit binaire, temps et date, etc.
4. Enregistrer les stations en mode prédéfini:
(1) Bouton pour jouer à des jeux / pause (1) (Si un scan complet a été effectué précédemment, veuillez
passer à l'étape 2)
(2) Trouvez la station de radio en appuyant sur le bouton précédent / suivant.
(3) Sélectionnez le canal que vous souhaitez enregistrer et appuyez sur le bouton Play / Break pour y entrer.
(4) Appuyez sur le bouton prédéfini pendant 3 secondes.
(5) Sélectionnez l'un des emplacements disponibles (vides) sur l'écran prédéfini (voir petit écran).
(6) Appuyez sur le bouton Play / Break pour enregistrer le canal
5. En bref, appuyez sur le bouton prédéfini pour accéder à la liste de radio prédéfini. Appuyez sur le bouton
devant le bouton / Suivant pour sélectionner la station DAB, puis appuyez sur le bouton Play / Pause pour le
lire.
Remarque: veuillez appuyer sur le paramètre par défaut pour accéder à vos stations radio prédéfinies en mode
DAB. Sinon, les stations sont automatiquement affichées dans l'ordre.

Français
14
lnstruction
Radio FM
1. Appuyez sur le bouton MODE / SEMBLY pour passer en mode FM.
2. Maintenez le bouton Play / Pause pendant 2 à 3 secondes pour démarrer la recherche automatique des
radiochanaux FM. Les canaux disponibles sont enregistrés après avoir terminé la recherche.
Paramètre de numérisation: appuyez sur la touche menu.info pendant 2 ~ 3 secondes pour définir le menu
(voir petit écran). Appuyez sur le bouton devant le bouton / Suivant pour sélectionner le réglage "Scan
Setting". Appuyez sur le bouton Play and Break pour confirmer et entrer. Appuyez sur le bouton Précédent /
Suivant pour sélectionner toutes les stations / stations fortes et appuyez sur le bouton Play / Pause pour
confirmer. Si vous sélectionnez toutes les stations, tous les canaux disponibles seront enregistrés après avoir
terminé la recherche. Si vous sélectionnez des stations solides, seules les stations de radio de signal solides
seront enregistrées après avoir terminé la recherche.
3. Appuyez sur le bouton Préréglage pour accéder à la liste des stations radio, puis appuyez sur le bouton
Advance / Suivant pour sélectionner la station souhaitée et appuyez sur le bouton Play / Pause pour le lire.
Appuyez sur le bouton Vol / Vol + pour définir le volume.
4. Appuyez sur le bouton précédent / Suivant pour régler la fréquence radio de 0,05 MHz. Pendant longtemps,
appuyez sur le bouton précédent / Suivant le bouton pendant 3 secondes pour démarrer la recherche
automatique de la station de radio précédente / suivante.
5. Appuyez sur le bouton préréglé pour ajouter la station de radio actuelle à la liste radio. Appuyez sur le
bouton Advance / Suivant pour sélectionner le numéro de liste que vous avez utilisé, puis appuyez sur le
bouton Play and Break pour confirmer.
Jouer de la musique bluetooth
1. Appuyez sur le bouton MODE / SEMBLY pour passer en mode BT.
2. Pour utiliser votre appareil compatible Bluetooth, assurez-vous que la fonction Bluetooth est activée et
recherchez " DAB W20 " dans la liste et cliquez dessus pour se connecter.
3. Jouez des films de musique ou audio de votre appareil compatible Bluetooth. Appuyez sur le bouton
précédent / Suivant pour accéder à la piste précédente / suivante et appuyez sur le bouton Vol + / Vol pour
définir le volume.
4. Appuyez sur le bouton Play / Pause pour jouer de la musique / pause.
5. Appuyez sur le bouton Play / Pause longtemps pour séparer Bluetooth.
Configuration du système
Gardez le bouton menu.info pendant 2 ~ 3 secondes pour entrer le menu (voir petit écran). Appuyez sur le
bouton devant le bouton / Suivant pour sélectionner les éléments sous-menus, appuyez sur le bouton Play and
Break pour confirmer et entrer. S'il n'y a qu'un seul sous-menu, appuyez sur le bouton Play / Pause pour
confirmer et entrez. Appuyez sur le bouton Menu.info pendant l'opération à retourner.

Français
15
lnstruction
L'heure et la date sont configurées
A- En mode radio DAB, l'appareil utilise automatiquement l'heure locale.
B- Temps manuel Configuration: Appuyez sur le bouton Menu.info pendant 2 ~ 3 secondes pour entrer dans le
menu (voir petit écran). Appuyez sur le bouton devant le bouton / Suivant pour sélectionner <System>.
Ensuite, appuyez sur le bouton Play and Break pour confirmer et entrez le système. Appuyez sur le bouton
devant le bouton / Suivant pour sélectionner <Heure / Date>, appuyez sur le bouton Play Slabs / Pause pour
saisir la date et l'interface de définition d'heure. Appuyez sur le bouton avant / Suivant <Set Date Format> /
<Aut Updated>.
1. Heure de poisson / date: appuyez sur le bouton Play / Break pour saisir l'heure / date: Date - Mois - Année -
Hour - Minute. (Appuyez sur le bouton précédent / Suivant pour sélectionner les numéros et appuyez sur la
touche pour les jeux / Break pour le confirmer.)
2. Hour de l'ensemble du système: Appuyez sur le jeu en jeu / pause pour configurer à 24h / 12h, appuyez sur
le bouton avant / Suivant pour le sélectionner et appuyez sur la touche pour jouer / faire une pause pour le
confirmer.
3. Définissez le format de date: appuyez sur le jeu pour jouer / casser pour saisir la datation du format de date,
appuyez sur le bouton PREV / Suivant pour appuyer sur le bouton pour les jeux et casser pour confirmer.
Réveil meublé
Cet appareil peut définir 2 alarmes.
1. Maintenez le bouton d'alarme pour saisir l'alarme 1 (voir petit écran). Maintenez le bouton d'alarme pour
définir l'interface Alarm 2 (voir petit écran).
2. ème alarme Configuration: Temps d'alarme - Source d'alarme - Répéter le volume d'alarme - Durée de
l'alarme. (Appuyez sur le bouton précédent / Suivant pour sélectionner, appuyez sur le bouton Play / Pause
pour confirmer et allez avec le suivant.)
Source sonore d'alarme: été / fm / dab
Répéter: une fois / jour / week-end / jour de travail
Volume d'alarme: appuyez sur le bouton Advance / Suivant pour adapter le volume d'alarme.
Durée d'alarme: 15 minutes / 30 minutes / ... / 2 heures
3. Appuyez sur la touche menu.info pour définir l'alarme. Appuyez sur le bouton d'alarme pour éteindre l'alarme
de l'interruption sur / o 2.
4. Lorsque le réveil sonne, appuyez sur le bouton Play / Pause ou Sleep pour activer la fonction de répétition.
Après 5 minutes, l'alarme sonne à nouveau, appuyez sur le mode / veille ou Un bouton bras / alarme pour
arrêter l'alarme.
Ajustement de la luminosité de la montre
Appuyez sur le bouton LUM pour adapter le niveau de luminosité de l'écran: faible / moyen / haut
Dormeur
1. Appuyez sur le bouton de sommeil pour configurer l'interface de la minuterie de sommeil (voir petit écran).
2. Appuyez sur le bouton précédent / Suivant pour choisir votre sommeil 15 minutes / ... / Dormez pendant 1
heure 30 minutes / sommeil. .
3. Appuyez sur le bouton Play / Pause pour confirmer le réglage des dormeurs.
4. L'appareil passe en mode veille après 15 minutes / 30 minutes /… / 2 heures. (Si vous sélectionnez "AUS"
puis appuyez sur le bouton pour les jeux / pause, la minuterie de sommeil est retourné).

16
Deutsch
Packliste
Gebührenanweisungen:
Packen Sie die Box aus
DAB Radio
Spezifikationen
Bedienungsanleitung
Garantiekarte
Adapter
● Dieses Produkt ist ein umfassendes digitales Rundfunkgerät mit DAB, FM, Bluetooth und drahtloses Ladung.
● Unterstützt Band III DAB/DAB+ Digital Signalempfang
● Unterstützt Band II 87.5-108 MHz FM-Empfang mit RDS-Funktion
● Unterstützt 5.0 Standard -Bluetooth -Version
● Mit großem LED -Display und kleinem LCD -Display
● Mit Echtzeituhrfunktion und automatischer Zeit-Update über DAB
● Zwei Sätze der Weckerfunktion mit optionalem DAB/FM/Summer Alarm Sound Quelle
● Das integrierte drahtlose Ladebad ist mit allen Qi-fähigen Telefonen kompatibel.
● Unterstützt Multisprachler (Neun Sprachen) Systembetrieb
● Audioausgangsleistung: RMS 3W
● Signal -Rausch -Verhältnis: ≥70DBA
● Verzerrung: ≤ 1%
● Frequenzgang: 100 Hz-18kHz
● Audio -Eingangsschnittstelle: DAB, FM, Bluetooth
● Anpassungsformular: Taste
● Lautsprecher: 53 mm externer Magnet (4 Ohm 3 W )
● drahtlose Ladeausgabe: 5W
● Eingangsleistung: DC 5V/2.5a
● DAB empfangen Eingangsempfindlichkeit: -97dbm
● FM empfangen Eingangsempfindlichkeit: -105 dbm
● Arbeitsumgebungstemperatur: -10ºC ~ 50 ºC
● Lagertemperatur: -20ºC ~ 70 ºC
● Produktgröße: 166*95*92 mm
● Produktnettogewicht: ca. 520 g
Verwenden Sie den mitgelieferten Netzteil (5V/2.5A), um das Gerät Inscabin mit elektrischer Sockel zu
verbinden, um Strom zu liefern.
17
Deutsch
Produktvorderansicht
1
16
18
17
2
4
5
6 8 9
7
3
10 12
13
14
15
11

18
Deutsch
Drahtloses Ladekissen
LED -Anzeige
Modus- / Standby -Taste
Kurzdruck - Wechseln Sie zwischen DAB/FM/Bluetooth -Modi.
Langes Drücken, um den Standby -Modus einzugeben, und dann kurz drücken, um den
Standby -Modus zu beenden.
Langes Drücken, um den Standby -Modus einzugeben, und dann erneut drücken Sie erneut,
um das Gerät zu betreiben.
Vol+
Vol-
Schlafknopf
Lange Press - Geben Sie die Sleep Timer ein, die Schnittstelle einrichten
Voreinstellung
DAB/FM -Modus: Short Press - RECHNUNG PREINSCHAFTRADIO STARTION.
Lange Drücken - Fügen Sie den aktuellen Radiosender zur voreingestellten Radioliste hinzu
Lum -Taste
Kurzdruck - Passen Sie den Helligkeitsniveau der Anzeige an: niedrig / mittel / hoch
kleines LCD -Display
Taste spielen/pausieren
DAB/FM -Modus: Langes Drücken - Automatische Suchfunkstationen.
Bluetooth -Modus: Kurzdruck - Spiel/Pause
Menü einrichten
Alarm 1 Taste
Kurzdruck - Turn on/off Alarm 1
Langes Drücken - Geben Sie Alarm 1 ein, die die Schnittstelle einrichten
Alarm 2 Taste
Kurzdruck - Turn on/off Alarm 2
Langes Drücken - Geben Sie Alarm 2 ein, die die Schnittstelle einrichten
Menü.info -Taste
Kurze Presse - Tupfinformationen anzeigen
Lange drücken - Einrichten des Menüs einrichten
Vorherige Schaltfläche
Nächste Schaltfläche
Antenne
Ladeport
Sprecher
01
02
03
04
06
05
07
09
08
10
11
12
13
14
15
16
17
18
Produktvorderansicht

19
Deutsch
Anweisung
Einschalten / Ausschalten
Verwenden Sie den mitgelieferten Netzteil (5 V/2.5a), um das Gerät Inscabin mit elektrischer Sockel zu
verbinden, um Strom zu liefern.
WLAN -Ladebad (Stromversorgung nach NAS -Adapter)
InScabin mit drahtloser Ladevorgänge verfügt über ein Qi -Ladepad oben, mit dem Sie QI -fähige Telefone
drahtlos aufladen können. Setzen Sie einfach Ihr Telefon auf die Spitze. Wenn Sie morgens aufwachen,
erhalten Sie ein vollständig aufgeladenes Telefon.
Radfunkkraft ein-/aus
Nach dem Anschließen der Leistung wird Inscabin angetrieben.
Lange drücken Sie die Modus-/Standby -Taste, um den Standby -Modus einzugeben, und drücken Sie dann den
Modus/Standby -Taste, um den Standby -Modus zu beenden.
Drücken Sie den Modus/Standby -Taste, um den Standby -Modus einzugeben, und drücken Sie dann die
Modus-/Standby -Taste erneut, power off .
DAB Radio
1. Nach dem Einschalten wird das Gerät automatisch in den DAB -Modus gilt und beginnt nach verfügbaren
DAB -Stationen zu suchen, die nach Abschluss der Suche gespeichert werden. (Wenn das Gerät bereits nach
Radiosendern gesucht hat, können Sie auch die Play/Pause -Taste gedrückt halten, um die automatische
Suche durchzuführen.)
2. Drücken Sie die Taste vor/ nächster, um die gewünschte DAB -Station auszuwählen (siehe kleiner Bildschirm)
und drücken Sie die Taste für Spielen/ Pause, um sie abzuspielen. Drücken Sie die Taste Vol-/Vol+, um die
Lautstärke einzustellen.
3. Kurz gesagt, drücken Sie das Menü.info -Taste, um die aktuellen Senderinformationen anzuzeigen (siehe
kleiner Bildschirm): Textinformationen, Signalstärke, Programmtyp, Episodenname, Kanalnummer/Frequenz,
Signalfehlerrate, Bitrate, Uhrzeit und Datum usw. .
4. Sparen Sie Stationen in den voreingestellten Modus:
(1) Taste zum Spielen von Spielen/Pause (1) (wenn zuvor ein vollständiger Scan durchgeführt wurde,
wechseln Sie bitte zu Schritt 2)
(2) Suchen Sie den Radiosender, indem Sie die vorherige/nächste Taste drücken.
(3) Wählen Sie den Kanal aus, den Sie speichern möchten, und drücken Sie die Taste für Spielen/Pause, um
sie einzugeben.
(4) Drücken Sie die voreingestellte Taste 3 Sekunden lang.
(5) Wählen Sie einen der verfügbaren (leeren) Slots auf dem Voreinstellungsbildschirm (siehe kleiner
Bildschirm).
(6) Drücken Sie die Taste für Spielen/Pause, um den Kanal zu speichern
5. Kurz gesagt, drücken Sie die voreingestellte Taste, um die voreingestellte Funkliste abzurufen. Drücken Sie
die Taste vor/ nächster Taste, um die DAB -Station auszuwählen, und drücken Sie dann die Taste Play/
Pause, um sie abzuspielen.
HINWEIS: Bitte drücken Sie die Voreinstellung, um im DAB -Modus auf Ihre voreingestellten Radiosender
zuzugreifen. Andernfalls werden die Stationen automatisch in der Reihenfolge angezeigt.

20
Deutsch
Anweisung
FM-Radio
1. Drücken Sie den Modus/Standby -Taste, um in den FM -Modus zu wechseln.
2. Halten Sie die Play/Pause -Taste für 2 bis 3 Sekunden gedrückt, um die automatische Suche nach FM
-Radiokanälen zu starten. Die verfügbaren Kanäle werden nach Abschluss der Suche gespeichert.
SCAN -Einstellung: Drücken Sie das Menü.info -Taste für 2 ~ 3 Sekunden, um das Menü einzustellen (siehe
kleiner Bildschirm). Drücken Sie die Taste vor/nächster Taste, um die Einstellung „Scan -Einstellung“
auszuwählen. Drücken Sie die Taste für Spielen und Pause, um zu bestätigen und einzugeben. Drücken Sie
die PREV/NEXT -Taste, um alle Stationen/starken Stationen auszuwählen, und drücken Sie die Play/Pause
-Taste, um zu bestätigen. Wenn Sie alle Stationen auswählen, werden alle verfügbaren Kanäle nach
Abschluss der Suche gespeichert. Wenn Sie starke Stationen auswählen, werden nach Abschluss der Suche
nur starke Signal -Radiosender gespeichert.
3. Drücken Sie die voreingestellte Taste, um zur Liste der Radiosender zu gelangen, und drücken Sie dann die
vorab/nächste Taste, um die gewünschte Station auszuwählen, und drücken Sie die Play/Pause -Taste, um
sie abzuspielen. Drücken Sie die Taste Vol-/Vol+, um die Lautstärke einzustellen.
4. Drücken Sie die vorherige/nächste Taste, um die Funkfrequenz jeweils um 0,05 MHz anzupassen. Lange
drücken Sie 3 Sekunden lang die vorherige Taste der Vor-/nächsten Taste, um die automatische Suche nach
dem vorherigen/nächsten Radiosender zu starten.
5. Drücken Sie die voreingestellte Taste, um der Radioliste den aktuellen Radiosender hinzuzufügen. Drücken
Sie die vorab/nächste Taste, um die von Ihnen gebrauchte Listennummer auszuwählen, und drücken Sie
dann die Taste für Spielen und Pause, um zu bestätigen.
Bluetooth -Musik spielen
1. Drücken Sie den Modus/Standby -Taste, um in den BT -Modus zu wechseln.
2. Um Ihr Bluetooth -fähiger Gerät zu verwenden, stellen Sie sicher, dass die Bluetooth -Funktion aktiviert ist,
und suchen Sie in der Liste nach „ DAB W20 “ und klicken Sie darauf, um eine Verbindung herzustellen.
3. Musik oder Audiofilme von Ihrem Bluetooth -fähigen Gerät abspielen. Drücken Sie die vorherige/nächste
Taste, um zum vorherigen/nächsten Track zu gehen, und drücken Sie die VOL+/VOL-Taste, um die
Lautstärke einzustellen.
4. Drücken Sie die Play/Pause -Taste, um Musik abzuspielen/pausieren.
5. Drücken Sie die Play/Pause -Taste lang, um Bluetooth zu trennen.
Systemkonfiguration
Halten Sie die Taste der Menü.info für 2 ~ 3 Sekunden gedrückt, um ein Einrichten des Menüs einzugeben
(siehe kleiner Bildschirm). Drücken Sie die Taste vor/nächster Taste, um Sub-Menus-Elemente auszuwählen,
drücken Sie die Taste für Spielen und Pause, um zu bestätigen und einzugeben. Wenn es nur einen Untermenü
gibt, drücken Sie die Play/Pause-Taste, um zu bestätigen und einzugeben. Drücken Sie während des Betriebs
die Taste der Menü.info, um zurückzukehren.
Table of contents
Languages:
Other inscabin Radio manuals


