inscabin P200 User manual

www.inscabin.com
Design by Locitech Group ( Hong Kong ) Limited
Assemble by Pingxiang Locitech Co., Ltd.
Made in China

Menu TreeMenu Tree
Menu Tree

DAB Radio Adapter Remote Control User Manual
● Power amplifier output power: 7W (8.0V 1KHZ sine wave, 0dB)
● Power amplifier signal-to-noise ratio: ≥75dBA
● Distortion: ≤1%
● Frequency response: 100HZ-18KHZ
● Audio input interface: DAB, FM, BT, USB, TF
● Adjustment form: button adjustment
● Speaker: 78mm external magnetic (4 ohm)
● Input power: 7.4V/1800mAh lithium ion battery
01
English 02
English
Specifications
Function description
Packing List
● Maximum input power: ≤6W
● USB/Micro SD maximum input sensitivity: 0dBm
● DAB receiving input sensitivity: -97dBm
● FM receiving input sensitivity: -105dBm
● Working environment temperature: -10ºC ~ 50 ºC
● Storage temperature: -20ºC ~ 70 ºC
● Product specifications: 156*90.5*184.5mm
● Net weight: about 995g
WARNING: To reduce the risk of fire or electric shock, do not expose this apparatus to rain or moisture.
Thank you for purchasing this inscabin product. For generations, inscabin tries to provide powered speaker products
to satisfy the
need of our end customers, even the most demanding ones. This product can add to your home entertainment,
personal
computer, and mini home theater great sound performance. Please read this manual carefully to obtain the best of this
system.
Charge lnstructions:
Connect the speaker (DC IN connector port on the rear panel)to the outlet
with the attached power adapter.Charge speaker for approximately 3~5hours before the first use.
The lightning flash with arrowhead inside
thetriangle, is intended to alert the user
to the presence of un-insulated dangerous
voltage within the product's enclosure
that may be of a sufficient magnitude to
constitute a risk of electric shock to persons.
To prevent the risk of electric shock, do not
remove cover (or back). No user-serviceable
Parts inside. Refer servicing to qualified
Service personnel only.
The exclamation point inside the triangle
is intended to alert the user to the presence
of important operating and maintenance
(servicing) instructions in the literature
accompanying the product.
1. Read these instructions. 2. Keep these instructions.
3. Heed all warnings. 4. Follow all instructions.
5. Do not use this apparatus near water. 6. Clean only with dry cloth.
7. Do not block any ventilation openings. Install in accordance with the manufacturer’s instructions.
8. Do not install near any heat sources such as radiators, heat registers, stoves, or other apparatus (including amplifiers) tha
produce heat.
9. Do not defeat the safety purpose of the polarized or grounding-type plug. A polarized plug has two blades with one wider tha
the other. A grounding type plug has two blades and a third grounding prong. The wide blade or the third prong are provided
for your safety. If the provided plug does not fit into your outlet, consult an electrician for replacement of the obsolete
10. Protect the power cord from being walked on or pinched particularly at plugs, convenience receptacles, and the point where
they exit from the apparatus.
11. Only use attachments/accessories specified by the manufacturer.
12. Unplug this apparatus during lightning storms or when unused for long periods of time.
13. Refer all servicing to qualified service personnel. Servicing is required when the apparatus has been damaged in any way, su
as power-supply cord or plug is damaged, liquid has been spilled or objects have fallen into the apparatus, the apparatus
been exposed to rain or moisture, does not operate normally, or has been dropped.
14. The MAINS plug or an appliance coupler is used as the disconnect device, the disconnect device shall remain readily operabl
Note:There is a built-in rechargeable lithium-ion battery in the speaker. Danger of explosion if disassemble the speaker. The speak
shall not be placed close to excessive heat such as fire or the like.
The battery shall not be exposed to excessive heat such as sunshine, fire or the like. Danger of explosion if the ba
incorrectly replaced.
Replace only with the same or equivalent type.
Use only with the cart, stand, tripod, bracket, or table specified by the manufacturer, or sold with the apparatus. When
a cart is used, use caution when moving the cart/apparatus combination to avoid injury from tip-over.
Correct Disposal of this product. This marking indicates that this product should not be disposed with other household
wastes throughout the EU. To prevent possible harm to the environment or human health from uncontrolled waste
disposal, recycle it responsibly to promote the sustainable reuse of material resources. To return your used device,
please use the return and collection systems or contact the retailerwhere the product was purchased. They can take
this product for environmental safe recycling.
● This product is a comprehensive digital multimedia audio equipment integrating DAB,
BlueTooth, FM, USB, and TF card playback
● Support Band III 174.928-239.20 MHz DAB/DAB+ digital signal reception
● Support Band II 87.5-108 MHz FM reception with RDS function
● Support 5.0 standard Bluetooth version
● With 2.4 inch TFT display, can display 240RGB*320 dots graphic pixels
● With real-time clock function and can automatically update the time through DAB
● Two sets of alarm clock functions with optional DAB/FM/Buzzer alarm source
● Built-in 7.4V /1800mAH lithium battery
● 3 inch full-range speaker and audio output RMS 7W (0dB 1KHz/THD<10%)
high-quality sound presentation
● Support multi-language (nine languages) system operation
Unpack the boxImportant safety instructions

03
English 04
English
01
02
03
04
05
06
07
08
08
07
05
06
01
02
03
04
14
15
11
10
09
13
12
01
02 03
04
19
17
15
18
16
14
05
06
07
08
09
13 12
11 10
01
02
07
05
03
06
04
08
09
10
11
12
13
14
15
16
17
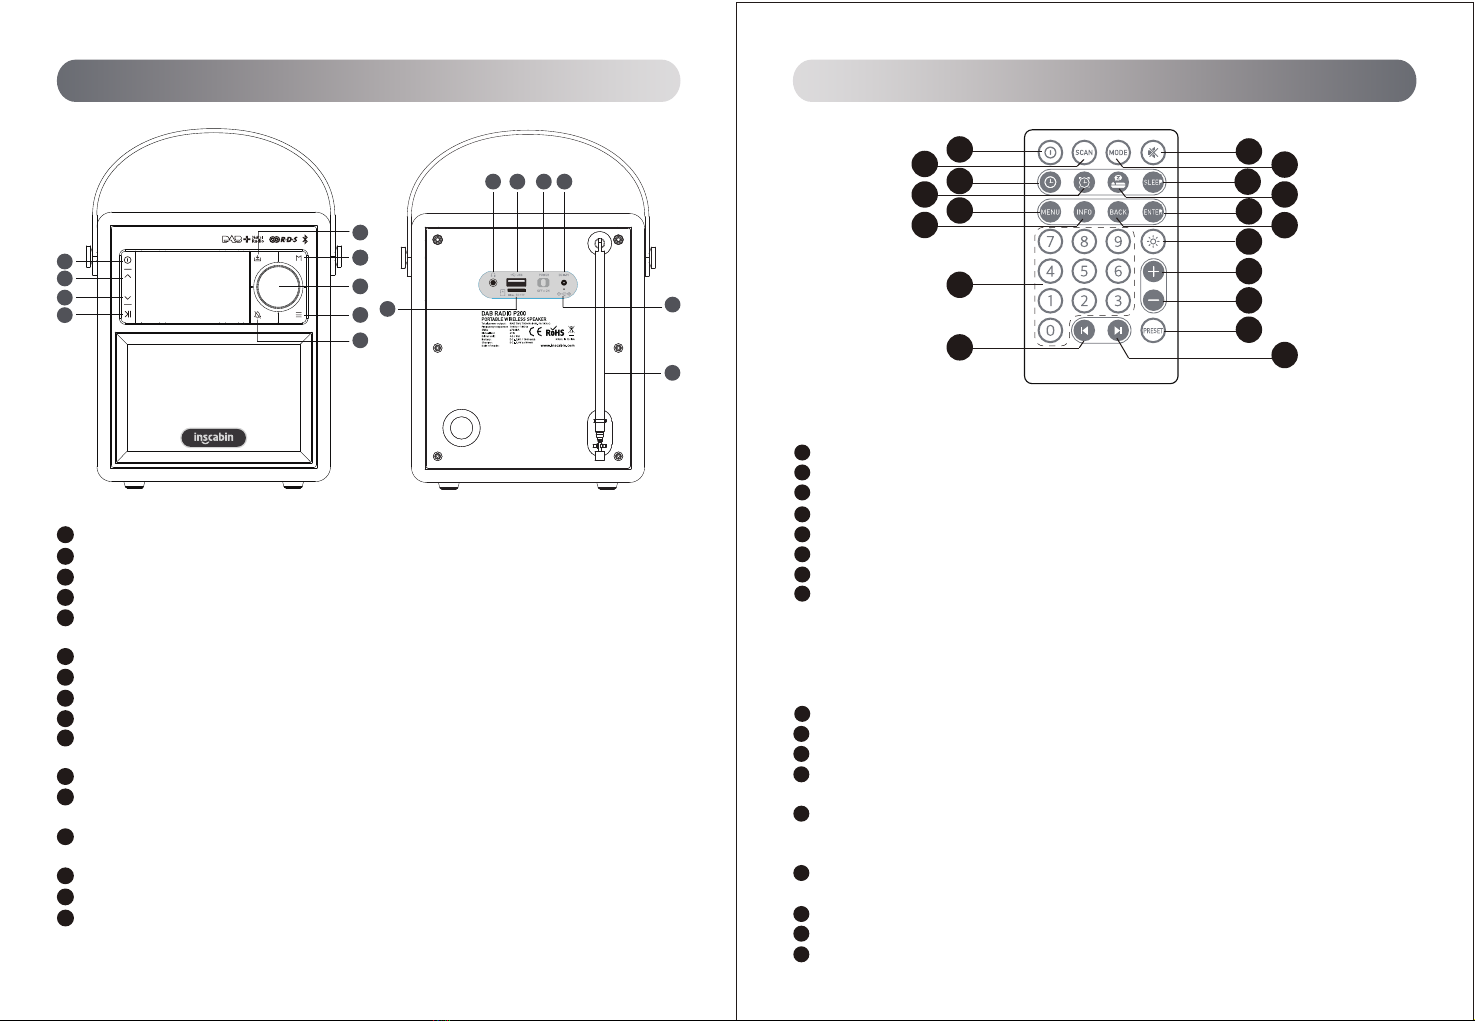
Product View Remote control schematic
Standby key: press this key to enter the clock standby screen
Up key
Down key: next song or next line
Play/Pause/Mute
Preset key: pre-store or recall favorite radio stations in DAB mode/press this key in FM mode
to recall saved radio stations
Mode/Light key---Short press: switch modes Long press: adjust display brightness
Info/Menu key---short press: view information long press: enter the menu
Alarm key: press this key to quickly enter the alarm setting
Headphone jack: suitable for standard headphones with 3.5mm headphone plug
A type USB jack: In USB mode, insert a USB flash drive here to play songs in the USB flash
drive
Power switch: turn the switch to ON to turn on, turn off to turn off
DC power jack: This hole is used by the adapter to charge the built-in battery of the machine,
please use the power adapter that comes with the accessory
Charging indicator hole: When the adapter is plugged in to charge the machine, the red light
is charging, and the green light is fully charged.
TF card jack: In TF mode, insert the TF card to play the songs in the card
Radio antenna
Volume encoder: Rotation: adjust the volume/up and down selection
Long press : ENTER/Auto scan key
Short press the standby button: enter function mode/standby
DAB& FM mode: short press to search for radio stations;
Clock setting key, short press to enter the clock setting interface;
ALARM key: short press --- enter the alarm setting state
MENU key: short press to enter the menu settings
INFO button: short press to display information
Number keys: Combine numbers 0-9 keys to select radio station or song number;
SKIP-key
DAB mode: short press --- move the station forward
Long press---to move forward quickly
FM mode: short press --- forward fine-tuning-
Long press --- forward semi-automatic search
Menu mode: short press --- move forward
Mute button ON/OFF
MODE button: mode switch button, DAB/FM/BT/USB/TF five modes to switch
In work mode, short press to set Sleep: OFF/15/30/45/60/90 minutes
Snooze button: When the alarm sounds, short press to enter the snooze function;
In the snooze function, short press to select the snooze time
ENTER key: DAB and FM mode-OK key
BT mode-play/pause button
In menu mode-confirm key
BACK key: Short press one level to return;
When the alarm is on, long press to cancel the alarm
Brightness key: LCD brightness adjustment key, three-segment brightness adjustable;
VOL+ key: increase the volume
VOL- key: Volume down
SKIP
DAB RADIO P200
PORTABLE WIRELESS SPEAKER
06
16
16
09 10 11 12
13
14
15

05
English 06
English
lnstruction lnstruction
18
19
PRESET key
Short press --- enter the interface of calling out radio stations, long press --- enter the interface of pre-stored
radio stations
SKIP+ key
DAB mode: short press --- move the station backward
Long press --- move the station backward quickly
FM mode: Short press --- Backward fine-tuning-
Long press --- Search backwards semi-automatically
Menu mode: short press --- move forward
Switch machine
①Turn the power switch on the back of the machine to ON to turn on, and turn to OFF to turn off.
② When the power is ON, it would directly go into the DAB mode.
DAB/FM/BT/USB/TF mode switch
①Enter DAB mode when power on, and automatically search for DAB stations (you can also long press the ENTER key
to re-search stations automatically), the machine will automatically synchronize DAB time after searching, after
searching for DAB stations, press the up and down keys to select the station and press ENTER Key to play the station.
②In DAB mode, press the MODE key to switch to FM mode, long press the ENTER key to automatically search and
save the station. When listening to a radio station, press the up and down keys to manually fine-tune the frequency of
the radio station. Long press the PRESET key to store your favorite Radio; short press the PRESET key to call out the
stored radio station, press the up and down keys to select the radio station, press the ENTER key to confirm, the
machine will play the radio station;
③In FM mode, press the MODE button to enter BT mode, the device name of this machine is "DAB P200", you can
use it according to the Bluetooth mode operation instructions in this manual;
④In BT mode, press the MODE button to enter the TF card mode, insert the TF card with MP3 songs to play the music
in the card, press the up and down keys to select the song, press the ENTER key to play/pause, short press the
INFO/MENU key to view Song information, long press the INFO/MENU button to enter the menu settings.
⑤In TF card mode, press the MODE button to enter the USB mode, insert the USB disk with MP3 songs to play the
music in the disk, press the up and down keys to select the song, press the ENTER key to play/pause, short press the
INFO/MENU key to view Song information, long press the INFO/MENU button to enter the menu settings.
How to enter Standby state
① In any playback mode, press the Standby button to enter the standby time mode. At this time, only the time, date
and alarm status are displayed.
② In Standby mode, you can press the Info/Menu button to set the time, date, alarm clock, etc., and press the Alarm
button to directly enter the alarm clock setting.
③Press Standby again in the standby mode to exit the standby mode and return to the current playback mode.
Recharge
①This machine can charge the machine when it is switched on and off, please use the supplied charger (DC9V, 700mA
output) for charging.
②Red light is on when charging, green light is on when fully charged.
③This machine supports charging and playing function.
Use headphones
①Please use earphones with 3.5mm diameter standard three-terminal or four-terminal plug.
②When the earphone is inserted, the earphone symbol is displayed on the screen, and there is no sound from the
speaker in earphone mode.
③In order to avoid discomfort to the ears due to high volume, it is recommended to turn down the volume before
inserting the earphones, and then adjust to the appropriate volume.
Menu Settings
①For the menu item setting in each mode, please refer to the figure below "MENU TREE".
②In each mode, long press the INFO/MENU key to enter the menu settings in this mode, press the up and down keys
to select the sub-menu items, press the ENTER key to confirm and enter, if there is only one sub-menu in the
sub-menu, press ENTER directly Key to confirm and enter. During operation, short press or long press INFO/MENU key
to return.
Time/calendar settings
① After the machine is turned on, it is in DAB mode and automatically searches for DAB radio stations. If a radio station
is found, the machine will automatically synchronize the local DAB time.
② If the local DAB radio station is not searched, the machine can also set the time manually. The setting process is as
follows, long press the Info/Menu key to enter the menu selection, press the up and down keys or the volume knob to
select "Time/Date", press the "ENTER" key to enter, turn the "volume knob" or the up and down keys to select "Set
Time/Date" And press the "ENTER" key to enter the "day" adjustment, press the volume knob or the up and down keys
to select, press the ENTER key to confirm and enter the "month" adjustment, also press the up and down keys or rotate
the volume knob to select, and then press the ENTER key to confirm and enter " Year" adjustment, press the up and
down keys or rotate the volume knob to select, press the ENTER key to confirm and enter the "hour" adjustment, press
the up and down keys or turn the volume knob to select, and then press the ENTER key to confirm and enter the
"minute" adjustment, then press the up and down keys Or turn the volume knob to select, press the ENTER key to
confirm, and it will automatically exit to the previous setting interface after completing the time and date setting. Press
INFO/MENU to return step by step, or long press Info/Menu to exit the menu directly to the main mode.
Auto Update/Set 12/24 Hour/Set Date Format/Clock Style item setting
Combining the up and down keys or turning the volume knob, the Enter key can complete the Auto Update/Set 12/24
Hour/Set Date Format/Clock Style item setting:
Auto Updatea item: select Update From Radio/No Update
Set 12/24 Hour item: select 12Hour/24Hour
Set Date Format item: select DD-MM-YYYY/ MM-DD-YYYY
Clock Style item: select Digital/ Anglog
Alarm setting
This machine can set 2 groups of alarms, which can be set according to the following steps.
①To set the alarm clock, short press the ALARM key to enter the ALARM setting interface;
②Press the up and down keys or turn the volume knob to select alarm 1 or alarm 2 settings;
③After making the selection, short press the "ENTER" key, press the up and down keys or turn
the volume knob to select the OnOff/Time/Source/Repeat/olume setting item;
Alarm item: On/Off selection;
Time item: select the time by up and down keys or turn the volume knob, and then press ENTER to confirm.
Battery loading:
Please refer to the illustration to open the byttery compartment,
insert the CR 2025 battery and close the compartment.
Note:
1.Do not place the remote control in places that are hot and humid.
2.Do not charge the battery.
3.Remove the battery when unused for long period of time.
4.The battery should not be exposed to excessive heat such as direct
sun, fire or similar.

07
English 08
English
lnstruction lnstruction
Source item: FM/DAB/Buzzer options;
Repeat item: There are Once/Daily/Weekends/Workday options;
Volume item: use the up and down keys or turn the volume knob to select the volume value, and then press the ENTER
key to confirm.
After setting, press Info/Menu to exit the alarm setting.
When the alarm sounds, the sound is gradually increased to the set volume. Press the ENTER key to activate the snooze
function, and then turn the volume knob to adjust the snooze countdown time; when the alarm is ringing, you can
press any other key to turn off the current alarm.
System settings
①In the function mode, long press the "INFO/MENU" key to enter the main menu setting interface, short press the up
and down keys or turn the volume knob to select the corresponding function setting interface, and short press "ENTER"
to enter the corresponding function setting interface.
②Sleep function is divided into: OFF/15/30/45/60/75/90/105/120 minutes
③Alarm has two alarms, 3 different alarms to choose from: Buzzer/DAB/FM; Alarm Repeat: Once/Daily/Week-
ends/Workday selection, after the alarm is finished, it will enter the standby state.
④Time/Date setting; Backlight setting; EQ sound effect setting; Language setting; Factory Reset to restore factory
settings; Info software version information, etc.
DAB function
① When the power is ON, it would directly go into the DAB mode.
②If the machine enters DAB mode for the first time, the machine will automatically search for radio stations; if the
machine has already searched for radio stations, you can also press and hold the ENTER key to perform automatic
station search.
③After the station search is completed, press the up and down keys or turn the volume knob to move the stations in
the station list up and down, and press the "ENTER" key to select the station; rotate the "VOLUME" button to adjust
the appropriate volume, short press "VOLUME" to mute it, Short press "VOLUME" again to mute off;
④Short press the "INFO/MENU" key to view the current station information: text information, signal strength, program
type, episode name, channel number/frequency, signal error rate, bit rate, time and date, etc.
⑤Long press the "PRESET" key to enter the radio station prestore interface, press the up and down keys or turn the
volume knob to move the prestored position up and down, press the up and down keys or turn the volume knob and
the "ENTER" key to prestore the radio station to the current position, short press "PRESET" "Key to enter the radio
station recall interface, then press the up and down keys or turn the volume knob to select the pre-stored radio station,
press the ENTER key to confirm and play. Note: A total of 20 favorite radio stations are pre-stored.
⑥Long press "INFO/MENU" key to enter the main menu setting interface, press the up and down keys or turn the
volume knob to select the corresponding function setting interface, short press "ENTER" to enter the corresponding
function setting interface. For specific settings, please refer to the above-mentioned "MENU TREE" chart.
Note:
Station List---Station list Scan---Auto search
Manual tune---Manually tune Prune Inavlid---trim invalid stations
FM function
①Turn on, press "MODE" key to enter FM mode;
②Press up and down keys to fine tune the radio station forward or backward, 50KHz jump one step; long press the
up/down key, you can search for the radio station forward or backward semi-automatically; long press the "ENTER" key
to search and save the radio station automatically.
③Rotate the volume encoder to adjust the appropriate volume, press down the volume knob to switch mute on/off
④Short press the "INFO/MENU" key to view the current radio station information: text information, program type,
episode name, channel information, time and date.
⑤Long press the "PRESET" key to enter the radio pre-store interface, press the up and down keys or turn the volume
knob "to move forward or backward.
After moving to the pre-stored position, short press “ENTER” to pre-store the radio station to the current position. Short
press the "PRESET" key to enter the radio station recall interface, press the up and down keys or turn the volume knob
to move the pre-stored position forward or backward, and short press "ENTER" to recall the pre-stored radio station for
playback.
Note: A total of 20 stations are pre-stored.
⑥Long press the "INFO/MENU" key to enter the main menu setting interface, press the up and down keys or turn the
volume knob to select the corresponding function setting interface, short press "ENTER" to enter the corresponding
function setting interface, the specific settings can refer to the above "MENU" TREE" chart.
⑥Scan setting---Search radio mode setting, you can select All Stations and Strong Stations.
Bluetooth pairing/play
①Turn on, press the "MODE" key to switch several times until it enters the BT mode; and you will hear a "grunt" sound,
indicating that the Bluetooth has been turned on and is in the waiting state for connection, and the LCD screen displays
the word "Disconnected".
②Use the Bluetooth device, take the mobile phone as an example, turn on the Bluetooth device on the mobile phone,
and then search for the Bluetooth device with the name "DAB P200", and then click to connect with "DAB P200", you
will hear the "ding-ding" music after about 10 seconds If the phone’s Bluetooth device is turned off, the machine will
emit a “boom” music sound and display the word “Disconnected” to indicate that the Bluetooth has been disconnected.
③Press up and down keys to switch songs up and down, short press "Play/Pause" key to play or pause.
④Rotate the "VOLUME" button to adjust the appropriate volume, Press "VOLUME" to pause/playback.
⑤Long press the ENTER key to disconnect from the mobile device.
USB disk (or TF card) playback
①Turn on and press the MODE button several times. When USB (or TF) appears on the display, it enters the USB mode
(or TF mode. At this time, insert a USB flash drive with MP3, WAV, FLAC, WMA, APE format songs ( Or TF card) you
can play music.
②Rotate the [VOLUME] button to adjust the volume.
③During playback, short press the PRESET key to switch the loop playback mode. There are currently three switchable
modes: ALL (loop all songs), SING (loop the current song), RAND (random playback).
④Short press the up and down keys to switch between up and down songs, long press the up and down keys to fast
forward and rewind, and short press the "Play/Pause" key to play or pause.
⑤During playback, short press the INFO/MENU button to view the currently playing song information (song name,
current track/total track, current playing time/total current track time, date, etc.), long press to enter the system
settings, For specific settings, please refer to the above-mentioned "MENU TREE" chart.

Radio DAB Adaptateur Télécommande Manuel de l'Utilisateur
● Puissance de sortie de l'amplificateur de puissance:
7 W (onde sinusoïdale 8,0 V 1 KHZ, 0 dB)
● Rapport signal / bruit de l'amplificateur de puissance: ≥75dBA
● Distorsion: ≤1%
● Réponse en fréquence: 100 HZ-18 KHZ
● Interface d'entrée audio: DAB, FM, BT, USB, TF
● Formulaire de réglage: réglage des boutons
● Haut-parleur: magnétique externe 78 mm (4 ohms)
● Puissance d'entrée: batterie lithium-ion 7.4V / 1800mAh
01
Français 02
Français
Caractéristiques
Description de la fonction
Liste de colisage
● Puissance d'entrée maximale: ≤6W
● Sensibilité d'entrée maximale USB / Micro SD: 0 dBm
● Sensibilité d'entrée de réception DAB: -97 dBm
● Sensibilité d'entrée de réception FM: -105dBm
● Température de l'environnement de travail:
-10ºC ~ 50 ºC
● Température de stockage: -20ºC ~ 70 ºC
● Spécifications du produit: 156 * 90,5 * 184,5 mm
● Poids net: environ 995g
WARNING: To reduce the risk of fire or electric shock, do not expose this apparatus to rain or moisture.
Thank you for purchasing this inscabin product. For generations, inscabin tries to provide powered speaker products
to satisfy the
need of our end customers, even the most demanding ones. This product can add to your home entertainment,
personal
computer, and mini home theater great sound performance. Please read this manual carefully to obtain the best of this
system.
Instructions de charge:
Connectez le haut-parleur (port de connecteur DC IN sur le panneau arrière) à la prise avec l'adaptateur
secteur fourni.Chargez le haut-parleur pendant environ 3 à 5 heures avant la première utilisation.
The lightning flash with arrowhead inside
thetriangle, is intended to alert the user
to the presence of un-insulated dangerous
voltage within the product's enclosure
that may be of a sufficient magnitude to
constitute a risk of electric shock to persons.
To prevent the risk of electric shock, do not
remove cover (or back). No user-serviceable
Parts inside. Refer servicing to qualified
Service personnel only.
The exclamation point inside the triangle
is intended to alert the user to the presence
of important operating and maintenance
(servicing) instructions in the literature
accompanying the product.
1. Read these instructions. 2. Keep these instructions.
3. Heed all warnings. 4. Follow all instructions.
5. Do not use this apparatus near water. 6. Clean only with dry cloth.
7. Do not block any ventilation openings. Install in accordance with the manufacturer’s instructions.
8. Do not install near any heat sources such as radiators, heat registers, stoves, or other apparatus (including amplifiers) tha
produce heat.
9. Do not defeat the safety purpose of the polarized or grounding-type plug. A polarized plug has two blades with one wider tha
the other. A grounding type plug has two blades and a third grounding prong. The wide blade or the third prong are provided
for your safety. If the provided plug does not fit into your outlet, consult an electrician for replacement of the obsolete
10. Protect the power cord from being walked on or pinched particularly at plugs, convenience receptacles, and the point where
they exit from the apparatus.
11. Only use attachments/accessories specified by the manufacturer.
12. Unplug this apparatus during lightning storms or when unused for long periods of time.
13. Refer all servicing to qualified service personnel. Servicing is required when the apparatus has been damaged in any way, su
as power-supply cord or plug is damaged, liquid has been spilled or objects have fallen into the apparatus, the apparatus
been exposed to rain or moisture, does not operate normally, or has been dropped.
14. The MAINS plug or an appliance coupler is used as the disconnect device, the disconnect device shall remain readily operabl
Note:There is a built-in rechargeable lithium-ion battery in the speaker. Danger of explosion if disassemble the speaker. The speak
shall not be placed close to excessive heat such as fire or the like.
The battery shall not be exposed to excessive heat such as sunshine, fire or the like. Danger of explosion if the ba
incorrectly replaced.
Replace only with the same or equivalent type.
Use only with the cart, stand, tripod, bracket, or table specified by the manufacturer, or sold with the apparatus. When
a cart is used, use caution when moving the cart/apparatus combination to avoid injury from tip-over.
Correct Disposal of this product. This marking indicates that this product should not be disposed with other household
wastes throughout the EU. To prevent possible harm to the environment or human health from uncontrolled waste
disposal, recycle it responsibly to promote the sustainable reuse of material resources. To return your used device,
please use the return and collection systems or contact the retailerwhere the product was purchased. They can take
this product for environmental safe recycling.
● Ce produit est un équipement audio multimédia numérique complet intégrant la lecture de
cartes DAB, BlueTooth, FM, USB et TF
● Prise en charge de la bande III 174,928-239,20 MHz DAB / DAB + réception du signal
numérique
● Prise en charge de la réception FM 87,5-108 MHz Bande II avec fonction RDS
● Prise en charge de la version Bluetooth standard 5.0
● Avec un écran TFT de 2,4 pouces, peut afficher des pixels graphiques de 240RGB * 320 points
● Avec la fonction d'horloge en temps réel et peut mettre à jour automatiquement l'heure via DAB
● Deux ensembles de fonctions de réveil avec source d'alarme DAB / FM / Buzzer en option
● Batterie au lithium 7,4 V / 1800 mAH intégrée
● Haut-parleur large bande de 3 pouces et sortie audio RMS 7W (0dB 1KHz / THD <10%)
présentation sonore de haute qualité
● Prise en charge du fonctionnement du système multilingue (neuf langues)
Déballer la boîteImportant safety instructions

03
Français 04
Français
01
02
03
04
05
06
07
08
08
07
05
06
01
02
03
04
14
15
11
10
09
13
12
01
02 03
04
19
17
15
18
16
14
05
06
07
08
09
13 12
11 10
01
02
07
05
03
06
04
08
09
10
11
12
13
14
15
16
17
VueproduitSchéma dela télécommande
Touche Standby: appuyez sur cette touche pour accéder à l'écran Standby de l'horloge
Touche Haut
Touche bas: chanson suivante ou ligne suivante
Bouton Lecture / Pause / Mute
Touche Preset: pré-mémoriser ou rappeler les stations de radio préférées en mode DAB / appuyez sur
cette touche en mode FM pour rappeler les stations de radio enregistrées
Touche Mode / Lumière --- Appui court: changer de mode Appui long: régler la luminosité de l'écran
Touche Info / Menu --- appui court: afficher les informations appui long: entrer dans le menu
Touche d'alarme: appuyez sur cette touche pour entrer rapidement le paramètre d'alarme
Prise casque: convient aux écouteurs standard avec prise casque 3,5 mm
Prise USB de type A: en mode USB, insérez une clé USB ici pour lire des chansons dans la clé USB.
Interrupteur d'alimentation: tournez l'interrupteur sur ON pour allumer, éteignez-le pour éteindre
Prise d'alimentation CC: ce trou est utilisé par l'adaptateur pour charger la batterie intégrée de la
machine, veuillez utiliser l'adaptateur secteur fourni avec l'accessoire
Trou de l'indicateur de charge: lorsque l'adaptateur est branché pour charger la machine, le voyant
rouge se charge et le voyant vert est complètement chargé.
Prise de carte TF: En mode TF, insérez la carte TF pour lire les chansons de la carte
Antenne radio
Codeur de volume
Rotation: régler le volume / sélection haut et bas
Appui long: touche ENTER / Balayage automatique
Appuyez brièvement sur le bouton Standby: entrez en mode de fonction / veille
Mode DAB & FM: appuyez brièvement pour rechercher des stations de radio;
Touche de réglage de l'horloge, appuyez brièvement pour entrer dans l'interface de réglage de l'horloge;
Touche ALARME: appuyez brièvement sur --- entrez l'état de réglage de l'alarme
MENU: appuyez brièvement pour accéder aux paramètres du menu
bouton INFO: appuyez brièvement pour afficher les informations
Touches numériques: combinez les touches numériques 0-9 pour sélectionner la station de radio ou le numéro
de chanson;
SKIP
Mode DAB: appui court --- faire avancer la station
Appui long --- pour avancer rapidement
Mode FM: appui court --- réglage fin avant-
Appui long --- recherche semi-automatique avant
Mode menu: appui court --- avancer
Bouton Muet ON / OFF
Bouton MODE: bouton de commutation de mode, DAB / FM / BT / USB / TF cinq modes pour basculer
En mode de travail, appuyez brièvement pour régler le Standby: OFF / 15/30/45/60/90 minutes
Bouton de répétition: lorsque l'alarme sonne, appuyez brièvement pour accéder à la fonction de répétition;
Dans la fonction de répétition, appuyez brièvement pour sélectionner la durée de répétition
Touche ENTER: Mode DAB et FM-Touche OK
Bouton de lecture / pause en mode BT
En mode menu, touche de confirmation
Touche RETOUR: appuyez brièvement sur un niveau pour revenir;
Lorsque l'alarme est activée, appuyez longuement pour annuler l'alarme
Touche de luminosité: touche de réglage de la luminosité LCD, luminosité à trois segments réglable;
Touche VOL +: augmenter le volume
Touche VOL-: Baisser le volume
SKIP
DAB RADIO P200
PORTABLE WIRELESS SPEAKER
06
16
16
09 10 11 12
13
14
15

05
Français 06
Français
lnstruction lnstruction
18
19
Touche PRESET
Appui court --- entrer dans l'interface d'appel des stations de radio, appui long --- entrer dans l'interface
des stations de radio pré-enregistrées
19. Touche SKIP +
Mode DAB: appui court --- déplacer la station vers l'arrière
Appui long --- déplacer rapidement la station vers l'arrière
Mode FM: Appui court --- Réglage fin en arrière-
Appui long --- Recherche semi-automatique en arrière
Mode menu: appui court --- avancer
Machine de commutation
①Mettez l'interrupteur d'alimentation situé à l'arrière de la machine sur ON pour l'allumer et sur OFF pour l'éteindre.
②Lorsqu'il est allumé, directement en mode DAB.
Commutateur de mode DAB / FM / BT / USB / TF
①Entrez en mode DAB lors de la mise sous tension et recherchez automatiquement les stations DAB (vous pouvez
également appuyer longuement sur la touche ENTER pour rechercher automatiquement les stations), la machine
synchronisera automatiquement l'heure DAB après la recherche, après avoir recherché des stations DAB, appuyez sur
et les touches bas pour sélectionner la station et appuyez sur la touche ENTER pour écouter la station.
②En mode DAB, appuyez sur la touche MODE pour passer en mode FM, appuyez longuement sur la touche ENTER
pour rechercher et enregistrer automatiquement la station. Lorsque vous écoutez une station de radio, appuyez sur les
touches haut et bas pour régler manuellement la fréquence de la station de radio. Appuyez longuement sur la touche
PRESET pour enregistrer votre radio préférée; appuyez brièvement sur la touche PRESET pour appeler la station de
radio mémorisée, appuyez sur les touches haut et bas pour sélectionner la station de radio, appuyez sur la touche
ENTER pour confirmer, la machine diffusera la station de radio;
③En mode FM, appuyez sur le bouton MODE pour passer en mode BT, le nom de l'appareil de cette machine est "DAB
P200", vous pouvez l'utiliser selon les instructions de fonctionnement du mode Bluetooth dans ce manuel;
④En mode BT, appuyez sur le bouton MODE pour entrer en mode carte TF, insérez la carte TF avec des chansons MP3
pour lire la musique de la carte, appuyez sur les touches haut et bas pour sélectionner la chanson, appuyez sur la
touche ENTER pour lire / mettre en pause , appuyez brièvement sur la touche INFO / MENU pour afficher les
informations sur la chanson, appuyez longuement sur la touche INFO / MENU pour accéder aux paramètres du menu.
⑤En mode carte TF, appuyez sur le bouton MODE pour entrer en mode USB, insérez le disque U avec des chansons
MP3 pour lire la musique sur le disque, appuyez sur les touches haut et bas pour sélectionner la chanson, appuyez sur
la touche ENTRÉE pour lire / mettre en pause , appuyez brièvement sur la touche INFO / MENU pour afficher les
informations sur la chanson, appuyez longuement sur la touche INFO / MENU pour accéder aux paramètres du menu.
Comment entrer en état Standby
①Dans n'importe quel mode de lecture, appuyez sur le bouton Veille pour entrer en mode Standby. À ce moment,
seuls l'heure, la date et l'état de l'alarme sont affichés.
②En Standby, vous pouvez appuyer sur le bouton Info / Menu pour régler l'heure, la date, le réveil, etc., et appuyer
sur le bouton Alarme pour entrer directement dans le réglage du réveil.
③Appuyez à nouveau sur Standby en Standby pour quitter le Standby et revenir au mode de lecture actuel.
Recharger
①Cette machine peut charger la machine lorsqu'elle est allumée et éteinte, veuillez utiliser le chargeur fourni (DC9V,
sortie 700mA) pour la charge.
②Le voyant rouge est allumé lors de la charge, le voyant vert est allumé lorsqu'il est complètement chargé.
③Cette machine prend en charge la fonction de chargement et de lecture.
Utilisez des écouteurs
①Veuillez utiliser des écouteurs avec une fiche standard à trois ou quatre bornes de 3,5 mm de diamètre.
②Lorsque l'écouteur est inséré, le symbole de l'écouteur s'affiche à l'écran et il n'y a pas de son provenant du
haut-parleur en mode écouteur.
③Afin d'éviter une gêne pour les oreilles due à un volume élevé, il est recommandé de baisser le volume avant
d'insérer les écouteurs, puis de régler le volume approprié.
Paramètres du menu
①Pour le réglage des éléments de menu dans chaque mode, veuillez vous référer à la figure ci-dessous "MENU TREE".
②Dans chaque mode, appuyez longuement sur la touche INFO / MENU pour accéder aux paramètres du menu dans
ce mode, appuyez sur les touches haut et bas pour sélectionner les éléments du sous-menu, appuyez sur la touche
ENTER pour confirmer et entrez, s'il n'y a qu'un seul sous -menu dans le sous-menu, appuyez directement sur la touche
ENTER pour confirmer et entrer. Pendant le fonctionnement, appuyez brièvement ou longuement sur la touche INFO /
MENU pour revenir.
Paramètres d'heure / calendrier
① Une fois la machine allumée, elle est en mode DAB et recherche automatiquement les stations de radio DAB. Si une
station radio est trouvée, la machine synchronisera automatiquement l'heure DAB locale.
② Si la station de radio DAB locale n'est pas recherchée, l'appareil peut également régler l'heure manuellement. Le
processus de réglage est le suivant, appuyez longuement sur la touche Info / Menu pour accéder à la sélection du
menu, appuyez sur les touches haut et bas ou sur le bouton de volume pour sélectionner "Time/Date", appuyez sur la
touche "ENTER" pour entrer, tournez le bouton " bouton de volume "ou les touches haut et bas pour sélectionner" Set
Time / Date "Et appuyez sur la touche" ENTER "pour entrer le réglage" day ", appuyez sur le bouton de volume ou sur
les touches haut et bas pour sélectionner, appuyez sur la touche ENTER pour confirmez et entrez le réglage "mois",
appuyez également sur les touches haut et bas ou tournez le bouton de volume pour sélectionner, puis appuyez sur la
touche ENTER pour confirmer et entrez le réglage "Année", appuyez sur les touches haut et bas ou tournez le bouton
de volume pour sélectionner, appuyez sur la touche ENTER pour confirmer et entrez le réglage "heure", appuyez sur
les touches haut et bas ou tournez le bouton de volume pour sélectionner, puis appuyez sur la touche ENTER pour
confirmer et entrez le réglage "minute", puis appuyez sur le bouton touches haut et bas Ou tournez le bouton de
volume pour sélectionner, appuyez sur la touche ENTER pour confirmer, et il reviendra automatiquement au réglage
précédent interface après avoir terminé le réglage de l'heure et de la date. Appuyez sur INFO / MENU pour revenir
étape par étape, ou appuyez longuement sur Info / Menu pour quitter le menu directement au mode principal.
Chargement de la batterie:
Veuillez vous reporter à l'illustration pour ouvrir le compartiment à piles,
insérer la pile CR2025 et fermer le compartiment.
Remarque:
1.Ne placez pas la télécommande dans des endroits chauds et humides.
2.Ne chargez pas la batterie.
3.Retirez la batterie lorsqu'elle n'est pas utilisée pendant une longue période.
4.La batterie ne doit pas être exposée à une chaleur excessive telle que la
lumière directe du soleil, un feu ou similaire.

07
Français 08
Français
lnstruction lnstruction
Mise à jour automatique / Réglage 12/24 heures / Réglage du format de la
date / Réglage de l'élément de style d'horloge
En combinant les touches haut et bas ou en tournant le bouton de volume, la touche Entrée peut terminer le réglage
de l'élément Mise à jour automatique / Régler 12/24 heures / Régler le format de la date / Style d'horloge:
Mise à jour automatiqueun élément: sélectionnez Mettre à jour depuis la radio / Pas de mise à jour
Définir l'élément 12/24 heures: sélectionnez 12 heures / 24 heures
Élément Définir le format de date: sélectionnez JJ-MM-AAAA / MM-JJ-AAAA
Élément Clock Style: sélectionnez Digital / Anglog
Réglage de l'alarme
Cette machine peut définir 2 groupes d'alarmes, qui peuvent être définis selon les étapes suivantes.
①Pour régler le réveil, appuyez brièvement sur la touche ALARM pour accéder à l'interface de réglage ALARM;
②Appuyez sur les touches haut et bas ou tournez le bouton de volume pour sélectionner les paramètres d'alarme 1
ou d'alarme 2;
③Après avoir fait la sélection, appuyez brièvement sur la touche "ENTER", appuyez sur les touches haut et bas ou
tournez le bouton de volume pour sélectionner l'élément de réglage OnOff / Time / Source / Repeat / olume;
Élément d'alarme: sélection marche / arrêt;
Élément de l'heure: sélectionnez l'heure à l'aide des touches haut et bas ou tournez le bouton de volume, puis appuyez
sur ENTER pour confirmer.
Élément source: options FM / DAB / Buzzer;
Répéter l'élément: il existe des options Une fois / Quotidien / Week-ends / Jour ouvrable;
Élément de volume: utilisez les touches haut et bas ou tournez le bouton de volume pour sélectionner la valeur du
volume, puis appuyez sur la touche ENTER pour confirmer.
Après le réglage, appuyez sur Info / Menu pour quitter le réglage de l'alarme.
Lorsque l'alarme retentit, le son est progressivement augmenté jusqu'au volume réglé. Appuyez sur la touche ENTER
pour activer la fonction de répétition, puis tournez le bouton de volume pour régler la durée du compte à rebours de
répétition; lorsque l'alarme sonne, vous pouvez appuyer sur n'importe quelle autre touche pour désactiver l'alarme
actuelle.
Les paramètres du système
①En mode de fonction, appuyez longuement sur la touche «INFO / MENU» pour accéder à l'interface de réglage du
menu principal, appuyez brièvement sur les touches haut et bas ou tournez le bouton de volume pour sélectionner
l'interface de réglage de fonction correspondante, et appuyez brièvement sur «ENTER» pour entrez dans l'interface de
réglage des fonctions correspondante.
②La fonction Standby est divisée en: OFF / 15/30/45/60/75/90/105/120 minutes.
③L'alarme a deux alarmes, 3 alarmes différentes au choix: Buzzer / DAB / FM; Répétition de l'alarme: une fois / tous
les jours / week-ends / sélection du jour ouvrable, une fois l'alarme terminée, elle passera en état Standby.
④réglage de l'heure / date; Réglage du rétroéclairage; Réglage des effets sonores EQ; Paramètres de langue;
Réinitialisation d'usine pour restaurer les paramètres d'usine; Informations sur la version du logiciel, etc.
Fonction DAB
①Lorsqu'il est allumé, directement en mode DAB.
②Si l'appareil passe en mode DAB pour la première fois, l'appareil recherche automatiquement les stations de radio;
si l'appareil a déjà recherché des stations de radio, vous pouvez également maintenir la touche ENTER enfoncée pour
effectuer une recherche automatique de stations.
③Une fois la recherche de stations terminée, appuyez sur les touches haut et bas ou tournez le bouton de volume
pour déplacer les stations de la liste des stations vers le haut et vers le bas, puis appuyez sur la touche «ENTER» pour
sélectionner la station; tourner le bouton "VOLUME" pour régler le volume approprié, appuyez brièvement sur
"VOLUME" à nouveau pour couper le son;
④Appuyez brièvement sur la touche "INFO / MENU" pour afficher les informations sur la station actuelle: informations
textuelles, force du signal, type de programme, nom de l'épisode, numéro / fréquence de canal, taux d'erreur du signal,
débit binaire, heure et date, etc.
⑤Appuyez longuement sur la touche "PRESET" pour accéder à l'interface de pré-enregistrement de la station de radio,
appuyez sur les touches haut et bas ou tournez le bouton de volume pour déplacer la position préenregistrée de haut
en bas, appuyez sur les touches haut et bas ou tournez le bouton de volume et le bouton " ENTER "pour pré-enregistrer
la station de radio à la position actuelle, appuyez brièvement sur la touche" PRESET "" pour accéder à l'interface de
rappel de la station de radio, puis appuyez sur les touches haut et bas ou tournez le bouton de volume pour sélection-
ner la station de radio pré-enregistrée, appuyez sur Appuyez sur la touche ENTER pour confirmer et jouer. Remarque:
U n total de 20 stations de radio favorites sont préenregistrées.
⑥Appuyez longuement sur la touche "INFO / MENU" pour accéder à l'interface de réglage du menu principal, appuyez
sur les touches haut et bas ou tournez le bouton de volume pour sélectionner l'interface de réglage de fonction
correspondante, appuyez brièvement sur "ENTER" pour accéder à l'interface de réglage de fonction correspondante.
Pour les réglages spécifiques, veuillez vous référer au tableau "MENU TREE" mentionné ci-dessus.
Remarque:
Liste des stations --- Balayage de la liste des stations --- Recherche automatique
Réglage manuel --- Syntonisation manuelle Prune Inavlid --- Trim des stations invalides
Fonction FM
①Allumez, appuyez sur la touche "MODE" pour entrer en mode FM;
②Appuyez sur les touches haut et bas pour régler finement la station de radio en avant ou en arrière, 50 KHz sautent
d'une étape; appuyez longuement sur la touche haut / bas, vous pouvez rechercher la station de radio en avant ou en
arrière semi-automatiquement; appuyez longuement sur la touche "ENTER" pour rechercher et enregistrer
automatiquement la station de radio.
③Tournez l'encodeur de volume pour régler le volume approprié, appuyez sur le bouton de volume pour activer /
désactiver la sourdine.
④Appuyez brièvement sur la touche "INFO / MENU" pour afficher les informations sur la station de radio actuelle:
informations textuelles, type de programme, nom de l'épisode, informations sur la chaîne, heure et date.
⑤Appuyez longuement sur la touche "PRESET" pour accéder à l'interface de pré-enregistrement de la radio, appuyez
sur les touches haut et bas ou tournez le bouton de volume "pour avancer ou reculer.
Après vous être déplacé vers la position préenregistrée, appuyez brièvement sur “ENTER” pour pré-mémoriser la
station de radio sur la position actuelle. Appuyez brièvement sur la touche «PRESET» pour accéder à l'interface de
rappel de la station de radio, appuyez sur les touches haut et bas ou tournez le bouton de volume pour déplacer la
position pré-enregistrée vers l'avant ou vers l'arrière, et appuyez brièvement sur «ENTER» pour rappeler la radio
pré-enregistrée station pour la lecture.
Remarque: un total de 20 stations sont pré-enregistrées
⑥Appuyez longuement sur la touche "INFO / MENU" pour accéder à l'interface de réglage du menu principal, appuyez
sur les touches haut et bas ou tournez le bouton de volume pour sélectionner l'interface de réglage de fonction
correspondante, appuyez brièvement sur "ENTER" pour accéder à l'interface de réglage de fonction correspondante,
les réglages spécifiques peuvent se référer au tableau "MENU" TREE "ci-dessus.
⑥Réglage du balayage --- Réglage du mode de recherche radio, vous pouvez sélectionner toutes les stations et les
stations fortes.
lnstruction

09
Français 10
Français
lnstruction lnstruction
Bluetooth appariement / jeu
①Allumez, appuyez sur la touche «MODE» pour basculer plusieurs fois jusqu'à ce qu'il entre en mode BT; et vous
entendrez un son“gurudu”, indiquant que le Bluetooth a été activé et est en attente de connexion, et l'écran LCD affiche
le mot «Déconnecté».
②Utilisez le périphérique Bluetooth, prenez le téléphone mobile comme exemple, allumez le périphérique Bluetooth
sur le téléphone mobile, puis recherchez le périphérique Bluetooth avec le nom "DAB P200", puis cliquez pour vous
connecter avec "DAB P200", et vous entendrez la musique "ding-ding" après environ 10 secondes Si vous éteignez le
périphérique Bluetooth du téléphone portable, la machine émettra un son de musique "dong dong" et affichera le mot
"Disconnected" pour indiquer que le Bluetooth est déconnecté, et l'écran LCD affiche "Bluetooth Connected" et le nom
du téléphone mobile connecté.
③Appuyez sur les touches haut et bas pour basculer les chansons de haut en bas, appuyez brièvement sur la touche
"lecture / pause" pour lire ou mettre en pause.
④Tournez le bouton "VOLUME" pour régler le volume approprié, appuyez sur "VOLUME" pour mettre en pause /
lecture.
⑤Appuyez longuement sur la touche ENTER pour vous déconnecter de l'appareil mobile.
Lecture de disque USB (ou carte TF)
①Allumez et appuyez plusieurs fois sur le bouton MODE. Lorsque USB (ou TF) apparaît sur l'écran, il entre en mode
USB (ou en mode TF. À ce stade, insérez une clé USB avec des chansons au format MP3, WAV, FLAC, WMA, APE (ou
carte TF) que vous pouvez lire la musique.
②Tournez le bouton [VOLUME] pour régler le volume.
③Pendant la lecture, appuyez brièvement sur la touche PRESET pour changer le mode de lecture en boucle. Il existe
actuellement trois modes commutables: ALL (boucle toutes les chansons), SING (boucle la chanson actuelle), RAND
(lecture aléatoire).
④Appuyez brièvement sur les touches haut et bas pour basculer entre les chansons haut et bas, appuyez longuement
sur les touches haut et bas pour avancer et reculer rapidement, et appuyez brièvement sur la touche "lecture / pause"
pour lire ou mettre en pause.
⑤Pendant la lecture, appuyez brièvement sur le bouton INFO / MENU pour afficher les informations de la chanson en
cours de lecture (nom de la chanson, plage actuelle / plage totale, durée de lecture actuelle / durée totale de la plage
actuelle, date, etc.), appuyez longuement pour accéder aux paramètres système, Pour les réglages spécifiques, veuillez
vous référer au tableau "MENU TREE" mentionné ci-dessus.

DAB Radio Adapter Fernbedienung Benutzerhandbuch
● Ausgangsleistung des Leistungsverstärkers:
7 W (8,0 V, 1 kHz Sinuswelle, 0 dB)
● Signal-Rausch-Verhältnis des Leistungsverstärkers: ≥75dBA
● Verzerrung: ≤1%
● Frequenzgang: 100 Hz - 18 kHz
● Audioeingangsschnittstelle: DAB, FM, BT, USB, TF
● Anpassungsformular: Tasteneinstellung
● Lautsprecher: 78 mm externer Magnet (4 Ohm)
● Eingangsleistung: Lithium-Ionen-Akku mit 7,4 V / 1800 mAh
01
Deutsche 02
Deutsche
Spezifikationen
Bedienungsanleitung
Packliste
● Maximale Eingangsleistung: ≤6W
● Maximale Eingangsempfindlichkeit von USB / Micro
SD: 0 dBm
● DAB-Empfangsempfangsempfindlichkeit: -97 dBm
● Eingangsempfindlichkeit des FM-Empfangs: -105 dBm
● Arbeitsumgebungstemperatur: -10ºC ~ 50 ºC
● Lagertemperatur: -20ºC ~ 70 ºC
● Produktspezifikationen: 156 * 90,5 * 184,5 mm
● Nettogewicht: ca. 995 g
WARNING: To reduce the risk of fire or electric shock, do not expose this apparatus to rain or moisture.
Thank you for purchasing this inscabin product. For generations, inscabin tries to provide powered speaker products
to satisfy the
need of our end customers, even the most demanding ones. This product can add to your home entertainment,
personal
computer, and mini home theater great sound performance. Please read this manual carefully to obtain the best of this
system.
Anweisungen zum Aufladen:
Schließen Sie den Lautsprecher (DC IN-Anschluss an der Rückseite) mit dem angeschlossenen
Netzteil an die Steckdose an. Laden Sie den Lautsprecher vor dem ersten Gebrauch ca. 3 bis 5 Stunden lang auf.
The lightning flash with arrowhead inside
thetriangle, is intended to alert the user
to the presence of un-insulated dangerous
voltage within the product's enclosure
that may be of a sufficient magnitude to
constitute a risk of electric shock to persons.
To prevent the risk of electric shock, do not
remove cover (or back). No user-serviceable
Parts inside. Refer servicing to qualified
Service personnel only.
The exclamation point inside the triangle
is intended to alert the user to the presence
of important operating and maintenance
(servicing) instructions in the literature
accompanying the product.
1. Read these instructions. 2. Keep these instructions.
3. Heed all warnings. 4. Follow all instructions.
5. Do not use this apparatus near water. 6. Clean only with dry cloth.
7. Do not block any ventilation openings. Install in accordance with the manufacturer’s instructions.
8. Do not install near any heat sources such as radiators, heat registers, stoves, or other apparatus (including amplifiers) tha
produce heat.
9. Do not defeat the safety purpose of the polarized or grounding-type plug. A polarized plug has two blades with one wider tha
the other. A grounding type plug has two blades and a third grounding prong. The wide blade or the third prong are provided
for your safety. If the provided plug does not fit into your outlet, consult an electrician for replacement of the obsolete
10. Protect the power cord from being walked on or pinched particularly at plugs, convenience receptacles, and the point where
they exit from the apparatus.
11. Only use attachments/accessories specified by the manufacturer.
12. Unplug this apparatus during lightning storms or when unused for long periods of time.
13. Refer all servicing to qualified service personnel. Servicing is required when the apparatus has been damaged in any way, su
as power-supply cord or plug is damaged, liquid has been spilled or objects have fallen into the apparatus, the apparatus
been exposed to rain or moisture, does not operate normally, or has been dropped.
14. The MAINS plug or an appliance coupler is used as the disconnect device, the disconnect device shall remain readily operabl
Note:There is a built-in rechargeable lithium-ion battery in the speaker. Danger of explosion if disassemble the speaker. The speak
shall not be placed close to excessive heat such as fire or the like.
The battery shall not be exposed to excessive heat such as sunshine, fire or the like. Danger of explosion if the ba
incorrectly replaced.
Replace only with the same or equivalent type.
Use only with the cart, stand, tripod, bracket, or table specified by the manufacturer, or sold with the apparatus. When
a cart is used, use caution when moving the cart/apparatus combination to avoid injury from tip-over.
Correct Disposal of this product. This marking indicates that this product should not be disposed with other household
wastes throughout the EU. To prevent possible harm to the environment or human health from uncontrolled waste
disposal, recycle it responsibly to promote the sustainable reuse of material resources. To return your used device,
please use the return and collection systems or contact the retailerwhere the product was purchased. They can take
this product for environmental safe recycling.
●Bei diesem Produkt handelt es sich um ein umfassendes digitales Multimedia-Audiogerät, das
die Wiedergabe von DAB-, BlueTooth-, FM-, USB- und TF-Karten integriert
● Unterstützt Band III 174.928-239.20 MHz DAB / DAB + digitaler Signalempfang
● Unterstützt Band II 87,5-108 MHz FM-Empfang mit RDS-Funktion
● Unterstützt die Standard-Bluetooth-Version 5.0
● Mit dem 2,4-Zoll-TFT-Display können Grafikpixel mit 240 RGB * 320 Punkten angezeigt werden
● Mit Echtzeituhrfunktion und kann die Zeit automatisch über DAB aktualisieren
● Zwei Weckfunktionen mit optionaler DAB / FM / Buzzer-Alarmquelle
● Eingebaute 7,4 V / 1800 mAH Lithiumbatterie
●3-Zoll-Breitbandlautsprecher und Audioausgang RMS 7W (0 dB 1 kHz / THD <10%) in hoher
Klangqualität
● Unterstützung des mehrsprachigen Systembetriebs (neun Sprachen)
Packen Sie die Box aus
Important safety instructions
03
Deutsche 04
Deutsche
01
02
03
04
05
06
07
08
08
07
05
06
01
02
03
04
14
15
11
10
09
13
12
01
02 03
04
19
17
15
18
16
14
05
06
07
08
09
13 12
11 10
01
02
07
05
03
06
04
08
09
10
11
12
13
14
15
16
17
Produktansicht Schaltplan der Fernbedienung
Standby-Taste: Drücken Sie diese Taste, um den Standby-Bildschirm der Uhr aufzurufen
Aufwärts-Taste
Ab-Taste: nächstes Lied oder nächste Zeile
Taste Wiedergabe / Pause / Mute
Preset-Taste: Speichern oder Abrufen von Lieblingsradiosendern im DAB-Modus / Drücken Sie diese Taste im
FM-Modus, um gespeicherte Radiosender abzurufen
Modus- / Lichttaste --- Kurzes Drücken: Umschalten der Modi Langes Drücken: Anpassen der Anzeigehelligkeit
Info- / Menütaste --- Kurzes Drücken: Informationen anzeigen Langes Drücken: Rufen Sie das Menü auf
Alarmtaste: Drücken Sie diese Taste, um die Alarmeinstellung schnell einzugeben
Kopfhörerbuchse: Geeignet für Standardkopfhörer mit 3,5-mm-Kopfhörerstecker
Eine USB-Buchse: Stecken Sie im USB-Modus hier ein USB-Flash-Laufwerk ein, um Songs auf dem
USB-Flash-Laufwerk abzuspielen
Netzschalter: Zum Einschalten den Schalter auf ON stellen, zum Ausschalten ausschalten
Gleichstrombuchse: Dieses Loch wird vom Adapter zum Laden des eingebauten Akkus des Geräts verwendet.
Verwenden Sie bitte das mit dem Zubehör gelieferte Netzteil
Ladeanzeigeloch: Wenn der Adapter zum Laden des Geräts angeschlossen ist, wird das rote Licht aufgeladen
und das grüne Licht ist vollständig aufgeladen.
TF-Kartenbuchse: Legen Sie im TF-Modus die TF-Karte ein, um die Songs auf der Karte abzuspielen
Radioantenne
Volumengeber
Drehung: Passen Sie die Lautstärke / Auf- und Ab-Auswahl an
Lang drücken: ENTER / Auto Scan-Taste
Drücken Sie kurz die Standby-Taste: Rufen Sie den Funktionsmodus / Standby auf
DAB & FM-Modus: Drücken Sie kurz, um nach Radiosendern zu suchen.
Takteinstellungstaste, kurz drücken, um die Takteinstellungsschnittstelle aufzurufen;
ALARM-Taste: Drücken Sie kurz ---, um den Alarmeinstellungsstatus aufzurufen
MENU-Taste: Kurz drücken, um die Menüeinstellungen aufzurufen
INFO-Taste: Kurz drücken, um Informationen anzuzeigen
Zifferntasten: Kombinieren Sie die Zifferntasten 0-9, um die Radiosender- oder Songnummer auszuwählen.
SKIP-Schlüssel
DAB-Modus: kurz drücken --- Sender vorwärts bewegen
Langes Drücken ---, um schnell vorwärts zu kommen
FM-Modus: kurz drücken --- Vorwärts-Feinabstimmung-
Langes Drücken --- halbautomatische Suche vorwärts
Menümodus: kurz drücken --- vorwärts gehen
Stummschalttaste EIN / AUS
MODE-Taste: Modusschaltertaste, DAB / FM / BT / USB / TF fünf Modi zum Umschalten
Drücken Sie im Arbeitsmodus kurz, um den Ruhezustand einzustellen: AUS / 15/30/45/60/90 Minuten
Schlummertaste: Wenn der Alarm ertönt, drücken Sie kurz, um die Schlummerfunktion aufzurufen.
Drücken Sie in der Schlummerfunktion kurz, um die Schlummerzeit auszuwählen
ENTER-Taste: DAB- und FM-Modus-OK-Taste
BT-Modus-Wiedergabe- / Pause-Taste
Bestätigen Sie im Menümodus die Taste
ZURÜCK-Taste: Drücken Sie kurz eine Ebene, um zurückzukehren.
Wenn der Alarm eingeschaltet ist, drücken Sie lange, um den Alarm abzubrechen
Helligkeitstaste: LCD-Helligkeitsanpassungstaste, dreiteilige Helligkeit einstellbar;
VOL + -Taste: Erhöhen Sie die Lautstärke
VOL-Taste: Lautstärke verringern
SKIP
DAB RADIO P200
PORTABLE WIRELESS SPEAKER
06
16
16
09 10 11 12
13
14
15

05
Deutsche 06
Deutsche
AnweisungAnweisung
18
19
PRESET-Taste
Kurzes Drücken --- Geben Sie die Schnittstelle zum Ausrufen von Radiosendern ein, langes Drücken --- Geben Sie
die Schnittstelle zum Speichern vorgespeicherter Radiosender ein
SKIP + Taste
DAB-Modus: kurz drücken --- Sender rückwärts bewegen
Langes Drücken --- Bewegen Sie den Sender schnell rückwärts
FM-Modus: Kurz drücken --- Rückwärts-Feinabstimmung-
Langes Drücken --- Halbautomatisch rückwärts suchen
Menümodus: kurz drücken --- vorwärts gehen
Maschine wechseln
①Schalten Sie den Netzschalter auf der Rückseite des Geräts zum Einschalten auf ON und zum Ausschalten auf OFF.
②Wenn eingeschaltet, direkt in den DAB-Modus.
DAB / FM / BT / USB / TF-Modusschalter
①Wechseln Sie beim Einschalten in den DAB-Modus und suchen Sie automatisch nach DAB-Sendern (Sie können auch
lange die EINGABETASTE drücken, um die Sender automatisch erneut zu suchen). Das Gerät synchronisiert die
DAB-Zeit nach der Suche automatisch. Drücken Sie nach der Suche nach DAB-Sendern die Taste nach oben und
Abwärts-Tasten, um den Sender auszuwählen, und drücken Sie die ENTER-Taste, um den Sender abzuspielen.
②Drücken Sie im DAB-Modus die MODE-Taste, um in den FM-Modus zu wechseln, und drücken Sie lange die
ENTER-Taste, um den Sender automatisch zu suchen und zu speichern. Drücken Sie beim Hören eines Radiosenders
die Auf- und Ab-Tasten, um die Frequenz des Radiosenders manuell einzustellen. Drücken Sie lange die PRESET-Taste,
um Ihr Lieblingsradio zu speichern. Drücken Sie kurz die PRESET-Taste, um den gespeicherten Radiosender aufzurufen,
drücken Sie die Auf- und Ab-Tasten, um den Radiosender auszuwählen, und drücken Sie die ENTER-Taste, um zu
bestätigen, dass das Gerät den Radiosender wiedergibt.
③Drücken Sie im FM-Modus die MODE-Taste, um den BT-Modus aufzurufen. Der Gerätename dieses Geräts lautet
"DAB P200". Sie können ihn gemäß den Betriebsanweisungen für den Bluetooth-Modus in diesem Handbuch
verwenden.
④Drücken Sie im BT-Modus die MODE-Taste, um den TF-Kartenmodus aufzurufen, legen Sie die TF-Karte mit
MP3-Songs ein, um die Musik auf der Karte abzuspielen, drücken Sie die Auf- und Ab-Tasten, um den Song
auszuwählen, und drücken Sie die ENTER-Taste, um abzuspielen / anzuhalten Drücken Sie kurz die Taste INFO / MENU,
um die Song-Informationen anzuzeigen. Drücken Sie lange die Taste INFO / MENU, um die Menüeinstellungen
aufzurufen.
⑤Drücken Sie im TF-Kartenmodus die MODE-Taste, um den USB-Modus aufzurufen, legen Sie die U-Disk mit
MP3-Songs ein, um die Musik auf der Disk abzuspielen, drücken Sie die Auf- und Ab-Tasten, um den Song auszuwählen,
und drücken Sie die ENTER-Taste, um abzuspielen / anzuhalten Drücken Sie kurz die Taste INFO / MENU, um die
Song-Informationen anzuzeigen. Drücken Sie lange die Taste INFO / MENU, um die Menüeinstellungen aufzurufen.
So rufen Sie den Standby-Status auf
①Drücken Sie in einem beliebigen Wiedergabemodus die Standby-Taste, um den Standby-Zeitmodus
aufzurufen. Zu diesem Zeitpunkt werden nurUhrzeit, Datum und Alarmstatus angezeigt.
②Im Standby-Modus können Sie die Info / Menü-Taste drücken, um Uhrzeit, Datum, Wecker usw. einzustellen,
und die Alarm-Taste drücken, um die Weckereinstellung direkt einzugeben.
③Drücken Sie im Standby-Modus erneut Standby, um den Standby-Modus zu verlassen und zum aktuellen
Wiedergabemodus zurückzukehren.
Aufladen
①Dieses Gerät kann das Gerät beim Ein- und Ausschalten aufladen. Verwenden Sie zum Laden das mitgelieferte
Ladegerät (DC9V, 700-mA-Ausgang).
②Rotes Licht leuchtet beim Laden, grünes Licht leuchtet beim vollständigen Laden.
③Dieses Gerät unterstützt die Lade- und Wiedergabefunktion.
Verwenden Sie Kopfhörer
①Verwenden Sie Kopfhörer mit einem Standardstecker mit drei oder vier Anschlüssen und einem Durchmesser von
3,5 mm.
②Wenn der Kopfhörer eingesetzt ist, wird das Kopfhörersymbol auf dem Bildschirm angezeigt und im Kopfhörermodus
ertönt kein Ton vom Lautsprecher.
③Um Unannehmlichkeiten für die Ohren aufgrund hoher Lautstärke zu vermeiden, wird empfohlen, die Lautstärke vor
dem Einsetzen der Kopfhörer zu verringern und dann auf die entsprechende Lautstärke einzustellen.
Menüeinstellungen
①Informationen zur Einstellung der Menüpunkte in den einzelnen Modi finden Sie in der Abbildung unten unter "MENU
TREE".
②Drücken Sie in jedem Modus lange die Taste INFO / MENU, um die Menüeinstellungen in diesem Modus aufzurufen,
drücken Sie die Auf- und Ab-Tasten, um die Untermenüelemente auszuwählen, und drücken Sie die ENTER-Taste, um
zu bestätigen und einzugeben, wenn nur ein Untermenü vorhanden ist -menü im Untermenü, drücken Sie direkt die
EINGABETASTE, um zu bestätigen und einzugeben. Drücken Sie während des Betriebs kurz oder lang die Taste INFO
/ MENU, um zurückzukehren.
Zeit- / Kalendereinstellungen
①Nach dem Einschalten befindet sich das Gerät im DAB-Modus und sucht automatisch nach DAB-Radiosendern. Wenn
ein Radiosender gefunden wird, synchronisiert das Gerät automatisch die lokale DAB-Zeit.
②Wenn der lokale DAB-Radiosender nicht durchsucht wird, kann das Gerät die Uhrzeit auch manuell einstellen. Der
Einstellvorgang ist wie folgt: Drücken Sie lange die Info / Menütaste, um die Menüauswahl aufzurufen, drücken Sie die
Auf- und Ab-Tasten oder den Lautstärkeregler, um "Uhrzeit / Datum" auszuwählen, drücken Sie die "ENTER" -Taste, um
die Taste einzugeben, und drehen Sie die Taste " Lautstärkeregler "oder die Auf- und Ab-Tasten zur Auswahl von" Set
Time / Date ". Drücken Sie die Taste" ENTER ", um die Einstellung" Tag "einzugeben. Drücken Sie den Lautstärkeregler
oder die Auf- und Ab-Tasten zur Auswahl und drücken Sie die ENTER-Taste, um Bestätigen Sie und stellen Sie die
Einstellung "Monat" ein, drücken Sie auch die Auf- und Ab-Tasten oder drehen Sie den Lautstärkeregler, um
auszuwählen, und drücken Sie dann die ENTER-Taste, um die Einstellung "Jahr" zu bestätigen und einzugeben, drücken
Sie die Auf- und Ab-Tasten oder drehen Sie den Lautstärkeregler Drücken Sie zur Auswahl die ENTER-Taste, um die
Einstellung "Stunde" zu bestätigen und einzugeben, drücken Sie die Aufwärts- und Abwärts-Taste oder drehen Sie den
Lautstärkeregler zur Auswahl. Drücken Sie dann die ENTER-Taste, um die Einstellung "Minute" zu bestätigen und
einzugeben, und drücken Sie dann die Taste Auf- und Ab-Tasten Oder drehen Sie den Lautstärkeregler zur Auswahl,
drücken Sie zur Bestätigung die ENTER-Taste, um automatisch zur vorherigen.
.
Batterieladung:
Bitte beziehen Sie sich auf die Abbildung, um das Batteriefach zu öffnen,
die CR2025-Batterie einzulegen und das Fach zu schließen.
Hinweis:
1.Stellen Sie die Fernbedienung nicht an heißen und feuchten Orten auf.
2.Laden Sie den Akku nicht auf.
3.Entfernen Sie den Akku, wenn Sie ihn längere Zeit nicht benutzen.
4.Der Akku darf keiner übermäßigen Hitze wie direkter Sonne, Feuer oder
Ähnlichem ausgesetzt werden.

07
Deutsche 08
Deutsche
AnweisungAnweisung
Einstellung zurückzukehren Schnittstelle nach Abschluss der Zeit- und Datumseinstellung. Drücken Sie INFO / MENU,
um Schritt für Schritt zurückzukehren, oder drücken Sie lange Info / Menu, um das Menü direkt in den Hauptmodus zu
verlassen.
Auto Update / Set 12/24 Hour / Set Date Format / Clock Style Elementeinstel-
lung
Durch Kombinieren der Auf- und Ab-Tasten oder Drehen des Lautstärkereglers kann die Eingabetaste die Einstellung
für die automatische Aktualisierung / Einstellung von 12/24 Stunden / Datumsformat / Taktstil einstellen:
Element Automatische Aktualisierung: Wählen Sie Von Radio aktualisieren / Kein Update
Set 12/24 Hour item: Wählen Sie 12Hour / 24Hour
Element Datumsformat festlegen: Wählen Sie TT-MM-JJJJ / MM-TT-JJJJ
Uhrstilelement: Wählen Sie Digital / Anglog
Alarmeinstellung
Dieses Gerät kann 2 Gruppen von Alarmen einstellen, die gemäß den folgenden Schritten eingestellt werden können.
①Um den Wecker einzustellen, drücken Sie kurz die ALARM-Taste, um die ALARM-Einstellungsoberfläche aufzurufen.
②Drücken Sie die Auf- und Ab-Tasten oder drehen Sie den Lautstärkeregler, um die Einstellungen für Alarm 1 oder
Alarm 2 auszuwählen.
③Drücken Sie nach der Auswahl kurz die Taste "ENTER", drücken Sie die Auf- und Ab-Taste oder drehen Sie den
Lautstärkeregler, um den Einstellungspunkt OnOff / Time / Source / Repeat / Volume auszuwählen.
Alarmelement: Ein / Aus-Auswahl;
Zeitelement: Wählen Sie die Uhrzeit mit den Auf- und Ab-Tasten oder drehen Sie den Lautstärkeregler und drücken Sie
zur Bestätigung die EINGABETASTE.
Quellelement: FM / DAB / Buzzer-Optionen;
Punkt wiederholen: Es gibt Optionen für Einmal / Täglich / Wochenenden / Arbeitstag.
Lautstärkeelement: Verwenden Sie die Auf- und Ab-Tasten oder drehen Sie den Lautstärkeregler, um den Lautstärkew-
ert auszuwählen, und drücken Sie zur Bestätigung die ENTER-Taste.
Drücken Sie nach dem Einstellen Info / Menü, um die Alarmeinstellung zu verlassen.
Wenn der Alarm ertönt, wird der Ton schrittweise auf die eingestellte Lautstärke erhöht. Drücken Sie die ENTER-Taste,
um die Schlummerfunktion zu aktivieren, und drehen Sie dann den Lautstärkeregler, um die Schlummer-Count-
down-Zeit einzustellen. Wenn der Alarm klingelt, können Sie eine beliebige andere Taste drücken, um den aktuellen
Alarm auszuschalten.
Systemeinstellungen
①Drücken Sie im Funktionsmodus lange die Taste "INFO / MENU", um die Hauptmenü-Einstellungsoberfläche
aufzurufen, drücken Sie kurz die Auf- und Ab-Tasten oder drehen Sie den Lautstärkeregler, um die entsprechende
Funktionseinstellungsoberfläche auszuwählen, und drücken Sie kurz "ENTER" auf Geben Sie die entsprechende
Funktionseinstellungsoberfläche ein.
②Die Schlaffunktion ist unterteilt in: AUS / 15/30/45/60/75/90/105/120 Minuten.
③Alarm hat zwei Alarme, 3 verschiedene Alarme zur Auswahl: Summer / DAB / FM; Alarmwiederholung: Einmal /
Täglich / Wochenende / Arbeitstagauswahl, nach Beendigung des Alarms wird der Standby-Status aktiviert.
④Uhrzeit- / Datumseinstellung; Einstellung der Hintergrundbeleuchtung; EQ Soundeffekt Einstellung; Spracheinstel-
lungen; Werksreset, um die Werkseinstellungen wiederherzustellen; Informationen zur Info-Softwareversion usw.
DAB-Funktion
①Wenn eingeschaltet, direkt in den DAB-Modus.
②Wenn das Gerät zum ersten Mal in den DAB-Modus wechselt, sucht das Gerät automatisch nach Radiosendern.
Wenn das Gerät bereits nach Radiosendern gesucht hat, können Sie auch die EINGABETASTE gedrückt halten, um die
automatische Sendersuche durchzuführen.
③Drücken Sie nach Abschluss der Sendersuche die Auf- und Ab-Tasten oder drehen Sie den Lautstärkeregler, um die
Sender in der Senderliste auf und ab zu bewegen, und drücken Sie die Taste "ENTER", um den Sender auszuwählen.
Drehen Sie die Taste "VOLUME", um die entsprechende Lautstärke einzustellen. Drücken Sie kurz "VOLUME", um die
Lautstärke stummzuschalten. Drücken Sie erneut kurz "VOLUME", um die Lautstärke auszuschalten.
④Drücken Sie kurz die Taste "INFO / MENU", um die aktuellen Senderinformationen anzuzeigen: Textinformationen,
Signalstärke, Programmtyp, Episodenname, Kanalnummer / -frequenz, Signalfehlerrate, Bitrate, Uhrzeit und Datum
usw.
⑤Drücken Sie lange die Taste "PRESET", um die Prestore-Schnittstelle des Radiosenders aufzurufen, drücken Sie die
Auf- und Ab-Tasten oder drehen Sie den Lautstärkeregler, um die vorgespeicherte Position auf und ab zu bewegen,
drücken Sie die Auf- und Ab-Tasten oder drehen Sie den Lautstärkeregler und die Taste " ENTER "-Taste, um den
Radiosender vorab in die aktuelle Position zu bringen, kurz" PRESET "drücken" "-Taste, um die Rückrufschnittstelle für
Radiosender aufzurufen, dann die Auf- und Ab-Tasten drücken oder den Lautstärkeregler drehen, um den vorgespe-
icherten Radiosender auszuwählen, drücken Die ENTER-Taste zum Bestätigen und Abspielen. Hinweis: Insgesamt sind
20 Lieblingsradiosender vorgespeichert.
⑥Drücken Sie lange die Taste "INFO / MENU", um die Einstellungsoberfläche des Hauptmenüs aufzurufen, drücken
Sie die Auf- und Ab-Tasten oder drehen Sie den Lautstärkeregler, um die entsprechende Funktionseinstellungsober-
fläche auszuwählen. Drücken Sie kurz "ENTER", um die entsprechende Funktionseinstellungsoberfläche aufzurufen.
Spezifische Einstellungen finden Sie in der oben genannten Tabelle "MENU TREE".
Hinweis:
Stationsliste --- Stationsliste Scan --- Automatische Suche
Manuelle Abstimmung --- Manuelles Einstellen von Prune Inavlid --- Trimmen ungültiger Sender
FM-Funktion
①Schalten Sie das Gerät ein und drücken Sie die Taste "MODE", um den FM-Modus aufzurufen.
②Drücken Sie die Auf- und Ab-Tasten, um den Radiosender vorwärts oder rückwärts zu optimieren. 50-kHz-Sprung
einen Schritt; Wenn Sie die Auf- / Ab-Taste lange drücken, können Sie halbautomatisch vorwärts oder rückwärts nach
dem Radiosender suchen. Drücken Sie lange die "ENTER" -Taste, um den Radiosender automatisch zu suchen und zu
speichern.
③Drehen Sie den Lautstärkeregler, um die entsprechende Lautstärke einzustellen, und drücken Sie den Lautstärk-
eregler, um die Stummschaltung ein- oder auszuschalten.
④Drücken Sie kurz die Taste "INFO / MENU", um die aktuellen Radiosenderinformationen anzuzeigen: Textinforma-
tionen, Programmtyp, Episodenname, Kanalinformationen, Uhrzeit und Datum.
⑤Drücken Sie lange die Taste "PRESET", um die Radio-Pre-Store-Oberfläche aufzurufen, drücken Sie die Auf- und
Ab-Tasten oder drehen Sie den Lautstärkeregler, um sich vorwärts oder rückwärts zu bewegen
Nachdem Sie in die vorgespeicherte Position gewechselt sind, drücken Sie kurz „ENTER“, um den Radiosender auf die
aktuelle Position vorzuspeichern. Drücken Sie kurz die Taste "PRESET", um die Schnittstelle zum Abrufen von Radiosen-
dern aufzurufen, drücken Sie die Auf- und Ab-Tasten oder drehen Sie den Lautstärkeregler, um die vorgespeicherte
Position vorwärts oder rückwärts zu bewegen, und drücken Sie kurz "ENTER", um das vorgespeicherte Radio abzurufen
Station für die Wiedergabe.
Hinweis: Insgesamt sind 20 Stationen vorgespeichert
⑥Drücken Sie lange die Taste "INFO / MENU", um die Hauptmenü-Einstellungsoberfläche aufzurufen, drücken Sie die
Auf- und Ab-Tasten oder drehen Sie den Lautstärkeregler, um die entsprechende Funktionseinstellungsoberfläche
auszuwählen. Drücken Sie kurz "ENTER", um die entsprechende Funktionseinstellungsoberfläche aufzurufen. Die
spezifischen Einstellungen können sich auf die obige Tabelle "MENU" TREE "beziehen.
⑥Scaneinstellung --- In der Einstellung für den Suchfunkmodus können Sie Alle Stationen und Starke Stationen
auswählen.
Anweisung

09
Deutsche 10
Deutsche
AnweisungAnweisung
Bluetooth-Pairing / Wiedergabe
①Schalten Sie das Gerät ein und drücken Sie die Taste "MODE", um mehrmals umzuschalten, bis es in den BT-Modus
wechselt. und Sie hören ein "Grunzen", das anzeigt, dass Bluetooth eingeschaltet ist und sich im Wartezustand für die
Verbindung befindet, und auf dem LCD-Bildschirm wird das Wort "Disconnected" angezeigt.
②Verwenden Sie das Bluetooth-Gerät, nehmen Sie das Mobiltelefon als Beispiel, schalten Sie das Bluetooth-Gerät auf
dem Mobiltelefon ein, suchen Sie nach dem Bluetooth-Gerät mit dem Namen "DAB P200" und klicken Sie dann auf, um
eine Verbindung mit "DAB P200" herzustellen Hören Sie die "Klingeln" -Musik nach ca. 10 Sekunden. Wenn das
Bluetooth-Gerät des Telefons ausgeschaltet ist, gibt das Gerät einen "Boom" -Musikton aus und zeigt das Wort
"Disconnected" an, um anzuzeigen, dass das Bluetooth getrennt wurde.
③Drücken Sie die Auf- und Ab-Tasten, um die Songs auf und ab zu schalten, und drücken Sie kurz die"Play /
Pause"-Taste, um sie abzuspielen oder anzuhalten.
④Drehen Sie die Taste "VOLUME", um die entsprechende Lautstärke einzustellen. Drücken Sie "VOLUME", um die
Wiedergabe anzuhalten.
⑤Drücken Sie lange die EINGABETASTE, um die Verbindung zum Mobilgerät zu trennen.
USB-Disk (oder TF-Karte) Wiedergabe
①Schalten Sie das Gerät ein und drücken Sie mehrmals die MODE-Taste. Wenn USB (oder TF) auf dem Display
angezeigt wird, wechselt es in den USB-Modus (oder TF-Modus). Legen Sie zu diesem Zeitpunkt ein USB-Flash-Laufw-
erk mit Titeln im MP3-, WAV-, FLAC-, WMA-, APE-Format (oder TF-Karte) ein, die Sie abspielen können Musik.
②Drehen Sie die [VOLUME] -Taste, um die Lautstärke anzupassen.
③Drücken Sie während der Wiedergabe kurz die PRESET-Taste, um den Loop-Wiedergabemodus umzuschalten.
Derzeit gibt es drei umschaltbare Modi: ALL (alle Songs schleifen), SING (den aktuellen Song schleifen), RAND
(zufällige Wiedergabe).
④Drücken Sie kurz die Auf- und Ab-Tasten, um zwischen Auf- und Ab-Songs zu wechseln, lange die Auf- und
Ab-Tasten, um schnell vor- und zurückzuspulen, und drücken Sie kurz die "Play / Pause"-Taste, um abzuspielen oder
anzuhalten.
⑤Drücken Sie während der Wiedergabe kurz die Taste INFO / MENU, um die aktuell wiedergegebenen Songinforma-
tionen anzuzeigen (Songname, aktueller Titel / Gesamtsong, aktuelle Wiedergabezeit / aktuelle Gesamtsongzeit,
Datum usw.), und drücken Sie lange, um die Systemeinstellungen aufzurufen. Spezifische Einstellungen finden Sie in
der oben genannten Tabelle "MENU TREE".

DAB Radio Adattatore Telecomando Manuale d'uso
● Potenza di uscita dell'amplificatore di potenza:
7 W (onda sinusoidale da 8,0 V 1 KHz, 0 dB)
● Rapporto segnale-rumore dell'amplificatore di potenza: ≥75dBA
● Distorsione: ≤1%
● Risposta in frequenza: 100 HZ-18 KHZ
● Interfaccia di ingresso audio: DAB, FM, BT, USB, TF
● Modulo di regolazione: regolazione del pulsante
● Altoparlante: magnetico esterno 78mm (4 ohm)
● Potenza in ingresso: batteria agli ioni di litio da 7,4 V / 1800 mAh
01
ltaliano 02
ltaliano
Specificazioni
Descrizione della funzione
Lista imballaggio
● Massima potenza in ingresso: ≤6W
● Massima sensibilità di input USB / Micro SD:
0 dBm
● Sensibilità ingresso ricezione DAB: -97dBm
● Sensibilità ingresso ricezione FM: -105 dBm
● Temperatura ambiente di lavoro: -10ºC ~ 50 ºC
● Temperatura di stoccaggio: -20ºC ~ 70 ºC
● Specifiche del prodotto: 156 * 90,5 * 184,5 mm
● Peso netto: circa 995 g
WARNING: To reduce the risk of fire or electric shock, do not expose this apparatus to rain or moisture.
Thank you for purchasing this inscabin product. For generations, inscabin tries to provide powered speaker products
to satisfy the
need of our end customers, even the most demanding ones. This product can add to your home entertainment,
personal
computer, and mini home theater great sound performance. Please read this manual carefully to obtain the best of this
system.
Charge lnstructions:
Connect the speaker (DC IN connector port on the rear panel)to the outlet
with the attached power adapter.Charge speaker for approximately 3~5hours before the first use.
The lightning flash with arrowhead inside
thetriangle, is intended to alert the user
to the presence of un-insulated dangerous
voltage within the product's enclosure
that may be of a sufficient magnitude to
constitute a risk of electric shock to persons.
To prevent the risk of electric shock, do not
remove cover (or back). No user-serviceable
Parts inside. Refer servicing to qualified
Service personnel only.
The exclamation point inside the triangle
is intended to alert the user to the presence
of important operating and maintenance
(servicing) instructions in the literature
accompanying the product.
1. Read these instructions. 2. Keep these instructions.
3. Heed all warnings. 4. Follow all instructions.
5. Do not use this apparatus near water. 6. Clean only with dry cloth.
7. Do not block any ventilation openings. Install in accordance with the manufacturer’s instructions.
8. Do not install near any heat sources such as radiators, heat registers, stoves, or other apparatus (including amplifiers) tha
produce heat.
9. Do not defeat the safety purpose of the polarized or grounding-type plug. A polarized plug has two blades with one wider tha
the other. A grounding type plug has two blades and a third grounding prong. The wide blade or the third prong are provided
for your safety. If the provided plug does not fit into your outlet, consult an electrician for replacement of the obsolete
10. Protect the power cord from being walked on or pinched particularly at plugs, convenience receptacles, and the point where
they exit from the apparatus.
11. Only use attachments/accessories specified by the manufacturer.
12. Unplug this apparatus during lightning storms or when unused for long periods of time.
13. Refer all servicing to qualified service personnel. Servicing is required when the apparatus has been damaged in any way, su
as power-supply cord or plug is damaged, liquid has been spilled or objects have fallen into the apparatus, the apparatus
been exposed to rain or moisture, does not operate normally, or has been dropped.
14. The MAINS plug or an appliance coupler is used as the disconnect device, the disconnect device shall remain readily operabl
Note:There is a built-in rechargeable lithium-ion battery in the speaker. Danger of explosion if disassemble the speaker. The speak
shall not be placed close to excessive heat such as fire or the like.
The battery shall not be exposed to excessive heat such as sunshine, fire or the like. Danger of explosion if the ba
incorrectly replaced.
Replace only with the same or equivalent type.
Use only with the cart, stand, tripod, bracket, or table specified by the manufacturer, or sold with the apparatus. When
a cart is used, use caution when moving the cart/apparatus combination to avoid injury from tip-over.
Correct Disposal of this product. This marking indicates that this product should not be disposed with other household
wastes throughout the EU. To prevent possible harm to the environment or human health from uncontrolled waste
disposal, recycle it responsibly to promote the sustainable reuse of material resources. To return your used device,
please use the return and collection systems or contact the retailerwhere the product was purchased. They can take
this product for environmental safe recycling.
● Questo prodotto è un'apparecchiatura audio multimediale digitale completa che integra
la riproduzione di schede DAB, BlueTooth, FM, USB e TF
● Supporta la ricezione del segnale digitale DAB / DAB + banda III 174,928-239,20 MHz
● Supporta la ricezione FM in banda II da 87,5-108 MHz con funzione RDS
● Supporta la versione Bluetooth standard 5.0
● Con display TFT da 2,4 pollici, è possibile visualizzare pixel grafici 240RGB * 320 dots
● Con la funzione di orologio in tempo reale e può aggiornare automaticamente l'ora
tramite DAB
● Due set di funzioni di sveglia con sorgente di allarme DAB / FM / Buzzer opzionale
● Batteria al litio da 7,4 V / 1800 mAH integrata
● Altoparlante full-range da 3 pollici e uscita audio RMS 7W (0dB 1KHz / THD <10%)
presentazione audio di alta qualità
● Supporta il funzionamento del sistema multilingue (nove lingue)
Disimballare la scatolaImportant safety instructions

03
ltaliano 04
ltaliano
01
02
03
04
05
06
07
08
08
07
05
06
01
02
03
04
14
15
11
10
09
13
12
01
02 03
04
19
17
15
18
16
14
05
06
07
08
09
13 12
11 10
01
02
07
05
03
06
04
08
09
10
11
12
13
14
15
16
17
Vista del prodottoSchema del telecomando
Tasto standby: premere questo tasto per accedere alla schermata di standby dell'orologio
Tasto Su
Tasto Giù: brano successivo o riga successiva
Pulsante Riproduci / Pausa / Mute
Tasto Preset: pre-memorizza o richiama le stazioni radio preferite in modalità DAB / premi questo tasto in
modalità FM per richiamare le stazioni radio salvate
Tasto Mode/Light --- Pressione breve: cambia modalità Pressione lunga: regola la luminosità del display
Tasto Info / Menu --- pressione breve: visualizza informazioni pressione lunga: accede al menu
Tasto Alarm: premere questo tasto per accedere rapidamente alle impostazioni della sveglia
Jack per cuffie: adatto per cuffie standard con connettore per cuffie da 3,5 mm
Una presa USB di tipo: in modalità USB, inserire qui un'unità flash USB per riprodurre i brani nell'unità flash USB
Interruttore di alimentazione: ruotare l'interruttore su ON per accendere, OFF per spegnere
Presa di alimentazione CC: questo foro viene utilizzato dall'adattatore per caricare la batteria integrata della
macchina, utilizzare l'adattatore di corrente fornito con l'accessorio
Foro dell'indicatore di carica: quando l'adattatore è collegato per caricare la macchina, la luce rossa si sta
caricando e la luce verde è completamente carica.
Jack per schede TF: in modalità TF, inserire la scheda TF per riprodurre i brani nella scheda
Antenna radio
Codificatore di volume
Rotazione: regola il volume / la selezione su e giù
Pressione lunga: tasto ENTER / Scansione automatica
Premere brevemente il pulsante di standby: accedere alla modalità funzione / standby
Modalità DAB e FM: premere brevemente per cercare le stazioni radio;
Tasto di impostazione dell'orologio, premere brevemente per accedere all'interfaccia di impostazione dell'orologio;
Tasto ALARM: pressione breve --- per accedere allo stato di impostazione della sveglia
Tasto MENU: premere brevemente per accedere alle impostazioni del menu
Tasto INFO: premere brevemente per visualizzare le informazioni
Tasti numerici: combina i tasti numerici 0-9 per selezionare la stazione radio o il numero del brano;
SKIP-chiave
Modalità DAB: pressione breve --- sposta la stazione in avanti
Premere a lungo --- per avanzare rapidamente
Modalità FM: pressione breve --- avanti regolazione fine-
Pressione lunga --- ricerca semiautomatica in avanti
Modalità menu: pressione breve --- vai avanti
Pulsante mute ON / OFF
Pulsante MODE: pulsante di commutazione modalità, DAB / FM / BT / USB / TF cinque modalità per passare
In modalità di lavoro, premere brevemente per impostare Sleep: OFF / 15/30/45/60/90 minuti
Pulsante snooze: quando suona la sveglia, premere brevemente per accedere alla funzione snooze;
Nella funzione snooze, premere brevemente per selezionare il tempo di snooze
Tasto ENTER: tasto DAB e FM-tasto OK
Tasto di riproduzione / pausa in modalità BT
Nel tasto di conferma modalità menu
Tasto INDIETRO: premere brevemente un livello per tornare;
Quando la sveglia è attiva, premere a lungo per annullare la sveglia
Tasto luminosità: tasto regolazione luminosità LCD, luminosità a tre segmenti regolabile;
Tasto VOL +: aumenta il volume
Tasto VOL: volume giù
SKIP
DAB RADIO P200
PORTABLE WIRELESS SPEAKER
06
16
16
09 10 11 12
13
14
15

05
ltaliano 06
ltaliano
lstruzionelstruzione
18
19
Tasto PRESET
Pressione breve --- per accedere all'interfaccia di chiamata delle stazioni radio, pressione lunga --- per
accedere all'interfaccia delle stazioni radio pre-memorizzate
Tasto SKIP +
Modalità DAB: pressione breve --- sposta la stazione all'indietro
Pressione lunga --- sposta rapidamente la stazione all'indietro
Modalità FM: pressione breve --- Regolazione fine all'indietro-
Pressione lunga --- Ricerca all'indietro semi-automatica
Modalità menu: pressione breve --- vai avanti
Cambia macchina
①Ruotare l'interruttore di alimentazione sul retro della macchina su ON per accenderlo e girare su OFF per spegnere.
②Quando è attivata, direttamente nella modalità DAB.
Selettore modalità DAB / FM / BT / USB / TF
①Accedere alla modalità DAB all'accensione e cercare automaticamente le stazioni DAB (è anche possibile premere a
lungo il tasto ENTER per cercare nuovamente le stazioni automaticamente), la macchina sincronizzerà automatica-
mente il tempo DAB dopo la ricerca, dopo aver cercato le stazioni DAB, premere il e giù per selezionare la stazione e
premere il tasto ENTER per riprodurre la stazione.
②In modalità DAB, premere il tasto MODE per passare alla modalità FM, premere a lungo il tasto ENTER per cercare
e salvare automaticamente la stazione. Quando si ascolta una stazione radio, premere i tasti su e giù per sintonizzare
manualmente la frequenza della stazione radio. Premi a lungo il tasto PRESET per memorizzare la tua radio preferita;
premere brevemente il tasto PRESET per richiamare la stazione radio memorizzata, premere i tasti su e giù per
selezionare la stazione radio, premere il tasto ENTER per confermare, la macchina riprodurrà la stazione radio;
③In modalità FM, premere il pulsante MODE per accedere alla modalità BT, il nome del dispositivo di questa macchina
è "DAB P200", è possibile utilizzarlo secondo le istruzioni per l'uso della modalità Bluetooth in questo manuale;
④In modalità BT, premere il pulsante MODE per accedere alla modalità scheda TF, inserire la scheda TF con brani MP3
per riprodurre la musica nella scheda, premere i tasti su e giù per selezionare il brano, premere il tasto ENTER per
riprodurre / mettere in pausa , premere brevemente il tasto INFO / MENU per visualizzare le informazioni sul brano,
premere a lungo il pulsante INFO / MENU per accedere alle impostazioni del menu.
⑤In modalità scheda TF, premere il pulsante MODE per accedere alla modalità USB, inserire il disco U con brani MP3
per riprodurre la musica sul disco, premere i tasti su e giù per selezionare il brano, premere il tasto ENTER per
riprodurre / mettere in pausa , premere brevemente il tasto INFO / MENU per visualizzare le informazioni sul brano,
premere a lungo il pulsante INFO / MENU per accedere alle impostazioni del menu.
Come accedere allo stato di standby
①In qualsiasi modalità di riproduzione, premere il pulsante Standby per accedere alla modalità tempo di attesa. Al
momento vengono visualizzati solo l'ora, la data e lo stato della sveglia.
②In modalità Standby, è possibile premere il pulsante Info / Menu per impostare l'ora, la data, la sveglia, ecc. E
premere il pulsante Sveglia per accedere direttamente all'impostazione della sveglia.
③Premere di nuovo Standby in modalità standby per uscire dalla modalità standby e tornare alla modalità di riproduzi-
one corrente.
Ricaricare
①Questa macchina può caricare la macchina quando è accesa e spenta, si prega di utilizzare il caricabatterie in
dotazione (DC9V, uscita 700mA) per la ricarica.
②La luce rossa è accesa durante la ricarica, la luce verde è accesa quando è completamente carica.
③Questa macchina supporta la funzione di ricarica e riproduzione.
Usa le cuffie
①Utilizzare auricolari con spina standard a tre terminali o quadruplo da 3,5 mm di diametro.
②Quando l'auricolare è inserito, il simbolo dell'auricolare viene visualizzato sullo schermo e non viene emesso alcun
suono dall'altoparlante in modalità auricolare.
③Al fine di evitare disagi alle orecchie a causa dell'elevato volume, si consiglia di abbassare il volume prima di inserire
gli auricolari, quindi regolare il volume appropriato.
Impostazioni del menu
①Per l'impostazione della voce di menu in ciascuna modalità, fare riferimento alla figura seguente "ALBERO DEL
MENU".
②In ciascuna modalità, premere a lungo il tasto INFO / MENU per accedere alle impostazioni del menu in questa
modalità, premere i tasti su e giù per selezionare le voci del sottomenu, premere il tasto ENTER per confermare e
accedere, se è presente un solo sottomenu -menu nel sottomenu, premere direttamente il tasto ENTER per confermare
e accedere. Durante il funzionamento, premere brevemente o premere a lungo il tasto INFO / MENU per tornare.
Impostazioni ora / calendario
①Dopo l'accensione, la macchina si trova in modalità DAB e cerca automaticamente le stazioni radio DAB. Se viene
trovata una stazione radio, la macchina sincronizzerà automaticamente l'ora DAB locale.
② Se la stazione radio DAB locale non viene cercata, la macchina può anche impostare l'ora manualmente. Il processo
di impostazione è il seguente, premere a lungo il tasto Info / Menu per accedere alla selezione del menu, premere i
tasti su e giù o la manopola del volume per selezionare "Set Time/Date", premere il tasto "ENTER" per accedere,
ruotare il " manopola del volume "o i tasti su e giù per selezionare" Imposta Time/Date "E premere il tasto" ENTER "per
accedere alla regolazione" giorno ", premere la manopola del volume o i tasti su e giù per selezionare, premere il tasto
ENTER per confermare e inserire la regolazione "mensile", premere anche i tasti su e giù o ruotare la manopola del
volume per selezionare, quindi premere il tasto ENTER per confermare e accedere alla regolazione "Anno", premere i
tasti su e giù o ruotare la manopola del volume per selezionare, premere il tasto ENTER per confermare e inserire la
regolazione "dell'ora", premere i tasti su e giù o ruotare la manopola del volume per selezionare, quindi premere il tasto
ENTER per confermare e inserire la regolazione "minuti", quindi premere il tasti su e giù Oppure ruotare la manopola
del volume per selezionare, premere il tasto ENTER per confermare, e si tornerà automaticamente all'impostazione
precedente interfaccia dopo aver completato l'impostazione di data e ora. Premere INFO / MENU per tornare passo
dopo passo oppure premere a lungo Info / Menu per uscire direttamente dal menu nella modalità principale.
Battery loading:
Please refer to the illustration to open the byttery compartment,
insert the CR 2025 battery and close the compartment.
Note:
1.Do not place the remote control in places that are hot and humid.
2.Do not charge the battery.
3.Remove the battery when unused for long period of time.
4.The battery should not be exposed to excessive heat such as direct
sun, fire or similar.

07
ltaliano 08
ltaliano
lstruzionelstruzione
Auto Update / Set 12/24 Hour / Set Date Format / Clock Style impostazione
voce
Combinando i tasti su e giù o ruotando la manopola del volume, il tasto ENTER può completare l'impostazione della
voce Aggiornamento automatico / Imposta 12/24 ore / Imposta formato data / Stile orologio:
Voce di aggiornamento automatico: selezionare Aggiorna da radio / Nessun aggiornamento
Imposta voce 12/24 ore: seleziona 12 ore / 24 ore
Imposta voce formato data: seleziona GG-MM-AAAA / MM-GG-AAAA
Voce stile orologio: selezionare Digitale / Anglog
Impostazione allarme
Questa macchina può impostare 2 gruppi di allarmi, che possono essere impostati in base ai seguenti passaggi.
①Per impostare la sveglia, premere brevemente il tasto ALARM per accedere all'interfaccia di impostazione ALARM;
②Premere i tasti su e giù o ruotare la manopola del volume per selezionare le impostazioni della sveglia 1 o della
sveglia 2;
③Dopo aver effettuato la selezione, premere brevemente il tasto "ENTER", premere i tasti su e giù o ruotare la
manopola del volume per selezionare la voce di impostazione OnOff / Time / Source / Repeat / olume;
Voce di allarme: selezione On / Off;
Voce ora: selezionare l'ora con i tasti su e giù o ruotare la manopola del volume, quindi premere ENTER per confermare
Voce sorgente: opzioni FM / DAB / Buzzer;
Ripeti articolo: ci sono opzioni Una volta / Giornaliero / Fine settimana / Giorno lavorativo;
Voce volume: utilizzare i tasti su e giù o ruotare la manopola del volume per selezionare il valore del volume, quindi
premere il tasto ENTER per confermare.
Dopo l'impostazione, premere Info / Menu per uscire dall'impostazione della sveglia.
Quando suona la sveglia, l'audio viene gradualmente aumentato al volume impostato. Premere il tasto ENTER per
attivare la funzione snooze, quindi ruotare la manopola del volume per regolare il tempo del conto alla rovescia; quando
suona la sveglia, è possibile premere qualsiasi altro tasto per disattivare la sveglia corrente.
Impostazioni di sistema
①Nella modalità funzione, premere a lungo il tasto "INFO / MENU" per accedere all'interfaccia di impostazione del
menu principale, premere brevemente i tasti su e giù o ruotare la manopola del volume per selezionare l'interfaccia di
impostazione della funzione corrispondente, quindi premere brevemente "ENTER" per accedere all'interfaccia di
impostazione della funzione corrispondente.
②La funzione sleep è suddivisa in: OFF / 15/30/45/60/75/90/105/120 minuti.
③L'allarme ha due allarmi, 3 diversi allarmi tra cui scegliere: Buzzer / DAB / FM; Ripetizione allarme: Una volta /
Quotidiano / Fine settimana / Giorno lavorativo, una volta terminata la sveglia, entrerà nello stato di attesa.
④Impostazione Time/Date; Impostazione della retroilluminazione; EQ impostazione degli effetti sonori; Impostazione
della lingua; Factory Reset per ripristinare le impostazioni di fabbrica; Informazioni sulla versione del software, ecc.
Funzione DAB
①Quando è attivata, direttamente nella modalità DAB.
②Se la macchina entra in modalità DAB per la prima volta, la macchina cercherà automaticamente le stazioni radio;
se la macchina ha già cercato stazioni radio, è anche possibile tenere premuto il tasto ENTER per eseguire la ricerca
automatica delle stazioni.
③Dopo aver completato la ricerca della stazione, premere i tasti su e giù o ruotare la manopola del volume per
spostare le stazioni nell'elenco delle stazioni su e giù, quindi premere il tasto "ENTER" per selezionare la stazione;
ruotare il pulsante "VOLUME" per regolare il volume appropriato, premere brevemente "VOLUME" per silenziarlo,
premere di nuovo brevemente "VOLUME" per silenziare;
④Premere brevemente il tasto "INFO / MENU" per visualizzare le informazioni sulla stazione corrente: informazioni di
testo, intensità del segnale, tipo di programma, nome dell'episodio, numero / frequenza del canale, tasso di errore del
segnale, bit rate, ora e data, ecc.
⑤Premere a lungo il tasto "PRESET" per accedere all'interfaccia di prestore della stazione radio, premere i tasti su e
giù o ruotare la manopola del volume per spostare la posizione di prestigio su e giù, premere i tasti su e giù o ruotare
la manopola del volume e il " Tasto ENTER "per ripristinare la stazione radio nella posizione corrente, premere
brevemente il tasto" PRESET "" per accedere all'interfaccia di richiamo della stazione radio, quindi premere i tasti su e
giù o ruotare la manopola del volume per selezionare la stazione radio preimpostata, premere il tasto ENTER per
confermare e riprodurre Nota: sono pre-memorizzate in totale 20 stazioni radio preferite.
⑥Premere a lungo il tasto "INFO / MENU" per accedere all'interfaccia di impostazione del menu principale, premere i
tasti su e giù o ruotare la manopola del volume per selezionare l'interfaccia di impostazione della funzione corrispon-
dente, premere brevemente "ENTER" per accedere all'interfaccia di impostazione della funzione corrispondente. Per
impostazioni specifiche, fare riferimento alla tabella "MENU TREE" sopra menzionata.
Nota:
Elenco stazioni --- Elenco stazioni Scansione --- Ricerca automatica
Sintonizzazione manuale --- Sintonia manuale Prune Inavlid --- trim stazioni non valide
Funzione FM
①Accendere, premere il tasto "MODE" per accedere alla modalità FM;
②Premere i tasti su e giù per sintonizzare la stazione radio in avanti o indietro, 50KHz saltare di un passo; premere a
lungo il tasto su / giù, è possibile cercare la stazione radio in avanti o indietro in modo semi-automatico; premere a
lungo il tasto "ENTER" per cercare e salvare automaticamente la stazione radio.
③Ruotare il codificatore del volume per regolare il volume appropriato, premere la manopola del volume per attivare
/ disattivare l'audio.
④Premere brevemente il tasto "INFO / MENU" per visualizzare le informazioni sulla stazione radio corrente: informazi-
oni di testo, tipo di programma, nome episodio, informazioni sul canale, ora e data.
⑤Premere a lungo il tasto "PRESET" per accedere all'interfaccia di pre-memorizzazione della radio, premere i tasti su
e giù o ruotare la manopola del volume "per spostarsi avanti o indietro.
Dopo essersi spostati nella posizione pre-memorizzata, premere brevemente “ENTER” per pre-memorizzare la stazione
radio nella posizione corrente. Premere brevemente il tasto "PRESET" per accedere all'interfaccia di richiamo della
stazione radio, premere i tasti su e giù o ruotare la manopola del volume per spostare la posizione memorizzata in
avanti o indietro, e premere brevemente "ENTER" per richiamare la radio memorizzata stazione per la riproduzione.
Nota: sono pre-memorizzate in totale 20 stazioni.
⑥Premere a lungo il tasto "INFO / MENU" per accedere all'interfaccia di impostazione del menu principale, premere i
tasti su e giù o ruotare la manopola del volume per selezionare l'interfaccia di impostazione della funzione corrispon-
dente, premere brevemente "ENTER" per accedere all'interfaccia di impostazione della funzione corrispondente, le
impostazioni specifiche possono fare riferimento alla tabella "MENU" TREE "sopra.
⑦Scan setting --- Cerca l'impostazione della modalità radio, puoi selezionare Tutte le stazioni e Stazioni forti.
Accoppiamento / riproduzione Bluetooth
①Accendere, premere il tasto "MODE" per passare più volte fino a quando non entra in modalità BT; e sentirai un
suono "grugnito", che indica che il Bluetooth è stato acceso ed è in stato di attesa per la connessione, e lo schermo
LCD visualizza la parola "Disconnesso".
②Utilizzare il dispositivo Bluetooth, prendere il telefono cellulare come esempio, accendere il dispositivo Bluetooth sul
telefono cellulare, quindi cercare il dispositivo Bluetooth con il nome "DAB P200", quindi fare clic per connettersi con
"DAB P200", si ascoltare la musica "ding-ding" dopo circa 10 secondi Se il dispositivo Bluetooth del telefono è spento,
la macchina emetterà un suono di musica "dongdong" e visualizzerà la parola "Disconnected" per indicare che il
Bluetooth è stato disconnesso.
lstruzione
Table of contents
Languages:
Other inscabin Radio manuals


