InstaBox i90 User manual

1
InstaBox i90 User’s Manual
Package Includes:
I90 x 1
Remote x 1
USB Cable x 1
Audio Cable x 1
User’s Manual x 1
Specifications
Output power: RMS 4W (THD + N = 10%, f0 = 1KHZ)
Signal to noise ratio: ≥ 70dBA
Distortion (%): ≤1%
Frequency response: 100Hz ~ 18KHz
Audio input mode: Bluetooth, AUX, USB, TF card, FM
Volume adjustment form: 360 degree knob adjustment
Speaker: Φ57mm, 4 , 5W
Power supply: lithium polymer rechargeable battery 1800mAh 3.7V
Charging power: DC5V ≥ 600mA
AUX maximum input sensitivity: 800mV
Working environment temperature: 0ºC ~ +50 ºC
Product specifications: 156mm / 116mm / 101mm
Net weight: 0.7kg

2
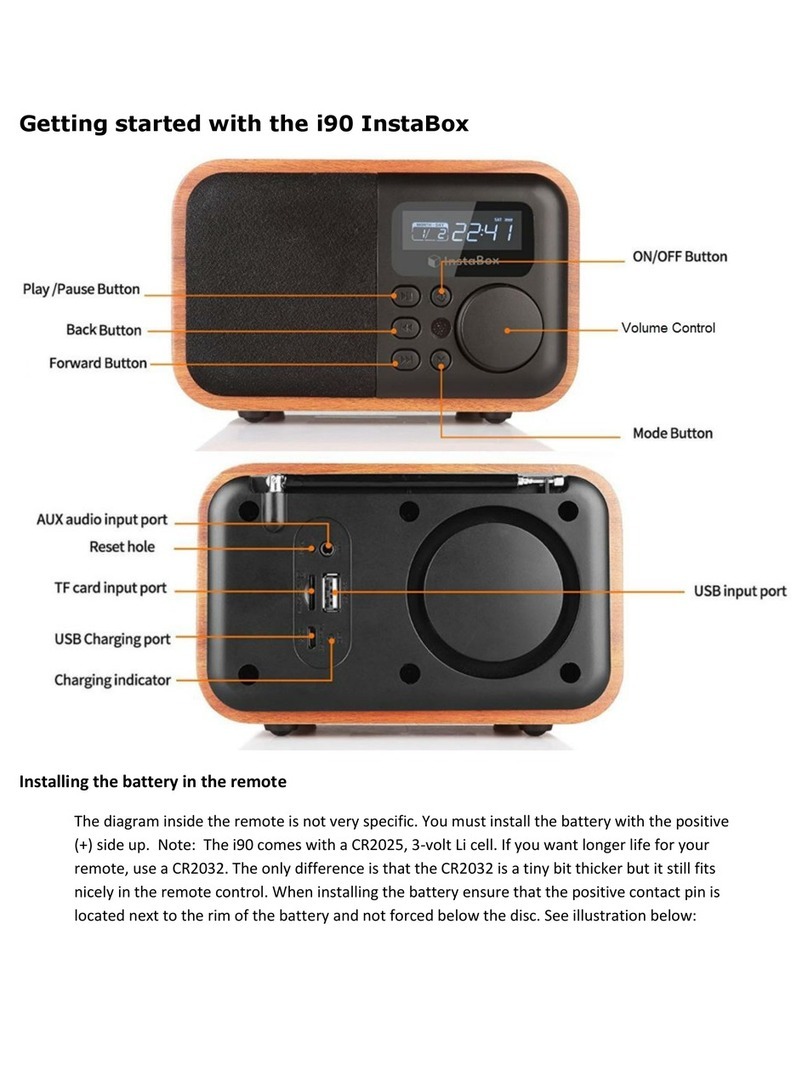
i90 Front View:
1 - Play / Pause Button
Radio Mode:
Short press—mute/play Long press—auto-search
Bluetooth Mode:
Short press —play/pause
Bluetooth Mode (Call received):
Short press—answer/hang up
Time Mode:
Short press-automatic power off setting
When Playing External Audio:
Short press—mute
When Playing U disk / TF Card Music:
Short press—play/pause

3
2 - Back Button
Music Mode: (U Disk / SD Card):
Short press—previous track Long press—rewind
Bluetooth Music Mode:
Short press—previous track
Radio Mode:
Short press—previous channel Long press—reverse search
3 - Forward Button
Music Mode: (U Disk / SD Card):
Short press—next track Long press—fast forward
Bluetooth Music Mode:
Short press—next track
Radio Mode:
Short press—next channel Long press—forward search
4 - On / Off Button
Long press—for 3 seconds for ON/OFF; for 8 seconds to clear all settings
5 –Volume Control
Works in any Playing Status
Turn clockwise —-increase the volume
Turn counterclockwise —-reduce the volume
6 - Mode Button
Function mode:
Short press to select: CLOCK/USB/SD/FM/AUX /BLUETOOTH
Note: any input not present will be skipped.
Time Mode:
Short press : clock/alarm setting

4
i90 Rear View:
8 –Aux Audio Input Port
Audio cable connection for computer, phone, or other source for audio input.
9 –Reset hole
Insert paper clip or other pointed device and hold button for 3 seconds to reset i90 to factory
defaults settings.
10 –TF or micro SD Card Input Port
TF card input for MP3 audio files
11 –USB Micro B Input/Charging Port
Insert micro USB cable for charging internal battery or for USB audio cable input
12 –Charging Indicator
When charging, the indicator will illuminate red, when fully charged, green. Charging time may be
increased if i90 unit is in use during charging cycle.
13 –USB Type A Input Port
USB port for audio input

5
i90 Remote Control
Note:
1. Please make sure the i90 is ON when you would like to use the remote, the ON/OFF button (01) in
the remote is only to set the i90 standby(power saving mode) but not turning on it.
2. Remote is design to provide an easy access to different function such as alarm/time/USB etc.
3. The button which corresponds with the remote:
a. ON/OFF button-button 03 in the remote
b. Play/pause button-button 15 in the remote
c. Previous track- button 16 in the remote
d. Next track- button 17 in the remote
e. M (mode) button-button 18 in the remote
Setting the calendar and clock (Sleeping Mode)
Short press the Mode and make sure the radio in “time” display
Short press the Mode button for 5 times

6
Use the Volume knob to adjust settings
Set current year
Press Forward Track button to select settings
Set the month
Set the day
Set the hour
Set the minutes
Press the ON/OFF button to finish and save settings
Please note that the clock only display in 24-hour format.
After setting the clock choose the desired Sleep time for the i90. Choices available are:
OFF, 30, 60, 90, 120 minutes.
a. Short press play button
b. Use the Volume knob to adjust settings
c. Choose your desired time
Setting the Alarm
The InstaBox i90 has four convenient alarms that can be set independently.
1. Make sure the radio in “TIME” display
2. Press Mode to set the alarm one
3. Use the volume control to select the desired hour.
4. Press Forward Track Button and repeat the same steps to set the minutes.
5. Press Forward Track Button to choose the alarm days:5/6/7 days to choose
6. Use the volume control to select the desired time
7. Press Forward Track Button to choose the alarm clock ring (USB/FM RADIO/BEEP/SD)
8. Press “play” to preview the ring
9. Use the volume control to select the desired time
10. Press OFF/ON Button to confirm setting. The Alarm sign will be flashing.
11. Press Play to turn the alarm ON or OFF. When ON is selected the alarm sign will remain on the
screen.
12. To set additional alarms follow the steps above. After step 1, use the M Control to choose which
of the four alarms to set –then follow the remaining steps.

7
Note: You must have the TF/SD card in inserted when the alarm is ON.
A quick access to delete all the alarms: press “Mode” to clear all the alarms.
A quick access to set the alarm clock ring (apply to alarm 1/2):
a. In USB/SD/RAD mode, press the alarm button in the remote, when the screen shows “AL1”,
it is set as the ring.
b. Short press the alarm button twice, when “AL2” appears, setting finished.
c. Note that this quick access is only apply to alarm 1/2.
13. Snoozing Function
a. Press the volume knob or the snooze button of the remote, alarm will be paused for 5/10
minutes, and ring again when countdown ends
b. Press any button except the volume knob and the snooze button to end the alarm
Using the FM Radio
1. You can scan the FM band and save desired stations.
a) Click Mode and select the FM function
b) Short press the Forward Track button to choose next channel,long press to delete the
exsiting station
c) Short press the Back button to choose the previous channel,long press to top the station
d) Long press Play on the radio or the remote control. The radio will automatically scan the
FM band from 87.5-108.5MHz and save stations found as P01-P60.
The Instabox i90 can store 60 preset radio stations.
2. You can step through saved stations using the forward and back buttons on the front panel or
on the remote. Select any previously stored channel by pressing the numbers (1-60) on the
remote, then press Play. If no station has been saved in a selected channel Err will display.
3. You can semi-automatically scan and save FM stations:
a) Hold the forward or back button to scan through available radio stations. To save a
selected station, press ‘DSP’in the remote control. Your selection is saved in the next
available preset position.
4. You may select any FM station directly by entering the station frequency then press Play.
(e.g.: for 105.1MHz = Press 1051 + Play).
5. To momentarily mute the radio press the Play button on the remote or on the front panel.
Note: The i90 external high gain antenna helps guarantee a high quality FM reception. Extend the
antenna and position it for the best reception.

8
Playing music from a micro-SD card or a Flash drive
Ports are provided on the rear panel of the i90 for a Micro-SD card and for a USB Flash drive. When
either type of device is plugged into the i90, TF or USB will appear on the screen and MP3 format
music will begin to play. The i90 supports memory sources up to 32GB at a maximum bit rate of
320kbps. All music selections must be in MP3 format.
Press the forward or back button to play the next or previous selection.
Press and hold the forward or back button to fast-forward or rewind a selection
Press the play button to pause/play the music,long press to set repeat mode
You can use the remote to numerically select a track. (Press 30 + Play= Play song 30)
Press “DSP” to select one of six different sound profiles:
NORMAL / ROCK / POP / CLASS / JAZZ / BASS
You can record segments of a selection for a playback repeat. Press A-B. “P—A” will show on the
display as the segment is saved. End the segment by again pressing A-B, “P—B” will display. The
segment will now play repeatedly until A-B is pressed again. The segment will stop and “P—E”
will display.
Using the External Auxiliary Input
Using the external audio cable provided, you can play audio from any external source using the
rear panel Aux audio input port. “AUX” will display on the front panel when the cable is used.
Use the play button to mute the input. Note: this is an input only port.
Bluetooth and InstaBox i90
1. The InstaBox i90 supports Bluetooth version V4.0+EDR
2. Press the Mode button or ‘m’ on the remote to turn on Bluetooth. ‘BLUE’ appears on the screen.
When you hear ‘DO-DI’ the Bluetooth is on and ready to pair.
3. Turn on the Bluetooth on your device and search for D90.
4. The i90 will connect in about 20 seconds and the external device content will begin to play.
5. Press the play button to play/pause the device playback
6. If the device content has tracks use the forward or back controls to play next or previous tracks.
7. The i90 will receive phone call audio and display ‘HP’ during a call. Press and hold the Play
button to disconnect or auto-connect a call
Battery Charging Management
The battery indicator on the upper right of the screen displays the amount of battery charge

9
The i90 is charge from a micro USB connector on the rear panel. It requires DC 5v
600MA for charging. The battery reaches full charge in 4 to 6 hours. The charge light on
the rear panel changes from red to green when the battery is fully charged.
The battery has a capacity of 1800 mAH. You can also use this battery as an emergency
backup for charging a cell phone. Plug your USB phone charging cable into the USB
audio input on the back of the i90 and your phone will commence charging.
Friendly Reminder
It is normal that the radio may get hot when charging or using.
Please turn off the power and disconnect all the outside devices of your radio before
cleaning.
Please do not expose to fire or cigarettes and prevent contact with water or moisture.
Please make sure your radio and the accessories stay dry and do not drop, throw or use
your radio violently.
Please use any antistatic soft cloth to clean your radio. Do not use any detergent which
contains any chemical material such as alcohol, benzene etc.
Avoid using your radio and the accessories in extreme heat or cold temperatures.
Do not attempt to take apart or repair your radio, or free warranty is void.
Other manuals for i90
1
Table of contents
Other InstaBox Speakers manuals
Popular Speakers manuals by other brands

Clark Synthesis
Clark Synthesis TACTILE SOUND AQ339 Aquasonic installation guide
Infinity
Infinity L-MPS Technical manual
Philips
Philips SGC5102BD - amBX 2.1-CH PC Multimedia Speaker... Specifications
Yamaha
Yamaha NS-B330 owner's manual
Steren
Steren MG-100 instruction manual
Mackie
Mackie SRM450v2 owner's manual
