Instant POD Multi-Pod 68 MB User manual

For more information and how-to videos,
visit instantappliances.com/instantpod
For more information and how-to videos,
visit instantappliances.com/instantpod
POD™
Multi-Pod Single Brew Coffee and Espresso Maker
User Manual
01 Get Started
02 Brew
03 Warranty and
Contact Info

2| [email protected] | 1-800-828-7280
WARNING
Read this manual carefully and completely and retain for future reference. Failure to
adhere to safety instructions may result in serious injury or damage.
IMPORTANT SAFEGUARDS
(Yes, we have to)
At Instant Brands, your safety always comes rst. Enjoy using
your Instant coffee maker knowing it was designed to be quick,
easy, and above all, safe.
As always, be cautious when using electrical appliances and follow
basic safety precautions.
READ ALL INSTRUCTIONS, SAFEGUARDS AND WARNINGS BEFORE
USE. FAILURE TO FOLLOW THESE SAFEGUARDS AND INSTRUCTIONS
MAY RESULT IN INJURY AND/OR PROPERTY DAMAGE.
01 For countertop use only. Always operate the appliance on a
stable, non-combustible, level surface.
02 For household use only. Not for commercial use. DO NOT use
the appliance for anything other than its intended use.
03 Make sure that your outlet voltage corresponds to the voltage
stated on the rating label of the coffee maker.
04 To protect against re, electric shock and injury to persons, DO NOT
immerse the power cord, plug or the appliance in water or other liquid.
05 Unplug from outlet when not in use and before cleaning. Allow
the appliance to cool before putting on or taking off parts, and
before cleaning the appliance.
06 Regularly inspect the appliance and power cord. DO NOT
operate the appliance if the power cord or plug is damaged,
or after the appliance malfunctions or is dropped or damaged
in any manner. For assistance, contact Customer Care by
instantappliances.com/#chat, or by phone at 1-800-828-7280.

instantappliances.com | 3
WARNING
Read this manual carefully and completely and retain for future reference. Failure to
adhere to safety instructions may result in serious injury or damage.
IMPORTANT SAFEGUARDS
07 DO NOT let the power cord hang over the edge of tables or
counters, and DO NOT allow it to touch hot surfaces.
08 DO NOT place the appliance on or near a hot gas or electric
burner, or in a heated oven.
09 Only ll the water tank with clean, cold water. Never ll the water
tank with mineral water, milk or other liquids.
10 DO NOT let the coffee maker operate without water.
11 Some parts of the appliance become hot when in operation.
DO NOT touch with bare hands. Follow instructions for safe
use to avoid burns.
12 DO NOT insert nger into the pod inlets beneath the top cover, to
avoid personal injury.
13 To disconnect, unplug from power source. To unplug, grasp the
plug and pull from the outlet. Never pull from the power cord.
14 DO NOT use outdoors. DO NOT leave the appliance exposed to
sun, wind, rain and/or snow.
15 Only operate and store the coffee maker above 0°C / 32°F.
16 DO NOT leave the appliance unattended when in use.
17 This appliance is NOT to be used by children or by persons with
reduced physical, sensory or mental capabilities. Close supervision
is necessary when any appliance is used near children and these
individuals. Children should not play with this appliance.

4| [email protected] | 1-800-828-7280
IMPORTANT SAFEGUARDS
18 The use of accessories not recommended by the manufacturer
may result in re, electric shock or injury to persons.
19 Only use pods intended for this appliance. If the pod does not t,
DO NOT force the pod into the appliance.
20 WARNING: There is extremely hot water in the pod inlet
during the brew process. To avoid the risk of injury, DO NOT
open the top cover during the brew process.
21 To reduce the risk of re or electric shock, do not remove the
bottom cover. No user-serviceable parts inside. Repair should
be done by authorized service personnel only.
22 If a long detachable power-supply cord or extension cord is
used:
• The marked electrical rating of the detachable power-supply
cord or extension cord should be at least as great as the elec-
trical rating of the appliance;
• The longer cord should be arranged so that it will not drape
over the counter top or table top where it can be pulled on by
children or tripped over.
SAVE THESE INSTRUCTIONS.
WARNING
Read this manual carefully and completely and retain for future reference. Failure to
adhere to safety instructions may result in serious injury or damage.

instantappliances.com | 5
IMPORTANT SAFEGUARDS
WARNING
Read this manual carefully and completely and retain for future reference. Failure to
adhere to safety instructions may result in serious injury or damage.
Special cord set instructions
As per safety requirement, a short power supply cord (0.6 m to 0.9 m /
24” to 35”) is provided to reduce the hazards resulting from grabbing,
entanglement and tripping.
This appliance has a polarized plug and one blade is wider than the other.
To reduce the risk of electrical shock, the plug is intended to t into a
polarized outlet only one way. If the plug does not t fully into the outlet,
reverse the plug. If it still does not t, contact a qualied electrician.
DO NOT attempt to modify the plug in any way.
WARNING
To avoid injury, read and understand the instructions in this user
manual before attempting to use this appliance.
WARNING
Electrical shock hazard.
• DO NOT use an adapter.
• DO NOT remove the bottom cover. No user-serviceable parts inside.
Repair should be done by authorized service personnel only.
Failure to follow these instructions may result in electric shock
and/or death.
WARNING
THE FAILURE TO FOLLOW ANY OF THE IMPORTANT
SAFEGUARDS AND/OR THE INSTRUCTIONS FOR SAFE USE
IS A MISUSE OF YOUR APPLIANCE THAT CAN VOID YOUR
WARRANTY AND CREATE THE RISK OF SERIOUS INJURY.

6| [email protected] | 1-800-828-7280
Let’s get started!...............................................................................................6
So, what’s in the box?...................................................................................... 6
Is something missing or damaged? ............................................................6
Product, parts and accessories .......................................................................7
Control panel ....................................................................................................8
Initial setup........................................................................................................9
Initial cleaning.................................................................................................10
Brewing K-Cups..............................................................................................12
Brewing espresso pods .................................................................................14
Brewing tips ....................................................................................................16
Care, cleaning and storage ...........................................................................17
Emptying the used pod container..............................................................18
Removing mineral deposits.........................................................................19
Troubleshooting .............................................................................................21
Warranty ..........................................................................................................22
Contact us........................................................................................................24
instantappliances.com | 6
Table of contents
Product specications
Model:
Multi-Pod
68 MB
68 oz
(2 Ltr) 120 V~60 Hz 1500 W lbs: 12.07
kg: 5.48
in: 16.2 L x
7.2 W x 13 H
cm: 41.2 L x
18.2 W x 33 H

instantappliances.com | 7
So, what’s in the box?
Before using your new coffee maker, make sure everything is present
and accounted for.
Illustrations in this document are for reference only and may differ from
the actual product. Always refer to the actual product.
• Instant Pod Multi-Pod Single Brew Coffee and Espresso Maker
• Drip tray and drip tray plate
• User manual
See Product, parts and accessories for a full parts breakdown.
For more information and how-to videos,
visit instantappliances.com/instantpod.
Is something missing or damaged?
Get in touch with a Customer Care Advisor through our chat widget
at instantappliances.com/#chat, by email at [email protected]
or by phone at 1-800-828-7280.
Let’s get started!

8| [email protected] | 1-800-828-7280
Instant Pod Multi-pod Single Brew Coffee and Espresso Maker
Make sure everything is installed properly before use.
Product, parts and accessories
Control panel
(Top)
Handle
Water tank cover
Water tank
handle
Water tank
Top cover
K-Cup needle
K-Cup inlet
K-Cup holder
Espresso inlet
Brew spout
Used pod container
Cup support
Drip tray plate
Drip tray
Power cord
Illustrations in this document are for reference only and may differ from the actual
product. Always refer to the actual product.

instantappliances.com | 9
The control panel of your Instant coffee maker is straightforward and
super easy to use. If you haven’t had your coffee yet, fear not! Your
brew is seconds away.
01 Power on/off
02 K-Cup pod options
12 oz cup (355 mL)
10 oz cup (296 mL)
8 oz cup (237 mL)
Control panel
Illustrations in this document are for reference only and may differ from the actual
product. Always refer to the actual product.
03 Espresso pod options
6 oz cup (177 mL)
4 oz cup (118 mL)
2 oz cup (60 mL)
0102 03

10 | [email protected] | 1-800-828-7280
Coffee is always a good idea, so let’s get this little guy going!
01 Pull your new coffee maker out of the box.
02 Remove all the material, adhesive strips and loose parts from
in and around the appliance.
03 Place the coffee maker on a stable, level surface.
04 Lift off the water tank, then remove and discard the red plug.
Place the water tank back on the base and press down to secure it.
The sticker on the water tank may be removed.
05 Slide the drip tray into place beneath the front of the coffee maker
06 Follow the instructions in Initial cleaning before using the coffee
maker for the rst time.
DO NOT remove safety warning stickers from the appliance.
Initial setup
CAUTION
Read the Important
Safeguards before using
the appliance. Failure
to read and follow those
instructions for safe use
may result in damage to the
appliance, property damage
or personal injury.
DO NOT place the
appliance on a stovetop.
Heat from an external
source will damage the
appliance.
DO NOT block the vents
on the bottom of the
appliance.
instantappliances.com | 11
Before making your rst piping hot cup, you must clean the coffee maker.
To do so, run the following programs without a pod in place.
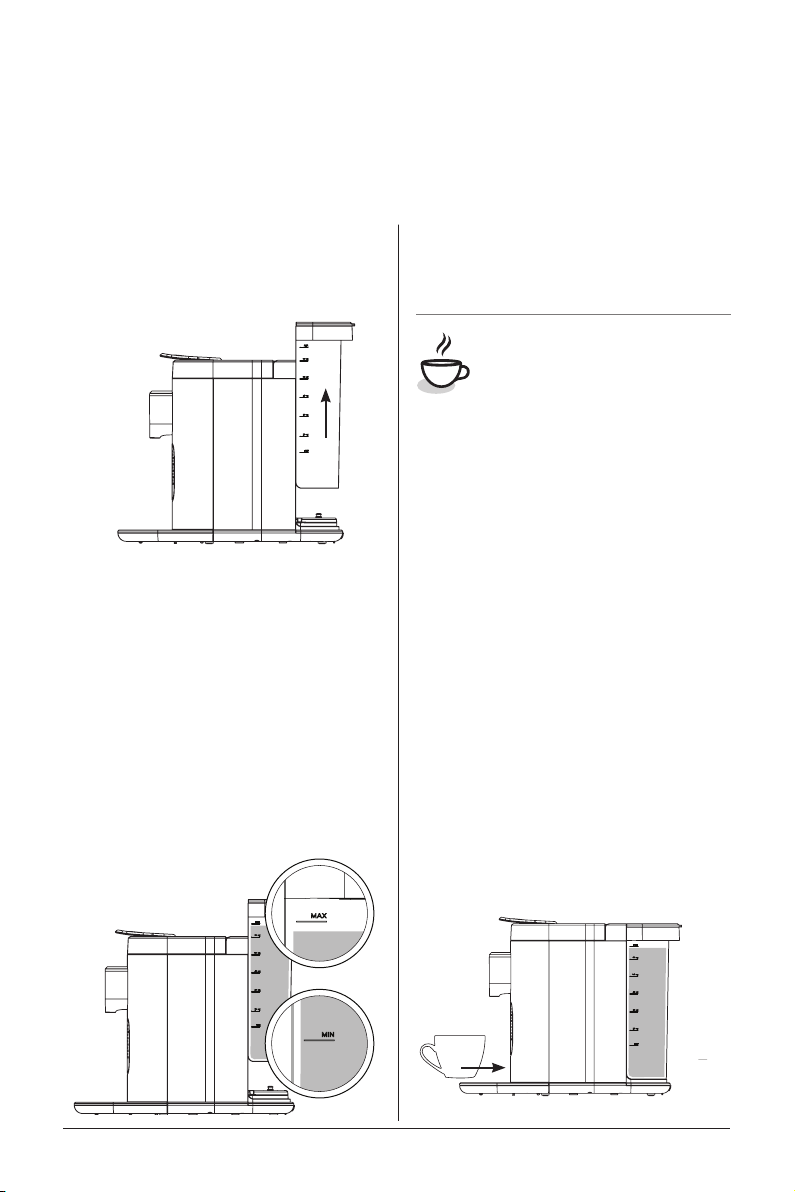
Initial cleaning
01 Lift the water tank upwards
to remove it from the back
of the coffee maker.
02 Clean the water tank with
warm water and dish soap,
then rinse it well with
clean water.
03 Fill the water tank with cool,
clean water to the MAX ll line
as indicated on the water tank.
04 Align the water tank with the
back of the coffee maker, then
press down to secure it.
Instant Tip You can leave the
water tank on the coffee maker
and ll it with a cup or pitcher,
or remove it to ll from your
faucet or fridge — your choice!
05 Plug the power cord into
a 120 V power source.
06 Use the handle to close
the top cover.
07 Place a mug beneath the
brew spout on the drip tray
plate — make sure the mug
is large enough to hold
8 oz / 237 mL of water.

12 | [email protected] | 1-800-828-7280
Initial cleaning
08 Touch the power key.
All of the keys illuminate.
09 Touch 6 oz. The key ashes
as the water heats.
10 The key illuminates when the
coffee maker starts brewing,
and soon hot water pours
from the brew spout.
To stop brewing at any time,
touch 6 oz again.
When the water stops
dripping, carefully discard
the water in the mug.
11 Place the mug back onto
the drip tray plate.
12 Touch 8 oz.
The key ashes as the
water heats.
13 The key illuminates when the
coffee maker starts brewing,
and soon hot water pours
from the brew spout.
To stop brewing at any time,
touch 8 oz again.
When the water stops
dripping, discard the water
in the mug. That’s it! Brew
away, friend.
CAUTION
Brewed liquid is hot. DO NOT place hands or unprotected skin beneath the brew spout while
the coffee maker is brewing.
WARNING
DO NOT open the top cover while the coffee maker is brewing. Opening the top cover
during operation may cause risk of personal injury and/or property damage.

instantappliances.com | 13
01 Fill the water tank with cool,
clean water to between the
MIN and MAX ll lines as
indicated on the water tank.
02 Use the handle to open the
top cover.
It must be fully open to
properly receive pods.
03 If it is not already installed,
insert the K-Cup holder
into the K-Cup inlet.
The coffee maker is only
compatible with generic,
universal reusable K-cups
(for use with versions 1.0
AND 2.0).
04 Insert a K-Cup into the
K-Cup holder.
05 Press the handle down to
close the top cover.
06 Place your mug beneath the
brew spout on the drip tray
plate, or if necessary, the entire
drip tray can be removed to
accommodate larger cups.
07 Touch the power key.
All of the keys illuminate.
Brewing K-Cups
Pick your favorite K-Cup, pop it in and in seconds you’ll have a hot,
steaming cup of delicious brew.

14 | [email protected] | 1-800-828-7280
Brewing K-Cups
08 Touch 8 oz, 10 oz, or 12 oz
from the K-Cup section,
depending on how much
you want to brew.
The key ashes as the
water heats.
Although all cup sizes
illuminate, if you select
2 oz, 4 oz, or 6 oz while
a K-Cup is in place, the
coffee maker will only
dispense water.
09 The key illuminates when the
coffee maker starts brewing,
and soon hot water pours
from the brew spout.
To stop brewing at any time,
touch the selected cup size
key again.
10 When the water stops
dripping, lift the handle
to open the top cover.
11 Carefully remove the used
K-Cup and discard it.
Easy, right? Enjoy!
WARNING
DO NOT open the top cover
while the coffee maker is in
operation.
DO NOT touch the blade in
the K-Cup holder when the
top cover is up.
DO NOT touch the water
outlet needle when the
top cover is up.
NOTICE
DO NOT attempt to brew if the water level is below the MIN ll line as indicated on the
water tank.

instantappliances.com | 15
There’s a world of avor packed into those itty-bitty espresso pods just
waiting to be brewed out. The coffee maker is compatible with the original
Nespresso-style capsules.
Brewing espresso pods
NOTICE
Before brewing your rst cup from an espresso pod, follow the steps in the
Initial cleaning to heat a cup of water without a pod in place.
01 Fill the water tank with cool,
clean water to between the
MIN and MAX ll lines as
indicated on the water tank.
02 Use the handle to open the
top cover.
It must be fully open to
properly receive pods.
03 Insert the espresso pod on its
side into the Espresso inlet.
Do not push down hard
on the pod as it will go
through to the used
pod container.
04 Press the handle down to
close the top cover.
05 To brew 2 oz or 4 oz, fold
down the cup support and
place your mug on it.
To make 6 oz, place your cup
onto the drip tray plate.
06 Touch the power key.
All of the keys illuminate.

16 | [email protected] | 1-800-828-7280
Brewing espresso pods
07 Touch 2 oz, 4 oz, or 6 oz
from the Espresso section,
depending on how much
coffee you want to brew.
The key ashes as the
water heats.
Although all cup sizes
illuminate, if you select
8 oz, 10 oz, or 12 oz
while an espresso
pod is in place, the
coffee maker will only
dispense water.
08 The key illuminates when the
coffee maker starts brewing,
and soon hot water pours
from the brew spout.
To stop brewing at any time,
touch the selected cup size
key again.
09 When the water stops
dripping, lift the handle
to open the top cover.
The pod automatically
drops into the used
pod container.
Smells heavenly… enjoy!
WARNING
DO NOT open the top cover
while the coffee maker is in
operation.
DO NOT touch the blade in
the K-Cup holder when the
top cover is up.
DO NOT touch the water
outlet needle when the
top cover is up.
NOTICE
DO NOT attempt to brew if the water level is below the MIN ll line as indicated on the
water tank.

instantappliances.com | 17
Follow these tips and tricks to make sure you’re treating yourself to the
best cup possible.
For how-to videos and other tips, visit
instantappliances.com/instantpod.
Tip How to do it and why
Make stronger, or
espresso-style coffee
with your coffee maker.
Choose a smaller cup size to brew a stronger cup.
Make coffee with
an espresso pod.
Choose a larger cup size to brew a weaker cup, or,
brew a regular espresso, then add water to make it an
Americano.
Always use fresh
ltered water.
The better the quality of your water, the better tasting
your coffee will be!
Using ltered water can also help to reduce mineral
deposits from accumulating in the coffee maker.
Pre-heat the coffee maker.
If your coffee maker cools between brewing sessions,
you may not be getting the best possible avor.
Heat up the coffee maker’s internal components to
improve the taste of your next cup.
To do so, run your desired brewing program without a
pod inserted, discard the water, then brew as normal!
Recycle or compost
single serve pods.
If you purchase biodegradable pods, the entire pod
can be added to a composter.
Plastic pods can be recycled if you remove the coffee
grounds rst.
Used coffee grounds can be added to soil to enrich
garden beds!
Rinse your K-Cup holder,
and/or clean the inlets
after brewing.
Residue can alter the taste of your brew. Follow Care,
cleaning and storage instructions to clean your inlets
and K-Cup holder after using the coffee maker, or,
simply run a brew program without a pod installed to
rinse the appliance.
Descale and clean your
coffee maker frequently.
See Removing mineral deposits for descaling
instructions.
Brewing tips

18 | [email protected] | 1-800-828-7280
Care, cleaning and storage
Clean your Instant Pod regularly to ensure the best possible avor,
and to prevent scale build-up.
Always unplug the coffee maker and let it cool to room temperature
before cleaning. Clean with a damp cloth and wipe dry — never use metal
scouring pads, abrasive powders or harsh chemical detergents on any of
the coffee maker’s parts.
Let all parts dry thoroughly before use, and before storage.
Parts Cleaning methods and instruction
K-Cup holder Remove from the coffee maker before cleaning.
Water tank The water tank is removable for cleaning.
Cup support The cup support and attached used pod container are
removable for cleaning.
Drip tray and
drip tray plate
The drip tray and drip tray plate are removable from the
coffee maker and come apart for cleaning.
Used pod container
Holds up to 10 used espresso pods at a time.
Empty weekly, or more as needed. DO NOT allow pods
to sit for longer than 7 days.
Coffee maker exterior Clean as needed.
Power cord Clean as needed. DO NOT fold the power cord
when storing.
WARNING
The coffee maker contains electrical components. To avoid re, electric shock or
personal injury:
• HAND WASH ONLY.
• DO NOT rinse or immerse the coffee maker, power cord or plug in water or other liquids.
• DO NOT clean any of the parts or components in a dishwasher.

instantappliances.com | 19
Emptying the used pod container
The used pod container can be easily removed to empty and clean.
To remove it
01 Press on the indent and fold
down the cup support.
02 The cup support doubles as
a handle. Use it to access the
used pod container.
03 Remove the container from
the coffee maker and empty it.
To install it
01 Insert the container into the
opening on the coffee maker.
02 Push the container into place.
03 If desired, fold up the cup
support, or brew a little
espresso to congratulate
yourself for a job well done!
Care, cleaning and storage

20 | [email protected] | 1-800-828-7280
Removing mineral deposits
With regular use minerals may accumulate in the coffee maker, which
can affect the temperature and strength of your brew.
To make sure your coffee maker stays in tip top shape, descale it
regularly to keep minerals deposits from building up.
If you forget, don’t worry! After 300 cycles, the 10 oz and 12 oz keys ash
to remind you to descale your coffee maker.
Cleaner Cleaner : Water Ratio
Household descaler 1 : 4
Citric acid 3 : 100
01 Combine cleaner and water as directed above.
02 Make sure the K-Cup holder is in place in the K-Cup inlet.
03 Fill the water tank to the MAX line with the cleaning mixture.
04 Place a large container beneath the drip nozzle. If necessary,
remove the entire drip tray from the coffee maker.
05 Touch and hold the 10 oz and 12 oz keys for 3 seconds. The cleaning
mixture runs through the appliance until the water tank is empty.
06 Discard the cleaning mixture and replace the container beneath
the drip nozzle.
07 Fill the water tank to the MAX line with cool, clean water.
08 Touch and hold the 10 oz and 12 oz keys for 3 seconds. The water
runs through the appliance until the water tank is empty.
09 Discard the water.
All done! Is it time for coffee yet?
Care, cleaning and storageCare, cleaning and storage
CAUTION
Hot water is used for descaling. To avoid risk of scalding personal injury and/or
property damage, the container must be large enough to hold the entire contents
of the water tank (68 oz / 2000 mL).
Table of contents
Other Instant Coffee Maker manuals

Instant
Instant INFUSION BREW User manual

Instant
Instant INFUSION BREW PLUS User manual

Instant
Instant 140-6013-01 User manual

Instant
Instant Keurig K-Cup Specification sheet

Instant
Instant 140-6016-01 User manual

Instant
Instant INFUSION BREW PLUS User manual

Instant
Instant SOLO Specification sheet

Instant
Instant CM1203-UL User manual

Instant
Instant 140-0097-01 User manual


