Instant 140-6016-01 User manual

get started
INSTANT®SOLO COFFEE MAKER
140-6012-01-0101_IB_SoloCoffeeMaker_US_Manual_FINAL.indd 1140-6012-01-0101_IB_SoloCoffeeMaker_US_Manual_FINAL.indd 1 7/16/21 1:29 PM7/16/21 1:29 PM

7
What’s in the box?
Instant Solo Single-Serve Coffee Maker
Reusable Coffee Pod with Handle
Illustrations are for reference only and may differ from the actual product.
ReusableCoffee Pod.AI 1 6/8/21 12:58 PM
Drip tray
Removable
Water tank
Removable from the Instant
Solo Coffee Maker base
Water tank lid LED panel
Brewing lid latch
140-6012-01-0101_IB_SoloCoffeeMaker_US_Manual_FINAL.indd 7140-6012-01-0101_IB_SoloCoffeeMaker_US_Manual_FINAL.indd 7 7/16/21 1:29 PM7/16/21 1:29 PM
8
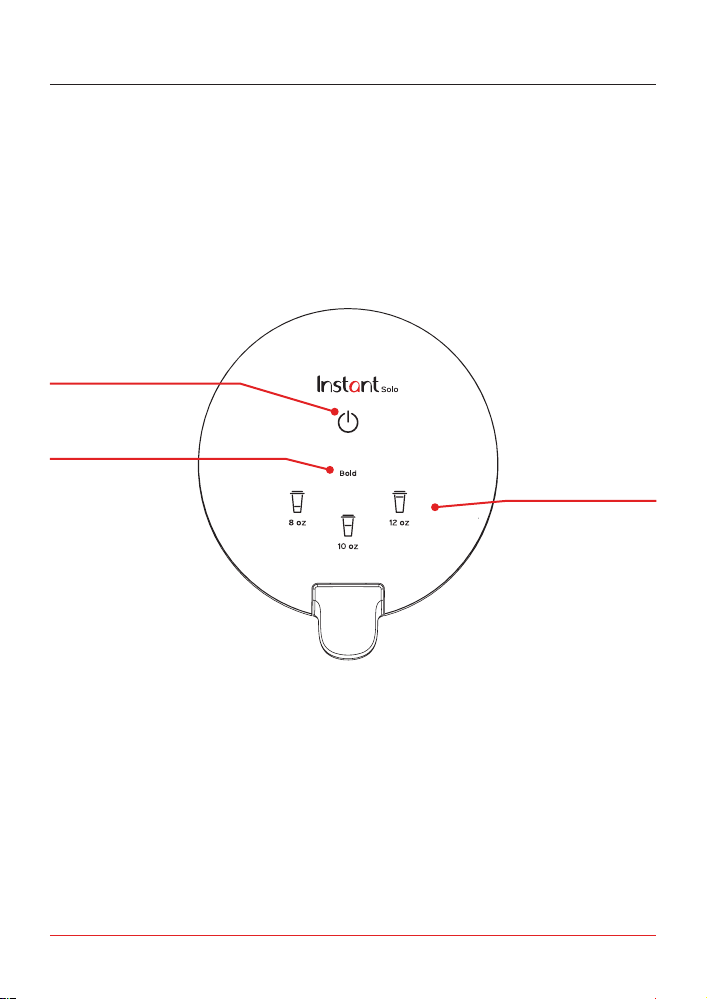
Your Instant Solo Coffee Maker
Remember to recycle!
We designed our packaging with sustainability in mind. Be sure to recycle
at a recycling center in your area.
Control panel
Here’s a look at the simple-to-use, easy-to-read Instant Solo Coffee Maker
control panel.
Serving Size
8 oz
10 oz
12 oz
Power
On/Off
Bold
Brew more
flavorful coffee
140-6012-01-0101_IB_SoloCoffeeMaker_US_Manual_FINAL.indd 8140-6012-01-0101_IB_SoloCoffeeMaker_US_Manual_FINAL.indd 8 7/16/21 1:29 PM7/16/21 1:29 PM

9
Your Instant Solo Coffee Maker
Plug-in and time-out
Once you plug in your Instant Solo Coffee Maker, you’ll hear a beep. Press
the power button (located above Bold) to turn on your Solo — the LED
buttons should light up.
After 30 minutes of inactivity, your coffee maker will enter standby mode.
The LED control panel will dim. After another 2 hours of inactivity, the
LED panel will shut off.
Sound Settings
You can turn button-pressing sounds and reminder beeps on or off.
1. Make sure your Instant Solo is on.
2. Press and hold the 8 oz and 12 oz buttons at the same time for
3 seconds.
3. Wait for the 8 oz and 12 oz buttons to blink twice.
Note: The device failure sound cannot be deactivated
140-6012-01-0101_IB_SoloCoffeeMaker_US_Manual_FINAL.indd 9140-6012-01-0101_IB_SoloCoffeeMaker_US_Manual_FINAL.indd 9 7/16/21 1:29 PM7/16/21 1:29 PM

10
Your Instant Solo Coffee Maker
Altitude Mode
If you’re using the Instant Solo Coffee Maker at +5,000 feet sea level,
enable Altitude Mode before you brew.
To turn Altitude Mode on
1. Make sure your Instant Solo is on.
2. Press and hold the 8 oz and 10 oz buttons for 3 seconds.
3. Wait until the 8 oz and 10 oz buttons blink twice.
To turn Altitude Mode off
1. Make sure your Instant Solo is on.
2. Press and hold the 8 oz and 10 oz buttons for 3 seconds.
3. Wait until the 8 oz and 10 oz buttons blink three times.
Water Empty Alert
Your Instant Solo will let you know when the water tank is empty or nearly
out of water. When this happens, you’ll hear a beep, brewing will stop, and
the LED control panel will flash. At this point, refill the water tank and exit
the alert mode by pressing any button.
140-6012-01-0101_IB_SoloCoffeeMaker_US_Manual_FINAL.indd 10140-6012-01-0101_IB_SoloCoffeeMaker_US_Manual_FINAL.indd 10 7/16/21 1:29 PM7/16/21 1:29 PM

11
Before you brew
Initial set up
1. Pull the Instant Solo coffee maker and all accessories out of the box.
2. Remove all packaging materials from within and around the Instant
Solo Coffee Maker.
3. Place your Solo on a dry, stable, and level surface.
4. Lift the water tank up and remove the foam cushion from underneath
the water tank.
5. Place water tank back on the coffee maker base.
6. Plug in your Instant Solo Coffee Maker.
Clean before use
1. Lift the water tank up to remove from Instant Solo Coffee Maker.
2. Handwash the water tank and reusable coffee pod with warm water
and dish soap. Rinse with warm, clear water.
3. Wipe the water tank and accessories with a clean, dry cloth.
4. With a damp cloth, wipe down the coffee maker base and
control panel.
140-6012-01-0101_IB_SoloCoffeeMaker_US_Manual_FINAL.indd 11140-6012-01-0101_IB_SoloCoffeeMaker_US_Manual_FINAL.indd 11 7/16/21 1:29 PM7/16/21 1:29 PM

12
Before you brew
Initial Cleaning
Before you brew your first cup of coffee, clean your Instant Solo Coffee
Maker. Run the following cleaning program without a coffee pod or the
reusable coffee pod.
1. Lift the water tank from the back of the coffee maker and remove
the water tank lid.
2. Fill the water tank with cold water to the MAX fill line as indicated
on the water tank.
3. Put the lid back onto the water tank and place the water tank back
onto the coffee maker.
4. Place a large mug which can hold at least 10 oz of liquid beneath
the brew spout and onto the drip tray.
5. Ensure the brewing lid is closed and securely latched. Press 8 oz button.
The key flashes as the water heats.
6. The 8 oz button will illuminate. The coffee maker begins a brewing
cycle and hot water will pour from the brew spot. After the brewing
cycle ends or is cancelled and the water stops dripping from the
spout, discard the water in the mug. To stop brewing at any time,
touch 8 oz again.
7. Place the mug back on the drip tray.
8. Touch 10 oz. The button flashes as the water heats.
9. The 10 oz. button will illuminate. The coffee maker begins a brewing
cycle and hot water will pour from the brew spot. After the brewing
cycle ends or is cancelled and the water stops dripping from the
spout, discard the water in the mug. To stop brewing at any time,
touch 10 oz again.
140-6012-01-0101_IB_SoloCoffeeMaker_US_Manual_FINAL.indd 12140-6012-01-0101_IB_SoloCoffeeMaker_US_Manual_FINAL.indd 12 7/16/21 1:29 PM7/16/21 1:29 PM
13
Be careful: Brewing reaches high temperatures. DO NOT touch the
brewing housing unit or spout during the brewing process. Touching
hot surfaces may result in personal injury and/or property damage.
Brewing Coffee
Brewing Coffee
Once you’ve cleaned your Instant Solo Coffee Maker and water tank, and
you’ve first run cleaning program, you can begin brewing a delicious cup
of coffee.
Bold
This program lets you brew a more flavorful cup of coffee by increasing
brewing time, allowing the water to extract more flavor from your coffee
grounds or coffee pod.
Altitude Mode
If you live at higher altitudes (over 5000 feet above sea level), be
sure you follow the instructions on page 10 so your coffee maker
works properly.
Reusable Coffee Pod and Coffee Pods
With the Instant Solo Coffee Maker, you can brew coffee with a K-Cup*pod,
or grind your favorite coffee beans and use the included reusable coffee
pod. Scoop about 2 tablespoons of medium to medium-fine ground coffee
into the reusable coffee pod.
140-6012-01-0101_IB_SoloCoffeeMaker_US_Manual_FINAL.indd 13140-6012-01-0101_IB_SoloCoffeeMaker_US_Manual_FINAL.indd 13 7/16/21 1:29 PM7/16/21 1:29 PM
14
Brewing Coffee
How to brew coffee
Prep
1. Fill the water tank up to the MAX fill line. DO NOT attempt to brew if
the water level is below the MIN fill line.
2. If you’re using coffee beans, grind them down to a medium or medium-
fine consistency. To open the reusable coffee pod, pull up on the
metal handle.
Brew
1. Lift the brewing lid latch and place the reusable coffee pod or K-cup*pod
in the brewing housing container.
2. Close the brewing lid, ensuring it is securely latched.
3. For a stronger cup of coffee, press Bold before selecting brew size.
4. Select the desired amount of coffee you would like to brew by pressing
the 8 oz, 10 oz or 12 oz buttons. The selected button will flash while
water heating cycle begins. You can stop brewing at any time by
pressing the selected cup size again.
5. The selected brewing cup size LED will remain illuminated when the
coffee maker starts brewing. Soon, hot water will pour from the
brew spout.
6. When the water stops dripping from the spout, lift the lid latch and
discard the coffee pod or contents within the reusable coffee pod.
7. Enjoy your freshly brewed cup of coffee.
Be careful: Brewing reaches high temperatures. DO NOT touch the
brewing housing unit or spout during the brewing process. Touching
hot surfaces may result in personal injury and/or property damage.
140-6012-01-0101_IB_SoloCoffeeMaker_US_Manual_FINAL.indd 14140-6012-01-0101_IB_SoloCoffeeMaker_US_Manual_FINAL.indd 14 7/16/21 1:29 PM7/16/21 1:29 PM
15
Care, Cleaning, Storage
Clean your Instant Solo Coffee Maker regularly to ensure the best
possible flavor and to prevent mineral deposits from building up in the
coffee maker.
Always unplug the coffee maker and let it cool to room temperature
before cleaning. Never use metal scouring pads, abrasive powders, or
harsh chemical detergents on any of the coffee maker’s parts.
Let all parts dry thoroughly before use, and before storage.
Instant Solo Part/
Accessory Cleaning methods and instructions
Water tank Remove the tank and handwash with dish soap
and warm water.
Reusable coffee pod Remove and handwash with dish soap and warm
water or place in the top rack of a dishwasher.
Stainless steel drip tray
Can be removed and washed by hand with dish soap
and warm water or placed in the top rack
of a dishwasher.
Coffee maker / LED panel Use a damp dish cloth to clean the outside
of the coffee maker and LED panel
Power cord DO NOT fold power cord when storing.
Be careful: The coffee maker contains electrical components.
To avoid fire, electric shock, or personal injury:
• Hand wash only.
• DO NOT rinse or immerse the coffee maker, power cord, or plug in
water or other liquids.
140-6012-01-0101_IB_SoloCoffeeMaker_US_Manual_FINAL.indd 15140-6012-01-0101_IB_SoloCoffeeMaker_US_Manual_FINAL.indd 15 7/16/21 1:29 PM7/16/21 1:29 PM
16
Care, Cleaning, Storage
Descaling / Removing Mineral Deposits
With regular use minerals may accumulate in the coffee maker, which can
affect the temperature and strength of your brew.
To make sure your coffee maker stays in tip top shape, descale it regularly
to keep minerals deposits from building up.
After 300 cycles, the 10 oz and 12 oz keys flash to remind you to clean and
descale your coffee maker.
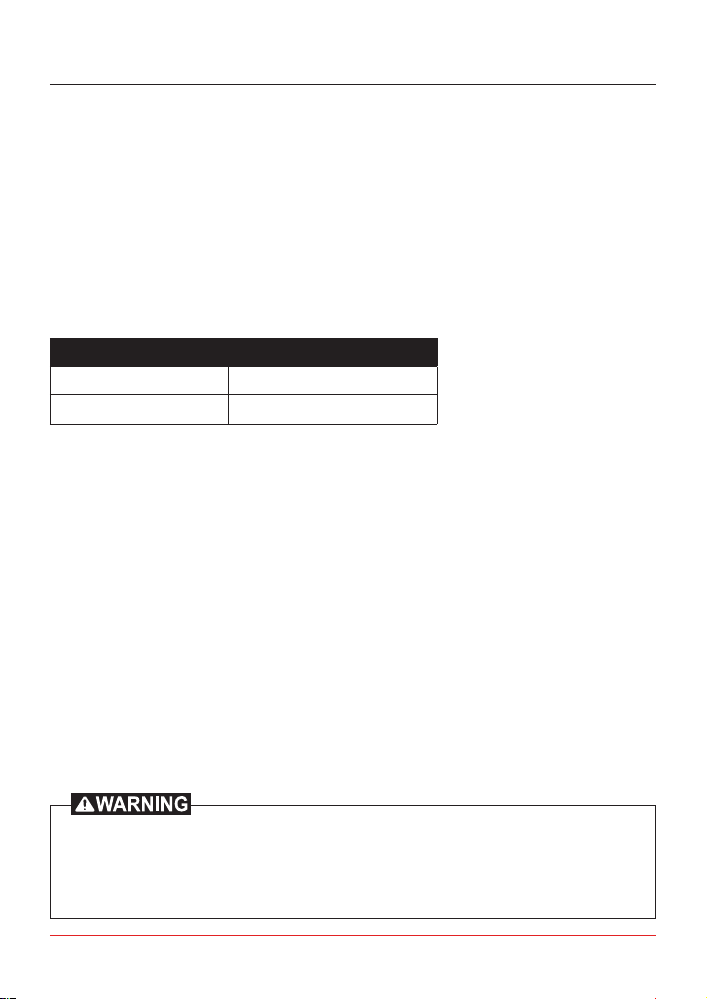
Descaling Solution Ratio
Cleaner Cleaner to water ratio
Household descaler 1 : 4
Citric acid 3 : 100
1. Combine cleaner and water as shown in the table above.
2. Make sure the reusable pod is in the brewing housing unit.
3. Fill the water tank to the MAX line with the cleaning mixture.
4. Place a large container beneath the drop nozzle. Ensure the brewing
lid is securely latched before continuing to step 5.
5. Touch and hold the 10 oz and 12 oz keys for 3 seconds. The cleaning
mixture runs through the appliance until the water tank is empty.
6. Discard the cleaning mixture from the container and place the
emptied container beneath the drip nozzle.
7. Rinse the water tank and fill to the MAX line with cool, clean water.
8. Touch and hold the 10 oz and 12 oz keys for 3 seconds. The cleaning
mixture runs through the appliance until the water tank is empty.
9. Discard water produced from coffee maker.
Be careful: Hot water is used for descaling. To avoid risk of personal
injury and/or property damage, the container must be large enough to
hold the entire contents of the water tank (40 oz / ~ 1183 mL). Any other
servicing should be performed by an authorized service representative.
140-6012-01-0101_IB_SoloCoffeeMaker_US_Manual_FINAL.indd 16140-6012-01-0101_IB_SoloCoffeeMaker_US_Manual_FINAL.indd 16 7/16/21 1:29 PM7/16/21 1:29 PM

17
Learn more
There’s a whole world of Instant Solo Coffee Maker information and help
just waiting for you. Here are some of the most helpful resources.
Register your product
Instanthome.com/register
Contact Consumer Care
Instanthome.com
support@instanthome.com
1-800-828-7280
Replacement parts and accessories
Instanthome.com
Connect and Share
Product specifications
Model Volume Wattage Power Weight Dimensions
SSCM-
1000
40 oz /
1183 mL
water tank
1250
watts
120V/
60Hz
2.1 kg
4.63 lbs.
in: 12.6 H x 5.3 W x 11.8 D
cm: 32 H x 13.5 W x 30 D
140-6012-01-0101_IB_SoloCoffeeMaker_US_Manual_FINAL.indd 17140-6012-01-0101_IB_SoloCoffeeMaker_US_Manual_FINAL.indd 17 7/16/21 1:29 PM7/16/21 1:29 PM
Table of contents
Other Instant Coffee Maker manuals

Instant
Instant SOLO Specification sheet

Instant
Instant Keurig K-Cup Specification sheet

Instant
Instant POD Multi-Pod 68 MB User manual

Instant
Instant INFUSION BREW User manual

Instant
Instant 140-0097-01 User manual

Instant
Instant INFUSION BREW PLUS User manual

Instant
Instant CM1203-UL User manual

Instant
Instant INFUSION BREW PLUS User manual

Instant
Instant 140-6013-01 User manual
Popular Coffee Maker manuals by other brands


Philips
Philips Senseo HD7806/50 Service manual

Salton
Salton Jumbo Java FC1667 Instruction booklet

motif
motif Essential owner's manual

Brew Express
Brew Express BE-104 Operation guide

Professional Series
Professional Series PS77931 user manual

Nescafe Dolce Gusto
Nescafe Dolce Gusto KRUPS KP 100B user manual


