Instar IN-5907HD User manual
INSTAR Deutschland - Your Specialist for IP-Cameras and Network Technology www.instar.com
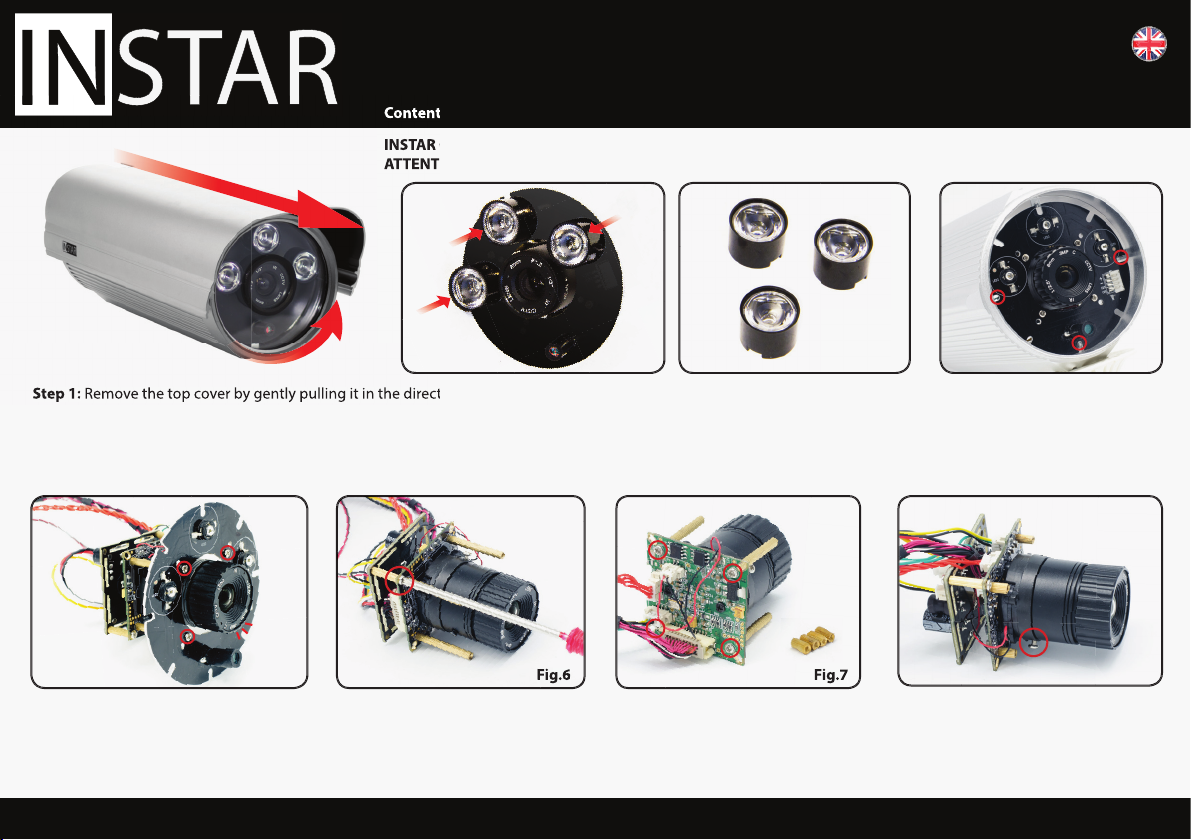
QUICK Installation Guide
4 mm Wide-Angle Lense for IN-5907HD
Content of delivery: 1x Wide-angle lense; 4x screws; 4x spacer; 4x springs; 3x diuser lenses; 1x installation guide
Step 1: Remove the top cover by gently pulling it in the direction of
the lense. Hold the back of the camera and remove the front cover
by turning it counter clockwise. Remove all three reectors from the
infrared LEDs and keep them for the use in the future (Fig. 2 & 3).
They will later be replaced by special diuser reectors (Step 11).
Step 6: Remove the screw securing the
lense. Grab the lense at the bottom and
unmount the lense by turning it counter
clockwise (Fig. 8).
Step 4: Loosen the four screws connect-
ing the LED board to the long gold co-
loured spacers (Fig. 5).
Step 2: There is a black cover sheet direct-
ly above the LED board. Please remove
this cover to get access to the screws be-
neath. For a clearer view, the following
pictures won’t show the camera casing.
Step 3: Remove all 3 screws on the sides which
are holding the LED board in place. Then
carefully take out the whole unit which con-
sists of LED board, lense and the sensor unit
(Fig. 4 & 5).
INSTAR Germany GmbH hereby ensures that you will not loose your warranty by installing this additional lense.
ATTENTION: Any damages caused by the user due to faulty installation are excluded from the warranty.
Fig.3Fig.2 Fig.4
Content of delivery:
Step 1:
Remove the top cover by gently pulling it in the direction of
INSTAR Germany GmbH
ATTENTION:
Fig.1
Fig.5 Fig.6 Fig.7 Fig.8
Fig.6
Fig.7
Step 5: Loosen the two outer screws at the opposite corners to get access to the
four inner screws which are holding the four long spacers in place (Fig.6). Remove
the long spacers and replace them with the included short spacers (Fig. 7 & 8).

Having troubles with assembling your new lense? You will nd more detailed instructions on our website as well as video
tutorials for selected camera models. INSTAR also oers an installation service for a small fee.
www.instar.com
QUICK Installation Guide
4 mm Wide-Angle Lense for IN-5907HD
Content of delivery: 1x Wide-angle lense; 4x screws; 4x spacer; 4x springs; 3x diuser lenses; 1x installation guide
Step 9-1: Now to the complicated
part: Take a spring from this Upgrade
Pack and place it between the LED
board and a short spacer. Use the in-
cluded long screws to lock this con-
struction in place by fastening the
screw onto the short spacer. Repeat
this for the remaining three spacers
(Fig. 10, 11 & 12).
For now it is only required to fasten
the screws by two turns.
Important! Please make sure the
LED board and the sensor board are
aligned correctly! (Fig.12)
Step 7: Please take the new wide-angle lense
and mount it in the lense mount by turning it
clockwise. Screw it all the way in and fasten the
xing screw on the lense mount in order to se-
cure the lense (Fig. 9).
Step 9-2: The sensor board has a cut-out
on the right side. The LEDs on the LED
board are on top while the brightness
sensor is at the bottom (Fig.12)
Step 11: You now may reapply the black front sheet cover to the LED board. But please
make sure you won’t need any further readjustment of your lense rst. This package
includes special diusing reectors for the extended viewing angle. Simply plug them
on top of the infrared LEDs like the original reectors from Fig. 2 used to be.
Step 10: Now put the whole front part back
into the camera casing and secure it with the
three outer screws removed before in Step 3
(Fig. 4). You will now need to move the lense
closer to the glass cover. In order to do that,
you need to fasten the four screws on the
LED board by one turn (Fig. 13). Dont turn
them too far since that would cause the lense
to come to much frontward which will give-
pressure to the front glass and you will risk
damaging the front glass of your camera per-
manently.
camera to your network and open the camera’s web interface in your web browser. While
keeping an eye on the cameras live video, slowly turn the front part of the lense to the left
or to the right until you get a sharp and clear image. Once done please fasten the xing
screw to keep this setting.
Notice: The outer ring is the part of the lens with the specication printing.
Important: In case you see reections
when it is dark and the IR LEDs are ac-
tivated, you can x that by sliding the
top cover more to the back. You can
also use the original reectors to limit
the illumination angle.
Step 8: After the installation you will need to
adjust the focal point of the lense. To do so you
need to untighten the xing screw on the out-
er ring of the lense (Fig. 9). Now connect the
Step 12: At last, carefully screw the
front cover back on the casing by turn-
ing it clockwise. Make sure to screw it
on tightly but without breaking the
front glass. In case the wide-angle
lense sticks out too much, you will
have to refer to step 10. Slide the top
cover back into position (see Fig. 1)
and enjoy your new wide-angle lense.
Fig.10
Fig.13
Fig.9
Fig.11
Fig.12
Other manuals for IN-5907HD
1


 installation manual")


