Instek Digital MatriVideo DVR-1U Series User manual

A complete systemto provide high resolution, long-term digital video
storage and an IP based CCTV solution on a scalable and reliable platform
DVR-1U Quick Start Guide
(HR-DR53xx-1U, HR-DR54xx-1U)
Change the IP Address
System Configuration ->Network Settings -> IP
Configuration? Select eth0 -> Enable eth0 ->
Static IP Configuration -> Enter the IP address,
Netmask, Gateway -> Press “OK” to proceed.
The eth0’s IP address is changed to
“192.168.1.10” in the document. Please wait for
a few moments for the changes to take effect.
Note: Keep the value of MTU as default (1500)
unless you have other devices such as a SAN
connected to the same network.
Add Storage to the DVR: The first HDD will
automatically be in use by the DVR. Subsequent
HDDs will need to be added via the hDSM.
Navigate to Storage Management -> Add
Storage Repository and select the available
storage repositories to add to the DVR. This can
be done individually or by using All to select all
available storage repositories. Select OK.
Proceed to the menu option Detect Available
Disk Volume to check the status of the HDDs.
The status of the HDDs should
display In Use.
Remember to go back to HDSM main menu ->
hDVR -> Start the DVR services. This will take a
few seconds to complete.
STEP 5 : SUBSCRIBE THE DVR
STEP 6 : TIME SYNC WITH THE DVR
Run the Command Center Lite software. During
the first run, you will be asked to subscribe (or
add) the DVR to the video recorder subscription
list.
Type in the IP address, Command Port, Live Port
and Playback Port of the NVR.
Command Port: 80
Live Port: 3514
Playback Port: 60006
Note: Do not change these port numbers if
connecting the DVR in a LAN environment. Click
Add to continue. You can add additional DVRs in
a similar fashion. When all the DVRs have been
added, click Next to continue.
Finish the configuration wizard and log into the
Command Center. The default username is
admin and the default password is id
Click on the MatriVideo Command Center Setup
(or Command Center Lite) tab on the bottom left
corner of the screen.
STEP 7 : SETTING UP THE CAMERAS
STEP 8 : VIEW THE VIDEO
CONTACT INFORMATION
Right-click on the DVR (labeled by its IP address)
in the camera tree panel and click Video
Recorder Setup. When asked to login the
default username is admin and the password is
id.
Click the Camera Setup tab.
Click Camera Setup Basic tab. Click the Active
box next to the camera name(s) to enable the
camera. Analog Cameras can be setup on the
top part of the window and the IP cameras can
be setup on the bottom part of the window.
You can also change the camera name by
clicking on the camera name row for each
camera, such as “Cam-01”, “Cam-02”.
Type in the IP address of the DVR or an available
time server. This will keep the time in sync
between the DVR and your PC running the
Command Center application.
For setting up IP cameras, please go to step e.
Note: Before continuing, you must configure the
IP address of each camera to ensure it is in the
same network segment as the DVR. Refer to your
camera’s user manual for more information on
how to do this.
In the IP Camera table, type a descriptive
Camera Name.
Select the Camera Type.
Type the IP Address of the IP cameras. Domain
names are supported if available on the
surveillance network.
The Port number is dependent on the IP camera.
Ch refers to the channel number of the video
server. See the IP camera or video server manual
for additional information.
The Login option is used to access the camera
configuration settings. Refer to the camera user
manual for additional information.
Click Audio, if supported. Refer to the camera’s
user manual for additional information.
Select the Resolution for the camera from the
drop-down list box.
Click the Video Stream tab to set up the Frame
Rate and Quality (Bitrate) for each individual
camera.
To setup 24x7 recording, click the Recording
Setup tab and then click Basic Setup. Select a
camera from the camera panel and change the
recording mode to 24x7. Alternatively, select 24x7
and then at the bottom of the screen click Copy to
All to apply the setting to all cameras in the group.
Click on the “+” icon next to the IP address of the
DVR to expand your camera tree.
Drag and drop the video source from the camera
tree to the blank patterns (1x1, 2x2, 3x3 or 4x4) to
view your video.
We graciously thank you for investing your
faith in Instek Digital and being a valuable
part of our corporation. Instek Digital’s prime
goal is to deliver leading technology in
addition to exceptional customer service and
technical support.
Instek Digital’s technical support
representatives are always available to
answer any of your support related questions
or concerns. Please refer to our website for
your regional support contacts:
http://www.instekdigital.com
USA:
Phone: 1-909-627-8811
Monday – Friday, 9 a.m. – 6 p.m. (Pacific Time)
ASIA PACIFIC:
Phone: 886-2-2914-1839
Monday – Friday, 9 a.m. – 6 p.m. (GMT+8)
E-mail:
g.
h.
i.
c.
b.
c.
b.
b.
a.
a.
a.
d.
f.
g.
h.
i.
e.
m.
b.
k.
l.
j.
a.

LCD Display USB Ports Power Switch
BOX CONTENTS
NETWORK CONNECTION OVERVIEW
FRONT PANEL OF THE 1U DVR
REAR PANEL OF THE 1U DVR
1. MatriVideo DVR x1
2. Document CD x1
3. Quick Start Guide x1
4. Power Adapter x1
5. Power Cable x1
6. Screws (Set) x1
7. Warranty Card x1
1. PS/2 ports for keyboard and mouse
2. Power input
3. VGA Port
4. COM Ports
5. USB ports
6. LAN Port
7. Video in Ports (8/16 channels)
8. Audio in Ports (8/16 channels)
STEP 1: CONNECT YOUR DVR STEP 2: POWER ON THE DVR
STEP 3: INSTALL COMMAND CENTER LITE
STEP 4: CONFIGURE THE DVR
Open the top cover of the DVR by removing the
screws on the top and sides of the unit.
a.
a.
To install a SATA II HDD inside the DVR, first
locate the empty HDD tray then remove the
single screw that secures it to the base.
(install HDD1 first)
Use the provided screws to secure a SATA II HDD
onto the HDD tray and snap the combined unit
back onto the base.
Attach the cable to the rear of the HDDs as shown.
b.
a.
b.
c.
d.
c.
b.
a.
THANK YOU FOR PURCHASING A QUALITY PRODUCT FROM INSTEK DIGITAL.
THIS QUICK START GUIDE WILL PROVIDE YOU WITH THE INSTRUCTIONS
NEEDED TO CONFIGURE YOUR DVR (SERVER) AND VIEW THE VIDEO FROM
THE COMMAND CENTER LITE APPLICATION (CLIENT SOFTWARE).
INSTEK DIGITAL SEPERATES THE CLIENT SOFTWARE FROM THE SERVER
INTO TWO DISTINCT ENTITIES. THIS SETUP ALLOWS YOU (THE CUSTOMER)
TO PLACE YOUR SERVER IN A SECURE, TAMPER-PROOF LOCATION, FURTHER
ENHANCING YOUR SECURITY PROTOCOLS.
The MatriVideo™ Hybrid Digital Video Recorder (hDVR)
is a state-of-the art recording system that provides DVD
quality video (CIF~D1) by using the most advanced H.264
compression technology. It is based on the Linux operating
system which is considered to be the most stable and secure
operating system in the world.
1 2 3 5 8
6 7
4
Connect the power cord.
Power on the DVR from the rear panel. The
booting process will take a few minutes to
complete.
Once the boot-up is complete, you will see the
following information: (System Version,IP
Address, Network Connectivity Information,
and the System Date & Time) on the front LCD
Panel.
Insert the Command Center Lite CD into the
CD-ROM drive of your personal laptop or desktop
and run the Command Center Lite Setup .
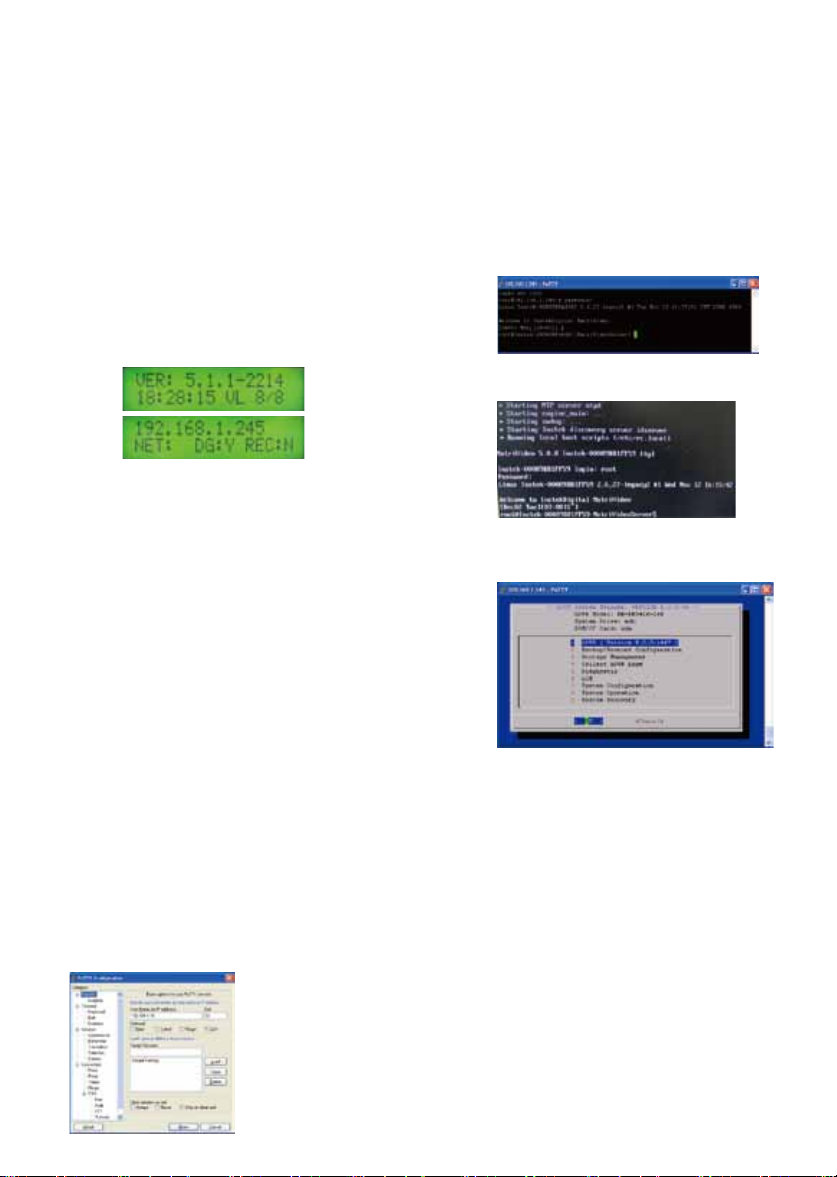
Configure the DVR via PuTTY (see step b) or
connect a keyboard and a monitor directly to
DVR (see step c).
PuTTY is a Secure Shell (SSH) client used to
securely connect to the DVR remotely. To launch
PuTTY navigate to Start ->Programs ->Instek
Digital ->Command Center Lite -> PuTTY. In
the text box labeled Host Name or IP Address,
enter the IP address of the DVR found on the
front panel LCD (the default IP address is
192.168.1.245). Click Open to initiate the remote
connection to the DVR.
c.
d.
e.
f.
The DVR uses an embedded Linux
Operating System. Once the DVR has a
keyboard and monitor connected, you will
see a login prompt. The DVR’s default
username is root and the password is id.
Connection via PuTTY
Direct Connection via the DVR
Under the OS prompt type in hdsm to run
the hDVR System Manager.
Change the Time Zone
System Configuration -> Time Zone
Change -> Select Continer or Ocean ->
Select Country/Region. Select Yes to
confirm.
Change the Date / Time
System Configuration -> Date / Time
Change -> Select Proceed to stop the
process and wait for a few seconds -> Use
[TAB], Up Arrow, Down Arrow to change the
Year, the Month and the Data. Use [TAB], UP
Arrow, Down Arrow to change the Hour,the
Minutes and the Seconds -> Select Proceed
to accept the changes.
e.
f.
g.
h.
i.
j.
Connect one end of the BNC cable to the camera
and the other to the video and audio-in ports. (Red
on the AV line indicates video, white indicates
audio.)
For extra COM port or RS485 direct connection,
please contact Instek for the optional USB to
RS232/485 converter.
To connect a PTZ camera, connect an RS-232 cable
between the converter and the DVR COM1 port.
Connect the PTZ camera and the RS-232 RS-485
converter by using the control cable.
To connect the DVR to the network, connect one
end of the RJ45 to the switch and the other end to
the RJ45 port on the DVR.
hDVR
Command Center / Command Cemter Lite
Ethernet Switch
IP Cameras
Analog Cameras
front
HDD1
HDD2
Put the DVR cover back on and tighten all the
screws.

LCD Display USB Ports Power Switch
BOX CONTENTS
NETWORK CONNECTION OVERVIEW
FRONT PANEL OF THE 1U DVR
REAR PANEL OF THE 1U DVR
1. MatriVideo DVR x1
2. Document CD x1
3. Quick Start Guide x1
4. Power Adapter x1
5. Power Cable x1
6. Screws (Set) x1
7. Warranty Card x1
1. PS/2 ports for keyboard and mouse
2. Power input
3. VGA Port
4. COM Ports
5. USB ports
6. LAN Port
7. Video in Ports (8/16 channels)
8. Audio in Ports (8/16 channels)
STEP 1: CONNECT YOUR DVR STEP 2: POWER ON THE DVR
STEP 3: INSTALL COMMAND CENTER LITE
STEP 4: CONFIGURE THE DVR
Open the top cover of the DVR by removing the
screws on the top and sides of the unit.
a.
a.
To install a SATA II HDD inside the DVR, first
locate the empty HDD tray then remove the
single screw that secures it to the base.
(install HDD1 first)
Use the provided screws to secure a SATA II HDD
onto the HDD tray and snap the combined unit
back onto the base.
Attach the cable to the rear of the HDDs as shown.
b.
a.
b.
c.
d.
c.
b.
a.
THANK YOU FOR PURCHASING A QUALITY PRODUCT FROM INSTEK DIGITAL.
THIS QUICK START GUIDE WILL PROVIDE YOU WITH THE INSTRUCTIONS
NEEDED TO CONFIGURE YOUR DVR (SERVER) AND VIEW THE VIDEO FROM
THE COMMAND CENTER LITE APPLICATION (CLIENT SOFTWARE).
INSTEK DIGITAL SEPERATES THE CLIENT SOFTWARE FROM THE SERVER
INTO TWO DISTINCT ENTITIES. THIS SETUP ALLOWS YOU (THE CUSTOMER)
TO PLACE YOUR SERVER IN A SECURE, TAMPER-PROOF LOCATION, FURTHER
ENHANCING YOUR SECURITY PROTOCOLS.
The MatriVideo™ Hybrid Digital Video Recorder (hDVR)
is a state-of-the art recording system that provides DVD
quality video (CIF~D1) by using the most advanced H.264
compression technology. It is based on the Linux operating
system which is considered to be the most stable and secure
operating system in the world.
1 2 3 5 8
6 7
4
Connect the power cord.
Power on the DVR from the rear panel. The
booting process will take a few minutes to
complete.
Once the boot-up is complete, you will see the
following information: (System Version,IP
Address, Network Connectivity Information,
and the System Date & Time) on the front LCD
Panel.
Insert the Command Center Lite CD into the
CD-ROM drive of your personal laptop or desktop
and run the Command Center Lite Setup .
Configure the DVR via PuTTY (see step b) or
connect a keyboard and a monitor directly to
DVR (see step c).
PuTTY is a Secure Shell (SSH) client used to
securely connect to the DVR remotely. To launch
PuTTY navigate to Start ->Programs ->Instek
Digital ->Command Center Lite -> PuTTY. In
the text box labeled Host Name or IP Address,
enter the IP address of the DVR found on the
front panel LCD (the default IP address is
192.168.1.245). Click Open to initiate the remote
connection to the DVR.
c.
d.
e.
f.
The DVR uses an embedded Linux
Operating System. Once the DVR has a
keyboard and monitor connected, you will
see a login prompt. The DVR’s default
username is root and the password is id.
Connection via PuTTY
Direct Connection via the DVR
Under the OS prompt type in hdsm to run
the hDVR System Manager.
Change the Time Zone
System Configuration -> Time Zone
Change -> Select Continer or Ocean ->
Select Country/Region. Select Yes to
confirm.
Change the Date / Time
System Configuration -> Date / Time
Change -> Select Proceed to stop the
process and wait for a few seconds -> Use
[TAB], Up Arrow, Down Arrow to change the
Year, the Month and the Data. Use [TAB], UP
Arrow, Down Arrow to change the Hour,the
Minutes and the Seconds -> Select Proceed
to accept the changes.
e.
f.
g.
h.
i.
j.
Connect one end of the BNC cable to the camera
and the other to the video and audio-in ports. (Red
on the AV line indicates video, white indicates
audio.)
For extra COM port or RS485 direct connection,
please contact Instek for the optional USB to
RS232/485 converter.
To connect a PTZ camera, connect an RS-232 cable
between the converter and the DVR COM1 port.
Connect the PTZ camera and the RS-232 RS-485
converter by using the control cable.
To connect the DVR to the network, connect one
end of the RJ45 to the switch and the other end to
the RJ45 port on the DVR.
hDVR
Command Center / Command Cemter Lite
Ethernet Switch
IP Cameras
Analog Cameras
front
HDD1
HDD2
Put the DVR cover back on and tighten all the
screws.

A complete systemto provide high resolution, long-term digital video
storage and an IP based CCTV solution on a scalable and reliable platform
DVR-1U Quick Start Guide
(HR-DR53xx-1U, HR-DR54xx-1U)
Change the IP Address
System Configuration ->Network Settings -> IP
Configuration? Select eth0 -> Enable eth0 ->
Static IP Configuration -> Enter the IP address,
Netmask, Gateway -> Press “OK” to proceed.
The eth0’s IP address is changed to
“192.168.1.10” in the document. Please wait for
a few moments for the changes to take effect.
Note: Keep the value of MTU as default (1500)
unless you have other devices such as a SAN
connected to the same network.
Add Storage to the DVR: The first HDD will
automatically be in use by the DVR. Subsequent
HDDs will need to be added via the hDSM.
Navigate to Storage Management -> Add
Storage Repository and select the available
storage repositories to add to the DVR. This can
be done individually or by using All to select all
available storage repositories. Select OK.
Proceed to the menu option Detect Available
Disk Volume to check the status of the HDDs.
The status of the HDDs should
display In Use.
Remember to go back to HDSM main menu ->
hDVR -> Start the DVR services. This will take a
few seconds to complete.
STEP 5 : SUBSCRIBE THE DVR
STEP 6 : TIME SYNC WITH THE DVR
Run the Command Center Lite software. During
the first run, you will be asked to subscribe (or
add) the DVR to the video recorder subscription
list.
Type in the IP address, Command Port, Live Port
and Playback Port of the NVR.
Command Port: 80
Live Port: 3514
Playback Port: 60006
Note: Do not change these port numbers if
connecting the DVR in a LAN environment. Click
Add to continue. You can add additional DVRs in
a similar fashion. When all the DVRs have been
added, click Next to continue.
Finish the configuration wizard and log into the
Command Center. The default username is
admin and the default password is id
Click on the MatriVideo Command Center Setup
(or Command Center Lite) tab on the bottom left
corner of the screen.
STEP 7 : SETTING UP THE CAMERAS
STEP 8 : VIEW THE VIDEO
CONTACT INFORMATION
Right-click on the DVR (labeled by its IP address)
in the camera tree panel and click Video
Recorder Setup. When asked to login the
default username is admin and the password is
id.
Click the Camera Setup tab.
Click Camera Setup Basic tab. Click the Active
box next to the camera name(s) to enable the
camera. Analog Cameras can be setup on the
top part of the window and the IP cameras can
be setup on the bottom part of the window.
You can also change the camera name by
clicking on the camera name row for each
camera, such as “Cam-01”, “Cam-02”.
Type in the IP address of the DVR or an available
time server. This will keep the time in sync
between the DVR and your PC running the
Command Center application.
For setting up IP cameras, please go to step e.
Note: Before continuing, you must configure the
IP address of each camera to ensure it is in the
same network segment as the DVR. Refer to your
camera’s user manual for more information on
how to do this.
In the IP Camera table, type a descriptive
Camera Name.
Select the Camera Type.
Type the IP Address of the IP cameras. Domain
names are supported if available on the
surveillance network.
The Port number is dependent on the IP camera.
Ch refers to the channel number of the video
server. See the IP camera or video server manual
for additional information.
The Login option is used to access the camera
configuration settings. Refer to the camera user
manual for additional information.
Click Audio, if supported. Refer to the camera’s
user manual for additional information.
Select the Resolution for the camera from the
drop-down list box.
Click the Video Stream tab to set up the Frame
Rate and Quality (Bitrate) for each individual
camera.
To setup 24x7 recording, click the Recording
Setup tab and then click Basic Setup. Select a
camera from the camera panel and change the
recording mode to 24x7. Alternatively, select 24x7
and then at the bottom of the screen click Copy to
All to apply the setting to all cameras in the group.
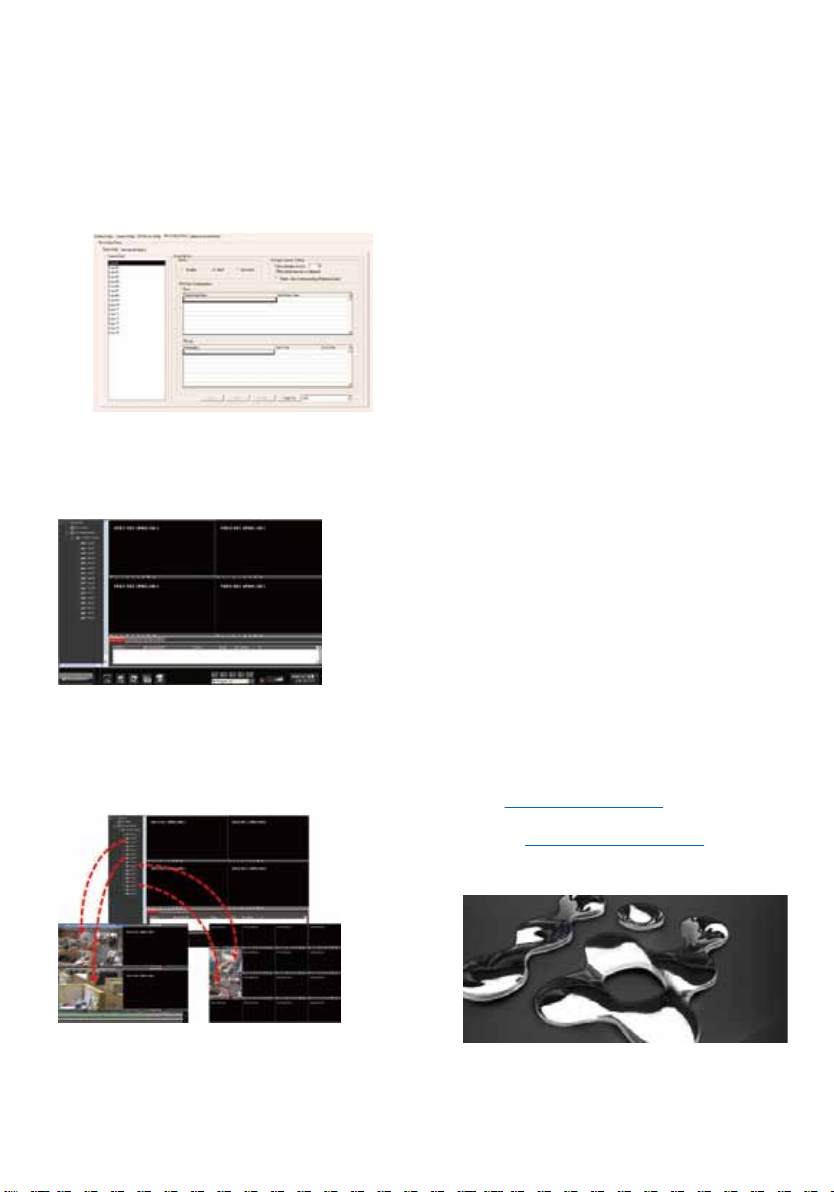
Click on the “+” icon next to the IP address of the
DVR to expand your camera tree.
Drag and drop the video source from the camera
tree to the blank patterns (1x1, 2x2, 3x3 or 4x4) to
view your video.
We graciously thank you for investing your
faith in Instek Digital and being a valuable
part of our corporation. Instek Digital’s prime
goal is to deliver leading technology in
addition to exceptional customer service and
technical support.
Instek Digital’s technical support
representatives are always available to
answer any of your support related questions
or concerns. Please refer to our website for
your regional support contacts:
http://www.instekdigital.com
USA:
Phone: 1-909-627-8811
Monday – Friday, 9 a.m. – 6 p.m. (Pacific Time)
ASIA PACIFIC:
Phone: 886-2-2914-1839
Monday – Friday, 9 a.m. – 6 p.m. (GMT+8)
E-mail:
g.
h.
i.
c.
b.
c.
b.
b.
a.
a.
a.
d.
f.
g.
h.
i.
e.
m.
b.
k.
l.
j.
a.

A complete systemto provide high resolution, long-term digital video
storage and an IP based CCTV solution on a scalable and reliable platform
DVR-1U Quick Start Guide
(HR-DR53xx-1U, HR-DR54xx-1U)
Change the IP Address
System Configuration ->Network Settings -> IP
Configuration? Select eth0 -> Enable eth0 ->
Static IP Configuration -> Enter the IP address,
Netmask, Gateway -> Press “OK” to proceed.
The eth0’s IP address is changed to
“192.168.1.10” in the document. Please wait for
a few moments for the changes to take effect.
Note: Keep the value of MTU as default (1500)
unless you have other devices such as a SAN
connected to the same network.
Add Storage to the DVR: The first HDD will
automatically be in use by the DVR. Subsequent
HDDs will need to be added via the hDSM.
Navigate to Storage Management -> Add
Storage Repository and select the available
storage repositories to add to the DVR. This can
be done individually or by using All to select all
available storage repositories. Select OK.
Proceed to the menu option Detect Available
Disk Volume to check the status of the HDDs.
The status of the HDDs should
display In Use.
Remember to go back to HDSM main menu ->
hDVR -> Start the DVR services. This will take a
few seconds to complete.
STEP 5 : SUBSCRIBE THE DVR
STEP 6 : TIME SYNC WITH THE DVR
Run the Command Center Lite software. During
the first run, you will be asked to subscribe (or
add) the DVR to the video recorder subscription
list.
Type in the IP address, Command Port, Live Port
and Playback Port of the NVR.
Command Port: 80
Live Port: 3514
Playback Port: 60006
Note: Do not change these port numbers if
connecting the DVR in a LAN environment. Click
Add to continue. You can add additional DVRs in
a similar fashion. When all the DVRs have been
added, click Next to continue.
Finish the configuration wizard and log into the
Command Center. The default username is
admin and the default password is id
Click on the MatriVideo Command Center Setup
(or Command Center Lite) tab on the bottom left
corner of the screen.
STEP 7 : SETTING UP THE CAMERAS
STEP 8 : VIEW THE VIDEO
CONTACT INFORMATION
Right-click on the DVR (labeled by its IP address)
in the camera tree panel and click Video
Recorder Setup. When asked to login the
default username is admin and the password is
id.
Click the Camera Setup tab.
Click Camera Setup Basic tab. Click the Active
box next to the camera name(s) to enable the
camera. Analog Cameras can be setup on the
top part of the window and the IP cameras can
be setup on the bottom part of the window.
You can also change the camera name by
clicking on the camera name row for each
camera, such as “Cam-01”, “Cam-02”.
Type in the IP address of the DVR or an available
time server. This will keep the time in sync
between the DVR and your PC running the
Command Center application.
For setting up IP cameras, please go to step e.
Note: Before continuing, you must configure the
IP address of each camera to ensure it is in the
same network segment as the DVR. Refer to your
camera’s user manual for more information on
how to do this.
In the IP Camera table, type a descriptive
Camera Name.
Select the Camera Type.
Type the IP Address of the IP cameras. Domain
names are supported if available on the
surveillance network.
The Port number is dependent on the IP camera.
Ch refers to the channel number of the video
server. See the IP camera or video server manual
for additional information.
The Login option is used to access the camera
configuration settings. Refer to the camera user
manual for additional information.
Click Audio, if supported. Refer to the camera’s
user manual for additional information.
Select the Resolution for the camera from the
drop-down list box.
Click the Video Stream tab to set up the Frame
Rate and Quality (Bitrate) for each individual
camera.
To setup 24x7 recording, click the Recording
Setup tab and then click Basic Setup. Select a
camera from the camera panel and change the
recording mode to 24x7. Alternatively, select 24x7
and then at the bottom of the screen click Copy to
All to apply the setting to all cameras in the group.
Click on the “+” icon next to the IP address of the
DVR to expand your camera tree.
Drag and drop the video source from the camera
tree to the blank patterns (1x1, 2x2, 3x3 or 4x4) to
view your video.
We graciously thank you for investing your
faith in Instek Digital and being a valuable
part of our corporation. Instek Digital’s prime
goal is to deliver leading technology in
addition to exceptional customer service and
technical support.
Instek Digital’s technical support
representatives are always available to
answer any of your support related questions
or concerns. Please refer to our website for
your regional support contacts:
http://www.instekdigital.com
USA:
Phone: 1-909-627-8811
Monday – Friday, 9 a.m. – 6 p.m. (Pacific Time)
ASIA PACIFIC:
Phone: 886-2-2914-1839
Monday – Friday, 9 a.m. – 6 p.m. (GMT+8)
E-mail:
g.
h.
i.
c.
b.
c.
b.
b.
a.
a.
a.
d.
f.
g.
h.
i.
e.
m.
b.
k.
l.
j.
a.
A complete systemto provide high resolution, long-term digital video
storage and an IP based CCTV solution on a scalable and reliable platform
DVR-1U Quick Start Guide
(HR-DR53xx-1U, HR-DR54xx-1U)
Change the IP Address
System Configuration ->Network Settings -> IP
Configuration? Select eth0 -> Enable eth0 ->
Static IP Configuration -> Enter the IP address,
Netmask, Gateway -> Press “OK” to proceed.
The eth0’s IP address is changed to
“192.168.1.10” in the document. Please wait for
a few moments for the changes to take effect.
Note: Keep the value of MTU as default (1500)
unless you have other devices such as a SAN
connected to the same network.
Add Storage to the DVR: The first HDD will
automatically be in use by the DVR. Subsequent
HDDs will need to be added via the hDSM.
Navigate to Storage Management -> Add
Storage Repository and select the available
storage repositories to add to the DVR. This can
be done individually or by using All to select all
available storage repositories. Select OK.
Proceed to the menu option Detect Available
Disk Volume to check the status of the HDDs.
The status of the HDDs should
display In Use.
Remember to go back to HDSM main menu ->
hDVR -> Start the DVR services. This will take a
few seconds to complete.
STEP 5 : SUBSCRIBE THE DVR
STEP 6 : TIME SYNC WITH THE DVR
Run the Command Center Lite software. During
the first run, you will be asked to subscribe (or
add) the DVR to the video recorder subscription
list.
Type in the IP address, Command Port, Live Port
and Playback Port of the NVR.
Command Port: 80
Live Port: 3514
Playback Port: 60006
Note: Do not change these port numbers if
connecting the DVR in a LAN environment. Click
Add to continue. You can add additional DVRs in
a similar fashion. When all the DVRs have been
added, click Next to continue.
Finish the configuration wizard and log into the
Command Center. The default username is
admin and the default password is id
Click on the MatriVideo Command Center Setup
(or Command Center Lite) tab on the bottom left
corner of the screen.
STEP 7 : SETTING UP THE CAMERAS
STEP 8 : VIEW THE VIDEO
CONTACT INFORMATION
Right-click on the DVR (labeled by its IP address)
in the camera tree panel and click Video
Recorder Setup. When asked to login the
default username is admin and the password is
id.
Click the Camera Setup tab.
Click Camera Setup Basic tab. Click the Active
box next to the camera name(s) to enable the
camera. Analog Cameras can be setup on the
top part of the window and the IP cameras can
be setup on the bottom part of the window.
You can also change the camera name by
clicking on the camera name row for each
camera, such as “Cam-01”, “Cam-02”.
Type in the IP address of the DVR or an available
time server. This will keep the time in sync
between the DVR and your PC running the
Command Center application.
For setting up IP cameras, please go to step e.
Note: Before continuing, you must configure the
IP address of each camera to ensure it is in the
same network segment as the DVR. Refer to your
camera’s user manual for more information on
how to do this.
In the IP Camera table, type a descriptive
Camera Name.
Select the Camera Type.
Type the IP Address of the IP cameras. Domain
names are supported if available on the
surveillance network.
The Port number is dependent on the IP camera.
Ch refers to the channel number of the video
server. See the IP camera or video server manual
for additional information.
The Login option is used to access the camera
configuration settings. Refer to the camera user
manual for additional information.
Click Audio, if supported. Refer to the camera’s
user manual for additional information.
Select the Resolution for the camera from the
drop-down list box.
Click the Video Stream tab to set up the Frame
Rate and Quality (Bitrate) for each individual
camera.
To setup 24x7 recording, click the Recording
Setup tab and then click Basic Setup. Select a
camera from the camera panel and change the
recording mode to 24x7. Alternatively, select 24x7
and then at the bottom of the screen click Copy to
All to apply the setting to all cameras in the group.
Click on the “+” icon next to the IP address of the
DVR to expand your camera tree.
Drag and drop the video source from the camera
tree to the blank patterns (1x1, 2x2, 3x3 or 4x4) to
view your video.
We graciously thank you for investing your
faith in Instek Digital and being a valuable
part of our corporation. Instek Digital’s prime
goal is to deliver leading technology in
addition to exceptional customer service and
technical support.
Instek Digital’s technical support
representatives are always available to
answer any of your support related questions
or concerns. Please refer to our website for
your regional support contacts:
http://www.instekdigital.com
USA:
Phone: 1-909-627-8811
Monday – Friday, 9 a.m. – 6 p.m. (Pacific Time)
ASIA PACIFIC:
Phone: 886-2-2914-1839
Monday – Friday, 9 a.m. – 6 p.m. (GMT+8)
E-mail:
Sales: [email protected]
Support: [email protected]
g.
h.
i.
c.
b.
c.
b.
b.
a.
a.
a.
d.
f.
g.
h.
i.
e.
m.
b.
k.
l.
j.
a.
This manual suits for next models
2
Table of contents
Other Instek Digital DVR manuals


