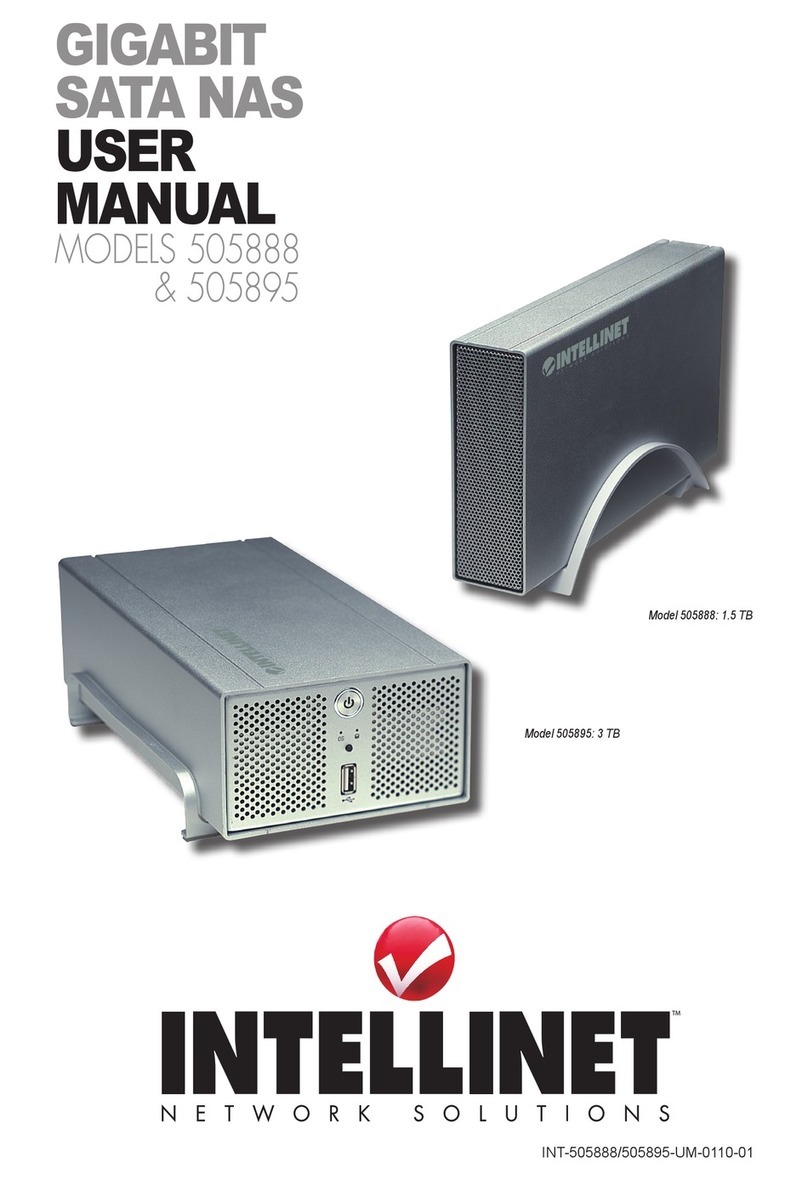
Intellinet 524469 User manual

GiGabit
Sata
NaS
2tb
uSer
maNual
MODEL 524469
INT-524469-UM-1108-01

2
CONTENTS
table of coNteNtS
INTRODUCTION...................................................................................................3
HARDWARE/ INSTALLATION...............................................................................5
Indicators & Connections .................................................................................6
QUICK INSTALLATION.........................................................................................7
Accessing the NAS ..........................................................................................7
ConguringtheNAS .......................................................................................11
CONFIGURATION............................................................................................... 13
Basic Settings ................................................................................................ 13
System Management ..................................................................................... 15
System Reports..............................................................................................20
User Management.......................................................................................... 21
NAS Management..........................................................................................23
P2P Settings ..................................................................................................34
FTP SERVER...................................................................................................... 37
WINDOWS USB PRINTER SERVER..................................................................38
UPnP SETTINGS ................................................................................................39
APPENDIX A.......................................................................................................40
SPECIFICATIONS................................................................................................41
section page

3
INTRODUCTION
iNtroductioN
ThankyouforpurchasingtheINTELLINETNETWORKSOLUTIONS™
Gigabit SATA NAS 2TB, Model 524469.
Addressingthegrowingneedsforadditionalhigh-speedstorageinthe
SOHOandsmall/medium-sizedbusinessenvironments,theGigabit
SATANAS2TBletsyouinstalltwoSATAharddrivesupto1Terabyte
eachforextremelyfastaccesstodatastorageonyournetwork.Andif
additionalspaceisneeded,youcanconnecttwoadditionalUSBHDDs.
TheGigabitSATANAS2TBsupportsRAID0andRAID1congurations:
RAID0(stripeddisks)distributesdataacrossbothharddrivestoimprove
speedandcapacity—however,ifoneharddrivefails,thedataislost;
Alternatively,RAID1(mirroreddisks)isabackupsolutionusingboth
harddrivestostorethesameinformation—ifoneharddrivefails,the
informationisnot lost.
WithaGigabitnetworkconnection,theSATANAS2TBprovidesultra-
fastdatathroughputofupto25MB/s,makingittheperfectnetwork
storageunitforsmallerworkgroups.Plus,youcanstreamvideosand
photosthroughyourUniversalPlugandPlay-enabledmediaplayerin
yourhomeentertainmentcenter.
Followtheinstructionsinthismanualandyou’llalsosoonbeenjoying
thebenetsoftheseadditionalfeatures:
• GigabitEthernetportforhigh-speednetworkconnectivity
• SupportedUSBharddrivelesystems:FAT32,EXT2,EXT3,NTFS
• IntegratediTunesDigitalAudioAccessProtocol(DAAP)serverdelivers
audiostreamstoanyiTunes-compatiblemediaplayeronthenetwork
• Built-inFTPserverallowingremoteuserstoupload/downloadles
• BitTorrentclienttodownloadlesfromtheBTnetworkwhilehaving
yourcomputerturnedoff
• Cross-platformlesharingforWindows,LinuxandMacOS
• Supportedleservingprotocols:CIFS(Samba),FTP,NFSandAFP
• Supports256useraccountsandusergroups
• Createupto250sharedfolders
• User(name/password)andSharingLevel(read/write)security
• SupportsSelf-MonitoringAnalysisandReportingTechnology-enabled
(SMART)harddrives
4
INTRODUCTION
• Adjustableharddrivespin-downtime
• Self-repairingandde-fragmentationfordataintegrityandperformance
• EasyWeb-basedcongurationviaWebbrowser
• FirmwareupdateviaWebbrowserandUSBHDD
• LifetimeWarranty
NOTE:Somescreenimagesaremodiedtottheformatofthismanual.
SYSTEM REQUIREMENTS
• Foraccessingles:
Networkadapterinstalledandfunctioningproperly
• ForPCconguration:
InternetExplorer5.5andaboveorlatestOperabrowserwithJava
support
• ForMacconguration:
InternetExplorer5.2orlatestOperabrowserwithJavasupport
• ForLinuxconguration:
LatestOperabrowserwithJavasupport
PACKAGE CONTENTS
• GigabitSATANAS2TB
• Poweradapter
• Quickinstallguide
• CDwithusermanual

5
HARDWARE INSTALLATION
hardware/iNStallatioN
Toinstallaharddisk/driveintheGigabitSATANAS2TB,followthe
steps below.
1. ShutdowntheNASandunplugthepowercordfromtheACoutlet.
2.Removethescrewsthatsecurethehard
disk/drivecovertothesideoftheNAS
deviceandslidethecoveroff.
3.Slidetheharddrive/diskinsidethe
coveryoujustremovedfromtheNAS
device.
4. Connect the SATA cable and hard
disk/drivepowercordbetweenthe
harddisk/driveandtheNAS.
5.Re-positiontheHDD/coverassemblyonto
theNAS,beingcarefulnottocrush(and
possibly damage or disconnect) the SATA
cable and HDD power cord. The hard
disk/driveinstallationisnowcomplete.Turn
on the NAS.

6
HARDWARE INSTALLATION
Indicators & Connections
1. Using Ethernet cable, connect the LAN
(Ethernet)porttoaPC,server,switch,hub
orothernetworkdeviceontheLAN.
2.Connecttheincludedpoweradaptertoa
surgeprotector.
3.If/whendesired,connectthedeviceport
(AorB)toanexternalUSBharddrive.
4.TurnonthepowertotheNAS.
RESET BUTTON
Ifyouforgetyourpasswordand/orunitIP
address,youwon’tbeabletoaccessthe
NAS.However,youcanusetherecessed
Resetbuttontorestorefactorysettings.
To initiate a reset, press and hold the
buttonin(usingastraightpinorsimilarobject)for5secondsormore
untiltheunitstopsbeeping.
POWER BUTTON
PresslightlyoncetoturntheNASonoroff.Theunitwillwritealldata
intothedriveandsafelypowerdown.Toforcetheunittopowerdown
immediately,pressandholdthebuttonuntilthepowerisoff.
FRONT PANEL LEDS
LED Status Indication
Power (not shown On Power to the NAS is on
atright) Off PowertotheNASisoff
HDD (A & B) / Data Flashing Attached HDD is reading/writing data
LAN / 10/100 On Network link is 10/100 Mbps
Off Linkisdisconnected
Flashing Transmitting/receivingdatapackets
LAN / 1000 On Network link is 1000 Mbps
Off Linkisdisconnected
Flashing Transmitting/receivingdatapackets
DC 12V
LAN
USB HDD
B port
USB HDD
port
Power
Reset

7
QUICKINSTALLATION
quick iNStallatioN
Accessing the NAS
MAPPING A SHARED FOLDER
Mappingyoursharedfolder(s)toyourcomputermakesaccessingthem
easier.Whenasharedfolderismapped,itwillappearasadriveletter
(forexample,“D:”or“E:”)onyourcomputer.Whenyouwanttoaccess
thatsharedfolder,youcansimplygotoMyComputeranddouble-
clickonthedriveletter.Youcanalsohavethecomputerlogintothe
sharedfolderatstartupsoyoudon’tneedtomanuallydoiteachtime.
TomaptheNAS’ssharedfoldertoadriveletterunderMyComputer:
1.Select“MapNetwork
Drive”fromtheTools
menu.
2.Chooseadriveletterto
usetomapyourshared
folder.Click“Browse”and
locatethesharedfolder
in Entire Network. Click
“OK”onceyou’velocated
thesharedfolder.

8
QUICKINSTALLATION
3.Select“Reconnectat
logon”soyoudon’tneed
to repeat this process.
Click“Finish.”
4.Youwillnowseethe
ShareasadriveinMy
Computer.Youcan
accessitbydouble-
clickingonthedrive.
ENABLING UPnP
UPnP(UniversalPlugandPlay)isonlyavailableinWindowsXP,Me
andVista.Thoughnotrequired,enablingitmakescongurationeasier.
1.GototheStartmenu;thenControlPanel;thenAdd/Remove
Programs.
2.Click“Add/Remove
WindowsComponents”
ontheleft-handsideto
display the Windows
ComponentsWizard
screen.

9
QUICKINSTALLATION
3.Highlight“Network
Services”andclick
“Details.”
4.Select“UniversalPlug
andPlay”andclick“OK.”
5.Select“Next”tocontinue.

10
QUICKINSTALLATION
6.Afterallthecomponents
areinstalled,click“Finish.”
Youcanaccessthe
congurationuserinterface
bydouble-clickingonMy
NetworkPlacesonyour
desktop.Double-clickonthe
UPnPdevicetogainaccess
tothecongurationpage.
NOTE:Youmayneedto
restartyourcomputerand/
orrefreshtheviewforthe
devicetoappear.

11
QUICKINSTALLATION
Conguring the NAS
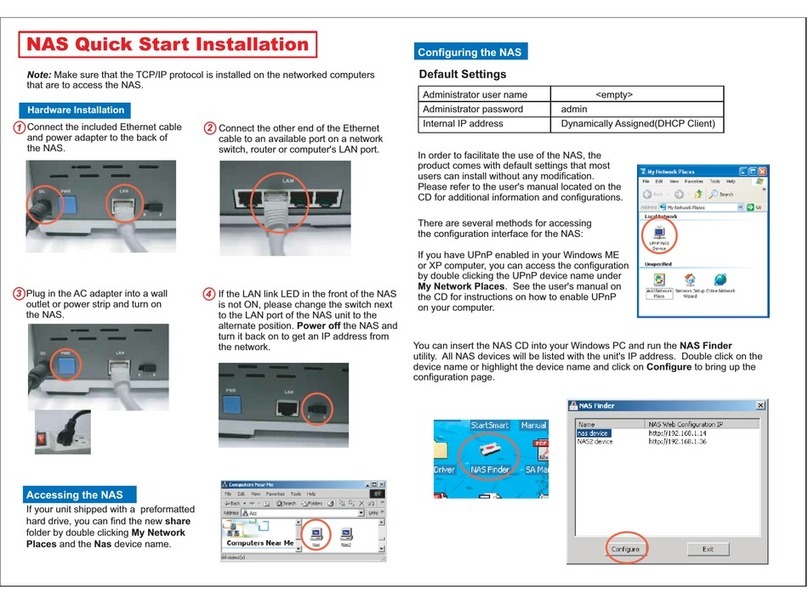
ThereareseveralmethodsforaccessingtheNAScongurationinterface.
• IfyouhaveUPnPenabled
inyourWindowsMe/XP/
Vistacomputer,youcan
accesstheconguration
bydouble-clickingthe
UPnPdeviceunderMy
Network Places.
• YoucanalsoinserttheinstallationCDinto
yourWindowsPCandruntheNASFinder
utility.YourNASunitshouldbelistedwith
theunit’sIPaddress.Double-clickthe
devicenameorhighlightthedevicename
andclick“Congure”todisplaythe
congurationpage.
• Ifyouknowthenameof
theNASdevice,youcan
enter it directly into an
InternetExplorerbrowser.
NOTE: Some network
congurationsorversions
ofInternetExplorermaynotndthedevicecorrectly.

12
QUICKINSTALLATION
• Userswho’vechanged
thedefaultsettingstoa
xedIPsettingcan
directly access the
congurationpageby
enteringtheNAS’sxed
IP address in the browser. A window shouldappearaskingfora
usernameandpassword.LeavetheUserNameeldblankandenter
“admin”inthePasswordeld.ASystemInformationscreenwillthen
display.
NAS FINDER
IncludedontheCDisautilityforlocatingthe
NASonthenetwork,asmentionedabove.
ThisapplicationrunsonWindowsMe,XP
andVistaoperatingsystems.Youcanrunthe
applicationfromtheCDorcopyittothe
computeryouwanttousetocongurethe
NAS.
AllNASdeviceswillbe
listed in the NAS Finder,
along with the associated
IPaddressoftheunit.
Double-clickthedevice
name or highlight the
devicenameandclick
“Congure”todisplaythe
UIfortheNASdevice.

13
CONFIGURATION
coNfiGuratioN
Fromtheuserinterface(UI),
youcanmaintainand
monitorallthefunctionsof
theNAS.Thisinterfaceis
accessiblefromany
computeronthenetwork
with the appropriate browser.
Onlyoneusercanloginto
the UI at a time.
ThepasswordfortheUIcan
besetintheadministrative
menu.Thisisadifferent
passwordthananyuser
passwords on the NAS. To
gettothelowermenus,
simplymoveyourcursor
overthemainmenuitems.
Basic Settings
TheBasicSettingsscreenallowsyoutonameyourNASandcongure
itasaDHCPclientorasaxedIPdeviceonthenetwork.NOTE: On
allscreens,click“Apply”toeffectanychangestotheconguration.The
NASmayreboottonalizethechanges.
NAS Name—NetworkdeviceshaveanIPaddressandaname.These
twoareusuallyrelatedandallowthenetworktoidentifythedevice.
Thisnamemustbeuniqueortheremaybedifcultiesinconguring
andusingtheNAS.Makesurethatnoothercomputerordevicein
thenetworkusesthesamenamethatyouassigntothisNAS.
Domain Name Server—Mostofthetime,thisinformationisn’tneeded,
asyourDHCPserverwillautomaticallyprovidetheinformation.
UPnP Media Server—RefertotheUPnPSettingssection.

14
CONFIGURATION
iTunes Media Server —RefertotheUPnPSettingssection.
DHCP Client—Thedefaultfactorysettinghasthisenabled(above).
ThereshouldbeaDHCPserveronthenetwork(usuallytherouter
ornetworkswitch).TheDHCPserverwillassigntheNASanIP
addresswhenitisturnedon.ThissettingallowstheNAStobe
easilyinstalledandincorporatedintoanynetworkenvironment.
Fixed IP Address —Insomesituations,itmaybebesttoassignthe
NASaxedIPaddress.Thisismostusefulwhenyouwanttoaccess
theNASfromaremotelocation,asmostrouterscanonlyforward
trafctoaspecicIPaddress.IfyouhavetheNASconguredasa
DHCPclient,yourIPaddresscouldchangeperiodically.Havingthe
NASconguredwithaxedIPaddressmeansthattheIPaddress

15
CONFIGURATION
willnotchangeunlessyoureassignit.
TheIPaddressyouassignmustfollowtwobasicrules.First,itmust
bewithinthesamesubnetofyourcurrentnetwork.Forexample,if
yourrouter’sIPaddressis192.168.1.1,yoursubnetismorethanlikely
192.168.1.x(wherexisanumberfrom2to254).Secondly,itcan’t
alreadybeinusebyanothercomputerornetworkdeviceonthe
network.Generally,NASwillonlybeaccessibletocomputersonthe
samesubnet.
Public IP, External Gateway &External
Netmask—Youcanndyourgateway’s
IPaddressandyournetmaskby
going to the command prompt and
runningipcong.
Intheaboveexample,the255.255.255.0subnetmaskindicatesthatthe
rstthreenumbersoftheIPaddress(192.168.1)arenotchangeablein
thissubnet.Hadthesubnetmaskbeen255.255.0.0,thenyoucould
assignanIPof192.168.x.x(wherexis0-254andnotbeingusedby
anyotherdeviceonthenetwork).
System Management
Mostofthesystemfunctions
canbecontrolledfromthis
menu.

16
CONFIGURATION
ADMINISTRATOR SETTINGS
Thisscreenpresentsthebasicadministratorfunctions—easilymodied
andmanagedbytheadministrator—intwopanels:Conguration
MaintainandAdministratorManagement.IntheCongurationMaintain
section,theadministratorcanbackupcurrentcongurationsettingsto
aPCorrestorethepreviousbackupsettingstotheNAS.Afterresetting
theNAS,restorethebackupsettingsandthesystemwillchangeback
to the original settings instantly.
Download cong—Justclick“bk_cong_xxxxxxxx.dat”todownload
thecurrentcongurationsettingstothePC.Choosethedirectoryto
savetheletoandclick“Apply.”
Upload cong—Click“Browse”toselectthecongurationsettingsyou
wanttorestore,thenclick“Apply”touploadtheletowriteitintothe
system. NOTE: Do notturnoffthepowerbeforethewritingis
completed:TheNASwillresetautomaticallyafterthelehasbeen
successfullywrittenintothesystem.
New Password — The administrator can change the administrator
passwordsimplybyenteringthenewpasswordinthiseld.
Browse...

17
CONFIGURATION
NOTE:YoumustenterthenewpasswordinbothPasswordelds.If
theeldentriesdon’tmatch,thepagewillnotbesubmitted.
Conrm New Password — Enter the new password again.
External Admin. port—Deneaportfortheremoteadministratorto
connect to.
Power down—Select“Yes”toturnthedeviceoff.
Restart device—Thisrebootsthedevicebasedononeofthefollowing
optionsselectedfromthedrop-downmenu:
•Never:Donotexecuteareboot.
•RightNow:Rebootimmediately.
•EveryDay:Rebootregularlyatthesettimeeveryday.
•EverySunday(throughSaturday):Rebootregularlyatthesettime
everySunday(orMondayandsoonthroughtheSaturdayoption).
Clear event log—Select“Yes”toclearthesystemhistory(listedin
EventReportbelow).Ifyouselect“No,”theeventrecordneverclears,
evenwhenyourebootthesystem.
Restore factory default—Select“Yes”torecoverthefactorysettings.
EVENT REPORT SETTINGS
Alltheeldsandfunctionsonthismenu/screenareforconguringthe
systemtosendalertstoane-mailaccount.

18
CONFIGURATION
Alarm Mail—Selecttoenableordisablethisfunction.
Mail Server Hostname (SMTP)—Entertheaddressofthemailserver;
e.g.,“mail.mydomain.com”or“111.222.333.444.”
Mail Server Login Name—Ifyourmailserverrequiresauthentication,
youneedtoentertheusernamehere.
Mail Server Login Password—Ifyourmailserverrequiresauthentication,
youneedtoenterthepasswordhere.
Administrator E-mail — This is the address to which the NAS 2TB sends
the e-mails.
Alert Level—Choosebetween“Normal”and“Warning.”
Send a test mail after setting—Enablethistoreceiveateste-mailas
soonasyouclick“Apply.”TheNASwillthensendoutatestmessage
tothespeciedAdministratorE-mailaddress(above).Ifyoudonot
receivethismessage,youwillneedtochecktheserversettings.
FIRMWARE UPDATE
Updatesandfunctionalitycanbeaddedviathisfunction.Checkthe
Webforthelatestrmwareifyouarehavinganyissues.Ingeneral,no
updateshouldbeneededunlessitisrecommendedbytechnicalsupport.
NOTE:Donotperformarmwareupdateoverawirelessconnectionor
powertheunitdownduringarmwareupdate.Anyinterruptionduringan
updatewilldamagethedeviceandrequireyoutosenditinforservice.
Select“Browse”tolocate
theupdatedrmware.If
thermwareleisn’t
correct,itwon’tupdate
thermwareintheunit.
An Update Report screen
willdisplaytheupdate
percentage,indicatingthestatusoftheoperation.Click“Restart”when
theuploadiscomplete.
Updating Firmware from an External USB Hard (Disk) Drive
BesidesupdatingthermwareontheFirmwareUpdatescreen,youcan
useanexternalUSBharddrivetocompletetheupdate.Justcopythe
leontotheUSBdriveandplaceitontheserver,andtheserverwill
automaticallyupdatethermwarewiththelatestversion.

19
CONFIGURATION
1.Createa“rmware”folder(case-sensitive)withintherootfolderof
theUSBharddrive.
2.Copythenewrmwareletothe“rmware”folder.
3.ConnecttheUSBdrivetotheserver’sUSBport.
4.Oncetheserverdetectsandndsthenewestversionofrmware,it
willemitthreelongbeepsandstarttheupdate.Theserverwillkeep
beepingandthePacketsLEDwillindicatetheupdateisinprogress.
WhenalltheLEDslightup,theupdateiscompleted.Theserverwill
then emit a long beep and restart.
NOTE:Duringtheupdate,allnetworkfunctionstemporarilyshutdown.
TIME SETTINGS
TheNAS’sbuilt-inclockshouldbeadjustedtothecurrentlocaltimeto
ensureaccuratetimereporting
inthelogsandlerecords.
SelectyourGMTtimezone
fromthedrop-downmenu,
then enter the date and time.
Click“Apply”toeffectthe
changes.Youcanndyour
GMTtimezonebydouble-
clicking the time display at
thebottom-rightcornerof
yourdesktop.
NTP Service
YoucanalsoactivatetheNTP
servicetoadjustthetime
throughtheassignedNTP
server.EnterthedesiredNTP
servernameorthedefault
NTPserver,assignthe
intervalsforautoupdates,
choosethestatusof
DaylightSaving,select
theDaylightSavingRegion,
thenclick“Apply.”
–5:00 Tampa

20
CONFIGURATION
System Reports
Administratorscanviewthe
systeminformationandlog
lesonthesescreens.
SYSTEM INFORMATION
Thisscreendisplaysusefulsysteminformation,suchasthermware
version,rmwarebuiltdate,systemuptimeandcurrentIPaddress.
Other manuals for 524469
1
Table of contents
Other Intellinet Storage manuals

Intellinet
Intellinet 522991 User manual

Intellinet
Intellinet 501712 User manual

Intellinet
Intellinet 500012 Original operating instructions

Intellinet
Intellinet 505888 User manual

Intellinet
Intellinet 500012 User manual

Intellinet
Intellinet 522991 Instruction Manual

Intellinet
Intellinet 503662 User manual

Intellinet
Intellinet 714464 User manual
Popular Storage manuals by other brands

Dell
Dell AMP01 Getting started

Sun Microsystems
Sun Microsystems StorEdge N8400 Upgrade guide

Sun Microsystems
Sun Microsystems SUN-OCC-SMC576 user manual

IBM
IBM Tape Library Magstar 3494 Operator's guide

Yardline
Yardline SANTA CLARA Assembly manual

Huawei
Huawei FusionModule2000 V500R003C10 Product description