interpret ECO-MAX LED User manual

Interpet has applied over 65 years of aquatic experience to
ensure every element of the design of this product has been
carefully considered to help you enjoy aquarium keeping.
Consumer Advice contact details
Interpet Ltd.
Consumer Advice Department
Vincent Lane, Dorking, Surrey RH4 3YX
Fax: 01306 876712
E-mail: customercar[email protected]
Interpet is a registered trademark of Interpet Limited.
SAVE THESE INSTRUCTIONS
IMPORTANT SAFEGUARDS
MAINTENANCE
Quick Start Guide
•Disconnect the supply before conducting
any maintenance.
•The cable or the flexible cord of the
luminaire cannot be replaced. If the cable is
damaged, the luminaire must be destroyed.
•This unit is for indoor use only – do not use
outside.
•Do not use this unit if the cable or
transformer plug are damaged or appear
to be malfunctioning.
•Do not use this unit if the transformer plug
gets wet.
•Dispose of responsibly following instructions
from your local authority.
Switch the Eco-Max LED off and remove
from the retro fit brackets – wipe off any dirt,
salt mineral deposits with a damp cloth. Do
not use cleaning agents that could enter the
aquarium and harm your livestock.
This product is guaranteed against defects in
Material and workmanship for 12 months from
the date of purchase, under normal usage.
The GUARANTEE DOES NOT APPLY in case of
improper use, negligence, lack of maintenance
or accidental damage. If the LED fails due to
a manufacturing fault within this period it will
either be replaced free of charge or repaired.
Liability is limited to replacement of the faulty
product only no other costs will be reimbursed.
This guarantee is not transferable and
does not affect your statutory rights. This
guarantee does not confer any rights other
than those expressly set out above.
You can help protect the environment. Please
remember to respect the local regulations:
hand in non-working electrical equipment
to an appropriate waste disposal centre.
To ensure aquarium success visit our website
for support, advice and helpful top tips on our
products and fishkeeping. www.interpet.co.uk
A N 11/ 12 / 2 0
GUARANTEE
NEED HELP?
ECO-
MAX
LED
IMPORTANT SAFETY
INSTRUCTIONS
SAVE THESE INSTRUCTIONS FOR FUTURE USE
1. The power supply transformer is not
waterproof – this must be mounted such
that it cannot fall into the aquarium or
be splashed by water. The cable must be
installed with a drip loop to prevent any water
running down the cable into the plug socket.
2. Three options for fitting
the Eco-Max LED
a. Hood location with
adhesive pads – Push fit the
brackets onto the lighting
unit – see illustration on
pack, attach the double
sided adhesive pads to the flat surface
of the brackets. Fix the Eco-Max LED to
the underside of the hood in the desired
location – ensure the hood surface is flat,
clean and dry. DO NOT attach directly
to fluorescent lamps or lamp reflectors.
b. Hood location with screws - Ensure the
hood material is thicker than the length of the
screws to prevent them protruding through
the outer surface. Fit the brackets onto the
lighting system – see illustration on pack.
Place the Eco-Max LED in the desired location
under the hood and draw around the brackets
with a pencil to indicate their position.
Remove the brackets from the Eco-Max
LED and place them in the pencil marked
position in the hood. Using the self-tapping
screws provided fix the bracket in position
using the fixing holes in the bracket. When
both brackets are fixed in position push
fit the Eco-Max LED into the bracket.
c. Hood location with glue – (glue sold
separately) push fit the brackets onto the
Eco Max LED – see illustration on pack.
Select desired location on the underside
of the aquarium hood and mark the position
of the brackets. Keep the hood away from
the aquarium while gluing the brackets
as the glue can be dangerous to the fish.
Clean the marked area with a damp cloth
then allow to dry, remove brackets from
the LED unit and glue into the marked
position on the aquarium hood.
An all-round plastic / wood glue is
recommended for application, for example:
502 super adhesive glue. Always follow the
glue manufacturer’s instructions fully.
HOW TO INSTALL
YOUR ECO-MAX LED
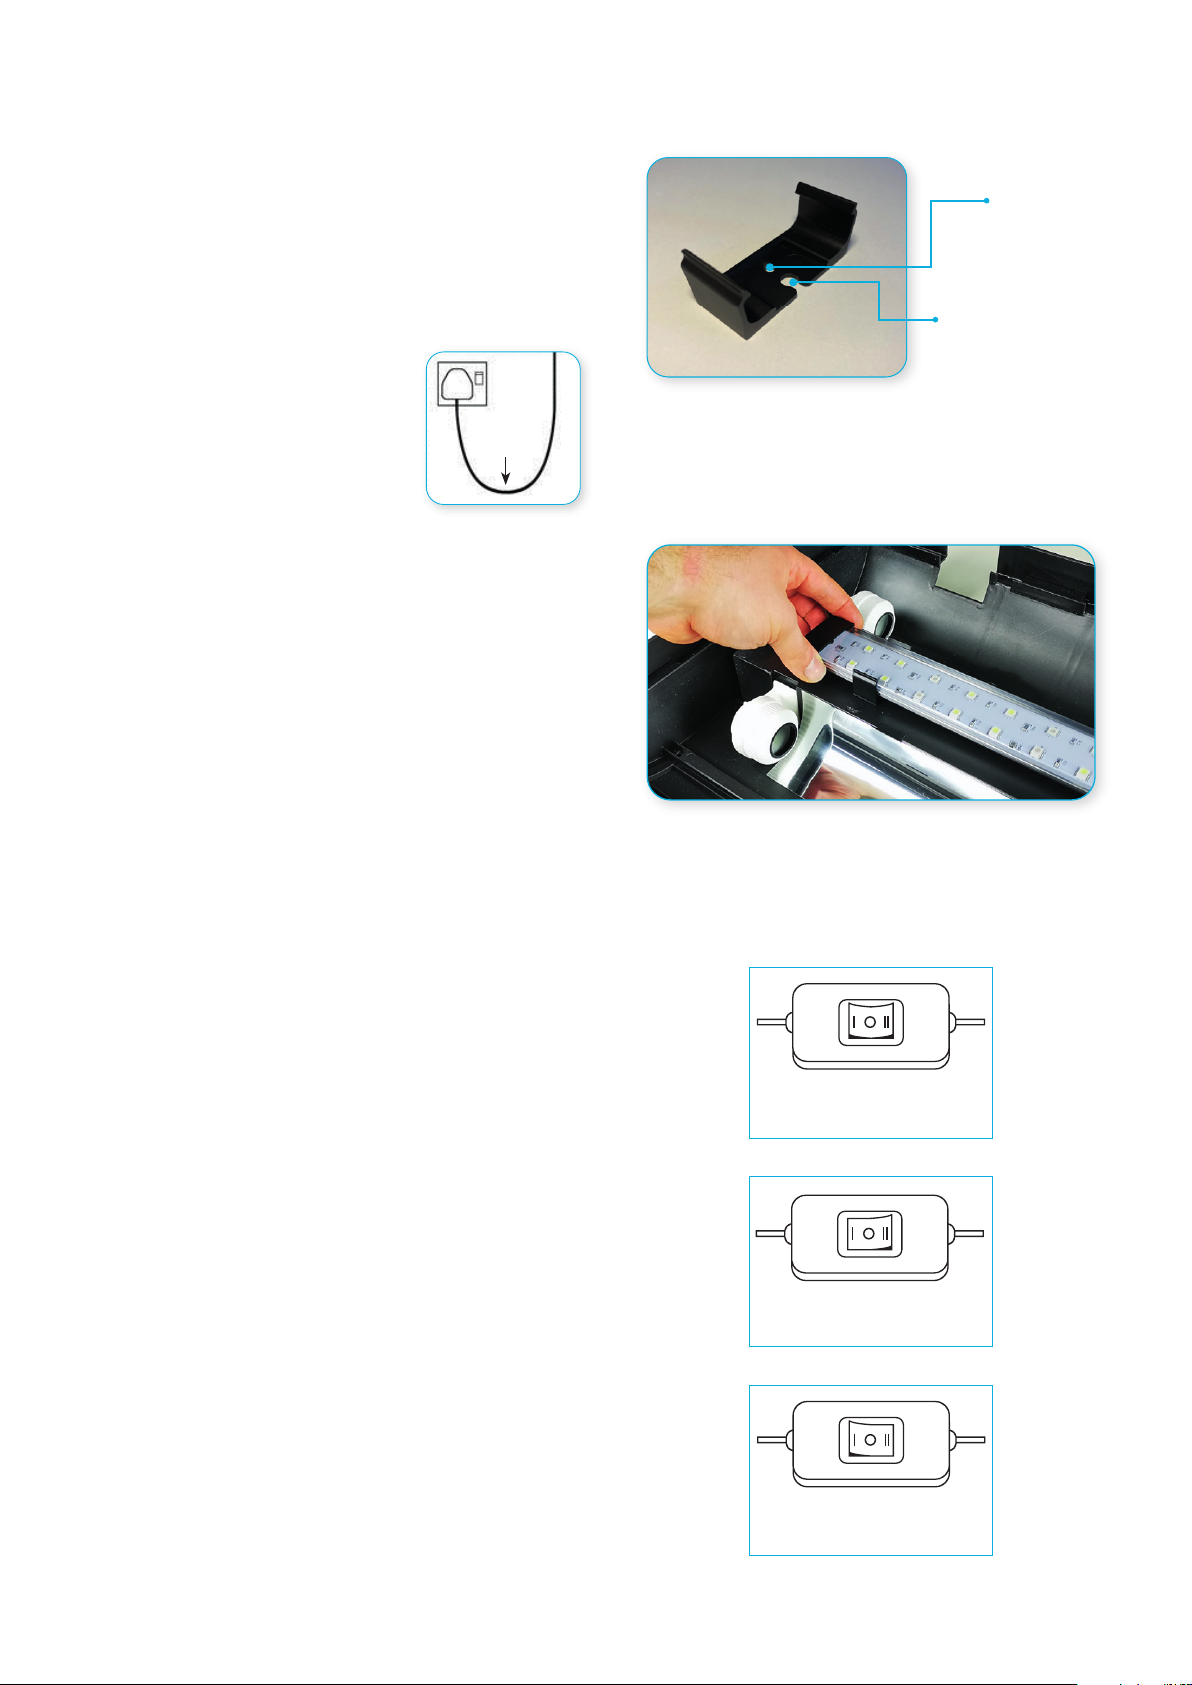
RETRO FIT BRACKETS
RECOMMENDED
INSTALLATION
Retro fit
screw
position
Sucker
button slot
SWITCH INSTRUCTIONS
All LEDs OFF
(Middle 0)
Blue
LEDs ON (I)
Blue & White
LEDs ON (II)
Drip
Loop
Table of contents
Popular Lighting Equipment manuals by other brands


Chauvet Professional
Chauvet Professional REM-RB200CM IP Quick reference guide

Walter
Walter MANOTOP installation instructions

Digilin
Digilin Calibre 500 installation guide

ETI
ETI 514032110 Use and care guide

Satco
Satco NUVO 67-100 Installation and safety instructions

Project Source
Project Source 20261-000 installation guide

Gainsborough
Gainsborough H754 Instructions for use

Hamilton Technology
Hamilton Technology Aruba Sun Series user manual

Commercial Electric
Commercial Electric 55702141 Use and care guide

Ledj
Ledj STRATOS SPOT user manual

MARIMEX
MARIMEX ProStar 6 Instructions for use

Holiday Living
Holiday Living W13B0005 quick start guide