INTERSPIRO Spiromatic test User manual

Spiromatic test
User Manual
99056C01
ENGLISH

Copyright © 2019 Interspiro
This publication contains or refers to proprietary information which is protected by copyright. All
rights are reserved. Interspiro®, Oxydive® and Divator® are registered trademarks belonging to
Interspiro. This publication may not be copied, photocopied, reproduced, translated, or converted to
any electronic or machinereadable form in whole or in part, without prior written approval from
Interspiro.

Table of Contents
Important information ......................................................................... 5
Product description ............................................................................ 6
Maintenance ................................................................................... 10
Before use ...................................................................................... 11
After use ......................................................................................... 16
Depressurize the test equipment ............................................... 16
Storage ........................................................................................... 17
Spiromatic test
3


Important information
Only holder of a valid Interspiro Service Certificate for the equipment in
question may carry out service and repairs on Interspiro breathing equipment.
Unauthorized service may result in malfunction and users relying there on
could sustain severe respiratory injury or death.
Whenever the equipment has been dismantled and assembled, it´s operation
must be checked in accordance with the Interspiro test instructions. Failure to
conform to this requirement may result in equipment malfunctions and cause
serious injury or death.
Changes to this document – necessitated by typographical errors, inaccuracies
of current information or improvements and changes of equipment – may be
made at any time without prior notice. Always refer to www.interspiro.com for
product or document updates and for service bulletins.
The chapter "Important information" must be read completely and the
regulations described there must be followed when doing any kind of service,
tests or repair on the apparatus. Failure to comply to this instructions may lead
to serious damage to the equipment, serious injury or death.
WARNING
Pressurized systems must always be handled with caution. In
extreme cases, fractures can occur in high pressure parts
which can be a danger to life.
CAUTION
In a number of the function tests, blowing sounds will occur
which can damage hearing. Always use hearing protection.
Spiromatic test
5
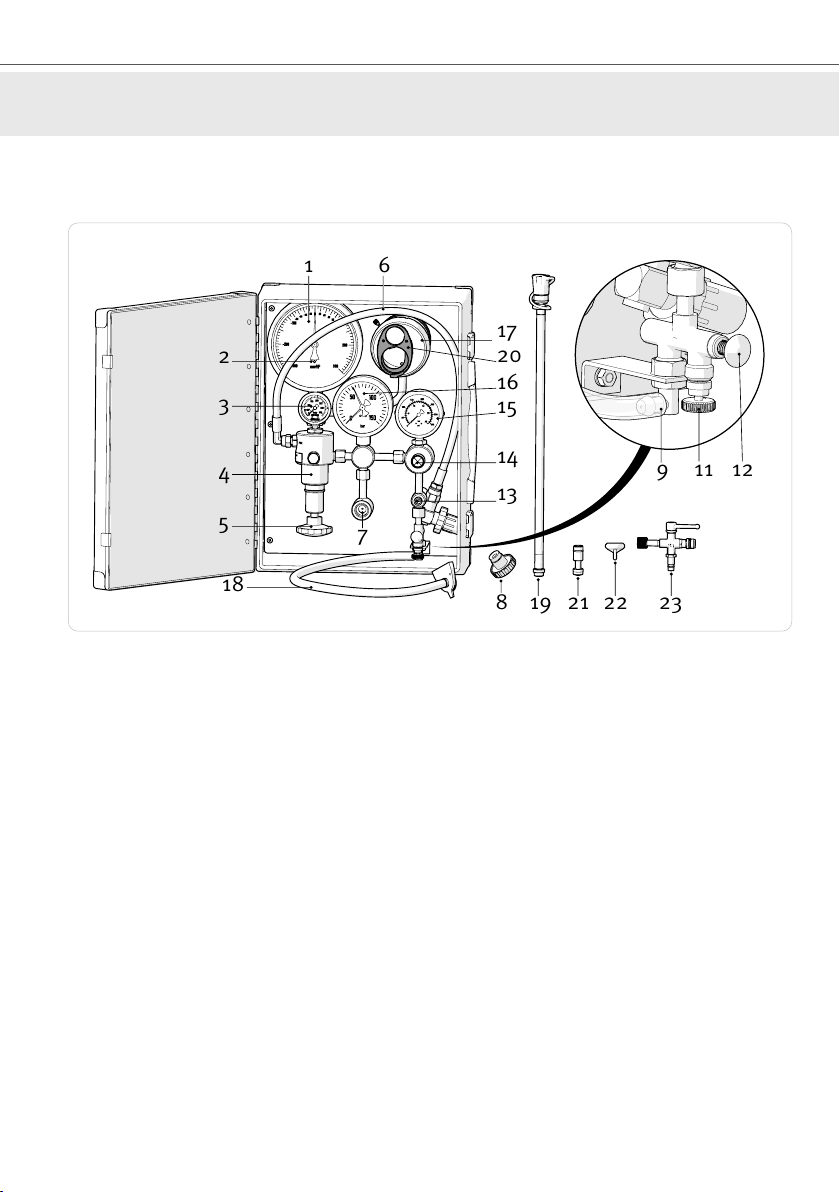
Product description
Product overwiew
1 6
2
3
4
5
18 819 21 22 23
12
7
13
14
15
16
20
17
9 11
1. Vacuum gauge ± 300 mmwc for reading the specific performance of the
breathing valve and the flow performance of the complete breathing
apparatus.
2. Adjustment screw for adjusting the pressure gauge to zero.
3. Air supply pressure gauge for reading the pressure from the air supply
through the pressure regulator (4).
4. Pressure regulator for a maximum permitted primary pressure of 300 bar
(4351 psi). Fitted with a safety valve that opens when the secondary
pressure rises above 150 - 160 bar (2175 - 2320 psi).
5. Regulating screw for setting the pressure to the pressure regulator to be
tested.
• To increase pressure - Turn inwards (clockwise)
• To decrease pressure - Turn outwards (counterclockwise)
6. Supply hose to air supply.
7. Connecting piece for regulator unit to be tested.
8. Protective plug to assemble in the Connecting piece (7) when storing
and / or transporting the test eqipment.
Spiromatic test
6

9. Hose nipple The nozzle gives approximately 160 l/min constant flow at
7,5 bar (94 psi) pressure. Press in the Selector valve (12) to start the flow.
10. Not used.
11. Shutting-off screw with a outlet that gives a constant flow of 7 l/min at 2
bar (29 psi).
12. Selector valve press in to start the flow to the hose nipple (9) and
stopping the flow to the shutting-off screw (11).
13. Medium pressure connection to connect the breathing valve hose of the
regulator unit that is tested. Fitted with a safety valve that opens at 25 bar
(363 psi).
14. Needle valve
15. Secondary pressure gauge for reading the secondary pressure from the
tested pressure regulator.
16. Primary pressure gauge for reading the secondary pressure of the
pressure regulator (4).
17. Test adapter housing to connect the test adapter in.
18. Hose with cover for connection between the hose nipple and the test
adapter.
19. Adapter hose to connect between the 3-way adapter and the medium
pressure connection.
20. Test adapter Spiromatic to connect the breathing valve to the
measurement housing.
21. Adapter for connecting the breathing hose from the regulator unit to the
medium pressure connection.
22. Key for drag pointer to set the primary pressure gauge to zero.
23. 3-way adapter for testing breating valves.
The Spiromatic test is used to do performance tests of Interspiro breathing
apparatuses.
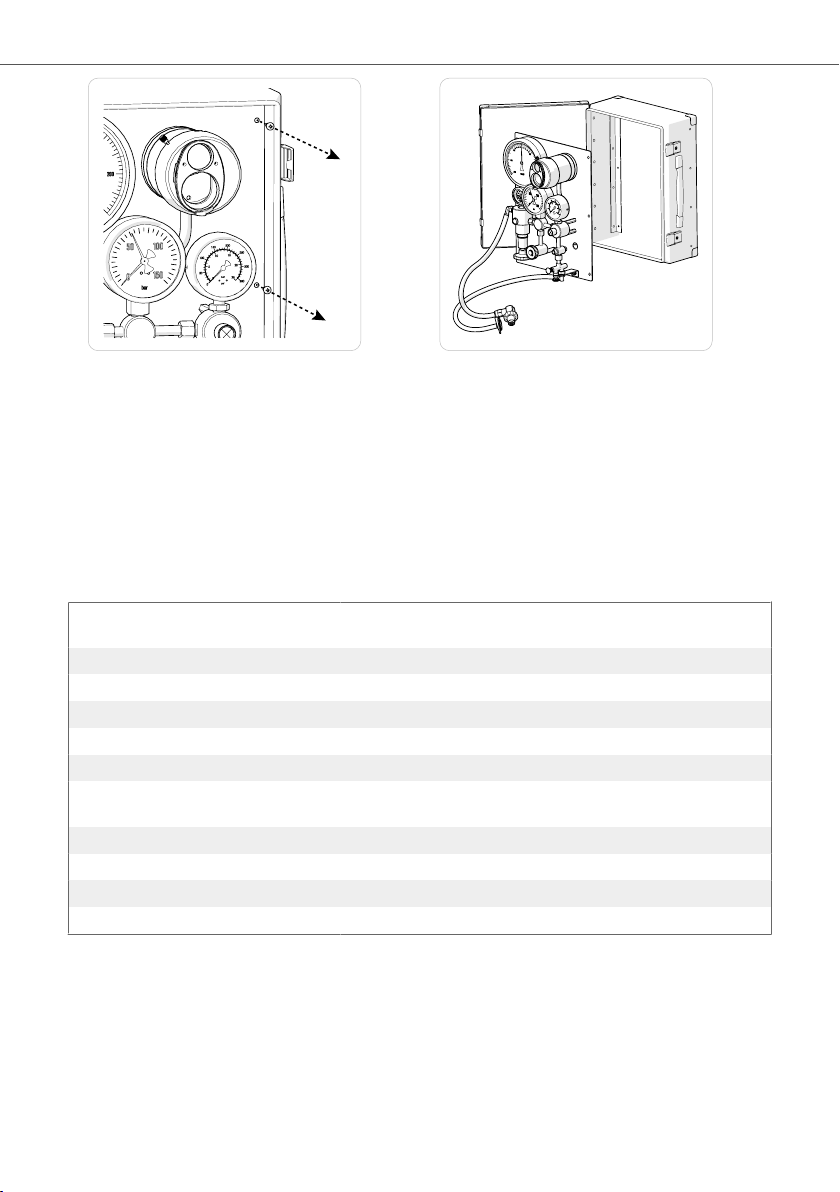
The Spiromatic test is mounted on a mounting plate in an aluminium transport
box. The mounting plate with the test equipment can be removed and secured
to the wall of the workspace if desired.
Remove the six screws to remove the plate.
Spiromatic test
7
Important! All components of the test equipment must be secured and
protected from impact during transportation.
The Spiromatic test is marked with part number, serial number and calibration
date.
Technical data
Material Aluminium, anodized, brass chromated, plastic, stainless
steel
Weight 12 kg
Dimensions
Length 475 mm
Width 355 mm
Height 175 mm
Pressure (maximum connecting
pressure)
300 bar (4351 psi)
Safety valve 1 150 - 160 bar (2175 - 2320 psi)
Safety valve 2 25 bar ± 1 bar (363 ± 14 psi)
Color Aluminium
Calibration interval 1 year
Spiromatic test
8

= HP
= MP
= LP
1. HP = High pressure area
2. MP = Medium pressure area
3. LP = Low pressure area
Spiromatic test
9

Maintenance
If the Spiromatic test needs to be repaired, it has to be sent to Interspiro for
reparation.
The Spiromatic test must be sent to Interspiro for service and calibration every
year.
If the Spiromatic test has not been calibrated by Interspiro for over a year, it
must not be used.
Strikes and/or impacts can damage:
• unprotected threads - which can make it impossible to assemble parts
• plastic components - which will reduce the performace of the equipment
• hoses - which can cause the hose to fracture
Spiromatic test
10
Table of contents
Other INTERSPIRO Test Equipment manuals


