Inteset Phoenix PMP01-LPiS User manual
Phoenix (PMP01-LPiS)
Home Media Player
System Configuration
Guide
Document Rev 1.00


Phoenix (PMP01-LPiS) System Configuration Guide
Page 1
Table of Contents
Introduction.................................................................................................................................... 3
Special Considerations ................................................................................................................ 3
Shipment Packaging ................................................................................................................ 3
Location of the System............................................................................................................. 3
Display Compatibility................................................................................................................ 3
Technical Support .................................................................................................................... 3
Chapter 1 - Installing the Hardware............................................................................................. 5
Items Needed for Installation ....................................................................................................... 5
Items Included with the System................................................................................................ 5
Additional Items........................................................................................................................ 6
Phoenix Front Panel Interfaces................................................................................................ 6
Phoenix Back Panel Interfaces ................................................................................................ 7
Hardware Setup........................................................................................................................... 7
Typical Cable Configuration ..................................................................................................... 8
Cable Configuration for Older Displays and Receivers............................................................ 8
On-board HD Audio Processing............................................................................................... 8
Chapter 2 –Configuring the System ........................................................................................... 9
Powering up the System.............................................................................................................. 9
Navigating the Phoenix Media Player Interface........................................................................... 9
Configuring the User Interface................................................................................................... 11
Media Library Folders............................................................................................................. 12
Setting Up Monitored Media Folders...................................................................................... 12
Importing Media Content............................................................................................................ 14
Importing Media Content using the Phoenix Media Player.................................................... 14
Configuring Streaming Service............................................................................................... 18
Chapter 3 –Advanced System Settings.................................................................................... 21
Configuring the Display.............................................................................................................. 22
Configuring Audio ...................................................................................................................... 22
Setting the System Time............................................................................................................ 23
Network Settings........................................................................................................................ 23
Reset Media Library................................................................................................................... 24
Advanced Control Configuration................................................................................................ 24
System Firmware Update Tool .................................................................................................. 25
Remote Support......................................................................................................................... 26


Phoenix (PMP01-LPiS) System Configuration Guide
Page 3
Introduction
This guide has been designed to help you get your system up and running quickly. It starts by describing
each of the items needed for installation. Then it will walk you through each step of setting up the cabling
for integration with your entertainment equipment (i.e.: display and sound system). You’ll then be guided
through configuring the system for use with your speaker system, display, and network.
Before you dive into the setup of the system, it’s important to review some special considerations
described in the following section.
Special Considerations
There are a few special considerations regarding the shipment packaging, where you locate your system,
display compatibility, and technical support procedures.
Shipment Packaging
KEEP YOUR SHIPMENT PACKAGING. The Inteset Phoenix Media Player is a sensitive piece of
equipment. Inteset has designed its shipment packaging to handle abuse during shipping. If for any
reason you need to ship the system you can feel confident that the system will arrive at its destination
intact.
Location of the System
The Phoenix Media Player should be located in an area where cool airflow is plentiful. Temperature
around the system should not exceed 72 degrees Fahrenheit. NEVER BLOCK VENTS. Be sure there is
plenty of room for airflow on all sides. Ideally, heat should be exhausted away from the back of the unit. It
should not be placed on top of another component that produces heat. It is also recommended that it be
located in a dry, dust free area. The Phoenix is made with only the highest quality components and is
very resistant to less than ideal conditions; however, keeping the system in the environment described
above will allow it to run for years and years.
Display Compatibility
The Phoenix Media Player is compatible with digital-based DVI or HDMI inputs on a display or receiver.
Video and audio cables are not included with the system and must be purchased separately. If DVI is
used, an optical S/PDIF audio cable is required as well. Refer to the subsequent Chapter 1- Installing the
Hardware to determine your exact cable needs.
Technical Support
In the event you have a problem with your system, highly skilled, responsive, technical support is
available. All support requests are tracked and need to be initiated through the Inteset Support Center
Web page (see the www.inteset.com support section). You will need the serial number found on the
bottom of your system, or in the front page of this guide when filling in the support form.
Every Phoenix system is equipped with remote access capability for support purposes. Once the Remote
Access feature is enabled on the Phoenix (this procedure is described later), an Inteset support
technician can remotely access the unit. This is ideal for assistance in configuration tasks, general help,
or system troubleshooting. In addition, every Phoenix unit contains the Inteset Heartbeat Monitoring
Service™. This service alerts Inteset of any issues the system is experiencing including fan troubles,
overheating, power problems, low disk space and more. The Phoenix system will send alerts to Inteset
who will then pass the information along to the installer for preemptive maintenance.


Phoenix (PMP01-LPiS) System Configuration Guide
Page 5
Chapter 1 - Installing the Hardware
In this chapter, you will be shown the items shipped with the Phoenix Media Player. You’ll learn
the various interfaces of the system’s front and back panels. Then, you’ll learn how to connect the
system to your display or receiver.
Items Needed for Installation
This section describes all the items needed to install your system.
Items Included with the System
There are several items shipped with Phoenix (PMP01-LPiS) system. Enclosed items are
described and shown in the image below.
Figure 1
1. Phoenix player
2. Phoenix player power transformer
3. System power cable
4. LPiS drive component (optional)
5. LPiS USB cables (optional)
6. Keyboard/mouse
7. Keyboard RF USB receiver
8. Keyboard/mouse batteries
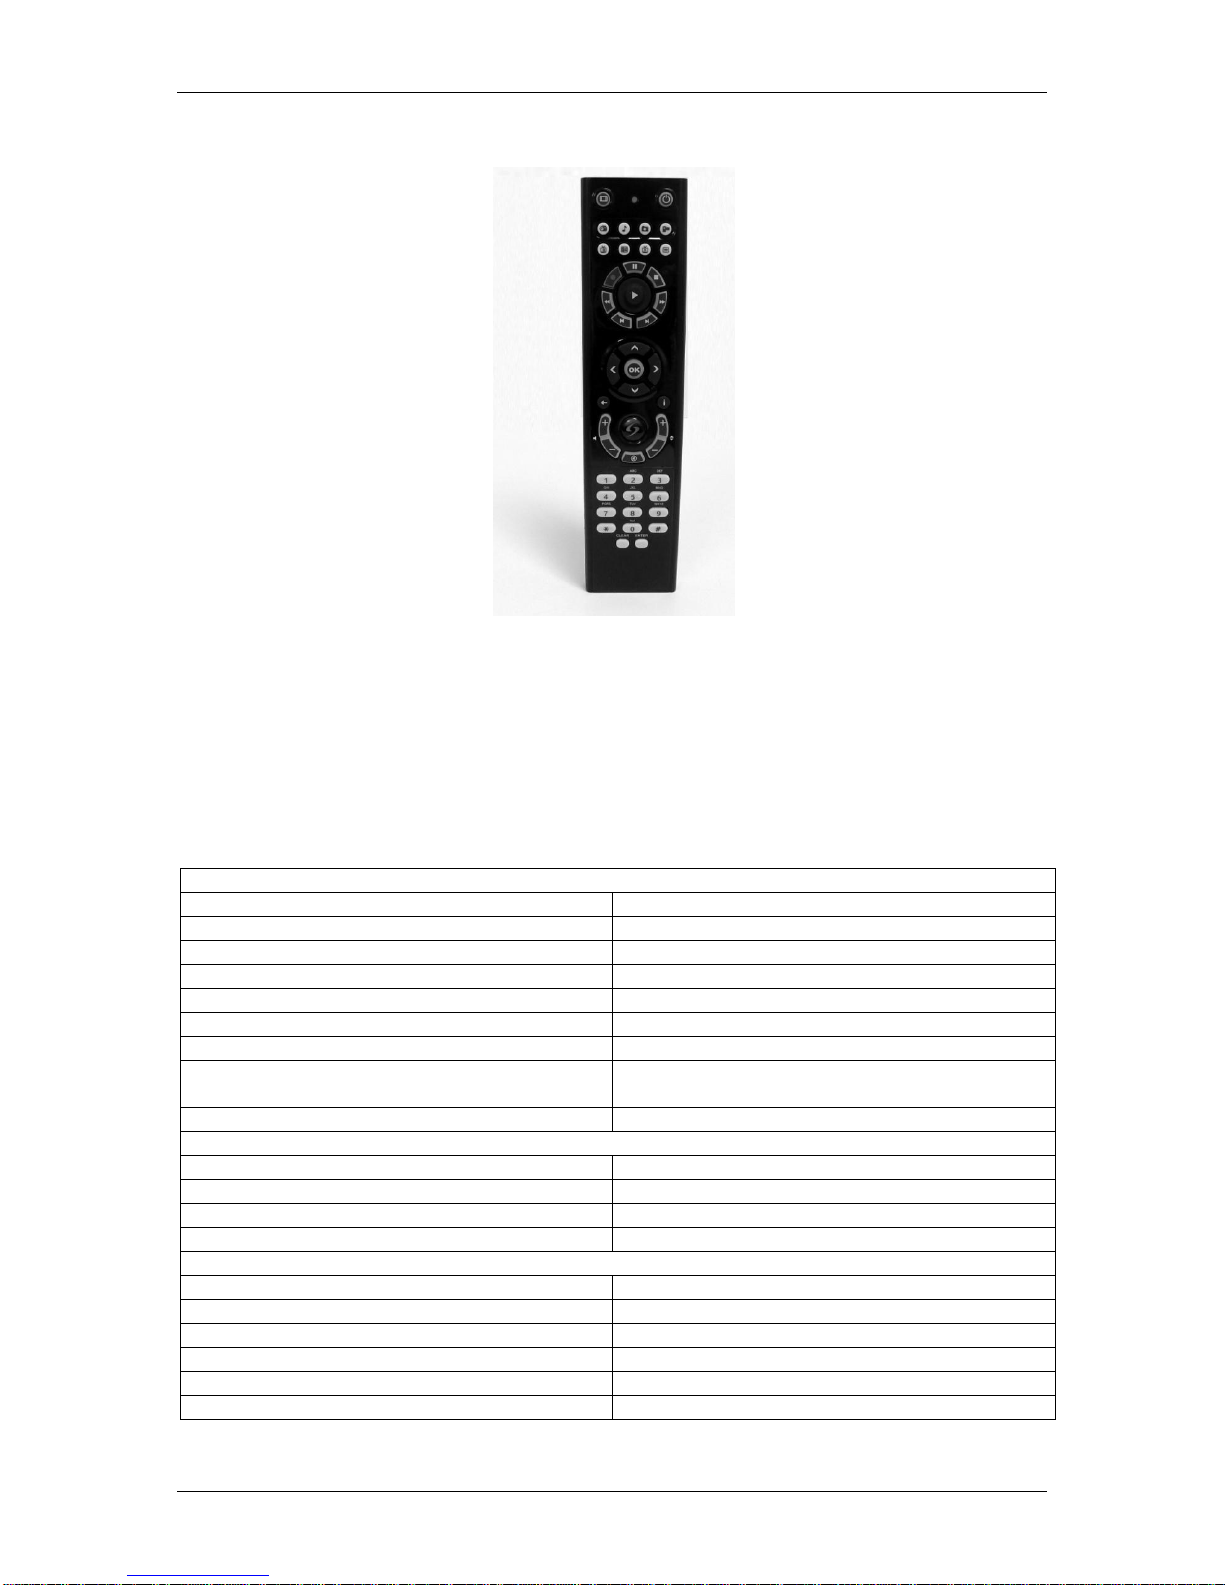
9. Remote control
10. Remote control batteries
Phoenix (PMP01-LPiS) System Configuration Guide
Page 6
Additional Items
You may also need additional cables that are not included. Below is a list of those items.
1. DVI-I or HDMI video cable
2. Cat5 or Cat6 Ethernet patch cable
3. Optical S/PDIF cable (if using DVI video cable)
4. Power strip with signal filtering
5. UPS battery backup unit
To protect your system from power outages and fluctuations it is HIGHLY RECOMMENDED that
you purchase a power conditioner and battery backup (250va or better). The most common
reason for audio/video component failures is due to power outages and/or surges. A power
conditioner and battery backup will protect against power fluctuations and supply better overall
audio/video performance.
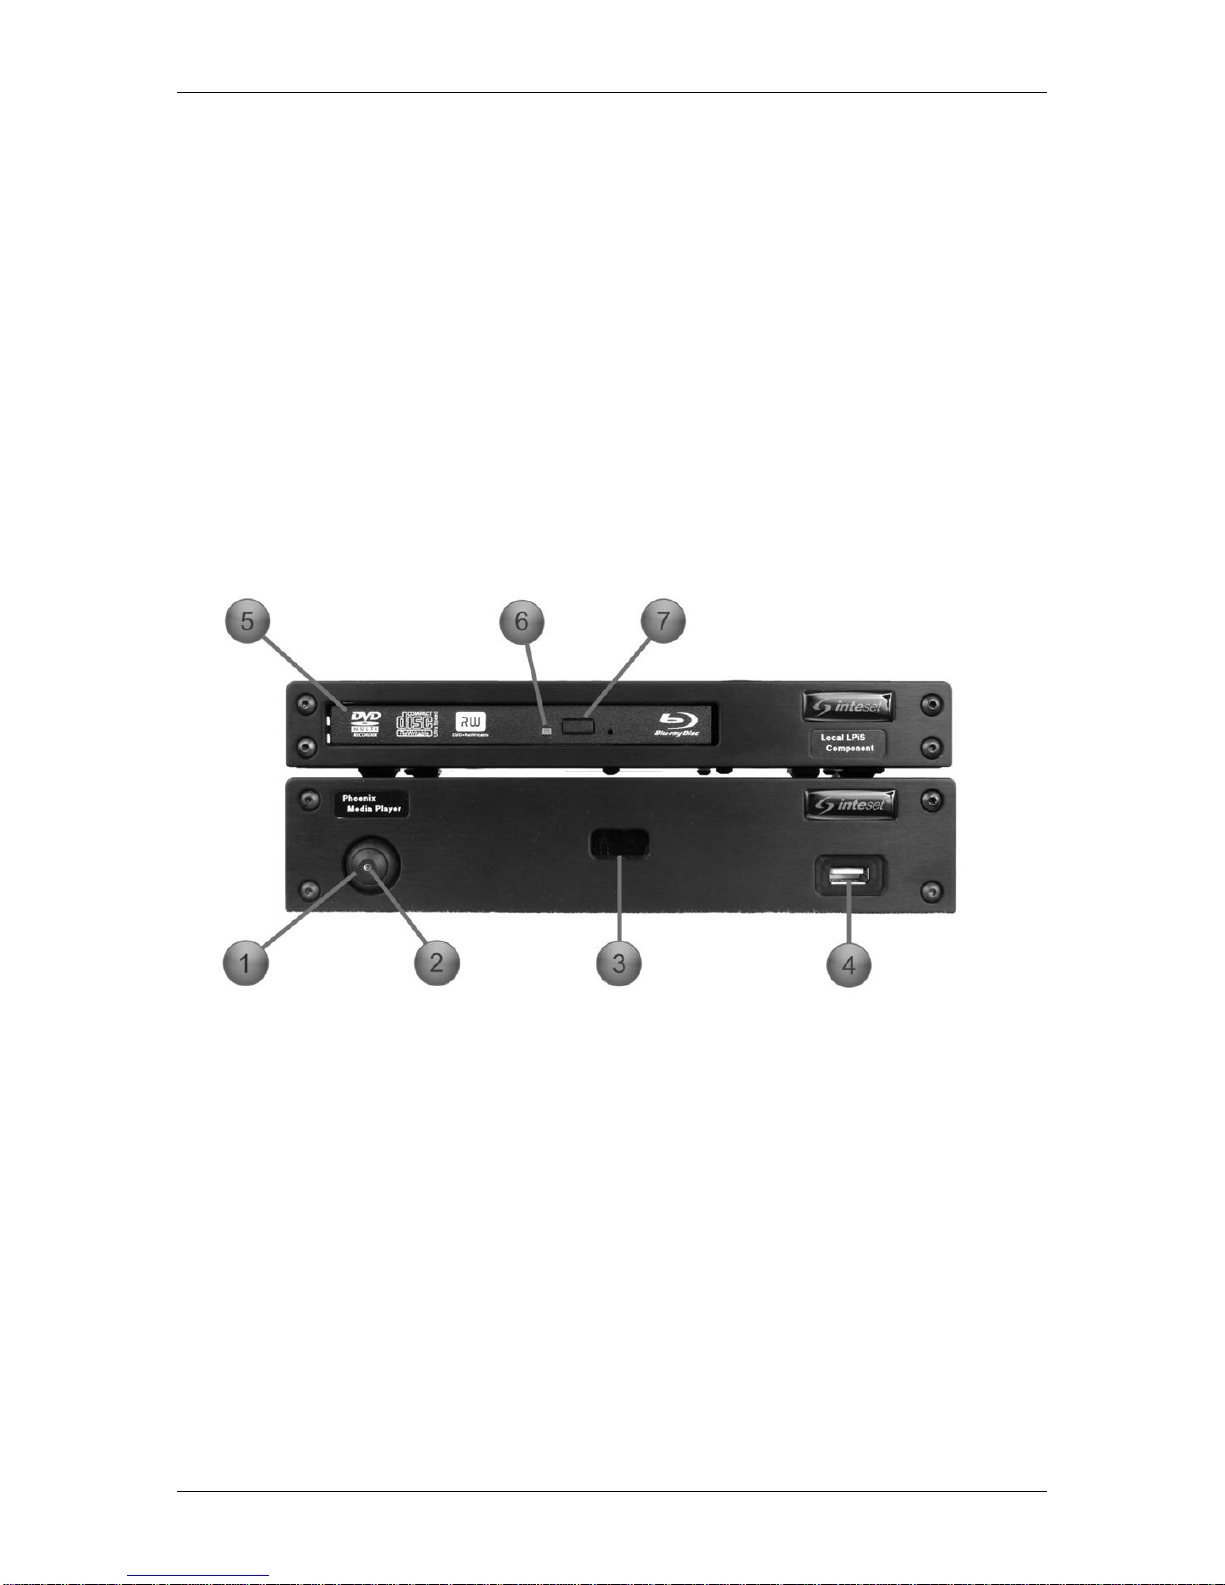
Phoenix Front Panel Interfaces
Below shows the various interfaces on the front panel of the Phoenix LPiS media player.
Figure 2
Front Panel Interface Descriptions
1. Phoenix power button
2. Phoenix power LED
3. IR receiver window
4. USB 2.0 (480Mbps) port
5. Optical drive read/write
6. Optical drive activity LED
7. Optical drive eject button
Phoenix (PMP01-LPiS) System Configuration Guide
Page 7
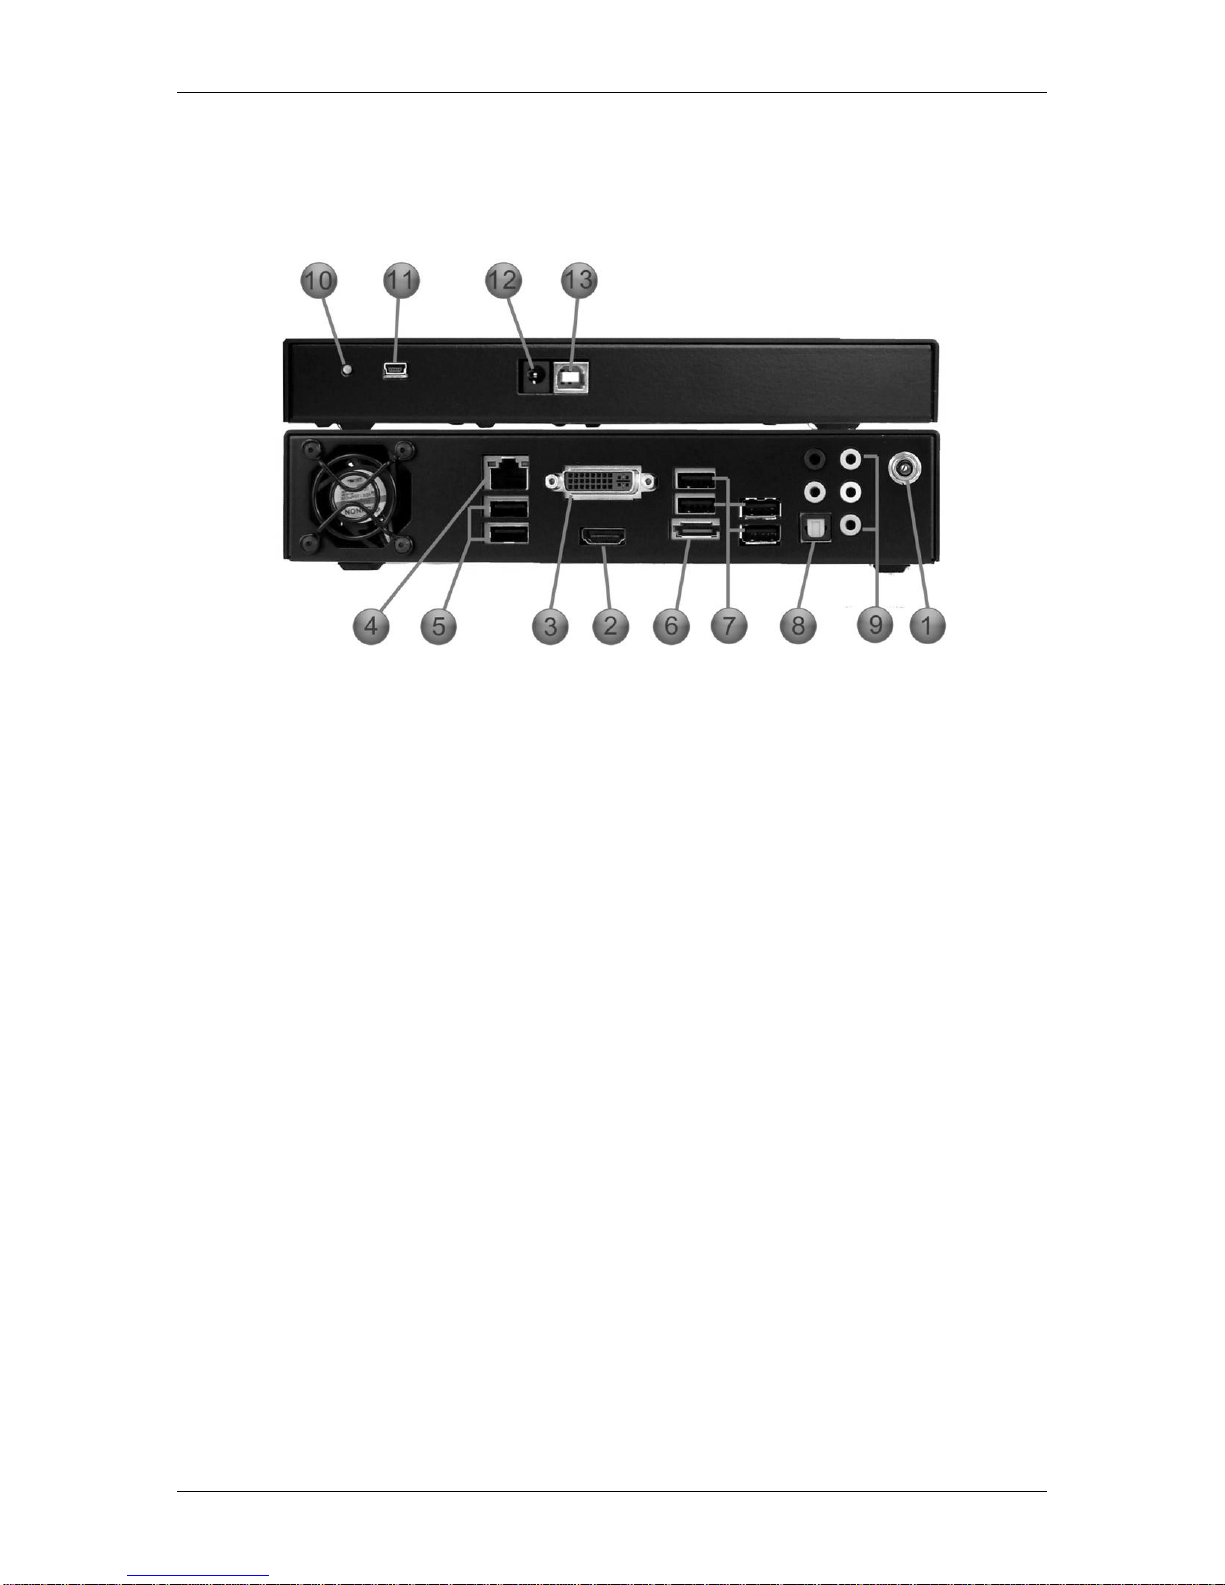
Phoenix Back Panel Interfaces
Below shows the various interfaces on the back panel of the Phoenix LPiS. Use the image and
descriptions of each interface below when setting up the cabling in the following sections.
Figure 3
Back Panel Interface Descriptions
1. Phoenix 110/240 volt power output jack
2. HDMI video output
3. DVI-I video output
4. 100/1000 Ethernet port
5. 2 USB 2.0 (480Mbps) ports –for use with LPiS component
6. eSata external drive input (for future use)
7. 4 USB 2.0 (480Mbps) ports –for external USB devices
8. S/PDIF audio output (optical) –for use in conjunction with DVI-I video
9. Analog audio output (deactivated by default)
10. LPiS storage drive activity LED
11. LPiS storage USB (mini-b) port
12. LPiS optical drive auxiliary power (unused)
13. LPiS optical drive USB (type-b) port
Hardware Setup
The hardware setup involves connecting various cables in the back of the Phoenix system and
then to your receiver and/or display device. Before you begin installing the various cables, you
must determine the type of setup you have. There are a couple of questions you need to answer
before proceeding:
1. Are you connecting the Inteset LPiS component (external drive unit) to the Phoenix?
2. Does your display device or receiver support a DVI or HDMI interface?
3. Are you using a separate receiver for sound processing or will the Phoenix process
sound and be connected directly to an amplifier?
Once you answer the questions above, you can begin connecting the various cables described in
the previous chapter. Refer to the images and steps in the following sections.

Phoenix (PMP01-LPiS) System Configuration Guide
Page 8
Typical Cable Configuration
The connection instructions below apply to the most typical installation which includes:
1. Connecting the Inteset LPiS Component (external drive unit) to the Phoenix player
2. Connecting the Phoenix player to an HDMI video/audio interface on your display or
receiver unit.
Follow the steps below to connect the Phoenix Media Player to your display and/or receiver.
Figure 4
Step 1. Connect the LPiS USB cable (Figure 1 –item 5) to the LPiS storage USB (mini-b)
port (Figure 4 –item 1). Connect the opposite end to the Phoenix USB port (Figure 4
–item 2)
Step 2. Connect the other LPiS USB cable (Figure 1 –item 5) to the LPiS storage USB (type-
b) port (Figure 4 –item 3). Connect the opposite end to the Phoenix USB port (Figure
4 –item 4)
Step 3. Connect the Ethernet cable to the Ethernet port on the Phoenix (Figure 4 –item 5),
then to the Ethernet receptacle in the wall.
Step 4. Connect the HDMI cable to the HDMI port on the Phoenix (Figure 4 –item 6), then to
the HDMI interface on the display or receiver.
Step 5. Connect the server system power cable (Figure 1 - item 2) to the power output jack of
the Phoenix (Figure 4 –item 8), then plug the other end into a UPS (highly
recommended), power strip filter, surge protector, or standard power outlet (not
recommend.)
Cable Configuration for Older Displays and Receivers
If your display and/or receiver does not support HDMI video/audio, use a DVI-I cable for the video
connection and an optical S/PDIF cable for the audio connection (see Figure 3 –items 3 and 8).
On-board HD Audio Processing
The Phoenix Media Player has the capability of processing the latest surround sound
technologies including Dolby TrueHD®and DTS-HD Master Audio®(HD 7.1 channel surround).
This means that you will not need to use a separate receiver to process these sound
technologies. The Phoenix player can output this type of audio through the analog audio outputs
(Figure 3 –item 9) direct to an amplifier. These outputs by default are disabled. Contact Inteset
technical support to activate these ports and assist you with the setup.
Phoenix (PMP01-LPiS) System Configuration Guide
Page 9
Chapter 2 –Configuring the System
Now that the hardware is set up and the cables have been connected, it’s time to turn on and
configure your system. In the following sections, you will learn how to:
Power on the system
Configure the system for your display, speaker, and network
Add media content
Before proceeding, you will need to select the input source of your display that matches the
physical connection to the Phoenix (i.e. DVI or HDMI). Consult your display manual to determine
how to select the appropriate input source.
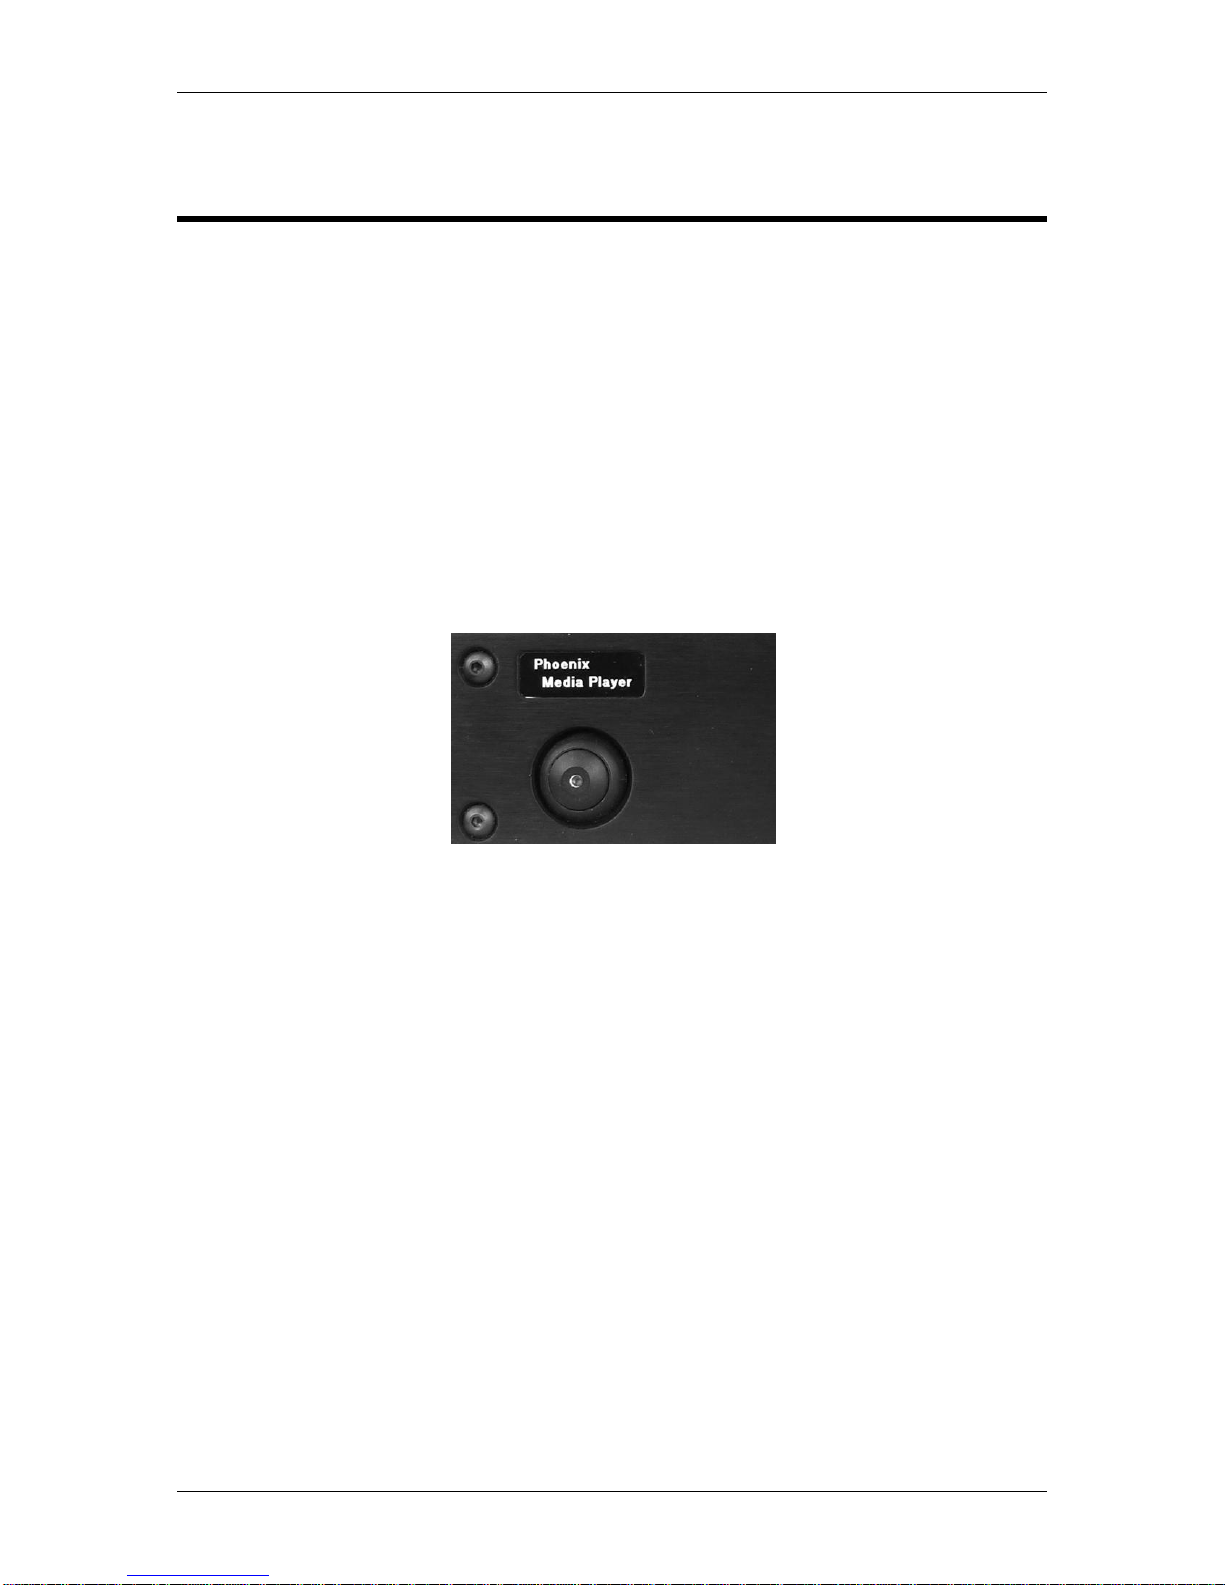
Powering up the System
Turn on the Phoenix player by pressing the power button on the front left side of the system. A
blue LED will shine on the button indicating that the power is on.
It will take up to 30 seconds for the system to fully initialize and connect to your network. Note
that you must have a DHCP capable network for the Phoenix to be able to connect without
modifying the systems network setting. If you do not have a DHCP capable network, or want to
assign a static IP address to the system, see Chapter 3 - Advanced System Configuration,
Network Settings section.
Now that the system is powered on, you can proceed to the next section, Navigating the Phoenix
Media Player Interface.
Navigating the Phoenix Media Player Interface
There are 2 devices included with the system that allow you to navigate the Phoenix interface: the
backlit IR remote control (Figure 1 –item 9), or RF keyboard and mouse (Figure 1 –item 6). The
recommended method of navigation is to use the remote control.
Almost all features can be accessed using just 7 buttons –the 4 Arrow buttons and the OK button
at the center of the remote. Two of the most used buttons on the remote control are the Inteset
Button found in the center of the remote, and the Back button. Pressing the Inteset button will
always return you to the Phoenix player’s Start screen, while the Back button will always return
you to the previous screen.
Phoenix (PMP01-LPiS) System Configuration Guide
Page 10
Other keys on the top of the remote, such as the music, pictures, video buttons, etc, will bring you
directly to their respective Phoenix entertainment functions. The transport controls below the
direct buttons are used for movie, music, video, and picture playback and include the Play, Stop,
Pause, Fast Forward, Rewind, Skip, and Replay buttons. The special exclamation point ( ! )
button can be used to display “Detail” information based on which screen you are viewing. Press
this button when you are in the Movie, Music, Pictures, or Video search screens to view the
available options it reveals for these features.
If you wish to use the keyboard and mouse as your device to navigate, the shortcut key guide
below will help you optimize your navigation experience.
General Phoenix Media Player Keyboard Shortcuts
Move up
UP ARROW
Move down
DOWN ARROW
Move left
LEFT ARROW
Move right
RIGHT ARROW
Select
ENTER or SPACEBAR
Jump back one screen at a time
PAGE UP
Jump ahead one screen at a time
PAGE DOWN
Go back to the previous screen or backspace
a single character in Search
BACKSPACE
More Info (Details)
CTRL+D
Start Menu Shortcuts
Music
CTRL+M
Videos
CTRL+E
Pictures
CTRL+I
Movie Library (DVD Menu if movie is playing)
CTRL+SHIFT+M
Transport controls
Pause
CTRL+P
Play
CTRL+SHIFT+P
Stop
CTRL+SHIFT+S
Skip Chapter
CTRL+F
Replay Chapter
CTRL+B
Fast Forward
CTRL+SHIFT+F

Phoenix (PMP01-LPiS) System Configuration Guide
Page 11
Rewind
CTRL+SHIFT+B
Mute
F8
Volume Down
F9
Volume Up
F10
When you move your mouse (located on the keyboard) or select a key on your keyboard, the
following Navigation Controls will appear within the interface. The Inteset button in the top left
corner will always bring you to the Start Menu from any location within the interface. The left
pointing arrow will always bring you to the previous screen.
For transport controls, you can find them at the bottom right corner of the screen. These buttons
will allow you to Play, Stop, Pause, Fast Forward, Rewind, Skip, Replay, Mute, and Volume
adjustment for any currently playing media.
Configuring the User Interface
In this section, you will learn the steps to configure the Phoenix Media Player user interface. This
entails setting up monitored content locations of your movies, music, pictures and videos. You will
learn how to import content. In addition, it describes the steps to set up your Netflix and Hulu
premium streaming service accounts.
Once the Phoenix is fully started, you will see the following screen and are ready to configure the
system.
Phoenix (PMP01-LPiS) System Configuration Guide
Page 12
Media Library Folders
Before setting up your monitored folders, it is worthwhile to explain the predefined media content
folders found on Inteset storage devices such as the LPiS drive component and TeraRAID NAS
servers. If you’ve purchased one of these devices, they contain the locations you’ll be storing
your media content.
Media content is stored in an area that Inteset refers to as the media library. The media library
contains several folders each responsible for storing specific types of media content. The media
content is added to these folders via importing and copying methods described later in this
section. Media content within these folders is available for playback by the Phoenix player. There
are four major media type categories found within the media library. Each is listed below.
Movies: This folder contains DVD and Blu-ray movie folders and files.
Pictures: This folder contains all of your digital images or other image files. File types include
BMP, JPG, PNG, TIF, and GIF files. These are the most common file formats produced by digital
cameras.
Music: This folder contains music and playlist files that have been copied (ripped) to the media
library via the Phoenix player or copied by a computer on the network. File types included in
these folders may include MP3, WMA, WAV, AAC, AC3, MP4, M4A files.
Videos: This folder contains all of your digital video files. File types include AVCHD, AVCHD Lite,
MPEG-4, MPEG-2, MPEG, MP4, 3GP, WMV, and AVI files. These are the most common file
formats produced by digital video cameras.
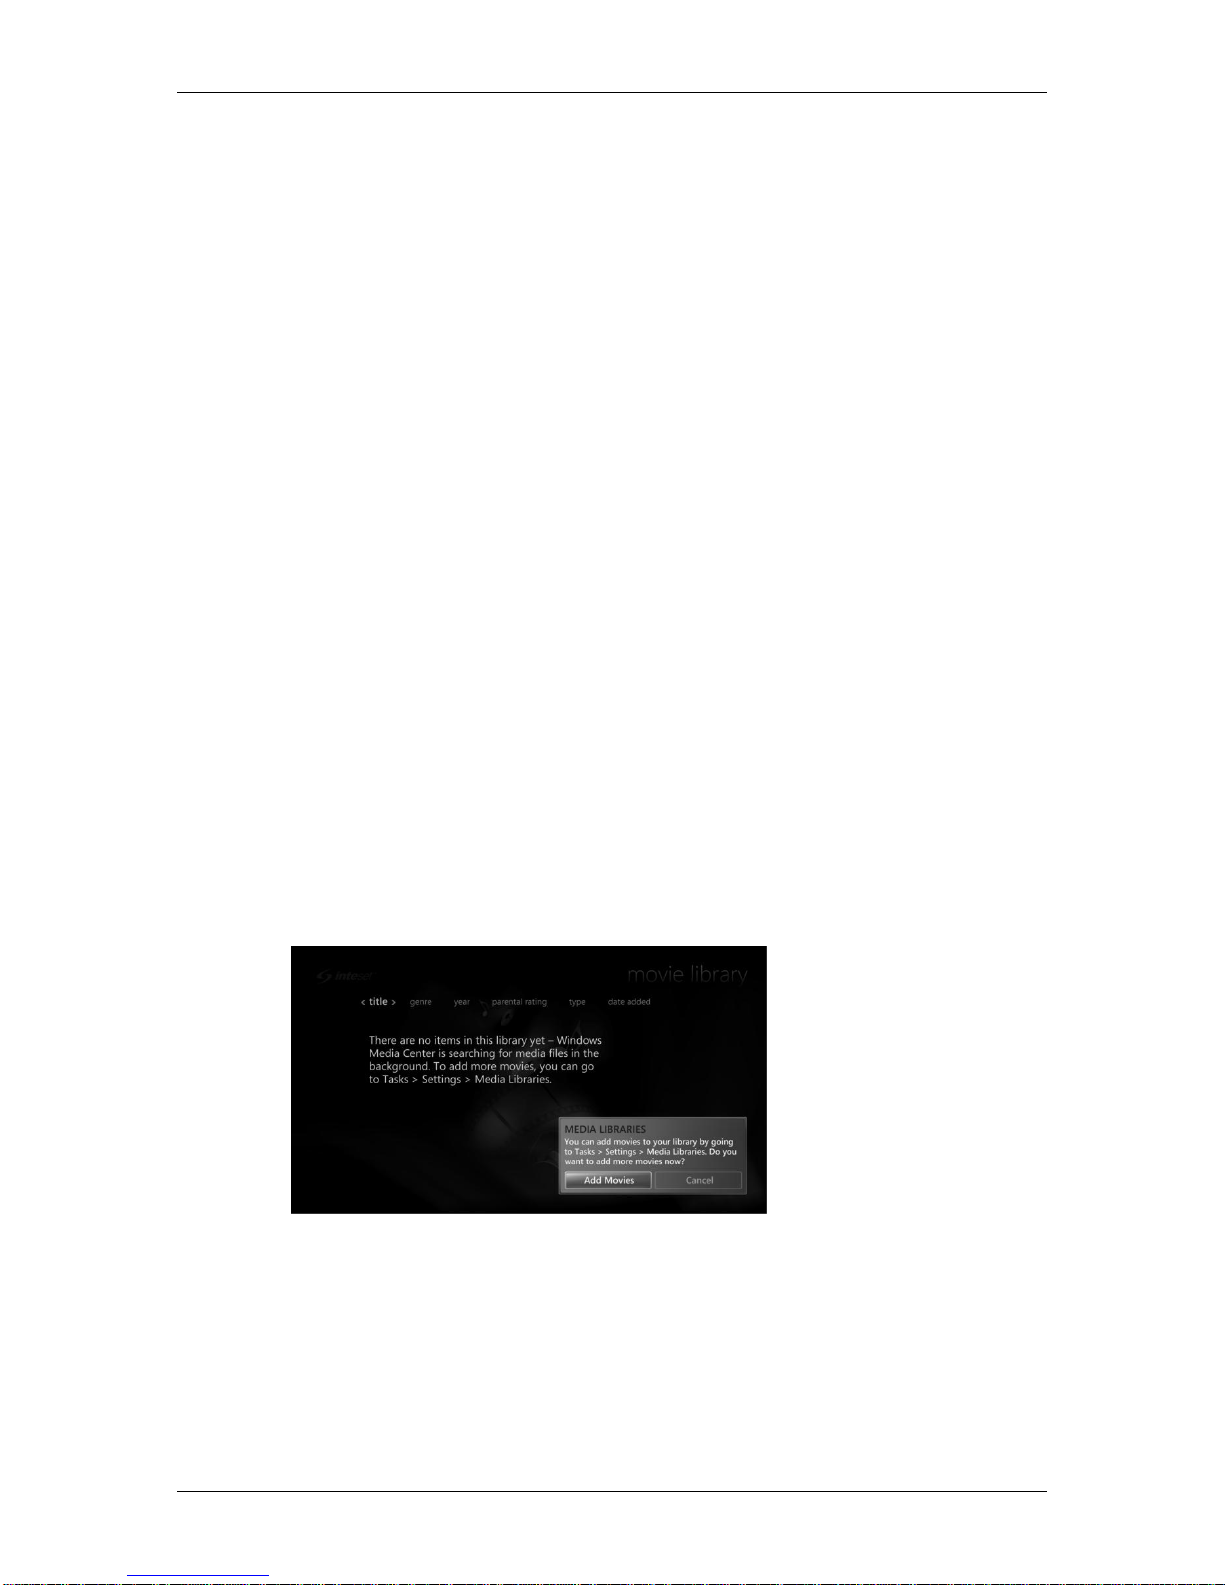
Setting Up Monitored Media Folders
In order to play back content stored on your storage device, you will need to define where these
content folders exist. Defining these locations is a simple one-time routine that you can perform
with your remote control.
Step 1. Using the remote control, navigate to the Movies/Movie Library option in the Start
menu, then select the “OK” button. You will be introduced to the following message.
NOTE: This message will only appear the first time you enter this screen.
Step 2. Choose the “Add Movies” button to open the “Manage Library” wizard screen as
shown below.

Phoenix (PMP01-LPiS) System Configuration Guide
Page 13
NOTE: The “Recorded TV” library shown in the list is not applicable.
Step 3. From here, choose the library for which you want to monitor (ie: Movies), then select
the “Next” button. A screen similar to the one below will be displayed.
Step 4. If your content is located on an Inteset LPiS drive device, choose the “On this
computer…” option. If it is located on an Inteset TeraRAID Storage server or other
network location, choose the “On another computer” option. Follow the simple on
screen instructions from this point forward.
Follow the above steps for each of the other media libraries including Music, Pictures, and
Videos. You can access these media libraries from the Phoenix main menu.

Phoenix (PMP01-LPiS) System Configuration Guide
Page 14
If you need to adjust the libraries in the future, you can access the “Manage Library”wizards
simply by going into the movies, music, pictures, or videos library screen, then choose the Details
button on the remote (looks like an exclamation point), or press the CTRL+D keys on your
keyboard. A dialog will appear with a list of options as shown below.
Choose the “Manage Library” option to start the wizard.
Importing Media Content
A convenient feature of the Phoenix Media Player is its ability to import your personal media
content into media library locations. This means you can store and access all of your pictures,
music, movies, and home videos from a single, user friendly interface.
There are a few methods of importing media content into your media library depending on the
type of media being imported. One way is to simply connect your media device or media disc (ie:
portable media player, camera, USB flash drive, digital video camera, etc) into the player via the
front USB port, or by placing a media disc (ie: CD, DVD, or Blu-ray) into the optional optical drive
unit (LPiS). The Phoenix player will prompt you appropriately on the next steps based on the
media type found on the device or disc.
The table below lists the supported media formats.
Media Type
Format
File Types
Video
Movie
Blu-ray (MTS), Blu-ray 3D™, BD Live™, DVD (VOB)
Home Video
AVCHD, AVCHD Lite, MPEG-4, MPEG-2, MPEG, MP4,
3GP, WMV, AVI
Pictures
PNG, BMP, GIF, JPG, TIF
Audio
Music
MP3, WMA, WAV, AAC, AC3, MP4, M4A
Note: Playback of media that is protected with DRM (Digital Rights Management) is not supported. If playback of this type
of content is attempted, you will receive playback error messages and the content will not play.
Importing Media Content using the Phoenix Media Player
You can add media content to the Phoenix player using a supported external device. There are
several types of devices that can be used for adding content. These consist of portable, USB
attached hard drive and flash drive devices, portable media player devices, and optical media
(CD, DVD, Blu-ray discs). The Phoenix player will scan the device or disc for supported media file
types and display applicable import and playback options based on what it finds. Each access
method for these devices is described briefly in the subsequent sections.

Phoenix (PMP01-LPiS) System Configuration Guide
Page 15
Importing Content Using an External Hard Drive, Flash Drive or other Media Capture
Device
Devices that support a standard hard drive format compatible with Windows (ie: digital cameras,
USB flash drives, digital video cameras, external USB drives, etc) are all sources for content
import. The device must supply a USB cable that is compatible with a computer USB connection
type. If your device has these properties, it’s likely the Phoenix player will be able to import the
media files contained on the device.
Connect the device to the Phoenix player’s front USB port. In a few seconds, if the device is
supported and depending on the content found on it, you will see a message dialog appear
similar to the one below.
From this point, select an option displayed and follow the instructions for that option. A screen
similar to the following will be displayed.
Enter an appropriate folder name for the media and select Import. A new folder (or folders
depending on the content type) will appear in your media library containing the pictures, videos,
and music that have been transferred from the device.
Importing Music Content from a Music CD
To build your music library, you can copy (rip) your CD collection to the media library. You can
expect copy times from 3 to 7 minutes per CD depending on the amount of tracks and their
length. Be sure the system is connected to the Internet otherwise the CD cover art will not be
attainable.

Phoenix (PMP01-LPiS) System Configuration Guide
Page 16
To copy a music CD, insert it into the optical drive (LPiS component). The Phoenix will play the
CD and display the Now Playing screen similar to the one shown below.
To copy the CD, select the “Rip CD” button on the screen. You will be prompted if you want to
continue. Answer “Yes” to the prompt to begin the ripping process. The copy process will store
the ripped content in the folder initially selected when choosing the monitored music folders (see
“Setting Up Monitored Media Folders” in the previous section).
Importing Movies
Similar to the process of copying music, you can store movie content from DVD and Blu-ray
movies to your movie library. DVD movies can take up to 30 minutes to store while Blu-ray
movies take up to 90 minutes.
Note: A third-party movie decryption module must be installed and registered in order to store DVD and Blu-ray movies.
Contact Inteset or your dealer for more information.
To store a movie, insert the movie disc into the Phoenix optical drive. In a few seconds, the
following screen will display.
From here, you can choose to play the movie from the optical drive, or store it. Another method to
launch the storing process is to select the “store movie” option from the Phoenix main menu
Movies menu strip as shown below.

Phoenix (PMP01-LPiS) System Configuration Guide
Page 17
Starting the storing process from this point first requires that the movie disc be inserted into the
optical drive. Regardless of the method chosen, the process will begin by introducing you to a
similar screen as the one below. Note that it will take a few minutes for the process to initialize
and to retrieve the movie cover art and profile information.
Once the process completes, a similar screen will be displayed allowing you to play the movie
from the storage location, edit the movie title, go to the Movie Library, or, store another movie.
Note that during the movie storing process and after the “Initialization” phase, you will be able to
perform other functions on the system such as watching another movie or watching Hulu content,
etc. Just press the Back button or the Inteset Logo button on the remote control to return to the
main Phoenix menu. At any time, you can return to the above “Status” screen by selecting the
“store movie” option from the main menu Movies menu strip.

Phoenix (PMP01-LPiS) System Configuration Guide
Page 18
Configuring Streaming Service
Included with the Phoenix player is the ability to search and watch content from leading, premium
streaming service Netflix and Hulu. Before you can enjoy these services, you’ll need to go to their
respective websites (www.netflix.com and www.hulu.com) and create an account. You will only
need to visit the websites once to setup your accounts. Otherwise, all features and viewing can
be performed through the Phoenix interface. Visit these sites from any computer to set up the
accounts. Both services require monthly services fees to take full viewing advantage, however,
each have trial programs so you can test them before fully committing to them. Note that Internet
streaming services such as Netflix and Hulu require a broadband Internet connection for best
performance and uninterrupted viewing. This is especially the case if there is more than one
Phoenix streaming content at the same time.
Signing Into Netflix
Once you have created an account on line, you will be able to sign into Netflix through the
Phoenix interface. To access Netflix on the Phoenix, select the Netflix button from the main menu
Movie strip as shown below.
You will be introduced to the following “Sign in” screen where you’ll need to enter your Netflix
account email address and password.
Press the Continue button to proceed to the movie search and viewing features of Netflix.
Signing Into Hulu
Once you have created a Hulu account on line and signed up to their Plus services, you will be
able to access premium content via the Phoenix interface. In order to access the content via the
Phoenix, you will first need to log in. From the Phoenix main menu, select the Internet TV strip,
then press the Hulu button as shown below.
Table of contents


