AGPtek ROCKER MUSIC PLAYER User manual


BEFORE USE
Thank you for purchasing AGPTEK portable
lossless music player. In order to give you a more
comprehensive understanding and help getting
quick start of this player. Please read this manual
carefully before using.
This instruction mainly introduces its function and
operation method and also collect some FAQs for
your reference.
We sincerely hope that Rocker will offer you a
better music experience.
IMPORTANT NOTE
:
The player DO NOT has internal memory. Before using
this player, please prepare a Micro SD card with music
files at first.

Product Introduction
Rocker is a portable Hi-Fi digital audio player with
high performance. It can support most of the
music formats such as MP3, WAV, WMA, APE,
FLAC, AAC, ALAC, OGG, etc. for up to
192KHz/24 bit sampling rate.
The built-in Bluetooth also allows to play in-cars,
as well as the shortcut access to play the music
and other functions. Here we have combined
some diagrams to better introduce Rocker.
Overview of the Buttons

Buttons and Controls
1. Power button : Hold to power on/off the player; Click to wake up/turn off screen.
2. Card slot: Support up to 256G Micro SD card.
3. Round Middle button: While it is in music playing interface, click to play or pause; In any other interfaces, click to enter,
switch or confirm.
4. When it is on music playing interface, short click to go to previous song/ hold to rewind; In any other interfaces, click
or hold to return.
5. When it is on music playing interface, click to go to its submenu; In any other interfaces, click to move up in the list.
6. When it is on music playing interface, click to go to next song/hold to fast forward; In any other interfaces, click to
enter the menu.
7. When it is on music playing interface, click to return to previous menu; In any other interfaces, click to move down in
the list.
8. Click to increase the volume.
9. Click to decrease the volume.
10. Earphone jack: insert the earphone into the jack.
11. Micro USB port: For date transfer, battery charging.

Power On/Off
Hold the power button for about 3 seconds to switch on the player when it is off. Hold the power button for
about 3 seconds to switch off the player when it is on. The player will go to the main interface after powered on.
Click to wake up when the screen is off. Click to turn off the screen when the screen is on.
▲Note:
1) The player will go to the music playing interface, and start playing the last music you left off last time after
powered on when you choose “On” under “Settings”→”Resume”.
2) The buttons on the front panel are not able to operate after you turned off the screen by clicking the power
button, but you can still adjust the volume by the volume button.
3) The player will power off automatically if inactive and no applications operate on backstage for 2 minutes.
Charge the Player
Connect the player by the attached USB cable to the USB port of a computer or a 5V/500mA
charger to charge the player.
▲Note: When it is successfully connected to the computer, the player says “Connect to
Computer”. You can click button to go to the charging mode which allows to play music while
charging.

Data Transfer
The player DO NOT has internal memory. Insert a Micro SD card(up to 256GB) before you
start. Then connect the player to computer for downloading the files or charging the player.
1. Make sure that your computer is on before you plug the player onto your computer.
2. As soon as your computer picks up the player, it shows as a removable disk on your computer.
3. Then drag and drop files onto the player.
▲Note:
1) If there is no music updated under “Music” after powered on, you can update it under “Settings”→”Music
Settings”→”Music Scan”.
2) Please do not disconnect the USB cable during dater transfer. Disconnecting the player from the computer
during date transfer may damage the player.
Main Menu
Each time you press the button , it will bring you to one of its nine different functions, including
Podcast, Bluetooth, Albums, Playlists, Music, Settings, Artists, Folder view, Now playing. Click /
/ / to choose from these functions. Click the middle button to access to its function.

Music
When there is a icon in the main interface, click the middle button to access to its function. The related list will show: All
songs, Playlists, Genres, Artist, Album, My favorites, Bookmark, Recent Songs.
Choose by clicking button / from the submenu and click the middle button to go to its music or bookmark lists.
All songs: all of the songs in the Micro SD card will be listed here(up to 15,000);
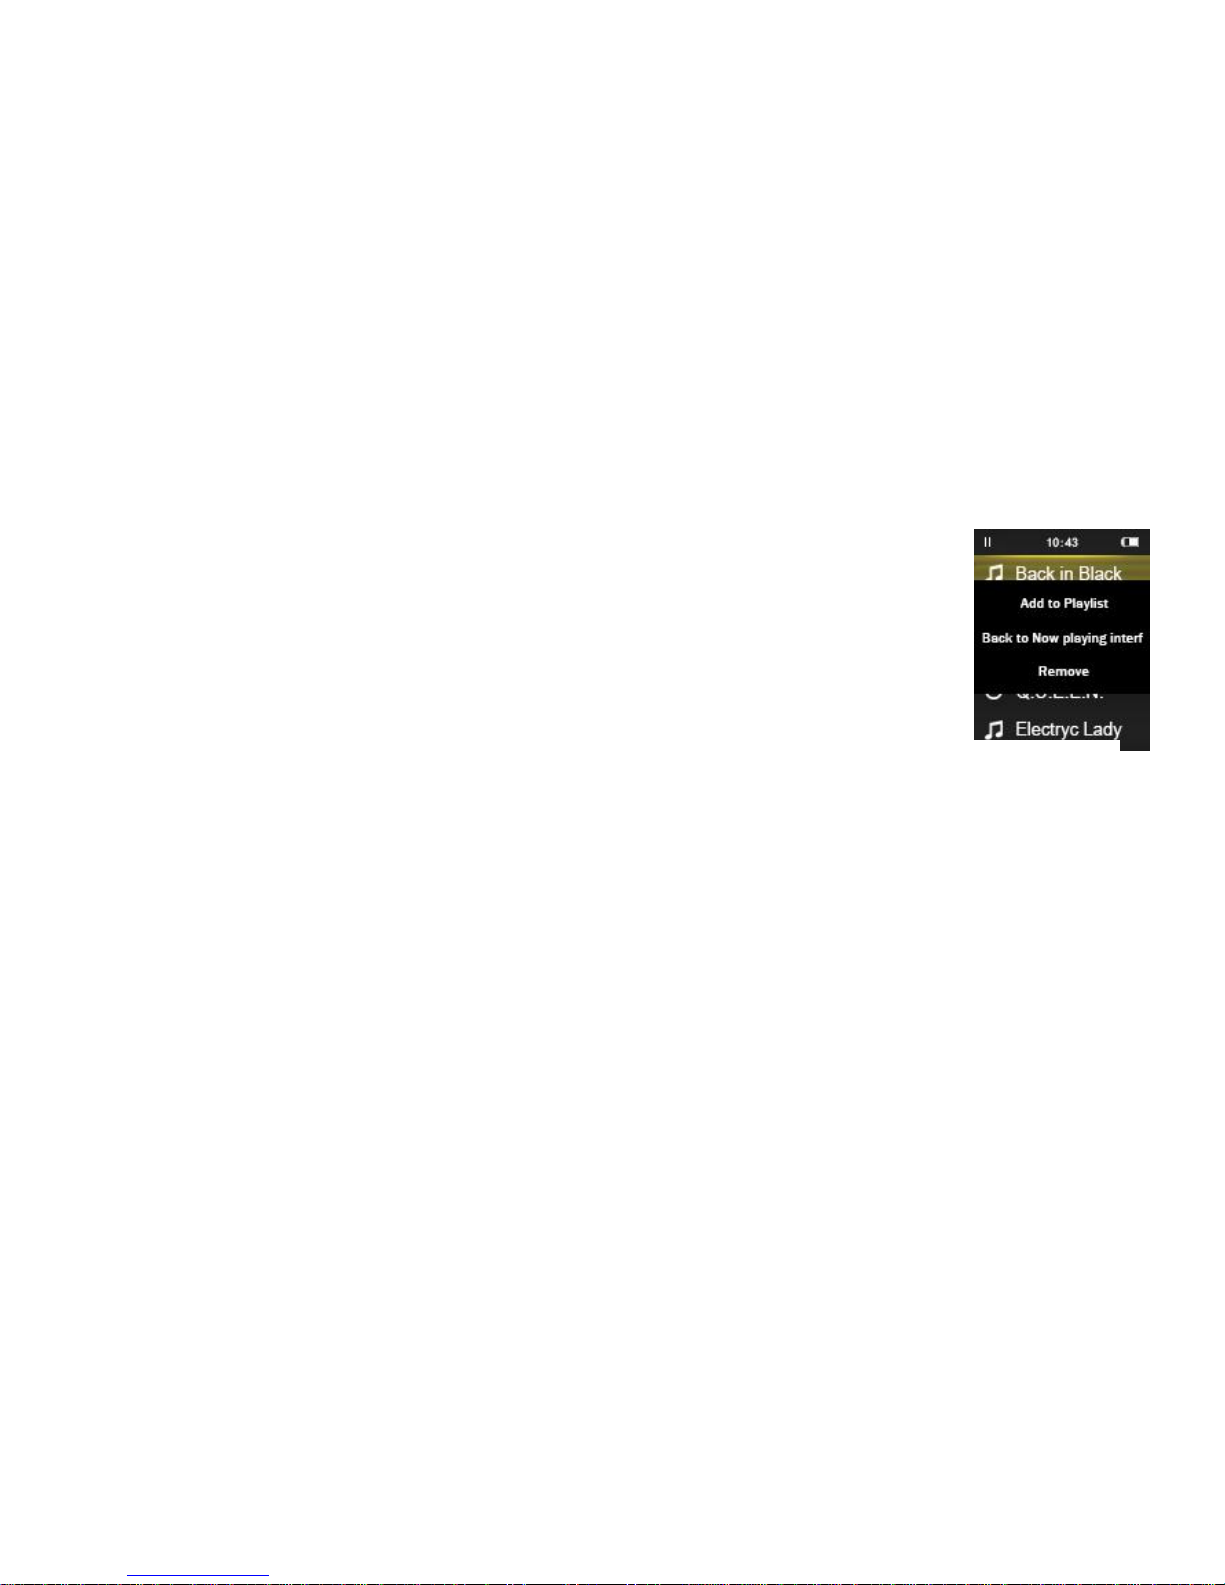
Playlists: all of the playlists created will be listed here(up to 50 playlists can be created);
Genres/Artist/Album: all of the songs will be listed by genres/artists/albums;
My favorites: all of the favorite songs added will be listed here(up to 15,000 songs can be added);
Bookmark: all of the bookmarks added will be listed here(up to 6 bookmark lists)
Recent Songs: the songs played recently will be listed here(up to 50 songs can be stored).
Music Playing Interface
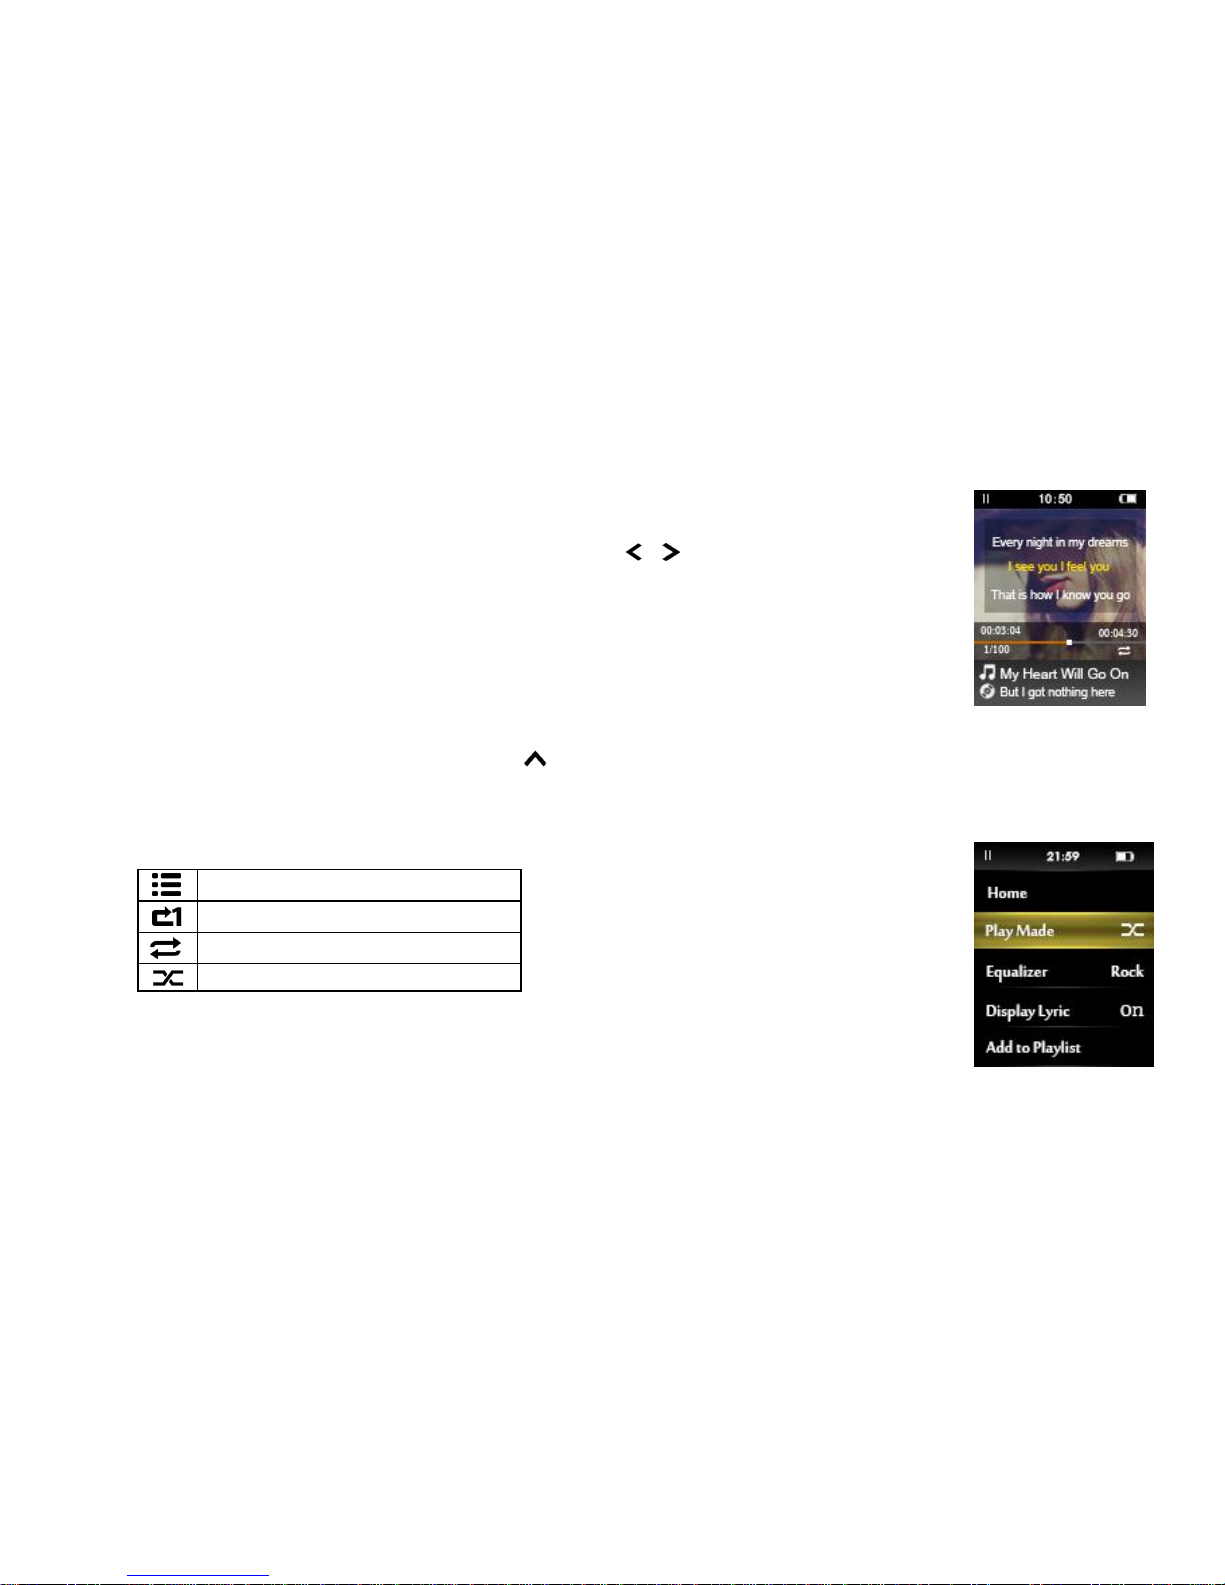
While in music playing interface, click button to return, click to go to the submenu.
Fast Rewind/Forward: While it’s on music playing interface, hold the button / to rewind/

forward quickly;
Previous/Next: While it’s on music playing interface, button / to go to the previous/next
music file.
Play/Pause: While it’s on music playing interface, click the middle button to play/pause.
Submenu
While it’s on music playing interface, click button to access to the submenu. The related list will show, including
Home, Play mode, Equalizer, Display Lyric, Add to Playlist, Add to My favorites, Add to Bookmark and Delete.
Play mode:
PLAY ALL
REPAET ONE
REPEAT ALL
SHUFFLE

Equalizer: click the middle button to set the sound effect: Popular, Rock, Hip hop, Jazz, Classical,
Off, Customization.(See more in “Settings”→“Customize the Equalizer”)
Display Lyrics: Select to turn on/off the lyric display.
Add to Playlist/Add to My Favorites/Add to Bookmark Select according to your need.
Delete: Delete the song you want.
▲Note:
1) After the bookmark is successfully saved, it will be marked by the song name. Choose the bookmark to go
back to the point you marked last time.
2) Find the bookmarks you saved under the submenu “Bookmark”, delete them with the option “Remove”.
3) This player enables to store up to 6 bookmark lists and each of which allows to add 50 bookmarks, Additional
bookmarks will override the ones set previously.
Add to/Remove from Playlist:
Add/remove one song: In music list, click button , then press / to choose from “Add to Playlist” to add the song

to the playlist or choose “Remove” to remove the song from the playlist. Click the middle button to confirm selection.
Add/remove songs in batches: Editing Playlist by media player could be painful, no matter by iPod
or others. There is a free program called Media Go. It's the easiest program to use for
transferring playlists to the AGPTEK. Just create your playlists in Media Go and then right-click its
name and select Add playlist to X :( Which is your MP3 player's disk). (You can download it at
http://mediago.sony.com/enu/)
After sending your playlist and music to the player, you can find it in "Folder view". Find the playlist and click to play.
How to sort you music or audio books before copying to the player?
Sort by name in computer
Before copying the files from your computer to the player, please arrange them on the computer in the CORRECT
sequence. Sorting is done by name (ASCII) and not by #, as in the samples below:

If the file order is sorted by name BEFORE you copying them into the player, they would be in right order. To play
your newly copied music on the player, open the "Music" folder.
Rename Music Files
If your music is not sort by the right number, use the application "Advanced Renamer" to sort your music by number.
Download Advanced Renamer on the website (https://www.advancedrenamer.com), For more details, please kindly
check the link).

Do the following to change the file names:
1. Choose the item "Add" > "Add files" or “Directories” to add your music into list.
2. If there is methods in the list click the “Clear” Methods toolbar button.
3. Click “Add Method”.
4. Select ”New Name” method and click OK.

5. In the text box type: <Inc Nr:1><Name>.<Ext> or <Inc Alpha:A><Name>.<Ext>。

6. Verify the names in the list and click “Start Batch”.

How to sort multiple audiobooks by same author?
The player arranges audiobook in the following order; author, name of book then followed by sections or chapters.
In order to keep different book titles written by the same author in correct flowing order, create a separate folder for
each, book title. Keep all books by same author under the author's name. The player will arrange titles of each book
written by the same author separately and keep the chapters in chronological order within the correct audiobook. For
example: (Author Smith has two books, Happiness and Dealing with Loss)
Smith > Dealing with Loss > section01, 02,....
Smith > Happiness > section 01, 02
Once you have finished listening to Dealing with Loss, the player will start playing the next book, Happiness.
Podcast
All of the music file whose genre is "podcast" will be listed in the Podcast, click the middle button to play.
Albums / Playlists / Artists
All of the songs will be listed here by album/play list/artist.

Bluetooth
When there is a icon in the main interface, click the middle button to access to its function.
Choose Off to turn off Bluetooth and all of the Bluetooth settings are not available.
Choose On to open Bluetooth and the related list will show, including: Scanning Bluetooth, Connected Device,
Available Device.
Bluetooth: Click the middle button to turn on/off the Bluetooth.
Scanning Bluetooth: Click the middle button to search the nearby device with its Bluetooth opened and the device
being searched will be listed.
Available Device: Choose from the device lists and click the middle button to connect, the screen says “Connecting”. If
it is successfully connected, the screen will say ”Connected Successfully”, if not, the screen will say “Connection Failed”.
If there is no Bluetooth around, the screen will say “Bluetooth not Found”.
Connected Device:If the device is not connected with Bluetooth, choose from the devices have been searched and
click the middle button to connect; if it has been connected with a device(such as a Bluetooth earphone or a Bluetooth
speaker), select the device and click the middle button to disconnect.

How to connect with smartphone or tablet via Bluetooth?
After successfully connected via Bluetooth, Rocker can play the music stored in the connected device. Press
button to disconnect or find the option “Disconnect” in the connected device.
Controls allowed by the connected device: go to next or previous song, increase or decrease the volume, r
ewind or fast forward;
Controls allowed by Rocker: only enables to increase or decrease the volume.
Folder View
When there is a icon in the main interface, click the middle button to access to its function. If there in no inserted
Mirco SD card, the screen will say ”File not Found!”. Please insert the Mirco SD card to view all of the files by folder in
the card and choose to play.
▲Note: Always put the lyric file and the music file in the same folder.
Now Playing
Find the icon in the main interface, click the middle button to access to its function. When there is music playing at
the backstage, click to go the music playing interface and resume playing music from where you left off;

When there is no music playing at the backstage, it will go to the Music List Interface. All of the songs in the SD card will
be listed here. Click the middle button to play.
Settings
When there is a icon in the main interface, click the middle button to access to its function. The related list will show,
including: Play mode, Language, Screen Brightness, Backlight Timer, Automatic Shut-off, Automatic Shut-off Timer, 24-
Hour Time, Time setting, Format the Card.
Music settings
The related list will show as below:
Music Scan: Scan all of the musics in the inserted SD card;
Gain Setting: Set Low/High gain;
Equalizer: Click the middle button to enter, then click the button / to switch between
Preset(Off-Rock-Classical-Jazz-Pop-Dance-Vocal-Blues-Metal) and Customization, click button
to return.
Customize the equalizer: Click the button / to switch to Customization, click the middle

button(the number turns yellow), click the button / to choose from these values, click the
middle button to confirm your selection(both the number and adjustable bar turn yellow), and
click the button / to increase/decrease the values. Click the middle/ button to switch, then
click the button / to choose from these values. Click button to return when both the
number and adjustable bar turn white.
Play Mode: Set the play mode;
Resume: Choose On(Off) if you want(don’t want) the music to start from you left off last time when you turn on the
player;
Gapless Playback: Choose On to turn on gapless playback. Choose Off to turn off gapless playback.
Powered On Volume: the volume after powered on can be set by Customization/Memory.
1) Choose Customization and then set the volume in Customize Volume After Powered On.
PLAY ALL
REPAET ONE
REPEAT ALL
SHUFFLE

2) Choose Memory and the player will memorize the volume before shut off the player and the volume is not
adjustable in Customize Volume After Powered On.
Customize Volume After Powered On: Click or hold / to set the volume for the music after powered on between
0-120.
Track Balance: Click the button / / / to set the degree of balance from 10(L) to 10(R); click the middle button
to save and return.
Display Album Cover: Click the middle/ button to choose display the album cover or not.
Display Lyrics: Click the middle/ button to choose to display the lyric or not.
Language: There are 8 languages included in this player, including: Simplified Chinese, Traditional Chinese, English,
Japanese, French, German, Spanish, Italian. Click the middle button to enter the language list and select by clicking the
/ button, press the middle button to confirm.
Screen Brightness: Click button / to increase/decrease the screen brightness(6 levels available), click the middle to
confirm and return.
Backlight Timer: In any interface, the screen will turn off automatically by the time when there is no operation and
reaches the preset backlight time. The backlight time can be set to 10s, 20s, 30s, 40s, 50s,∞(always on). Click button
/ to add/reduce the time. Press the middle button to save and return.
Other manuals for ROCKER MUSIC PLAYER
1
Table of contents
Other AGPtek Media Player manuals