August DTV350C User manual

DTV350C
3.5 Inch Digital TV and Multimedia Player
August International Ltd
United Kingdom
Telephone: +44 (0) 870 850 3525
www.augusitnt.com

Thank you for buying our August TV. You may already be
familiar with using a similar product but please take time
to read these instructions carefully. It is designed to
familiarise you with the product’s many features and to
ensure that you get the very best from your purchase.
To ensure your safety and the safety of others, please
ensure you read the Safety Instructions you use this
product.
Please ensure the product and its accessories are disposed
in compliance with WEEE (Waste Electrical and Electronic
Equipment) Directive and other regulations. Please check
with your local authority for disposal regulations.
If you need help, please contact our Customer Service:
Telephone: +44 (0) 870 850 3525
Safety
Disposal
Customer Service:
before
User Manual
Quick Start Guide
DTV350C
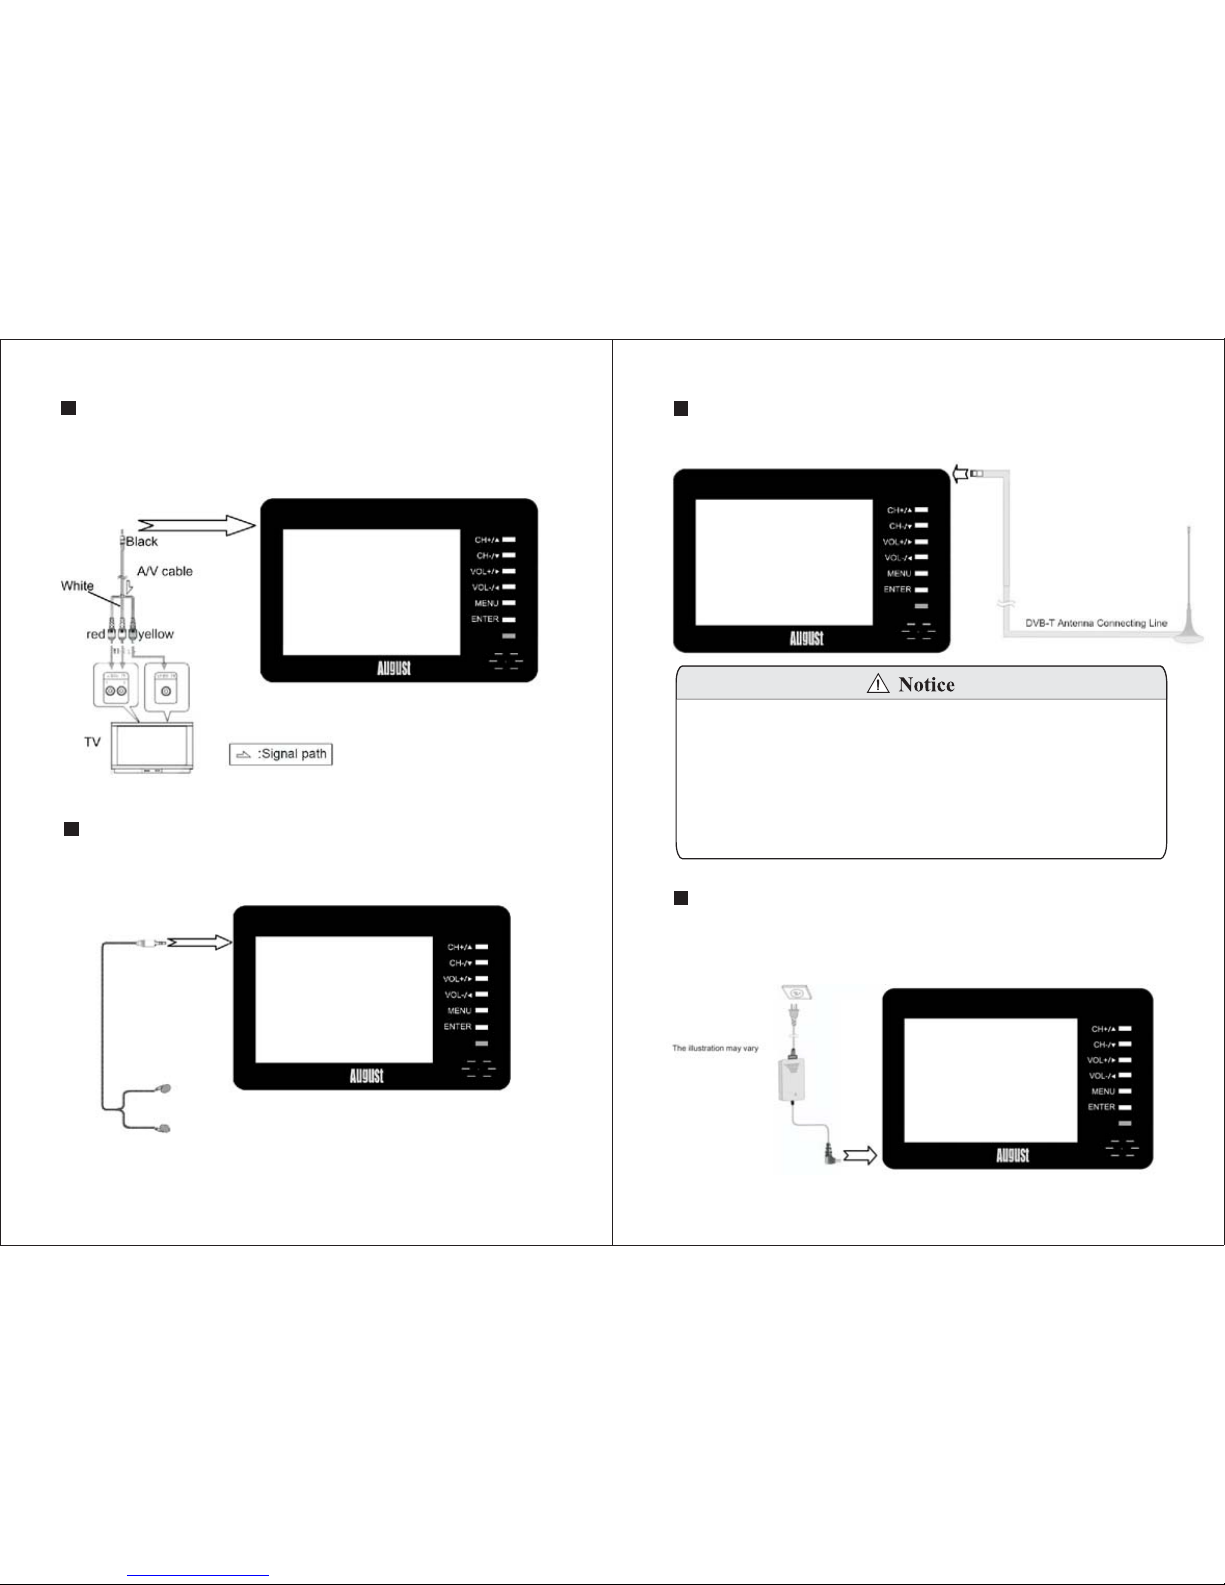
1. It is suggested that you use a roof top aerial when scanning
for TV channels for the first time, if any signal is detected,
the channel information will be saved on the TV, you may
then switch back to the portable antenna supplied and
change your location to find the best place to receive the
signal.
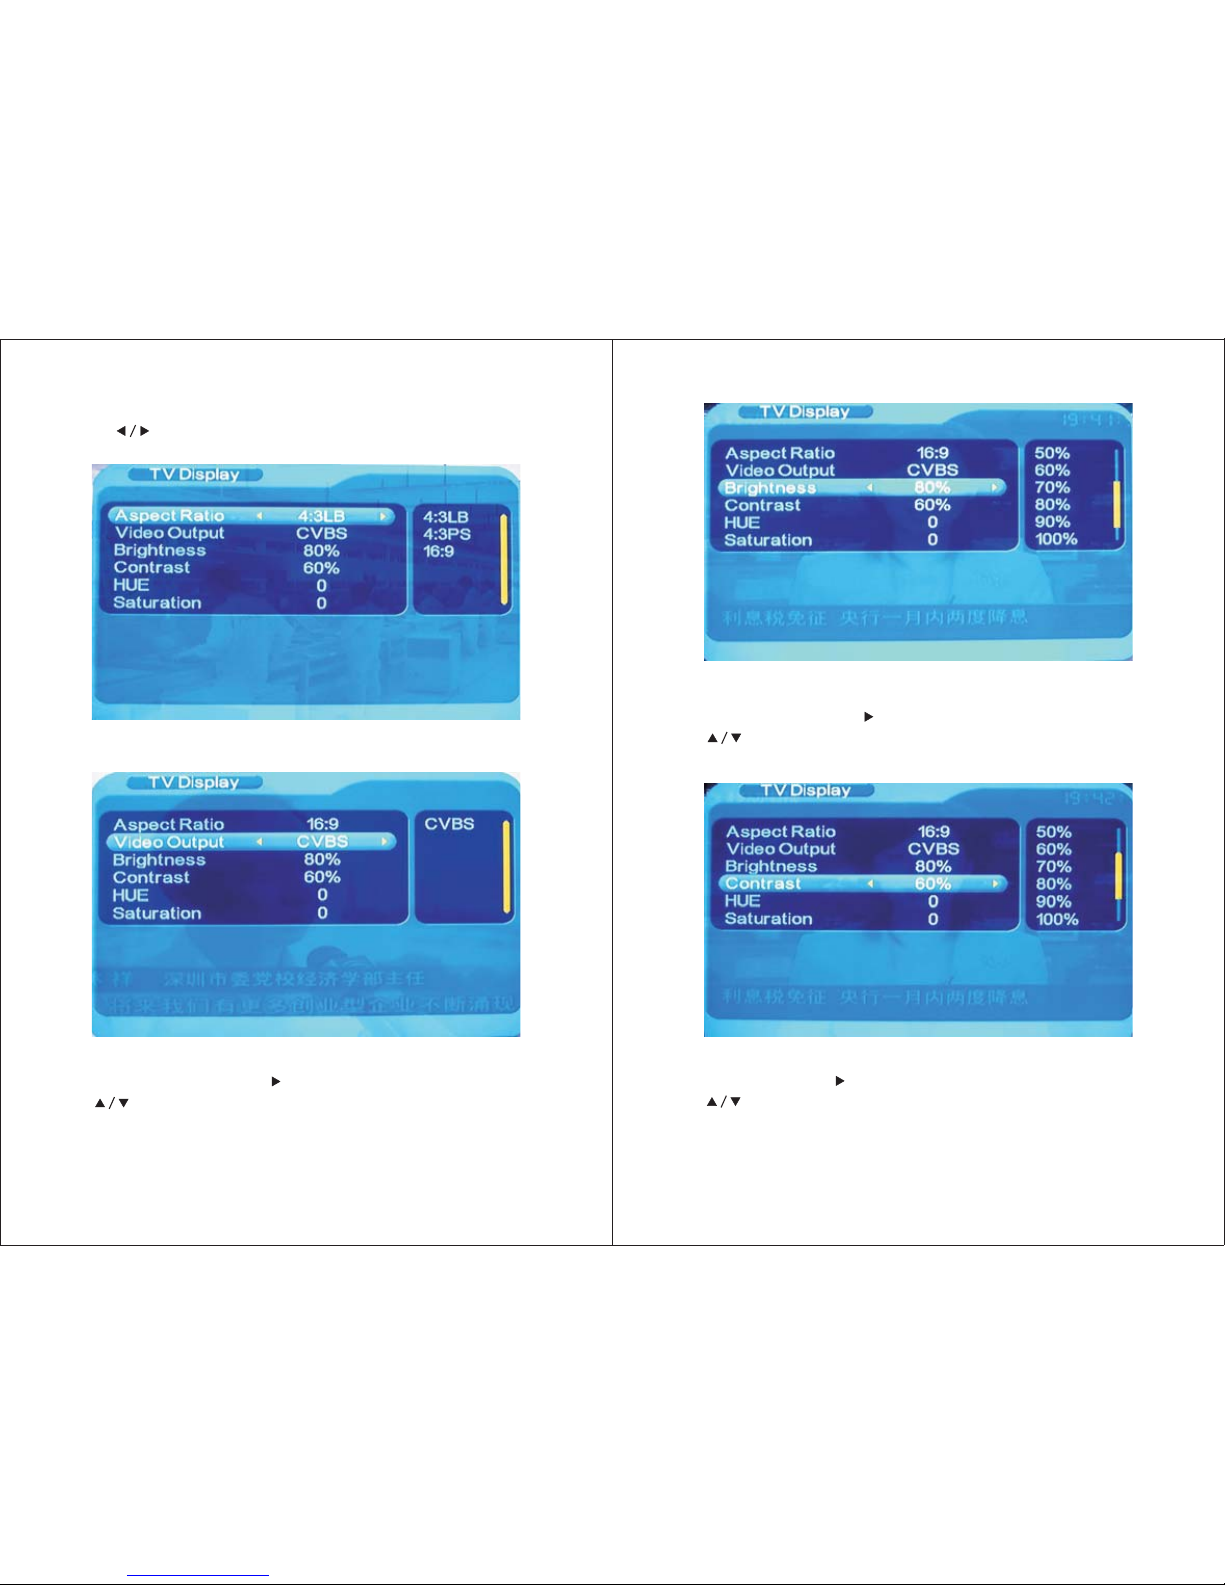
2. When turning on the device for the first time, “Initial Install”
will show, follow the instructions to select OSD Language
and Area, press ENTER to confirm and exit. As this is the
first time using the device, no channel information has
been stored, it will show “Database Empty”. To search for
channels, press MENU, select “Digital TV” by pressing
ENTER, select “Installation”, then select “Country Scan”,
press ENTER to start the search. Once the search has
finished, use CH+ or CH- to select channels .
3. If you have done the first time installation before, and
would like to search for Digital Freeview channels again,
or if you have moved to a different region and need to scan
channels again, press MENU, select “Digital TV” by
pressing ENTER, select “Installation”, then select
“Country Scan”, press ENTER to start the search. Once the
search has finished, use CH+ or CH- to select channels.
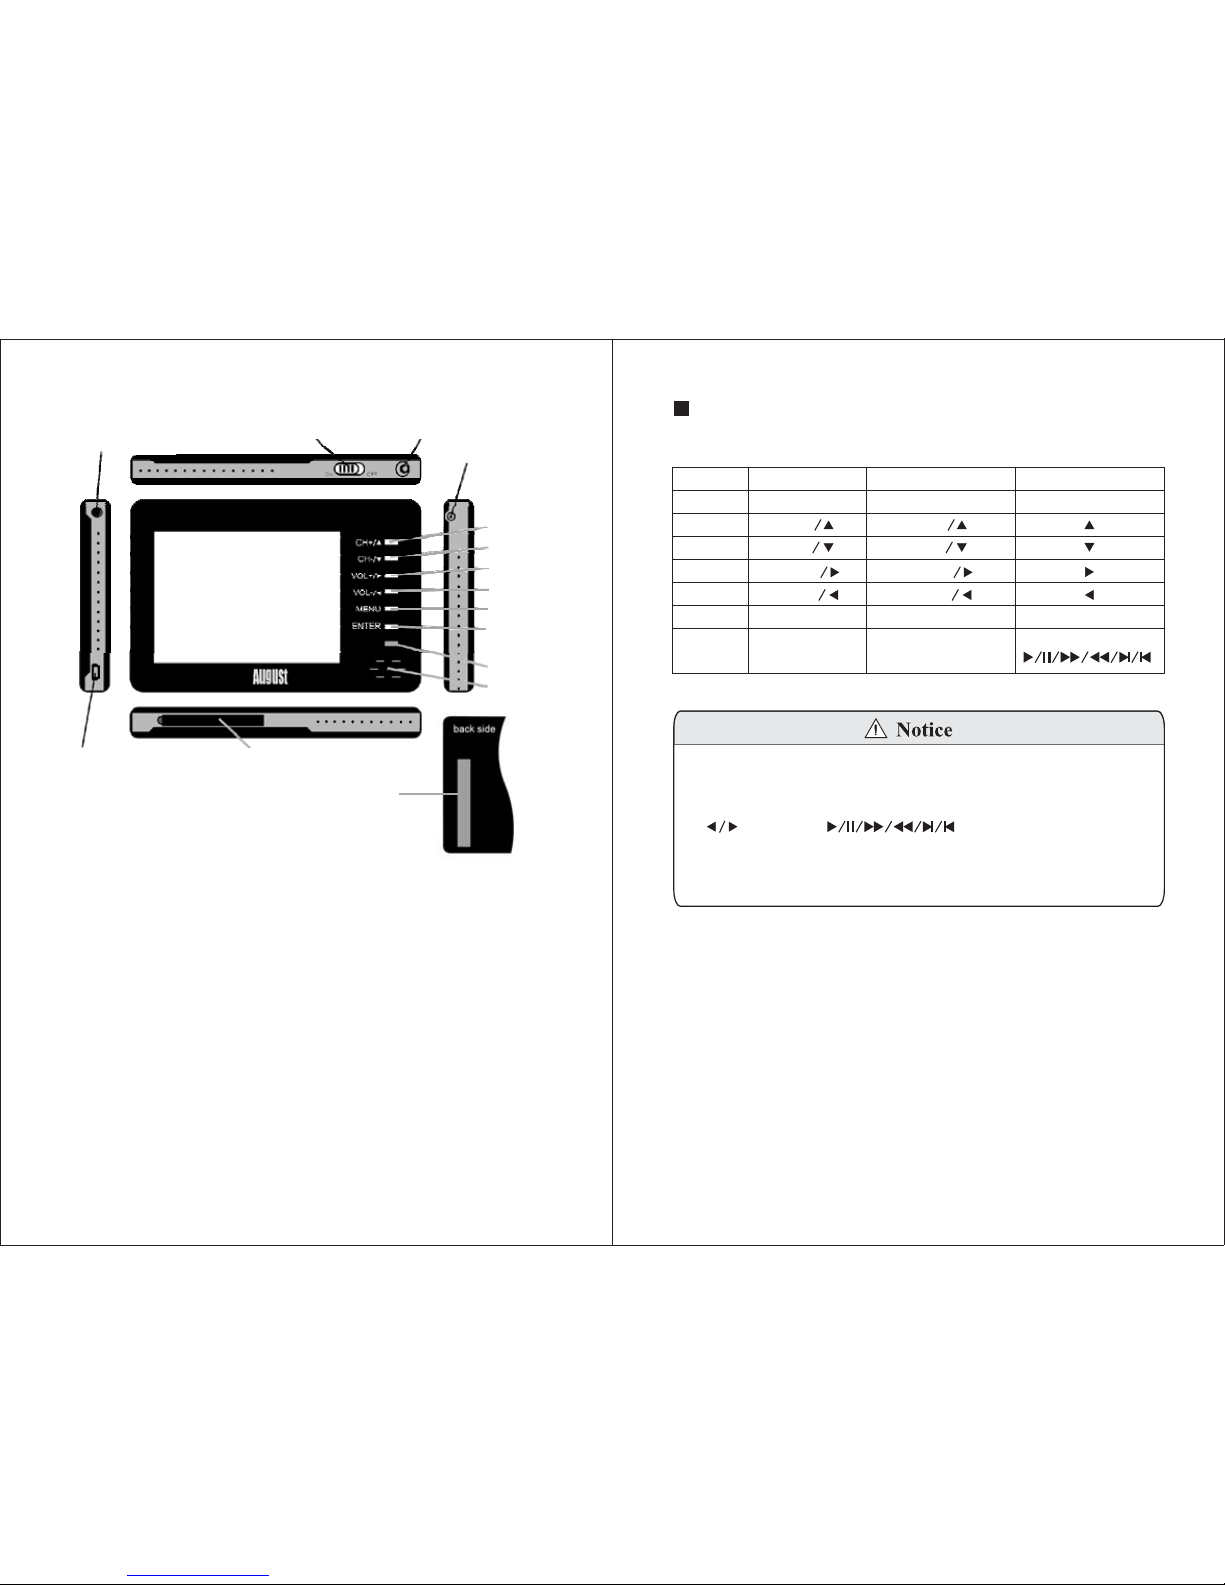
4. To play video or music on a SD card or memory stick, insert
the SD card to the card slot or connect the memory stick
to the USB port using the USB cable supplied, press MENU,
select “Movie” or “Music”, press ENTER to start the play.
During the playback, press ENTER, use to select
“Play”, “Pause”, “Forward”, “Reverse”, “Next” and
“Previous” options, press MENU to stop the playback and
exit to the main menu.

5. To play photos on a SD card or memory stick, insert the
SDcardtothecardslotorconnectthememorysticktothe
USB port using the USB cable supplied, press MENU,
select “Photo”, press ENTER to start the play. During the
playback, press for the mirror effect, press again to back
to normal, press for upside down effect, press again to
back to normal, press to rotate clockwise, press
to rotate anticlockwise, press ENTER for photo slideshow,
photos in the selected folder will show repeatedly,
press MENU to stop and exit to the main menu.
6. Please note the included portable antenna may only be
used in areas where signal is very strong. There may be
difficulties in receiving signal with the portable antenna
in some regions at present, this is due to the fact that
Freeview (www.freeview.co.uk) is yet to operate in full
power in the UK. The government aims to achieve a full
switchover by 2012, which will occur in stages, region by
region between 2008 and 2012, at present the quality of
Freeview reception varies in different regions across the UK.
As mentioned on the Freeview website, only 73% of the
UK population is able to receive Freeview at present.
Reception may be affected by various factors such as
proximity to transmitters, tall building structures, thick
walls, ceilings and etc. An aerial adapter is also provided
for connecting the device with a rooftop aerial where the
signal is not sufficient for the small antenna included.
7. For any further queries, please telephone August
International Ltd helpline 0870 850 3525 or email
Contents
1.Safety Instructions
2.Features
3.Accessories
4.Part Names and Functions
5.Connections
6.Rechargeable Battery
7.Main Menu
8.Freeview TV (DVB-T)
9.Card Reader & USB Functions
10.Games
11.System Setup
12.Specifications
13.Troubleshooting
14.Warranty
1
2
2
3
4
7
8
8
19
22
23
25
26
28

-1-
STRONG
STRONG
STRONG
STRONG
1. Safety Instructions
Maintenance
Please unplug all connection wires before start cleaning this machine.
Storage and Use
Never expose
the TV set to
moisture,dust
oil or smoke.
Never put this
machine in
containers that
are unstable as
this may cause
damage.
Never extrude
or chafe this
machine with
sharp objects.
Keep this
machine away
from hot or
cold places.
Working
temperature of
this device is
0C~50C,
storage
temperature is
-10 C ~ 60 C.
゚゚
゚゚
Keep the TV
set away from
water or damp
environment.
Avoid
dropping or
exposing to
impacts.
Please wipe the
display screen
and buttons with
a softcloth. Only
clean the screen
with professional
LCD TV screen
cleanser.
Never wipe this
machine with
abrasive cloth,
detergent
powder, alcohol
and benzene etc.
Various
propellants or
chemical
cleaning products.
Alcohol
-2-
2. Features
Mobile Freeview TV and Media Player
3.5 inch LCD display 320 x 240 pixels
Play AVI, MPEG1, 2, &4, MP3, WAV, JPEG format
SD/MMC card reader support up to 8GB
USB jack for playback from external media
Built-in rechargeable battery
Watching TV or video playback for up to 3 hours
Audio playback for up to 10 hours
Electronic Program Guide and subtitles
Multilanguage On Screen Display menu
Output TV & video to an external large screen TV
Built-in speaker and earphones jack
Support TV reception at speed up to 180km/h where the
signal is very strong
3 Accessories.
AC/DC adaptor
USB cable Portable antenna
Aerial adaptor AV cable
Earphones
User Manual
DTV350C
3.5 Inch Digital TV and Multimedia Player
Car adaptor (Optional)

-3-
4. Part Names and Functions
123
4
5
6
7
8
9
10
11
12
13 14
15
1. Earphones jack/AV output
2. Power On/Off switch
3. Telescopic antenna
4. External antenna jack
5. Channel+/Up/Previous
6. Channel-/Down/Next
7. Volume+/Right
8. Volume-/Left
9. Main Menu/Return
10. Select/Confirm/Submenu
11. Indicator light
12. Built-in speaker
13. DC Power In/USB jack
14. SD/MMC card slot
15. Bracket
-4-
Panel Button Functions
This table explains the functions of the buttons on the
player in each mode:
Button Freeview TV (DVB-T) Card & USB
Power
MENU
Power Power
CH+
CH-
VOL+
VOL-
Menu/Return Menu/Return
ENTER Confirm,
Sub Menu*
Confirm,
1
2
3
4
5
6
7
1. When watching TV, press ENTER to access to the
Submenu for more options.
2. During movie and music playback, press ENTER, use
to select .
3. During photo playback, press ENTER for photo
slideshow, photos in the selected folder will show
repeatedly.
CH+
CH-
VOL+
VOL-
*
5. Connections
1. Always turn off all devices before connecting or
disconnecting any cables.
2. Audio/Video cables should be connected correctly
according to the colour.
Yellow plug - Video jack
White plug - Left Audio jack
Red plug - Right Audio jack

-5-
5.1 Connecting to an external TV
This device allows output TV & video to an external large
screen TV. Use the AV cable supplied to connect the device
to a TV as shown in the illustration below:
5.2 Connecting the earphones
Connect the earphones to the earphone/AV jack on the
right side of the device. The speaker is automatically
deactivated when earphones are connected.
5.3 Connecting the portable antenna
Connect the portable antenna to the aerial jack on the left
side of the device.
Please note the portable antenna is provided for watching
Freeview TV where the signal is very strong. Reception
may be affected by various factors such as proximity to
transmitters, tall building structures, thick walls, ceilings
and weather etc. An aerial adaptor is also provided for
connecting the device with a rooftop aerial where the
signal is not sufficient for the portable antenna included.
-6-
5.4 Connecting the power supply
Connect the AC power adaptor provided to the USB jack
on the right side of the device as show below, then connect
it to the mains. The power indicator light will turn red.

-7-
Fully charge the battery before using the device for the
first time.
Normally it takes about two hours for the battery to be
fully charged. When charging the battery, the power
indicator light will turn red, when fully charged, the
light will turn off.
The video playback time is about 3 hours when the
battery is full charged. It is normal the device becomes
warmer when in use.
When the battery reaches a low level, a low battery
symbol will show on the LCD screen, the device will
turn itself off automatically after the battery is gone.
Fully charge the battery when it will not be used for a
long period of time.
Switching off the device while charging the battery can
shorten the charging time and extend the life of the battery.
A lithium-ion battery only provides a limited number of
discharge/charging cycles. The playback time of the
device will reduce gradually during the lifetime of the
battery.
Do not attempt disassemble or replace the battery, as
this will invalidate the warranty. Any repairs must be
carried out by either the manufacturer or their nominated
service centre. Parts inside this device are subject to high
voltage.
6. Rechargeable Battery
-8-
7. Main Menu
1. Press MENU, the main menu will show as below:
2. Use CH+/ and CH-/ to select the following mode:
Digital TV: Change settings in Freeview TV (DVB-T) mode.
Movie: Play movie files from a SD card or USB memory stick.
Music:PlaymusicfilesfromaSDcardorUSBmemorystick.
Photo: View photos from a SD card or USB memory stick.
Games: Play built-in games.
Setup: Change system settings.
3. Press ENTER to confirm.
8. Freeview TV (DVB-T)
When turning on the device for the first time, “Initial Install”
will show, follow the instructions to select OSD Language
and Area, press ENTER to confirm and exit. As this is the
first time using the device, no channel information has been
stored, it will show “Database Empty”. To search for
channels, please follow the instruction 8.2.1.
8.1 First time turn on the device

-9-
8.2 Digital TV Setup
Press MENU, select “Digital TV”, it gives the following
options: Installation, Configuration, Software Upgrade,
Factory Default, and Version.
8.2.1 Installation
Installation is for searching channels, it can be accessed
by selecting MENU->Digital TV->Installation, and it
gives two search options: Country Scan and Manual Scan.
-10-
8.2.1.1 Country Scan
The default country setting of this device is England.
Country Setting can be changed by selecting MENU->
System Setup->Area. Select “Country Scan” and the auto
search will start.
8.2.1.2 Manual Scan
If you know a channel's broadcasting frequency and
number, using manual scan to find the channel can be quicker.

-11-
8.2.2 Configuration
Configuration offers two options: On Screen Display and
TV. It can be accessed by selecting MENU->Digital TV
->Configuration.
8.2.2.1 On Screen Display (OSD)
The user interface can be changed through OSD setting.
Left of the menu lists all the options under OSD.
Press to select an option.
1. OSD: change the colour and pattern of the menu, press
to select between Theme1-5.
2. OSD Timeout: set the display time of an information
dialog window, press to select between 1-6 seconds,
the system default is 3 seconds.
-12-
4. OSD Language: the system supports Multilanguage user
interface, press to enter the language list, use
to select, press ENTER to confirm.
5.1 Audio Language: select the 1st available audio
Language, press to enter the language list, use
to select, press ENTER to confirm.
6. 2 Audio Language: select the 2nd available audio
Language, press to enter the language list, use
to select, press ENTER to confirm.
3. OSD Trans: set the diaphaneity of the menu, press
to adjust from 0%-60%.
8.2.2.2 TV
This option allows the user to set preferred display settings.
nd
st

8.2.2.2.1 Aspect Ratio
Press to select between 16:9, 4:3 Pan Scan, 4:3
Letter Box, press ENTER to confirm and exit the setting.
8.2.2.2.2 Video Output
The Video Output has been set to CVBS as default.
-13-
8.2.2.2.3 Brightness
Select Brightness, press to move to the option list,
use to select, press ENTER to confirm, press ENTER
again to exit the setting.
-14-
8.2.2.2.4 Contrast
Select Contrast, press to move to the option list,
use to select, press ENTER to confirm, press ENTER
again to exit the setting.
8.2.2.2 5 HUE.
Select HUE, press to move to the option list,
use to select, press ENTER to confirm, press ENTER
again to exit the setting.

8.2.2.2 6 Saturation.
Select Saturation, press to move to the option list,
use to select, press ENTER to confirm, press ENTER
again to exit the setting.
8.2.3 Software Upgrade
This function is for manufacturer use only.
-15- -16-
8.2.5 Version
This provides the hardware, software and system
information of this device.
8.3 Submenu
When watching Freeview TV, pressing ENTER can
accesstotheSubmenuasshownbelow:
8.2.4 Factory Default
To restore the system to factory default, press MENU,
select Digital TV->Factory Default, then press ENTER.

-17-
8.3.1 Subtitle
Select “Subtitle”, press ENTER. Press to choose
subtitle on or off.
8.3.2 Electronic Program Guide (EPG)
Select “EPG”, press ENTER. The detailed program guide
will be shown as below:
-18-
8.3.3 TTX
8.3.4 Multi Audio
Teletext function is not available.
Select “Multi audio”, press ENTER. Press to select
Left Audio, Right Audio and Stereo.
8.3.5 Program Info
Select “Program info”, press ENTER, program information
will show.

8.3.6 TV/Radio
Use “TV/Radio” to switch between digital TV and Radio
mode.
-19-
9. Card Reader & USB Functions
This player has built-in SD/MMC card reader and USB
port. It supports the playback of MP3, JPEG, MPEG4 and
AVI files. Before connecting the device, make sure the SD
card or USB memory stick contains playable files.
InsertaSDcardtothecardslotofthedeviceorconnect
an USB memory stick to the device using the USB cable
supplied.
-20-
9.1 Movie
Press MENU, select Movie, press ENTER, the Movie menu
will show.
Use to select a subtrack.
Press ENTER to view the video files in the subtrack.
Use to select a movie you want to watch, press
ENTER to confirm.
During the playback, press ENTER, use to select
“Play”, “Pause”, “Forward”, “Reverse”, “Next”
and “Previous” options, press
MENU to stop the playback and exit to the main menu.
()
9.2 Music

-21-
Press MENU, select Music, press ENTER, the Music menu
will show. The operations on how to select, play or stop the
playback of music files are the same as the Movie play.
9.3 Photo
Press MENU, select Photo, press ENTER, the Photo menu
will show.
Use to select a subtrack.
Press ENTER to view the photos in the subtrack.Use
to select a photo, press ENTER to confirm.
During the playback, press for the mirror effect, press
again to back to normal, press for upside down effect,
press again to back to normal, press to rotate clockwise,
press to rotate anticlockwise, press ENTER for photo
slideshow, photos in the selected folder will show
repeatedly, press MENU to stop and exit to the main menu.
-22-
10. Games
Games can be accessed by selecting MENU-> Games
->Native Games.
Press to select the game you want to play, press
ENTER to confirm. The games are played using
buttons.

-23-
To exit the game, press ENTER to pause, then select Exit
Game.
11. System Setup
To change the system setup, press MENU, select System
Setup, then press ENTER.
Press to select an option, use to change the
settings. After setting, press ENTER, to exit the setup, it
will show “Successfully updated”.
-24-
This table explains the functions of each setting:
Setting Function Available Options
EQ Setup Equalizer settings Standard, Classic, Rock,
Jazz, Pop
Surround Sound settings Off, Concert, Church,
Passive, Live
Display OFF The LCD screen will turn
off if there is no operation
for a certain period of time
in Music mode.
5s: screen off after 5
seconds no operation.
15s: screen off after 15
seconds no operation.
Off: no screen off setting.
JPEG Effect On, Off
LCN Logic Channel Number On, Off
LCD Brightness Brightness setting From 10% to 100%
Area Area setting England/ Germany/ Italy/
France/ Spain/ Holland/ Taiwan
/ China/ Norway/Sweden/
Finland/Greece/Australia
GMT Offset Time zone setting Auto, -12:00 ~ +12:00
Photo display setting

-25-
12. Specifications
Screen size: 3.5 Inch
Resolution: 320X240 pixels
Aspect Ratio: 4:3
Brightness: 250 cd/m
Contrast: 300:1
NTSC
Operating frequency: 470-862MHz
Output impedance: 75ohm
Lithium-ion rechargeable battery
(1950mAh, 3.7V)
- Watching DTV for up to 3 hours
- Video Playback for up to 3 hours
- Audio Playback for up to 10 hours
- Charging time: 2 hours
AC 100~240V 50~60 Hz
DC 5V/2A
<3W
AVI (MPEG-1,2, and 4)
MP3, WAV
JPEG (up to 1024 x 768)
105x75x18mm
About 150 g
LCD Display
Video Standard
Antenna
Battery
Power Adaptor
Power consumption
DVB Decode Standard
Video Format
Audio Format
Photo format
Dimensions
Net Weight
Others
Working Temperature: 0 C to +50 C
Storage Temperature: -10 C to +60 C
Working Humidity: 45% to 80% RH
Storage Humidity: 30% to 90% RH
゚゚
゚゚
Note: Design and specifications of this device are subject
to change without notice.
MPEG 2
2
-26-
13. Troubleshooting
Problems listed below do not necessarily signify a fault
with the unit. Please check this list before requesting repairs.
Solution
Problem Possible Cause
No sound Device is not properly
connected.
Check connections and
connect to external
device using appropriate
cables.
Speakerisoffwhen
earphones is in use.
Disconnect the earphones.
No picture Device is not properly
connected.
Check connections and
connect to external device
using appropriate cables.
No or bad signal No Freeview (DVB-T)
signal or the signal is too
weak.
Check the antenna.
Change the orientation
of the antenna. Use a roof
top aerial or an amplified
aerial. Perform a channel
scan if move to a
different region.
Picture freezing
and or sound
distorting
The signal is too weak. Check the antenna.
Change the orientation
of the antenna. Use a roof
top aerial or an amplified
aerial. Perform a channel
scan if move to a
different region.
Database empty No channels saved. Perform a channel scan.
Battery can't be
charged
Adaptor loose. Re connect the adaptor.
The player gets
warmer
The player has been used
too long.
It's normal, please power
off for several minutes.

-27-
1.This operation instruction is only intended for reference.
No further notice is available to any modification of all
information contained therein. Due to continuing
improvements, the features and design are subject to
change without notice.
2. No user serviceable components are fitted inside this
device. Do not attempt any repairs, as this will
invalidate the warranty. Any repairs must be carried out
by either the manufacturer or their nominated service
centre. Parts inside this device are subject to high
voltage. .
Warning This product is guaranteed for 2 years from the date of the original purchase. This
warranty covers costs of parts and labour for the first 12 months and covers
manufacture defects of major components which include LCD screens, DVD disc
loaders and software on main circuit board for the second 12 months. In the
unlikely event of any defect arising due to faulty materials or workmanship, the
unit will be either replaced or repaired(where possible) during this period. An
alternative product will be offered in case the product is no longer available or
repairable.
This warranty is subject to the following conditions:
The warranty is only valid within the country where the product is purchased
The product must be correctly installed and operated in accordance with the
instructions given in the user's manual.
The product must be used solely for domestic purposes.
The warranty only covers the main unit, and does not cover the accessories.
The warranty does not cover the damage caused by misuse, negligence,
accident and natural disaster.
The warranty will be rendered invalid if the product is resold or has been
damaged by inexpert repairs. The manufacture disclaims any liability for
incidental or consequential damages.
Please consult our customer service before returning any product; we are not
responsible for any unexpected product returns.
Any faulty products must be kept and returned in the original packaging with
all the accessories and the original copy of the purchase receipt.
The warranty is in addition to, and does not diminish, your statutory or legal rights.
Please note:
1.A LCD display panel comprises a very large number of pixels and each pixel
contains three sub-pixels - red, green and blue. Due to the complex manufacturing
process, occasional pixel anomalies may occur. Pixel anomalies cannot be fixed
or repaired and can happen at any stage in the LCD's life. August products should
not be deemed as faulty if there are no more than three bright and dark pixels
respectively.
2.Portable TV antennas included in the box are for people to watch Freeview TV
in areas where the signal is very strong and there may be difficulties in receiving
signal with the included portable antennas in some regions at present. This is due
to the fact that Freeview is yet to operate in full power in the UK. August Tvs
should not be deemed as faulty if it can receive Freeview by connecting to a
proper digital rooftop aerial.
Telephone: +44 (0) 870 850 3525
Email: [email protected]
Customer Service:
Warranty
-28-
Other manuals for DTV350C
1
Table of contents
Other August Media Player manuals
Popular Media Player manuals by other brands

GSS
GSS Timed Media Player 1 Assembly instruction

Networked Media Tank
Networked Media Tank A-110 user guide

Lucas Industries
Lucas Industries LMP303 series user guide

Rockford Fosgate
Rockford Fosgate RFX4000 Operation manual

ActionTec
ActionTec Wireless Digital Media Player DMP011000-01 user manual

Panduit
Panduit AT-OMNI-111-WP manual