iOCEAN Smartphone User manual

User Manual
User Manual
Welcome to Use iOCEAN smartphones
1

User Manual
Contents
CONTENTS.......................................................2
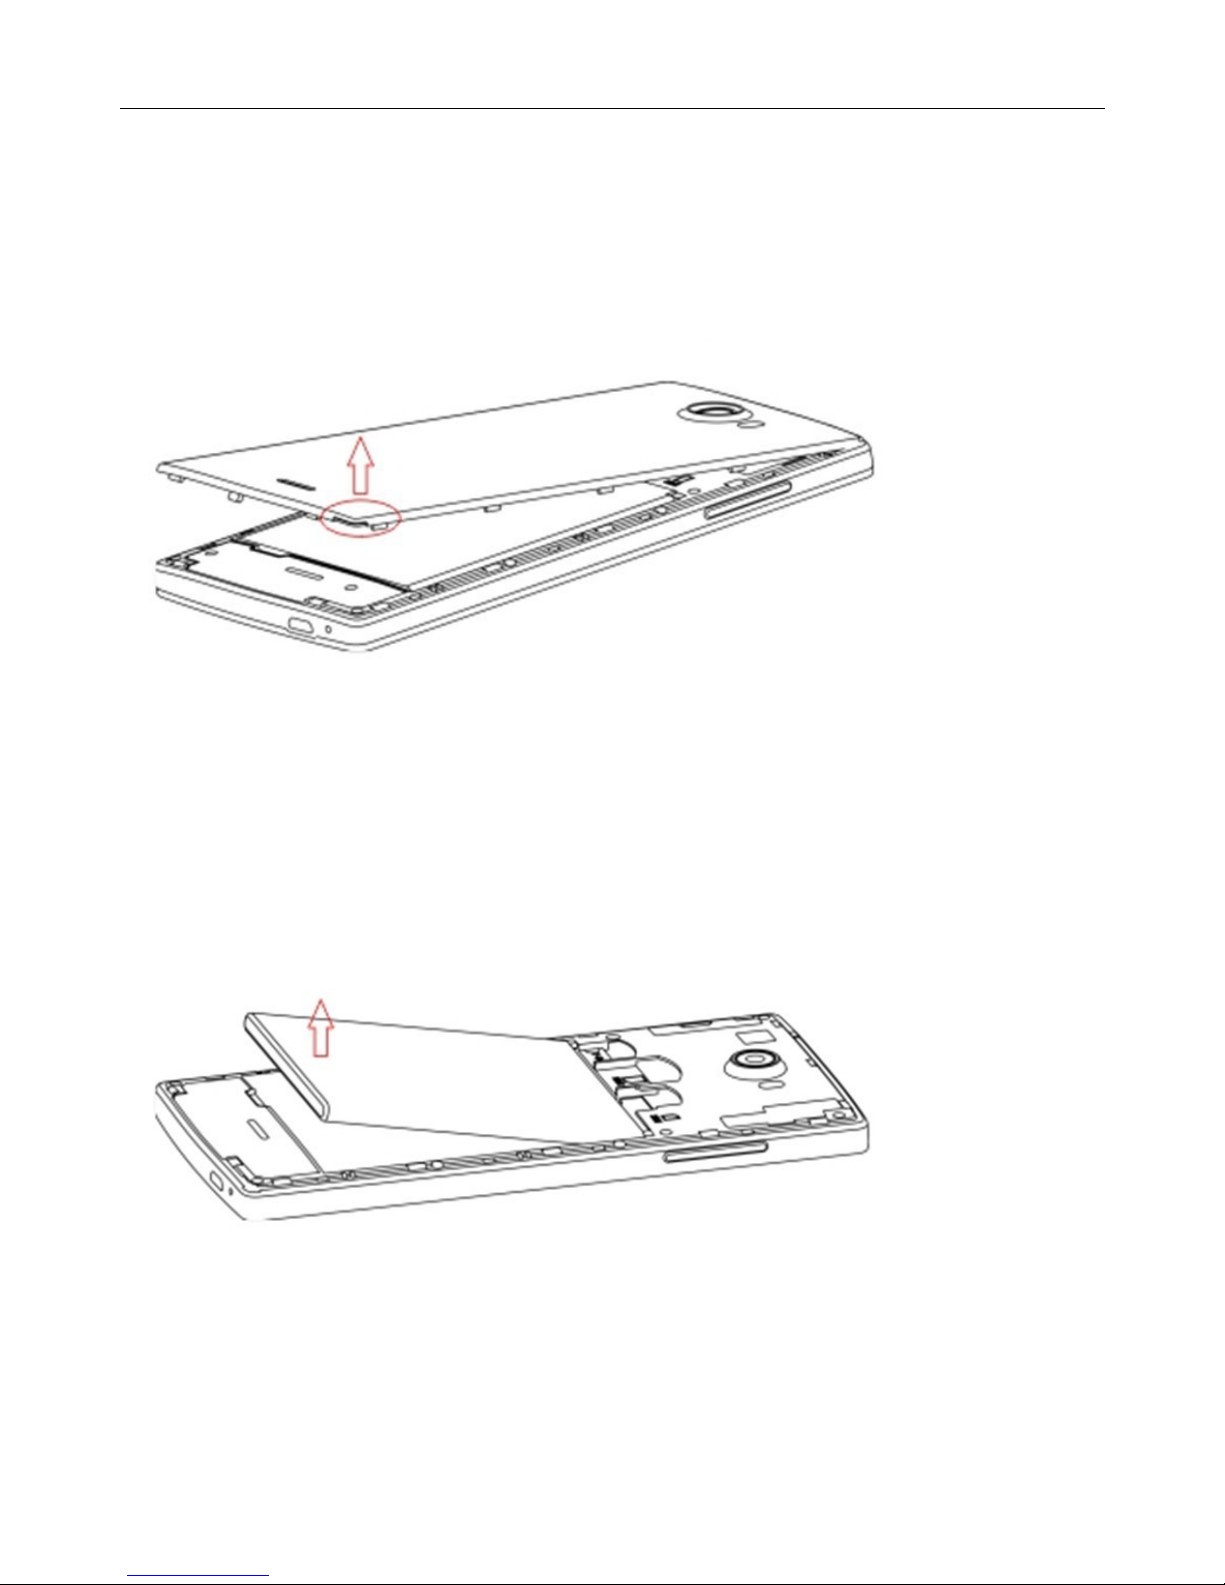
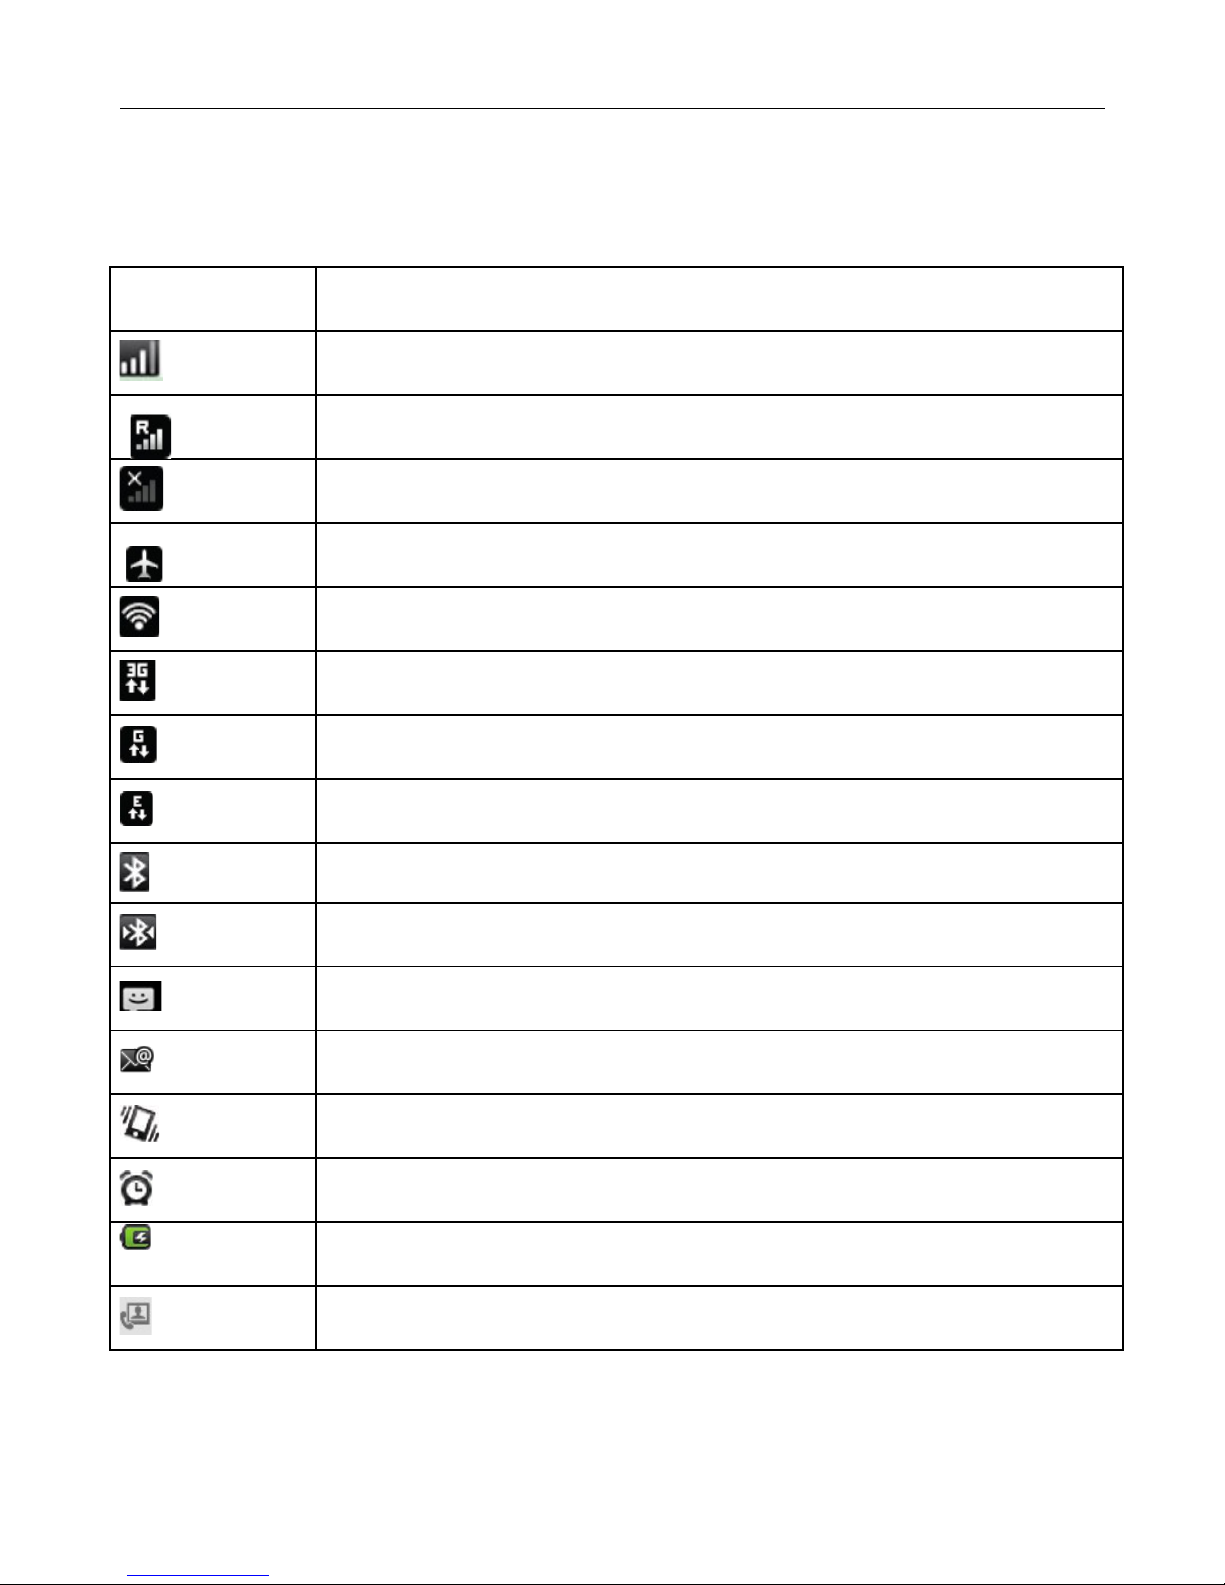
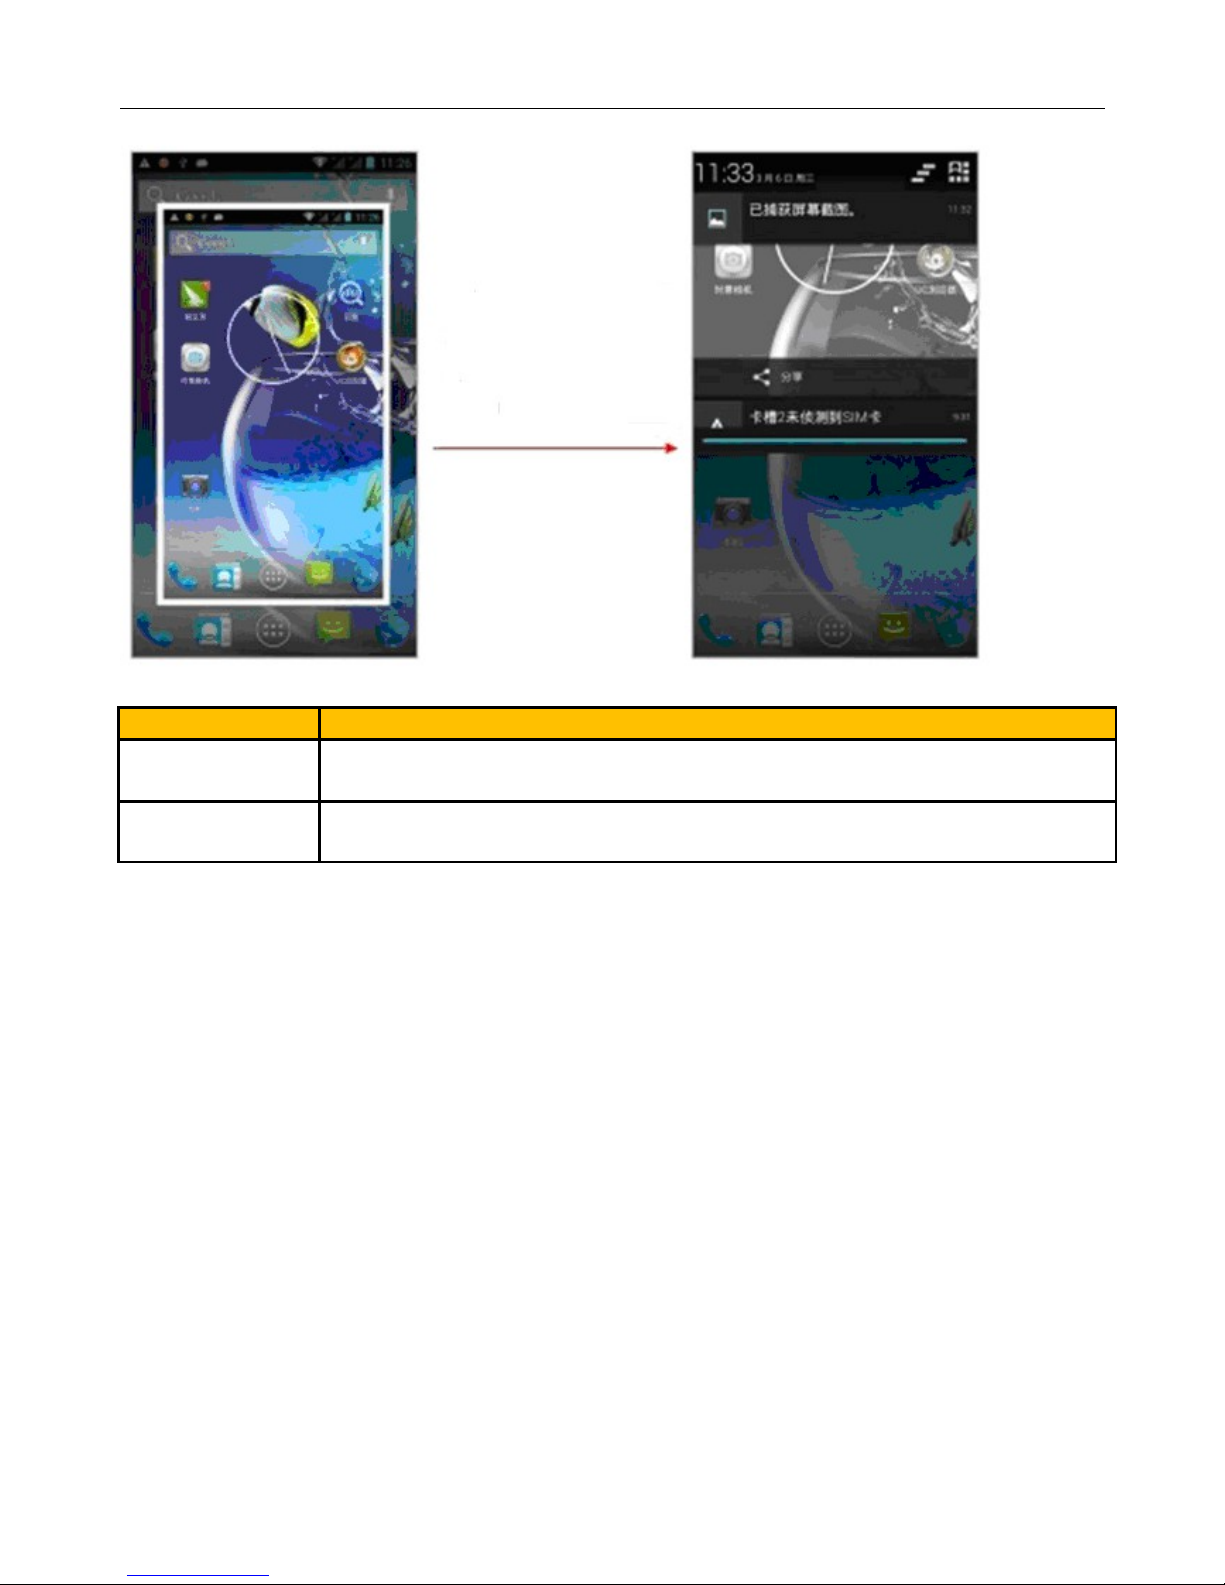
1 . APPEARANCE AND KEYPAD OPERATIONS..............................................................................................3
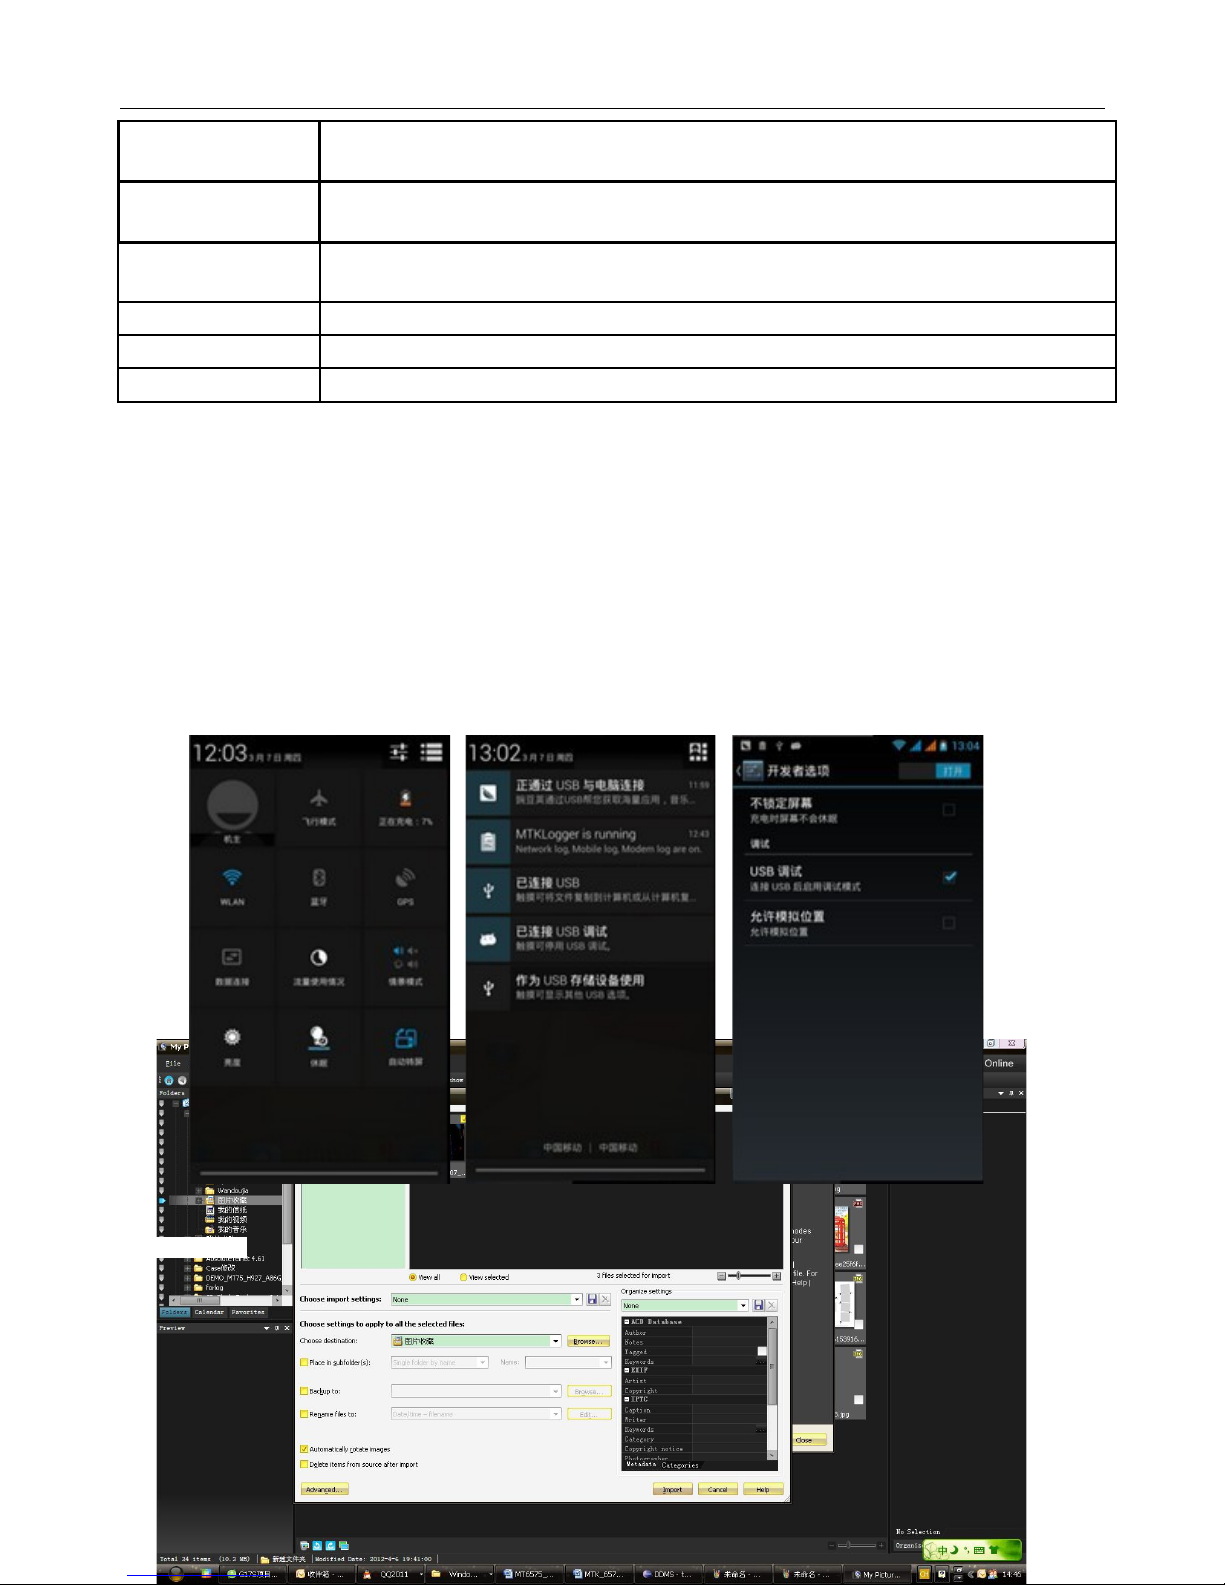
2. USING MEMORY CARD AS U DISK.......................................................................................................9
3.WIFI 10
4. BLUETOOTH.......................................................................................................................................12
13
5.MAIL 13
6.DIALLING...........................................................................................................................................15
. MESSAGING.......................................................................................................................................19
8. CONTACTS.........................................................................................................................................23
9. INTERNET EXPLORER..........................................................................................................................26
10. RECORDER.......................................................................................................................................2
11.CLOCK 28
12.CACULATOR.....................................................................................................................................29
13.CAMERA ..........................................................................................................................................30
14. IMAGES............................................................................................................................................33
15. MUSIC 35
16. CALENDER.......................................................................................................................................3
1 .FM RADIO.......................................................................................................................................38
18.SETTINGS..........................................................................................................................................39
19. NOTICES FOR T E USE OF P ONE ....................................................................................... 43
2

User Manual
1 . Appearance and Keypad Operations
Appearance and keys:
01 Front camera
02 Earphone
03 Distance/Light sensor
04 Pilot lamp
05 Menu
06 Main screen
07 Return
08 Volum
09 Microphone
10 USB hole
11 Back camera
12 Flash
13 Speaker
14 Earphone hole
15 Power button
3

User Manual
How to remove the back cover :
1, In status of power off, screen adown
2, Dig from snap joint of lower fright, with your thumb and forefinger
How to remove the battery:
1, Take down the back cover [reference to above process]
2, Fix the metal part of the battery to corresponding contacts ,and lay down the battery
How to insert SIM card:
1, Take down the back cover
2, Take down the battery if you have install it
3, Make metal contacts adown, insert SIM card to SIM 1 hole, as show in figure
4

User Manual
4, Make metal contacts adown, insert SIM card to SIM 2 hole , as show in figure
How to insert or pu out Micro SD card:
1, Insert : Insert Micro SD card to the slot as show in figure
2, Pull out :Pull out it from the slot
5

User Manual
Icon:
Icon Meaning
GSM Signal
GSM Roam
Urgent call only
Airplane mode
Wifi Signal
3G service
GPRS service
EDGE service
Bluetooth
Bluetooth devices interlinking
New messages
New emails
Vibration mode
Clock alarm
Charging
3G talking
6

User Manual
Screen un ock
Default as swipe screen to unlock , support shortcuts
Screenshots
click “Power” & “Volume – ” , get the screen shot from status bar
7

User Manual
Keys Functions
home Press this button to return home from any application or interface.
Press it to open recently opened application window.
menu Press it to start the menu ,which allows you to perform actions in the current
interface or options’ menu.
8

User Manual
back Press it to return to the previous interface ,or to close dialog box 、options’
menu、notification panel or the keypad.
power Press it to open the phone’s menu ,then you could choose to lock the
screen 、turn off the phone,or set it to the silent mode .
up Press it to increase the volume
Press it to turn the phone to vibration mode from the silent mode.
down Press it to decrease the volume.
P-Serson Cover it, and then the phone’s backlight will turn off
front camera Entering the camera interface, switched to the front camera can photo yourself.
2. Using Memory Card as U Disk
If you want to send music, pictures or other files to the phone’s memory card from the computer ,you should set
memory card as u disk first.
a) Set memory card as u disk
1) Connect the phone to the computer with USB cable. The notification icon will appear in the status box.
2) Use USB mobile transmission line will connected to the computer
3) In the notification panel, touch USB is connected ,then touch“Open the USB Storage Device”
b)After the connection can be directly in the PC check images captured on camera.
9

User Manual
Notice: different PC operating system to how to operate to normal use the U disk.
1)WIN7 Can directly use
2)XP update windows media player to 11
3)Install wpdmtp.inf driver
4)Vista Unconfirmed
Notice :On the PC operation assistant tool such as obile phone, Must be open the USB debugging.
3.WIFI
Wi-Fi provides as far as 300feet (100M) range of wireless network access. If you use cell phone to connect wifi, you
should connect to the wireless access point or 「hot spots」.
Notices:The availability and coverage of Wi-Fi signal depend on the number, infrastructure and other
objects penetrated by the signal.
Open Wi-fi and to connect to the wireless network
1) Press home>menu,then touch settings>wifi and internet
2) Select the wi-fi box,to open Wi-Fi. Phone will automatically scan for available wireless networks.
3) Touch Wi-Fi settings. Then a list of Wi-Fi network will show the founded network name and security settings.
(open network or WEP、WPA/WPA2 with password).If you enable the notification in Wi-Fi settings, The status
box will show this icon ( ) when open available wireless network founded.
4) Touch one of the Wi-Fi choices to connect the network. When you choose open network, phone will
connect to it automatically. If you choose WEP 、WPA/WPA2 with password, you should type the
password first, then touch to connect it.
10

User Manual
Notices:when the phone is connected to the wireless network,
The status box will show this Wi-Fi icon( ), and the approximate
signal strengthen (the number of lit bars).If touch the connected
network,will display the name of Wi—Fi network, status, speed, signal,
strength, security, information and IP address.
If you want to delete the wireless settings, please touch “not reserve”
as in the right picture. If you want to connect to this network, you
should re-enter these settings.
Notices:
Unless you choose not to reserve the network, otherwise, there is no need to re-enter the corresponding password when
next time connecting to the previously encrypted wireless network. Wi-Fi will search automatically, that is, phone needn’t to
perform additional steps to connect Wi-Fi networks.
Notices:
Unless you choose not to reserve the network with password, otherwise, there is no need to re-enter the corresponding
password when next time connecting to the previously encrypted wireless network. Wi-Fi will search automatically, that is,
phone needn’t to perform additional steps to connect Wi-Fi networks.
Connect to other Wi-Fi networks
1) In the interface of wireless and network, touch Wi-Fi settings. The founded Wi-Fi networks will show on the Wi-
Fi network list.
2) Touch other Wi-Fi networks, and then you can connect to this network.
Notices:in addition, you can surf the internet via GPRS. We default that the GPRS in SIM1 is opened
after started, users can select manually ,the specific location is “settings>wireless and internet>data
connection”,touch “SIM1、SIM2、no data connection”,when the dot turns green, it’s already opened.
11

User Manual
4. B uetooth
Turn on Bluetooth or set the phone can be detected
1) Press home>menu, the touch settings.
2) Touch wireless and internet, then choose Bluetooth box to open the Bluetooth function. After started, the
status box will show this icon ( ). Touch “scan for devices”the it starts to scan for all devices within range.
3) Touch Bluetooth settings, all the devices founded will display in the list under the icon.
(select the box “can be detected”, set it to be detected, the other Bluetooth devices will be able to find the
phone.)
important:the maximum detecting time of the phone is 2 minutes.
Pairing and connection of Bluetooth headset
1) Press home>menu, then touch settings.
2)Touch wireless and internet>Bluetooth settings, then select Bluetooth box, then your phone will scan
for the Bluetooth devices within range ,and show the founded devices in the list under the icon.
Tips:
a. If the list can’t find your equipment, touch scanning equipment to re-scan it.
b. Make sure that the devices wanted are under the detected mode.
3) Touch headset in the equipment list to finish the connection.
Notices:generally Bluetooth devices need password to be paired, often use 「0000 」as the default
password.4)The pairing and connecting status will show under the headset in the Bluetooth devices list.
When the headset connected to your phone, the status box will show this icon ( ) means
connected. Then you can use the headset to make or receive callings.

User Manual
Cut the connection to the Bluetooth
1) Press home>menu>settings>wireless and internet>Bluetooth settings.
2) In the list of Bluetooth equipment, touch or tap and hold the connected hand-free headset.
3) Press and select “cancel the pairing”.
Bluetooth proximity sensor
After pairing the two device,you can test out the signal is strong or weak by the Bluetooth proximity sensor
device
5.Mai
5.1 Gmai
Create an electronic mail account
Select mail> settings. You can activate or edit existing e-mail accounts as well as create a new e-mail
account.
a. Select mail, Google account setting interface appears. Then touch‘next step’> create account>enter
name,last name and e-mail account.
b. Google servers determine whether the name can be used, if so, new interface appears prompting enter
password, then judge the password’ security, users who doesn’t meet the requirements need to re-enter the
password.
c. Successfully register a new Gmail account, a messenger created automatically for testing.
Loading mail account
a. Open Gmail skip introduction screen>loading interface appears >select load
b. Enter name, password then load
E-mail account initialization ,prompting “login successful” All Google accounts will be synchronized.

User Manual
Creating and sending ,mails
When creating mails, select mail > creating mails. Enter the address(recipient)、theme and contents. Press
MENU you could ‘append’、‘Add Cc/Bcc’, select send or discarded.
Receive mails
There is tone for new mails, in the status box will show this button , Press Menu >‘refresh’,refresh
and update the number of the unread mails in a proper way.
Delete mails
When loading a mail account,if you want to delete it,you need to restore factory settings . When loading
a second one,you could press the menu button to delete it.
Notices:many functions depend on Gmail Account,for example:Electronic Market、Google Talk、Sync
Contact and Calendar.
5.2 Emai
Load Emai .
c. Open network connection,
d. In setting the account interface, input the correct email address and password and click next
mobile phone automatically complete the sending and receiving server Settings. Pop-up mail find
frequency, and user Settings interface, complete Settings, click next.
e. For account creation name, the editor of the law that email user name, and click next. Complete s
et, synchronous mailbox.
Create and send Email
When creating mails, select mails > create mails. Enter the address(recipient)、theme and contents.
Press MENU you could ‘append’、‘Add Cc/Bcc’, select send or discarded or save as draft.
Check the Email files
Click on the bottom folder options, list all folder options

User Manual
6.Dia ing
When the icon of internet server appears in the screen, you could dial or receive callings. The signal bar on
the top right corner show the strength of network signal (the maximum with 4 signal bars) .
Start dialing
Open application’s main menu>dial. You could choose SIM1 or SIM2 to do the dialing.

User Manual
Dialling
At the dialing Keboard ,enter the phone number,and then click the dialing key , after that,you should
choose one SIM card or internet call. If needed to call the extension,you could click the “dial pad” in the
bottom of the screen to open the interface or press menu key to select “delay 2 seconds” ,and then enter
the number of the extension.
The dialup keyboard input number, click Menu can IP dial-up or speed dial
Video call: video call usually refers to the Internet and mobile Internet based on (3 G Internet) end, through
the phone between the speech of the real-time transmission and image (user of bust, photographs, items,
etc.) of a way to communicate. Only 3 G to support this function. Input a number click video dial-up, each
other answers the phone after both can through camera for video calls.
Telephone calls in the call log
Every telephone number called and received in“SIM1、SIM2”will reserved in phone’s menu of call log. On
the top left of every call record will show“SIM1 or SIM2”
All numbers in the call log can be dialed by clicking the button ”dial” on the right side of the screen.
When number list appearing ,click it to catch details ;press it for long you could dial via “SIM1 or SIM
2”,meanwhile you can edit, delete, save the number or do other operations.
Receive callings
When calling comes (top left will show from which SIM card )press“Answer”and slide towards right until
the middle button, then you can receive callings.
Proximity sensor
According to the distance between phone and human body ,it will adjust automatically the switch of the
backlight.

User Manual
During the call, close the phone to the ear, the backlight will turn off automatically ,which could save
batteries and prevent inadvertently touching.
Refuse to answer the phone
a. When standby, calling comes ,press “refuse”button and slide towards left side until the middle
button, then you could refuse the calling.
b. When using,calling comes,click on the “refuse”button to refuse the calling.
Two-way call/multiparty call(conference call)
Notices:this function needs that SIM card open multiparty call features.
1) Already exist a call in the phone
2) Click“Add calls”,dial another call(or receive another call,phone default open ”call
waiting”(settings–dialing settings–other dialing settings),after both connected,could
view the status of calling.
3)select“combine call”– you can combine two calls into one way.
4)after multiparty call connected ,you could separate the calls or hang up one of them
via“the small arrow of conference call”.
Telephone recording
During the call,more>start record,you could record the dialog of the call.
1)settings>set other functions of the call in the dialing settings,for example:Call Transfer– after
all the settings finished and turned on,you could transfer the call to a certain number.
2)In settings>dialing settings >other dialing settings,open “call waiting”.After turned on,you can
receive another call when already exist one,The answering and rejecting functions are just like the
ordinary phone.

User Manual
Video call
When you use video call,ensure to install 3G SIM card. in the dialing interface,enter numbers ,then
press the symbol ,so that complete the video call.
The second way to use video call
Open the menu of applications>contacts, press one contact of the contacts,then press long the phone
number,and select the” video call”.
Call settings
Voice Ca
1)Voice Mail:The voice mailbox in setting in the input voicemail number.
2) IP prefix number:Setting the different of SIM cards IP prefix numbers
3)Call forwarding:Can set respectively 2 a SIM card, the line is busy, and no one has to receive, not be
connect four connecting way
3) Call barring: Can set respectively two to the SIM card call restrictions

User Manual
4) Additional Settings:a.My phone number b.Call waitting。
Video Ca
1)Local video replacement:Set a picture to display when camera off use.
2) Display peer video:Display picture for replacing peer video when it is unavailable.
3)Peer video replacement:Set a picture to display when peer video unavailable.
4)Enable back camera:Available to switch cameras if turn on.
5) Bigger Peer video:Turn on to make peer video bigger than local video.
6)Auto drop back:Drop back to voice call connecting automatically
7)Outgoing video call:Display local video when make a video call.
8) Incoming video call:Display local video when accept an incoming video call.
9) Other settings: a. Call forwarding b.Call barring c.Additional settings
Internet ca
1) Account
2) Use Internet calling
Other Settings
1)Fixed Dialing Numbers
2)Minute Reminder:Turn on minute reminder at 50s of every minute.
3)Quick Response:Can edit the text messages rejected by the information when content.
7. Messaging
Important:the message title of this phone is the phone number ,will be reserved in s similar for of
dialog,instead of the usual folder structure. Messages with blue background are those received, and
messages with white background are those sent.
Send SMS to certain phone number
1) Press home>messaging,touch“new messages”.
2) In the interface of “edit”:

User Manual
a.Click “recipient”box to start input method,you can also click“enter”box to start input method,in
that way you can enter characters.
b.Click the button of “send from SiM1 or SIM2”to start sending.
Send MMS to certain phone number
When creating message ,it was defaulted as SMS ,it will be turned to MMS when following operations
were done. You can send MMS via clicking “send” after editing.
1) In the interface of “edit”,Click the button of “Menu”:
2) Click “append” ,you can spend the following attachments ,then it will be turned to MMS
automatically.
Table of contents