ION iCD02K User manual

iCD02K
DIGITAL DJ STATION
Quick Start Owner’s Manual
Manual de inicio rápido del usuario
(ESPAÑOL)
Schnellbedienungsanleitung
(DEUTSCH)
Manuale Rapido di Utilizzazione
(ITALIANO)
Guide d’utilisation simplifié
(FRANÇAIS)

DIGITAL DJ STATION QUICK SETUP
1. Make sure all items listed on the front of
this guide are included in the box.
2. READ SAFETY INSTRUCTION BOOKLET
BEFORE USING THE PRODUCT.
3. Study this setup diagram.
4. Place Digital DJ Station in an appropriate
position for operation.
5. Make sure all devices are turned off and all
faders and gain knobs are set to “zero”
6. Connect all stereo input sources as
indicated in the diagram.
7. Connect the stereo outputs to power
amplifier(s), tape decks, and/or other audio
sources.
8. Plug all devices into AC power.
9. Switch everything on in the following order.
•audio input sources (i.e. turntables or
CD players)
•Digital DJ Station
•last, any amplifiers or output devices
10. When turning off, always reverse this
operation by,
•turning off amplifiers
•Digital DJ Station
•last, any input devices
11. Go to http://www.ion-audio.com for
product registration.
More information about this product may be
found at http://www.ion-audio.com
REAR CONNECTIONS
1. Channel Inputs: Unbalanced RCA jacks for
connecting external sources. The Phono/Line
input is selected using the toggle switch on
the front panel. Turntables, HiFi VCRs,
cassette and reel-to-reel tape decks, DAT
machines, CD players, laser discs, tuners,
even synthesizers or other mixing consoles
can be connected using these jacks. NOTE:
Plug mono audio sources into both left and
right inputs using a “Y” cable connector.
2. GND: This screw connector should be used
to connect any turntables or other devices
that need to be grounded.
3. Input Selector Switch: Use this to allow
either line level or phono level equipment to
be plugged into your channel inputs. When
Phono input is selected, your signal is fed
directly to the high-quality RIAA phono pre-
amplifiers. Use this position only for
turntables. Line level sources will overload
the sensitive phono pre-amps and will sound
very bad, so always be sure to toggle the
line/phono switch over to line before
connection of line sources.
4. Record Output: This RCA output is for
connecting a recording device such as a tape

deck or CD recorder. The level of the record
output is based upon pre-master levels.
5. Master Output (RCA): This output is for
connecting an external monitoring device
such as a PA system, powered monitors, or a
home stereo. The level of the master stereo
output signal is controlled by the master
fader.
6. Mic Input: Plug your 1/4” Microphone plug
in here.
7. AC In: This mix station is designed to work
with the power supply cord that comes with
the unit. While the power is switched off,
plug the power supply into the mix station
first, then plug it into the outlet.
8. Power Switch: Use this switch to turn on
the mix station after all input devices are
already connected to prevent damage to
your equipment. Turn the station on before
you turn on amplifiers and turn off amplifiers
before you turn off the mix station.
3
FRONT PANEL FEATURES
1. Input Fader: Controls individual source
levels in the mix.
2. Input toggle switch - Selects which
source will be live to that channel based on
what you have connected to the rear panel
input section
3. Replaceable Crossfader - Achieves clean
segues between the two input channels.
"Hard left" selects Channel 1. "Hard right"
selects Channel 2. With the crossfader
centered, both assigned channels are live.
Use the crossfader for fast and seamless
segues from one selected channel to the
other
Note: The crossfader is user replaceable in
case of failure. Simply unscrew the two
large screws which hold it in place, lift it
out and disconnect it’s cable. Re-attach the
new crossfader and screw the mounting
plate back onto the unit - you’re back in
business!
4. Fader Start – Activation allows you to
start the CD players from you crossfader.
Travel from left to right will start the right
CD player and pause the left CD player
5. Mic Input Fader – Adjusts microphone
level.
6. Mic On/Off Toggle – Activates
microphone.
7. Master Fader - Controls the overall output
level.
8. Vocal Cancel/Stereo/Mono toggle -
Changes the Master output between Mono
and Stereo, and vocal cancel.
9. Stereo EQ – Adjust final master output
equalization of treble, middle, and bass.
10. LED METER - Indicates the Master output
level.
11. Channel Cue Selector - Used to route
channel audio to your headphones.
12. Headphone Level – Adjusts cue volume.
13. Headphone Jacks – Used to connect
either 1/8” or 1/4” plugs for audio
monitoring with headphones.
CD PLAYER FEATURES
1. OPEN/CLOSE (Disc Tray Open/Close) -
Press to load or eject the disc. Each press
will open or close the disc tray on the
transport. NOTE: Tray will not open unless
the disc has been paused. Tray will
automatically close after 30 seconds.
2. TIME (Time Button) - Switches the time
display between elapsed playing time and
remaining time on the track and remaining
time on the entire CD.
3. CONT/SING - Will cause just a single
track to play or all tracks in order by
pressing once or twice.

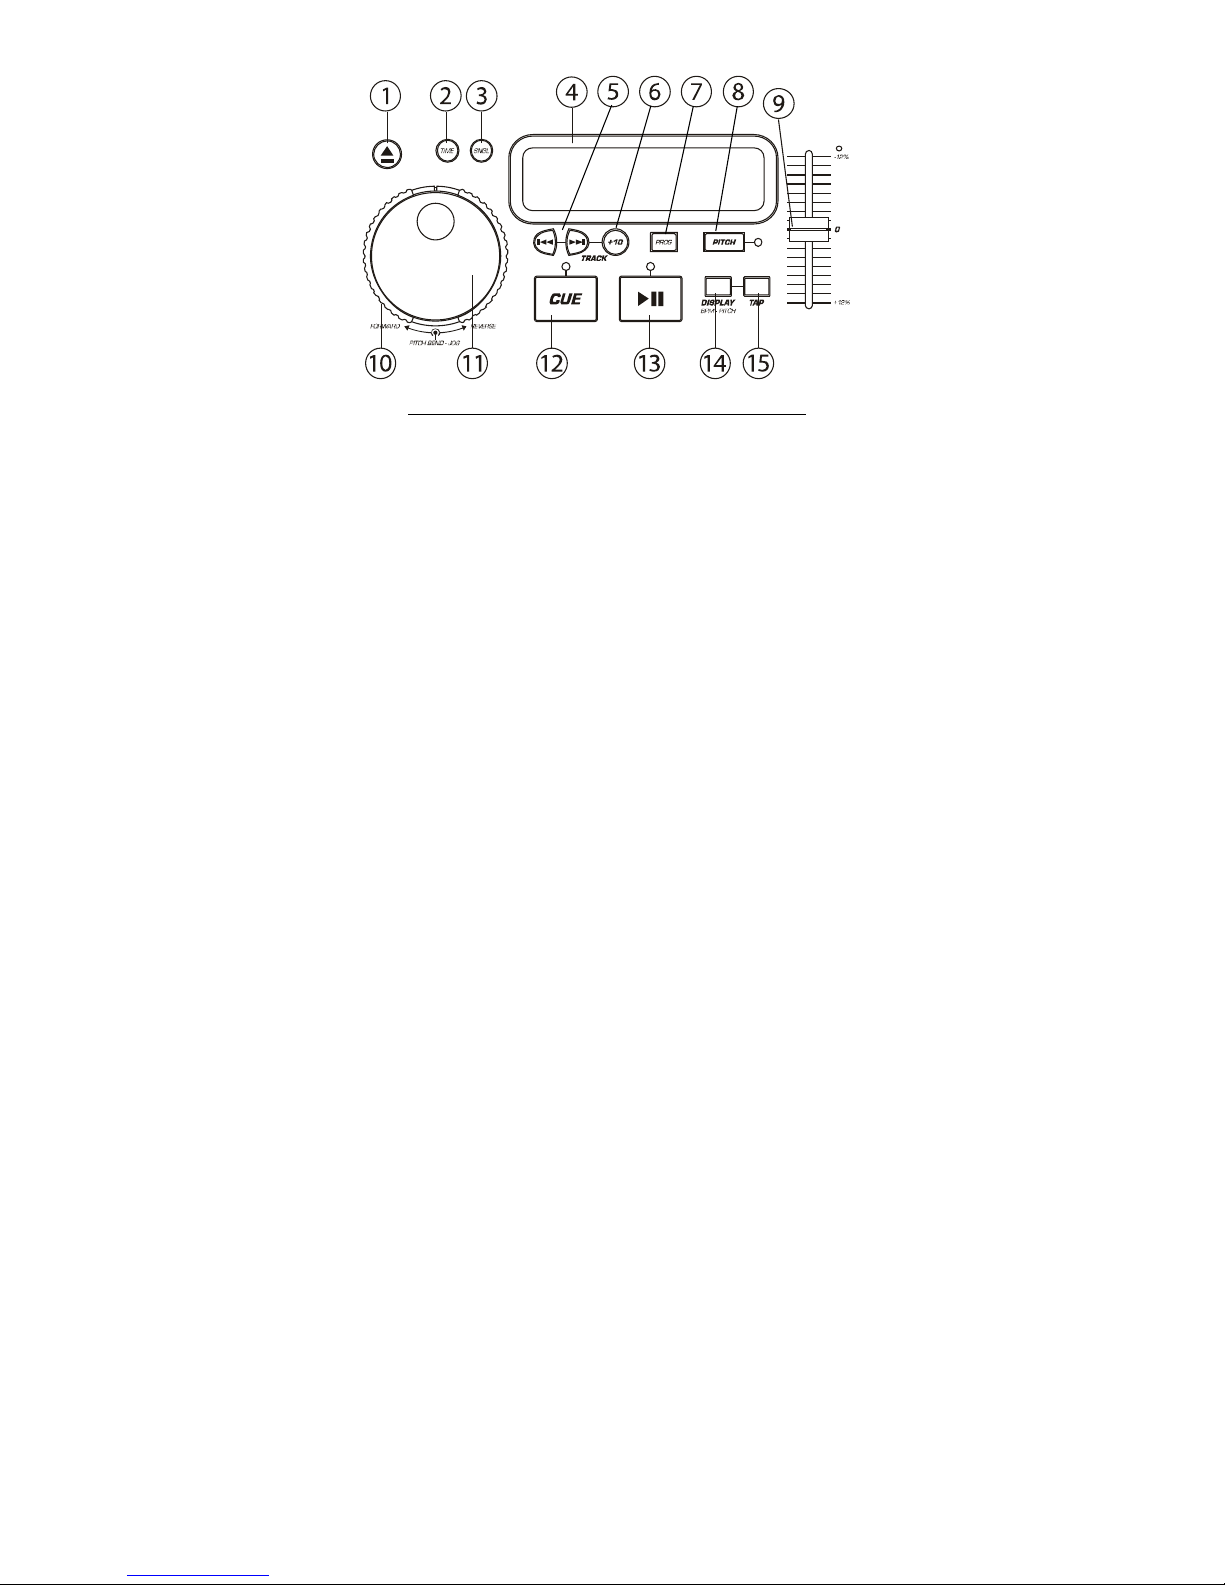
4. LCD DISPLAY - Indicates all the functions,
as they are occurring, with the CD. These
functions are explained in the next section.
5. TRACK (Track Buttons) - Used to select
the track to be played.
6. Track 10 Button - This button is for
quickly advancing to higher tracks on a CD.
7. PROGRAM - Depress this button and the
unit will stop and the program indicator will
light. Select each track to be programmed
and press the PROGRAM button between
selections. You can program up to 30
tracks. Press PLAY to start the program.
To exit and erase program, either hold the
program button down for more than 2
seconds while the unit is stopped, open the
disc tray, or turn off the power.
8. PITCH (Pitch Button) - Activates the
Pitch Slider.
9. PITCH SLIDER - The pitch can be changed
up to +/-12% by pressing the PITCH
button so the PITCH LED is lit, then moving
the sliding fader. The pitch will not be
changed if the PITCH LED is off.
10. SEARCH WHEEL (OUTER RING) - 3
forward and 3 reverse speed positions for
searching through songs. The more you
turn the wheel in either direction the faster
you search through the music.
11. PITCH BEND/JOG WHEEL (INNER
RING) - The jog wheel serves 2 functions
depending on the current mode.
a) The jog wheel will control a slow
frame search when the CD is not
playing. To set a new frame cue
point, spin the wheel then press play
when you have determined the
proper position. Press CUE to return
to the “CUE POINT”.
b) When both CD players are playing a
CD, the pitch bend function allows
the positioning of the bass beats to
be matched after the pitch of each
disc is matched. Either player can
“catch up” or “fall back” to match the
other player. The jog wheel will
temporarily bend the pitch of the
music if the song is already playing
by rotating the wheel clockwise to
speed up or counterclockwise to slow
down. By changing the pitch of one
disc with respect to the pitch of the
other disc, the beats can be matched.
12. CUE - Pressing the CUE button during play
provides a return to the position at which
play was started. If PAUSE is used before
CUE, that will become the cue point.
Alternately pressing the PLAY button and
the CUE button allows the CD to be played
from the same position any number of
times. The CUE LED will light up from the
time the CUE button is pressed until the CD
has been reset to the position at which play
was started. Steady lighting of this LED
indicates the ready condition.
13. START/PAUSE (Play/Pause Button) -
Each press of the Play/Pause Button causes
the operation to change from play to pause
or from pause to play.
14. BPM/PITCH BUTTON - Switches the
mode of the display between showing the
BPM and the percentage change in pitch.
15. TAP BUTTON - Tap this button with the
beat of the music to determine the current
Beats Per Minute (BPM).
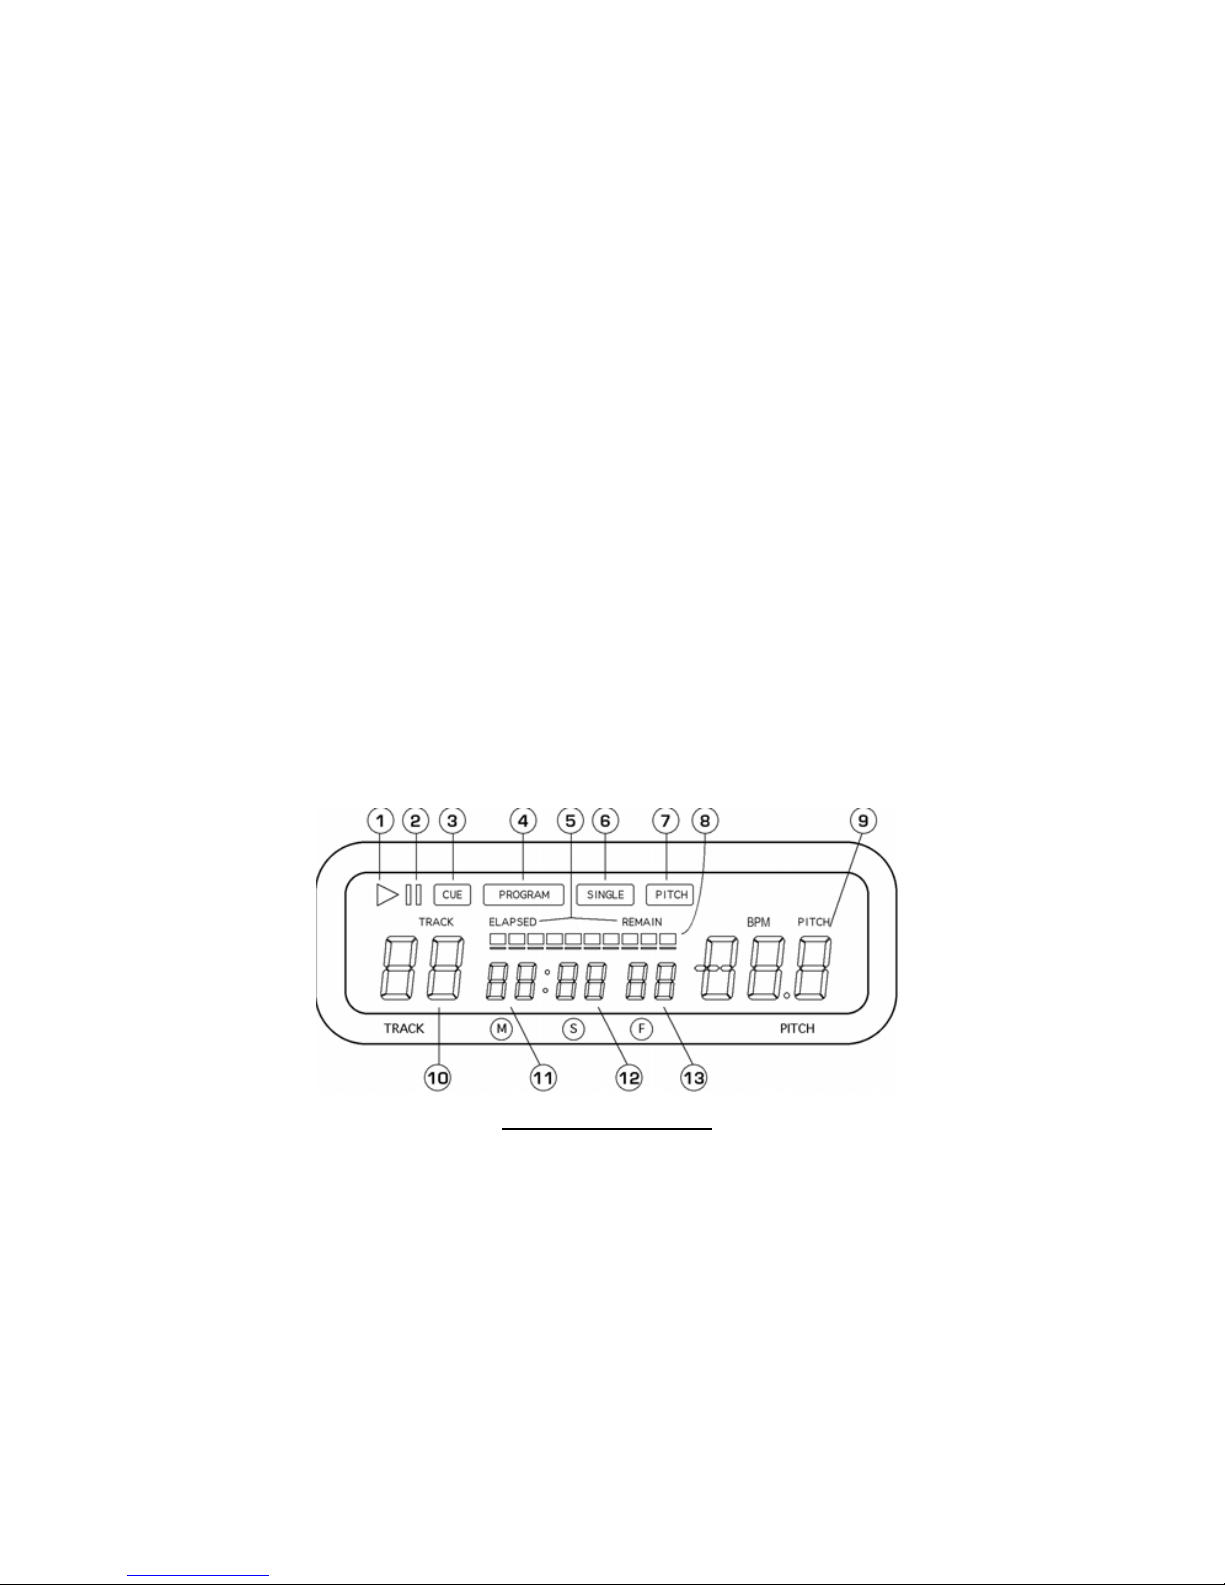
LCD DISPLAY FEATURES
1. PLAY: Active while the unit is actually playing a
CD.
2. PAUSE: Active when the unit is paused.
3. CUE: Flashing when the unit is setting a cue
point. Lit continuously when the unit is paused
at a cue point.
4. PROGRAM: Used for pre-programming the
track order to automatically be played by the
unit. This is a great function if you need to
leave the CD player alone.
5. TIME MODE: (Elapsed) is for showing time as it
is taking place.(Remain) shows how much time
is left on a particular track. This function is
controlled by the TIME BUTTON.
6. SINGLE: Shows when the unit is set to play
just one track at a time. When this is not lit, the
CD will play continuously through all tracks. This
function is controlled by the SING/CONT
BUTTON.
7. PITCH: Is lit when the PITCH BUTTON is
active.
8. TIME BAR: Shows either time remaining
or elapsed depending on the setting of the
TIME BUTTON.
9. PITCH/BPM: Shows the percentage
change in pitch or current BPM.
10. TRACK: Shows the current track that the
unit is playing.
11. MINUTES: Shows the minutes elapsed or
remaining depending on mode setting.
12. SECONDS: Shows the seconds elapsed or
remaining depending on mode setting.
13. FRAMES: The CD Player breaks down a
second into 75 frames for accurate cueing.
This shows the frames elapsed or
remaining depending on mode setting.

PLAY / PAUSE & CUE OPERATIONS
PLAY & CUE
Back Cue Operation
Play Interval
Press "PLAY/PAUSE"
to start music Press "CUE" return to
last starting point
Position on Disc
Pressing the “PLAY/PAUSE” button starts the disc. Pressing the “CUE” button will reset the disc to the last place
where the disc was started. This is called the cue point. By alternately pressing the “PLAY/PAUSE” button and
the “CUE” button, the disc may be returned and played from the cue point any number of times. This function
is called back cue.
PLAY, PAUSE & CUE
Back Cue Operation
Play Interval Play Interval
Press "PLAY/PAUSE"
to start music Press "PLAY/PAUSE"
to start music Press "CUE" return t
o
last starting point
Press "PLAY/PAUSE"
to pause music
Position on Disc
When play has been paused and then started again, the return position for the back cue will be updated to this
new position.
EDITING CUE POINT
Back Cue Operation
Play Interval
Press "PLAY/PAUSE"
to start music
Adjust the "CUE" point
with the jog wheel
Press "CUE" return to
last starting point
Position on Disc
When the inner dial is turned while a cue point is set, a new cue point can be located. The CD player will repeatedly
play small parts of the CD as you move it to the desired position. By pressing “PLAY/PAUSE” then “CUE” you can
confirm that the new cue point is desirable.
MATCHING THE BEATS PER MINUTE
Match the tempo by monitoring the music of both PLAYER 1 and PLAYER 2 by ear and adjusting the pitch.
When the tempo of the music of the selected CD player is slow compared to the tempo of the other player,
move the slider to the ( + ) side and match the tempo. When faster, move the pitch slider to the ( - ) side. The
following illustration shows the case of matching the pitch of PLAYER 2 to the pitch of the music being played on
PLAYER 1.
1. Press PLAY/PAUSE to start PLAYER 1.
PLAYER 1 is playing
2. Press PLAY/PAUSE to start PLAYER 2
Both CD players are playing discs.
3. Listen to PLAYER 2 in your headphones. If the beat of channel 2 (in the headphones) is
faster than channel 1, slow down the beat of channel 2 using the pitch control.
4. If the beat of channel 2 (in the headphones) slower than the beat of channel 1, speed
up the beat using the pitch control.

USING THE BPM DISPLAY FEATURE
Press the BPM button to select the BPM feature on the display on the side of the CD player that you wish to
set. Tap the Counter button to the beat of the music.
You will see the BPM number appear in the display. The more times you tap the more accurate your number
will be. When you adjust the pitch slider the display number will change by an equal percentage.
BEAT MATCHING USING PITCH BEND
If you find the BPM’s (Beats Per Minute or Tempos) are the same, however, the drum beats are not matched
you will need to temporarily change the pitch. The illustration below shows how to match the beat of PLAYER
2 to the beat of the music being played on PLAYER 1. (This procedure can be done on either PLAYER).
After matching the BPM’s adjust the pitch temporarily as follows:
When PLAYER 2 is rotate the jog wheel counter
clockwise
When PLAYER 2 is behind rotate the jog wheel
clockwise
The pitch changes automatically while the jog wheel is rotated. The faster you rotate the wheel the more you
change. Releasing the wheel results in a return to the original pitch. (So the BPM’s are once again the same.)
EXAMPLE OF MIXING USING BOTH PLAYERS OF YOUR CD PLAYER
While playing a disc on PLAYER 1, load a disc into PLAYER 2 and select your next track, match its pitch to the
track playing on PLAYER1 and when you are ready use the crossfader on your mixer to fade from PLAYER 1 to
PLAYER 2.
PLAYER 1
Load a disc and press the
OPEN/CLOSE button.
PLAYER 2
Load a disc and press the
OPEN/CLOSE button.
PLAYER 2
Press the Pause button ofPLAYER 2.
PLAYER 2
Listen with the monitor and
press the play button.
PLAYER 2
With a matching downbeat from
Player 1 press the playbutton.
PLAYER 1
Select the track to be played.
PLAYER 2
Select the track to be played.
PLAYER 2
Rapidly search for a cue point using
the outer wheel
PLAYER 2
Press the cue button then playto be
sure ofthe set cue point.
PLAYER 2
If you are beat mixing, turn on your
Pitch adjust and follow the directions
for beat matching.
Load a disc in PLAYER 1 and
select the track and press PLAY.
Load a disc in PLAYER 2 and
select the track then play.
Set and edit a start cue point on
PLAYER 2
Check your new cue point
Do a MIX!
PLAYER 1
Press the PLAY button
PLAYER 2
Press the PLAY button
PLAYER 2
Slowly set the right cue point
using the inner wheel
PLAYER 2
Reset the player to the Cue point
by pressing Cue
MIXER
Whenyouarehappywithyourmix
move the crossfader accordingly.

INSTALACIÓN RÁPIDA DE LA ESTACIÓN DIGITAL PARA DJ (ESPAÑOL)
1. Asegúrese de que todos los artículos incluidos
al inicio de este manual están incluidos en la
caja.
2. LEA EL FOLLETO DE INSTRUCCIONES DE
SEGURIDAD ANTES DE UTILIZAR EL
PRODUCTO.
3. Estudie este diagrama de instalación.
4. Coloque la ESTACIÓN DIGITAL PARA DJ en una
posición adecuada para su funcionamiento.
5. Asegúrese de que todos los dispositivos están
apagados y de que todos los faders y
potenciómetros de ganancia están en posición
“cero”.
6. Conecte todas las fuentes de entrada al estéreo
como se indica en el diagrama.
7. Conecte las salidas del estéreo a los
amplificadores de alimentación, unidades de
cinta magnética y/o otras fuentes de audio.
8. Enchufe todos los dispositivos al suministro de
corriente alterna.
9. Prenda todo en el siguiente orden:
•fuentes de entrada de audio (por ej.
giradiscos o reproductores de CD)
•ESTACIÓN DIGITAL PARA DJ
•por último, cualquier amplificador o
dispositivo de salida
10. Al apagar, realice siempre esta operación al
contrario:
•apague los amplificadores
•ESTACIÓN DIGITAL PARA DJ
•por último, cualquier dispositivo de
entrada
11. Visite http://www.ion-audio.com para registrar
el producto.
Puede encontrar más información sobre este
producto al visitar http://www.ion-audio.com
CONEXIONES TRASERAS
1. Entradas de canal: Jacks RCA no balanceados
para la conexión de fuentes externas. La salida
de Phono/Línea es seleccionada utilizando el
interruptor de palanca del panel delantero.
Giradiscos, reproductores de video de alta
fidelidad (HiFi), casetes y unidades de cinta
magnética reel-to-reel, máquinas DAT (Digital
Audio Tape), reproductores de CD, discos láser,
sintonizadores e incluso sintetizadores u otros
instrumentos pueden ser conectados utilizando
estos jacks. NOTA: Enchufe las fuentes de
audio mono en ambas entradas, derecha e
izquierda, usando un cable conector tipo “Y”.
2. GND: Este conector de tornillo debe ser usado
para conectar cualquier giradiscos u otro

dispositivo que tiene que ser conectado a
tierra.
3. Interruptor selector de entrada: Haga uso
de este interruptor para dejar que el equipo de
nivel de línea o nivel de phono pueda ser
enchufado en sus entradas de canal. Cuando se
seleccione la entrada de phono, su señal
introducida directamente a los pre-
amplificadores phono RIAA de alta calidad.
Utilice esta posición solo para giradiscos. Las
Fuentes de nivel de línea sobrecargarán los
pre-amplificadores de phono sensibles y tendrá
un sonido de muy mala calidad, así que
asegúrese siempre de conmutar el interruptor
de línea/phono a línea antes de conectar las
fuentes de línea.
4. Salida de grabación: Esta salida RCA es para
conectar un dispositivo de registro como una
unidad de cinta magnética o grabador de CD. El
nivel de la salida de registro se basa en los
niveles de pre master.
5. Salida Master (RCA): Esta salida sirve para
conectar un dispositivo de monitorización
externo como, por ejemplo, un sistema de
megafonía, monitores de potencia o un estéreo.
El nivel de la señal de salida del área de
estéreo está controlado por el master fader.
6. Salida de micro (Mic): Enchufe su micrófono
de ¼” aquí.
7. AC In (Entrada de corriente alterna): Esta
estación de mezclas está diseñada para
trabajar con el cable de suministro de
alimentación que acompaña a la unidad.
Mientras que la alimentación esté apagada,
enchufe primero el suministro de alimentación
a la estación de mezclas y luego enchúfelo a la
toma de corriente.
8. Interruptor de alimentación: Use este
conmutador para prender la estación de
mezclas después de que todos los dispositivos
de entrada hayan sido conectados para evitar
daño a su equipo. Prenda la estación de
mezclas antes de prender los amplificadores y
apague los amplificadores antes de apagar la
estación de mezclas.
3
LAS CARACTERÍSTICAS DEL PANEL FRONTAL
1. Fader de entrada: Controla los niveles de
fuente individuales del mezclador.
2. Interruptor de palanca de entrada:
3. Crossfader reemplazable – Consigue segues
limpios entre los dos canales de entrada.
“Completamente hacia la izquierda” selecciona
el canal 1. “Completamente hacia la derecha”
selecciona el canal 2. Con el crossfader en el
centro, ambos canales están activos. Use el
crossfader para segues rápidas y uniformes de
un canal seleccionado a otro.
Nota: El crossfader puede ser reemplazado por
el usuario en caso de fallo. Simplemente,
desatornille los dos tornillos grandes que lo
sujetan, sáquelo hacia fuera y desconecte el
cable. Vuelva a sujetar el nuevo crossfader y
atornille la placa de montaje de nuevo en la
unidad – ¡ya puede volver al trabajo!
4. Activador del Fader (Start) – La activación
le permite poner los reproductores de CD en
funcionamiento desde su crossfader. Al
desplazarlo de izquierda a derecha, activará el
reproductor de CD de la derecha y desactivará
el reproductor de CD de la izquierda.
5. Fader de entrada de micro – Ajusta el nivel
del micrófono.
6. Palanca de encendido/apagado del micro
– Pone el micrófono en funcionamiento.
7. Master Fader – Controla el nivel de salida
global.
8. Palanca de estéreo/mono/cancell vocal –
Cambia la salida del master entre mono y
estéreo. Escoja también cancell vocal
9. Ecualizador de estéreo - Ajusta la
ecualización final de salida del master de los
agudos, medios y graves.
10. MEDIDOR LED – Indica el nivel de salida del
master.
11. Selector de Cue de canal – Utilizado para
enviar audio de canal a sus auriculares.
12. Nivel de auriculares- Ajusta el volumen de
cue.
13. Conector de auriculares – Utilizado para
conectar clavijas de 1/8” o 1/4” para el
monitoreo de audio con los auriculares.

CARACTERÍSTICAS DEL REPRODUCTOR DE CD
1. ABRIR/CERRAR (Bandeja de disco
Abrir/Cerrar) – Púlselo para introducir o
expulsar el disco. Cada vez que lo pulse se
abrirá o cerrará la bandeja del disco en la
unidad. NOTA: La bandeja no se abrirá a
menos que el disco haya sido detenido. La
bandeja se cerrará automáticamente a los 30
segundos.
2. TIME (Botón de tiempo) – Cambia la
visualización del tiempo entre el tiempo de
reproducción transcurrido y el tiempo restante
en la pista y el tiempo restante en todo el CD.
3. CONT/SING – Al pulsar una o dos veces, hará
que se reproduzcan una o todas las pistas en
orden.
4. PANTALLA LCD – Indica todas las funciones
del CD a medida que van teniendo lugar. Estas
funciones se explican en la siguiente sección.
5. TRACK (Botones de pista) – Utilizados para
seleccionar la pista que se va a reproducir.
6. Botón de pista 10 – Este botón es utilizado
para avanzar rápidamente en las pistas del CD.
7. PROGRAMA – Pulse este botón y la unidad se
detendrá y el indicador de programa se
iluminará. Seleccione todas las pistas que
desee programar y pulse el botón de
PROGRAMA entre cada selección. Podrá
programar hasta 30 pistas. Pulse PLAY para
activar el programa. Para salir y borrar el
programa, mantenga pulsado el botón de
programa durante más de 2 segundos mientras
la unidad está parada, abra la bandeja del
disco, o apague la fuente de alimentación.
8. PITCH (Botón de Pitch) – Activa el deslizador
de tono (pitch).
9. DESLIZADOR DEL PITCH – El pitch puede
variar hasta un +/-12% pulsando el botón del
PITCH de modo que el LED del pitch esté
iluminado; tras esto, deslizando el fader. El
pitch no variará si el LED del pitch está
apagado (OFF).
10. SEARCH WHEEL (RUEDA EXTERIOR) – esta
rueda dispone de 3 posiciones de velocidad de
avance y 3 de reverso para buscar dentro de
las canciones. Cuanto más gire la rueda en
cualquiera de las dos direcciones, más rápida
será la búsqueda.
11. PITCH BEND/JOG WHEEL (RUEDA
INTERIOR) – Esta rueda de avance lento tiene
2 funciones dependiendo del modo en el que se
encuentre.
a) La rueda de avance lento controlará una
búsqueda de frames lentos cuando el CD
no se esté reproduciendo. Para
determinar un nuevo punto cue de
frame, gire la rueda y pulse PLAY una
vez que haya determinado la posición
adecuada. Pulse CUE para volver al
“PUNTO CUE”.
b) Cuando ambos reproductores de CD
están reproduciendo un CD, la función
pitch bend permite el posicionamiento de
los beats de graves para que coincidan
una vez que el pitch de cada disco
coincide. Cualquiera de los reproductores
puede “adelantarse” o “atrasarse” para
coincidir con el otro reproductor. La
rueda de avance lento (jog wheel)
cambiará provisionalmente el tono de la
música si la canción se está
reproduciendo girando la rueda en el
sentido de las agujas del reloj para
acelerar o en el sentido contrario para
ralentizar. Cambiando el tono de un
disco con respecto al tono del otro disco,
los beats pueden ser igualados.
12. CUE – Al pulsar el botón de CUE durante la
reproducción, se volverá a la posición a la cual
comenzó la reproducción. Si se activa la PAUSA
antes del CUE, esto se convertirá en un punto
cue. Si se presionan alternativamente los
botones PLAY y CUE, el CD será reproducido
desde la misma posición cuantas veces se
desee. El LED del CUE se iluminará desde el
momento en que se pulse el botón de CUE
hasta que el CD haya sido reiniciado a la
posición a la que se comenzó la reproducción.
Una iluminación continua de este LED indica
que el CUE está listo.
13. START/PAUSE (Botón de
reproducción/pausa) –Cada vez que se
pulsa el botón de reproducción/pausa esto hace
que se cambie de reproducción a pausa o de
pausa a reproducción.
14. BOTÓN DE BPM/PITCH – Alterna el modo de
la pantalla entre la visualización de los BPM y el
porcentaje de cambio en el tono (pitch).
15. BOTÓN DE TAP – Golpee este botón con el
beat de la música para determinar los beats
por minuto (BPM) en ese momento.

Características de la pantalla LCD
1. PLAY: Está activo si la unidad está
reproduciendo un CD en ese momento.
2. PAUSE: Está activo si la unidad está en pausa.
3. CUE: Parpadea si la unidad está determinando
un punto cue. Se ilumina de forma continua si
la unidad está detenida en un punto cue.
4. PROGRAMA: Se utiliza para programar con
antelación el orden de las pistas que van a ser
reproducidas automáticamente por la unidad.
Esta es una función de gran utilidad si necesita
dejar alejarse del reproductor de CD.
5. MODO DE TIEMPO: “Transcurrido” muestra el
tiempo a medida que va teniendo lugar;
“restante” muestra cuánto tiempo queda en
una pista determinada. Esta función se controla
mediante el botón de TIEMPO (TIME).
6. SINGLE: Muestra cuando la unidad está
configurada para reproducir las pistas de una
en una. Cuando no esté encendido, el CD se
reproducirá todas las pistas de forma continua.
Esta función se controla mediante el botón de
SING/CONT.
7. PITCH: Está iluminado cuando el botón de
tono (pitch) está activado.
8. BARRA DE TIEMPO: Muestra el tiempo
restante o transcurrido dependiendo de la
configuración del botón de tiempo.
9. PITCH/BPM: Muestra el porcentaje de
cambio del tono (pitch) o las BPM en ese
momento.
10. TRACK (PISTA): Muestra la pista que la
unidad está reproduciendo en ese momento.
11. MINUTOS: Muestra los minutos restantes o
transcurridos dependiendo de la configuración
del modo.
12. SEGUNDOS: Muestra los segundos restantes o
transcurridos dependiendo de la configuración
del modo.
13. FRAMES: El reproductor de CD divide un
segundo en 75 frames para un cueing más
preciso. Muestra los frames restantes o
transcurridos dependiendo de la configuración
del modo.
OPERACIONES DE PLAY/PAUSA Y CUE
PLAY (REPRODUCCIÓN) Y CUE
Pulsando el botón de “PLAY/PAUSE” se pondrá el disco en funcionamiento. Pulsando el botón "CUE" se el disco comenzará
de nuevo en la misma posición en la que comenzó anteriormente. Esto es lo que se llama punto cue. Pulsando los botones
de “PLAY/PAUSE” y “CUE” alternativamente, el disco podrá volver al mismo punto cue y reproducirse cuantas veces
desee. Esta función se denomina back cue.
PLAY, PAUSE Y CUE
Cuando la reproducción se haya detenido y comenzado de nuevo, la posición de retorno para el back cue será actualizada a la
nueva posición.

MODIFICACIÓN DEL PUNTO CUE
Si la rueda interna se gira cuando se establece un punto cue, podrá hallarse un nuevo punto cue. El reproductor de CD
reproducirá repetidamente fragmentos cortos del CD a medida que lo mueve a la posición deseada. Pulsando “PLAY/PAUSE” y
luego “CUE” podrá confirmar que el nuevo punto cue es el que usted desea.
Igualar los beats por minuto
Iguale el tempo monitoreando la música del reproductor 1 y 2 de oído y ajustando el pitch. Cuando el tempo de la
música del reproductor de CD seleccionado sea lento comparado con el del otro reproductor, desplace el deslizador
hacia el (+) e iguale el tempo. Cuando sea más rápido, desplace el pitch hacia (-). La siguiente ilustración muestra el
caso en el que se iguala el pitch del reproductor 2 con el pitch de la música reproducida por el
reproductor1.
1. Pulse PLAY/PLAUSE para que comience el reproductor 1.
El reproductor 1 está en marcha.
2. Pulse PLAY/PLAUSE para que comience el reproductor 2.
Ambos reproductores de CD están en funcionamiento.
3. Escuche el reproductor 2 en sus auriculares. Si el beat del canal 2 (en los auriculares) es más
rápido que el del canal 1, ralentice el beat del canal 2 por medio del control del pitch.
4. Si el beat del canal 2 (en los auriculares) es más lento que el beat del canal 1, acelere el beat por
medio del control del pitch.
USO DE LA CARACTERÍSTICA DE VISUALIZACIÓN DE LOS BPM
Pulse el botón de BPM para seleccionar la función de BPM que desea configurar en la pantalla situada en el lateral del
reproductor de CD. Golpee el botón de Counter al ritmo (beat) de la música.
Observará que aparece el número de BPM en la pantalla. Cuantas más veces golpee, más preciso será el número.
Cuando ajuste el deslizador del pitch, el número mostrado cambiará por un porcentaje equivalente.
IGUALACIÓN DEL BEAT HACIENDO USO DEL PITCH BEND
Aunque observe que los BPM (Beats por minuto o tempos) son iguales, sin embargo, los beats de la batería no se
corresponden y necesitará cambiar el pitch provisionalmente. La ilustración siguiente muestra cómo igualar el beat del
reproductor 2 al beat de la música que está sonando en el reproductor 1. (Este procedimiento puede realizarse en
cualquiera de los reproductores).
Una vez haya igualado los BPM, ajuste el pitch provisionalmente como se muestra a continuación:
Cuando el reproductor 2 esté adelantado, gire la
rueda de avance lento (jog wheel) en el sentido
contrario a las agujas del reloj
Cuando el reproductor 2 esté retrasado, gire la rueda
de avance lento (jog wheel) en el sentido de las
agujas del reloj

El pitch cambia de forma automática a medida que se gira la rueda de avance lento. Cuanto más rápido gire la rueda,
más cambiará. Si se suelta la rueda, se volverá al pitch original. (De modo que los BPM son de nuevo los mismos).
EJEMPLO DE MEZCLA UTILIZANDO AMBOS REPRODUCTORES DE SU REPRODUCTOR DE CD
Mientras reproduce un disco en el reproductor 1, inserte un disco en el reproductor 2 y seleccione la siguiente pista,
iguale el pitch con el de la pista del reproductor 1 y, cuando esté listo, use el crossfader de su mezclador para pasar
lentamente del reproductor 1 al reproductor 2.

DIGITALE DJ-STATION SCHNELLAUFBAU (DEUTSCH)
1. Versichern Sie sich, daß alle auf der Vorderseite
dieser Anleitung aufgeführten Gegenstände in
der Schachtel enthalten sind.
2. LESEN SIE DIE SICHERHEITSHINWEISE,
BEVOR SIE DAS PRODUKT IN BETRIEB
NEHMEN.
3. Sehen Sie sich dieses Aufbaudiagramm genau
an.
4. Stellen Sie das DIGITALE DJ-STATION an eine
für den Betrieb geeignete Stelle.
5. Stellen Sie sicher, daß alle Geräte
ausgeschaltet sind und alle Blendregler und
Drehknöpfe auf "null” stehen
6. Schließen Sie alle Stereo-Eingabequellen wie im
Diagramm gezeigt an.
7. Verbinden Sie die Stereo-Ausgabekanäle mit
dem/den Verstärker/n, Kassettendecks
und/oder anderen Tonquellen.
8. Schliessen Sie alle Geräte an den
Wechselstromkreis an.
9. Schalten Sie alles in der folgenden Reihenfolge
ein:
•Toneingabequellen (z.B. Plattenspieler
oder CD-Spieler)
•DIGITALE DJ-STATION
•zuletzt jegliche Verstärker oder
Ausgabegeräte
10. Beim Ausschalten, drehen Sie diese Reihenfolge
jeweils um, indem Sie:
•die Verstärker ausschalten
•dann den DIGITALE DJ-STATION
•zuletzt alle Eingabequellen
11. Besuchen Sie die Webseite http://www.ion-
audio.com, um Ihr Produkt zu registrieren.
Weitere Informationen über dieses Produkt
können unter der Adresse http://www.ion-
audio.com gefunden werden
ANSCHLÜSSE RÜCKSEITE
1. Kanalanschlüsse: Unbalancierte RCA-Buchsen
zum Anschluss von externen Quellen. Der
Phono/Line-Anschluss wird über den
Kippschalter an der Vorderseite des Gerätes
selektiert. Plattenspieler, HiFi VCRs, Kassetten-
und Tonbanddecks, DAT-Maschinen, CD-
Spieler, Laser Discs, Tuner, sogar Synthesizer
oder andere Mix-Bedienpulte können über diese
Buchsen angeschlossen werden. HINWEIS:
Schliessen Sie Mono-Tonquellen mit einer "Y”-
Kabelverbindung an die linken und rechten
Anschlüsse an.

2. GND: Diese Schraubverbindung sollte zum
Anschluss jeglicher Plattenspieler oder anderer
Geräte, welche geerdet weden müssen,
verwendet werden.
3. Eingabeauswahlschalter: Verwenden Sie
diesen, um entweder Line-Pegel oder Phono-
Pegel Geräte an Ihre Kanalanschlüsse
anzuschliessen. Wenn Phonoeingabe angewählt
ist, wird Ihr Signal direkt durch die
Hochqualitäts-RIAA Phono-Vorverstärker
geleitet. Verwenden Sie diese Auswahl nur für
Plattenspieler. Line-Pegelquellen führen zu
einer Überlastung der sensiblen
Phonovorverstärker und werden sehr
schlechten Klang erzeugen, versicheren Sie sich
also, daß der Line-/Phono-Schalter auf Line
gestellt ist, bevor Sie Line-Quellen
anschliessen.
4. Aufnahmeausgabe: Diese RCA-Ausgabe dient
zum Anschluss eines Aufnahmegerätes, wie
z.B. eines Kassettendecks oder eines CD-
Recorders. Der Pegel der Aufnahmeausgabe
basiert auf dem Pegel vor dem Master.
5. Master-Ausgabe (RCA): Diese Ausgabe dient
zum Anschluß von externen Monitoren, wie z.
B. einer PA, Aktivmonitoren oder einer Heim-
Stereoanlage. Der Pegel des Master-
Stereoausgabesignals wird vom Master-
Blendregler gesteuert.
6. Mikrofoneingang: Schliessen Sie hier Ihren
1/4”-Mikrofonstecker an.
7. Wechselstromanschluß: Dieses Mix-
Bedienpult ist für den Betrieb mit dem
mitgelieferten Stromkabel entworfen. Mit dem
Gerät in ausgeschaltetem Zustand, schliessen
Sie die Stromversorgung erst an das Mix-
Bedienpult und dann an die Steckdose an.
8. EIN/AUS-Schalter: Verwenden Sie diesen
Schalter, um das Gerät einzuschalten, nachdem
alle Eingabegeräte bereits angeschlossen sind,
um Ihre Ausrüstung vor Beschädigung zu
schützen. Schalten Sie das Bedienpult ein,
bevor Sie den/die Verstärker einschalten und
schalten Sie den/die Verstärker aus, bevor Sie
das Bedienpult ausschalten.
3
BEDIENUNGSELEMENTE VORDERSEITE
1. Eingabe-Blendregler: Steuert die Pegel der
individuellen Quellen im Mix.
2. Eingabe-Kippschalter – Selektiert die Live-
Quelle für diesen Kanal, abhängig davon,
welche Geräte Sie im Eingabebereich an der
Rückseite angeschlossen haben
3. Austauschbarer Überblendregler –
Ermöglicht saubere Übergänge zwischen den
zwei Eingabekanälen. "Ganz links" wählt Kanal
1 an. "Ganz rechts" wählt Kanal 2. Wenn der
Überblendregler in der Mitte steht, sind beide
zugeordneten Kanäle live. Benutzen Sie den
Überblendregler für schnelle und nahtlose
Übergänge von einem gewählten Kanal zum
anderen
HINWEIS: Der Überblendregler kann vom
Benutzer bei Defekt ausgewechselt werden.
Lösen Sie lediglich die zwei großen
Befestigungsschrauben, heben Sie ihn heraus
und ziehen Sie das Kabel aus dem Regler.
Stecken Sie den neuen Überblendregler ein und
schrauben Sie die Trägerplatte wieder an das
Gerät - und schon geht’s weiter!
4. Blendregler-Start – Falls dieser aktiviert ist,
können Sie die CD-Spieler von Ihrem
Überblendregler aus starten. Wenn von links
nach rechts geschoben wird, wird der rechte
CD-Spieler gestartet und der linke CD-Spieler
pausiert
5. Mikrofon-Eingabeblendregler – Steuert den
Mikrofonpegel.
6. Mikrofon Ein-/Aus- Schalter – Schaltet das
Mikrofon ein/aus.
7. Master-Blendregler – Steuert den gesamten
Ausgabepegel.
8. Stereo/Mono-Umschalter/ Stimmlich
cancell – Umschalten der Master-Ausgabe
zwischen Mono und Stereo. Auch wählt
stimmlichen cancell aus
9. Stereo-EQ – Einstellung der Entzerrung von
Höhen, Mitten und Bässen für die endgültige
Master-Ausgabe.
10. LED ANZEIGE – Zeigt den Pegel der Master-
Ausgabe an.
11. Kanal-Cue-Auswahlschalter – Wird dazu
benutzt, den Kanal auf Ihrem Kopfhörer hörbar
zu machen.
12. Kopfhörerpegel – Stellt die Cue-Lautstärke
ein.
13. Kopfhörerbuchsen – Werden zum Anschluss
von entweder 1/8” oder 1/4”
Steckverbindungen zum Ton-Monitoring mit
Kopfhörer verwendet.

CD-SPIELER BEDIENELEMENTE
1. AUF/ZU (Disc-Einlegevorrichtung Auf/Zu)
– Drücken Sie hier, um die Disc einzulegen
oder herauszunehmen. Jedes Betätigen wird
die Einlegevorrichtung auf der Schiene öffnen
oder schliessen. HINWEIS: Die
Einlegevorrichtung öffnet nur dann, wenn die
CD pausiert ist. Die Einlegevorrichtung
schliesst nach 30 Sekunden automatisch.
2. ZEIT (Zeittaste) – Schaltet die Zeitanzeige
zwischen vergangener Abspielzeit,
verbleibender Abspielzeit des Titels und
verbleibender Abspielzeit der gesamten CD..
3. KONT/EINZ – Bei einmaligem oder
mehrfachem Drücken, spielt das Gerät nur
einen Titel oder alle Titel nacheinander ab.
4. LCD-ANZEIGE- Zeigt alle CD-Funktionen
während des Ablaufs an. Diese Funktionen
werden im nächsten Abschnitt erläutert.
5. TITEL (Titeltasten) - Diese Tasten werden
benutzt, um den Titel, welcher gespielt werden
soll, auszuwählen.
6. Titel-10-Taste – Diese Taste dient zum
schnellen Anwählen von höher numerierten
Titeln auf der CD.
7. PROGRAMM – Drücken Sie diese Taste
herunter, wird das Gerät anhalten und die
Programmanzeige leuchtet auf. Wählen Sie alle
Titel, welche in das Programm aufgenommen
werden sollen, aus und drücken Sie die
PROGRAMM-Taste nach jeder Wahl. Sie
können bis zu 30 Titel vorprogrammieren.
Drücken Sie PLAY, um das Programm zu
starten. Um aus dem Programm auszusteigen
oder es zu löschen, halten Sie entweder die
Programmtaste für mehr als 2 Sekunden
gedrückt während das Gerät gestoppt ist,
öffnen die Einlegevorrichtung oder schalten den
Strom ab.
8. TONLAGE (Tonlagentaste) – Aktiviert den
Tonlagenschieberegler.
9. TONLAGEN-SCHIEBEREGLER – Die Tonlage
kann bis zu +/-12% verändert werden, indem
man die TONLAGE-Taste drückt, so daß das
TONLAGE LED aufleuchtet und dann den
Schiebeblendregler bewegt. Die Tonlage wird
nicht verändert, wenn das TONLAGE LED nicht
aufleuhtet.
10. SUCHRAD (ÄUßERER RING) - 3 vorwärts
und 3 rückwärts Geschwindigkeitsstellungen
um Musikstücke zu durchsuchen. Je mehr das
Rad in die eine oder andere Richtung gedreht
wird, umso schneller wird das Musikstück
durchsucht.
11. TONLAGE VERÄNDERUNG/JOG-RAD
(INNERER RING) – Das Jog-Rad hat,
abhängig von der augenblicklichen Betriebsart,
2 Funktionen.
a) Während die CD nicht abgespielt wird,
kann das Jog-Rad eine langsame
Rahmensuche ausführen. Um einen
neuen Rahmen-Cue-Punkt zu setzen,
drehen Sie das Rad und drücken Sie
dann Play, sobald Sie die genaue Position
bestimmt haben. Drücken Sie CUE, um
zum “CUE POINT” zurückzukehren.
b) Falls beide CD-Spieler eine CD abspielen,
ermöglicht es die
Tonlageveränderungsfunktion, die
Position der Basstakte anzugleichen,
nachdem die Tonlage beider Discs
angeglichen wurde. Jeder der beiden
Spieler kann “aufholen” oder
“zurückfallen” um dem jeweils anderen
Spieler gleichzukommen. Das Jog-Rad
wird vorübergehend die Tonlage des
Musikstücks verändern, wenn dieses
bereits abgespielt wird, durch Drehen
des Rads im Uhrzeigersinn um schneller
zu werden oder gegen den
Uhrzeigersinn, um langsamer zu werden.
Die Takte können angeglichen werden,
indem die Tonlage einer Disc unter
Berücksichtigung der Tonlage der
anderen Disc verändert wird.
12. CUE – Drücken der CUE-Taste während des
Abspielens erzeugt eine Rückkehr zur
anfänglichen Abspielposition. Falls PAUSE vor
CUE gedrückt wird, wird dies der neue Cue-
Punkt. Abwechselndes Drücken der Tasten
PLAY und CUE führt zum beliebig oftmaligen
Abspielen der CD, angefangen von derselben
Position. Das CUE LED leuchtet ab dem
Zeitpunkt auf, in dem die CUE-Taste gedrückt
wurde, bis die CD wieder auf die Position, an
welcher das Abspielen begann, zurückgesetzt
wurde. Falls dieses LED ständig aufleuchtet,
zeigt dies Betriebsbereitschaft an.
13. START/PAUSE (Play/Pause-Taste) – Jedes
Drücken der Play/Pause-Taste schaltet
zwischen Abspielen und Pausieren und
umgekehrt um.
14. TPM/TONLAGE-TASTE – Schaltet zwischen
Anzeigeart TPM und prozentuale Veränderung
der Tonlage um.
15. TAP TASTE – Antippen dieses Knopfes im Takt
der Musik führt zur Errechnung der
augenblicklichen Takte Pro Minute (TPM).

LCD-ANZEIGEELEMENTE
1. PLAY: Aktiviert, während das Gerät eine CD
abspielt.
2. PAUSE: Aktiviert, wenn das Gerät pausiert.
3. CUE: Blinkt, wenn das Gerät einen Cue-Punkt
setzt. Leuchtet ununterbrochen, wenn das
Gerät an einem Cue-Punkt pausiert.
4. PROGRAM: Wird verwendet, um die Titelfolge,
welches das Gerät automatisch abspielen soll,
vorzuprogrammieren. Dies ist eine
hervorragende Funktion für den Fall, daß Sie
den CD-Spieler sich selbst überlassen müssen.
5. TIME MODE: (Abgelaufen) zeigt die Zeit im
tatsächlichen Abspielverlauf an.(Verbleibend)
zeigt an, wieviel Zeit für einen bestimmten Titel
verbleibt. Diese Funktion wird über die ZEIT-
Taste gesteuert.
6. SINGLE: Wird angezeigt, wenn das Gerät auf
das jeweilige Abspielen eines einzigen Titels
eingestellt ist. Falls dies nicht aufleuchtet,
werden alle Titel der CD nacheinander
abgespielt. Diese Funktion wird über die
KONT/EINZ-Taste gesteuert.
7. PITCH: Leuchtet auf, wenn die TONLAGE-
TASTE aktiviert ist.
8. TIME BAR: Zeigt entweder die verbleibende
oder die abgelaufene Zeit an, je nach
Einstellung der ZEIT-TASTE.
9. PITCH/BPM: Zeigt die prozentuale
Veränderung der Tonlage oder die
augenblicklichen TPM.
10. TRACK: Zeigt an, welchen Titel das Gerät im
Augenblick abpielt.
11. MINUTES: Zeigt entweder die vergangenen
oder verbleibenden Minuten an, je nach
Einstellung der Betriebsart.
12. SECONDS: Zeigt entweder die vergangenen
oder verbleibenden Sekunden an, je nach
Einstellung der Betriebsart.
13. FRAMES: Für exaktes Cueing unterteilt der
CD-Spieler eine Sekunde in 75 Rahmen. Zeigt
entweder die vergangenen oder verbleibenden
Rahmen an, je nach Einstellung der Betriebsart.
PLAY/PAUSE & CUE-FUNKTIONEN:
PLAY & CUE:
Ein Drücken der “PLAY/PAUSE”-Taste startet die Disc. Wird die “CUE”-Taste gedrückt, wird die Disc zum letzten
Anfangspunkt zurückgesetzt. Dies ist der Cue-Punkt. Abwechselndes Drücken der Tasten “PLAY/PAUSE” und “CUE” führt
zum beliebig oftmaligen Abspielen der CD, angefangen von derselben Position. Diese Funktion wird Rück-Cue genannt.
PLAY, PAUSE & CUE
Falls das Abspielen pausiert und dann wieder gestartet wurde, wird die Rückkehrposition für das Rück-Cue auf diese neue Position
festgelegt.

CUE PUNKT
Wird das innere Rad während des Festlegens eines Cue-Punkts gedreht, kann ein neuer Cue-Punkt gefunden werden. Der CD-
Spieler wird wiederholt kleine Teile der CD abspielen während Sie die gewünschte Position anwählen. Sie können bestätigen,
daß der neue Cue-Punkt der Gewünschte ist, indem Sie “PLAY/PAUSE” und dann “CUE” drücken.
ANGLEICHEN DER TAKTE PRO MINUTE
Gleichen Sie das Tempo an, indem Sie sowohl die Musik von SPIELER 1 als auch SPIELER 2 abhören und die Tonlage
angleichen. Falls das Tempo der Musik des gewählten CD-Spielers im Vergleich zum Tempo des anderen Spielers
langsam ist, bewegen Sie den Schieberegler auf die ( + )-Seite und passen Sie das Tempo an. Falls schneller, bewegen
Sie den Schieberegler auf die ( - )-Seite. Die folgende Abbildung zeigt den Fall, in welchem die Tonlage von SPIELER 2 der
Tonlage der Musik, welche auf SPIELER 1 abgespielt wird, angepasst wird.
1. Drücken Sie “PLAY/PAUSE”, um SPIELER 1 zu starten.
PLAYER 1 spielt
2. Drücken Sie “PLAY/PAUSE”, um SPIELER 2 zu starten.
Beide CD-Spieler spielen CDs ab.
3. Hören Sie SPIELER 2 über Ihren Kopfhörer ab. Falls der Takt auf Kanal 2 (im Kopfhörer) schneller
als der von Kanal 1 ist, verlangsamen Sie den Takt von Kanal 2 mit der Tonlagensteuerung.
4. Falls der Takt auf Kanal 2 (im Kopfhörer) langsamer als der von Kanal 1 ist, erhöhen Sie den Takt
mit der Tonlagensteuerung.
VERWENDUNG DER TPM-ANZEIGEFUNKTION
Drücken Sie die TPM-Taste, um die TPM-Funktion in der Anzeige auf der Seite jenes CD-Spielers, welchen Sie einstellen
möchten, auszuwählen. Tippen Sie die Zählertaste im Takt der Musik an.
Die TPM-Anzahl erscheint in der Anzeige. Je öfter Sie antippen, umso genauer wird diese Anzahl sein. Wenn Sie den
Tonlagen-Schieberegler einstellen, wird sich diese Anzahl um einen entsprechenden Prozentsatz ändern.
ANPASSUNG DES TAKTS DURCH DIE TONLAGENVERÄNDERUNG
Falls Sie entdecken, daß die TPMs (Takte pro Minute oder das Tempo) zwar gleich sind, doch die Trommelschläge nicht
übereinstimmen, müssen Sie vorübergehend die Tonlage verändern. Die folgende Abbildung zeigt Ihnen, wie man den
Takt von SPIELER 2 mit dem Takt der Musik, welche auf SPIELER 1 abgespielt wird, in Einklang bringt. (Dieser Vorgang
kann auf jedem der beiden SPIELER durchgeführt werden).
Nachdem Sie die TPMs in Einklang gebracht haben, verändern Sie die Tonlage wie folgt:
Falls SPIELER 2 schneller ist, drehen Sie das Jog-Rad
gegen den Uhrzeigersinn.

Falls SPIELER 2 langsamer ist, drehen Sie das Jog-
Rad im Uhrzeigersinn.
Die Tonlage verändert sich automatisch während das Jog-Rad gedreht wird. Je schneller Sie das Rad drehen, umso mehr
verändert sich die Tonlage. Ein Loslassen des Rads bringt die Musik wieder zur originalen Tonlage zurück. (Die TPMs
sind also wieder gleich.)
BEISPIELE ZUM MIXEN MIT BEIDEN CD-SPIELERN
Während SPIELER 1 eine CD abspielt, legen Sie eine Disc in SPIELER 2 und wählen Sie Ihr nächstes Musikstück aus,
bringen Sie die Tonlage in Einklang mit dem Musikstück auf SPIELER 1 und wenn Sie fertig sind, blenden Sie mit dem
Überblendregler Ihres Mixers von SPIELER 1 auf SPIELER 2 über.

MONTAGGIO RAPIDO POSTAZIONE DIGITALE PER DJ (ITALIANO)
1. Verificare che tutti gli elementi elencati
sul frontespizio di questo manuale siano
inclusi nella confezione.
2. PRIMA DI UTILIZZARE IL PRODOTTO
LEGGERE IL LIBRETTO DELLE
ISTRUZIONI DI SICUREZZA.
3. Esaminare attentamente lo schema di
montaggio.
4. Posizionare la console POSTAZIONE
DIGITALE PER DJ in modo adeguato
all’operazione.
5. Assicurarsi che tutti i dispositivi siano
spenti e che tutti i fader e le manopole di
guadagno siano a “zero”.
6. Collegare tutti gli ingressi stereo come
indicato nello schema.
7. Collegare le uscite stereo
all’amplificatore(i), alle piastre di
registrazione e/o altre sorgenti audio.
8. Collegare tutti gli apparecchi alla
corrente C.A.
9. Accendere tutto nel seguente ordine:
•sorgenti di ingresso audio (cioè le piastre
o i lettori CD)
•il POSTAZIONE DIGITALE PER DJ
•per ultimi, tutti gli amplificatori o i
dispositivi di uscita
10. Al momento dello spegnimento, invertire
sempre questa operazione,
•spegnendo gli amplificatori,
•il POSTAZIONE DIGITALE PER DJ
•per ultimi, tutti i dispositivi di ingresso
11. Andare sul sito http://www.ion-
audio.com per la registrazione del
prodotto.
Potrete trovare ulteriori informazioni relative a
questo prodotto sul sito http://www.ion-
audio.com
COLLEGAMENTI POSTERIORI
1. Ingressi Canale: Jack RCA non bilanciati per il
collegamento di sorgenti esterne. L’ingresso
Phono/Linea viene selezionato utilizzando il
commutatore situato sul pannello anteriore.
Utilizzando questi jack è possibile collegare
giradischi, VCR HiFi, macchine a cassette e
reel-to-reel, macchine DAT, lettori CD, laser
disc, tuner, e perfino sintetizzatori o altre
console di missaggio. NOTA: Inserire sorgenti
audio mono negli ingressi di sinistra e di destra
utilizzando un cavo connettore a “Y”.
2. GND: Questo connettore a vite va utilizzato per
collegare giradischi o altri apparecchi che
richiedono una messa a terra

3. Interruttore Selettore di Ingressi: Viene
usato per permettere la connessione di
apparecchi a livello di linea o phono negli
ingressi di canale. Quando viene selezionato
l’ingresso Phono, il segnale è alimentato
direttamente dai pre-amplificatori RIAA phono
di alta qualità. Utilizzare questa posizione
unicamente per le piastre. Le sorgenti a livello
di linea sovraccaricheranno i phono pre-amp,
sensibili, e suoneranno molto male, quindi
bisogna sempre ricordarsi di commutare
l’interruttore linea/phono su linea prima di
collegare sorgenti di linea.
4. Uscita Record: Questa uscita RCA serve per il
collegamento di un apparecchio di registrazione
quali una piastra o un registratore CD. Il livello
dell’uscita è basato su livelli pre-master.
5. Uscita Master (RCA): Questa uscita è
designata al collegamento di dispositivi di
monitoraggio esterni quali un sistema di
diffusione sonora, monitor o un impianto di
home stereo. Il livello del segnale di uscita
stereo master è regolata dal master fader.
6. Ingresso Mic: Inserire qui un microfono a
1/4”.
7. AC In: Questa console di missaggio è
progettata per funzionare con i cavi di
alimentazione forniti con l’apparecchio. Ad
alimentazione scollegata, inserire il cavo per
prima cosa nella console, quindi inserirlo nella
presa.
8. Interruttore di Alimentazione: Utilizzare
questo interruttore per accendere la console
dopo aver collegato tutti gli ingressi per
prevenire eventuali danni all’apparecchio.
Accendere la console prima degli amplificatori,
e spegnere gli amplificatori prima della console.
3
CONFIGURAZIONE PANNELLO ANTERIORE
1. Fader Ingressi: Controlla i singoli livelli di
sorgente nel mix.
2. Interruttore selettore di ingressi –
Seleziona la sorgente che sarà attiva sul
canale, a seconda di cosa è stato collegato alla
sezione degli ingressi sul pannello posteriore.
3. Crossfader Sostituibile – Ottiene passaggi
puliti tra i due canali di ingresso. "Hard left"
seleziona il Channel 1. "Hard right" seleziona il
Channel 2. Con il crossfader centrato, entrambi
i canali assegnati sono attivi. Usare il
crossfader per passaggi veloci e continui da un
canale all’altro
Nota: Il cursore è sostituibile dal’utente caso
mai si dovesse usurare. Svitare le due grosse
viti che lo fissano in posizione, tirarlo fuori
sollevandolo escollegarne il cavo. Fissare
nuovamente il nuovo crossfader e riavvitare il
coperchio sull’apparecchio - ora siete di nuovo
in corsa!
4. Fader Start – La sua attivazione consente di
avviare i lettori CD dal crossfader. Un
movimento da sinistra a destra avvierà il
lettore CD destro e metterà in pausa il lettore
CD sinistro .
5. Fader Ingresso Mic – Regola il livello del
microfono.
6. Commutatore Mic On/Off – Attiva il
microfono.
7. Master Fader – Controlla il livello globale delle
uscite
8. Commutatore Stereo/Mono/Cancell Vocale
– Cambia l’uscita Master da Mono a Stereo.
Sceglie anche il cancell vocale
9. EQ Stereo – Regola l’equalizzazione finale
dell’uscita master degli acuti, medi e bassi.
10. LED METER – Indica il livello dell’uscita
Master.
11. Selettore Cue di Canale – Usato per
convogliare l’audio di canale alle cuffie.
12. Livello Cuffie – Regola il volume di cue.
13. Jack Cuffie – Usato per collegare prese da
1/8” o 1/4” per il monitoraggio audio con le
cuffie.
Table of contents
Languages:
Other ION Dj Equipment manuals

ION
ION iCJ01 Technical document

ION
ION HOUSE PARTY User manual

ION
ION HOUSE PARTY iPA18L User manual

ION
ION MOBILE DJ User manual

ION
ION DISCOVER DJ PRO User manual

ION
ION Holiday Party Plus User manual

ION
ION DISCOVER DJ User manual

ION
ION Holiday Party Smart User manual

ION
ION iDJ2GO User manual

ION
ION DISCOVER DJ User manual