DEAR CUSTOMER
Thank you for purchasing the Ionmax Ion70 Ionic Cool Mist Humidier with Humidistat. The Ion70
reintroduces moisture into the air to help you maintain a comfortable humidity level in your home. It can
help to efciently relieve respiratory ailments such as colds, us or hay fever caused by dry air.
Please read this manual carefully to ensure proper usage and save these instructions for future
reference.
FEATURES
• Built-in ioniser to help revitalise and clean the air
• Adjustable humidistat to maintain desired humidity
• 12-hour timer settings for added convenience
• 3 moisture control settings - low, medium, high
• Easily adjustable moisture and timer via LCD display
• 7-colour night light makes it suitable for use at night or in the bedroom
• Optional ion resin lter system to reduce limes in water
• Auto switch off and water tank is empty light indicator
SAFETY INSTRUCTIONS:
When using electrical appliances, basic safety precautions should always be followed to reduce the risk
of re, electric shock, and injury to persons, including the following:
1. Check the household voltage to ensure that it matches the unit’s rated specication before operating.
2. Children should be supervised to ensure that they do not play with the appliance.
3. Do not add water directly to the moisture outlet as this will damage the unit.
4. Do not allow children to play with any product packaging, such as plastic bags.
5. To avoid re hazard, never put the cord under rugs or near heat registers, radiators, stoves, or
heaters.
6. Do not place the unit near heat sources such as stoves, radiators, and heaters. Do locate your unit
on an inside wall near an electrical outlet. The unit should be at least 10cm away from the wall for
best results.
7. Do not attempt to rell the unit without rst unplugging the unit from its electrical outlet.
8. Do not operate any appliance with a damaged cord or plug, after the appliance malfunctions, or
if it has been dropped or damaged in any manner. Return the appliance to the manufacturer for
examination, electrical or mechanical adjustment, or repair.
9. Always place the unit on a rm, at, level surface at least 60cm above the oor.
10.Do not allow the moisture outlet to directly face the wall.
11.Never tilt, move, or attempt to empty the unit while it is operating.
12.Shut off and unplug the unit before removing the water tank and moving the unit.
13.Do not attempt to repair or adjust any electrical or mechanical functions on this unit. Doing so will
void your warranty. The inside of the unit contains no user serviceable parts. All servicing should be
performed by qualied personnel only.
14.Do not plug in the cord with wet hands: this could result in electrical shock.
15.Never use detergents, gasoline, glass cleaner, furniture polish, paint thinner or other household
solvents to clean any part of the unit.
16.Do not pour water into any openings other than the water tank.
17.Excessive humidity in a room can cause water condensation on windows and some furniture. If this
happens, turn the unit off.
18.Never place the housing under water ow or immerse it in liquid.
CORD AND PLUG INSTALLATION SAFETY INSTRUCTIONS:
The length of the cord on the unit was selected to reduce the hazards of becoming tangled in, or
tripping over a longer cord. If a longer cord is necessary, an approved extension cord may be used.
The electrical rating of the extension cord must be equal to or greater than that of the humidier.
Please take extra care to arrange the extension cord so that it will not drape over the countertop or
tabletop where it can be pulled on by children or accidentally tripped over.
PRE-OPERATING INSTRUCTIONS
1. Please ensure the unit is switched off and disconnected from the electrical outlet.
2. Place the unit on a at surface, about 60 cm above the oor and 10 cm away from the wall. Do not
place the unit on or near moisture-sensitive surfaces or furniture.
3. Fill up the water tank:
a. Remove the water tank by lifting it straight upward. (g. 1).
b. Twist off the tank cap located on the bottom of the tank by turning it counter clockwise. Fill the
water tank with cool, fresh water.
Do not ll tank with warm water as this may cause leakage.
Do not use essential oils as this may damage the unit.
c. After lling the tank, replace the tank cap by rmly turning it clockwise and then replace the water
tank onto the base. The tank will immediately begin to empty into the base.
4. Plug in the unit’s power cord into a 220V AC electrical outlet.
1 2
FIGURE 1.
Filter cartridge
Water tank cap
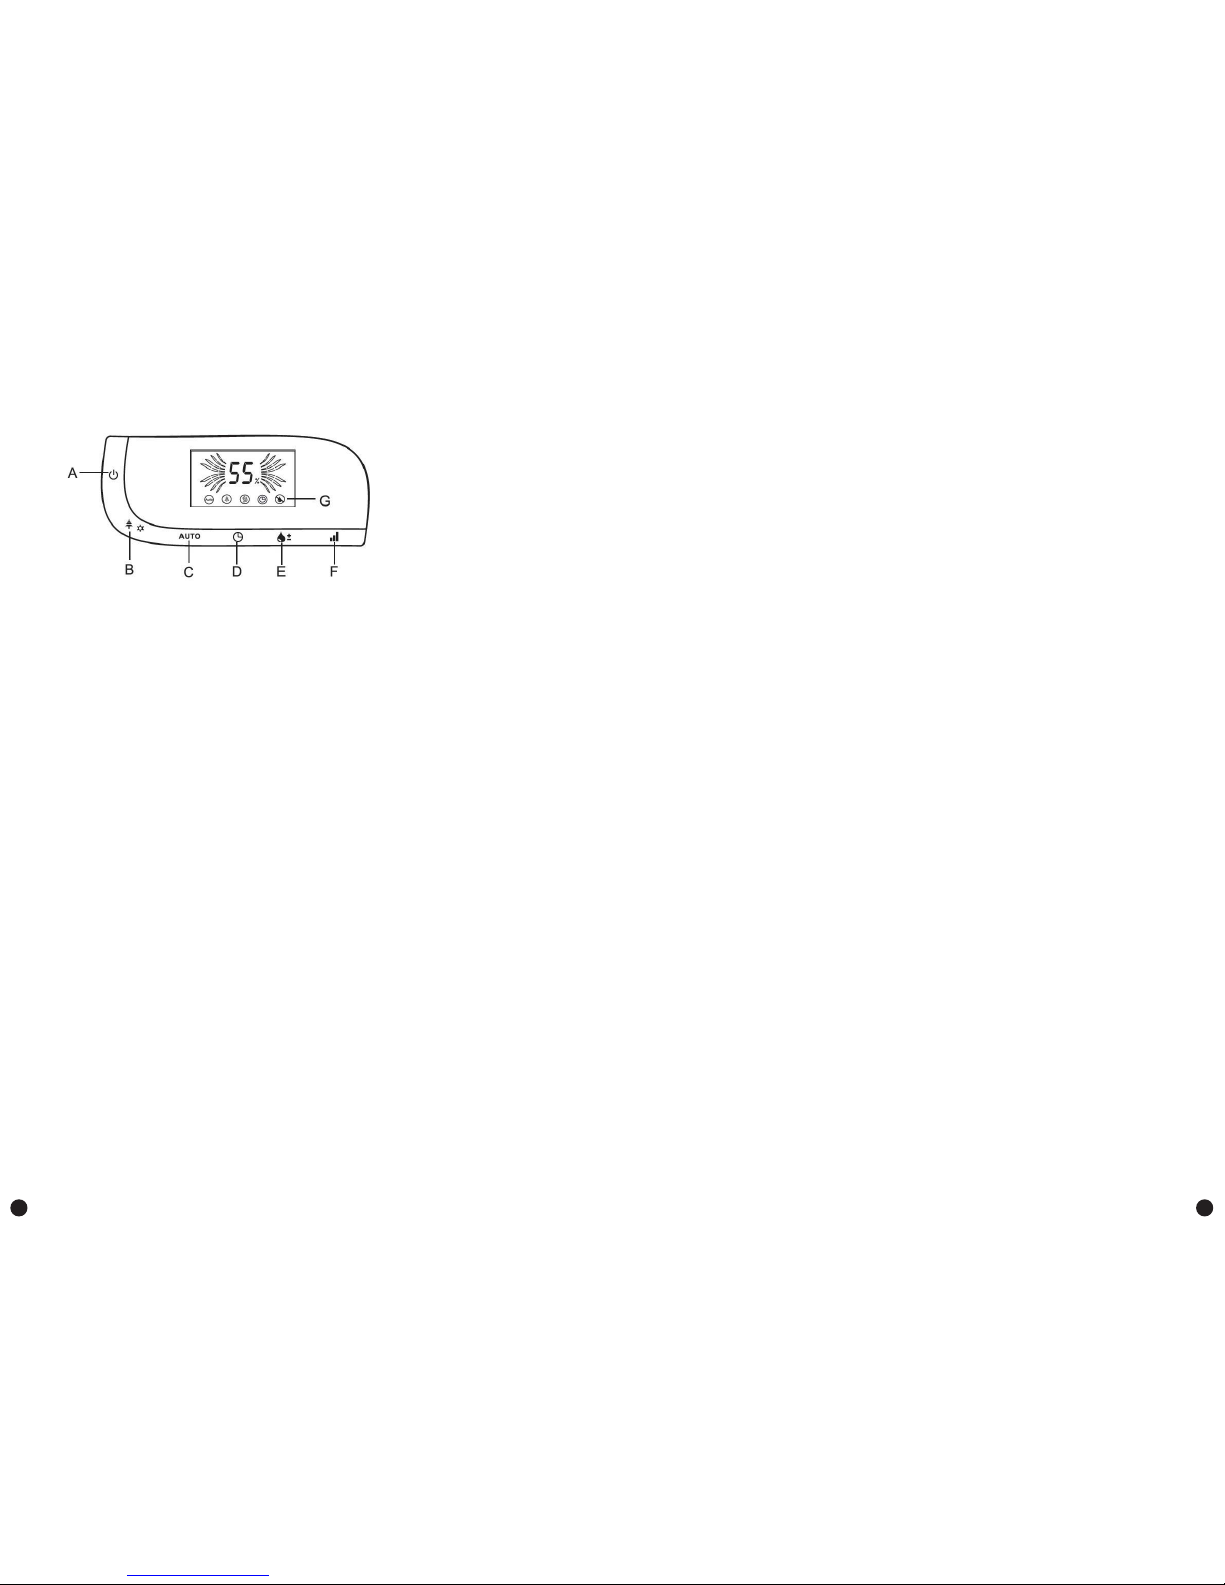
Control panel
Moisture outlet
Handle
Water tank
Transducer
Water level sensor
Main body