ionmax ION90 User manual

ionmax.com.au
1300 800 200

USER MANUAL
Updated: 07-08-2013. Version 2.1.
ION90
HYBRID UV
HUMIDIFIER

PRODUCT DESCRIPTION
CONTROL PANEL DESCRIPTION
TECHNICAL SPECIFICATIONS
GENERAL INFORMATION
FEATURES
Auto Mode
UV Bio-Photocatalyst Sterilization and Deodorization
Dual Mist Outlet
Duo-HumidicationMethods
Humidity Level Control
HumidicationTimer
Hydrostat for Pre-Set Humidity Level
Programmed Humidity Setting
Regulated Mist Volume
Sleep Mode
Water Shortage Indicator
Anti-bacteriaNano-Silverlter
USING THE IONMAX HUMIDIFIER
Operating Notes
Cleaning & Maintenance
Storing Guide
TROUBLESHOOTING
WARNING & PRECAUTIONS
SAFETY INSTRUCTIONS
IMPORTANT NOTICE
WARRANTY
DEAR CUSTOMER
ThankyouforpurchasingtheIonmaxIon90HybridUVHumidier.TheIon90reintroducesmoistureinto
the air to help you maintain a comfortable humidity level in your home. Utilising a combination of UV
LED and Bio-photocatalyst technology, the Ion90 sterilises and deodorises the air before allowing it to
emit clean, pure mist.
Please read this manual carefully to ensure proper usage and save these instructions for
future reference.
CONTENTS
This product includes:
•1xWaterTank
•1xDemineralizationAnti-bacterialNano-Silverlter
* Please contact us immediately if any of the above mentioned items are not included
1
PAGE 2
PAGE 3
PAGE 3
PAGE 4
PAGE 5
PAGE 5
PAGE 5
PAGE 5
PAGE 5
PAGE 5
PAGE 5
PAGE 6
PAGE 6
PAGE 6
PAGE 7
PAGE 7
PAGE 7
PAGE 7
PAGE 7
PAGE 8
PAGE 8
PAGE 9
PAGE 9
PAGE 11
PAGE 12
PAGE 13

PRODUCT DESCRIPTION
Hybrid UV Humidier - ION90
2

HR
CONTROL PANEL DESCRIPTION
TECHNICAL SPECIFICATIONS
HumidicationTechnology
Power Consumption
Coverage
Tank Capacity
HumidicationRate
ContinuousHumidication
Empty Weight
Product Dimension (W x D x H)
HumidierSettings
Features
Regulated Mist Volume
Colors Available
Optional Product Accessory
Ultrasonic Cool and Warm Mist with Humidistat Control
and UV Bio Photo Catalyst
Cool Mist - 40W
Warm Mist - 125W
UV LED Light - 1W
Up to 16m²
6.5 litres
Cool Mist - 300 ml/hr
Warm Mist - 400 ml/hr
Cool Mist - Minimum 21 hr
Warm Mist - Minimum 16 hr
3.5 kg
180mm (w) x 260mm (d) x 315mm (h)
LED Display Screen
•Humidity Status
•Humidifier Settings
•Auto Mode
•UV Bio-Photocatalyst Sterilization and Deodorization
•Dual Mist Outlet
•Duo - Humidification Methods
•Humidity Level Control
•Humidification Timer
•Hydrostat for Pre-set Humidity Level
•Programmed Humidity Settings
•Sleep Mode
•Water Shortage Indicator
3 levels of Mist Volume
White
Demineralization Filter or Brush
3

GENERAL INFORMATION
What is Humidity?
Humidity is the amount of dampness or water vapor in the air.
What is Relative Humidity (RH)?
The Relative Humidity is the relative ratio of the amount of dampness or water vapor in the air, at a
specictemperature,tothemaximumamountthattheaircouldholdatthetemperature,expressedas
a certain percentage.
What are the consequences of low humidity levels to the human body?
When a person is exposed to low humidity levels, his or her hydration levels will be reduced and many
negative bodily symptoms either occur or are aggravated.
Some of the common symptoms include:
•Blocked,stuffedorrunningnose
•Electrostaticshocks
•Fatigue,sleeplessnessandpoorconcentration
•InfectionsandillnessesofourrespiratorysystemlikeAsthma
•DryskindiseaselikeEczema
What is the desired Relative Humidity Level?
A comfortable atmosphere indoors between 60% to 70% relative humidity is the recommended level.
•Difficultyinbreathing
•Dry,scalyandchappedskin
•Soreanddrythroat
•Soreanddryeyes
Humidity Levels
Humidity Level in Air-con Room (indoor)
Ideal Humidity Level (indoor)
Outdoor Humidity Level
RH (%)
30% - 40%
60% - 70%
70% - 95% * Recommended by the Guideline
for Good Indoor Air Quality
Why use Ultrasonic Technology for humidication?
Ultrasonic Technology is an extremely effective and economical method of maintaining and
moderating the relative humidity level in the surrounding air. Ultrasonic Technology works in soundless
operationandcreateshighoscillationsandvibrationsthattransformwaterintonevaporizedmist.The
mist is then dispersed into the surrounding air to add humidity into the air.
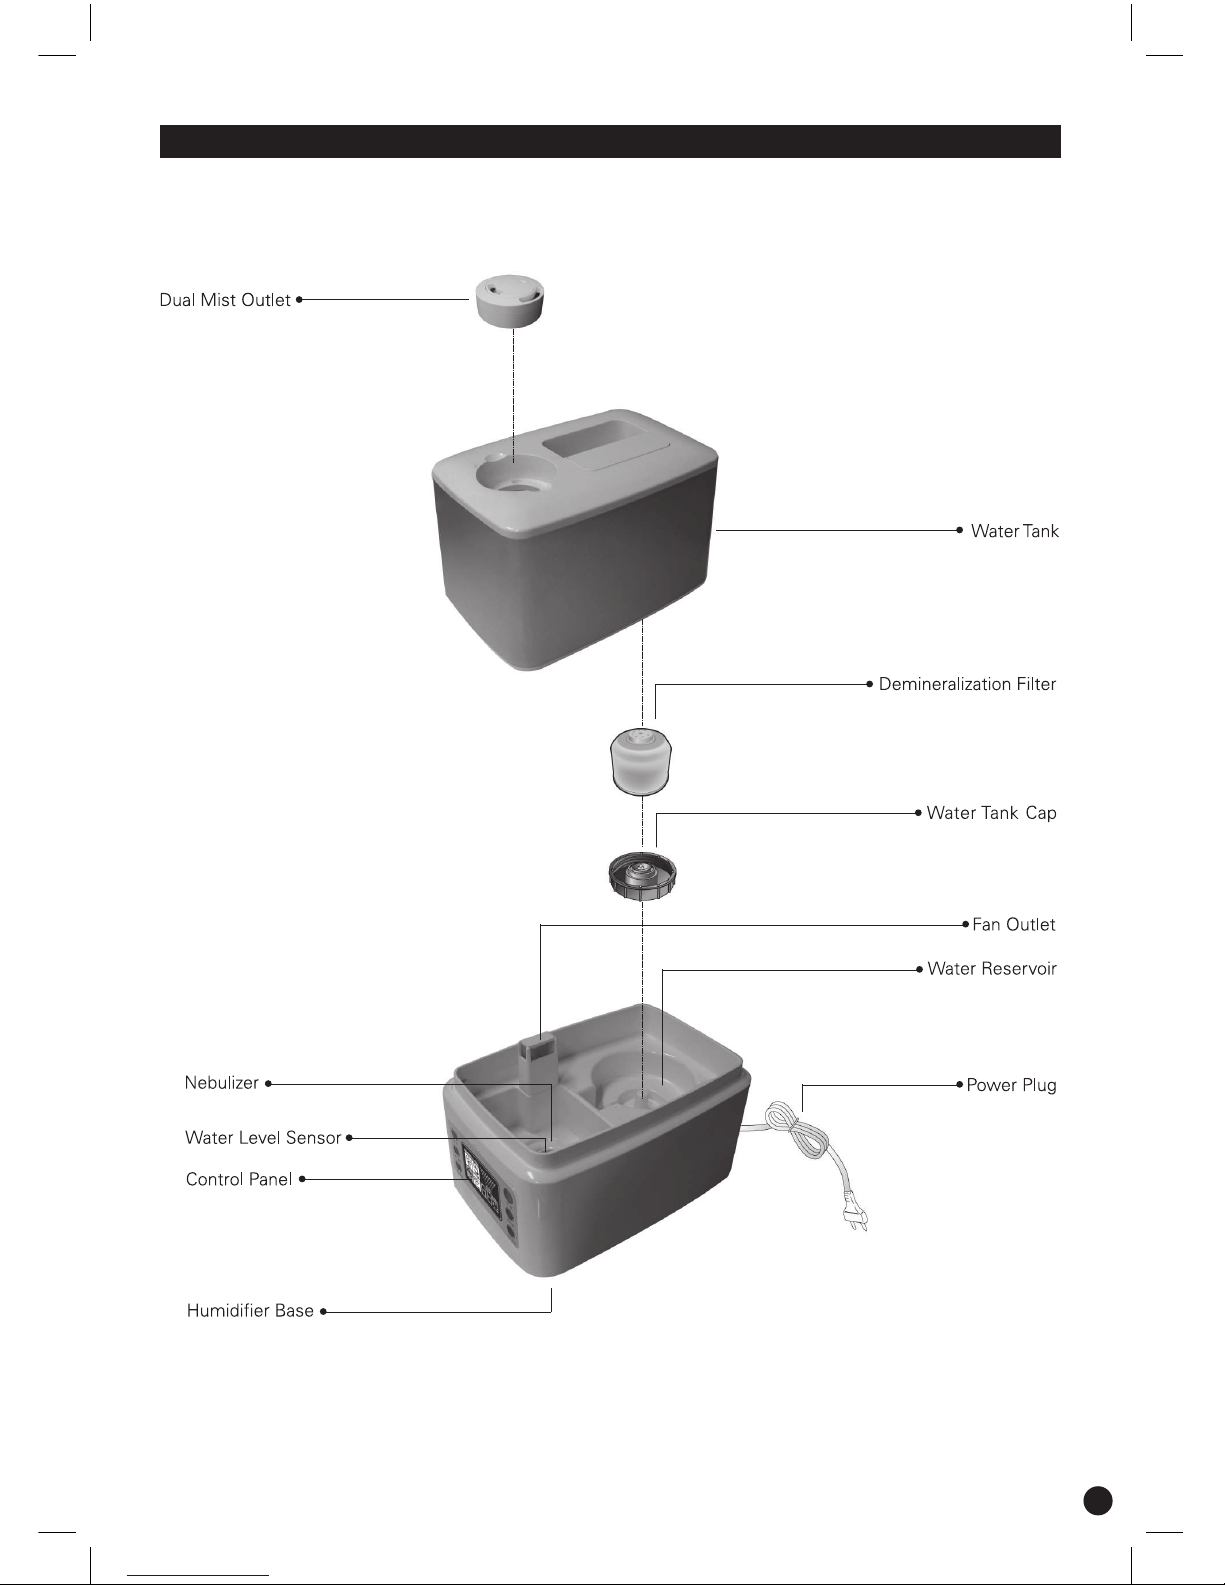
How does the IONMAX Humidier ION90 work?
WhenwaterispouredintotheWaterTank,itowsintotheWater Reservoir. Here, the water comes in
contact with the ultrasonic resonator called the Nebulizer. The Nebulizer vibrates in a rapid speed of up
toonemilliontimespersecond.Thishigh-speedvibrationcausesthewatertobreakupintominutene
droplets that then pass through the Mist Outlet to increase the humidity level in the room effectively.
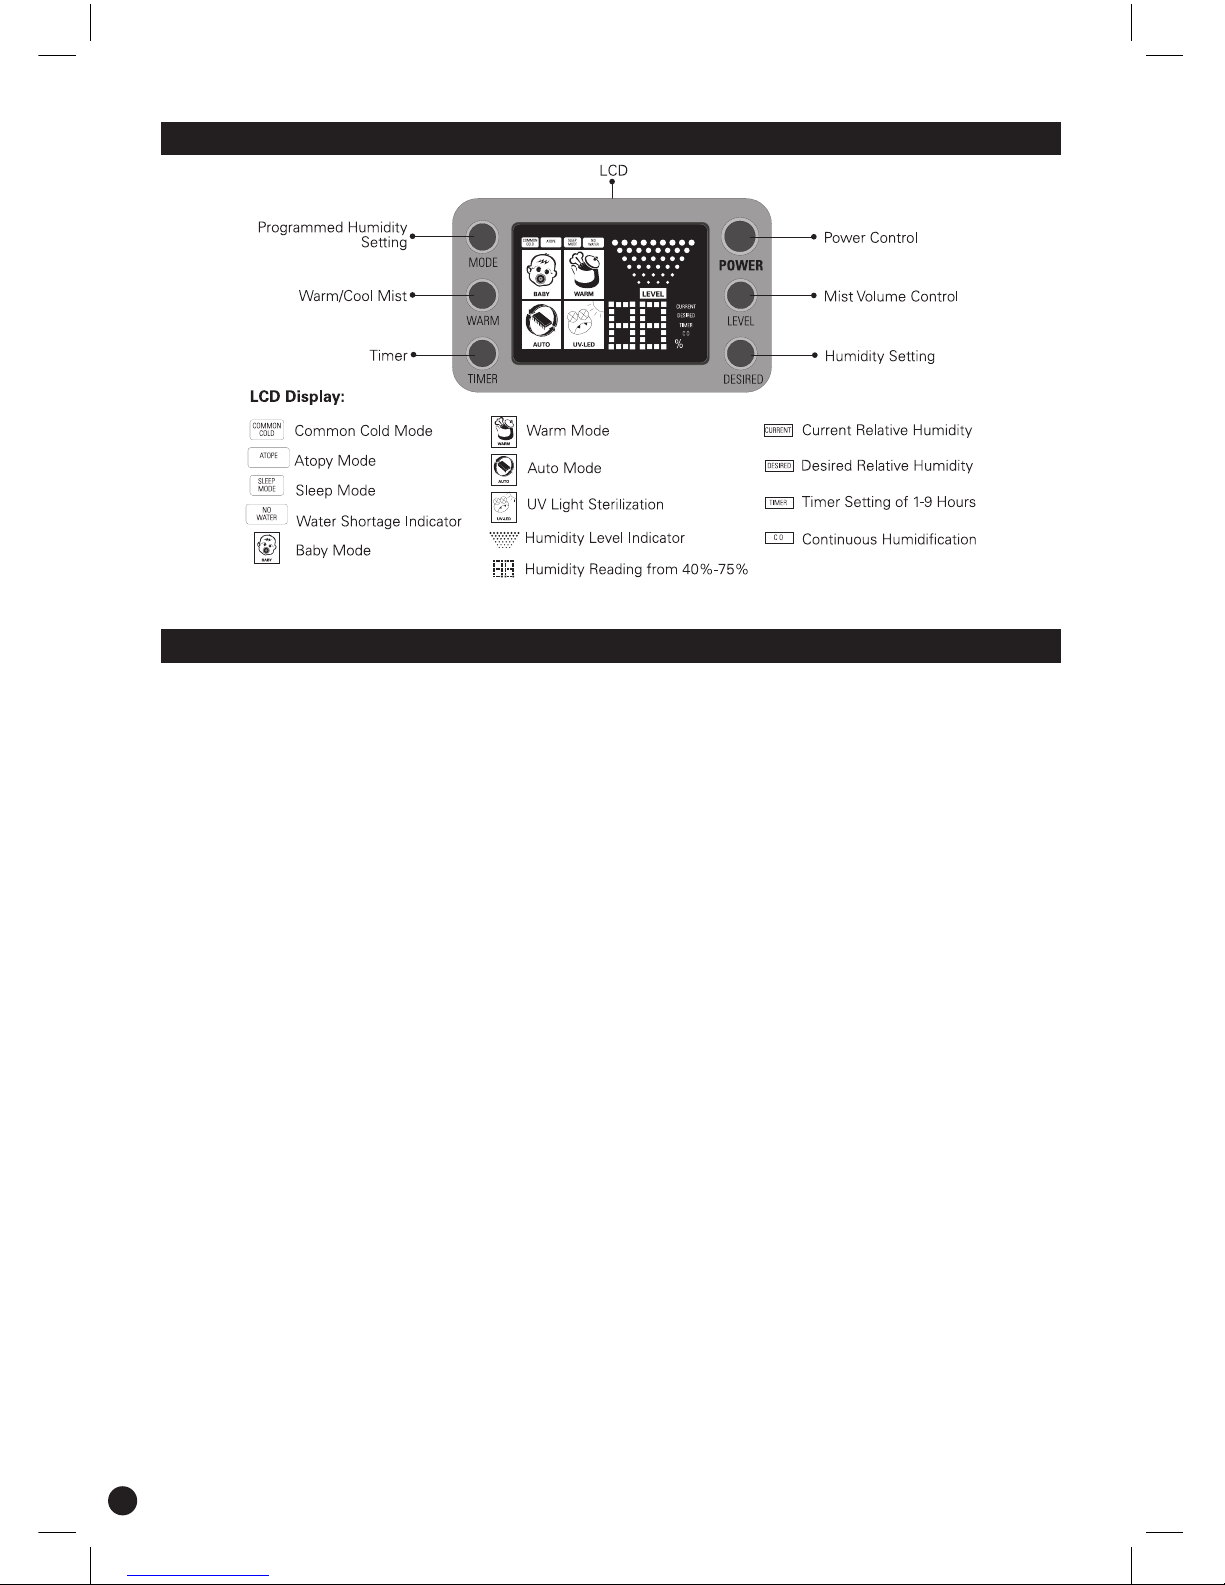
FEATURES
AUTO MODE
When set to , the IONMAX Humidier ION90 will automatically adjust the level of mist volume to
accomodate the surrounding humidity level till it reaches the DESIRED relative humidity. The desired
humidity level is between 50% and 65% RH.
4

UV BIO-PHOTOCATALYST STERILIZATION AND DEODORIZATION
Relyingonthefanoutlettodelivermist,IONMAXHumidierION90usesacombinationofUVLEDandBio-
Photocatalyst to constantly sterilize and deodorize the air before allowing it to blow out clean, pure mist.
The combination of bio material and photocatalyst acts as an environmental friendly oxidizing agent
when activated by ultraviolet ray. When the photocatalyst captures ultraviolet light, it forms activated
oxygen from water or oxygen in the air. The formed activated oxygen effectively decomposes smelly
particles to achieve maximum deodorization and sterilization effects.
DUAL MIST OUTLET
Foramorecomprehensivecoverageofthesurroundings,theIONMAXHumidierION90hastwomist
outletswhichcanberotatedaccordinglytoyoursurroundingforoptimalefciency.
DUO-HUMIDIFICATION METHODS
TheIONMAXHumidierION90hasthecapabilitytousetwotypesofhumidication methods. Heat
Vapourizing (Warm Mist) and Ultrasonic Humidication (Cool Mist). Both methods utilise ultrasonic
vibrations.ItisrecommendedtousetheWarmMistoptionifyouwanthumidicationtotakeplacefaster.
The mist that is emitted via the Warm Mist option is around 35°C whilst the Cool Mist option is room
temperature.
HUMIDITY LEVEL CONTROL
IONMAXHumidierION90allowsyoutotalcontrolinpre-settingandchoosefromahumiditylevelof
40% to 75% RH (at an increment of 5%) or even in Continuous mode.
HUMIFICATION TIMER
IONMAXHumidierION90canbeprogrammedtoworkfrom1to9hoursorruncontinuously.Thetime
advances by 1 hour each time the is pressed.
5

HYDROSTAT FOR PRE-SET HUMIDITY LEVEL
TheIONMAXHumidierION90comeswithanin-builthydrostatthatworksasanautomaticsensorof
the surrounding relative humidity and hence facilitates it to continuously moderate and sustain your
desired relative humidity.
Whenthepre-setor programmed relativehumidityisreached,thehumidication process willpause
automatically.Alternatively,thehumidicationprocesswillresumeagainiftherelativehumiditydrops
below the pre-set level.
PROGRAMMED HUMIDITY SETTINGS
Common Cold
Inthismode,theIONMAXHumidierION90willmaintaintherelativehumidityfrom56%to70%RH.It
helps to keep the relative humidity high for better breathing as well as to alleviate cold symptoms.
Atopy
IONMAXHumidierION90isalsoabletohelppeoplewithAtopy*bymaintainingtherelativehumidity
from 50% to 62% (at an increment of 2%). This range of relative humidity is also suitable and comfortable
for babies.
*An allergy that makes a person susceptible to certain allergic responses such as hay fever and asthma.
REGULATED MIST VOLUME
RegulatethemistvolumeofyourIONMAXHumidierION90bychoosingbetweenlevelsof“Low”,
“Medium”or“High”.
6

SLEEP MODE
When set to SLEEP,theIONMAXHumidierION90LCDbecomesdimmerwiththerelativehumidity
set at 60%. It will operate continuously for 8 hours with WARM on before powering off automatically.
WATER SHORTAGE INDICATOR
TheIONMAXHumidierION90comeswithaninbuiltwatershortagesensorthatwillinformyouwhen
the water level is low. The unit will beep 5 times and the will blink continuously to alert you of the
status.ThisisusefulinremindingtheusertorelltheWater Tank.
DEMINERALIZATION FILTER
When water goes through the Demineralization Filter, it is restructured at an ionic level and the dissolved
mineral salts and other additives are removed, thereby softening the water. This aids in reducing mineral
buildupatthenebulizerandnerultrasonichumidication.
USING THE IONMAX HUMIDIFIER
Ensure that the power cord is removed from the power supply at all times during installation,
relling of water, maintenance and transportation.
OPERATING NOTICE
Remove the unit from all packaging. Check and ensure
thattherearenoforeignobjectsinsidetheWater Tank and
Water Reservoir.
Remove the Water Tankfromthebaseandllitwithclean,
tepid or cool water from the tap. NOTE: DO NOT use water
above 40°C.
Empty water from base.
Fasten the cap of the Water Tank snugly and place it back
onto the Humidier Base. Please note that whenever a
lledWater Tank is placed onto the Humidier Base, the
sound of gurgling water is normal. This happens when water
is travelling from the Water Tank into the Water Reservoir.
WaitforawhileforthewatertolluptheWater Reservoir.
Step 1:
Step 2:
Step 3:
Step 4:
7

Select a stable surface to situate the unit. Plug the power
cord into the power supply and switch on. A beep signal
will be heard. Press the “POWER” button and the unit
will commence operation in mode. Read more on the
“FEATURES” section to understand the various functions
of IONMAX Humidier ION90. To power off, press the
“POWER” button again.
Please note that the unit might stop from time to time if:
1) The programmed relative humidity is met.
2) There is a shortage of water supply.
3) There is a disruption of power supply.
Step 5:
CLEANING & MAINTENANCE
Recommended Maintenance
ItisrecommendedtocleanandmaintaintheIONMAXHumidierION90at
least once a week.
Before you start:
- DO NOT use any detergents, solvents or aggressive agents to clean the unit.
- DO NOT use brushes or cloths that are abrasive or might cause scratches
or damage to the unit.
- DO NOT allow water to sit in the tank for more than 1 week.
To Clean The Body Casing
TheIONMAXHumidierION90shouldalwaysbe regularly maintained and
cleaned. For external maintenance, regularly use a damp cloth to wipe the
surface to prevent the accumulation of dust.
To Clean The Water Tank
Remove sediments or scale buildup by shaking the Water Tank vigorously
afterrellingtheWater Tank. Pour out the water and wipe the internal tank
thoroughly with a soft cloth.
To Clean The Water Reservoir
Pour water away from the Water Reservoir as shown in the picture. DO NOT
let water get into the Fan Outlet. Remove sediments or scale buildup inside
the Water Reservoir by using a damp cloth to wipe the surface.
IMPORTANT
1) When the Nebulizer is not regularly cleaned, the efciency of the unit will be
compromised or even damaged depending on the severity.
2) DO NOT clean the Nebulizer with any solvents or aggressive agents.
3) DO NOT scratch or rub the surface of the Nebulizer with a sharp article.
STORING GUIDE
TokeeporstoretheIONMAXHumidierION90,ensurethatwateristhoroughlydrained,removedand
dried from the Water Tank and Water Reservoir before storing in a cool and dry place.
8

PROBLEM POSSIBLE CAUSE WHAT TO DO?
Humidierdoesnot
operate
•Powercablenotpluggedin.
•Humidiernotswitchedon.
•Thereisawatershortage.
(No Water indicator lit up)
•Increasepre-sethumiditylevel
or wait till surrounding humidity
level drops.
•RelltheWater Tank.
•Regularmaintenanceofhumidier
No Mist Output •Desiredpre-sethumiditylevelhas
been met.
•Thereisawatershortage.
(No Water indicator lit up)
•Mineral/Sedimentbuildupat
the Nebulizer
•Pluginpowercable.
•PushthePOWER Button.
•RelltheWater Tank.
Mist With Odor •Ill-maintainedhumidier
•Waterisunclean
•StaleWater
•Regularmaintenanceofhumidier
•Removeallexistingwaterinthe
tank and base, clean with fresh
waterandrellwithfreshwater.
No Water Indicator
lits up despite
sufcientwater
•WaterLevelSensoroatstuck
•Unitnotsittinglevel
•GentlyreleaseWaterLevel
Sensoroat.
TROUBLESHOOTING
WARNING AND PRECAUTIONS
DO NOT add any additives into
the Water Tankunlessspecied.
DO NOT use any detergents,
solvents or aggressive agents to
cleanthehumidier.
DO NOT cover any opernings or
insertanyforeignobjectsinside
anycrevicesofthehumidier.
DO NOTusethehumidierifthe
power cord is faulty.
Repairsofhumidiersareonly
to be made by qualied service
engineers. Improper repair can
cause considerable danger to
the user.
Always choose a stable and at
surfacetoplaceyourhumidier.
9

Refrain from overloading your
power supply with multiple power
plugs.
DO NOT pour water into the Fan
Outlet of the unit.
DO NOT scratch or rub the
surface of the Nebulizer with
a sharp article. Use the brush
provided instead.
DO NOT move or incline the
humidierduringoperation.
DO NOT pour water directly into
the Mist Outlet. Fill water only
through the Water Tank.
DO NOThandlethehumidier
or power cord with wet hands.
DO NOTimmersethehumidier
base into water.
Alwaysunplugthehumidier
duringinstallation,relling
of water, maintenance and
transportation.
DO NOTplacehumidierunder
direct sunlight, high temperature,
near computers or sensitive
electronic appliances.
10

SAFETY INSTRUCTIONS
!
1)Readtheoperatinginstructionscarefullybeforeusingthehumidierandkeepthem
for later reference.
2) Persons who are not familiar with the operating instructions, as well as children and
personsundertheinuenceofmedication,alcoholordrugsarenotadvisedtooperate
thehumidier,orareonlyadvisedtooperateitundersupervision.
3)Onlyoperatethehumidierwhenitiscompletelyassembled.
4)AlwaysensurethatthereissufcientwaterintheWater Tank before operation.
5)Useonlyclean,tepidorcoolwatertollthetank.
6) DO NOT use Essential Oil.
7) Always have the Mist Outlet and Water Tank in place while the unit is operating.
Rotate the Mist Outlet so that it is aimed away from walls or furniture.
11

Water Overow
TheION90humidierwaterfeedsystemreliesongravityandvacuuminthereservoir(tank)tocontrol
waterowtotheunit.Whenthetankisinstalledonthebase,acertainamountofwaterwillbedrawn
fromthetanktocreateavacuum.Ifwaterisalreadypresentinthebase,overowingmayoccurwhich
can cause the unit to appear to be leaking.
Toensurenooverowoccurs,pleasefollowthestepsbelowwhenoperatingyourdevice:
1.Emptythebaseofallwaterduringeachrell.
2.Completelyllthereservoir(tank)duringeachrell.
Ifpossible,relltheunitonlywhenthe‘empty’lightcomesonasthebasewillalreadybeempty.
Condensation
Occasionally, water may pool at the base of the unit due to condensation build-up which may make the
unit to appear to be leaking. This can occur when the air temperature drops as warm air holds more
water than cold air.
Switching from cool to warm mist increases the air temperature slightly. Reduce the humidity settings to
prevent too much moisture from being created.
Donotoperateahumidierinasmallroomwherethetemperatureislowascondensationmayoccur
on walls and windows.
Air conditioners act as dehumidifers removing moisture from the air. Turning off or reducing the intensity
ofyourairconditionerwillhelpthehumidiertoworkmoreefciently.
12

WARRANTY DETAILS
Congratulations on your purchase! It is our aim to provide you with quality products that you can
trust. Our products come with guarantees that cannot be excluded under the Australian Consumer
Law.Youareentitledtoareplacementorarefundforamajorfailureandforcompensationforany
other reasonably foreseeable loss or damage.
You are also entitled to have the goods repaired or replaced if the goods fail to be of acceptable quality
andthefailuredoesnotamounttoamajorfailure.
The Guarantee
The product is guaranteed to be free from defects in workmanship and parts for a period of 12
months from date of purchase for domestic use and 3 months for commercial use. Defects that occur
within this warranty period, under normal use and care, will be repaired, replaced or refunded at our
discretion,solelyatouroptionwithnochargeforpartsandlabour.Thebenetsconferredbythis
warranty are in addition to all rights and remedies in respect of the product that the consumer has
under the Trade Practices Act and similar state laws.
Proof of Purchase
This warranty is valid for the original purchase and is not transferable. Please keep your purchase
docket or receipt as proof of purchase and as proof of date on which the purchase was made. The
purchase docket (or a copy) or receipt must be presented with the warranty when making a claim
under this warranty.
Service during the Warranty Period
Authorization Number). Ensure that the RA# is clearly stated on the outside of the packaging and that
the product is properly packaged so that no damage occurs to the product during transit. Shipping of
the product back to us for warranty will be at your cost. A product return without the RA# or proof of
purchase will not be accepted.
Extent of Warranty
This warranty is limited to defects in workmanship or parts. All defective products or parts will be
repaired or replaced. This warranty does not cover manuals and packaging.
Normal Wear and Tear
This warranty does not cover normal wear and tear to the product or parts.
Exclusions
This warranty does not cover:
•Any defect caused by an accident, misuse, abuse, improper operation, lack of reasonable care,
unauthorisedmodication,lossofparts,tamperingorattemptedrepairbyapersonnotauthorised
by the distributor.
•Any product that has been damaged by a lightning strike either directly or indirectly or a main power
surge or liquid ingress.
•The product if it is located outside of Australia.
•Any damage caused by improper power input or improper cable connection.
Andatech Corporation Pty. Ltd.
PO Box 3038, Nunawading VIC 3131, Australia.
13

14
Other manuals for ION90
2
Table of contents
Other ionmax Humidifier manuals