Iseevy H.265 HEVC User manual

H.265 HEVC/H.264 AVC/MJPGE
Video/Audio Encoder
User Manual
(V2.1.3)

2
Content
1, Overview.................................................................................................... 3
2, Interfaces................................................................................................... 3
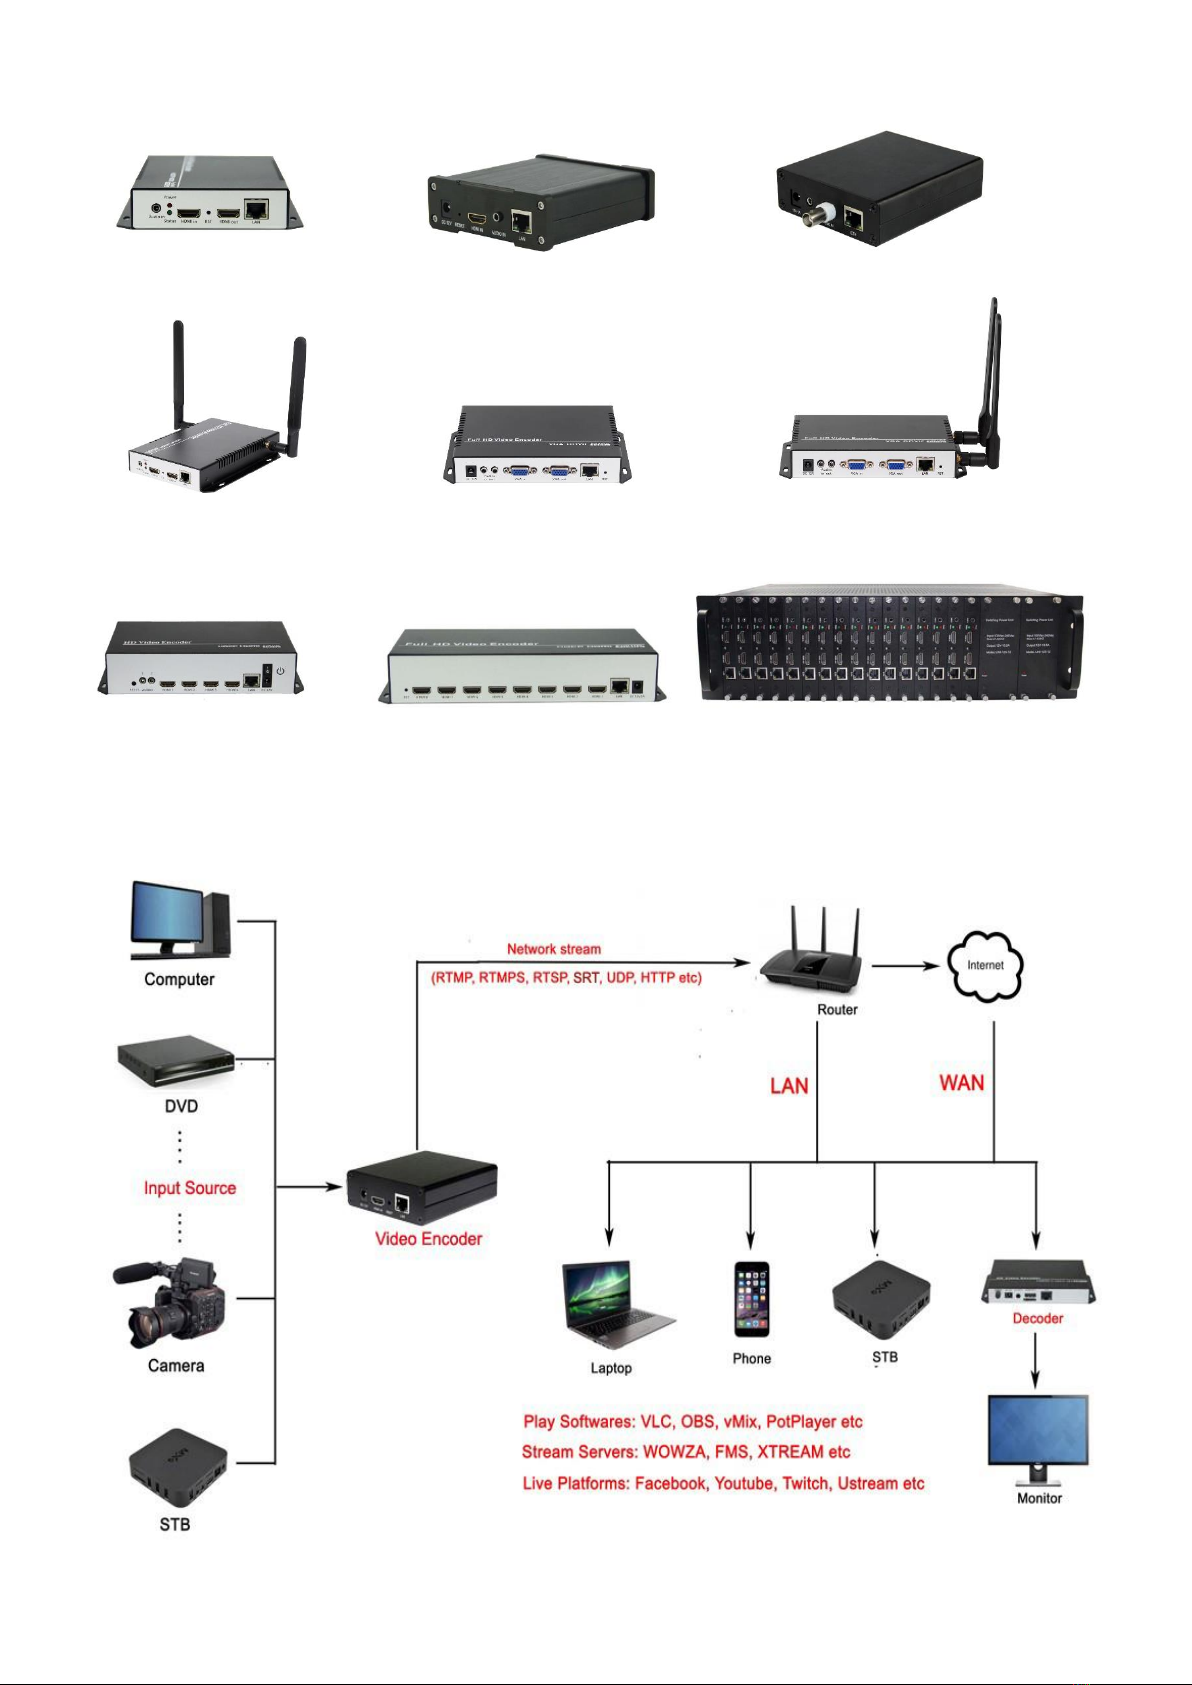
3, Connections............................................................................................... 4
4. Web Login ................................................................................................. 5
4.1 WINDOWS OS Computer..................................................................... 5
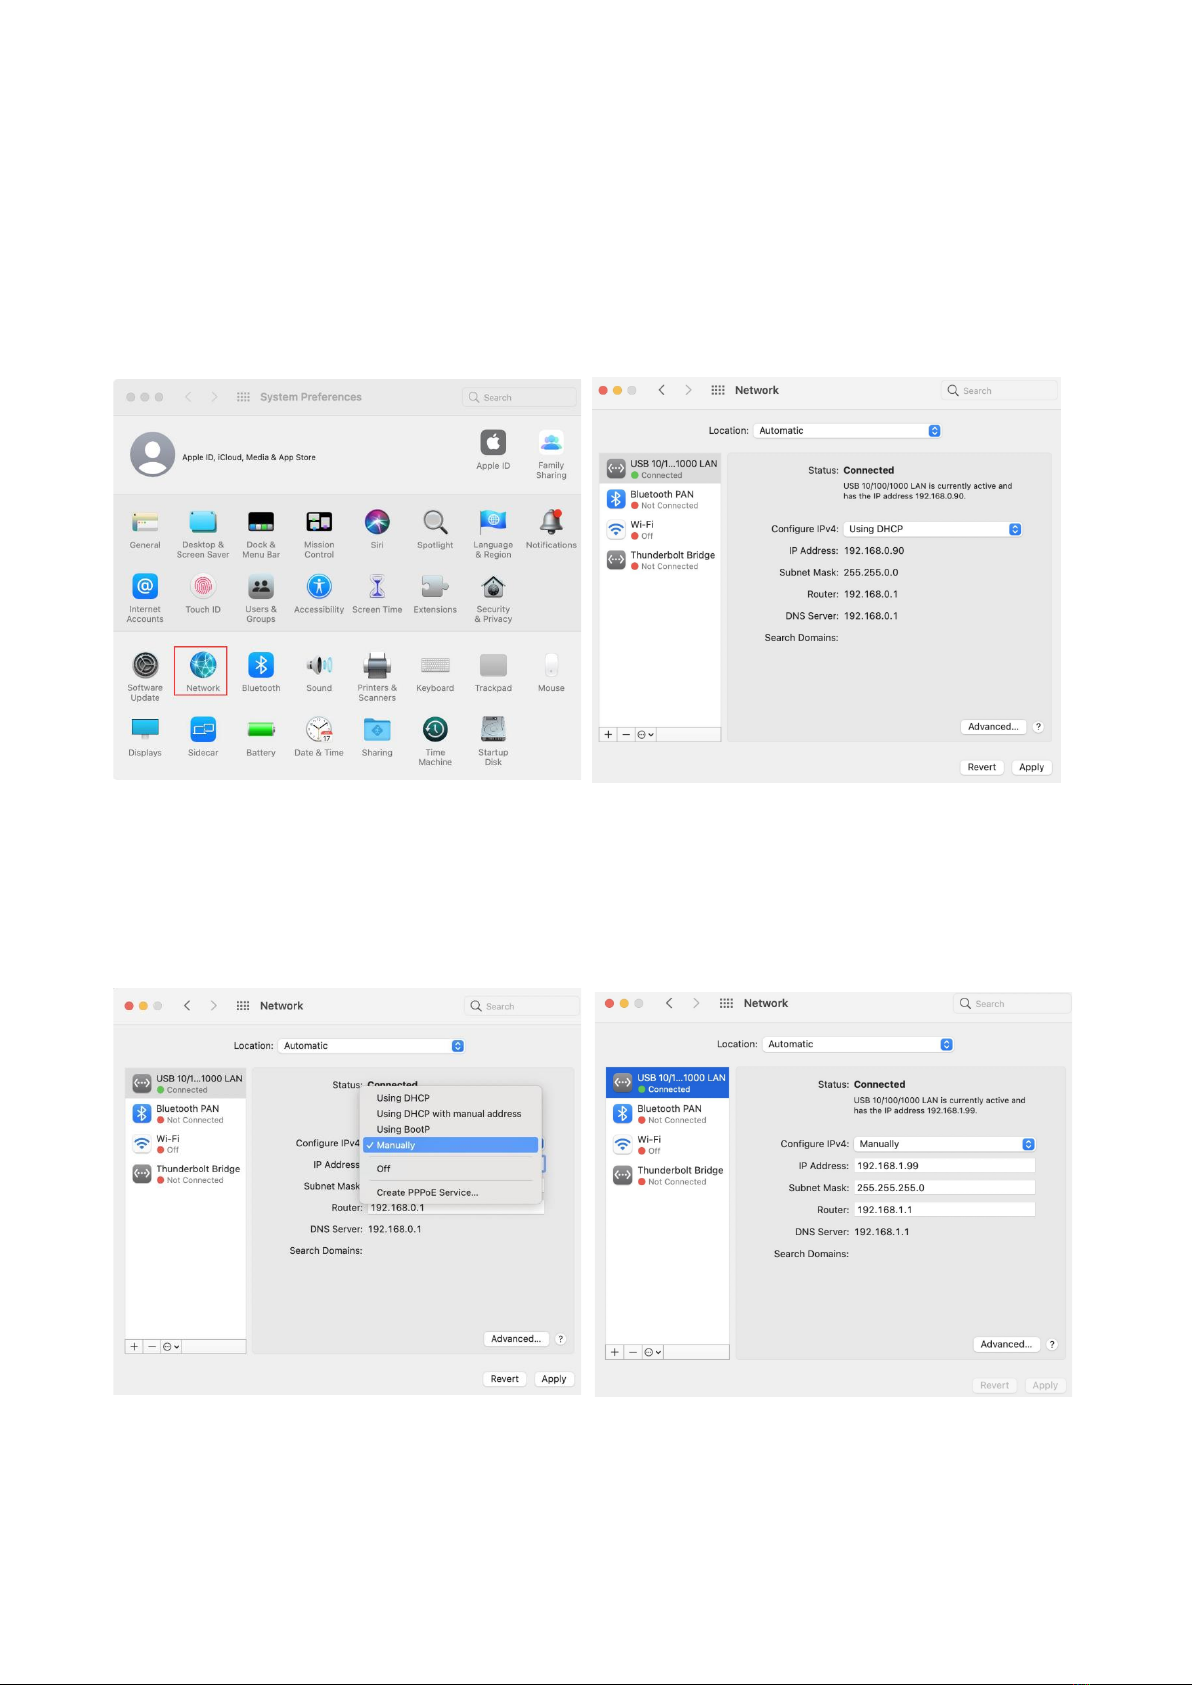
4.2 MAC OS Computer............................................................................... 7
4.3 Login Device Web................................................................................. 8
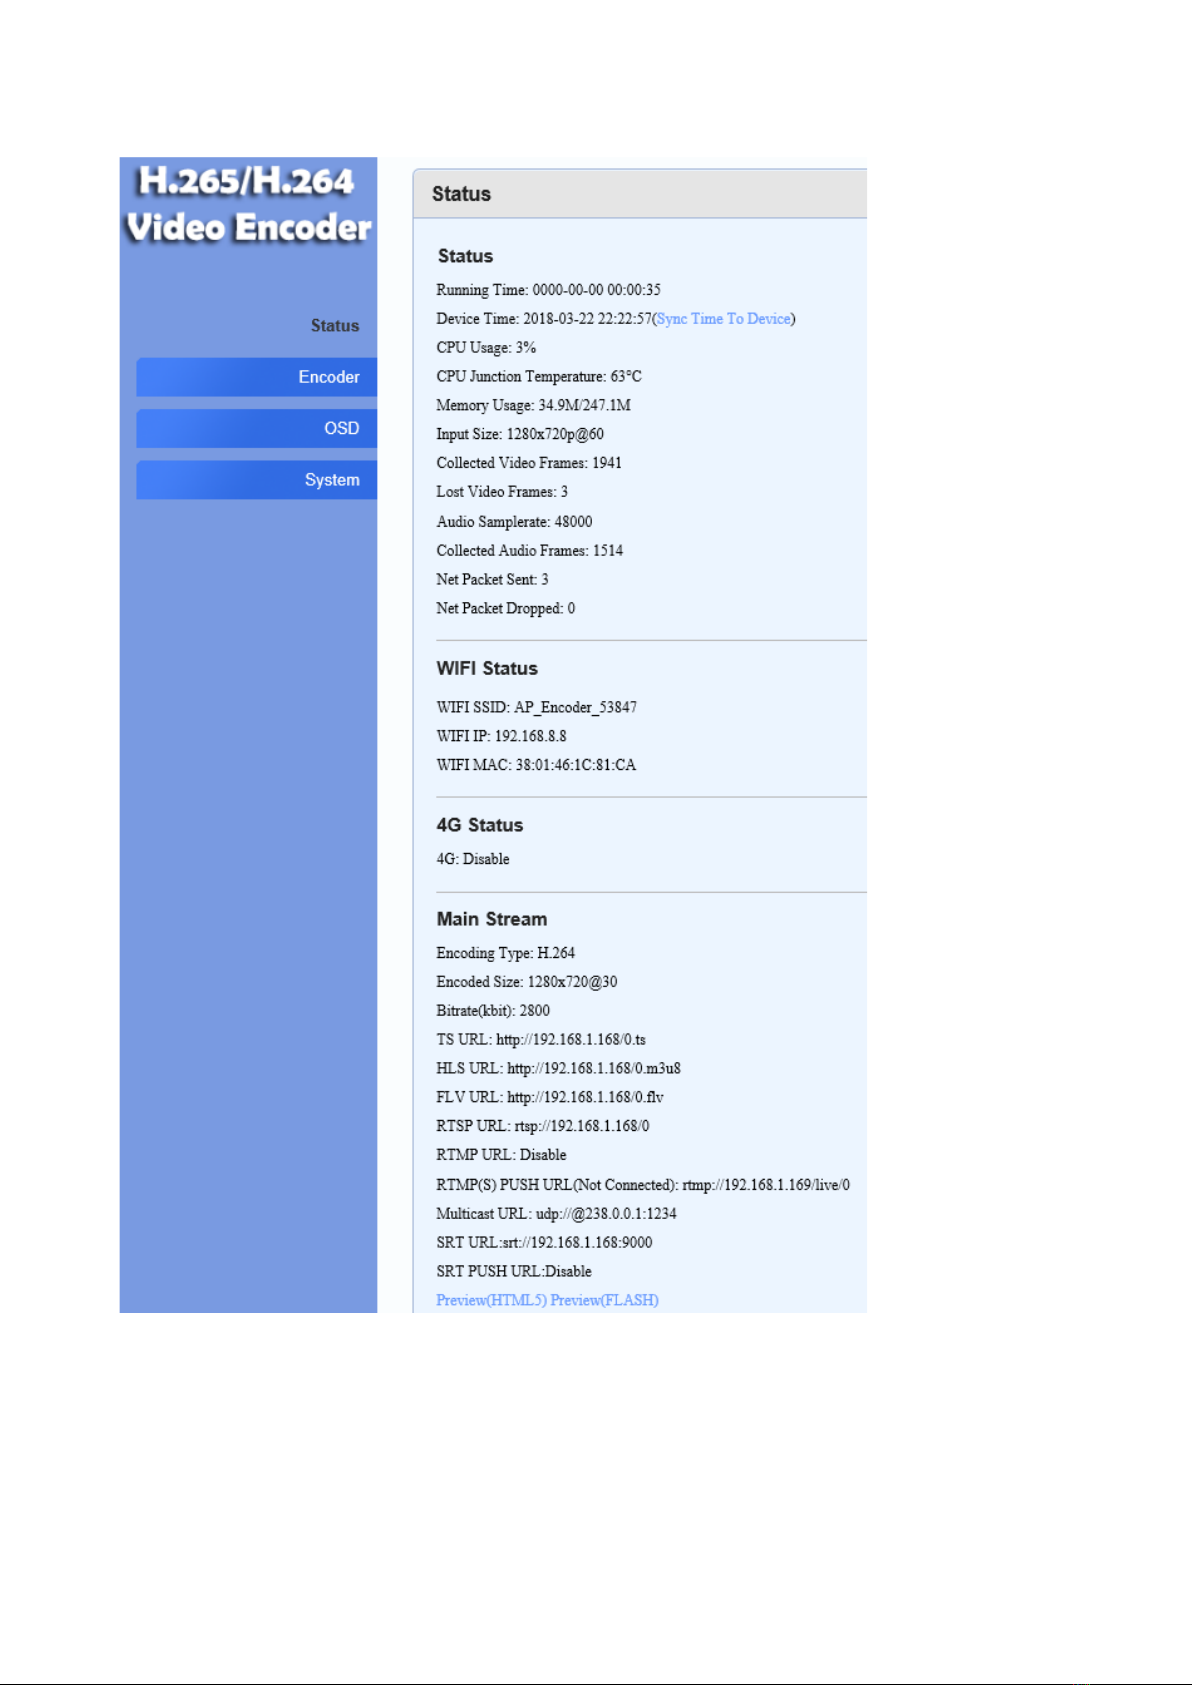
5, Status Display............................................................................................ 8
6, Preview Stream ......................................................................................... 9
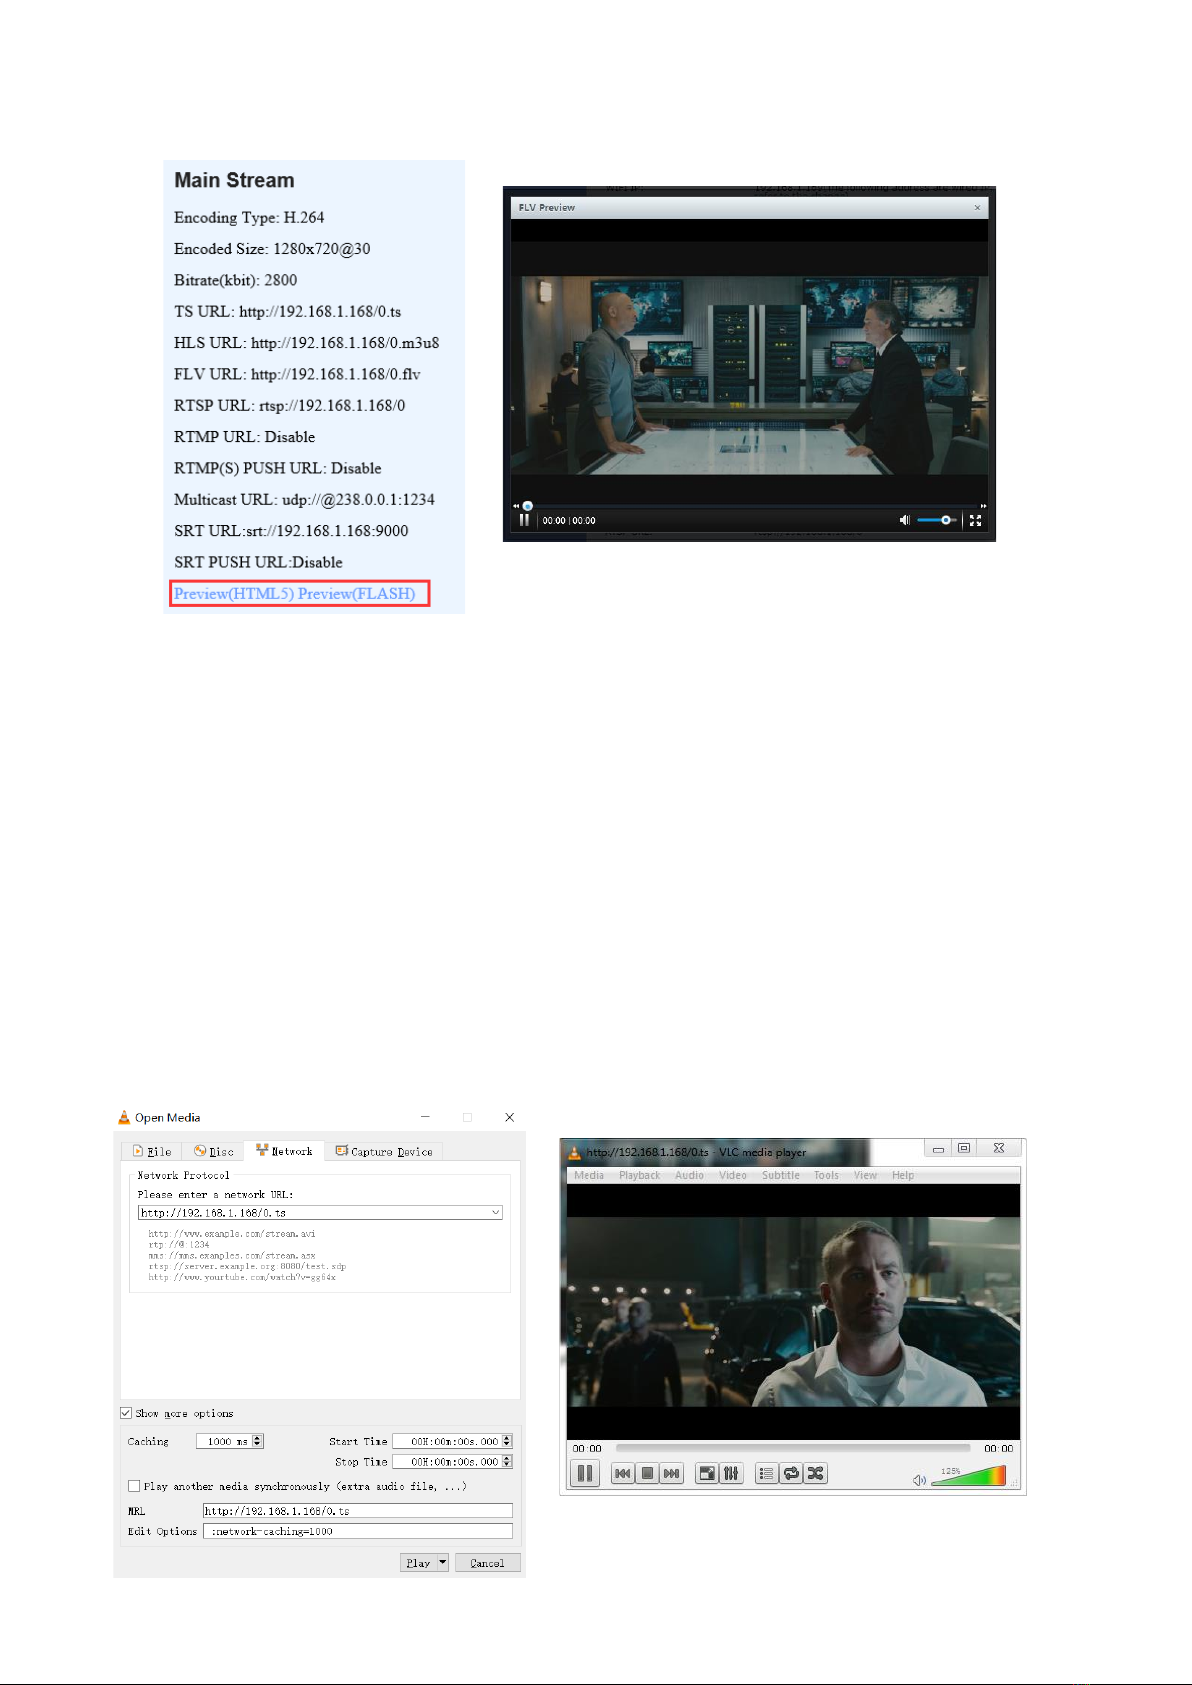
6.1 Preview by Browser .............................................................................. 9
6.2 Preview by VLC Player ....................................................................... 10
7. Network Setting ....................................................................................... 11
7.1 Wired Network Setting ........................................................................ 11
7.2 WiFi Network Setting........................................................................... 12
7.2.1 AP Mode ....................................................................................... 12
7.2.2 WiFi Mode..................................................................................... 13
7.3 4G Network Setting............................................................................. 14
8. Main Stream Encoding Setting................................................................. 15
8.1 Video Encoding Setting....................................................................... 15
8.2 Protocol Setting................................................................................... 16
9 OSD Setting.............................................................................................. 17
10. Instructions for Live on Youtube............................................................. 18
11. Instructions for Live on Facebook .......................................................... 20
12. Audio Encoding Settings........................................................................ 22
13. System Settings..................................................................................... 22
14. Trouble Shootings.................................................................................. 24

3
1, Overview
H.265/H.264/MJPEG HDMI/SDI/VGA/CVBS Encoder is a professional HD
audio&video encoding device with powerful functionality. It supports
HDMI/SDI/VGA/CVBS (optional) signal 4K/1080P/D1 (optional) input, then
generates H.265/H.264/MJPGE profiles network video streams with
RTMP/RTMPS/SRT/RTSP/UDP/HTTP/SRT/FLV/HLS/TS/Multicast/Unicast/
ONVIF protocols and AAC/MP3 format Audio.
Its high integration and cost-effective design make this device widely applied
in IPTV, live stream, broadcast, video conference, remote education, network
video record etc.
2, Interfaces
HDMI+Wired
HDMI+WiFi
HDMI+WiFi+Battery Holder
SDI+Wired
SDI+WiFi
SDI+WiFi+Battery Holder
H.264 HDMI+4G
H.265 HDMI+4G
H.265 SDI+4G

4
3, Connections
HDMI+Loopout
4K+USB/TF Record
CVBS+ Wired
4 channel HDMI
8 channel HDMI
16 channel HDMI
HDMI+Loopout+WiFi
VGA+Loopout
VGA+Loopout+WiFi

5
4. Web Login
If you can’t open the encoder login web interface by http://192.168.1.168
directly, you can modify your computer IP address, make it in the same network
segment with encoder.
Note: the following instructions is just for that modify your computer IP address
to make sure you can login the encoder web.
After you login the encoder web successfully, please modify the encoder IP,
Gateway, DNS to match your router network (refer to “7.Network Setting”),
then change the computer IP back to the original configuration, they will work
fine normally in your router network.
4.1 WINDOWS OS Computer
Step 1: Connected the device with computer directly by a Network Cabe.
Step 2: Setup your computer's local network settings as followings:
Open “Network Connections” interface, right click the “Ethenet” icon, select
“Properties”

6
Select “Internet Protocol Version 4 (TCP/IPv4)”, click “Properties”
IP address: 192.168.1.90
Subnet Mask: 255.255.255.0
Router: 192.168.1.1

7
4.2 MAC OS Computer
Step 1: Connected the device with computer directly by a Network Cabe
Step 2: Setup your computer's local network settings as followings:
Enter “System Preferences”---select “Network”
Configure IPv4: Manually
IP address: 192.168.1.90
Subnet Mask: 255.255.255.0
Router: 192.168.1.1

8
4.3 Login Device Web
Open IE browser and enter the IP address: http://192.168.1.168. Default user
name: admin.
Default password: admin.
5, Status Display
Through the “Status” interface, we can check the “Input Size”, “Collected Video
Frames”, “Lost Video Frames” “Audio Sample Rate” “Collected Audio Frames”
to confirm the input source connection if fine.
Check the “WiFi Status” and “4G Status” to confirm if WiFi or 4G network
connected successfully.
“Main Stream” “Sub Stream1” “Sub Stream2” “Sub Stream3”
are showing each stream the video encoding size, bit rate
and TS/HLS/FLV/RTSP/RTMP(S)/Multicast/SRT protocol stream URLs.

9
6, Preview Stream
6.1 Preview by Browser
Visit the device Status interface, click the “Preview” button, it will play the

10
video&audio stream directly in browser.
6.2 Preview by VLC Player
Download and install “VLC media player” in your computer.
Click “Media”---“Open Network Stream”, then fill the stream network URL (get
it from device status interface), click “Play”.
Default URLs:
TS URL: http://192.168.1.168/0.ts
HLS URL: http://192.168.1.168/0.m3u8
FLV URL: http://192.168.1.168/0.flv
RTSP URL: rtsp://192.168.1.168/0
RTMP URL: rtmp://192.168.1.168/live/0
Multicast URL: udp://@238.0.0.1:1234
SRT URL: srt://192.168.1.168:9000

11
7. Network Setting
7.1 Wired Network Setting
Click “System”—“Network” to enter wired network setting interface.
DHCP: keep disable.
IP: modify it in the same network segment with your router, default is
192.168.1.168. (For example: if your router IP address is 192.168.0.1, you
need to modify it to 192.168.0.168)
Netmask: Device network mask, default is 255.255.255.0
Gateway: modify it same with your router IP address, default is 192.168.1.1
(For example: if your router IP address is 192.168.0.1, you need to modify
it to 192.168.0.1)
DNS1: keep 8.8.8.8 or modify it same with your router IP

12
DNS2: keep 8.8.4.4 or modify it same with your router IP
7.2 WiFi Network Setting
(This part guide only for WiFi encoders)
7.2.1 AP Mode
AP mode is for computer/mobile quickly connect the device to configure the
settings by WiFi.
Reset the Device, it will auto restore the AP mode.
Connected AP mode steps:
Step1, Computer/Mobile connect the AP mode WiFi Essid network, default
WiFi password is 12345678.
Step2, Login the device web by the AP IP address http://192.168.8.8

13
7.2.2 WiFi Mode
WiFi Mode is for connect device with WiFi network by WiFi
WiFi Mode: select “WIFI”, then click “apply” button. Enter “Reboot” interface,
click “reboot” button.
WiFi Essid: fill the WiFi network name.
WiFi password: fill the WiFi network password.
WiFi DHCP: enable it, then click “Apply” and “Reboot”, you will get a WiFi IP
from the Status interface, but sometimes it will be auto changed.
If you want to get a fixed WiFi IP, please disable WiFi DHCP, then configure the
WiFi IP and gateway correctly as bellowing:
WiFi IP: WiFi IP address, (For example: if your router IP address is
192.168.0.1, you need to modify it to 192.168.0.169)
WiFi gateway: WiFi router address, (For example: if your router IP address
is 192.168.0.1, you need to modify it to 192.168.0.1)
Note: Wired IP address had better to be in different network segment with
WiFi IP. For example, if WiFi IP is 192.168.1.169, had better modify wired
IP to 192.168.x.168, x is not 1.

14
7.3 4G Network Setting
(This part guide only for 4G encoders)
Operations:
1, Confirm your 4G sim card can visit Internet and play video.
2, Plug the 4G sim card into the device sim card slot, connect the antennas.
3, Power on the device.
4, Enter 4G web interface.
5, Enable 4G, click “Apply”, then click “reboot” on reboot interface.
6, Login the status interface to check the 4G status if connected completed.
7, If still shows not connected, confirm the APN, Username, Password info from
the 4G sim card provider. Fill them in the 4G interface, click “Apply”, then click
“reboot” on reboot interface.
8, If 4G Status shows “DISCONNECTED 10”, it means device didn’t detect the
4G SIM card, please check the Sim card installation, and try power off and on
the device.
9, If 4G Status shows “DISCONNECTED 11”, it means the 4G SIM card setup
the PIN code, please plug the SIM card to your phone, then cancel the PIN
code by your phone. You can also GOOGLE search “How to turn SIM PIN on
and off” to get the more detailed instructions.
Note: If 4G enabled, LAN/WiFi can not do live streaming job.
If you want to use WiFi or LAN to do live streaming, please disable 4G,
apply and reboot

15
8. Main Stream Encoding Setting
8.1 Video Encoding Setting
Encoding Type: H.264 or H.265 or Mjpeg
Encode level: baseline profile / main profile / high profile
Encoding frame rate: 5-60 frames(it can output 60P When Input is 60P too)
Bitrate control: VBR(quality priority) and CBR(bandwidth Priority)
GOP: 30 (Key frame interval)
Encoding size:
1920x1080,1680x1050,1280x720,1024x576,850x480,720x576,720x540,720x
480,720x404,704x576,640x480,640x360,608x488,544x480,480x480,480x38
4,480x360,480x320,480x272,480x720,400x320,400x224,352x480,352x228,3
20x256,320x240,320x180,240x180,176x144
Video bit rate: 16-32000K

16
8.2 Protocol Setting
UTP protocol(Private) ,default address http://192.168.1.168/0.utp
HTTP protocol, default address http://192.168.1.168/0.ts
HLS protocol, default address http://192.168.1.168/0.m3u8
FLV protocol, default address http://192.168.1.168/0.flv
RTSP protocol, default address rtsp://192.168.1.168/0
RTMP pull stream address, default address rtmp://192.168.1.168/live/0
RTMP push stream address:
rtmp://ip:port/xxx/xxx or rtmp://user:pass@ip:port/xxx/xxx
RTMP default port: 1935
Multicast protocol, default address UDP://@238.0.0.1:1234
Unicast protocol, default address:
UDP://@192.168.1.50:1234 (Note:192.168.1.50 is received device)
SRT pull stream address, default address: srt://192.168.1.168:9000
SRT push stream address: default address: srt://192.168.1.169:9000
(Note:192.168.1.169 is SRT server IP address)
Sub Stream(1,2,3) Encoding Setting:
The configuration methods are same with main stream

17
9 OSD Setting
Zone 1-4,you can enable max to 4 image or txt
(Text, support English/number Character)
(Image, support 24bit BMP file ,less than 500KB,transparency color is R:241
G:241 B:241)
X: the left and right positions displayed by 0-1920 text.
Y: the up and down positions displayed by 0-1080 text.
Font Size: the size of 8-72 text display in the display screen.
Alpha: 0-128 , transparency
Logo: select logo files
(Please upload PNG or 24-bit BMP(0xF1F1F1 is transparent) pictures less
than 500 kByte, the file name is logo1.bmp\logo2.bmp\logo3.bmp\logo4.bmp,
or logo1.png\logo2.png\logo3.png\logo4.png)

18
10. Instructions for Live on Youtube
1.Open live streaming page on Youtube
2.Create a live stream channel
3.Copy rtmp address from Youtube.
The whole address(Stream URL+ Stream Key) is
rtmp://a.rtmp.youtube.com/live2/hrbg-47km-1xmy-wa1b-8ayh
“/” is necessary
\

19
4. Paste the whole RTMP address in “RTMP/RTSP PUSH URL” of the device
web, select “Enable”. click “Apply”, then click “reboot” on reboot interface.
5. Youtube request audio must be available, so please confirm your input
source has audio at the same time.
Setup “Sampling Rate” to 48000 is better for Youtube Live.
6, Cos Youtube do not support H.265 encoding video, please select the stream
encoding type to H.264

20
7, Check the Network settings carefully, refer to “7. Network Setting”
11. Instructions for Live on Facebook
1.Open live streaming page on Facebook,
https://www.facebook.com/live/create
This manual suits for next models
2
Table of contents
Other Iseevy Media Converter manuals
Popular Media Converter manuals by other brands

ADF Web
ADF Web HD67E05-IP-A1 user manual

HEIDENHAIN
HEIDENHAIN AK ERP 10 Series Mounting instructions

Optoma
Optoma ThemeScene HD3000 Service manual

IONODES
IONODES ION-R200 user manual

Shenzhen 3onedata Technology
Shenzhen 3onedata Technology 3012 user manual

Converters.TV
Converters.TV Hand View III Operation manual