iskn REPAPER User manual


We are delighted to welcome you to the Repaper community.
This user guide gives you all the best tips to get started
with your Repaper.
Find these instructions for use at: iskn.co/start
EN
FR
DE
ES
CN

2
GET STARTED
Box content ................................................................................................................................................................................................................. 3
Repaper: a brand new 3-in-1 ............................................................................................................................................................. 4
Some basic notions to get started ............................................................................................................................................ 5
Before using Repaper .................................................................................................................................................................................. 6
You’re almost there ......................................................................................................................................................................................... 6
Repaper & Screen: from paper to the screen, in real time ................................................................... 7
- Slip on Repaper Ring™ ................................................................................................................................................................................ 7
- Attach a sheet of paper ............................................................................................................................................................................. 7
- Download Repaper Studio ..................................................................................................................................................................... 8
- Switch on and connect Repaper ..................................................................................................................................................... 9
Any questions? ....................................................................................................................................................................................................... 10

3
BOX CONTENT
REPAPER REPAPER RING™
(SIZE S)
REPAPER STYLUS
2B LEAD PENCIL 2 REPAPER CLIPS MICRO USB CABLE
SKETCHBOOK
(A5)
USER GUIDE LEGAL NOTICE
LEGAL
NOTICE
EN
FR
DE
ES
CN
USER GUIDE
Guide d’utilisation
Bedienungsanleitung
Guía de uso
用户指南
A5
14,8 cm x 21 cm
5.8 in x 8.3 in
180 g / m2
110,5 lb
NATURAL WHITE
HEAVY WEIGHT DRAWING PAPER

4
REPAPER: A BRAND NEW 3-IN-1
Give your ideas free rein. Anywhere, anytime.
REPAPER & SCREEN
From paper to the screen, in real time.
Watch your creations come to life before your very eyes,
at your ngertips. Capture your ideas in no time, with
your favorite tools.
REPAPER ONLY
On paper, no screen.
Just using an ordinary sheet of paper, your sketches can
be saved in Repaper.
Go to Repaper Studio to discover this feature.
Good to know
Save up to 10 drawings in the Repaper memory if not
connected.
Micro SD card slot up to 32GB for unlimited storage
(card not included).
REPAPER & STYLUS
Paperless, with a stylus.
Use Repaper as a graphic tablet whenever you want. With
Repaper Stylus, edit and enhance your creations with
your favorite software.
Go to Repaper Studio to discover this feature.
Good to know
Activate Repaper & Stylus via Repaper Studio.
Handling of pressure levels depends on your graphics
software.
You will need:
You will need:
You will need:
or or

5
SOME BASIC NOTIONS TO GET STARTED
Button 0
Front LED 1
Front LED 2
Micro USB slot Side LED
Micro SD card slot Power on button
Button 1
Button 2Button 4
Button 3Conguration of buttons
in Repaper Studio
Side LED
Charging
Charged
Front LED 1
Repaper ON / Pulsing blue
Repaper connected / Solid blue
Low battery indicator / Flashing red
Front LED 2
Contact detected
Unstable environment / Flashing red
See page 6
Marking out the active area
EN
FR
DE
ES
CN

6
BEFORE USING REPAPER
iskn’s Augmented Interaction™ technology works with magnets measuring the position
and orientation of Repaper Ring™ in real time.
Follow these few basic rules for optimal use:
• Avoid placing Repaper on a metal table or one made
with metal parts.
• Be sure to use only one writing tool at a time.
For best use, keep all other metal objects more than
20cm (7,9“) away from Repaper (smartphones/tablets,
speakers, magnets, computers, etc.).
YOU’RE ALMOST THERE
First charge Repaper using your computer (PC or Mac).
CONNECT REPAPER
to your computer using the micro USB cable.
START OF CHARGING
The side LED is orange.
DEVICE IS CHARGED
The side LED is green.
Only charge Repaper using the micro USB cable provided
via your PC or Mac.
Do not charge Repaper by plugging it directly into an AC
outlet using an adapter.
You can start using Repaper while charging.
3 hours maximum

7
SLIP ON REPAPER RING™ / REPAPER & SCREEN
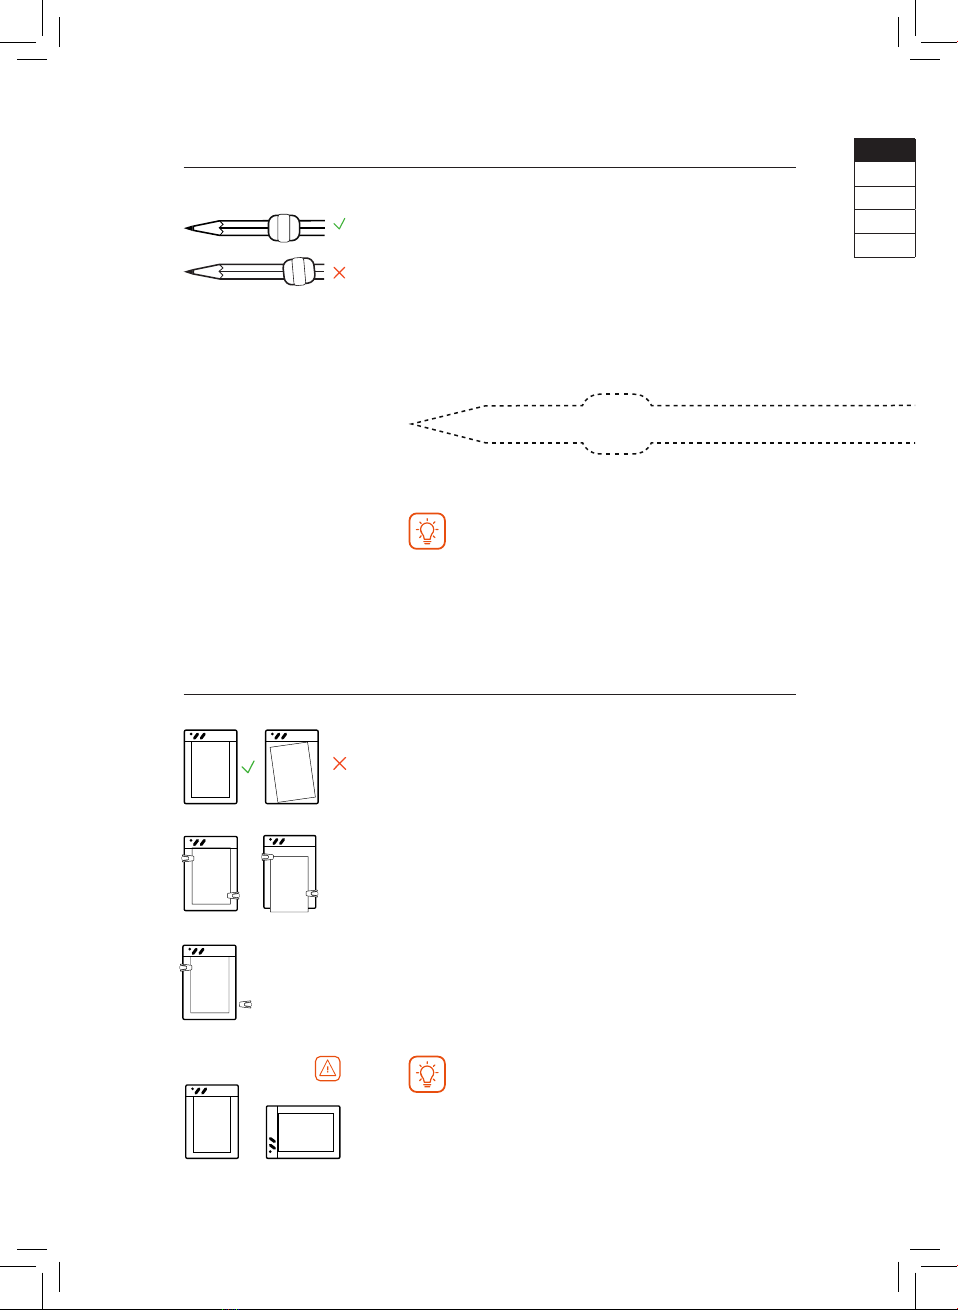
Take your favorite pencil, slide down Repaper Ring™ to
about 3 - 4cm (1,2“) (1,6“) from the tip.
TIP
Check the position of Repaper Ring™ by placing your tool
here.
Good to know
Repaper Ring™ provided in this box is size S.
It can be used on all writing tools with a diameter of
up to 7.3mm (0,3“).
For larger diameters, size M is available
(sold separately).
List of compatible tools: iskn.co/tools
ATTACH A SHEET OF PAPER / REPAPER & SCREEN
Remove a sheet of paper from the sketchbook and place
it on Repaper surface using the markings.
1. Slide the Repaper clips until you hear them click.
2. To put on a new sheet: push the tab down and insert
your sheet.
3. Lift the tab and pull back the Repaper clips.
Good to know
Be careful not to change the position of the sheet
during use.
Use only one sheet at a time (not a sketchbook).
All types of paper are compatible with Repaper.
Sheet dimensions: 148 mm x 210 mm (5.8’’ x 8.3’’).
EN
FR
DE
ES
CN
Ensure Repaper Orientation
1. 2.
3.
or

8
DOWNLOAD REPAPER STUDIO / REPAPER & SCREEN
REPAPER STUDIO
Developed to work with Repaper, the Repaper Studio
application brings your creations to life.
Good to know
Internet connection required.
Repaper Studio and Repaper are compatible with
smartphones and tablets (Bluetooth®), PC and Mac
(micro USB cable).
List of compatible devices:
iskn.co/compatibility
PC / MAC
Download from:
iskn.co/app
TABLET / SMARTPHONE
Download from:

9
PC / MAC TABLET/ SMARTPHONE
Switch on Repaper by pressing and holding down the on button.
Front LED 1 blue pulsing light shows that Repaper is on.
Connect Repaper to your
computer using the micro USB
cable supplied.
Enable Bluetooth on your
tablet/smartphone.
Open Repaper Studio and follow the instructions.
The solid blue front LED 1 indicates that Repaper is now
connected and ready for use.
SWITCH ON AND CONNECT REPAPER / REPAPER & SCREEN
NOW YOU CAN UNLEASH YOUR CREATIVITY!
Start drawing naturally and simply.
Your creations can come to life, from paper to the screen, in real time.
For optimal performance, be sure to carry out the most
recent update of Repaper from your computer (PC or Mac).
Follow the steps in your Repaper section of Repaper
Studio.
EN
FR
DE
ES
CN

10
ANY QUESTIONS?
Happy?
Share your experience!
#withrepaper
iskn.co
LEARN MORE
iskn.co/start
Find the step by step
guide to Repaper online.
FOR HELP
help.iskn.co
Check out these
questions and answers
about Repaper and its
use.
PROBLEMS?
help@iskn.co
For any other questions,
please do not hesitate
to contact us.
We will do our best to
answer you as soon as
possible!

Nous sommes heureux de vous accueillir
dans la communauté Repaper.
Ce guide d’utilisation vous donnera toutes les clés pour
prendre en main votre Repaper.
Retrouvez ces conseils d’utilisation sur : iskn.co/start
EN
FR
DE
ES
CN

12
MISE EN ROUTE
Contenu de votre boîte ............................................................................................................................................................................ 13
Repaper : un 3-en-1 inédit ..................................................................................................................................................................... 14
Quelques notions pour commencer ....................................................................................................................................... 15
Avant d’utiliser Repaper ......................................................................................................................................................................... 16
Vous y êtes presque ....................................................................................................................................................................................... 16
Repaper & Screen : du papier à l’écran, en temps réel ................................................................................ 17
- Glissez Repaper Ring™ ............................................................................................................................................................................... 17
- Fixez une feuille de papier ..................................................................................................................................................................... 17
- Téléchargez Repaper Studio ................................................................................................................................................................ 18
- Allumez et connectez Repaper ......................................................................................................................................................... 19
Des questions ? ...................................................................................................................................................................................................... 20

13
CONTENU DE VOTRE BOÎTE
REPAPER REPAPER RING™
(TAILLE S)
REPAPER STYLUS
CRAYON GRAPHITE
2B
2 REPAPER CLIPS CÂBLE MICRO USB
CARNET
DE CROQUIS
(A5)
GUIDE
D’UTILISATION
NOTICE LÉGALE
LEGAL
NOTICE
EN
FR
DE
ES
CN
USER GUIDE
Guide d’utilisation
Bedienungsanleitung
Guía de uso
用户指南
A5
14,8 cm x 21 cm
5.8 in x 8.3 in
180 g / m2
110,5 lb
NATURAL WHITE
HEAVY WEIGHT DRAWING PAPER

14
REPAPER : UN 3-EN-1 INÉDIT
Laissez vos idées s’exprimer au gré de vos envies. N’importe où, n’importe quand.
REPAPER & SCREEN
Du papier à l’écran, en temps réel.
Vos créations prennent vie sous vos yeux, du bout des
doigts. Capturez vos idées en un instant, avec vos outils
préférés.
REPAPER ONLY
Sur papier, sans écran.
Sur une simple feuille de papier, vos croquis sont
sauvegardés dans Repaper.
Rendez-vous dans Repaper Studio pour découvrir cette
fonctionnalité.
Bon à savoir
Sauvegardez jusqu’à 10 dessins dans la mémoire de
Repaper si non connectée.
Port carte micro SD jusqu’à 32 Go pour un stockage
illimité (carte non incluse).
REPAPER & STYLUS
Sans papier, avec stylet.
Utilisez Repaper comme une tablette graphique quand
vous le souhaitez. Avec Repaper Stylus, éditez et sublimez
vos créations sur vos logiciels préférés.
Rendez-vous dans Repaper Studio pour découvrir cette
fonctionnalité.
Bon à savoir
Activez Repaper & Stylus via Repaper Studio.
La gestion des niveaux de pression dépend de vos
logiciels de création.
Vous aurez besoin de :
ou ou

15
QUELQUES NOTIONS POUR COMMENCER
Bouton 0
LED frontale 1
LED frontale 2
Port micro USB LED latérale
Port carte micro SD Bouton d’allumage
Bouton 1
Bouton 2Bouton 4
Bouton 3
LED latérale
En charge
Chargée
LED frontale 1
Repaper ON / bleue respirante
Repaper connectée / bleue xe
Batterie faible / rouge clignotante
LED frontale 2
Contact outil détecté
Environnement instable / rouge clignotante
voir page 16
Délimitation de la zone active
EN
FR
DE
ES
CN
Conguration des boutons
dans Repaper Studio

16
AVANT D’UTILISER REPAPER
La technologie iskn d’Augmented Interaction™ fonctionne par magnétisme. Celle-ci
mesure la position et l’orientation de Repaper Ring™ en temps réel.
Quelques principes sont à respecter pour un
fonctionnement optimal :
• Évitez de positionner Repaper sur une table métallique
ou composée de pièces en métal.
• Veillez à n’utiliser qu’un seul outil d’écriture à la fois.
Pour une utilisation uide, éloignez tout autre objet
métallique à plus de 20cm de Repaper (smartphones/
tablettes, haut-parleurs, aimants, ordinateurs, etc.).
VOUS Y ÊTES PRESQUE
Commencez par recharger Repaper à l’aide de votre ordinateur (PC ou Mac).
BRANCHEZ REPAPER
à votre ordinateur à l’aide du câble micro USB.
DÉBUT DE LA CHARGE
La LED latérale est orange.
FIN DE LA CHARGE
La LED latérale est verte.
Chargez uniquement Repaper sur votre PC ou Mac
à l’aide du câble micro USB fourni.
Ne chargez pas Repaper en la branchant directement
sur une prise secteur à l’aide d’un adaptateur.
Vous pouvez commencer à utiliser Repaper pendant la
charge.
3 heures maximum

17
GLISSEZ REPAPER RING™ / REPAPER & SCREEN
Prenez votre crayon favori, glissez Repaper Ring™ à
environ 3 - 4cm de la pointe.
ASTUCE
Vériez la position de Repaper Ring™ en plaçant votre
outil ici.
Bon à savoir
Repaper Ring™ fournie dans cette boîte est de tailleS.
Elle peut se glisser sur tous les outils d’écriture ayant
un diamètre allant jusqu’à 7,3mm.
Pour un diamètre supérieur, la taille M est disponible
(vendue séparément).
Liste des outils compatibles : iskn.co/tools
FIXEZ UNE FEUILLE DE PAPIER / REPAPER & SCREEN
Retirez une feuille du carnet de croquis et placez-la sur la
surface de Repaper en vous aidant des repères.
1. Faites glisser les Repaper clips jusqu’au clic.
2. Placez une nouvelle feuille : poussez la languette vers
le bas et insérez votre feuille.
3. Soulevez la languette et retirez les Repaper clips.
Bon à savoir
Veillez à ne pas modier la position de la feuille
pendant l’utilisation.
N’utilisez qu’une seule feuille à la fois
(pas de carnet).
Tous les types de papier sont compatibles avec
Repaper. Dimensions de la feuille : 148 mm x 210 mm.
EN
FR
DE
ES
CN
Orientation Repaper à respecter
1. 2.
3.
ou

18
TÉLÉCHARGEZ REPAPER STUDIO / REPAPER & SCREEN
REPAPER STUDIO
Développée pour fonctionner avec Repaper,
l’application Repaper Studio donne vie à vos créations.
Bon à savoir
Connexion internet requise.
Repaper Studio et Repaper sont compatibles avec les
smartphones et tablettes (Bluetooth®), PC et Mac
(câble micro USB).
Liste des appareils compatibles :
iskn.co/compatibility
PC / MAC
À télécharger sur :
iskn.co/app
TABLETTE / MOBILE
À télécharger sur :

19
PC / MAC
TABLETTE / SMARTPHONE
Allumez Repaper en eectuant un appui long sur le bouton
d’allumage.
La LED frontale 1 bleue respirante indique que Repaper
est allumée.
Branchez Repaper à votre
ordinateur à l’aide du
câble micro USB fourni.
Activez le Bluetooth de votre
tablette / smartphone.
Ouvrez Repaper Studio et suivez les étapes.
La LED frontale 1 bleue xe indique que Repaper est maintenant
connectée et prête à être utilisée.
ALLUMEZ ET CONNECTEZ REPAPER / REPAPER & SCREEN
VOTRE CRÉATIVITÉ PEUT MAINTENANT S’ENVOLER !
Commencez à dessiner naturellement et simplement.
Vos créations prennent vie, du papier à l’écran, en temps réel.
Pour un fonctionnement optimal, veillez à eectuer la
dernière mise à jour de Repaper depuis votre ordinateur
(PC ou Mac). Suivez les étapes de la section de votre
Repaper dans Repaper Studio.
EN
FR
DE
ES
CN
Table of contents
Languages:
Other iskn Tablet manuals