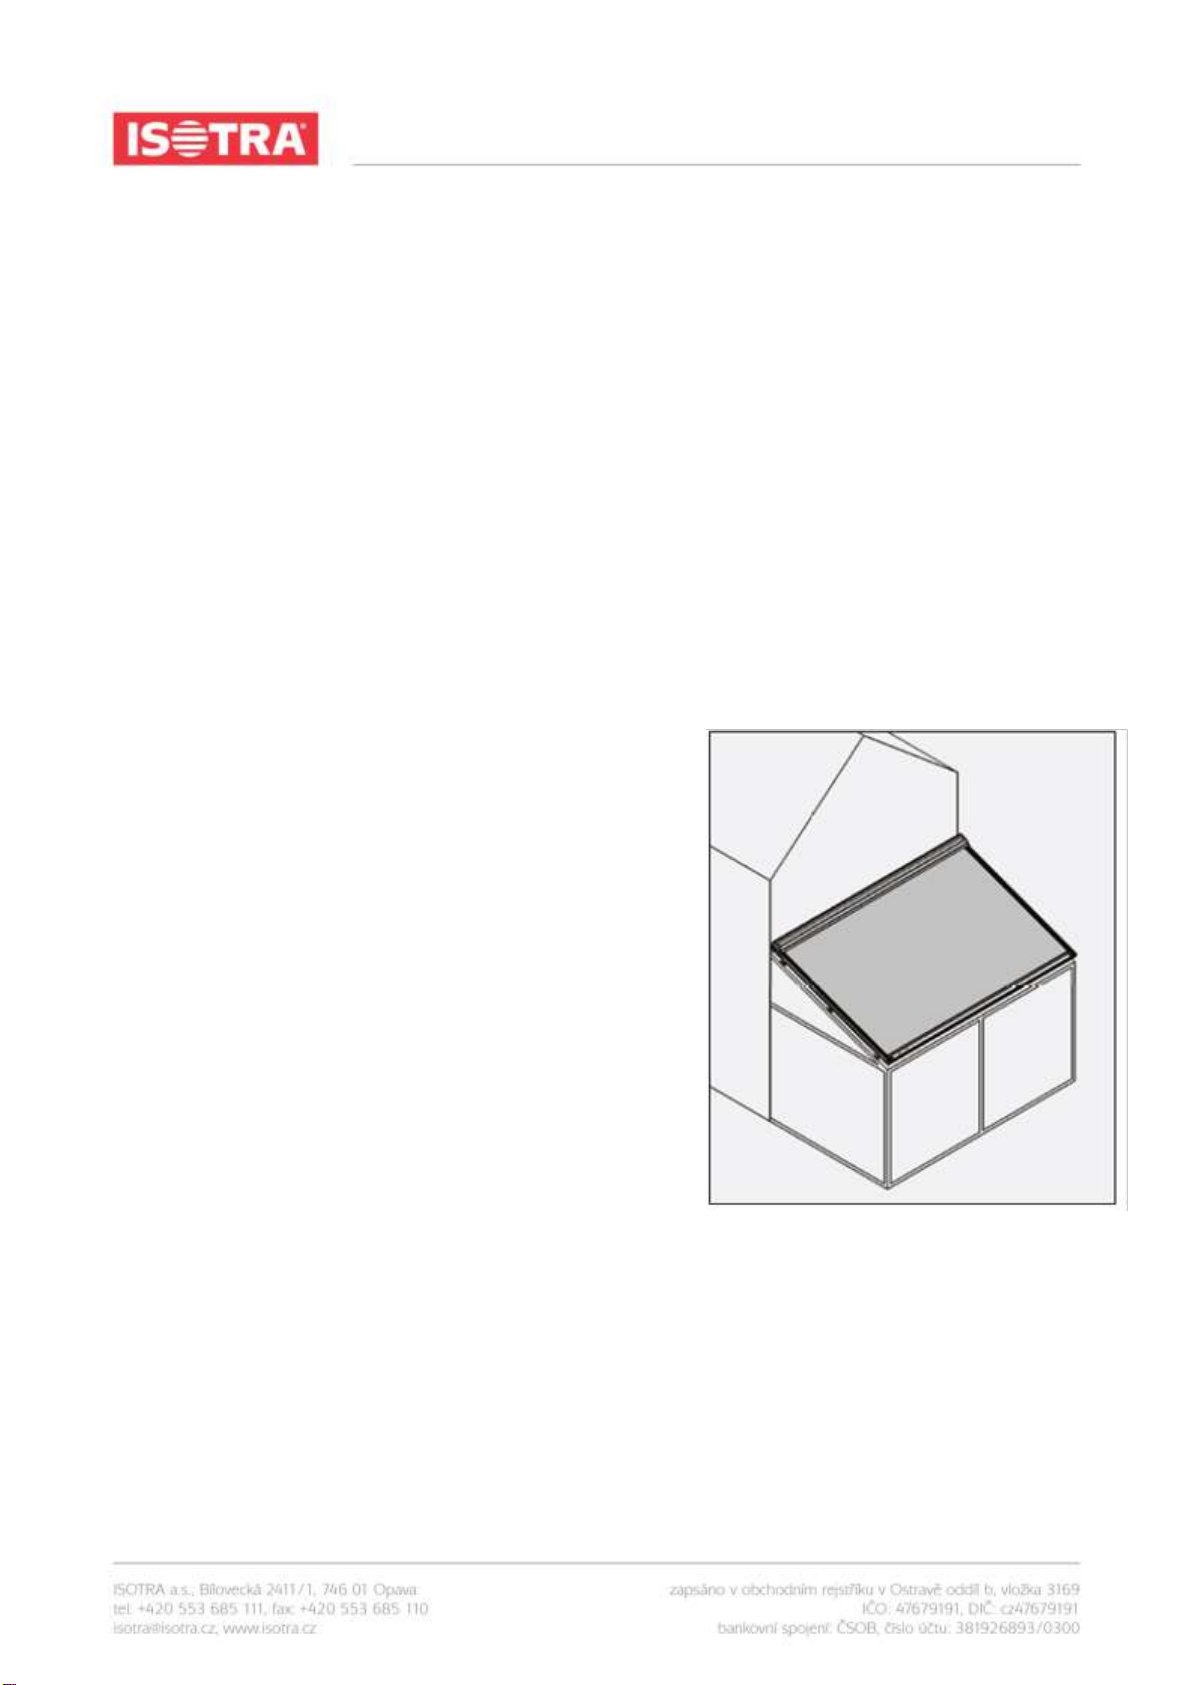
Isotra VERANDA HRV80-ZIP User manual

MEASUREMENT AND INSTALLATION MANUAL
Manual validity: 10.10.2023
1
VERANDA HRV80-ZIP
ALERTS AND WARNINGS
Installation must be performed by qualified personnel in accordance with EN and locally applicable safety regulations on
electrical systems for households.
See also the document with the product technical data.
Study this manual in detail before utilising the product.
The stretching of springs creates considerable forces. Be very careful and stand on a firm surface during the work.
Ensure good lighting of the assembly area. Remove obstacles and impurities. Ensure that no other persons except the
fitters are present in the work area. Unauthorised persons are likely to get in the way and endanger themselves and
other people.
This symbol indicates the possibility of personal injury or damage to the product.
This symbol indicates warning.
This symbol indicates that force must be used during the activity.
Only use electric screwdrivers with the proper tightening torque set.
This symbol indicates the need of visual check.
This symbol indicates an optional element.
The manufacturer does not accept any responsibility for any inaccuracies or typographical errors that may be found in
this manual. The manufacturer reserves a right to carry out alterations of the product which it deems necessary or in
the user’s interest and which do not change the basic operating and safety characteristics of the device. It is forbidden
to make changes of any kind to the design or configuration without prior consultation with the manufacturer. The end
user must receive operating instruction for the product.

MEASUREMENT AND INSTALLATION MANUAL
Manual validity: 10.10.2023
2
GENERAL INSTRUCTIONS
Several safety measures must be adopted for the safe use and maintenance of the Veranda. Observe the following
instructions for your own safety and safety of other persons. Should you have any doubts, contact your supplier.
This manual describes the use and operation of standard shading products. In addition to the instructions given in this
document, instructions for some components (e.g., electrical) may also be included in other documents. Read this
manual carefully before using the product.
All components supplied are designed for this particular product. Adding other products may adversely affect the safety
of this product. If any components are added or modified without consultation with the supplier, the warranty shall
become void.
Do not allow unauthorised persons (especially children) to operate this product. They may be exposed to danger during
operation. No rights shall be derived from this manual. We reserve the right to make technical modifications without
having to inform the customers. Your supplier shall be obliged to supply shading technology to you in accordance with
locally applicable standards and requirements. Check that the product is CE marked and that all documents have been
supplied.
THE VERANDA IS A LARGE AND HEAVY MOVING OBJECT. IMPROPER OPERATION, DEFECTS, AND NEGLIGENT ACTIVITIES
MAY POSE A DANGER OR PERSONAL INJURY. CONTACT YOUR SUPPLIER SHOULD YOU HAVE ANY QUESTIONS OR
MATTERS THAT ARE NOT EXPLAINED OR INSUFFICIENTLY EXPLAINED IN THIS MANUAL. ALWAYS PROCEED WITH
CAUTION WHEN USING THIS SHADING PRODUCT.
CAUTION: PINCH OR TRAP
HAZARD!
CAUTION: CUT HAZARD!
CAUTION: HAZARD!
CAUTION: SAFETY INSTRUCTIONS FOR SHADING PRODUCT
Improper installation, maintenance, or operation may pose a danger or personal injury.
This shading product must be CE marked.
Observe the following safety instructions:
A. Ensure that installation, maintenance, and repairs be performed by qualified and skilled persons.
B. Study this manual prior to performing any installation works, maintenance, or repairs. Do not commence any works
unless you have a manual for the given shading product available.
C. Maintain safe distance from the moving sunshade. The moving sunshade is likely to pose a danger or cause personal
injury.
D. Prevent children from operating the product.
E. When operating the sunshade, always have it in sight. Its movement may be obstructed by persons (especially
children).
F. Watch your fingers when in vicinity of the moving telescopic poles, drums, box, and other moving parts of the
sunshade.

MEASUREMENT AND INSTALLATION MANUAL
Manual validity: 10.10.2023
3
G. Ensure regular checks and maintenance of the sunshade.
ATTENTION:
SPRINGS IN THE LOWER PROFILE AND THE PULL CORDS ARE UNDER A VERY HIGH MECHANICAL TENSION.
NEVER ATTEMPT TO REPAIR, ADJUST, OR DISASSEMBLE THEM YOURSELF.
The above may pose a danger or cause personal injury. Call a qualified technician! Read this manual before installing or
repairing the product.
Study this manual before performing any work on the Veranda. To ensure personal safety, it is essential to follow the
instructions in this manual.
Store this manual in a safe place. If you sell the sunshade, or hand it over to another person, you are required to hand
this manual over to the new owner.
The supplier shall not be responsible for any loss or damage caused by improper use of the Veranda.
OPERATING PRINCIPLE
The Veranda box contains a winding drum to which fabric is wound. When unwinding the fabric, a system of cords and
springs (which is under tension) forces the lower profile outside, maintaining the fabric taut. Optimum fabric tension is
attained in the lowest position of the lower profile. The lower profile moves in sliding blocks and guide rails.
NEVER DISASSEMBLE THE LOWER PROFILE, SLIDING BLOCK, CORD, SPRING, LATERAL FRAME, HOLDER, OR
ANY OTHER PART OF THE SUNSHADE. THESE ACTIVITIES MAY ONLY BE PERFORMED BY QUALIFIED,
COMPETENT PERSONS.
OPENING AND SHUTTING
ALWAYS HAVE THE VERANDA IN SIGHT WHEN OPENING AND SHUTTING IT, AND ENSURE NO PERSONS
OR OBSTACLES PREVENT SMOOTH MOVEMENT OF THE LOWER PROFILE.
SHUT THE SUNSHADE AT NIGHT. THE USER MUST ALWAYS BE AWARE WHETHER THE SUNSHADE IS
OPEN OR SHUT.
PREVENT CHILDREN AND UNAUTHORISED PERSONS FROM USING OR PLAYING WITH THE SUNSHADE.
THE SAME APPLIES TO SWITCHES AND REMOTE CONTROLS. ALWAYS KEEP THE REMOTE CONTROL OUT
OF THE REACH OF CHILDREN.
WHEN WORK IS BEING PERFORMED NEAR THE SUNSHADE, THE SUNSHADE MUST BE SHUT AND THE
AUTOMATIC CONTROL AND POWER SUPPLY SWITCHED OFF.
The sunshade is powered by an electric motor.
If you hear abnormal noise during the operation, switch off the sunshade and inform your technician.
The following part contains a concise set of instructions for users. Detailed instructions are specified in the operating
instructions for the electric drive.
OPENING
Press the DOWN button on the switching unit, remote controller, or automatic control unit (hold the button pressed in
case of press-button switches).

MEASUREMENT AND INSTALLATION MANUAL
Manual validity: 10.10.2023
4
STOPPING
Press the OFF button on the switching unit, remote controller, or automatic control unit.
SHUTTING
Press the UP button on the switching unit, remote controller, or automatic control unit (hold the button pressed in case
of press-button switches).
SHUTTING THE SUNSHADE
ALWAYS BEAR THE FOLLOWING IN MIND WHEN SHUTTING THE SUNSHADE:
TO PREVENT THE RISK OF PINCHING, HOLD YOUR HEAD, FINGERS, AND OTHER PARTS OF THE BODY
OUT OF THE REACH OF THE BOX WHEN THE LOWER PROFILE MOVES TO THE IDLE POSITION ON THE
BOX.
BE CAREFUL ABOUT THE RISK OF GRIPPING (LOOSE GARMENTS) NEAR THE DRUMS. SHEAR HAZARD
MAY OCCUR IN AREAS WHERE THE TELESCOPIC POLE PASSES THROUGH THE DRUMS. THIS MAY
POSSIBLY LEAD TO SEIZING AND PINCHING.
IMPROPER USE
The shading system has been designed as sun protection, and it therefore cannot be used as an awning for any weather
conditions. Improper use may lead to serious danger.
SAFETY MEASURES:
Do not expose the Veranda to wind loads exceeding the values specified in the handover protocol. Excessive wind loads
may seriously damage the fabric, mechanism, and mounting or anchoring elements. The wind resistance class actually
achieved after installation of the sunshade depends on the fasteners used, surface to which the system is fixed, and the
place of installation. Do not use the Veranda when the wind force exceeds the wind resistance class determined by the
installer, which may be lower than the wind resistance class specified by the manufacturer.
Do not open the Veranda in the rain. This will prevent the risk of water accumulation on the fabric. Water accumulation
increases the weight of the Veranda and is likely to cause tear of the fabric, damage to the mechanical components,
detachment of the Veranda from the mounting surface, or injury to the by-standers and users (by falling objects).
Do not open the Veranda during snowfall or in frost (risk of damage).
Do not roll the Veranda up if foreign objects are present on the fabric or in the box. First remove such objects,
otherwise there is a risk of damage to the Veranda (by falling objects).
Do not open the Veranda if persons or other obstacles are present in the direction of opening. This is likely to cause
personal injury.
Do not hang any objects (such as flower pots) to the lower profile, guide rails, and box. This may cause damage to the
Veranda and lead to the risk of fall of objects.

MEASUREMENT AND INSTALLATION MANUAL
Manual validity: 10.10.2023
5
Maximum force on non-retractable parts = 800 Pa.
3
up to wind resistance class 3 = wind force of 6 Bft. = 49 km/h max. allowed
HRV08-ZIP
HRV80-ZIP
HRV80-ZIP-2P
2
up to wind resistance class 2 = wind force of 5 Bft. = 35 km/h max. allowed
HRV52
HRV08-ZIP
HRV80-ZIP
HRV80-ZIP-2P
1
up to wind resistance class 1 = wind force of 4 Bft. = 27 km/h max. allowed
HRV52
HRV08-ZIP
HRV80-ZIP
HRV80-ZIP-2P
0
up to wind resistance class 0 = wind force of ≤3 Bft. = ≤20 km/h max. allowed
HRV52
HRV08-ZIP
HRV80-ZIP
HRV80-ZIP-2P
SAFETY ELEMENTS
Automatic controller: wind protection.
Automatic controller: wind/sun control system.
Study the respective operating instructions thoroughly.
Note: The user must always be aware whether the sunshade is open or shut. The controller may fail in unusual
circumstances like power failure, defect, sudden storm, etc. This may cause damage to the Veranda and lead to the risk
of fall of objects.
If you know that you will not be present for a longer period time, switch the automatic controller to manual operation
and roll the Veranda up before leaving.
If the lower profile of the Veranda moves at the height under 2.5 metres above the ground, the Veranda must be
operated by an impulse switch (the motor stops if you release the switch). This ensures the user always has a good view
of the moving Veranda and prevents personal injury.
The motorised Veranda cannot be rolled up in case of power failure. In areas with high wind forces and frequent power
failures, it is recommended to consider using the motor-generator set as a backup drive.
REPAIRS, MAINTENANCE, DEFECTS
To ensure optimal use of the Veranda, it is recommended to ensure its regular inspection and maintenance (at least
once a year). For your own safety, we recommend that you sign a maintenance contract with the Veranda installation
company –preferably with the person who installed your Veranda.
The Veranda requires regular checks for wear and damage to the fabric and frame. Veranda that needs repair must not
be used.
In case of failure, contact the company that ensures maintenance for you. Any and all warranty claims shall be void
unless annual maintenance is performed by a specialised company using original spare parts.
MAINTENANCE AND REPAIRS OF THE SUNSHADE, ESPECIALLY THE ARMS, MOTORS, AND SAFETY
ELEMENTS, MAY ONLY BE PERFORMED BY AUTHORISED PERSONS. MOTORS MAY START
ABRUPTLY. IT IS THEREFORE NECESSARY TO DISCONNECT THE MOTORS FROM THE MAINS (E.G.,
BY SWITCHING OFF THE CIRCUIT BREAKER) WHILE CLEANING OR MAINTENANCE IS PERFORMED.
OUR PRODUCTS MUST BE INSTALLED IN A MANNER ENSURING THAT ALL PARTS ALWAYS REMAIN
ACCESSIBLE FOR MAINTENANCE AND REPAIRS, OTHERWISE THE MANUFACTURER SHALL NOT
BEAR ANY ADDITIONAL COSTS (E.G., FOR DEMOLITION WORKS AND REPAIRS OF THE FAÇADE AND
INTERIOR WALLS) CAUSED.
You may perform the following undemanding maintenance works and checks yourself:
Maintenance of the mechanism:

MEASUREMENT AND INSTALLATION MANUAL
Manual validity: 10.10.2023
6
Check of pull cords for damage and/or wear (every 3 months).
Check of cord position in the roller (every 3 months).
Regular cleaning of areas in the guide rails in which the sliding block wheels move (every 3 months, or more frequently
if necessary).
Lubrication of the sliding block wheels (at least once a year).
Lubrication of the wheels under the end of the guide rails (at least once a year).
Lubrication of the wheels opposite the control side (at least once a year).
Lubrication of the drum bearings (at least once a year).
Lubrication of the hinge pins of the arms and bearings opposite the control mechanisms using a silicone-based dry
lubricant (at least once a year).
Note: Do not soil the fabric.
Maintenance of the profiles:
Regularly clean the profiles with lukewarm water and a neutral detergent, e.g., car shampoo. Then wash with fresh
water (at least twice a year).
Never use corrosive and aggressive products. We strongly discourage using steel wool and other abrasive materials.
Maintenance of the fabric:
The Veranda fabric is covered with a special layer that resists soiling.
Dust should be removed from the fabric by a vacuum cleaner, by an air blower, by beating, or brushing down.
Water stains should be thoroughly wetted and wiped by a clean cloth. Detergents like soap or other chemicals should
only be used if absolutely necessary.
The best way to clean fingerprints and grease spots is to use a clean cloth with a drop of a mild dish soap (never use
trichloroethane III).
Also bear the following in mind:
Never open the Veranda in heavy rain, strong wind, frost, and snowfall.
If the fabric is permanently exposed to all weather conditions, it is highly probable that sediments caused by air
pollution will accumulate on the fabric, decreasing the quality of the fabric.
THIS VERANDA MAY ONLY BE DISASSEMBLED
AND REMOVED BY QUALIFIED FITTERS. THE
DISASSEMBLY OF COMPONENTS MAY BE
DANGEROUS AS THE CORDS, SPRING, AND
TELESCOPIC POLE ARE UNDER A VERY HIGH
MECHANICAL TENSION. SECURE THESE
CONTACT YOUR SUPPLIER SHOULD YOU HAVE ANY
QUESTIONS OR MATTERS THAT ARE NOT
EXPLAINED OR INSUFFICIENTLY EXPLAINED IN THIS
MANUAL.
THE VERANDA IS A LARGE AND HEAVY MOVING
OBJECT. IMPROPER OPERATION, DEFECTS, AND

MEASUREMENT AND INSTALLATION MANUAL
Manual validity: 10.10.2023
7
The fabric may be rolled up for a short time even if it is wet. After that, it is necessary to dry the fabric in unrolled
position. If wet fabric remains rolled up for a long time, mildew or rot is likely to appear.
HAZARDOUS DANGEROUS COMPONENTS
PRIOR TO DISASSEMBLY.
ENSURE DISPOSAL OF THE DISASSEMBLED
SHADING SYSTEM IN ACCORDANCE WITH
LOCAL ENVIRONMENTAL REGULATIONS. IF
NECESSARY, CONSULT THE LOCAL
ENVIRONMENTAL PROTECTION AUTHORITY.
NEGLIGENT ACTIVITIES MAY POSE A DANGER OR
PERSONAL INJURY.

MEASUREMENT AND INSTALLATION MANUAL
Manual validity: 10.10.2023
8
MEASUREMENT AND INSTALLATION
GENERAL INFORMATION
The HRV80-ZIP shutter is able, to a great extent, to regulate the amount of sunlight entering the room, thus reducing
uncomfortably high level of light and heat. The shutter fabric is protected and rolled up in a box which is closed by the
lower profile in the completely rolled-up position. The box is fastened to the guide rails.
Safe distance between the fabric and the veranda roof is ensured by guide rails and the cord-spring system that
maintains the fabric taut at all times. The system has been so designed that it is able to overcome any minor tolerances
in the roof structure seating. The whole system is made of corrosion-resistant materials.
There are several installation options. As a standard, the HRV80-ZIP shutter is installed above the veranda because the
most efficient method of sun protection is above the glass panels. The shutter may then be installed to the veranda
profiles using the holders. There are various types of holders available.
The HRV80-ZIP shutter is equipped with a zipper system that ensures proper tightening of the fabric in every position of
the lower profile and prevents the fabric from slipping off the guide rails. The individual parts of the fabric are always
fitted with a zipper on the left and right sides, where the thicker part locks with the plastic zipper profile. The profile is
inserted in an aluminium guide profile.
The HRV80-ZIP shutter consists of the following parts:
• Box with an easily removable winding drum with motorised control;
• Fabric with a zipper, rolled up in the box;
• Guide rails for easy connection of the zipper profile;
• Lower profiles with a spring that maintains the fabric taut.
INSTALLATION OPTIONS
The HRV80-ZIP shutter may only be installed to the supporting
structure, top–down.
• Outdoor installation;
• The fabric is located outside;
• The sunshade is visible from the outside;
• The zipper is at the window side;
• In case of Soltis 86 and 92 fabrics, the aluminium side is facing the
sun;
• In case of blackout fabrics, the grey film is facing the window.
Note: It is essential to comply with the minimum slope requirement to
prevent water from accumulating on the fabric, causing its bowing
with possible permanent deformation. This would cancel the
guarantee. If the shutter remains open in rain, water will run off in an
uncontrolled manner through the sliding blocks of the lower profile. There is no water-retention mechanism (gutter)
under the guide rails.
Minimum tilt angle for all fabrics and LED s lighting is 14°.
The maximum angle of slope for all variants is 30°!
•The following applies to Verandas with the Soltis 86 and Soltis 92 fabrics: in case of extension > 2670 mm, the fabric
must have a horizontal seam.
•The following applies to Verandas with the Soltis B92 fabrics: in case of extension > 1700 mm, the fabric must have a
horizontal seam.

MEASUREMENT AND INSTALLATION MANUAL
Manual validity: 10.10.2023
9
INSTALLATION
Note: Always ensure squareness of installation. If squareness is not ensured, the fabric is likely to wrinkle.
See the overview of assembly holders.
Caution: The maximum distance between two guide rail holders is 1600 mm.
The maximum overhang is 500 mm.
Make sure that the box and lower profile can be opened at all times and that the mechanical parts inside are always
accessible. If this rule is not complied with, ISOTRA shall not bear any costs associated with demolition works!
MEASUREMENT
Total width = from the centre of the guide rail to the centre of the guide rail. The outer part of the box is always 40 mm
(2×20 mm) wider than the centre of the guide rails or the centre of the fixing holders
Slope: measured from the back side of the box on the upper side by the wall to the front side of the guide rail including
the cover.
The final position of the lower profile may be set flush with the end of the guide rail cover.
Note: The box width is always 40 mm greater than the ordered width of the shutter.
Typ č. – Type
šířka – width
height

MEASUREMENT AND INSTALLATION MANUAL
Manual validity: 10.10.2023
10
DESIGN
The fabric has zippers on the sides, and if the guide rails are properly installed, the zippers ensure the fabric remains
taut in any position of the lower profile thanks to the tension between the zipper and the guide rails.
Cracking may be heard when rolling up the shutter, which is caused by the fabric tension that expels air from below the
fabric when rolling up. Wrinkling may also appear on the zipper side, caused by various material thicknesses and the
related expansion factors.
In case of blackout shutters, the zippers are on the Soltis side of the fabric, not on the side with the blackout film, which
increases adhesion and lower fabric movement. Due to this fact, it may be possible that part of the fabric in the zipper
may be visible due to wind force or in oblique view, but this is of little importance compared to the overall view or the
fabric tension (reduction of wrinkling).
When the 86/92 fabric is used, the zippers are always on the back side of the fabric –i.e., facing the window. In addition
to placing an inscription or a logo to the fabric, it is also possible to inverse the fabric colour or the fabric side on the
sunshade.
BLACKOUT
The Veranda can also be used to black out the room, i.e., to protect it from light coming from the outside during
presentations or projections, but it is not a 100% blackout during which it would be possible to develop photographs.
The following must be taken into account to achieve proper blackout:
• It is only possible by using a blackout fabric.
• The spaces between the guide rails, the box, the wall, and the window frame must be carefully sealed (for example, by
using silicone, rails, etc.).
• Wind action may cause the bottom lath to waft up, and a gap may occur as a result.
• Account should be taken of a small gap between the extension pole and the guide rail.
• Placing an extra angled profile (30×20×2) for the bottom section against the wall reduces the chance of light
penetration even more.
FASTENERS
All fasteners are made of stainless steel, and all accessories are always part of the supply.
PACKAGING
The Veranda HRV80-ZIP is supplied packed in rigid cardboard boxes.
USE AND MAINTENANCE
Proper use and maintenance substantially increase the Veranda’s service life.
Do not use the Veranda as rain or wind protection.
Regular maintenance prevents excessive wear and operational problems.
Cleaning the frame: use soft water instead of aggressive substances that are likely to damage the coating and
protective layers.
Cleaning the fabric: in dry condition, using a semi-stiff brush.
Remove stubborn stains with warm water and a weak solution of a detergent, then rinse with plenty of clean water.
Prior to rolling up, leave the fabric to completely dry up (this also applies in case of unexpected rain).

MEASUREMENT AND INSTALLATION MANUAL
Manual validity: 10.10.2023
11
SAFETY
To ensure safety of the end user, the Veranda must be installed in strict accordance with the installation instructions.
Lower SA bracket –Alu
LOWER SECTION IS
RETRACTED
1/2
2/2

MEASUREMENT AND INSTALLATION MANUAL
Manual validity: 10.10.2023
12
Upper SB bracket –Alu
Upper side of bracket –Alu

MEASUREMENT AND INSTALLATION MANUAL
Manual validity: 10.10.2023
13
Foot of Av raised bracket –Alu
Cv raised bracket –Alu
Foot of Bv raised bracket –Alu

MEASUREMENT AND INSTALLATION MANUAL
Manual validity: 10.10.2023
14
LIST OF NECESSARY TOOLS
typ B
ASSEMBLY STEPS
INTERMEDIATE STEPS

MEASUREMENT AND INSTALLATION MANUAL
Manual validity: 10.10.2023
15
INSTALLATION INSTRUCTIONS

MEASUREMENT AND INSTALLATION MANUAL
Manual validity: 10.10.2023
16
Type A
Type B

MEASUREMENT AND INSTALLATION MANUAL
Manual validity: 10.10.2023
17

MEASUREMENT AND INSTALLATION MANUAL
Manual validity: 10.10.2023
18

MEASUREMENT AND INSTALLATION MANUAL
Manual validity: 10.10.2023
19
CHECK

MEASUREMENT AND INSTALLATION MANUAL
Manual validity: 10.10.2023
20
Other manuals for VERANDA HRV80-ZIP
1
Table of contents
Other Isotra Lawn And Garden Equipment manuals
Popular Lawn And Garden Equipment manuals by other brands

EINHELL
EINHELL GE-EC 720 T Original operating instructions

Yard force
Yard force GM B40 Original instructions

Griesser
Griesser Solozip Operating and maintenance instructions

DS Produkte
DS Produkte MG2149 instruction manual

Westfalia
Westfalia 28 59 32 instruction manual

Holman
Holman MK21013 instruction manual