Ispring DS4S Manual

Ver. 11/2022


We stand behind our products
Since 2005, iSpring has been dedicated to providing high-quality drinking water to families across
the United States. We provide various residential faucets and water filtration systems that purify
your water in everyday life and deliver pure, healthy, and tasty water to you and your family.
At iSpring, we strive to develop products to the highest of standards and aim to make excellent
drinking water accessible for all households.With affordable pricing, reliable quality, prompt
delivery, and top-notch customer service, we hope to assist in bringing you great water for years to
come.


Prior to Installation
Read this instruction manual carefully prior to installation.
Keep this manual readily available for future reference.
Table of Contents
User Information...........................................................................................................3
Product Operation & Specifications .............................................................................4
Before You Start ...........................................................................................................4
System Parts Identification ...........................................................................................6
Using the System
Control Panel LED Light Functions .............................................................................7
Operation.......................................................................................................................8
Care and Cleaning.......................................................................................................11
Troubleshooting ..........................................................................................................13
Warranty
Warranty and Registration ..........................................................................................14

User Information
The user must adhere to the installation specifications described in this Product Installation and
Operation Manual (hereinafter referred to as the "instruction manual"). iSpring is not responsible
for damage, loss, or injury resulting from neglect, improper maintenance, or unauthorized
modification of the unit.
●The unit should be placed only on flat surfaces. Do not mount on a wall.
●Use only authorized iSpring parts. Using unauthorized or aftermarket components will void the
product warranty.
●Unauthorized modification and disassembly are strictly prohibited and will void the warranty.
●Never touch the power cord connector when your hands are wet, as this may result in electric
shock.
●Never turn the dispenser upside down or tilt it more than 45 degrees. If the unit has been resting on
its side for a long time, place the water dispenser in the upright position for approximately 12 hours
before turning it on.
●Never use this dispenser with water that is unsafe to drink or is from an unknownsource.
●This water dispenser is equipped with a grounded power cord plug for your safety.
●Keep your water dispenser in a dry place away from direct sunlight.
●Leave a minimum of 2" (5 cm) around the back and sides of the dispenser for proper ventilation.
●Always install your water dispenser on a level floor. Please wait 3 minutes before restarting the
machine after shutting it down.
●Always unplug the water dispenser before servicing.
●Regular cleaning of your water dispenser is required for your warranty. Please follow the cleaning
instructions outlined in this manual and clean the dispenser every four months.
●The lower front panel must permanently be installed/positioned on the unit for proper operation.
Page 3 www.123filter.com | (678) 261-7611 | support@123filter.com

Product Operation & Specifications
Though testing was performed under standard laboratory conditions, the actual performance of the
system may vary based on local water conditions and quality.
SPECIFICATIONS
Model DS4S
Dimensions W x D x H
11.8 in. x 14.1 in. x 41.7 in.
30 cm x 35.8 cm x 106 cm
Water Inlet Temp.
40-100 °F
Heating Temp (approx.).
194 °F / 90 °C
Cooling Temp (approx.).
41-48 °F / 5-9 °C
Heating Power Consumption
500 W
Cooling Power Consumption
85 W
Filters
Stage
Model
Purpose
Life
1st FPDS:
PP Filter
High-capacity polypropylene filter.
Made with food-grade polypropylene micro-fibers.
Removes sediment, dirt, sand, silt, rust, and scale particles.
3 - 6
mo.
2nd
FGKDS:
GAC+KDF
Compound
Filter
Made with high-quality KDF and granular activated carbon.
Reduces chlorine, lead, hydrogen sulfide, odors, and other
contaminants.
6 - 12
mo.
3rd
FCDS:
CTO Carbon
Block Filter
Made with high-quality activated carbon.
Reduces chlorine, foul odor, and taste.
Removes sediment, dirt, sand, and rust.
6 - 12
mo.
4th
FTDS:
Post Activated
Carbon Filter
Made with high-quality granular activated carbon.
Reduces chlorine, foul odor, and taste.
Removes sediment, dirt, sand, and rust.
6 - 12
mo.
*Filters life may varies per source water quality.
Before You Start
Failure to follow these instructions can result in death, fire, or electrical shock.
Caution
Never allow children to dispense hot water without proper and direct supervision.
Do not plug in or turn on the water dispenser unless there is water in the system.
Refrigerants must be handled and disposed of by qualified service personnel only. Before
discarding this water dispenser to landfill, contact local authorities for advice on proper disposal
methods for refrigerants.
www.123filter.com | (678) 261-7611 | support@123filter.com Page 4

Warning
Never put anything flammable close to the dispenser.
This water dispenser is designed for indoor applications only.
Electric shock hazard: Do not overload sockets or extension cords.
Do not damage the refrigeration cooling system.
Do not touch the plug with wet hands to prevent electric shock.
Always disconnect the power cord before attempting to clean or move the dispenser.
ELECTRICAL REQUIREMENTS:
A 115 Volt, 60 Hz., AC only 15 amperes fused, grounded electrical supply is required. It is
recommended that a separate circuit serving only your Water Dispenser be provided. Use an outlet
that a switch cannot turn off.
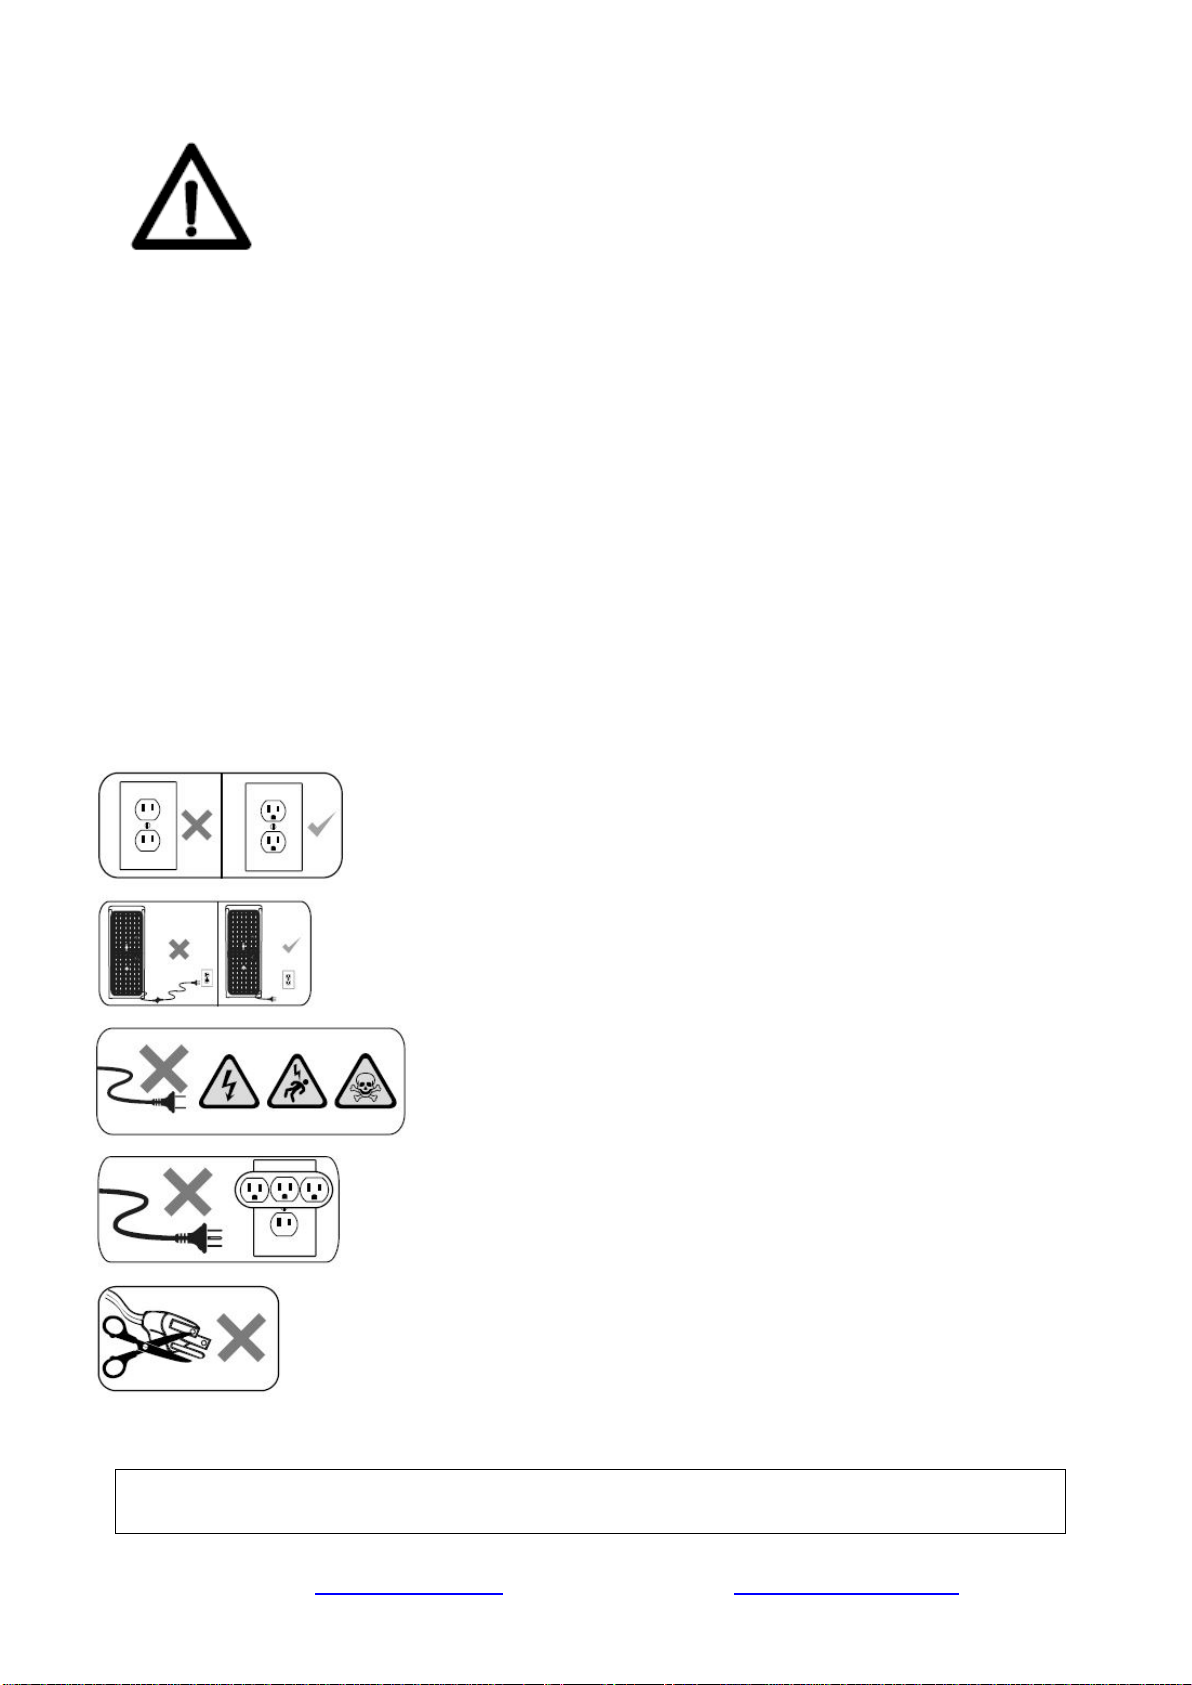
GROUNDING INSTRUCTIONS:
This appliance must be grounded. In an electrical short circuit,
grounding reduces the risk of electric shock by providing an
escape wire for electric current.
Improper use of the grounding plug can result in a risk of property
damage, the electric shock causing severe injury, even death.
This appliance is equipped with a power cord having a grounding
wire with a grounding plug and must be connected into an
adequately grounded polarized outlet. Consult a qualified
electrician if the grounding instructions are not entirely understood
or if doubt exists as to whether the wall outlet is properly
grounded.
If the wall outlet is a standard two prong outlet, it is your
responsibility and obligation to have it replaced with a properly
grounded 3-prong wall outlet.
Do not under any circumstances cut or remove the third (ground)
pin from the power cord plug.
Do not use adapter plugs or extension cords with this appliance.
If the power cord is too short, have aqualified electrician install an
electrical outlet near the machine.
Do NOT use the machine if the power cord becomes frayed or
otherwise damaged.
www.ispringfilter.com/support.
Page 5 www.123filter.com | (678) 261-7611 | support@123filter.com

System Parts Identification
1. Hot Water Push Button (with Child Safety Lock)
2. Room Temperature Water Push Button
3. Cold Water Push Button
4. LED (Ready-to-Dispense Indicator Lights)
•Red = Hot Water
•Yellow = Water Levels
•Blue = Cold Water
5. Door Switch (Controls System Operation)
6. Removable Drip Tray & Grill
7. Filters (1st stage → 4th stage: left → right)
8. Inline Ball Valve (ABV1K)
9. Lower Front Door
NOTE: Door must always be closed for proper operation
10. Leak-detect Sensor
11. Hot Water Switch (red)
12. Adjustable Cold Water Control
13. Drain Line Valve & Cap
14. Power Cord
15. Condenser Coil
16. Water Inlet
www.123filter.com | (678) 261-7611 | support@123filter.com Page 6

Control Panel LED Light Functions
Off Flashing Solid
1 Red LED Light
(Hot Water)
The heating system is
off.
Activate the hot water
(red) switch on the
panel (page 6 #11).
Hot water is heating.
Hot water has
reached optimum
temperature, water
ready to dispense.
2 Yellow LED
Light
(Water Level)
Water levels inside
the reservoir are low.
Check the water inlet
and the valves.
Water levels inside
the reservoir are
normal.
3 Blue LED Light
(Cold Water)
The cooling system is
off.
Connect the power
cord (page 6 #14) to an
electrical outlet.
The cooling system
is cooling.
Coldwater has
reached optimum
temperature, and the
water is ready to
dispense.
NOTE: The hot water heating system will not operate during the water level inside the
reservoir is low.
Page 7 www.123filter.com | (678) 261-7611 | support@123filter.com

Operation
(1) Quick Connect Instruction
It is highly recommended that you watch the video ''How to Connect and Disconnect Quick
Connect Fittings | DIY Installation'' on YouTube.
Cut the tubing end squarely using a utility knife or scissors. Insert the tubing into the quick connect
fitting for at least 1/2''. You will need to wiggle the tube and apply additional pressure to create a
seal.
(2) Install Feed Water Adapter (AFW43) (Optional)
It is highly recommended that you watch the video ''How to Install a Feed Water Adapter for
Reverse Osmosis (RO) and Other Applications | iSpring AFW43'' on YouTube.
Step 1. Turn off the Cold Water Supply Valve (CWSV) under the sink and open the kitchen
faucet to release pressure. Get a towel or bucket to catch any water drips. Disconnect the
kitchen faucet connector pipe from the CWSV.
Step 2. Install the Feed Water Adapter onto the CWSV and tighten it using a wrench or
pliers. Make sure the O-ring is seated inside the adaptor.
Step 3. Re-install the kitchen faucet connector pipe onto the male end of the Feed Water
Adapter. Turn the handle of the Feed Water Adapter to the perpendicular OFF position.
Turn on the CWSV slowly, and ensure you get a proper seal.
Step 4. Connect the 1/4'' tubing to the Feed Water Adapter.
www.123filter.com | (678) 261-7611 | support@123filter.com Page 8

The included bushing can be threaded on either
side of the Feed Water Adapter to fit the
configuration of both 3/8'' COMP and 1/2'' NPT.
(3) Installation
Step 1. Choose a suitable location for the system. It must be placed on a flat surface.
Step 2. Install the Removable Drip Tray & Grill at the front of the system.
Step 3. Insert the 1/4" tubeinto the 1/4" water inlet (page 6 #16) at the back of the system.
Step 4. Plug in the power cord (page 6 #14) to the power socket at the back of the system.
Vibrations can be expected as the system starts.
Step 5. Turn the handle of the Feed Water Adapter (AFW43) to the parallel ON position
if installed. Turn on the Inline Ball Valve (ABV1K) (page 6 #8) slowly if closed, and close
the Lower Front Door (page 6 #9).
Step 6. Prepare a bucket, remove Drain Line Cap (page 6 #13) at the back of the system,
and let it run for at least 5 minutes and until the water is clean to flush the system. This
should be done each time the filters are changed.
Step 7. Once the rinsing is completed, screw back the Drain Line Cap (page 6 #13).
Step 8. Activate the hot water (red) switch (page 6 #11) on the panel if you want to turn
on the heating system.
Step 9. The system is ready for use (see Control Panel LED Light Functions for more details,
page 7).
Page 9 www.123filter.com | (678) 261-7611 | support@123filter.com

(4) Dispensing Cold Water
This Water Dispenser left the factory with the cold water temperature control
default setting for Energy Star compliance. This setting will deliver cold water
temperatures between 4°C - 8°C (39°F - 46°F). The temperature can be
adjusted. Using a screwdriver, turn the dial clockwise between " " (cold) and
" " (colder) until the desired temperature is reached.
(5) Dispensing Hot Water
Warning: Hot water temperatures can reach 94˚C/201˚F and produce severe scalding. Never
let children dispense water without direct adult supervision.
NOTE: The hot water temperature is factory set and cannot be adjusted.
(6) Going Away on Vacation
To conserve energy, unplug the dispenser and drain the reservoirs when not using the dispenser for
long periods or when going on vacation (see Draining the Reservoirs, page 11). Follow Initial
Product Cleaning Procedures upon return and startup of the dispenser.
www.123filter.com | (678) 261-7611 | support@123filter.com Page 10

Care and Cleaning
Cleaning the Outside of the Water Dispenser
Cleaning the Drip Tray
Draining the Reservoirs
Caution: Water May Still Be Hot.
Page 11 www.123filter.com | (678) 261-7611 | [email protected]

Changing the Filters
Step 1. Open the Lower Front Door (page 6 #9).
Step 2. Turn off the Inline Ball Valve (ABV1K) (page 6 #8).
Step 3. Drain the Reservoirs. (page 11)
Step 4. Unscrew the filter(s) to be replaced. (turn left)
Step 5. Screw the corresponding replacement filter(s) into each slot. (turn right)
Step 6. Turn on the Inline Ball Valve (ABV1K) (page 6 #8).
Step 7. Close the Lower Front Door (page 6 #9).
Step 8. After replacing the filter, prepare a bucket, remove Drain Line Cap (page 6 #13) at the
back of the system, flush the system by running the water for at least 5 minutes and until the
water is clean after installing a new filter(s). (page 9 > Operation >> Installation >>> Step 5-
9)
Replacement Filter Packs
Stage
1st
2nd
3rd
4th
Model
FPDS
FGKDS
FCDS
FTDS
F3DS
1
1
1
-
F4DS
1
1
1
1
F7DS
2
2
2
1
www.123filter.com | (678) 261-7611 | support@123filter.com Page 12

Troubleshooting
PROBLEM
POSSIBLE CAUSE
SUGGESTED SOLUTION
The water
dispenser is
leaking
The drain cap and silicone seal are
not secure.
Ensure seal is secure in drain plug
and tighten drain cap (page 6 #13).
Water is not hot
or cold enough
The unit is unplugged.
Plug the power cord (page 6 #14) into
the outlet.
The hot water switch at the unit's
panel is in the OFF position.
Activate hot water switch (page 6
#11) to the ON position.
Indicator lights are not lit.
Connect the power cord (page 6 #14)
to an electrical outlet; the cooling
cycle starts automatically. Activate
the hot water switch (page 6 #11) at
the unit's panel.
The circuit breaker in your home
has tripped, or the fuse has blown.
Reset the breaker or replace the fuse.
The hot water thermostat tripped
(turned off).
Turn off the hot water switch (page 6
#11) for15-30 minutes to allow the
tank to cool, and then turn the switch
back on. The temperature limit switch
will reset automatically.
The lower front door is not closed
correctly.
Ensure the lower front door (page 6
#9) is closed adequately for proper
operation.
The water
dispenser is not
dispensing water
Possible air pocket.
Push down the dispenser buttons (page
6 #1, #2, #3) to prime the unit.
The child safety lock (hot water) is
not activated.
Activate the child safety lock by
sliding the red lock button to the side
while pressing the hot water button
(page 6 #1) at the same time.
The water
dispenser is
noisy
The water dispenser is uneven.
Make sure the dispenser is on an even
surface that can support its total
weight.
The water pump makes noise as it
fills the tank.
This is normal.
The water
dispenser is
beeping
Water detected by the leak-detect
sensor.
Remove the leak-detect sensor (page
6 #10) from the sit, make sure it is
dry, and replace it back to the sit.
Need help with troubleshooting? If you have any questions or find there are missing parts or
damage, please call 1-678-261-7611 or visit www.ispringfilter.com
(The model of this product is "DS4S".)
Page 13 www.123filter.com | (678) 261-7611 | [email protected]


__________________ __________________
__________________ __________________
______________________________________________
____________ ______________ _________________
___________________________________________
__________________________________________________________


¡
¡¢
¢
Table of contents
Other Ispring Water Dispenser manuals
Popular Water Dispenser manuals by other brands

BWT
BWT AQA drink Magnesium Mineralizer II operating manual

BRIO
BRIO CLNLPOU520SCFF2 Installation and operation manual

Propur
Propur INLINE CONNECT FS10 Installation & use instructions

Arctic Spas
Arctic Spas Onzen Technical guide

Elkay
Elkay EHFRA7FC A Series Installation and use manual

Culligan
Culligan Water Tower owner's guide

CSI
CSI Reactr VS Series Installation & operation manual

Follett
Follett Symphony Plus 50 Series Installation, operation and service manual

Kenmore
Kenmore ULTRASOFT 625.38817 owner's manual

Aerus
Aerus Origins WC400 Operation manual

Vivreau
Vivreau V3-201 owner's manual

Whirlpool
Whirlpool 8LIECH-SCSSFP5W user manual