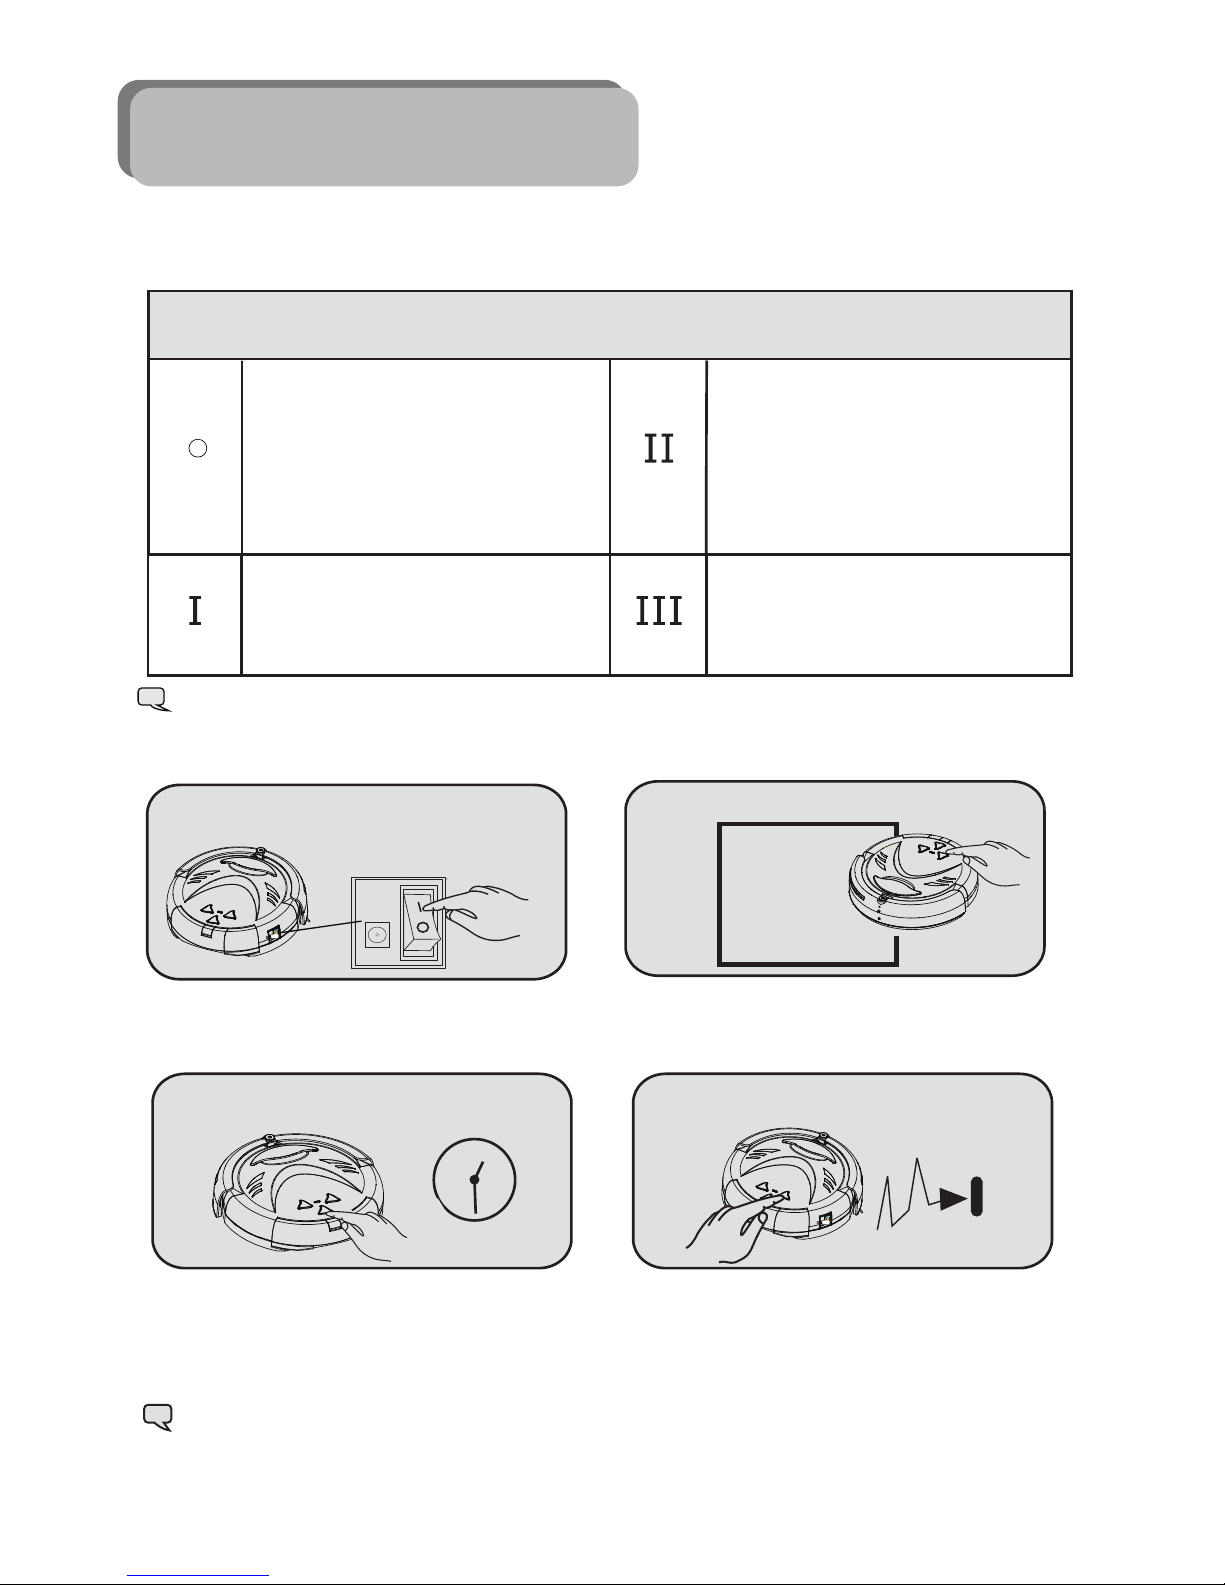
Itouchless RV003A User manual

USER MANUAL
RV003A

Contents
1. Safety Instruction………………2-4
2. Product Formation…………… 5-6
3. Product Installation…………… 7
4. Product Usage…………………8-9
5. Product Maintenance…………10-13
6. Troubleshooting Guide..……….…..14
7. Technical Specifications...…………15
1.1 Use Notes
1.2 Safety Precautions
1.3 Child Safety
1.4 About Battery
1.5 Usable Range
2.1 Main Body and Accessories
2.2 Accessories Introduction
3.1 Main Body
3.2 Remote Control
4.1 Introduction of Work Mode
4.2 Remote Control
4.3 Charging the Battery
5.1 Daily Storage
5.2 Clean the Main Body
5.3 Clean the Dust Box
5.4 Clean the Filter
5.5 Clean the Main Brush
5.6 Clean the Side Brush
5.7 Clean dust chamber
5.8 Clean the Wheels
5.9 Clean the Sensors
- 01 -
Instructions for use shall be provided with the appliance so
that appliance can be used safely.
The plug must be removed from the socket-outlet before
cleaning or maintaining the appliance.
This appliance can be used by children aged from 8 years and
above and persons with reduced physical, sensory or mental
capabilities or lack of experience and knowledge if they have
been given supervision or instruction concerning use of the
appliance in a safe way and understand the hazards involved.
Children shall not play with the appliance. Cleaning and user
maintenance shall not be made by children without supervision.
Children should be supervised to ensure that they do not play
with the appliance.
Only to be used with the power supply unit provided with the
appliance.
This appliance is intended to be used in indoors only.
Warnings

1.2 Safety Precautions
Caution
- 02 -
1.Safety Instructions
1.1 Use Notes
Before using the product, please observe the following safety precautions:
* Read the instructions carefully and use the product according to the stated procedures
* Keep this manual in a safe place for future reference
* If you wish to give this product to someone, be certain to enclose this manual
* Mis-operation may lead to serious personal injury and damage to the product
.
Use the original power adapter and battery provided.
Use of other items may damage the product and cause fire or
electric shock.
If the cleaner is damaged upon opening the box, do not use it.
Do not disassemble or attempt to service the cleaner.
Contact our Customer Support team.
Do not touch the electric outlet or the cleaner if your hands are wet,
as this may cause electric shock.
Thank you for your purchase!
We’re sure you will love your new Robot Vacuum Cleaner
with Remote Control (RV003A)
If you have any questions, contact iTouchless
Customer Support at
Do not use the cleaner in areas where it is likely to be damaged,
such as outdoors or where there is a very uneven floor
Turn the cleaner off when it is charging

- 03 -
Attention
Power the cleaner off
when it is not in use to
maintain the battery.
The cleaner is only to
be used indoors.
Prevent water, oil, or
other liquids from
entering the cleaner.
If the cleaner will not be
used for an extended
period of time, fully charge
the battery, then remove it
and place it in a cool, dry,
shaded place.
Make certain that no wires are
on the floor when the cleaner
is in use, as they may become
tangled in the brush or wheels.
Please remove all
fragile objects.
If the cleaner has never
been used or not used for
an extended period of
time, the battery should
be charged for
approximately 12 hours.
Frequent use of the cleaner
will help ensure optimal
battery performance.
Do not remove the adapter from the electric socket by pulling on
the wire, and do not bend the wire or place any object on top of it.
Do not place the cleaner near fire, flammable items, explosive items,
or corrosive materials.
Do not place any part of your clothing or body (hair, fingers, etc.)
near the main brush or wheels, as this may cause personal injury
开
/
关
Use the handle or hold
the cleaner body to
pick it up, rather than
grasping the front
cover.

1.5 Usable Range
*Not suitable for use in extreme hot or cold environments.
*The cleaner is only to be used indoors.
*Close doors to rooms or areas where the cleaner may be
ineffective or damaged.
*Do not use the cleaner where there may be wet, flammable,
explosive, or corrosive materials or substances.
*Do not use the cleaner to vacuum sharp objects, such as glass,
or it may cause damage to the cleaner.
Wooden Floor Tile Carpet
Usable Range
Unusable Range
- 04 -
The cleaner may be used on the following surfaces:
* The cleaner should not be
used by children.
* Do not allow children to handle
or play with the packing bag, as
this may cause personal injury
or strangulation.
1.3 Child Safety 1.4 About Battery
1. Only the original battery must be used.
2. The battery must be removed before discarding
the cleaner.
3. If you wish to replace the battery, contact our
Customer Support team for detailed instructions.
4. If liquid leaks from the battery, do not touch
the liquid. Wipe the liquid up with a dry cloth
and place the battery into an appropriate
battery recycling or disposal collection.

- 05 -
2. Product Formation
2.1 Main Body and Accessories
Remote Control
*1pc Main Body
*1pc
Tip:
Battery
*1pc
Screwdriver
*1pc
Filter
*2pcs
Side Brush
*2pcs
Cleaning Brush
*1pc
Adaptor
*1pc
* The battery, side brush, and filter are pre-installed. A replacement side brush and
filter are included in the packaging.

2.2 Accessories Introduction
- 06 -
1
Front Shell
Top View
Dustbin Control Buttons
Charging Electrodes
Wall Detection
Sensors
Top Cover
Bottom View
Front
Wheel
Battery Pack
Right
Side Brush
Left Side Brush
Right Wheel
Left Wheel
Ground
Detection
Sensors
Middle Bristle
Brush
Dustbin
Dust Chamber
Middle Rubber
Brush
Power Switch Charging Jack

3.1 Installing the Battery
3.Product Installation
- 07 -
1. Power the cleaner off when it is not in use. This will help preserve the effectiveness of the
battery.
2. If the cleaner has never been used or not used for an extended period of time, the battery
should be charged for approximately 12 hours. Frequent use of the cleaner will help ensure
optimal battery performance.
3. Only the original battery should be used. Use of another battery may damage the cleaner.
3.2 Remote Control
3. Power the cleaner on using the power
switch and check to see if the remote
control can control the cleaner. If not,
review "Troubleshooting Steps" in this
manual.
1. Remove the battery
cover.
2. Place two size AAA
alkaline batteries into
the battery compartment,
according to positive and
negative terminal indication
Installation:
1. Place the cleaner on the ground so that the
bottom is facing up.
2. Place the battery into the battery
compartment until the side tabs click into
place.
Removal:
1. Push the side tabs in and pull up on
the battery.
ON
/
OFF
Caution:
Danger! Electric shock.

Auto Cleaning Mode
Spot Cleaning Mode
- 08 -
4.1.2 Modes of Operation
4.Product Usage
Tip: When the battery power is running low, the cleaner will emit a beeping
sound to indicate it is time to recharge the battery.
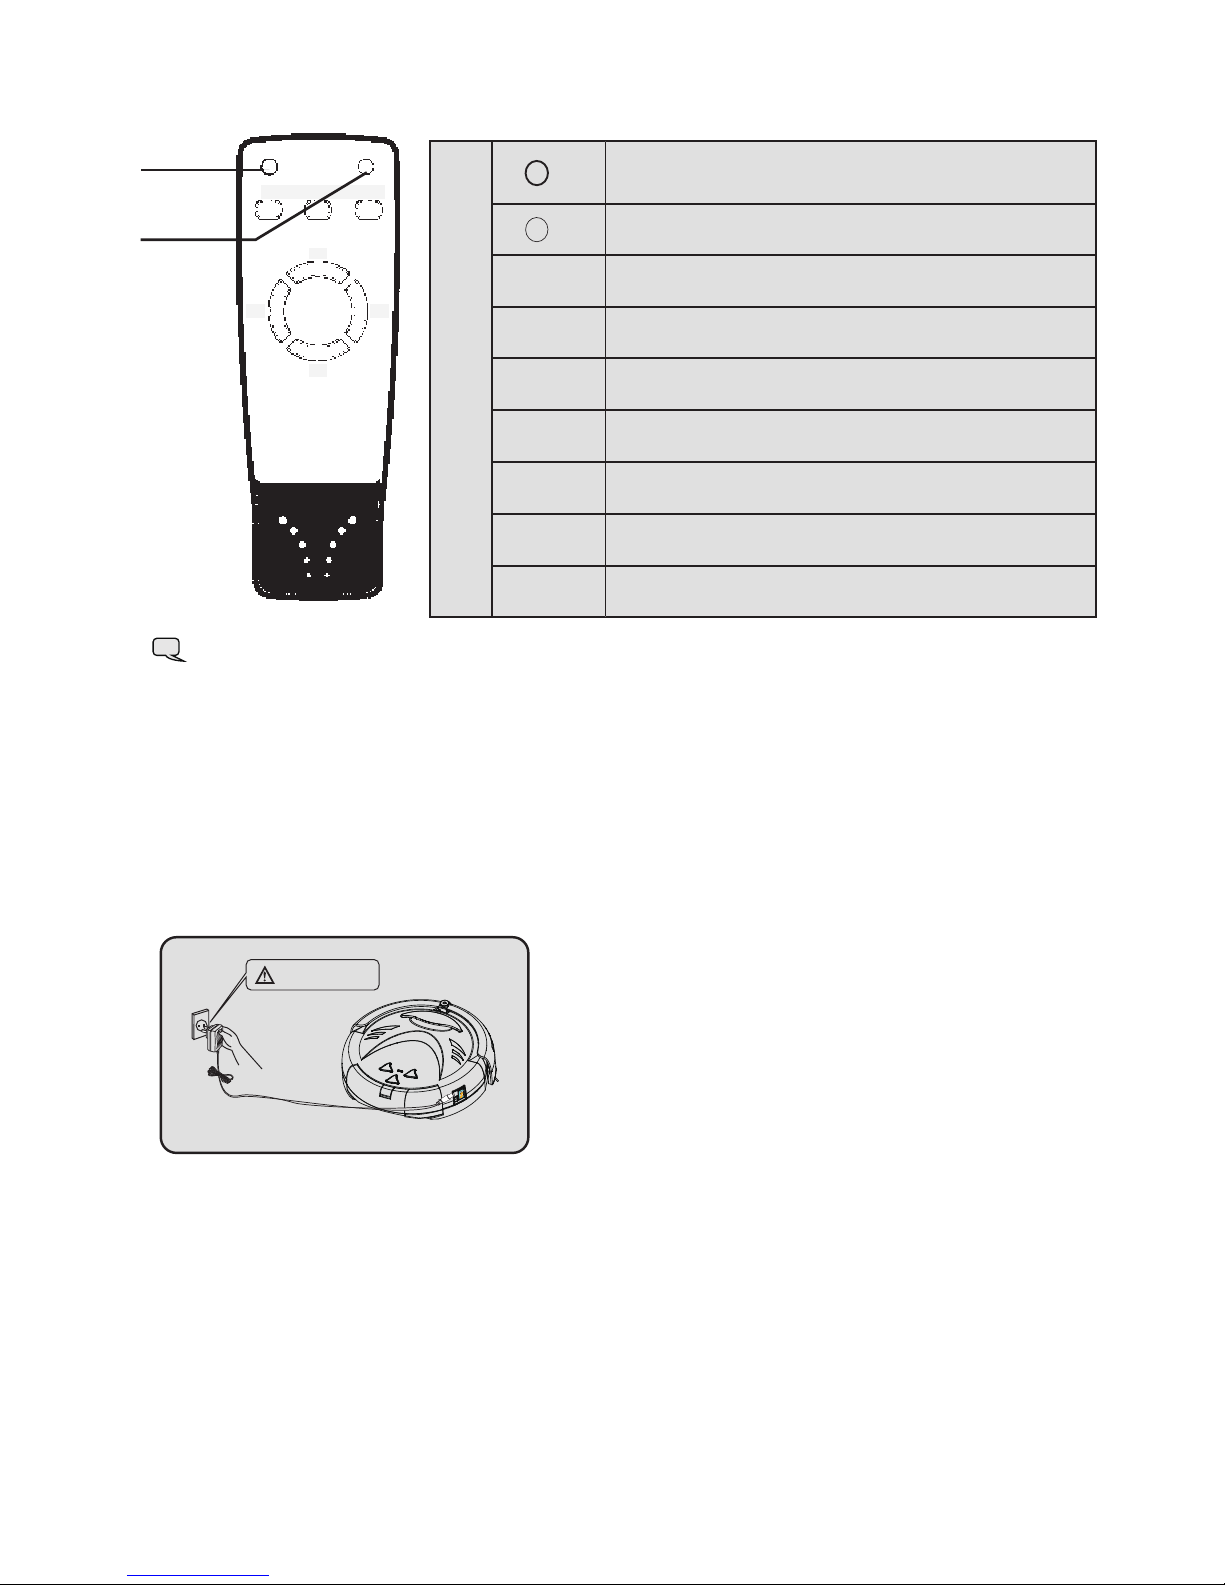
4.1.1 Introduction to Control Buttons
4.1 How to use the robot
Button instructions:
1. In Standby Mode, the indicator light
will remain solid. When the cleaner is in
one of the three cleaning modes, the
mode button will alight. When the
cleaner is charging, the indicator light
will blink on and off.
Tip: While the cleaner is in use, pressing any button will cause it to stop.
Timed Cleaning Mode button:
While in Standby Mode, press the "II"
button to begin the Timed Cleaning
Mode.
Spot Cleaning Mode button:
While in Standby Mode, press the "I"
button to begin the Spot Cleaning
Mode.
Automatic Cleaning Mode:
While in Standby Mode, press the "III"
button to begin the Automatic
Cleaning Mode.
Control Buttons
1. Before powering the cleaner on, be certain
the battery has been charged. Once powered on,
the cleaner is in Standby Mode and the indicator
light will remain solid.
3.When the cleaner is in Standby Mode,
press the “II” button to start Timed
Cleaning Mode. The cleaner will operate
for 30 minutes.
4.When the cleaner is in Standby Mode,
press the “III” button to start Automatic
Cleaning Mode. The cleaner will operate
until the battery power is depleted.
Standy Mode
Timed Cleaning Mode
2.When the cleaner is in Standby Mode,
push the “I” button to start Spot Cleaning
Mode. The cleaner will operate in small area
of focus.

4.2 Remote Control
- 09 -
Tip:
1. The Remote Control range is 4 meters.
局部清扫/星期六
Power Button
Power
Indicator
SPOT
CLEAN
MAX
When the cleaner is in Standby Mode, press the
Power Button to power the cleaner off.
When a button is pressed on the Remote Control,
the Power Indicator will light up.
While in Standy Mode, press the "SPOT" button to
begin the Spot Cleaning Mode.
While in Standby Mode, press the "CLEAN" button to
begin Timed Cleaning Mode.
While in Standy Mode, press the "MAX" button to
begin the Automatic Cleaning Mode.
While in Standy Mode, press the "FORWARD" button
to move the cleaner forward manually.
While in Standby Mode, press the "BACK" button to
move the cleaner backwards manually.
While in Standby Mode, press the "LEFT" button to
move the cleaner left manually.
While in Standby Mode, press the "RIGHT" button to
move the cleaner right manually.
Introduction of remote controller keys
SPOT CLEAN MAX
FORWAED
LEFT
RIGHT
BACK
FORWARD
BACK
LEFT
RIGHT
4.3 Charging the Battery
Plug the power adaptor into the cleaner.
Then, plug the power adapter into an electric
outlet. Take precaution when plugging the
adapter into an electric outlet.
Danger!

- 10 -
1. Push down on the "Press"
button
2. Pull the dustbin out and discard
debris in a trash receptacle. .
3.Clean the dustbin using the
cleaning brush, then put the
dustbin back into the cleaner.
(Note: Do not wash by water directly)
5.1 Daily Storage
Tip:
Clean the vacuum
routinely to maintain
optimal performance.
5.2 Cleaning the Main Body
5.3 Cleaning the Dustbin
5. Product Maintenance
If the cleaner has not been used for an extended period
of time, charge the battery fully and clean the bottom
of the vacuum.
When the cleaner is not in use, power the cleaner off
to preserve battery effectiveness.
1. Before cleaning the main body, power the cleaner off and
disconnect the power adaptor.
2. Clean the main body using a dry cloth.
Do not use water or other liquid to clean the main body.
ON/OFF

- 11 -
5.5 Cleaning the Main Brush
5.5.1 Assemble and Disassemble the Main Brush
5.4 Cleaning the Filter
1. Press the tab in to release the filter
compartment and remove it from the dustbin.
2. Push the tabs out to remove the filter from
the filter compartment.
3. Use the Cleaning Brush to gently brush away dust. You may also run the filter under cold water.
If you washed the filter, allow it to try completely.
4. Place the filter back into the filter compartment, and place the filter compartment back into
the dustbin.
1. Push the tab to release the Main Brush
compartment arm.
2. Grasp the Main Brush and lift it up.

5.6 Cleaning the Side Brush
- 12 -
5.5.2 Cleaning the Middle Bristle Brush or Middle Rubber Brush
3. Remove the Main Brush from the
compartment.
4. To return the Main Brush, set it back into the
compartment and push the arm down until the
tab clicks.
1. To clean the Middle Bristle Brush or
Middle Rubber Brush, power the cleaner
off and turn it upside down.
2. Remove hair or string that has become
tangled around the brush by cutting the
hairs or string and pulling them out.
1
1
1.Use the screwdriver to
remove the Side Brush plate
screws.
2.Remove the Side Brush plate. 3.Unscrew the Side Brush screw
to remove the Side Brush.
Tip: After cleaning, carefully replace the Side Brush and plate.

- 13 -
5.9 Clean the Sensors
Use a cotton swab or a soft, dry cloth
to gently wipe dust off of the sensor.
5.8 Cleaning the Wheels
Use the Cleaning Brush to wipe dust off
of the wheels. Do not use water to
clean the wheels.
5.7 Cleaning the Dust Chamber
1.Turn the cleaner upside down
and press the tabs of the plate
cover in to release the plate
cover.
2. Gently brush dust out of the
chamber using the Cleaning
Brush.
3. Put the plate cover back in
place and push in until the tabs
click and lock in place.
1

1. If the batteries are old, they may need to be replaced.
2. If the remote sensor is dusty, wipe it with a cotton swab or soft, dry cloth.
6The cleaner is always
wall-following
71. Check to see if anything is caught in the left or right wheel.
The cleaner is just
going in circles
81. Check to see if the Main Brush is stuck because of tangled hair or string.
2. Check to see if the dustbin is full and needs to be emptied.
The cleaner has stopped
and all indicator lights
are flashing
- 14 -
6. Troubleshooting Guide
1
No Problems Solutions
The cleaner is falling
down stairs
2The cleaner does
not power on.
1. Check the sensors underneath the cleaner. If they appear dusty,
gently wipe them with a cotton swab or soft, dry cloth.
2. The sensors are less effective under very bright light or on very
dark floor surfaces.
1. Ensure that the power switch is in the "ON" position
2. Ensure that the battery is sufficiently charged
Tip: If you cleaner is still experiencing problems after following the above suggestions,
please contact iTouchless Customer Support.
3The cleaner stops
suddenly during
cleaning.
4
5
The cleaner is not
recharging
The remote controller
is not working
1. Check to see if the cleaner is in Spot Cleaning or Timed Cleaning Mode.
2. Ensure that the battery is sufficiently charged.
1. Confirm that the power adapter is properly attached to a working outlet
and is properly attached to the cleaner.
2. If the battery appears damaged, contact Customer Support.
1. Ensure that nothing on the floor is blocking the cleaner, and that
nothing is tangled in the wheels.

7.Technical Specifications
Main Body Parameters Accessories Parameters
Working Voltage
Rated Power
Dust Box Capacity
Voice
Specification
Charging Time About 4-5 Hours
Working Time
Work Temp Range
Work Humidity Range
DC14.4 V
23 W
250ML
65dB
340*340*90mm
About 60 min
-20 50
90%RH
Output Voltage
Remote Control
Adaptor
Remote Distance
Battery
DC24V
Output Current 600mA
4M
AAA alkaline Batteries *2
- 15 -
Battery
Battery Capacity 1700mAh
Ni-MH

Robot Vacuum Cleaner (Cleaner
23783 Eichler Street, Units A - C, Hayward, CA 94545
™
$19.95 and
© 2017

Table of contents
Other Itouchless Vacuum Cleaner manuals