iTronics 9005I User manual

Model No. 9005I
LED Alarm Clock Radio
Radio Reveil
EN
1. Lorsque la radio est éteinte, laissez appuyer sur le bouton “ON / OFF / NAP”
(2) pendant environ 4 secondes et l'affichage ainsi que l'indicateur FM (D)
clignoteront.
2. Appuyez sur les boutons “P+” (7) ou “P-“ (3) pour paramétrer la durée de
la sieste time (45, 60, 90 ou 120 minutes).
3. Appuyez sur le bouton “ON / OFF / NAP” (2) pour confirmer.
DIMMER
Lorsque la radio est éteinte et que l'heure est affichée, appuyez sur le bouton
“SNOOZE / SLEEP / DIM” (1) pour sélectionner la luminosité de l'affichage pour
qu'il soit plus ou moins lumineux.
Recharge par USB
Charge les portables et/ou d'autres appareils électroniques par le biais
du port USB (câble non inclus).
SERVICE CLIENT
Téléphone : 1-888-971-6539 (USA et CA uniquement)
E-mail : service@myitronics.com
Horaires : Jour de la semaine 8h00 – 18h00 EST
Cette garantie vous donne des droits légaux et vous pouvez peut-être avoir
d'autres droits selon le pays.
-15-
V20160705 EN FR

-1- -2-
Top view
Back view
Front view
2
6
3
7
4
8
5
9
1
13 10
11
12
A
B
C
D
E
F
G
READ THIS INSTRUCTION MANUAL BEFORE
OPERATING THE APPLIANCE.AND SAVE IT FOR
FUTURE REFERENCE.
CONTROLS AND INDICATORS
1. SNOOZE / SLEEP / DIM” button
2. “ON / OFF / NAP” button
3. “P-“ button
4. “ALARM 1 / VOL –“ button
5. “HOUR / TUNING –“ button
6. “TIME / PRESET” button
7. “P+” button
“
A. Time and radio frequency display
B. Alarm 2 buzzer
C. Alarm 2 radio indicator
D. FM
E. AM
F. Alarm 1 buzzer
G. Alarm 1 radio indicator
8. “ALARM 2 / VOL +” button
9. “MIN / TUNING +” button
10. Battery compartment
11. FM antenna
12. DC plug
13. USB
( )Battery not included
SL EE P
DI M

-3-
PREPARATION FOR USE
ALARM CLOCK OPERATION
Setting the time
• When the clock display is blinking, you cannot power on radio by the
/ OFF / NAP” button (2).
“ON
This clock radio includes a battery backup system that will maintain the time
and alarm settings during a temporary power interruption. Insert two 'AAA'
size batteries (not included) correctly by matching the polarity (+/-) markings
in the battery compartment (10). If you experience a power failure while
batteries are installed, the display will turn 'off' but the clock will continue to
run and maintain your alarm settings. When replacing batteries, please
replace all batteries at the same time with only new batteries.
The clock radio has slip proof silicon feet. Place the clock radio only on
protected furniture.
Unwind the FM antenna (11) on the back of the clock radio. Extend and
reposition the antenna for best radio reception.
1 Press and hold down “TIME / PRESET” button (6) for approximately 3 seconds
until the display flashes.
.
2. Press “HOUR / TUNING –“button (5) repeatedly to change the hour setting.
3 Press “MIN / TUNING +“button (9) repeatedly to change the minute setting..
4 Press “TIME / PRESET” button (6) to confirm the time and the display will stop
flashing.
.
SETTING THE ALARM TIME
This clock radio has dual alarms that can be set and used independently.
The procedure to set both alarms are the same. Both alarms can either
sound the buzzer or radio.
-4-
•
the “ON / OFF / NAP” button (2) to turn FM radio or AM radio on. Press and
hold down the “ON / OFF / NAP to turn the radio off.
Note: The alarm time can only be set when the radio is turned off. Press
1. For setting alarm time 1 with buzzer, press “ALARM 1 / VOL –“ button (4) and
indicator (E) will flash. For setting alarm time 1 with radio, press “ALARM
1 / VOL –“ button (4) twice and indicator (F) will flash.
2. When the digits are flashing, press “HOUR / TUNING –“ button (5) repeatedly
to change the hour setting. Press “MIN / TUNING +“ button (9) repeatedly
to change the minute setting.
TECHNICAL SPECIFICATIONS
• – FM Frequency: 87.5 108MHZ
• – AM Frequency: 522 1620KHZ
• ADAPTER Model: GPU410501000WD00
• ADAPTER input: 120VAC 60HZ
• ADAPTER output: 5.0VDC 1.0A
• Supplier of adapter: Huxu Electronics Factory
• The time can only be set when the radio is turned off. Press the “ON / OFF
/ NAP” button (2) to turn the FM radio or AM radio on. Press and hold down
the “ON / OFF / NAP to turn the radio off.
• You cannot set any function when the clock display is blinking after
plugging the device in, press the “TIME/PRESET” to stop the blinking and
begin to set the settings.
Note: 5. When the alarm sounds, press any button to turn off alarm or press “SNOOZE
/ SLEEP / DIM” button (1) to enter snooze mode. or blink during will
4. To cancel the alarm, press “ALARM 1 / VOL –“ button (4) three times when
the current time is showing. The alarm indicators will turn off.
3. Press “ALARM 1 / VOL –“ button (4) to confirm.

Note:
• You must make the time and alarm time adjustments while the display is
flashing. The display will stop flashing after approximately 10 seconds if
adjustments are not made.
Radio
General operations
Pre-set station memory
Sleep mode
When the radio is on, press “SNOOZE / SLEEP / DIM” button (1) to enter sleep
mode. “OFF” will be displayed. Press “SNOOZE / SLEEP / DIM” button (1)
repeatedly for the duration of the “SLEEP” time. The range of “SLEEP” time is
90 minutes to 10 minutes, as displayed on the screen.
NAP
Set the desired NAP time and the radio will turn on automatically after the
preset time.
1. When the radio is off, press and hold “ON / OFF / NAP” button (2) for
approximately 4 seconds and the display and FM indicator (D) will flash.
-5- -6-
6. Follow the same instructions for alarm 2 with “ALARM 2 / VOL +” button
(8).
1. Press the “ON/OFF/NAP” button (2) to turn FM radio or AM radio on.
2. For manual tuning, press “HOUR / TUNING –“button (5) or “MIN / TUNING +
“button (9) for FM increments of 0.1mHz (AM increments of 0.009MHZ).
3. For automatic tuning, press and hold down the “HOUR / TUNING –“button
(5) or “MIN / TUNING +“button (9) for approximately 3 seconds. Depress
the button and the radio will start to scan for the next available station.
4. Press “ALARM 1 / VOL –“button (4) or “ALARM 2 / VOL +“button (8) to adjust
volume level. The display changes to show the volume level indication
(00 to 14) during the volume adjustments, then changes back to the
radio station frequency and then the current time.
5. Press “HOUR / TUNING –“button (5) or “MIN / TUNING +“button (9) to show
the radio station frequency.
1. The radio can store up to 20 FM stations and 20 AM stations.
2. To store a station in memory, tune to the desired radio station. Press and
hold down “TIME/PRESET” button (6) for approximately 3 seconds and “P01”
on the display will flash. Press the “P+” button (7) or “P-“ button (3) to the
desired station memory (P01 to P20). Press “TIME/PRESET” button (6) once
to confirm.
3. Repeat the above steps for up to 20 stations.
4. To recall the station, press “P+” button (7) or “P-“ button (3) until desired
station is reached.
snooze mode. Alarm will sound again after 5 minutes. Alarm buzzer does
not cut the radio sound. If alarm waken up by radio, volume control for
radio is not available.
When the radio is off and the current time is showing, press “SNOOZE / SLEEP
/ DIM” button (1) to select the brightness of the display between high or low.
Dimmer
3. Press “ON / OFF / NAP” button (2) to confirm.
2. Press “P+” button (7) or “P-“ button (3) to set the desired nap time (45, 60,
90 or 120 mins)

-7-
Modéle No. 9005I
LED Alarm Clock Radio
Radio Réveil
FR
USB charging
Charge mobile phones and/or the other electronic devices through USB
cable(cable not included).
CUSTOMER SERVICE
Telephone: 1-888-971-6539 (US&CA only)
Email: service@myitronics.com
Hours: Weekdays 9:00 AM-5:00 PM EST
This warranty gives your special legal rights and you may also have other
rights which vary from state to state.
-8-

LISEZ ATTENTIVEMENT CE MANUEL D'INSTRUCTION
AVANT D'UTILISER L'APPAREIL ET GARDEZ-LE
POUR DE FUTURES RÉFÉRENCES.
Vue du dessus
Vue de l'arrière
2
6
3
7
4
8
5
9
1
13 10
11
12
SL EE P
DI M
Vue de l'avant
A
B
C
D
E
F
G
CONTRÔLES ET INDICATEURS
1. Bouton “SNOOZE / SLEEP / DIM”
2. Bouton “ON / OFF / NAP”
3. Bouton “P-“
4. Bouton “ALARM 1 / VOL –“
5. Bouton “HOUR / TUNING –“
6. Bouton “TIME / PRESET”
7. Bouton “P+”
8. Bouton “ALARM 2 / VOL +”
9. Bouton “MIN / TUNING +”
10. Compartiment des piles
11. Antenne FM
12. Prise DC
13. USB
(non inclus)
A. Affichage de l'heure et de la fréquence radio
B. Avertisseur sonore de l'alarme 2
C. Indicateur radio de l'alarme 2
D. FM
E. AM
F. Avertisseur sonore de l'alarme 1
G.Indicateur radio de l'alarme 1
-9- -10-

SPÉCIFICATIONS TECHNIQUES
•
• Fréquence AM : 522—1620KHZ
• Modèle de l'ADAPTATEUR : GPU410501000WD00
• Tension d'entrée de l'ADAPTATEUR : 120VAC 60HZ
• Tension de sortie de l'ADAPTATEUR : 5.0VDC 1.0A
• Fournisseur de l'adaptateur : Usine Huxu Electronics
Fréquence FM : 87.5—108MHZ
PRÉPARATION POUR L'UTILISATION
Ce radio réveil inclut un système de batterie de secours qui permettra de
garder l'heure et le paramétrage d'alarme pendant une coupure d'électricité
temporaire. Insérez correctement deux piles AAA en respectant (non inclus)
les symboles de polarité (+/-) inscrits dans le compartiment des piles (10). Si
une coupure d'électricité se produit alors que le réveil contient des piles,
l'affichage s'éteindra mais l'horloge et l'alarme continueront de fonctionner.
Lorsque vous changez les piles, remplacez toutes les piles en même temps
avec des piles neuves.
Le radio réveil est équipé de pieds en silicone antidérapant. Placez le
radio réveil uniquement sur des meubles protégés.
Déroulez l'antenne FM (11) située à l'arrière du radio réveil. Étirez-la et
positionnez-la pour obtenir la meilleure réception radio.
FONCTIONNEMENT DU RADIO RÉVEIL
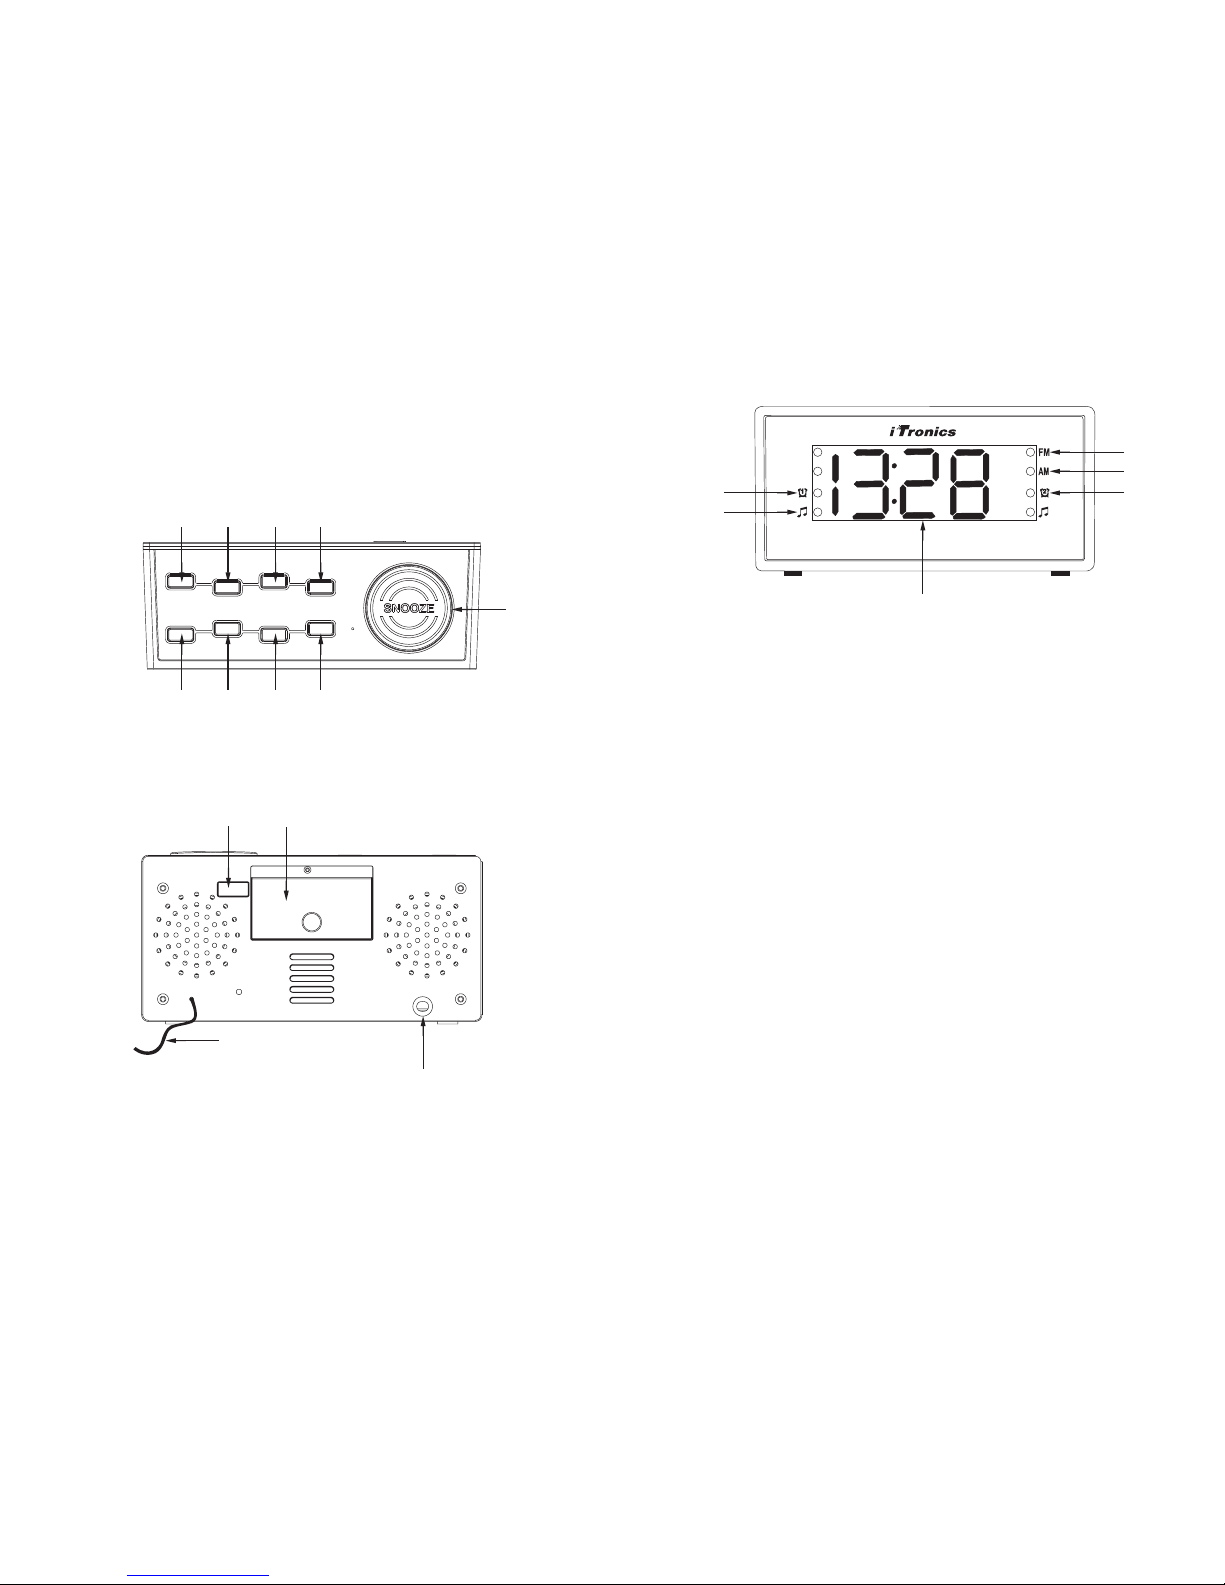
PARAMÉTRER L'HEURE
Remarque :
• Vous ne pouvez pas paramétrer de fonctions lorsque l'affichage de
clignote après avoir branché l'appareil. Appuyez sur “TIME/
PRESET” pour arrêter le clignotement et commencer le paramétrage.
l'horloge
•
sur le bouton “ON / OFF / NAP” (2) pour allumer la radio FM ou AM. Laissez
appuyer sur le bouton “ON / OFF / NAP pour éteindre la radio.
L'heure ne peut être paramétrée que lorsque la radio est éteinte. Appuyez
•
radio avec le bouton “ON / OFF / NAP” (2).
Lorsque l'affichage de l'horloge clignote, vous ne pouvez pas allumer la
1. Laissez appuyer sur le bouton “TIME / PRESET” (6) pendant environ 3
secondes jusqu'à ce que l'affichage clignote.
2. Appuyez sur le bouton “HOUR / TUNING –“ (5) à plusieurs reprises pour
changer les heures.
3. Appuyez sur le bouton “MIN / TUNING +“ (9) à plusieurs reprises pour
changer les minutes.
4. Appuyez sur le bouton “TIME / PRESET” (6) pour confirmer l'heure et
l'affichage arrêtera de clignoter.
PARAMÉTRER L'ALARME
Ce radio réveil dispose de deux alarmes qui peuvent être paramétrée et
utilisée indépendamment. La procédure pour paramétrer les deux alarmes
est identiques. Les deux alarmes peuvent soit faire retentir une sonnerie soit
déclencher la radio.
•
éteinte. Appuyez sur le bouton “ON / OFF / NAP” (2) pour allumer la radio
FM ou AM. Laissez appuyer sur le bouton “ON / OFF / NAP pour éteindre la
radio.
Remarque : L'alarme ne peut être paramétrée que lorsque la radio est
1. Pour paramétrer l'alarme 1 avec une sonnerie, appuyez sur le bouton
“ALARM 1 / VOL –“ (4) et l'indicateur (E) clignotera. Pour paramétrer
l'alarme 1 avec la radio, appuyez deux fois sur le bouton “ALARM 1 / VOL –
“ (4) et l'indicateur (F) clignotera.
2. Lorsque les chiffres clignotent, appuyez sur le bouton “HOUR / TUNING –
“ (5) à plusieurs reprises pour changer les heures. Appuyez sur le bouton
“MIN / TUNING +“ (9) à plusieurs reprises pour changer les minutes.
-11- -12-

3. Appuyez sur le bouton “ALARM 1 / VOL –“ (4) pour confirmer.
4. Pour annuler l'alarme, appuyez trois fois sur le bouton “ALARM 1 / VOL
–“ (4) lorsque l'heure actuelle est affichée. Les indicateurs de l'alarme
s'éteindront.
5 Lorsque l'alarme sonne, appuyez sur n'importe quel bouton pour l'éteindre .
ou appuyez sur le bouton “SNOOZE /SLEEP / DIM” (1) pour entrer en mode
snooze. ou clignoteront en mode snooze. L'alarme sonnera de
nouveau après 5 minutes. La sonnerie de l'alarme ne coupe pas la radio.
Si l'alarme est paramétrée pour déclencher la radio, le contrôle du volume
pour la radio n'est pas disponible.
6. Suivez les mêmes instructions pour l'alarme 2 avec le bouton “ALARM 2 /
VOL +” (8).
Remarque
•
L'affichage arrêtera de clignoter après environ 10 secondes si aucun
changement n'est effectué.
Vous devez ajuster l'heure et l'alarme lorsque l'affichage clignote.
RADIO
Fonctionnement général
1. Appuyez sur le bouton “ON/OFF/NAP” (2) pour allumer la radio FM ou AM.
2. Pour un réglage manuel, appuyez sur les boutons “HOUR / TUNING –“ (5)
ou “MIN / TUNING +“ (9) pour un changement FM de 0,1mHz (changement
AM de 0,009mHz).
3. Pour un réglage automatique, appuyez sur les boutons “HOUR / TUNING
–“ (5) ou “MIN / TUNING +“ (9) pendant environ 3 secondes. Relâchez le
bouton et la radio commencera à rechercher la prochaine station
disponible.
4. Appuyez sur les boutons “ALARM 1 / VOL –“ (4) ou “ALARM 2 / VOL +“ (8)
pour ajuster le volume. L'affichage changera pour indiquer le volume
(de 00 à 14) pendant son ajustement avant de revenir à la fréquence
de la station radio, puis à l'heure actuelle.
5. Appuyez sur les boutons “HOUR / TUNING –“ (5) ou “MIN / TUNING +“ (9)
pour afficher la fréquence de la station radio.
Enregistrement préréglé des stations
1. La radio peut stocker jusqu'à 20 stations FM et 20 stations AM.
2. Pour stocker une station dans la mémoire, rendez-vous sur la station de
votre choix. Laissez appuyer sur le bouton “TIME/PRESET” (6) pendant
environ 3 secondes et “P01” clignotera sur l'affichage. Appuyez sur les
boutons “P+” (7) ou “P-” (3) pour atteindre la station stockée dans la
mémoire que vous désirez (de P01 à P20). Appuyez une fois sur le bouton
“TIME/PRESET” (6) pour confirmer.
3. Répétez les étapes ci-dessus pour jusqu'à 20 stations.
4. Pour retourner à la station, appuyez sur les boutons “P+” (7) ou “P-” (3)
jusqu'à ce que vous atteigniez la station de votre choix.
Mode veille
1. Lorsque la radio est allumée, appuyez sur le bouton “SNOOZE / SLEEP / DIM”
(1) pour entrer en mode veille. “OFF” sera affiché. Appuyez sur le bouton
“SNOOZE / SLEEP / DIM” (1) à plusieurs reprises pour la durée de la veille.
La durée de la veille va de 90 minutes à 10 minutes, comme indiqué sur
l'écran.
NAP
Paramétrez la durée de la sieste (NAP) et la radio d'allumera automatiquement
après la durée déterminée.
-13- -14-
This manual suits for next models
1
Table of contents
Languages: