ITW Food Equipment Group VULCAN HOBART WOLF VC4ED User manual

MODELS
VC4ED
VC4EC
VC6ED
VC6EC
HEC5
HEC5D
HEC5X
HEC5DX
WKE
WKED
WKEC
ELECTRIC CONVECTION OVENS
INSTALLATION &
OPERATION MANUAL
ITW FOOD EQUIPMENT GROUP, LLC P.O. BOX 696, LOUISVILLE, KY 40201-0696 TEL: 502-778-2791
www.hobartcorp.com FORM 31159 Rev. ( (/201)
www.vulcanhart.com

– 2 –
Table of Content
GENERAL. . . . . . . . . . . . . . . . . . . . . . . . . . . . . . . . . . . . . . . . . . . . . . . . . . . . . . . . . . . . . . . . . . 3
INSTALLATION. . . . . . . . . . . . . . . . . . . . . . . . . . . . . . . . . . . . . . . . . . . . . . . . . . . . . . . . . . . . . . 4
Unpacking ............................................................. 4
Location ...............................................................4
Installation Codes and Standards ...........................................4
Installing Basic Oven ..................................................... 4
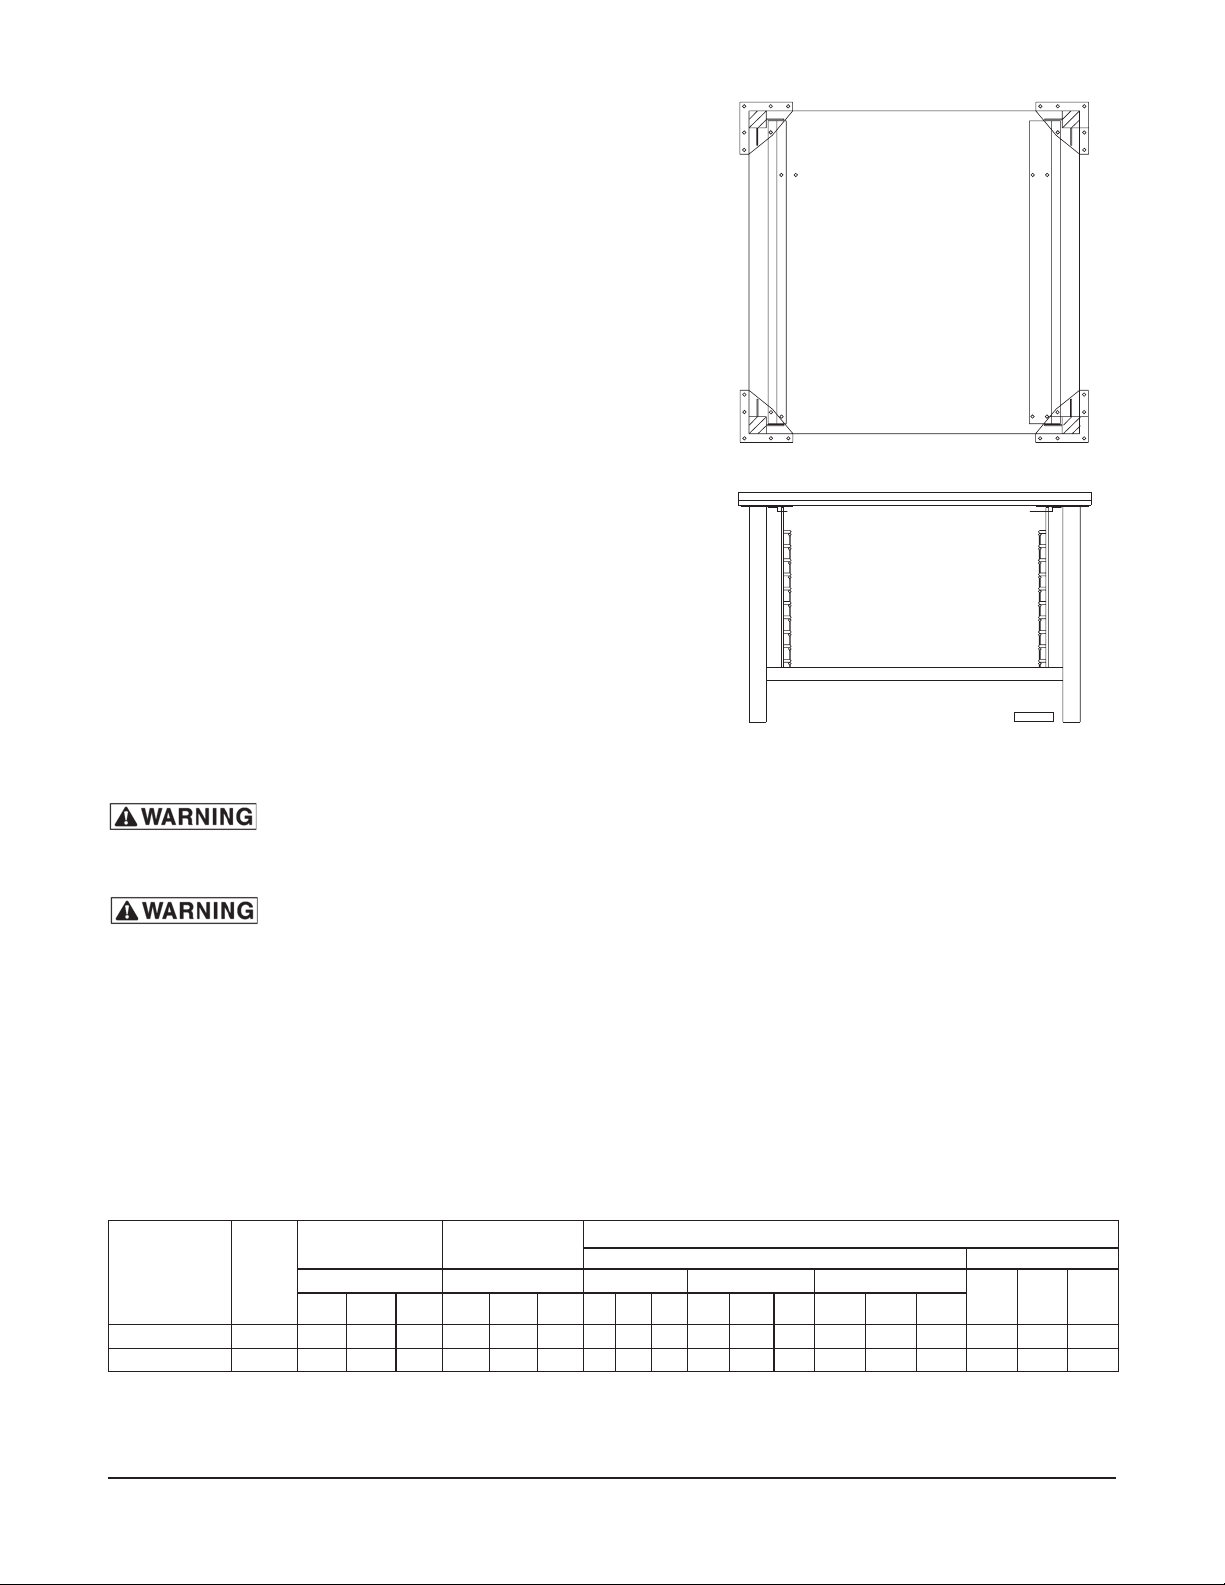
Assembling the Legs to the Single Oven . . . . . . . . . . . . . . . . . . . . . . . . . . . . . . . . . . . . . . 4
Leveling ...............................................................4
Casters . . . . . . . . . . . . . . . . . . . . . . . . . . . . . . . . . . . . . . . . . . . . . . . . . . . . . . . . . . . . . . . . 4
Assembling the Stand to the Oven ........................................... 5
Electrical Connections . . . . . . . . . . . . . . . . . . . . . . . . . . . . . . . . . . . . . . . . . . . . . . . . . . . . 5
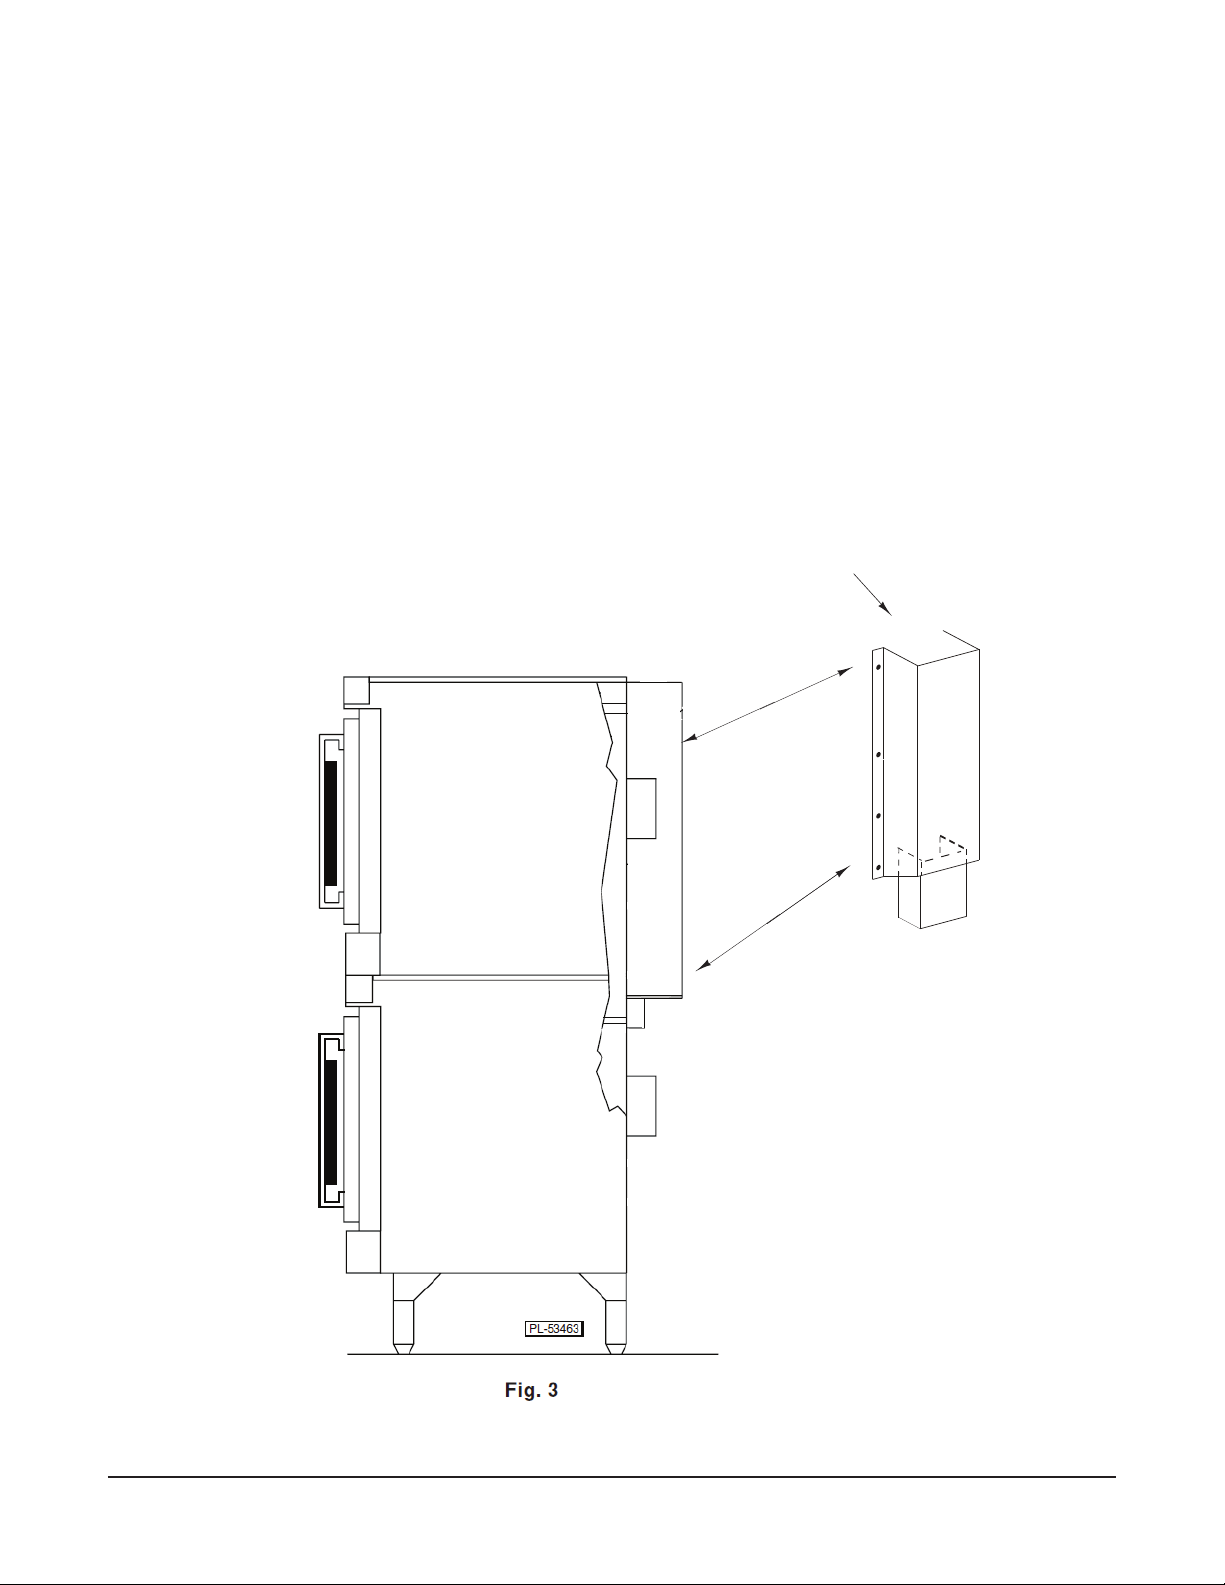
Assembling Stacked Ovens . . . . . . . . . . . . . . . . . . . . . . . . . . . . . . . . . . . . . . . . . . . . . . . . 6
Electrical Connections (Stacked Ovens) ...................................... 7
OPERATION . . . . . . . . . . . . . . . . . . . . . . . . . . . . . . . . . . . . . . . . . . . . . . . . . . . . . . . . . . . . . . . . 8
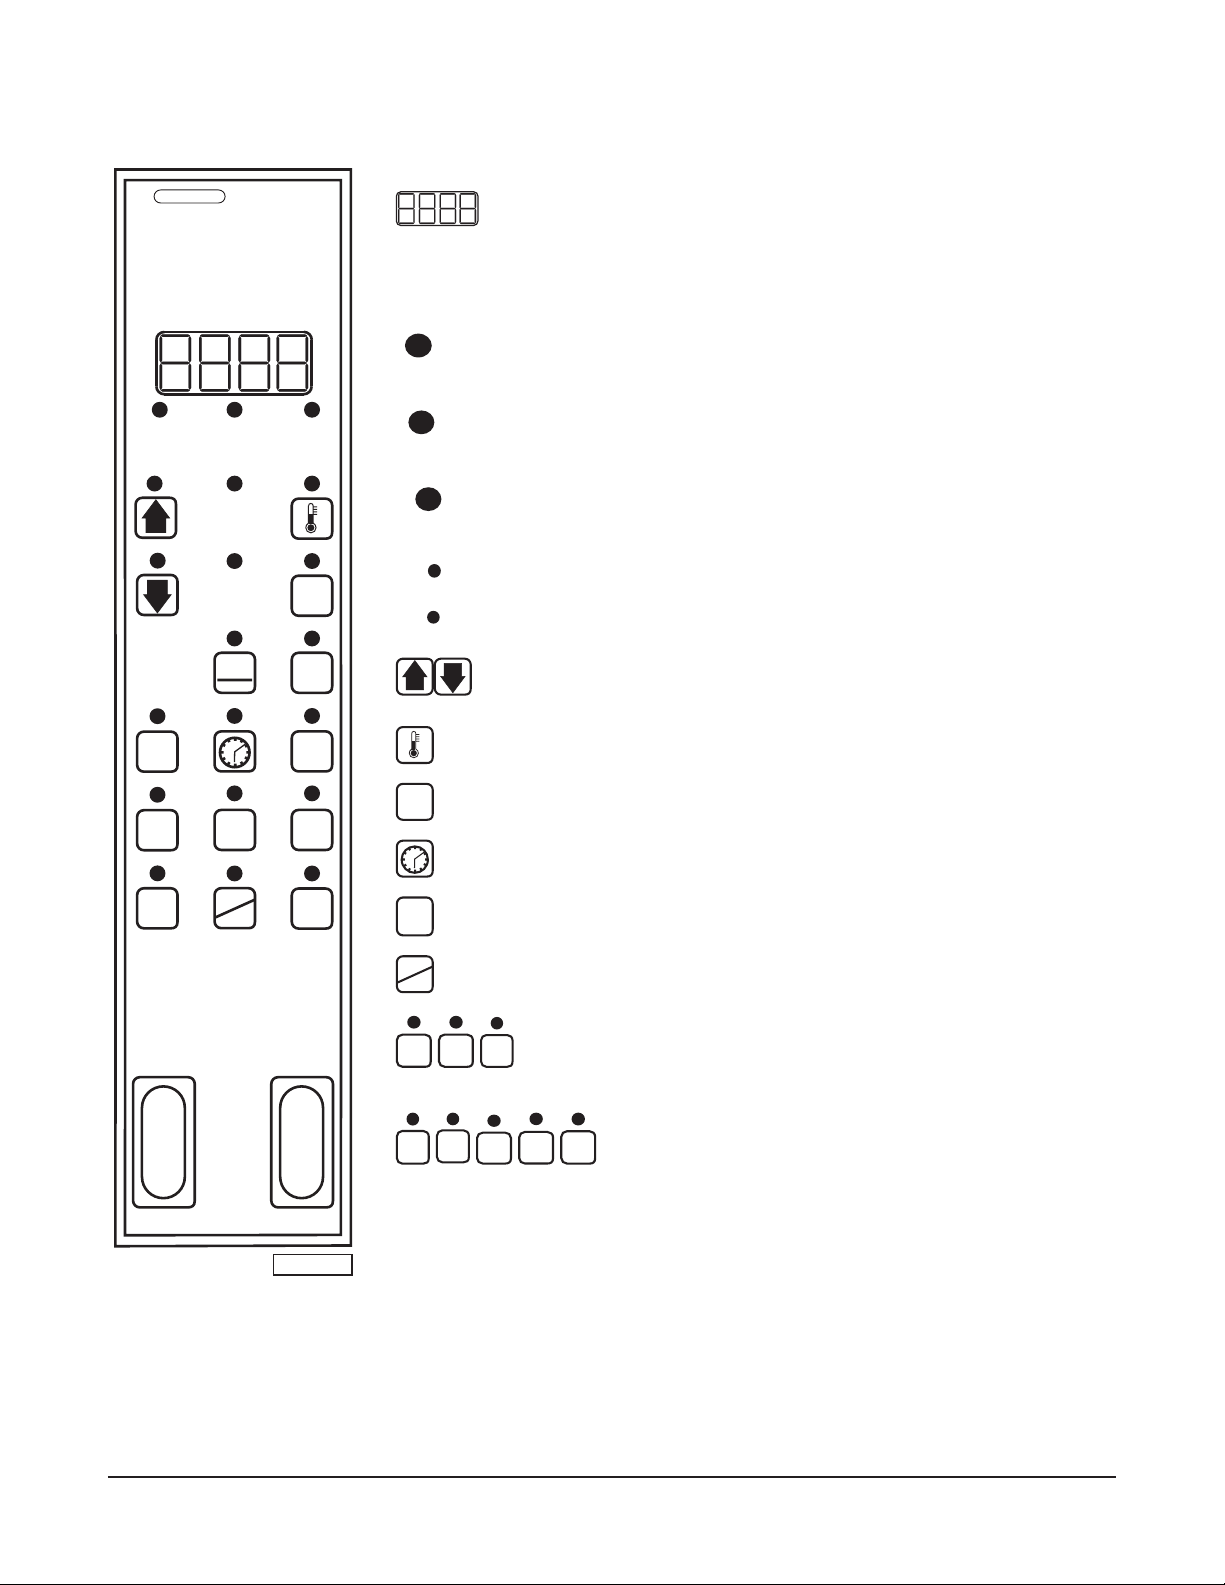
Controls .............................................................. 8
Before First Use (All Models) ............................................... 9
Using Electric Models ..................................................... 9
Controls . . . . . . . . . . . . . . . . . . . . . . . . . . . . . . . . . . . . . . . . . . . . . . . . . . . . . . . . . . . . . . 10
Manually Setting the Temperature and Cook Time . . . . . . . . . . . . . . . . . . . . . . . . . . . . . 11
To Program Menu Item and Rack Number Cook Times . . . . . . . . . . . . . . . . . . . . . . . . . . 11
Setting the Oven for Roast & Hold .......................................... 13
Roast & Hold Operation .................................................13
Proper Utensils ......................................................... 13
Operating Hints . . . . . . . . . . . . . . . . . . . . . . . . . . . . . . . . . . . . . . . . . . . . . . . . . . . . . . . . 13
Cooking Guidelines . . . . . . . . . . . . . . . . . . . . . . . . . . . . . . . . . . . . . . . . . . . . . . . . . . . . . 14
Standard Cooking Time Chart . . . . . . . . . . . . . . . . . . . . . . . . . . . . . . . . . . . . . . . . . . . . . 15
Power Outage . . . . . . . . . . . . . . . . . . . . . . . . . . . . . . . . . . . . . . . . . . . . . . . . . . . . . . . . . 15
Cleaning . . . . . . . . . . . . . . . . . . . . . . . . . . . . . . . . . . . . . . . . . . . . . . . . . . . . . . . . . . . . . . 15
MAINTENANCE ............................................................ 16
Replacing Lamps .......................................................16
Service and Parts Information . . . . . . . . . . . . . . . . . . . . . . . . . . . . . . . . . . . . . . . . . . . . . 16

– 3 –
Installation, Operation and Care of
ELECTRIC CONVECTION OVENS
KEEP THESE INSTRUCTIONS FOR FUTURE USE
Your Electric Convection Oven is produced with quality workmanship and material. Proper installation,
usage and maintenance of your oven will result in many years of satisfactory performance.
The manufacturer suggests that you thoroughly read this entire manual and carefully follow all of the
instructions provided.
GENERAL
The Electric Convection Ovens feature a 500°F thermostat, timer, porcelain interior and a two -speed, 1/2
HP blower motor as standard equipment. Ovens equipped with standard voltages are 208 or 240 V, 60 Hz,
single- or three-phase. Ovens equipped for 480 V, 60 Hz, single- or three-phase electrical speciflcations
are optional.
The Oven is a single cavity oven furnished with flve racks. Independently opening doors are standard;
simultaneously opening doors with chain mechanism underneath are optional. Oven lights with on-off
switch are standard on all models.
An open stand with lower storage rack is available as an option.
Stacked ovens are furnished with either Stacking Kit 426983G1 (8" LEGS) or Stacking Kit 426984G1
(CASTER) for mounting one oven on top of the other.
Additional racks are available as accessories.
Features of the models are shown below:

– 4 –
INSTALLATION
UNPACKING
Immediately after unpacking the oven, check for possible shipping damage. If the oven is found to be
damaged, save the packaging material and contact the carrier within 15 days of delivery.
Prior to installation, verify that the electrical service agrees with the speciflcations on the oven data plate,
located on the inside of the top front cover.
Do not use the doors or their handles to lift the oven.
LOCATION
The installation location must allow adequate clearances for servicing and proper operation. For solid
state and digitally controlled models, there must be 18" (45 cm) of clearance on the right side of the oven
from any open ‡ame.
INSTALLATION CODES AND STANDARDS
In the United States, install the oven in accordance with: 1) State and local codes; 2) National Electrical
Code, NFPA-70 (latest edition) and 3) NFPA Standard #96, Vapor Removal from Cooking Equipment
(latest edition), available from National Fire Protection Association, Batterymarch Park, Quincy, MA 02269.
In Canada, install the oven in accordance with: 1) Local codes; 2) Canadian Electrical Code, CSA
Standard C22.2 No. 1 (latest edition) and 3) Canadian Standard for Commercial Cooking Equipment CSA
Standard C22.2 No.109 (latest edition).
INSTALLING BASIC OVEN
The basic oven must be installed on legs or mounted on a modular stand. Installations on concrete bases
or other supports restricting air circulation underneath the oven is not advisable and may void the warranty.
If using the modular stand, set the oven on the stand after unpacking.
ASSEMBLING THE LEGS TO THE SINGLE OVEN
The legs must be installed on the bottom of the oven. Gently position the oven on its left side, taking care
not to cause scratches or damage.
Attach each of the four leg assemblies to the bottom of the oven with the 24 bolts and lockwashers
(six bolts and lockwashers per leg). Carefully raise the oven to its normal position.
LEVELING
Adjust the legs to ensure that the oven racks are level in the flnal installed position.
CASTERS
If the oven is to be installed on casters, assemble the casters to the legs provided. Then attach the caster-
leg units to the oven at each corner using the 24 bolts and lockwashers (six bolts and lockwashers per
leg). Place the locking casters on the front legs and nonlocking casters on the rear legs.

– 5 –
ASSEMBLING THE STAND TO THE OVEN
Attach each of the four leg assemblies to the bottom of the
oven with the 24 bolts and lockwashers (six per leg). Carefully
raise the oven to the normal position.
Attach the undershelf to the legs with eight bolts and
lockwashers (two per leg).
Install the rack guides into the shelf at the desired locations
(for pan or ‡at rack), then attach the rack supports to the
top end of the rack guides. Attach rack supports to the leg
assembly by removing one middle bolt and reattaching the
back through the end holes in the rack support (Fig. 2).
Fig. 2
ELECTRICAL CONNECTIONS
BACK
FRONT
PL-53274
ELECTRICAL AND GROUNDING CONNECTIONS MUST COMPLY WITH THE APPLI
CABLE PORTIONS OF THE NATIONAL ELECTRICAL CODE ANSI/NFPA70 (LATEST EDITION) AND/OR
OTHER LOCAL ELECTRICAL CODES.
DISCONNECT ELECTRICAL POWER SUPPLY AND PLACE A TAG AT THE
DISCONNECT SWITCH TO INDICATE THAT YOU ARE WORKING ON THE CIRCUIT.
Remove the wiring compartment cover on the front of the oven. Remove the appropriate knockout on the
bottom of the oven and attach the power supply conduit to the bottom of the oven.
Comply with the appropriate wiring diagram (located inside the right side panel) when making connections
to the electrical supply lines.
Replace the wiring compartment cover and right side panel. Turn on the power supply.
ELECTRICAL DATA
TOTAL
KW
208-240 V
3-PHASE LOADING
480 V
3-PHASE LOADING
NOMINAL AMPERES PER LINE WIRE
3-PHASE 1-PHASE
KW PER PHASE KW PER PHASE 208 V 240 V 480 V 208 V 240 V 480 V
L1-L2 L2-L3 L1-L3 L1-L2 L2-L3 L1-L3
L1 L2 L3 L1 L2 L3 L1 L2 L3
Single Oven 12.5 4 4 4.5 4 4 4.5 35 33 35 33 29 33 14.4 15.3 15.3 60 52 26
Stacked Oven 25 8 8 9 8 8 9 70 66 70 66 58 66 28.8 30.6 30.6 120 104 52

– 6 –
ASSEMBLING STACKED OVENS
Unpack the ovens and the stack kitV. Position the oven to be used as the bottom oven on its left
sidefor access to the oven bottom, taking care not to scratch or damage it.
Attach the four leg RUFDVWHUassemblies with the 24 bolts and lockwashers (six per leg).
Place the lower oven (with legsRUFDVWHUV) on the floor and remove two 7/16" (11 mm) diameter
knockouts on eachside of the top H[WHULRUSDQHO.5HPRYHNQRFNRXWIURPWRSRYHQEDVH
Install two locating studs to the bottom of the top oven per stacking kit instructions.
Move the oven with legs RUFDVWHUVto the installed position. Place the upper oven on top of the lower
oven usingthe locating studs.
Remove the optional rear panel, if provided, from the TOP oven. 5HPRYHWRSRYHQYHQWJXDUGInstall
the Stacking Flue (Fig. 3) withthe four screws provided. Replace the top oven rear panel, if
provided.
STACKING FLUE

– 7 –
ELECTRICAL CONNECTIONS (Stacked Ovens)
ELECTRICAL AND GROUNDING CONNECTIONS MUST COMPLY WITH THE APPLI
CABLE PORTIONS OF THE NATIONAL ELECTRICAL CODE AND/OR OTHER LOCAL ELECTRICAL
CODES.
DISCONNECT ELECTRICAL POWER SUPPLY AND PLACE A TAG AT THE
DISCONNECT SWITCH TO INDICATE THAT YOU ARE WORKING ON THE CIRCUIT.
Make sure that the electrical power supply agrees with the speci ications on the oven data plate, the wiring
diagram on the oven and Electrical Data, page 5.
Wires to connect both ovens are provided with DVHSDUDWHZLULQJNLWIRUVWDFNHGHOHFWULF ovenV.
Carefully route these leads from the topoven through the bushing (supplied with DQRWKHU
stacking kit) through the electrical access knockoutholes common to both ovens.
Connect wires X, Y and Z from the upper oven to the lower oven per the wiring diagram. Attach the
power supply conduit to the bottom of the lower oven. Connect the powersupply leads to the line
side of the terminal block on the bottom oven.
Finally, inspect and check all wiring and terminal connections for tightness or pinch points (cover on
oven frame).
Refer to reference drawing 426986 supplied with the stacking kit for electrical connection instructions.
Refer to instructions supplied with the stacking kit for marking the combined electrical load information
to the electrical data plate of the bottom oven.

– 8 –
OPERATION
THE OVEN AND ITS PARTS ARE HOT. USE CARE WHEN OPERATING, CLEANING
OR PERFORMING ANY MAINTENANCE.
CONTROLS
MOVE TO VENT
MASTER SWITCH
ON
HEAT
OFF
TEMPERATURE
TIMER
LOW
HI
FAN SPEED
OVEN COOL
OFF
OFF
ON
LIGHTS
05
10
15
20
25
30
35
40
45
50
55
60
150
150
225
250
275
300
325 350 375 200
400
425
450
250
475
500
F
100 C
PL-53491
MOISTURE VENT DAMPER – Open the damper to exhaust excess moisture. Close the damper
when cooking dry products. Select settings between OPEN and
CLOSED for optimum performance.
MASTER SWITCH – ON - Turns oven control circuits on.
– OFF - Turns oven control circuits off.
– OVEN COOL - Allows the fan motor to run with the doors ajar to
speed oven cooling.
ON LIGHT (Amber) – Lit when MASTER SWITCH is turned to ON.
HEAT LIGHT (White) – Comes on and goes off when the heating elements cycle on and off.
TEMPERATURE – Controls oven temperature.
TIMER – Use to set the cooking time. Alarm sounds continuously when time
has elapsed to 0. Turn the timer OFF to silence the alarm. The timer
does not turn the oven off. Keep timer set to OFF when the oven is
not in use.
FAN SPEED – Adjust air velocity in the oven cavity.
HI - Normal operating speed.
LOW - Use this setting when cooking a delicate product like
meringue, which could blow around in the oven.
LIGHTS – ON - Turns the interior lights on.
– OFF - Turns the interior lights off.

– 9 –
BEFORE FIRST USE (All Models)
Before using the oven for the flrst time, it must be burned off to release any odors that might result from
heating the new surfaces in the chamber.
1. Using a clean damp cloth, wipe the inside of the oven, including the racks.
2. Close the oven doors, turn the MASTER SWITCH to ON, turn the Thermostat to 300°F (149°C) and
allow the oven to cycle for 6 to 8 hours before turning the MASTER SWITCH to OFF.
USING ELECTRICAL MODELS
Preheating
1. Turn MASTER SWITCH to ON. Amber ON light will come on, indicating that power to oven is on.
2. Set Thermostat as desired. Refer to COOKING GUIDELINES for suggested temperatures and times
for various products.
3. Prepare product and place in suitable pans. When white HEAT light goes off, oven has reached
desired preheat temperature.
Cooking
1. Open doors and load the product into the oven. Place pans in the center of the racks. Close doors.
2. Set the Timer. After the preset time lapses, turn Timer to OFF position to stop alarm.
3. When product is done, open doors and carefully remove cooked product from the oven. Care should
be taken when wiping up any spills, as oven is still hot.
End of Day
1. Turn Thermostat to OFF.
2. Turn MASTER SWITCH to OVEN COOL. Leave doors open while the fan is on to cool the oven.
3. When oven has cooled sufflciently, turn MASTER SWITCH to OFF and clean the oven.

– 10 –
1
2
SET
PRIMARY
SECONDARY
MENU SELECT
MODE
R & H READY
OVEN
HEATING
OVEN
1/2
3/4
5/6
POWER LIGHTS
START
ROAST
&
HOLD
STOP
ON
OFF
ON
COOL
OVEN OFF
MENU RACK
3
4
5
PL-53464
CONTROLS
Always displays [HR:Min] when setting the Time.
Displays [HR:Min] if the countdown Time is more than 1 Hour.
Displays [Min:Sec] if the countdown Time is less than 1 Hour.
Displays Temperature in °F.
R & H
MODE
Indicates the oven is in the Roast and Hold Mode.
OVEN
READY
Indicates the oven is preheated and ready for cooking.
OVEN
HEATING
Indicates the oven is preheating.
PRIMARY
Primary indicates Menu Items 1, 3 or 5.
SECONDARY
Secondary indicates Menu Items 2, 4 or 6.
Up arrow increases and Down arrow decreases a displayed Time
or Temperature value (if arrow keys are lit).
TEMPERATURE: Use with SET to set the oven temperature.
SET
SET: Use with Time or Temperature.
TIME: Use with SET to manually set the time.
ROAST
&
HOLD
Selects Roast & Hold mode; also selects Low Fan Speed.
START
STOP
Press once to start; press a second time to stop.
1/2
3/4
5/6
Press once for Primary Menu Items (1, 3 or 5).
Press a second time for Secondary Menu Items (2, 4 or 6).
1
2
3
4
5
Rack Buttons select individual Menu/Rack Number
Cook Times — once programmed.

– 11 –
MANUALLY SETTING THE TEMPERATURE AND COOK TIME
To Set the Temperature
1. Press the SET button. Press the TEMPERATURE button; StPt displays to indicate Setpoint.
2. Use the Up and Down arrow keys to increase or decrease the displayed Temperature value.
3. Press the SET button again to save the Temperature setpoint in the computer.
To Set the Cook Time
1. Press the SET button. Press the TIME button. Tine displays to indicate TIME.
2. Use the Up and Down Arrow keys to increase or decrease the displayed Cook Time (HR:Min).
3. Press the SET button again to save the Time setting in the computer.
To Start Cooking
1. Press the START/STOP button.
2. The manual Cook Time counts down to 00:00. Displays [HR:Min] above 1 hour; [Min:Sec] below.
3. The buzzer will sound. To silence the buzzer, press the START/STOP button again.
4. The control retains the manual settings for Temperature and Time.
TO PROGRAM MENU ITEM AND RACK NUMBER COOK TIMES
Factory Preset and Programmable Cook Times are shown in the table, below
UNEM
NOITCELES
UNEM
METI
TESERPYROTCAF
METIUNEM
EMITKOOC
SEULAVELBAMMARGORP
METIUNEM
EMITKOOC
1KCAR
EMITKOOC
2KCAR
EMITKOOC
3KCAR
EMITKOOC
4KCAR
EMITKOOC
5KCAR
EMITKOOC
yramirP2/1 1 .nim01
yradnoceS2/1 2 .nim51
yramirP4/3 3 .nim02
yradnoceS4/3 4 .nim52
yramirP6/5 5 .nim03
yradnoceS6/5 6 .nim53
The Primary indicator light with Menu 1/2 selects Menu Item 1 (Factory Preset Cook Time = 10 minutes).
The Secondary indicator light with Menu 1/2 selects Menu Item 2 (Factory Preset Cook Time = 15 minutes).
This is similar, for Menu Buttons 3/4 or 5/6. Any menu item cook time can be changed using the procedure
below. Rack number Cook Times may be programmed if desired but are not required.
To Change the Time Setting for any Menu Item (1 – 6)
1. To enter program mode, press and hold the Up and Down arrow buttons until PrOG displays.
2. Select the Menu Item to be programmed (1 – 6). Tine displays to indicate TIME. Use the Up and
Down arrow buttons to increase or decrease the Menu Item's COOK TIME. Repeat this step for any
other Menu Items.
3. Press the START/STOP button; LOC displays. Press the START/STOP button a second time to
save the Menu Item(s)' COOK TIME(s).
4. Press the START/STOP button once to begin cooking (with the Menu Item's Cook Time). To exit,
press the START/STOP button a second time.
To Program Individual Rack Number Cook Times for a Menu Item
1. To enter program mode, press and hold the Up and Down arrow buttons until PrOG displays.
2. Select the Menu Item to be programmed (1 — 6); Tine displays to indicate TIME.
3. Then select the rack number (1 — 5). [t 1] indicates rack 1; [t 2] indicates rack 2 and so on. Use the
Up and Down arrows to increase or decrease the COOK TIME for any rack number.
4. Press the START/STOP button; LOC displays. Press the START/STOP button a second time to save
the Menu/Rack Number's COOK TIME(s).
5. To exit program mode, press START/STOP twice.

– 12 –
Always Set the Temperature Before Setting the Time
1. Press the SET button. Press the TEMPERATURE button; StPt displays. Use the Up and Down Arrow
keys to increase or decrease the temperature. To save, press the SET button again.
At startup, the display will initially show a GROWING BAR. When the oven temperature reaches the Set
Point, the set temperature displays. The READY light is lit, the HEAT light goes out and the oven is ready
for you to select the Cook Time, Menu Item Cook Time or Menu/Rack Number Cook Time.
Starting a Timed Cycle On All Racks
1. Open the door; door will display.
2. Place the desired product on any of the flve racks.
3. Close the door. The display should return to the set temperature or the GROWING BAR.
4. Press the Menu Key once for Primary or twice for Secondary to select a Menu Item Cook Time.
5. Press the START/STOP button. Pressing the START/STOP button after making a menu selection
will time all racks for the selected menu time.
6. The timer will count down the time remaining for the Menu Item Cook Time.
7. When the time has counted down to 00:00, the buzzer will sound and all Rack Buttons will ‡ash.
8. To silence the buzzer, press the START/STOP button.
Starting a Timed Cycle Using Programmed Individual Menu/Rack Number Cook Time(s)
1. After the set temperature is reached, open the door; door displays. Place product(s) in oven.
2. Close the door. The display returns to the set temperature or the GROWING BAR.
3. Select the Menu Item (once for Primary or twice for Secondary) and the Rack Number to select the
Menu/Rack Number Cook Time. If using simultaneous cook times, select the other Menu/Rack
Number's.
4. The timer selects the rack number with the shortest cook time and counts down to 00:00.
5. The buzzer sounds and the rack number ‡ashes. To silence the buzzer, press the ‡ashing Rack
Number.
6. Open the door; door displays. Remove the flnished product and close the door.
7. The next shortest cook time displays, its rack number ‡ashes and the time counts down to 00:00.
8. The buzzer sounds. Press the ‡ashing Rack Number. Open the door; door displays. Remove the
product and close the door.
9. Repeat steps 7 through 8 until all rack number's are done.
To Display the Actual Oven Temperature
1. Press and hold the Temperature button for three seconds to display Actual Oven Temp until released.
To End a Cooking Cycle
At the end of a cooking cycle, the alarm will sound. To silence the alarm and end a Menu Item cooking
cycle, press START/STOP. To silence the alarm and end a rack number cooking cycle, press the Rack
Number.
To cancel a cooking cycle which might have been started in error, press and hold the Rack Number button
to be terminated and press START/STOP at the same time.
Door and Timing
Opening the door while loading additional product will interrupt all timing functions until the door is closed
and the timer resumes. For example, if a product time had diminished to 1 minute and the door was
opened for 30 seconds and then closed, the timer would still show 1 minute.

– 13 –
SETTING THE OVEN FOR ROAST & HOLD
1. Press the ROAST & HOLD button to select Roast & Hold.
2. Set the flrst stage Temperature and the Cook Time as described in: MANUALLY SETTING THE
TEMPERATURE AND COOK TIME. Press START/STOP to begin cooking.
3. The HOLD Temperature is preset by the computer control at 150°F (66°C).
4. The LOW FAN SPEED is present during Roast & Hold. Use Roast & Hold to select LOW FAN
SPEED.
ROAST & HOLD OPERATION
Roast & Hold cooks the product in two stages. During First Stage Cooking, the oven temperature is
regulated by the Temperature setpoint and the Time setting. After the time counts down to 00:00, Second
Stage Cooking begins. During Second Stage Cooking, the heating elements are off as the temperature in
the oven declines to the Hold Temperature. The doors should remain closed during Second Stage Cooking.
When the Hold temperature is reached, the display ‡ashes HOLD. Temperature in the oven will be
maintained at the Hold temperature until the oven is turned off.
PROPER UTENSILS
The use of proper utensils can enhance oven operation. Medium and lightweight pans allow the product
to warm faster. Roast meats in shallow pans deep enough to hold all juices yet allow free air circulation.
OPERATING HINTS
When using the convection oven for the flrst time with a particular food, check the degree of doneness
periodically before the suggested time has elapsed. This will ensure the desired doneness is achieved.
Record your temperature and time settings for various products. The convection oven can provide consistent
and repeatable results.
The convection oven is faster than conventional deck-type ovens; temperature settings are lower and
cook times are shorter. Since recipes and foods are subject to many variations and tastes, the guidelines
regarding Times and Temperatures in this manual are SUGGESTIONS ONLY. Experiment with your food
products to determine the cooking temperatures and times that give you the best results.
NOTE: For a more even bake in electric deep ovens, place the pans horizontally in the center of the oven
rack and decrease the suggested cooking temperature by 50°F (10°C).

– 14 –
COOKING GUIDELINES
The information in the Cooking Guidelines chart is suggested only. Cooking times for various products may
be different depending on the brand, consistency and the chef’s preferences for taste and presentation.
The times below may require adjustments. Note the times and temperatures of your preferred results
for future use. The preheating time for all of the following is 15 minutes. The computer control's Holding
Temperature is preset at 150°F (66°C) and cannot be changed.
COOKING GUIDELINES (HOLDING FEATURE)
Cooking Cooking Min. Hold Max. Internal Internal
Amount Temp. Time Time Cook Temp. Hold Temp.
Product lbs. (kg) °F (°C) Hours Hours °F (°C) °F (°C)
Prime Rib 20 (9.06) 225 (107) 5 4 140 (60)
Rib Eye Boneless 12 (5.43) 225 (107) 3 4 140 (60)
Top Round 20 (9.06) 225 (107) 5 4 140 (60)
Steamship Round 20 (9.06) 225 (107) 7 2 140 (60)
Bottom Round 20 (9.06) 225 (107) 5 8 140 (60)
Boneless Strip Loin 12 (5.43) 225 (107) 3 4 140 (60)
Whole Tenderloin 6 (2.71) 225 (107) 2 2 140 (60)
Top Sirloin Butt 14 (6.34) 225 (107) 3 4 140 (60)
Beef Short Ribs 10 (4.53) 225 (107) 4 4 165 (74)
Cube Steaks 10 (5.43) 225 (107) 3 3 180 (82)
Beef Back Ribs 30 (13.6) 225 (107) 5 4 175 (79)
Beef Stew 10 (5.43) 225 (107) 4 6 175 (79) 150 (66)
Corned Beef 12 (5.43) 250 (121) 4 4 165 (74) 150 (66)
Fresh Ham 12 (5.43) 250 (121) 6 4 165 (74)
Cooked Cured Ham 12 (5.43) 250 (121) 4 4 135 (57)
Pork Back Ribs 10 (4.53) 250 (121) 5 3 175 (79) 150 (66)
Pork Spare Ribs 30 (13.6) 250 (121) 5 4 175 (79) 150 (66)
Fresh Sausages 10 (4.53) 225 (107) 2 5 (Max) 175 (79)
Pre-Cooked Sausage 10 (4.53) 250 (121) 13/4 51/2 (Max) 160 (71)
Roast Suckling Pig 30 (13.6) 250 (121) 6 3 170 (77) 155 (68)
Bacon 350 (177) 40 min. N/A
Roasted Chicken 10 (4.56) 350 (177) 45 min. N/A 165 (74)
Chicken Pieces (per tray) 10 (4.56) 250 (121) 21/2 1/2 (Max) 170 (77) 150 (66)
Whole Chickens
(per chicken) 3.25 (1.47) 250 (121) 21/2 41/2 (Max) 170 (77) 140 (60)
Whole Turkeys 20 (9.06) 230 (110) 61/2 12 (Max) 170 (77) 160 (71)
Bone In Turkey Breast 10 (4.53) 250 (121) 5 1 160 (71) 150 (66)
Roast Duckling (per duck) 4 (1.81) 350 (177) 11/2 3 (Max) 170 (77) 150 (66)
Rack of Lamb 15 racks 250 (121) 31/2 21/2 160 (71)
per tray
Lamb Shanks, Braised 250 (121) 4 4 180 (82) 150 (66)
Fish Filets 4-6 oz. (23g) 225 (107) 40 min. 4 160 (71)
1/1 Gastronome
Clear Soups or 12x20x4" 225 (107) 3 Overnight 175 (79) 150 (66)
Steam Pan
Frozen Pizza (2) 18” Pies 350 (177) 15 min. 2 175 (79) 160 (71)
Rice 1 Qt. dry 250 (121) 2 18 160 (171) N/A
Baked Potatoes 90 CT. 350 (177) 1 11/2 200 (93) 170 (77)

– 15 –
POWER OUTAGE
In case of a power outage, the oven will automatically shut down. When power is restored to the lines, the
oven will resume its normal operation. However, if the oven is to be left unattended during a power outage,
push the MASTER SWITCH to the OFF position. When power is restored to the lines, push MASTER
SWITCH to the ON position, wait for the oven to preheat, then resume normal cooking operations.
CLEANING
WARNING: DISCONNECT ELECTRICAL SUPPLY AND PLACE A TAG AT THE DISCONNECT SWITCH
TO INDICATING THAT YOU ARE WORKING ON THE OVEN BEFORE CLEANING.
• Clean outside of the oven daily by wiping with a clean, damp cloth.
• Clean porcelain oven interior daily with soap or detergent and water. Rinse thoroughly and wipe dry
with a soft, clean cloth.
Optional Stainless Steel Oven Interior
Soap or detergent and water usually handle routine cleaning. Rinse thoroughly and dry with a soft, clean
cloth.
For burned-on foods and grease which resist simple soap and water cleaning, an abrasive cleanser
(scouring powder) mixed into a paste may be used. Apply with stainless steel wool or sponge, always
rubbing with the grain.
This treatment is equally effective for "heat tint" (slightly darkened areas caused by oxidation). Again,
remember to rub in the direction of the polish lines. Rinse with clear water and dry with a soft cloth.
STANDARD COOKING TIME CHART
Product Amount Temp. Time
Frozen Croissant Dough 1.75 oz. 350°F (177°C) 25 Min
Cinnamon Croissant 1.75 oz. 350°F (177°C) 35 Min.
Small Bread Loaves 1 Tray 350°F (177°C) 30 Min.
Large Bread Loaves 1.5 lbs. 350°F (177°C) 60 Min.
Sheet Cake (1) 18x26" Tray 300°F (149°C) 25 Min.
Scone Mix 1 Tray 350°F (177°C) 30 Min.
Muffln Mix 1 Tray 350°F (177°C) 30 Min.
Kaiser Rolls 1 Tray 350°F (177°C) 16 Min.
Italian Bread 1 Tray 350°F (177°C) 40 Min.
Danish Rounds* 1 Tray 350°F (177°C) 30 Min.
Cream Cake* 1 Tray 350°F (177°C) 60 Min.
Cookies 1 Tray 325°F (163°C) 16 Min.
*The maximum internal cooking temperature should be 190°F (88°C).

– 16 –
SERVICE AND PARTS INFORMATION
To obtain service and parts information concerning your Oven, contact the Vulcan-Hart Service Depot
in your area (refer to listing supplied with this oven) or Vulcan-Hart Company Service Department at the
address or phone number shown on the front cover of this manual.
FORM 31159 Rev. ( (/201)PRINTED IN U.S.A.
MAINTENANCE
the oven.
5(3/$&,1*6,'(02817('/$036
procedures.
LUBRICATION
The fan motor comes with sealed bearings and requires no lubrication.
VENT
Periodically check the flue, when the oven is cool, to be sure it is free of obstructions.
$,5,17$.(
5HDUDLULQWDNHVORWVDQGKROHVVKRXOGEHFOHDQHGZLWKDGDPSFORWKUHJXODUO\),*
The UHDUDLULQWDNHVPXVWEHNHSWFOHDU
1RQFRPSOLDQFHPD\OHDGWRFRPSRQHQWIDLOXUH
Fig.
5($5$,5
,17$.(
1.Allow oven to cool.
2.Remove all racks by pulling forward, lifting up and out.
3.
Unscrew glass dome from light body.
4.Replace the bulb.
5.Reassemble glass dome and racks.
$OORZRYHQWRFRRO
5HPRYHDOOUDFNVE\SXOOLQJIRUZDUGOLIWLQJXSDQGRXW
5HPRYHWKHULJKWUDFNJXLGHE\OLIWLQJXSDQGSXOOLQJRXW
3U\JODVVFRYHURIIE\VOLGLQJDIODWWRROXQGHUWKHERWWRPOLSRIWKHFRYHU
5HSODFHWKHEXOE*ORYHVVKRXOGEHZRUQZKLOHKDQGOLQJEXOEV
5HDVVHPEOHJODVVFRYHUDQGUDFNVE\UHYHUVLQJWKHGLVDVVHPEO\SURFHGXUH
5(3/$&,1*5($502817('/$036
The oven and its parts are hot. Use care when operating, cleaning or servicing
Disconnect the electrical power to the machine and follow lockout / tagout

– 16 –
F-31159 Rév. E (03/05/2019) IMPRIMÉ AUX É.-U.
RENSEIGNEMENTS SUR LES PIÈCES ET L'ENTRETIEN
Pour obtenir plus de renseignements sur les pièces et l'entretien de votre four de la série VC, contactez
le centre de service autorisé de Vulcan-Hart de votre région (consultez la liste fournie avec votre four),
ou contactez directement le service de l'entretien de la compagnie Vulcan-Hart, à l'adresse ou au
numéro de téléphone indiqué sur la couverture de ce manuel.
ENTRETIEN
! AVERTISSEMENT : Le four et ses composants sont chauds. Exercer une extrême prudence
lors de l’exploitation, du nettoyage et de l’entretien de cet appareil.
! AVERTISSEMENT : Couper l’alimentation électrique de l’appareil et suivre les procédures de
verrouillage et d’étiquetage.
LUBRIFICATION :
Le moteur du ventilateur est pourvu de roulements scellés ne nécessitant aucune lubrication.
VENTILATION :
Une fois l’an, il faut vérier le conduit d’évacuation lorsqu’il est froid pour s’assurer qu’il n’est pas
obstrué.
ENTRÉE D’AIR
Les fentes et les trous de l’entrée d’air arrière devraient être nettoyés régulièrement avec un chiffon
humide. FIG. 4.
!AVERTISSEMENT :
Les entrées d’air arrière doivent rester dégagées.
Le non-respect de cette procédure peut entraîner le
non-fonctionnement du composant.
REMPLACEMENT DES AMPOULES LATÉRALES :
1. Laissez refroidir le four.
2. Retirez toutes les grilles en les tirant vers l’avant et en les soulevant pour les sortir.
3. Retirez le guide de la grille de droite en le soulevant et en le tirant vers l’extérieur.
4. Soulevez le couvercle en verre en glissant un outil plat sous la lèvre inférieure du couvercle.
5. Remplacez l’ampoule. Vous devriez porter des gants quand vous travaillez sur des ampoules.
6. Remettez le couvercle de verre et les grilles en place en inversant la méthode de démontage.
REMPLACEMENT DES AMPOULES ARRIÈRES :
1. Laisser refroidir le four.
2. Enlever toutes les grilles en les tirant vers soi et en les soulevant.
3. Dévisser le dôme de la lampe.
4. Remplacer l’ampoule.
5. Remettre le dôme et les grilles en place.
ENTRÉE D’AIR
ARRIÈRE
Fig.

– 15 –
TABLEAU DES TEMPS DE CUISSON STANDARD
Produit Qté Temp. Durée
Pâte à croissant congelée 1,75 oz 350oF (177oC) 25 min.
Croissant à la cannelle 1,75 oz 350oF (177oC) 35 min.
Pain, petit 1 plateau 350oF (177oC) 30 min.
Pain, grand 1,5 lb 350oF (177oC) 60 min.
Gâteau rectangulaire (1) plateau de 18x26 po 300oF (177oC) 25 min.
Mélange à scone 1 plateau 350oF (177oC) 30 min.
Mélange à mufn 1 plateau 350oF (177oC) 30 min.
Pain mollet Kaiser 1 plateau 350oF (177oC) 16 min.
Pain italien 1 plateau 350oF (177oC) 40 min.
Danoises* 1 plateau 350oF (177oC) 30 min.
Gâteau à la crème* 1 plateau 350oF (177oC) 60 min.
Biscuits 1 plateau 325oF (177oC) 16 min.
* La température interne maximale de cuisson doit être de 190oF (88oC).
REMPLACEMENT DES LAMPES
Le four s'éteint automatiquement lorsque survient une interruption de courant. Lorsque
l'alimentation électrique reprend, le four se remettra en marche normalement. Toutefois, si le
four doit être laissé sans surveillance durant une PANNE ÉLECTRIQUE, placez l'interrupteur
principal à la position « OFF ». Lorsque l'alimentation électrique est rétablie, remettez
l'interrupteur principal en position « ON », attendez le préchauffage, puis continuez les
opérations de cuisson de façon normale.
NETTOYAGE
AVERTISSEMENT : COUPEZ L'ALIMENTATION ÉLECTRIQUE ET PLACEZ UNE ÉTIQUETTE DE
SÉCURITÉ SUR L'INTERRUPTEUR INDIQUANT QUE VOUS TRAVAILLEZ SUR LE FOUR AVANT
D'ENTREPRENDRE LE NETTOYAGE.
• Nettoyez quotidiennement l'extérieur du four à l'aide d'un chiffon humide propre.
• Nettoyez quotidiennement la chambre intérieure du four en porcelaine avec de l'eau et du savon
ou du détergent. Rincez soigneusement, puis séchez avec un linge doux et propre.
Intérieur optionnel en acier inox
De l'eau et du savon ou du détergent sont sufsants pour les nettoyages de routine. Rincez
soigneusement, puis séchez avec un linge doux et propre.
Pour les aliments collés par la chaleur et la graisse, qui résistent aux nettoyages simples à l'eau et au
savon, un nettoyant abrasif (comme la poudre à récurer) mélangé à de l'eau pour former une pâte peut être
utilisé. Appliquez à l'aide d'une laine d'acier ou d'une éponge, et frottez toujours dans le sens du grain.
Ce traitement est également efcace pour les « décolorations » dues à la chaleur (les endroits
légèrement noircis par l'oxydation). Souvenez-vous ici encore de frotter dans le sens du poli. Rincez à
l'eau claire, et essuyez avec un chiffon doux.

– 14 –
DIRECTIVES DE CUISSON
Les renseignements de ce tableau de directives de cuisson sont fournis à titre indicatif seulement. Les temps
de cuisson peuvent être différents pour divers produits, selon la marque, la consistance et la préférence du
chef quant au goût et à la présentation. Les durées ici-bas sont sujettes à des ajustements. Prenez en note
les durées et les températures de cuisson de vos résultats les plus probants pour usage futur. Le temps de
préchauffage pour tous les aliments ci-dessous est de 15 minutes. La température de maintien de l'ordinateur
de contrôle est xée à 150oF (66oC), et ne peut être changée.
DIRECTIVES DE CUISSON (MODE CUISSON ET MAINTIEN)
Produit Quantité lbs
(kg)
Température
de cuisson
oF (oC)
Durée de
cuisson
Heures
Temps de
maintien
Heures
Température
interne
maximale
oF (oC)
Température
interne de
maintien
oF (oC)
Roti de côte 20 (9,06) 225 (107) 5 4 140 (60)
Faux-let, désossé 12 (5,43) 225 (107) 3 4 140 (60)
Intérieur de ronde 20 (9,06) 225 (107) 5 4 140 (60)
Ronde « steamship » 20 (9,06) 225 (107) 7 2 140 (60)
Extérieur de ronde 20 (9,06) 225 (107) 5 8 140 (60)
Contre-let, désossé 12 (5,43) 225 (107) 3 4 140 (60)
Filet entier 6 (2,71) 225 (107) 2 2 140 (60)
Haut de surlonge 14 (6,34) 225 (107) 3 4 140 (60)
Bouts de côtes, boeuf 10 (4,53) 225 (107) 4 4 165 (74)
Bifteck attendri 10 (5,43) 225 (107) 3 3 180 (82)
Côtes levées de dos, boeuf 30 (13,6) 225 (107) 5 4 175 (79)
Ragoût, boeuf 10 (5,43) 225 (107) 4 6 175 (79) 150 (66)
Boeuf salé 12 (5,43) 250 (121) 4 4 165 (74) 150 (66)
Jambon frais 12 (5,43) 250 (121) 6 4 165 (74)
Jambon salé, cuit 12 (5,43) 250 (121) 4 4 135 (57)
Côtes levées de dos, porc 10 (4,53) 250 (121) 5 3 175 (79) 150 (66)
Côtes levées, porc 30 (13,6) 250 (121) 5 4 175 (79) 150 (66)
Saucisses fraîches 10 (4,53) 225 (107) 2 5 (max) 175 (79)
Saucisses pré-cuites 10 (4,53) 250 (121) 1 3/4 5 1/2 (max) 160 (71)
Cochon de lait rôti 30 (13,6) 250 (121) 6 3 170 (77) 155 (68)
Bacon 350 (177) 40 min. N/D
Poulet rôti 10 (4,56) 350 (177) 45 min. N/D 165 (74)
Morceaux de poulet (par plateau) 10 (4,56) 250 (121) 2 1/2 1/2 (max) 170 (77) 150 (66)
Poulets entiers (par poulet)
3,25 (1,47) 250 (121) 2
1/2
4
1/2
(max) 170 (77) 140 (60)
Dindes entières
20 (9,06) 230 (110) 6
1/2
12 (max) 170 (77) 160 (71)
Poitrine de dinde, avec os
10 (4,53) 250 (121) 5 1 160 (71) 150 (66)
Canardeau rôti (par canard)
4 (1,81) 350 (177) 1
1/2
3 (max) 170 (77) 150 (66)
Carré d'agneau Carré de 15 par
plateau 250 (121) 3 1/2 2 1/2 160 (71)
Jarrets d'agneau, braisés 250 (121) 4 4 180 (82) 150 (66)
Filets de poisson 4-6 oz (23 g) 225 (107) 40 min. 4 160 (71)
Soupes claires Gastronome 1/1 ou
plat à pocher de
12x20x4 po 225 (107) 3 toute la nuit 175 (79) 150 (66)
Pizza congelée (2) pizzas de 18 po 350 (177) 15 min. 2 175 (79) 160 (71)
Riz 1 pinte à sec 250 (121) 2 18 160 (171) N/D
Pommes de terre au four
90 CT. 350 (177) 1 1
1/2
200 (93) 170 (77)

– 13 –
PRÉPARATION DU FOUR POUR LE MODE CUISSON ET MAINTIEN
1. Appuyez sur la touche « ROAST & HOLD » pour sélectionner le mode cuisson et maintien.
2. Fixez la température et la durée pour la première phase de la cuisson selon les directives données
dans la section « RÉGLAGE MANUEL DE LA TEMPÉRATURE ET DE LA DURÉE DE CUISSON ».
3. La température pour la phase MAINTIEN est xée à 150oF (66oC) par l’ordinateur de contrôle.
4. Durant le mode cuisson et maintien, le ventilateur fonctionne à basse vitesse . Vous pouvez
sélectionner le mode cuisson et maintien pour vous servir de cette vitesse plus basse.
MODE CUISSON ET MAINTIEN
Le mode cuisson et maintien exécute la cuisson d'un produit en deux étapes. Durant la première phase
de la cuisson, la température du four est réglée selon un point xé, et la durée de cuisson s’écoule
selon les paramètres xés de la minuterie. Une fois que la minuterie atteint 00:00, la deuxième phase
de la cuisson débute. Durant cette seconde phase, les éléments de chauffe cessent de fonctionner, et
la température du four s'abaisse graduellement jusqu'à la température de maintien. Les portes doivent
demeurer fermées durant la deuxième phase de la cuisson.
Lorsque la température de maintien est atteinte, « HOLD » apparaît sur l'afcheur et clignote. Le four
sera maintenu à la température de maintien jusqu'à ce qu'il soit éteint.
USTENSILES APPROPRIÉS
L'utilisation d'ustensiles adéquats peut améliorer les opérations de cuisson. Des plateaux légers ou peu
lourds permettent aux aliments de se réchauffer plus rapidement. Faites griller les viandes dans des
bacs assez profonds pour retenir les jus, mais pas au point d'entraver la libre circulation d'air dans la
chambre.
ASTUCES D'UTILISATION
Lorsque vous utilisez pour la première fois le four à convection pour un certain type d'aliment, vériez
l'état de la cuisson à quelques reprises avant d’atteindre la n de la durée de cuisson suggérée. Ceci
vous assurera d'obtenir la cuisson désirée.
Prenez en note les températures et les durées de cuisson pour une gamme de produits. Le four à
convection permet d'obtenir des résultats constants, pouvant être répétés.
Le four à convection est plus rapide qu'un four conventionnel à deux paliers ; les températures de cuisson
sont plus basses, et les durées plus courtes. Les recettes et la préparation des aliments étant sujettes à
beaucoup de variations et à des goûts différents, considérez que les directives de ce manuel concernant
les durées et les températures ne sont que des SUGGESTIONS. Expérimentez avec vos propres
aliments an de déterminer les températures et les durées de cuisson qui donnent les meilleurs résultats.
NOTE : Pour une cuisson plus égale avec les fours électriques grande profondeur, placez les plateaux
horizontalement au centre de la grille, et réduisez la température suggérée de 50oF (10oC).
Other manuals for VULCAN HOBART WOLF VC4ED
1
This manual suits for next models
10
Table of contents
Popular Convection Oven manuals by other brands

Rational
Rational iCombi Pro Original Installation Instructions

NERONE
NERONE GN User and maintenance manual

Ewave
Ewave EWGC12W3 instruction manual

Zanussi
Zanussi EasyPlus 239504 Brochure & specs

Inoxtrend
Inoxtrend GUP 304 INSTRUCTIONS FOR THE INSTALLATION, USE AND MAINTENANCE

Maxima
Maxima 09300420 user manual