iWantit iDABHF12 User manual

hi- with DAB radio &
dock for iPhone and iPod
iDABHF12
instruction manual
(iPod and iPhone are not included)
iDABHF12_IB_RC_120928_Annie.indd 1 28/09/2012 5:20 PM

iDABHF12_IB_RC_120928_Annie.indd 2 28/09/2012 5:20 PM

Contents
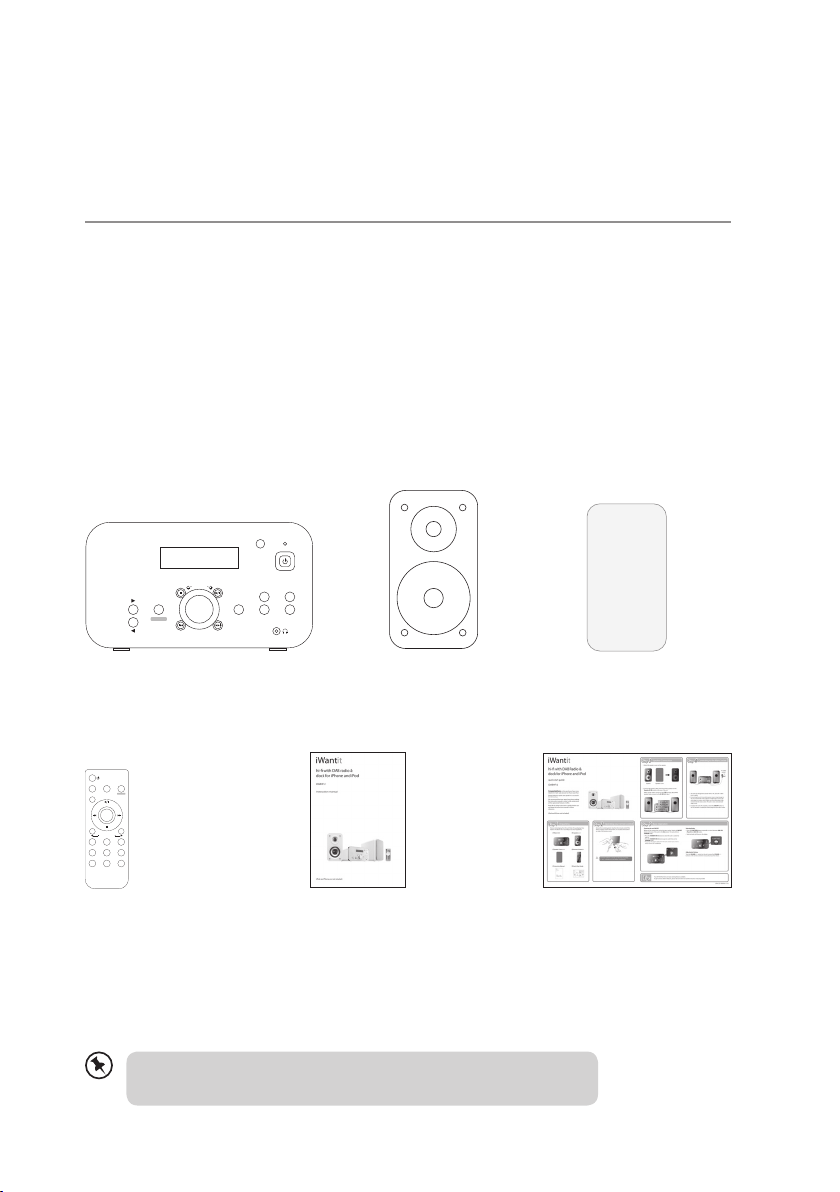
unpacking .......................................................................................................................................... 5
product overview ............................................................................................................................. 6
front view...................................................................................................................................................................... 6
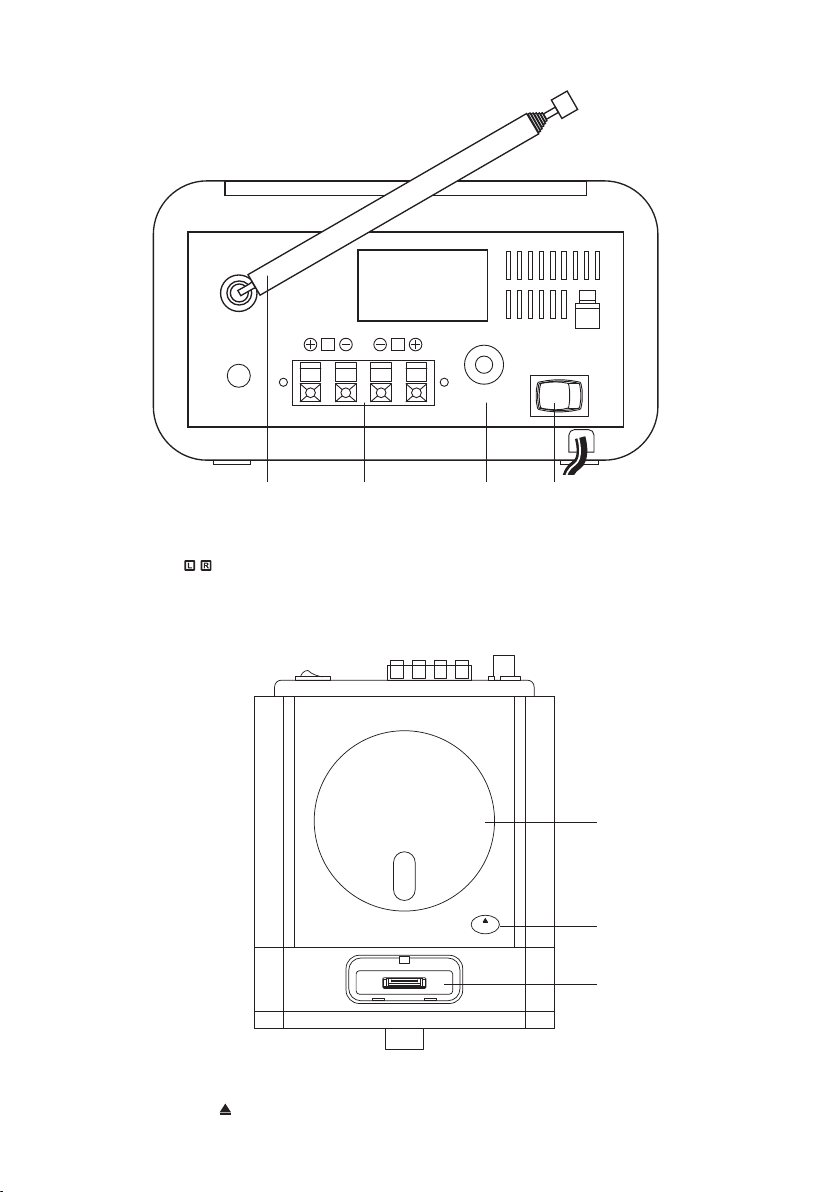
rear view........................................................................................................................................................................ 7
top view......................................................................................................................................................................... 7
remote control .................................................................................................................................. 8
operating your remote control ...................................................................................................... 9
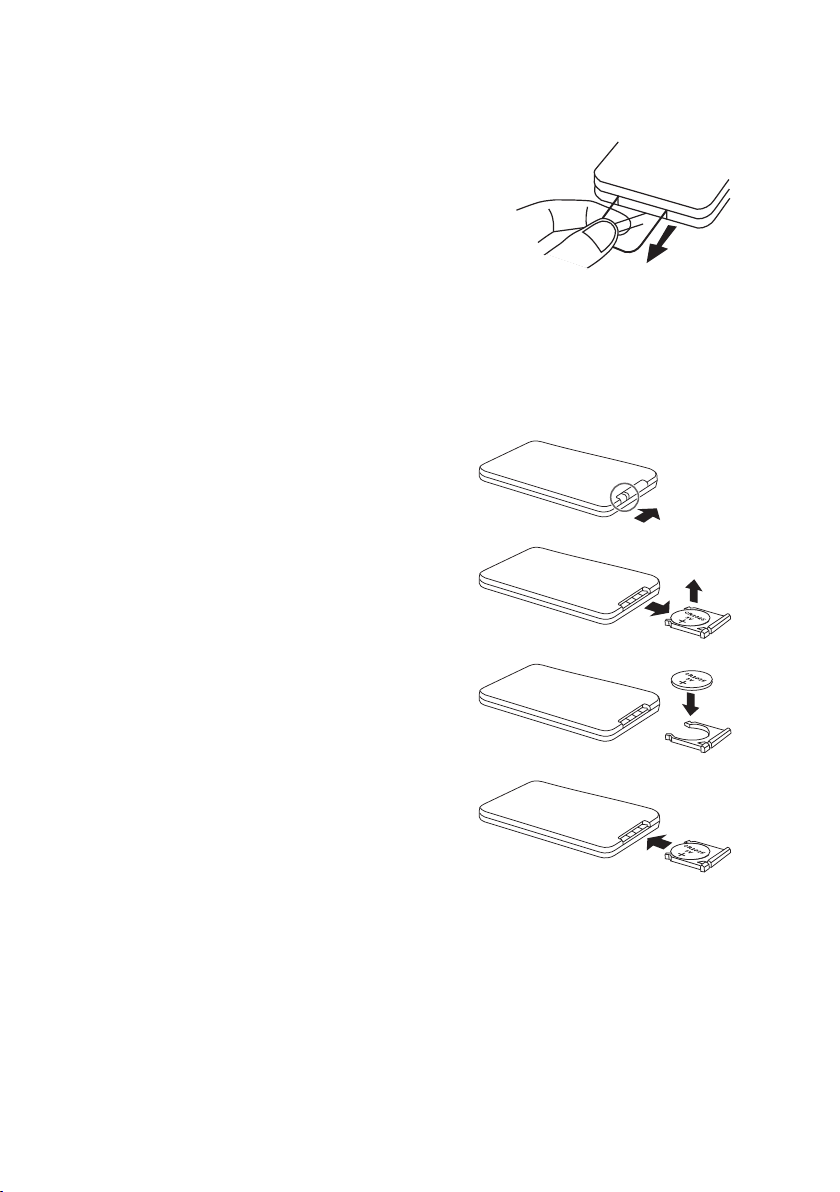
battery replacement for the remote control............................................................................... 9
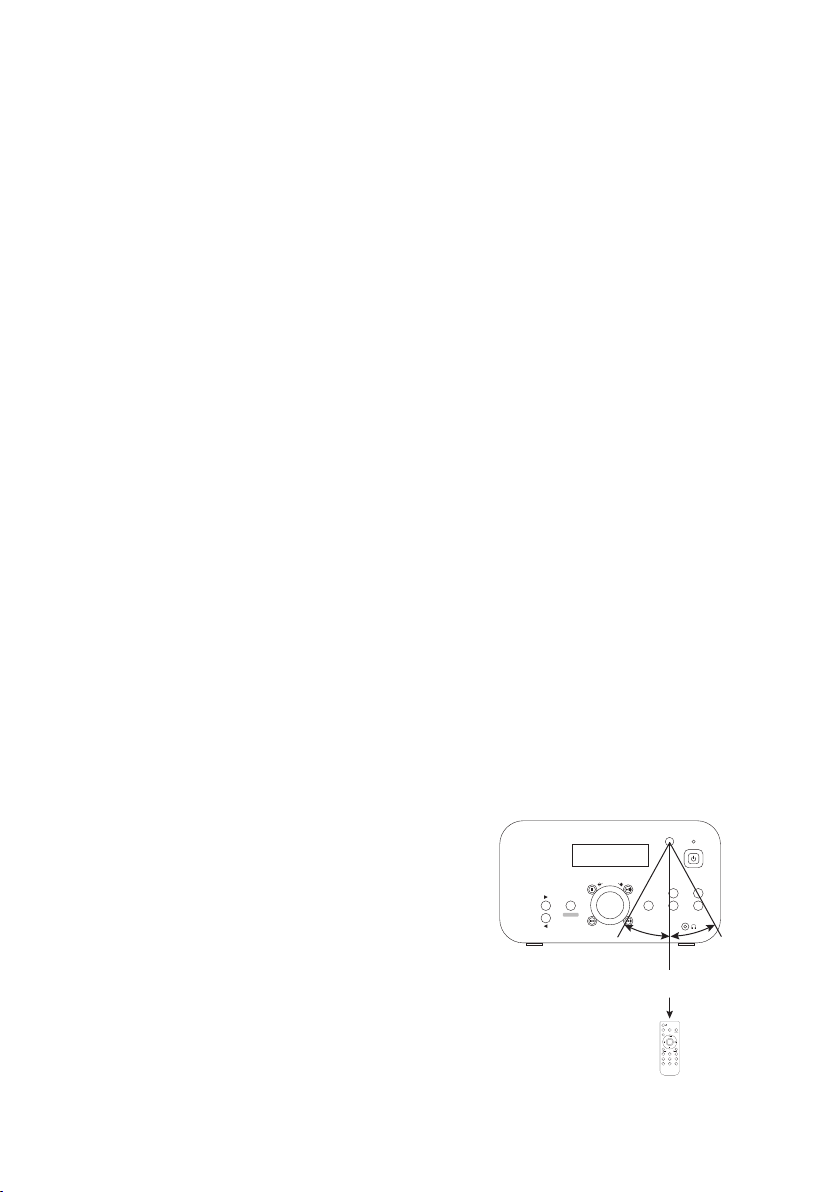
remote control operation range.................................................................................................. 10
connections ..................................................................................................................................... 11
speaker connections...............................................................................................................................................11
mains power ..............................................................................................................................................................11
using earphones.......................................................................................................................................................12
playing music from an audio device.................................................................................................................12
basic operation ............................................................................................................................... 13
powering the unit on/o.......................................................................................................................................13
selecting modes .......................................................................................................................................................13
adjusting the volume..............................................................................................................................................13
mute function............................................................................................................................................................13
auto setting the clock.............................................................................................................................................13
manually setting the clock....................................................................................................................................14
setting the daily timer ............................................................................................................................................14
to cancel the daily timer........................................................................................................................................14
setting the sleep timer ...........................................................................................................................................15
EQ control ...................................................................................................................................................................15
DAB operation................................................................................................................................. 16
full scan........................................................................................................................................................................16
manual tuning...........................................................................................................................................................16
secondary services...................................................................................................................................................16
storing stations .........................................................................................................................................................17
recalling a stored station.......................................................................................................................................17
DAB display modes..................................................................................................................................................18
FM operation................................................................................................................................... 19
auto scan.....................................................................................................................................................................19
manual scan ...............................................................................................................................................................19
audio mode................................................................................................................................................................19
storing stations .........................................................................................................................................................19
recalling a stored station.......................................................................................................................................20
FM display modes ....................................................................................................................................................20
iDABHF12_IB_RC_120928_Annie.indd 3 28/09/2012 5:20 PM

compatible disc types.................................................................................................................... 21
CD operation ................................................................................................................................... 21
playback ......................................................................................................................................................................21
to pause playback....................................................................................................................................................21
to stop playback .......................................................................................................................................................21
skipping to another track......................................................................................................................................21
repeat playback ........................................................................................................................................................21
programme setting .................................................................................................................................................22
programme play.......................................................................................................................................................22
programme cancel...................................................................................................................................................22
random playback .....................................................................................................................................................22
intro playback............................................................................................................................................................22
iPhone/iPod operation .................................................................................................................. 23
inserting the iPhone/iPod and selecting iPod mode..................................................................................23
control iPhone/iPod menu ...................................................................................................................................24
charging your iPhone/iPod...................................................................................................................................24
LINE IN operation............................................................................................................................24
maintenance.................................................................................................................................... 25
handling discs ...........................................................................................................................................................25
cleaning discs ............................................................................................................................................................25
storing discs ...............................................................................................................................................................25
cleaning the unit ......................................................................................................................................................25
hints and tips................................................................................................................................... 26
specications................................................................................................................................... 28
safety warnings............................................................................................................................... 29
iDABHF12_IB_RC_120928_Annie.indd 4 28/09/2012 5:20 PM

5
unpacking
Remove all packaging from the unit. Retain the packaging. If you dispose of it please do so
according to local regulations.
The following items are included:
Main Unit x 1 Speaker Covers x 2Speakers x 2
Remote Control x 1 Instruction Manual x 1 QSG x 1
SKIP/TUNE SEARCH
STANDBY
STANDBY/ON
FUNCTION
TIMER
MENU/INFO
STOP
PLAY/PAUSE
SCAN
SELECT/
FM MO./ST.
PRESET/
ARROW CLOCKPRESET
/MEMORY
V
O
L
U
M
E
MENU/INFO
REPEAT
SELECT/
MONO/ST.
SCAN
PRESET
/MEMORY
CLOCK
PRESET/ARROW
TIMER
INTROEQ
RANDOM
FUNCTION
SLEEP
MUTE VOLUME
– +
STANDBY/ON
Thank you for purchasing your new iWantit Hi-Fi with DAB Radio & Dock.
We recommend that you spend some time reading this instruction manual in order that you fully
understand all the operational features it oers. You will also nd some hints and tips to help you
resolve any issues.
Read all the safety instructions carefully before use and keep this instruction manual for future
reference.
If items are missing or damaged, please contact Partmaster (UK only).
Tel: 0844 800 3456 for assistance.
iDABHF12_IB_RC_120928_Annie.indd 5 28/09/2012 5:20 PM

6
SKIP/TUNE SEARCH
STANDBY
STANDBY/ON
FUNCTION
TIMER
MENU/INFO
STOP
PLAY/PAUSE
SCAN
SELECT/
FM MO./ST.
PRESET/
ARROW CLOCKPRESET
/MEMORY
V
O
L
U
M
E
1. LCD Display
2. PRESET/ARROW Buttons
• Press to select previous/next preset
number.
• Press to move Up/Down on the
menu screen in iPod mode.
3. STANDBY LED Indicator
4. Remote Control Sensor
Receives signals from the remote
control.
5. STANDBY/ON Button
6. FUNCTION Button
Press to switch between CD, DAB, FM,
AUX IN and iPod mode.
7. MENU/INFO Button
Press to display menu/information.
8. TIMER Button
9. CLOCK Button
10. PRESET/MEMORY Button
11. STOP Button
Press to stop playing a disc.
12. SKIP/TUNE SEARCH Button
• Press to skip backwards to the
beginning of the track or the
previous track.
• Press and hold to perform fast
reverse playback.
13. VOLUME +/– Control
Turn to adjust the volume.
14. SKIP/TUNE SEARCH Button
• Press to skip forwards to the next
track.
• Press and hold to perform fast
forward playback.
15. PLAY/PAUSE/SCAN Button
• Press to start or resume playback of
a disc.
• Press to scan to a radio station.
16. SELECT/FM MO./ST. Button
• Press to conrm selections on the
menu screen.
• Press to switch between auto and
mono mode.
17. Earphones Socket
2
1
6
3
5
4
7
9
8
product overview
front view
10 13 161511 1712 14
iDABHF12_IB_RC_120928_Annie.indd 6 28/09/2012 5:20 PM

7
ON
LINE IN
R
OFF
L
1 2 3 4
rear view
1. FM Aerial
2. Speaker / Sockets
3. LINE IN Socket
4. ON/OFF Button
Switch the unit ON/OFF
1. CD Compartment
2. OPEN/CLOSE button
3. iPhone/iPod Dock
top view
OPEN/
CLOSE
1
2
3
iDABHF12_IB_RC_120928_Annie.indd 7 28/09/2012 5:20 PM

8
remote control
1. STANDBY/ON Button
2. MENU/INFO Button
Press to display menu/ information.
3. REPEAT Button
4. Button
• Press to skip backwards to the
beginning of the track or to the
previous track.
• Press and hold to perform fast
reverse playback.
5. Button
Press to stop playing a disc.
6. PRESET/ARROW Button
• Press to select previous preset
number.
• Press to move up on the menu
screen in iPod mode.
7. CLOCK Button
8. EQ Button
9. MUTE Button
10. FUNCTION Button
Press to switch between CD, DAB, FM,
AUX IN and iPod mode.
11. PRESET/MEMORY Button
12. /SCAN Button
• Press to start or resume playback of
a disc.
• Press to scan to a radio station.
13. SELECT/MONO/ST. Button
• Press to conrm selections on the
menu screen.
• Press to switch between auto and
mono mode.
14. Button
• Press to skip forwards to the next
track.
• Press and hold to perform fast
forward playback.
15. PRESET/ARROW Button
• Press to select next preset number.
• Press to move down on the menu
screen in iPod mode.
16. RANDOM Button
17. TIMER Button
18. INTRO Button
19. SLEEP Button
20. VOLUME +/– Button
Turn to adjust the volume.
MENU/INFO
REPEAT
SELECT/
MONO/ST.
SCAN
PRESET
/MEMORY
CLOCK
PRESET/ARROW
TIMER
INTROEQ
RANDOM
FUNCTION
SLEEP
MUTE VOLUME
– +
STANDBY/ON
2
6
7
3
5
4
8
9
1
11
15
17
13
14
12
19
20
16
10
18
iDABHF12_IB_RC_120928_Annie.indd 8 28/09/2012 5:20 PM

9
battery replacement for the remote control
The remote control requires a CR2032, 3V Lithium battery.
1. Slide and hold the battery release tab in the
direction of the arrow.
operating your remote control
Remove the insulating mylar strip from the remote
control if the battery is being used for the rst time.
It is located at the bottom back side of the remote
control.
2. Pull out the battery holder and remove the old
battery.
3. Replace with a new battery.
4. Insert the battery holder back into the remote
control.
iDABHF12_IB_RC_120928_Annie.indd 9 28/09/2012 5:20 PM

10
remote control operation range
Point the remote control at the unit no more
than 4 metres from the remote control sensor
and within 60° of the front of the unit. The
operating distance may vary depending on the
brightness of the room.
handling the battery
• Improper or incorrect use of batteries may cause corrosion or battery leakage, which
could cause re, personal injury or damage to property.
• Install the battery correctly by following the polarity (+ and –) indications in the battery
compartment.
• When the battery is exhausted, the remote control will not function.
• Only use the battery type indicated in this manual.
• Do not dispose of the used battery as domestic waste. Dispose of it in accordance with
the local regulations.
• Small button cell batteries such as the one used in the remote control are easily
swallowed by young children and this is dangerous. Keep loose button cells away from
young children and make sure that the battery holder tray is secure in the remote
control. Seek medical advice if you believe a cell has been swallowed.
handling the remote control
• If you nd it dicult to open the battery cover, use a paper clip to help you slide the tab.
• Do not drop or cause impact to the remote control.
• Do not spill water or any liquid on the remote control.
• Do not place the remote control on a wet object.
• Do not place the remote control under direct sunlight or near sources of excessive heat.
• Remove the battery from the remote control when not in use for a long period of time,
as it could cause corrosion or battery leakage and may result in physical injury and/or
property damage including re.
SKIP/TUNE SEARCH
STANDBY
STANDBY/ON
FUNCTION
TIMER
MENU/INFO
STOP
PLAY/PAUSE
SCAN
SELECT/
FM MO./ST.
PRESET/
ARROW CLOCKPRESET
/MEMORY
V
O
L
U
M
E
30° 30°
Within about 4m
MENU/INFO
REPEAT
SELECT/
MONO/ST.
SCAN
PRESET
/MEMORY
CLOCK
PRESET/ARROW
TIMER
INTROEQ
RANDOM
FUNCTION
SLEEP
MUTE VOLUME
– +
STANDBY/ON
iDABHF12_IB_RC_120928_Annie.indd 10 28/09/2012 5:20 PM

11
connections
speaker connections
1. Attach the speaker covers to the speakers.
ON
LINE IN
R
OFF
L
R L
Speaker Speaker Cover
2. Connect the speaker cables at the back of the speakers to the Speaker / sockets at
the rear of the unit.
(Black speaker cables connect to the / red clips; Black/White speaker cables connect
to the / black clips.)
mains power
• This unit was designed to operate with an AC 230-240V ~50Hz power supply.
• Connecting the unit to any other power source may cause damage to the unit. Unwind
the mains cable to its full length. Connect the mains plug to a mains socket. Make sure
the mains plug is fully inserted into the mains socket. The unit is now connected and
ready to use.
• To switch the unit o completely, switch the ON/OFF button to the OFF position or
unplug the mains plug from the mains socket.
ON
LINE IN
R
OFF
L
iDABHF12_IB_RC_120928_Annie.indd 11 28/09/2012 5:20 PM

12
playing music from an audio device
The AUX input is located on the rear side of the unit. Use a 3.5mm audio stereo cable (not
included) to connect the audio device through the LINE IN socket.
ON
LINE IN
R
OFF
L
Auxiliary Equipment
3.5mm audio stereo cables
(Not included)
earphones
(Not included)
using earphones
Turn down the volume before connecting the
earphones. Slowly raise the volume with the
earphones on until you reach your desired volume.
When earphones are connected, the speaker is
automatically muted. SKIP/TUNE SEARCH
STANDBY
STANDBY/ON
FUNCTION
TIMER
MENU/INFO
STOP
PLAY/PAUSE
SCAN
SELECT/
FM MO./ST.
PRESET/
ARROW CLOCKPRESET
/MEMORY
MULTI FUNCTION DISPLAY
V
O
L
U
M
E
Long-term exposure to loud music may cause hearing
damage. It is best to avoid extreme volume when
using earphones, especially for extended periods..
iDABHF12_IB_RC_120928_Annie.indd 12 28/09/2012 5:20 PM

13
basic operation
powering the unit on/o
When you rst connect the unit to the mains socket. Switch the ON/OFF button at the rear
of the unit to the ON position. The unit will be in STANDBY mode.
• Press the STANDBY/ON button to switch the unit to switch the unit on.
• Press the STANDBY/ON button again to switch the unit to STANDBY mode.
• Disconnect the mains cable from the mains socket if you want to switch the unit o
completely.
selecting modes
• Press the FUNCTION button repeatedly to switch between DAB, FM, iPod, CD and AUX
IN modes.
• Selected mode will show on the display.
adjusting the volume
Turn the VOLUME +/– control on the unit or press the VOLUME +/– on the remote control
to increase/decrease the volume.
mute function
Press the MUTE button on the remote control to temporarily stop the speakers emitting
sound. The display will show“MUTE”. To cancel mute and restore the sound, turn the
VOLUME +/– control on the unit or press the MUTE button again or press the VOLUME +/–
buttons on the remote control.
auto setting the clock
When you rst turn on your radio it will automatically set the time by searching out the DAB
signal. It will continue to search for the clock whilst in DAB mode until it has managed to set
the time. If after 10 minutes the clock has not automatically set itself try repositioning the
radio to get a better reception.
After the clock has been set, if there is no signal under the CD or iPod mode
or if no iPhone/iPod docked during iPod mode, the unit will automatically
switch to STANDBY mode within 15 minutes.
iDABHF12_IB_RC_120928_Annie.indd 13 28/09/2012 5:20 PM

14
manually setting the clock
When you rst connect the unit to the mains socket, the unit will be in STANDBY mode,
and the display will show“–– : ––”.
1. While in STANDBY mode, press the CLOCK button and the hour digits ash on the
display.
2. Press the SKIP/TUNE SEARCH buttons to adjust the hour digits, and then press
the CLOCK button to conrm. The minute digits will ash on the display.
3. Press the SKIP/TUNE SEARCH buttons to adjust the minute digits, and then
press the CLOCK button to conrm. The clock setting is now complete.
setting the daily timer
1. Press the TIMER button repeatedly to select the Timer On mode. The “Timer On” and
the “ ” icon will show on the display to indicate the timer is on.
2. While in Timer On mode, press and hold the TIMER button until the display shows “On
Timer”, and the hour digits ash.
3. Press the SKIP/TUNE SEARCH buttons to adjust the hour digits, and then press
the TIMER button to conrm. The minute digits will ash on the display.
4. Press the SKIP/TUNE SEARCH buttons to adjust the minute digits, and then
press the TIMER button to conrm.
5. When setting the On Timer Clock, the display will show “O Timer” and the hour digits
will ash.
6. Press the SKIP/TUNE SEARCH buttons to adjust the hour digits, and then press
the TIMER button to conrm. The minute digits will ash on the display.
7. Press the SKIP/TUNE SEARCH buttons to adjust the minute digits, and then
press the TIMER button to conrm.
8. Finally use the SKIP/TUNE SEARCH buttons to select DAB, FM, CD or iPod
mode, then press the TIMER button to conrm. The display will show “the volume
level #”and ash. Press the SKIP/TUNE SEARCH buttons to adjust the volume,
and then press the TIMER button to conrm.
9. Setting the Timer function is now complete.
to cancel the daily timer
In STANDBY mode, press the TIMER button repeatedly until you have selected the Timer
O mode. The “Timer O” will show on the display.
iDABHF12_IB_RC_120928_Annie.indd 14 28/09/2012 5:20 PM

15
setting the sleep timer
Use the sleep timer to turn the system o after a certain number of minutes in play mode.
By setting the sleep timer, you can fall asleep to music and know that your system will turn
o by itself rather than play all night.
1. To set the sleep timer press the SLEEP button on the remote control repeatedly, it
changes the number of minutes shown on the display in this sequence:
SLEEP-90 SLEEP-80
SLEEP-OFF SLEEP-10 SLEEP-20 SLEEP-30 SLEEP-40
SLEEP-70 SLEEP-60 SLEEP-50
2. The system is now set to turn o after the number of minutes you have set. The display
will show “S#”. e.g. “S10 (SLEEP-10)” indicates 10 minutes sleep timer, “S20 (SLEEP-20)”
indicates 20 minutes sleep timer and so on.
3. Press the SLEEP button repeatedly to cancel the sleep timer, until “SLEEP-OFF” shows
on the display and “S#” will disappear from the display.
EQ control
This system supports a variety of equalizers and sound eects.
During playback, press the EQ button on the remote control to select a desired music
mode. Each time the EQ button is pressed, the music mode will change to the next one as
follows:
FLAT CLASSICAL ROCK POP JAZZ
iDABHF12_IB_RC_120928_Annie.indd 15 28/09/2012 5:20 PM

16
DAB operation
If the unit is connected to the mains power and then switched on from standby for the
rst time, the unit will automatically enter into the DAB mode and perform auto quick scan
function. During the scan the display will show “Searching…”together with a slide bar that
indicates the progress of the scan and the amount of stations that have been found so far.
Once the scan has nished, the unit will select the rst alphanumerically found station. To
explore the found stations, press the SKIP/TUNE SEARCH buttons.
full scan
The full scan will search for the entire DAB Band III channels. After the scan has nished, the
rst alphanumerically found station will be automatically selected.
1. To activate auto scan, press and hold the PLAY/PAUSE/SCAN button to enter
Autotune Full scan mode, the display will show “Searching…”and a progressing slide
bar.
2. All the stations that have been found will be stored automatically. To explore and listen
to the found stations, press the SKIP/TUNE SEARCH buttons to select.
manual tuning
As well as the auto tune function, you can manually tune the receiver. This can help you
when aligning your aerial or when adding stations that were missed while auto tuning.
1. Press and hold the SELECT/FM MO./ST. button until display shows“Manual tune”.
2. Press the SKIP/TUNE SEARCH buttons to cycle through the DAB channels,
which are numbered from 5A to 13F.
3. After your desired channel number is selected, the display will show the multiplex.
Press the SELECT/FM MO./ST. button to conrm.
4. Press the SELECT/FM MO./ST. button to exit Manual tune mode.
secondary services
You may see a “>” symbol after the name of the station, this indicates that there are
secondary services available to that station. These secondary services contain extra
services that are related to the primary station. e.g. a sports station may want to add extra
commentaries. The secondary services are inserted directly after the primary station in the
station list.
To select the secondary station, press the SELECT/FM MO./ST. button when the “>” appears
in the display before the station name. When the secondary service ends, the unit will
automatically switch back to the primary station.
iDABHF12_IB_RC_120928_Annie.indd 16 28/09/2012 5:20 PM

17
storing stations
You can store up to 20 of your favourite stations to the memory. This will enable you to
access your favourite stations quickly and easily.
1. To store a preset, you must rst be listening to the station that you would like to save,
press and hold the PRESET/MEMORY button. The “Preset Empty #”will show on the
display and the preset number will ash.
2. Press the PRESET/ARROW buttons to select your desired preset station number
and then press the PRESET/MEMORY button to conrm.
3. The station will be stored and the screen will then show“Preset # Stored“.
recalling a stored station
1. Once you have saved a station to one of the preset buttons, you can recall it by
pressing the PRESET/MEMORY button.
2. Press the PRESET/ARROW buttons repeatedly to select your desired preset station
number.
3. Press the PRESET/MEMORY button to conrm the selection.
• The stored stations will be saved into the memory and power o will not
erase it. Storing a new station into a preset location will erase the previously
stored station in that location.
• To reset this unit while in ON mode, press and hold the FUNCTION button to
display “Press SELECT Key to Reset” on the LCD display, and then press the
SELECT/FM MO./ST. button to conrm.
iDABHF12_IB_RC_120928_Annie.indd 17 28/09/2012 5:20 PM

18
DAB display modes
Every time you press the MENU/INFO button, the display will cycle through the following
display modes: Programme Type, Ensemble/Multiplex (Group name), Signal Strength,
Time/Date, Frequency, Audio Bit Rate, DLS.
The information is displayed on the lower segment of the display.
programme type
This describes the style of the programme that is
being broadcast. If the information is not available,
the display will show“<Programme Type> ”.
ensemble/multiplex name
A multiplex is a collection of radio stations that are
bundled and transmitted on one frequency. There
are national and local multiplexes. Local ones contain
stations that are specic to that area.
DAB – unlike normal radio, groups together
several radio stations and transmits them on one
frequency.
signal strength
The display will show a slide bar to indicate the signal
strength, the stronger the signal, the longer the bar
will be from left to right.
time/date
The broadcaster (Radio station) provides clock and
date information automatically so there’s no need to
manually set this information. If the information is not
available, the display will show “<Time/Date> ”.
frequency
The frequency of the present station will be displayed.
audio bit rate
The display will show the digital audio bit rate being
received.
DLS (Dynamic Label Segment)
Dynamic label segment is a scrolling message that
the broadcaster may include with their transmissions.
The message usually includes information, such as
program details etc.
Time/Date
Frequency
Audio Bit Rate
Programme Type
Signal Strength
DLS
Ensemble/Multiplex
(Group name)
iDABHF12_IB_RC_120928_Annie.indd 18 28/09/2012 5:20 PM

19
FM operation
Press the FUNCTION button repeatedly to select FM mode. The display will show FM and
the frequency.
auto scan
To search for an FM station, press the PLAY/PAUSE/SCAN button to start the auto scan
forward or press and hold the PLAY/PAUSE/SCAN button to start the auto scan reverse.
Once a station has been found, the scanning will stop automatically.
manual scan
To search for FM stations manually, press the SKIP/TUNE SEARCH buttons
repeatedly until your desired frequency is reached.
With FM radio it may be necessary to ne tune each station by pressing the
SKIP/TUNE SEARCH buttons repeatedly. Each press will adjust the
frequency by 0.05MHz. If reception is still poor adjust the position of the aerial
or try moving the radio to another location.
audio mode
Press the SELECT/FM MO./ST. button to toggle between the Auto or Mono selection.
The unit will automatically switch between stereo and mono in auto mode, but
you can override this and switch this function manually. This is helpful when
receiving poor signal reception.
storing stations
You can store up to 20 of your favourite stations to the memory. This will enable you to
access your favourite stations quickly and easily.
1. To store a preset, you must rst be listening to the station that you would like to save,
press and hold the PRESET/MEMORY button. The preset number will ash.
2. Press the PRESET/ARROW buttons to select your desired preset station number
and then press the PRESET/MEMORY button to conrm.
3. The station will be stored and the screen will then show“Preset # Stored“.
iDABHF12_IB_RC_120928_Annie.indd 19 28/09/2012 5:20 PM

20
recalling a stored station
1. Once you have saved a station to one of the preset buttons, you can recall it by
pressing the PRESET/MEMORY button.
2. Press the PRESET/ARROW buttons repeatedly to select your desired preset station
number.
3. Press the PRESET/MEMORY button to conrm the selection.
• The stored stations will be saved into the memory and power o will not
erase it. Storing a new station into a preset location will erase the previously
stored station in that location.
• There are some preset stations in default setting. You can overwrite these as
you like.
• To reset this unit while in ON mode, press and hold the FUNCTION button to
display “Press SELECT Key to Reset” on the LCD display, and then press the
SELECT/FM MO./ST. button to conrm.
FM display modes
Every time you press the MENU/INFO button, the display will cycle through the following
display modes: Frequency, Auto/Mono, Signal Strength.
Frequency
Auto/Mono
Signal Strength
frequency
This shows the frequency of the current station.
auto/mono
While in FM mode, the display will show if the
station being received is in mono or stereo.
The receiver will automatically switch between
Stereo and Mono mode. You can however
override this function, so that you can manually
switch between Stereo and Mono mode, which
is helpful if you’re listening to a poor FM signal.
signal strength
The display will show a slide bar to indicate
the signal strength, the stronger the signal, the
longer the bar will be from left to right.
iDABHF12_IB_RC_120928_Annie.indd 20 28/09/2012 5:20 PM
Table of contents
Other iWantit Stereo System manuals