iWantit i44PODCR10 User manual

hi- with subwoofer and docking for iPod
i44PODCR10
instruction manual
(iPod not included)
i44PODCR10_IB_110810_Zell.indd 1 10/08/2011 6:05 PM

Contents
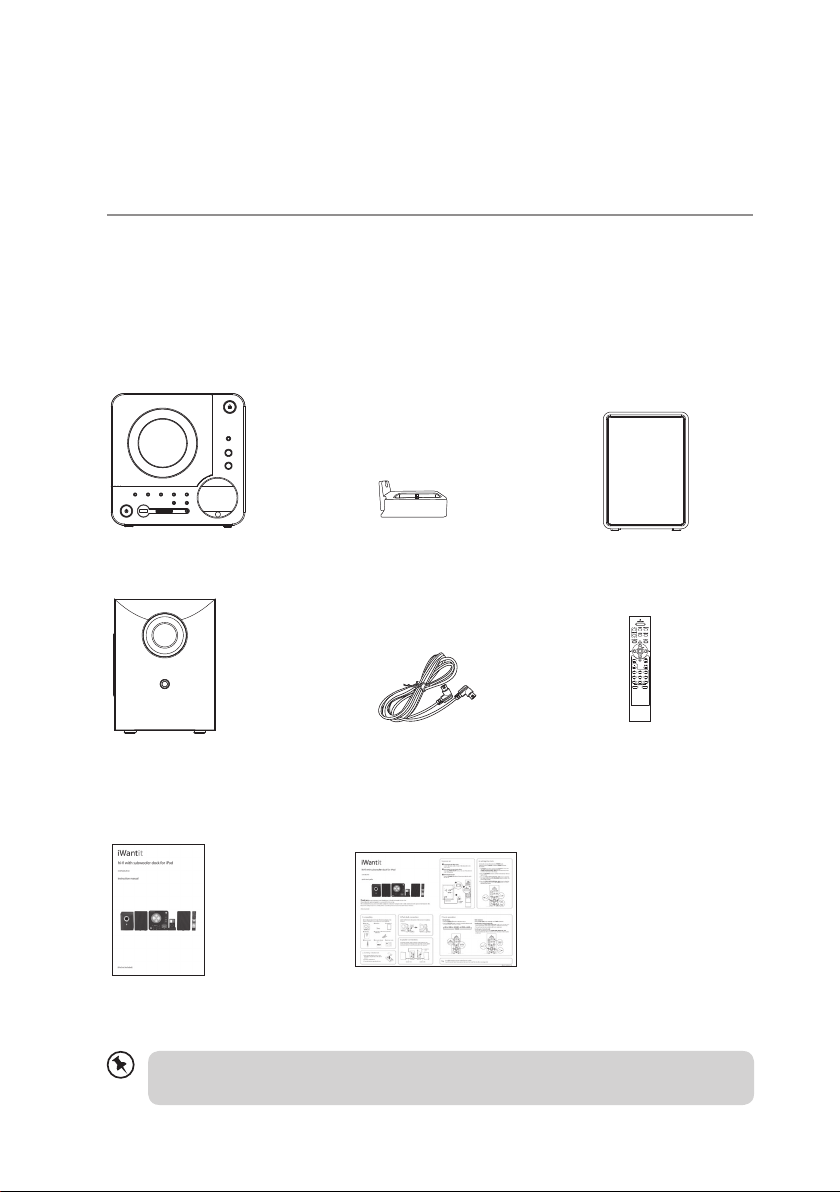
unpacking .......................................................................................................................................... 4
product overview ............................................................................................................................ 5
- front and side view.......................................................................................................................................................... 5
- rear view ............................................................................................................................................................................. 5
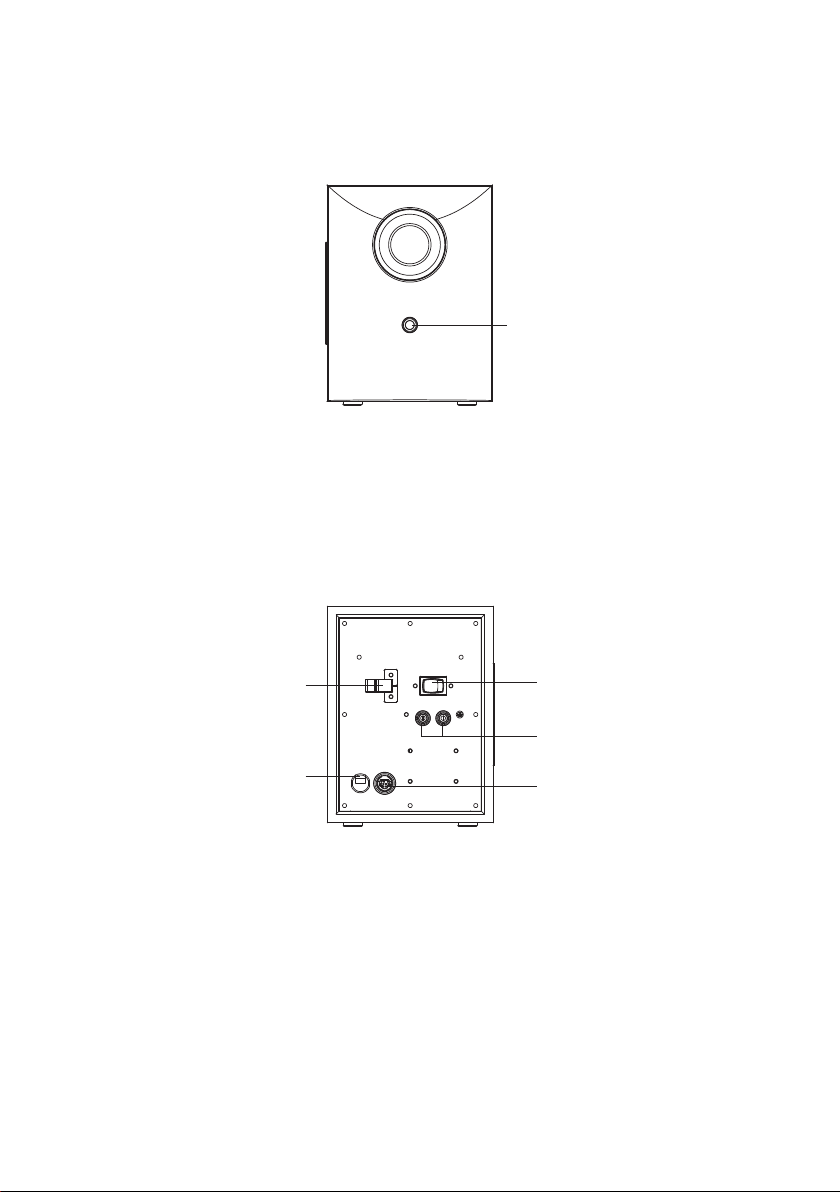
subwoofer..................................................................................................................................................................... 6
- front view ........................................................................................................................................................................... 6
- rear view ............................................................................................................................................................................. 6
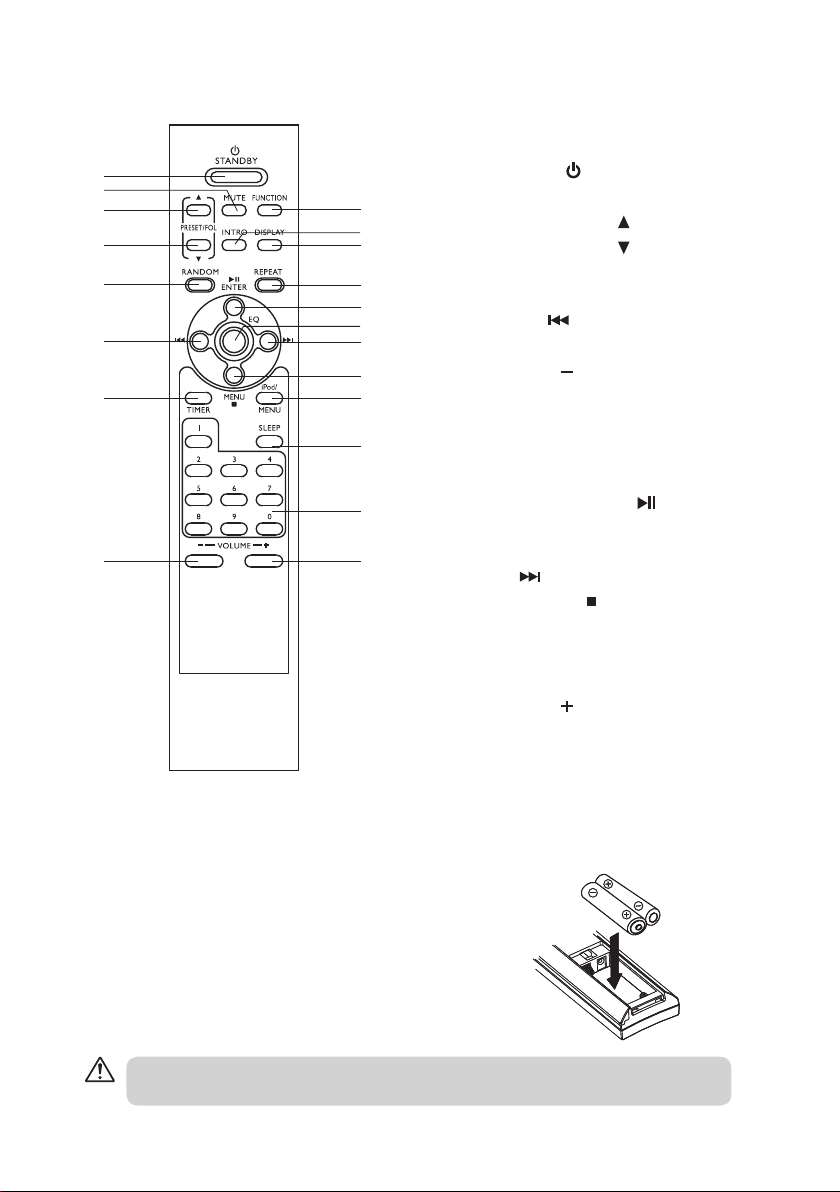
remote control ............................................................................................................................................................ 7
battery installation for the remote control.......................................................................................................7
handling the batteries.............................................................................................................................................. 8
handling the remote control.................................................................................................................................. 8
remote control operation range........................................................................................................................... 8
LCD display window.................................................................................................................................................. 9
wall mounting .................................................................................................................................. 9
connections ..................................................................................................................................... 10
speaker connections...............................................................................................................................................10
iPod dock connection ............................................................................................................................................10
connecting to the mains socket .........................................................................................................................10
for personal listening..............................................................................................................................................10
compatible disc types....................................................................................................................11
basic operation ............................................................................................................................... 11
powering on/o........................................................................................................................................................11
selecting modes .......................................................................................................................................................11
repeat play..................................................................................................................................................................12
- CD........................................................................................................................................................................................12
- MP3/WMA ........................................................................................................................................................................12
random play (on the remote control)...............................................................................................................12
intro play (on the remote control) .....................................................................................................................12
mute setting (on the remote control)...............................................................................................................13
adjusting the volume .............................................................................................................................................13
clock setting...............................................................................................................................................................13
timer setting ..............................................................................................................................................................13
sleep timer setting...................................................................................................................................................14
preset EQ.....................................................................................................................................................................14
CD / MP3 / WMA operation........................................................................................................... 15
playback ......................................................................................................................................................................15
to pause playback....................................................................................................................................................15
to stop playback .......................................................................................................................................................15
to listen to a desired track.....................................................................................................................................16
- CD .......................................................................................................................................................................................16
- MP3 / WMA ......................................................................................................................................................................16
i44PODCR10_IB_110810_Zell.indd 2 10/08/2011 6:05 PM

USB / SD card operation................................................................................................................ 17
during STANDBY mode..........................................................................................................................................17
playback ......................................................................................................................................................................17
to pause stop playback..........................................................................................................................................17
program mode ................................................................................................................................ 18
1. how to play the program.................................................................................................................................18
- CD........................................................................................................................................................................................18
- MP3/WMA ........................................................................................................................................................................18
2. program play........................................................................................................................................................18
3. cancel program ...................................................................................................................................................18
iPod operation ................................................................................................................................ 19
in STANDBY mode:...................................................................................................................................................19
in iPod mode:.............................................................................................................................................................19
iPod MENU mode:....................................................................................................................................................19
charging the iPod player battery through the main unit:.........................................................................20
video out setting (for iPod video only).............................................................................................................20
AUX operation................................................................................................................................. 20
radio operation ............................................................................................................................... 21
searching for a station automatically................................................................................................................21
searching for a station manually ........................................................................................................................21
selecting mono / stereo.........................................................................................................................................21
presetting stations...................................................................................................................................................21
tuning in to a preset station.................................................................................................................................21
for better reception .................................................................................................................................................21
memory back-up ............................................................................................................................ 22
maintenance.................................................................................................................................... 22
- handling discs.................................................................................................................................................................22
- cleaning discs..................................................................................................................................................................22
- storing discs.....................................................................................................................................................................22
hints and tips................................................................................................................................... 23
specications................................................................................................................................... 24
safety warnings............................................................................................................................... 25
i44PODCR10_IB_110810_Zell.indd 3 10/08/2011 6:05 PM

4
The Main Unit
Subwoofer
(P.N.: 073-0222LK-20A4)
Speakers x 2
(P.N.: 042-0227LK-EBA1)
Connection Cable between
Subwoofer & Main Unit
(P.N.: 196-012010-063)
Instruction Manual
(P.N.: i44PODCR10-IB-002)
Quick Start Guide
(P.N.: i44PODCR10-QSG-002)
iPod Dock
(P.N.: 075-022200-01B0)
Remote Control
(P.N.: 070-0008LK-A1F0)
If items are missing or damaged, please contact Partmaster (UK only).
Tel: 0844 800 3456 for assistance.
unpacking
Remove all packaging from the unit. Retain the packaging. If you dispose of it please do so
according to local regulations.
The following items are included:
Thank you for purchasing your new iWantit Hi-Fi with Subwoofer and Docking for iPod.
We recommend that you spend some time reading this instruction manual in order that you fully
understand all the operational features it oers. You will also nd some hints and tips to help you
resolve any issues.
Read all the safety instructions carefully before use and keep this instruction manual for future
reference.
i44PODCR10_IB_110810_Zell.indd 4 10/08/2011 6:05 PM

5
product overview
front and side view
1. FM Aerial
2. AUX “R” Socket
3. AUX “L” Socket
4. PRESET/FOLDER Button
5. REPEAT Button
6. PRESET/FOLDER Button
7. STANDBY Button
8. USB DEVICE Insert Port
9. SD/MMC CARD Insert Slot
10. SEARCH/SKIP/TUNING
DOWN Button
11. iPod/MENU Button
12. SEARCH/SKIP/TUNING
UP Button
13. IR Sensor
14. iPod Dock
15. CD Door
16. CD Door OPEN/CLOSE
Button
17. FUNCTION Button
18. VOLUME + Button
19. VOLUME – Button
20. STOP/MENU Button
21. PLAY/PAUSE/ENTER
Button
22. LCD Display Window
23. Socket connecting to
Subwoofer
24. Earphone Socket
25. Video Out Jack
2
1
16
17
23
24
18
19
21
20
22
3
4
5
6
814
7 9 13111210
rear view
15
26. Wall Mounting Holes
27. Memory Back-Up Battery Door
26
27
25
i44PODCR10_IB_110810_Zell.indd 5 10/08/2011 6:05 PM

6
28
subwoofer
front view
rear view
28. Subwoofer LED Indicator
29. Clip for Connection Cable
30. Mains Cable
31. Power Switch
32. Speakers Connection Sockets
33. Socket Connecting to Main Unit
30
29 31
32
33
i44PODCR10_IB_110810_Zell.indd 6 10/08/2011 6:05 PM

7
battery installation for the remote control
1. Press and slide the back cover to open the battery
compartment of the remote control.
2. Insert two AAA batteries.
3. Close the battery compartment cover.
remote control
1. STANDBY Button
2. MUTE Button
3. PRESET/ FOLDER Button
4. PRESET/ FOLDER Button
5. RANDOM Button
6. TUNING/SKIP/SEARCH
DOWN Button
7. TIMER Button
8. VOLUME Button
9. FUNCTION Button
10. INTRO Button
11. DISPLAY Button
12. MONO/ ST./REPEAT Button
13. PLAY/PAUSE/ENTER Button
14. EQ Button
15. TUNING/SKIP/SEARCH
UP Button
16. STOP/MENU Button
17. iPod/MENU Button
18. SLEEP Button
19. 0 – 9 Button
20. VOLUME Button
20
19
18
15
16
13
12
17
7
8
3
4
5
6
2
1
9
11
10
14
Install the batteries correctly by following the polarity ( + and – ) indications in the battery
compartment.
i44PODCR10_IB_110810_Zell.indd 7 10/08/2011 6:05 PM

8
handling the batteries
• Improper or incorrect use of batteries may cause corrosion or battery leakage, which
could cause re, personal injury or damage to property.
• Install the battery correctly by following the polarity (+ and -) indications in the battery
compartment.
• When the battery is exhausted, the remote control will not function.
• Only use the battery type indicated in this manual.
• Do not dispose of the used battery as domestic waste. Dispose of it in accordance with
local regulations.
• Small button cell batteries such as the one used in the remote control are easily
swallowed by young children and this is dangerous. Keep loose button cells away from
young children and make sure that the battery holder tray is secure in the remote
control. Seek medical advice if you believe a cell has been swallowed.
• If you are not going to use the unit for a long time, remove the batteries to avoid damage
from battery leakage and corrosion.
handling the remote control
• Take care of your ngernails when you press and hold the battery release tab.
• Do not drop or cause impact to the remote control.
• Do not spill water or any liquid on the remote control.
• Do not place the remote control on a wet object.
• Do not place the remote control under direct sunlight or near sources of excessive heat.
• Remove the battery from the remote control when not in use for a long period of time,
as it could cause corrosion or battery leakage and may result in physical injury and/or
property damage including re.
remote control operation range
Point the remote control at the unit no more than
5 metres from the remote control sensor and within
60° of the front of the unit. The operating distance may
vary depending on the brightness of the room.
Within about 5 m
30° 30°
i44PODCR10_IB_110810_Zell.indd 8 10/08/2011 6:05 PM

9
wall mounting
Fix the two screws (Size: 3.5*25BA) (not included) into the wall. They should be parallel to
each other. The distance between the two screws should be 182 mm.
LCD display window
2 3
1
4
6
5
1. Timer Indicator
2. Album / Number Indicator
3. Stereo Indicator
4. ESP (Electronic Stability
Program) Indicator
5. Track / Number / Time Indicator
6. Volume Indicator
i44PODCR10_IB_110810_Zell.indd 9 10/08/2011 6:05 PM

10
connections
speaker connections
Connect the speaker cables at the back of the speakers to the speaker sockets (L/R) at the
back of the subwoofer. Use the supplied connection cable to connect the subwoofer to the
main unit.
iPod dock connection
Attach the iPod dock to the right side of the main unit by tightening the screw.
connecting to the mains socket
Check that the voltage marked on the rating label matches your mains voltage.
Connect the mains cable at the back of the subwoofer to a mains socket.
for personal listening
Connect headphones (Ø3.5mm stereo mini plug) to the earphones socket. Adjust the
volume control to obtain the desired volume level.
When the earphones are connected, the speakers will automatically mute.
i44PODCR10_IB_110810_Zell.indd 10 10/08/2011 6:05 PM

11
basic operation
powering on/o
When you rst connect the unit to the mains socket, switch the POWER switch at the rear
of the subwoofer to the “ON” position. The unit will be in STANDBY mode.
• Press the STANDBY button to switch the unit on.
• Press the STANDBY button again to switch the unit o.
• Disconnect the mains cable from the mains socket if you want to switch the unit o
completely.
selecting modes
Press the FUNCTION button repeatedly to switch between modes (CD, USB, SD/MMC,
iPod, AUX or TUNER).
SD/MMC
compatible disc types
Disc Types Disc Logo Recorded Content
CD-R (CD Recordable) AUDIO
CD-RW (CD-Rewritable) AUDIO
AUDIO-CD (Compact Disc Digital Audio) AUDIO
Some recorded les may not be able to be played due to the type and format of disc or
condition of the recording.
• If there is no signal when the unit is in CD / USB Devices / SD & MMC / iPod mode, the unit
will automatically turn o in 15 minutes.
• When the unit is in the iPod mode and if there is no iPod in the iPod dock, the unit will
automatically turn o in 15 minutes.
• While in STANDBY mode, press any button to illuminate the display for 10 seconds.
• To save energy, turn o the unit by switching the POWER switch at the rear of the unit to
the “OFF” position.
i44PODCR10_IB_110810_Zell.indd 11 10/08/2011 6:05 PM

12
repeat play
CD
1. Press the REPEAT button once on the remote, REPEAT is
displayed. CD will play the current track repeatedly.
random play (on the remote control)
1. Press the RANDOM button once , RANDOM is displayed.
2. Press the RANDOM button again, to resume normally play.
intro play (on the remote control)
1. Press the INTRO button once, INTRO is displayed. INTRO will
play the rst 10 seconds of each track.
2. Press the INTRO button twice, and then resume to normal
play.
MP3/WMA
1. Press the REPEAT button once on the remote control,
REPEAT is displayed. The current track will play repeatedly.
2. Press the REPEAT button twice, REPEAT ALL is displayed.
All les will play repeatedly.
3. Press the REPEAT button a third time, REPEAT ALBUM is
displayed. The current album will play repeatly.
4. Press the REPEAT button four times, REPEAT function will
turn o.
2. Press the REPEAT button twice, REPEAT ALL is displayed.
CD will play all tracks repeatedly.
3. Press the REPEAT button a third time, REPEAT function will
turn o.
i44PODCR10_IB_110810_Zell.indd 12 10/08/2011 6:05 PM

13
mute setting (on the remote control)
1. When you press the MUTE button once on the remote
control, the volume level will ash & the audio output will be
temporarily terminate.
2. Press the MUTE button once again, the volume level and the
audio output will return to normal.
adjusting the volume
Press the VOLUME +/ –buttons on the main unit or on the remote control to increase/
decrease the volume.
Press the MUTE button on the remote control to switch the sound o. The volume level will
ash and the audio output will be temporarily terminated. Press the MUTE button again to
resume audio listening.
clock setting
Setting the clock can only be done in STANDBY mode.
When the unit is in STANDBY mode the“STANDBY” indicator illuminates.
1. In STANDBY mode, press and hold the iPod/MENU button until“24“ ashes on the
screen and then press the TUNING/SKIP/SEARCH or buttons to select
the 12-hour or 24-hour time format on the display.
2. Press the iPod/MENU button to conrm the time format. The hour digits will ash.
3. Press the TUNING/SKIP/SEARCH or buttons to adjust the hour digits and
then press the iPod/MENU button to conrm. The minute digits will ash.
4. Press the TUNING/SKIP/SEARCH or buttons to adjust the minute digits and
then press the iPod/MENU button to conrm and nish clock setting.
timer setting
The timer function will turn the unit on at a preset time.
1. Press the TIMER button on the remote control until the “ ON”
indicator and “00:00” shows on the display and the hour digits
ash.
2. Press the TUNING/SKIP/SEARCH or buttons to
adjust the hour digits and then press the TIMER button to
conrm. The minute digits will ash.
3. Press the TUNING/SKIP/SEARCH or buttons to adjust
the minute digits and then press the TIMER button to conrm
the TIMER ON time.
4. After adjusting “TIMER ON”, “ OFF” indicator will show on the
display and the hour digits will ash.
5. Press the TUNING/SKIP/SEARCH or buttons to
adjust the hours digits and then press the TIMER button to
conrm. The minute digits will ash.
6. Press the TUNING/SKIP/SEARCH or buttons to adjust the minute digits and
then press the TIMER button to conrm the TIMER OFF time.
i44PODCR10_IB_110810_Zell.indd 13 10/08/2011 6:05 PM

14
7. Now the “TUNER” indicator will ash on the display. Press the TUNING/SKIP/SEARCH
or buttons to select the mode (CD / USB / SD/MMC / iPod / AUX / TUNER).
8. Press the TIMER button again, the timer “VOL” indicator will ash on the display. Press
the TUNING/SKIP/SEARCH or buttons to adjust the volume to the desired
level.
9. After adjusting “TIMER ON”and “TIMER OFF”, press the TIMER button to conrm. The
““ indicator will show on the display.
10. The unit will be turned on automatically to the selected CD / USB / SD CARD / iPod /
AUX / TUNER mode and turn o when the timer reaches the preset time.
To cancel timer, press the TIMER button on the remote control until the TIMER indicator
turns o.
sleep timer setting
The sleep timer automatically turns the unit o after a certain time.
1. While the unit is on, press the SLEEP button and “ ” will show on the display.
2. Press the SLEEP button repeatedly to select the desired sleep time as below:
3. After setting a desired sleep time, the sleep indicator will show on the display.
4. The unit will automatically turn o once it counts down the sleep time.
To clear the preset sleep time, keep pressing the SLEEP button until the sleep icon
disappear.
preset EQ
This system supports a variety of equalizers and sound eects.
During playback, press the EQ button on the remote control to select a desired music
mode. Each time the EQ button is pressed, the music mode will change to the next one as
follows:
• Each enable state will be cleared if buttons are not pressed in 10 seconds.
• For the FM tuner timer, it will turn on to the last station you tuned into.
• If the display shows “ERROR” while you set the “TIMER ON”it means both “TIMER ON” and
“TIMER OFF”is the same. In this case, please go to“TIMER OFF”to set the o time rst.
i44PODCR10_IB_110810_Zell.indd 14 10/08/2011 6:05 PM

15
to pause playback
Press the PLAY/PAUSE/ENTER button
to pause the playback. The time elapsed
indicator will ash.
To resume playback, press the PLAY/
PAUSE/ENTER button again.
4. Press the PLAY/ PAUSE/ ENTER to
play the rst track of the CD disc.
CD / MP3 / WMA operation
playback
1. Press the CD DOOR OPEN/CLOSE button to open the
disc door. Put the disc with the label side facing towards
you and then close the disc door gently.
2. Press the FUNCTION button repeatedly to select CD
mode. The unit will start to read the CD/MP3 disc
automatically.
3. If there is no disc or the disc can’t be read,“NO DISC” will
show on the display.
to stop playback
Press the STOP/MENU button to stop playback.
For MP3 / WMA Discs
(1) This unit can play CD, CD-R, CD-RW, MP3 and WMA discs.
(2) It can read “ 8 cm “ and “ Multi Section “ MP3 DISC.
(3) The “Playback Transfer Rate”in MP3 and WMA.
a. In MP3, transfer bit rate : 32 - 320 kbps.
b. In WMA, transfer bit rate : 64 - 320 kbps.
(4) The “Max Readable 99 folders and 999 tracks”.
(5) If there is no disc or the disc can’t be read TOC, NO DISC will be displayed.
i44PODCR10_IB_110810_Zell.indd 15 10/08/2011 6:05 PM

16
MP3 / WMA
1. Press the PRESET/FOLDER or button to display the album number, then press the
TUNING/SKIP/SEARCH or button to display the track number.
2. When the desired track is displayed, press the PLAY/PAUSE/ENTER button to start
playing the track.
3. If the MP3 and WMA are written in“ID3”.
a) When the desired track is displayed, press the PLAY/PAUSE button to start
playing the track.
The ID3 function will automatically turn on at the same time. It will then
automatically search more than 64 letters of “FILE NAME”“TITLE NAME”“ARTIST
NAME” which move from the right side to the left side on the display continuously.
b) Press the DISPLAY button, the display shown“ID3 OFF“ for 1-2 seconds then the
ID3 function will turn o.
to listen to a desired track
CD
1. Press the TUNING/SKIP/SEARCH or button on the
main unit (or remote control) until the desired track number
appears on the display, then press the PLAY/PAUSE/ENTER
button to start playing.
2. During play mode, press the TUNING/SKIP/SEARCH or
button to skip to the next or previous track.
3. Press and hold the TUNING/SKIP/SEARCH or button,
to fast forward or rewind back to the desired location in the
same track.
4. Press the PLAY/PAUSE/ENTER button to start playing.
5. Press the DISPLAY button once, the ESP function will turn on
and the ESP indicator will ash on the display.(Shock Proof
Function: CD 40sec , MP3 100sec)
6. Press the DISPLAY button again, the ESP function will turn o
& the ESP indicator disappears from the display.
i44PODCR10_IB_110810_Zell.indd 16 10/08/2011 6:05 PM

17
USB / SD card operation
during STANDBY mode
1. Insert the USB DEVICE or SD MMC CARD, and then press the STANDBY button on
the main unit (or remote control) to power”ON”the unit.
2. Press the FUNCTION button on the main unit (or remote
control) to select the USB or SD/MMC mode. The main unit
will automatically read the total number of folders and tracks
at the same time.
3. If the USB memory device has more than one folder.
a) Press the PRESET/FOLDER or buttons to select each folder.
b) Press the TUNING/SKIP/SEARCH or buttons to select the track in the
selected folder.
4. If the MP3 and WMA are written in“ID3”.
a) While the unit is in MP3 or WMA playing modes. Press the DISPLAY button once.
The display will show a“ID3 ON”, and then will automatically display more than
64 letters of “TITLE NAME”, “ARTIST NAME” or “ALBUM NAME” which are moving
continuously from the right corner to the left corner on the display.
b) Press the DISPLAY button once again. The display will shows a“ID3 OFF”, and then
the main unit will play normally.
playback
Press the PLAY/PAUSE/ENTER button to start playback. The
display will show the current track number and its elapsed time.
• The unit can play MP3 and WMA only in this mode.
• The unit can support memory devices not larger than 32GB.
• It can support USB version 1.1 and 2.0.
• The unit does not support all kinds of“dual voltage-MMC”or “MMC-Plus” cards.
• The unit does not support WMA les which are protected “DRM FILE”.
At all times, always connect the USB device / SD Card in standby mode to avoid damage to
the main unit.
to pause stop playback
1. Press the PLAY/PAUSE/ENTER button to pause the
playback. The time elapsed indicator will ash.
2. To resume playback, press the PLAY/PAUSE/ENTER
button again.
3. Press the STOP/MENU button to stop playback.
i44PODCR10_IB_110810_Zell.indd 17 10/08/2011 6:05 PM

18
program mode
You can program up to 64 tracks in any order. Program mode is activated while in stop
mode.
1. how to play the program
CD
1. Press the iPod/MENU button, shift to PROGRAM mode.
2. Press the TUNING/SKIP/SEARCH or button to select
the track number.
3. Press the iPod/MENU button to conrm the track number.
4. Repeat the above steps 2 & 3 to preset a maximum of 64
programmes that you want to play.
MP3/WMA
1. Press the iPod/MENU button, to select PROGRAM mode. The
album number will ash.
2. Press the TUNING/SKIP/SEARCH or button to select
the album number.
3. Press the iPod/MENU button to select the track number.
4. Press the TUNING/SKIP/SEARCH or button, the track
number will change.
5. Press the iPod/MENU button to conrm the track number.
6. Repeat the above steps 1 to 5 to preset the MP3/WMA
program.
2. program play
Press the PLAY/PAUSE/ENTER button on the main unit (or remote control). The unit
will play the rst track of the program. When all the tracks have been played, the main unit
display will show the number of tracks and the playing time of the CD/MP3 tracks.
3. cancel program
1. Press the STOP/MENU button once, or open the CD tray door and close it again to
erase the memory.
2. When you set a new program, the existing one will be cleared.
During program mode:
• Press the REPEAT button once, the “REPEAT” indicator will illuminate on the display. The
main unit will repeat the current track.
• Press the REPEAT button twice, the “REPEAT ALL” indicator will illuminate on the display.
The main unit will repeat all the total number of programmed tracks.
• Press the REPEAT button once more again. The main unit will return to normal playback.
i44PODCR10_IB_110810_Zell.indd 18 10/08/2011 6:05 PM

19
iPod operation
in STANDBY mode:
1. Insert your iPod into the iPod dock.
2. Turn on the main unit by pressing the STANDBY button,
and then press the FUNCTION button to select iPod
mode. The iPod indicator will appear on the display.
in iPod mode:
1. Press the PLAY/PAUSE/ENTER button once to start the iPod playing. Adjust the
volume control by pressing the VOLUME +/ – buttons. To stop playback, press the
STOP/MENU button once.
2. Press the PLAY/PAUSE/ENTER button once to pause the current track. To resume
playback, press the PLAY/PAUSE/ENTER button once again.
3. To skip forwards or backwards, press the TUNING/SKIP/SEARCH or button to
select the desired track.
4. Press the REPEAT or RANDOM button to make the iPod play repeatedly or randomly.
iPod MENU mode:
1. In iPod mode, press the iPod/MENU button once to enter
iPod MENU mode. The iPod MENU indicator will appear on the
display.
2. Press the PLAY/PAUSE/ENTER button to enter the desired
menu folder.
a) Press the TUNING/SKIP/SEARCH or buttons on the unit (or remote
control) to search the current content in the each desired menu folder.
b) If you want return to the iPod menu, press the STOP/MENU button again.
3. To resume playback, press the iPod/MENU button once again, the unit will return to
iPod mode.
4. Press the STOP/MENU button repeatedly to return to the iPod menu.
a) To select the current menu as belows :
Music > Extras > Photo Import (without this function display on the iPod Mini) >
Settings > Shue Songs > Backlight > Now Playing will shows on the iPod Player
display.
b) Press the TUNING/SKIP/SEARCH or button on the unit (or remote control)
to search the current menu.
iPod touch version 1.1.4 or above can support REPEAT or RANDOM functions.
i44PODCR10_IB_110810_Zell.indd 19 10/08/2011 6:05 PM

20
video out setting (for iPod video only)
1. While the unit in STANDBY mode : Connect the TV set with a video cables (RAC-type
cables) to the VIDEO out jack on the rear of the unit.
2. While the unit is iPod mode : Press the“MENU” button on the iPod Click Wheel to set
the video function.
3. To set your iPod to display videos on a TV :
a) Choose Videos > Video Settings, and then set TV Out to Ask or On.
b) If you set TV Out to Ask, your iPod will give you the option of showing videos on
your TV or on your iPod every time you want to play a video.
AUX operation
1. Before connecting to the mains socket, use the RCA stereo LINE IN cable (not included)
to connect your audio device through the AUX socket at the rear of the unit.
2. Connect the mains cable to the mains socket. The unit will be in STANDBY mode.
3. Press the STANDBY/ON button to switch the unit on.
4. To select the AUX mode, press the FUNCTION button repeatedly until AUX is
displayed.
5. In AUX mode, you can operate your audio device directly for playback features.
charging the iPod player battery through the main unit:
1. Your iPod has a internal nonremovable battery, the battery may need to be charged if
the iPod has not been used for a while.
2. You can automatically charge the iPod through the main unit in STANDBY or POWER
ON mode.
• The iPod battery is 80% charged in about an hour, and fully charged in about a few hours.
If you charge it while playing music, it may take longer.
• It is not better to charge under the TUNER mode. It may interfere the reception.
• During the unit in iPod mode. The video function of the iPod with abnormal working
normally.
Update the latest version of the iPod video function from the apple web-site.
• In any time, you can control the iPod on the main unit, remote control or iPod player itself
while the unit in the “iPod”or “iPod MENU”mode.
• In any time, the iPod must be xed well under in the STANDBY mode to avoid the unit and
iPod were damaged.
• During the unit in iPod mode, when the partly video function of iPod without normal
working or happened with abnormal, you can update the iPod version or load up latest
version from web.
• If you have an iPod Video, you can watch videos on a TV connected that through the unit
to your iPod Video.
• iPod classic 80/160GB, iPod nano 3rd generation(Video) 4/8GB, iPod touch 8/16GB, should
be inserted into the iPod dock before operating the step 3.
i44PODCR10_IB_110810_Zell.indd 20 10/08/2011 6:05 PM
Table of contents
Other iWantit Stereo System manuals