J-80 Stellar J User manual

1
J 80
Stellar J
Welcome Aboard!
Quick Start Guide/Boat Manual

2
J-80 Boat Manual
Seattle Sailing Club
Welcome aboard Stellar J, one of our J-80 performance sailboats popular for racing and
complete with a small cabin for short cruises. We are doing everything possible to make sure
this boat is always ready to go. Please treat her with the care she deserves, like she is your
own boat. This manual is designed to make your journey easier and give you the extra
information underway you may be seeking. Help us out by filling out and turning in the user
reports each trip so we can continue providing the safest and best equipment possible.
Thanks and have a great sail! SSC
Stellar J is of the favorite boats in our fleet for the following reasons:
Day sailing performance
Racing performance with a well-established fleet
Asymmetrical spinnaker (for qualified charterers)
Small cabin with basic sleeping quarters in v-berth.
Shore power and built-in running lights
Stellar J
Challenges - Things to Know
Make sure to locate shore power and integral running lights and steaming light. Disconnect before
you leave the dock and bring the cord with you as it belongs to the boat. During the cold months,
make sure to re-connect shore power and turn on heaters and dehumidifiers when you return.
Electronics are specific to each J-80. Stellar J has no built-in instruments.
Make sure to disconnect the fuel line before tilting engine out of water to avoid damaging line
between the transom and the engine.
Always ease the boom vang, main sheet and reefing lines before raising the mainsail.
Don’t use the forward hatch as it is prone to breaking if not lowered gently when opening. If you do
open it, Do Not let it slam! Please leave it locked closed.
The companionway hatch slides very easily! Be careful not to lean against and take a tumble down
into the cabin unexpectedly!

3
Table of Contents
Boat Specifications p. 4
Inventory list p. 5
Safety Equipment p. 6
Systems
The Engine-Starting/Stopping/Operating p. 7-8
Refueling p. 8
Outboard Diagram p. 9
Electrical Systems/Electronics p. 10-11
Sails and Rigging p. 12-17
Main Sail Reefing/ Diagram p. 15-17
Securing J-80s- Post Sail Checklist p. 18-20
Amenities Specific to each J-80 p. 22-25

4
Stellar J
Boat Specifications
LOA: 8.0 meters/ 26.25’
LWL: 22.0’
Beam: 8.25’
Draft: 4.9’
Mast Height: 37.5’
Fuel Tank capacity: 6 gallons
Anchor: Danforth anchor w Rode: Chain is 12’/ line is 100’ twisted nylon marked
in 30’ increments stowed in plastic tub below companionway.
Engine: Mercury 4 HP 4 stroke outboard
Accommodations: Sleeps 2 V-berth (dbl)
Instrumentation: None
Sails: Main Sail w reef, roller furling genoa/jib, asymmetrical spinnaker.

5
Stellar J
Inventory List (Owner’s notes in italics)
OPERATIONS EQUIPMENT Location
Danforth anchor w/8’chain and 100-150’ line. Below companionway
Boat Hook V-berth
1 Winch handle Pocket inside companionway to starboard
(While sailing, keep handle in pocket on the port side of companionway. Return to inside pocket when done.)
Roller Furling Headsail (103-107%) w/ attached sheets. Forestay
SAFETY Location
4 Type II PFDs in bag V-berth
1 Type IV Throw cushion Aft of companionway
1 Type IV Horseshoe Port stern pulpit
2 Type ABC: 1 - Fire Extinguishers Starboard/port bulkhead
1 Air Horn w/ replacement canister Safety box/starboard storage hammock
Flare kit w/ 3 handheld, 1 whistle “ “
Portable Bilge pump Under starboard settee
Bucket Aft of companionway
First Aid kit Storage hammock to starboard
Manual Bilge Pumps
Bailing Bucket (aft of companionway)Portable bilge pump (below starboard settee)

6
Safety Equipment/USCG Required items
Registration- Stellar J’s papers are kept in the front of this manual.
PFDs- Although each sailor should supply their own PFD to fit their body type and usage
requirements, many times there are extra personal floatation devices stowed in the v-berth. Know
where and how many are onboard before you leave the dock. Each member should always wear a
life jacket when the boat is underway. Stellar J is equipped with a bag of four Type II PFDs in v-berth.
Type IV’s -There is a USCG throw seat cushion abaft the companionway and horseshoe-style Type
IV on the port stern pulpit.
Flares- There is a flare kit with current handheld flares located in the safety box. Please ensure
these are dated properly and look usable.
Fire extinguishers- 2 Type B-I extinguishers located on the port/starboard bulkhead in the main
salon.
Air Horn- safety box (with 1 replacement air cartridge located in starboard storage hammock)
Running/steaming lights- built-in pull switch outboard of safety box on starboard bulkhead
First Aid Kit- Located in storage hammock to starboard
PFDs in V-berth/Type BC: I Extinguishers/ Safety Box Horseshoe Type IV
Horn/First Aid/winch handles Safety Box Bailing bucket/Anchor/Type IV
(aft of companionway)

7
Stellar J’s SYSTEMS
The Engine-Starting/Stopping/Operating
Stellar J is powered by a 4 HP Mercury 4 stroke outboard engine. This is a great engine and if
cared for during your charter will serve you well. Always make sure the engine is getting coolant,
lubrication, and proper fuel by completing the checklist each day.
Pre-start Checklist:
ALWAYS check the following before starting the engine:
- Engine is lowered into the water.
- Fuel level is more than ½ full
- To vent, fuel cap is tightened until it clicks.
- Connect fuel line
- Ensure fuel petcock selector is in horizontal position (AUX tank) (see diagram)
- Pump bulb
- Kill cord connected
- Engine in neutral (shift through forward, reverse, neutral)
- Choke out
- Throttle in start position keeps cold engine from running too high
(results in damage)
- Make sure water is flowing out after start
Engine and Mount:
The outboard is secured on a motor mount that positions the engine aft of the rudder. To lower the
engine, rock the engine slightly forward and pull up on the stainless steel bail on the starboard side, then
allow the engine to gently tilt down. When in use, the throttle handle will contact the stern pulpit unless it
is raised above the level of the pulpit. At operating speed, the engine will generally remain straight and
the throttle handle can be raised to a vertical so that it does not contact the pulpit. To tilt up the engine
while sailing or at the dock, make sure the gear shift lever is in Forward and pull the engine up to the
horizontal position by grasping the handle on the aft end of the engine cover.
Starting the engine:
After completing the checklist, you are ready to start the outboard. Clear the boom, and crewmates
away from swing room as you will need clearance to get a good long pull on the start cord. With each
pull, try to get the maximum length of cord utilized by a quick snapping action at the last. Wait 3
seconds before next pull. It should start in 3-5 pulls. Once running, push in the choke until the engine is
running smoothly. To achieve full-throttle range the choke typically has to be completely pushed in
once the engine is warmed up.
If the engine doesn’t start:
Go back through checklist to problem solve. Sometimes the fuel line is not fully attached, the kill switch
is not fully connected, or the vent is not open enough. Recheck everything, then retry.

8
Flooded engine:
Too soft/short of pulls can result in a flooded engine. If you smell rich fuel and engine hasn’t started
after 6 or more pulls, you have probably flooded. If so disconnect fuel, turn throttle way up and pull
several strokes to clear. Try again. If still flooded, contact the dock staff. You may have to wait 20
minutes before retrying.
Engine Operation:
Cold outboards typically like to run at a moderate pace; however, once they are warmed up they
should idle and run smoothly at low RPMs. Never run an engine high before it is warmed up as you
can break cold metal pieces. Running the engine in neutral a couple minutes after start (to warm up)
as well as a couple minutes before you kill the engine (to cool down) optimizes performance and
increases engine longevity. The challenge is keeping a good RPM (without operating at high speed
inside the marina), but slow enough to keep it from cutting out. It is best to utilize neutral whenever
possible to rev up engine and coast. Anytime you are shifting gears make sure to slow throttle speed to
low. Shifting too high can sever the shear pin which protects the transmission.
To achieve a tighter turn radius, angling the engine the same direction as the tiller can be very effective
especially in reverse.
Warning: Make sure engine is well secured with clamps turned tightly to the right. (Righty
tighty
) Never loosen these underway and risk dropping engine into the water. Also, the safety
line should be connected from engine to the boat. Especially with rough seas.
Stopping the engine-
To shut down the engine, throttle down, put into neutral then pull off the kill switch. Once the engine
stops, disconnect fuel line. Next, hoist the engine out of the water by first shifting to forward gear and
tilt to completely clear. (Engine will not tilt unless it is shifted into forward.) Close tank vent.
Refueling- Mercury 4 stroke engines only burn unleaded! Not diesel or pre-mix.
Disconnect fuel line from engine then close vent on tank. Carry to fuel dock downwind of
boat to avoid filling cabin with fumes. Fill tank watching closely for overflow. Fuel dock
pumps do not have auto shut-off valves.Once full, reconnect to engine, close cap until it
clicks to vent, and then go through start procedures. Only refuel if you had the boat for an
overnight. SSC will refuel day-sail charters.
Safety precautions:
Anytime you smell gas fumes in the cabin, do not start engine until you have completely ventilated the
boat by opening all compartments.
Never leave the fuel tank up high in the cockpit when you are motoring outside of the marina. A falling
fuel tank could cause a fire!

9

10
Stellar J has shore power and is equipped with lights
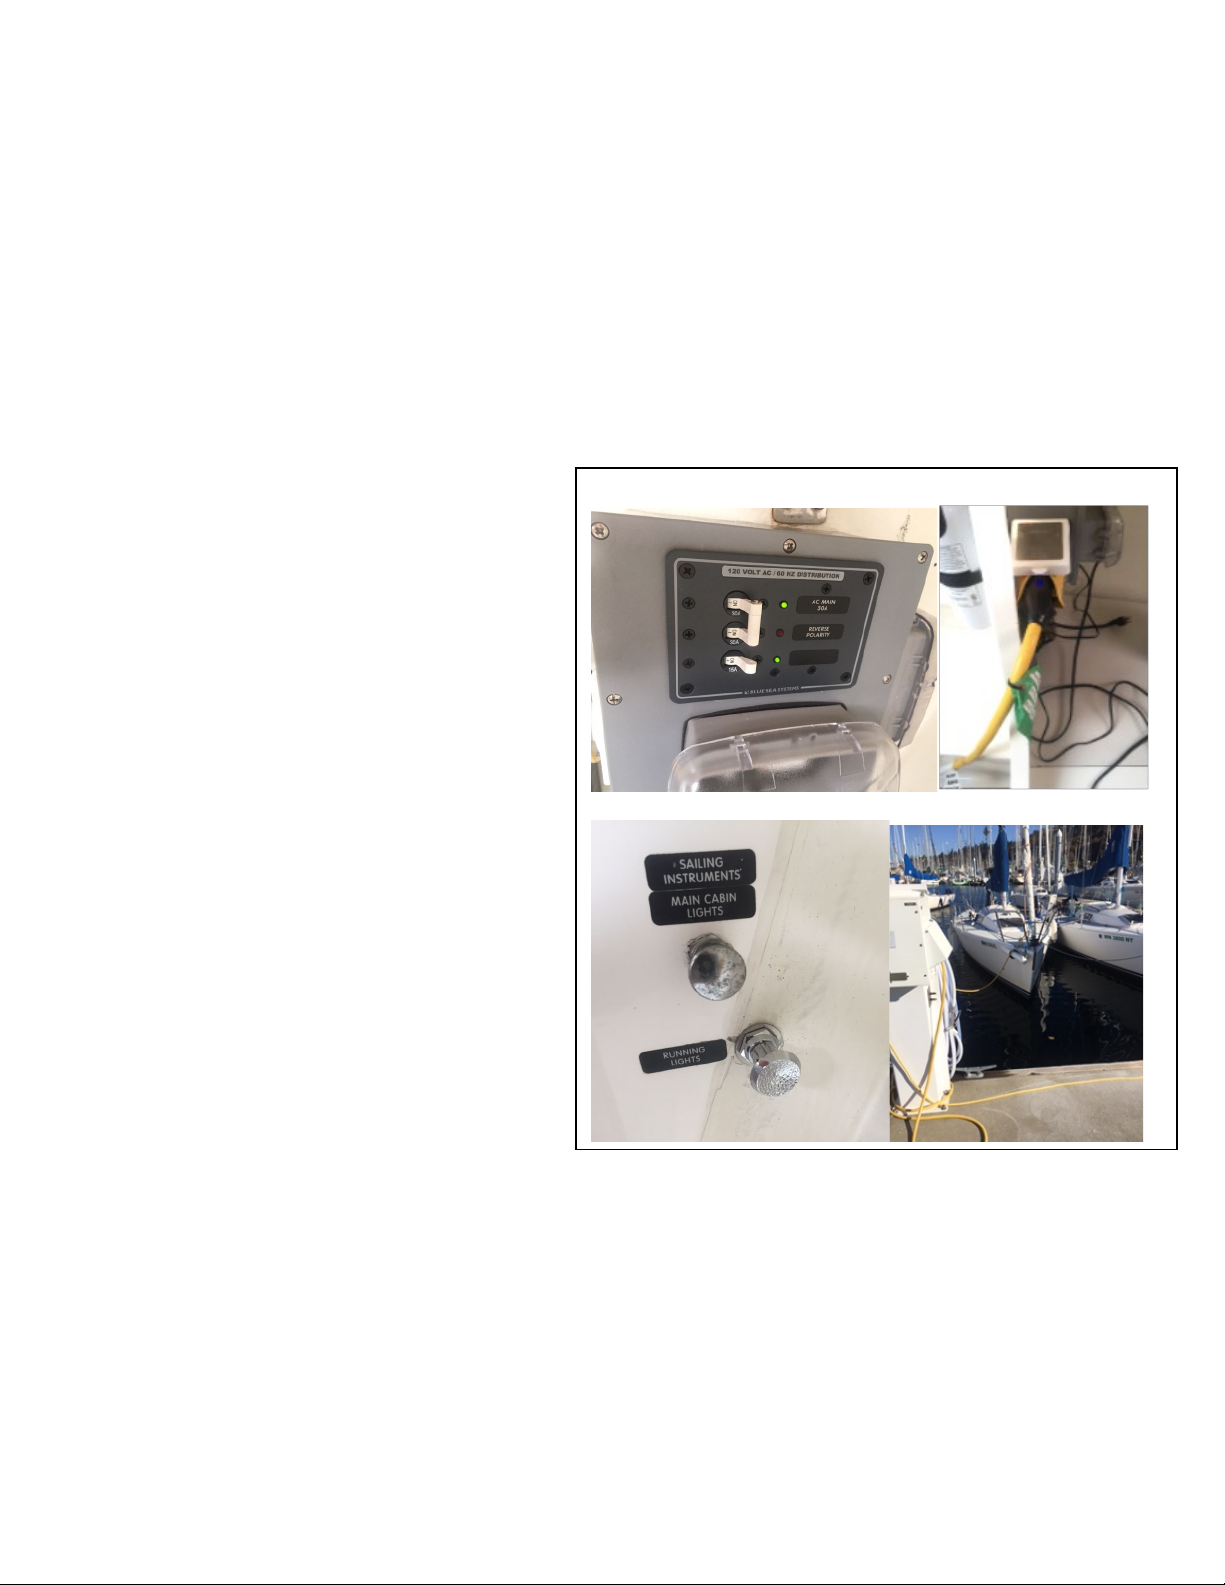
Electrical Systems
If the J80 you are rigging has a big extension cord to the dock it has shore power. This
means the boat has internal running lights, and possibly a depth sounder and other instruments.
AC: The shore power cord accesses 110v electricity from the dock and is utilized on the J80s for
recharging the 12v batteries. Before leaving the dock, turn off the shore breaker first, then unplug
the shore end of cord. Always bring the cord onboard as it belongs to the boat owner.
Shore Power:
The shore power cord on Stellar J charges the battery and powers both a heater and
dehumidifier during the winter months. The AC power supply box is located in the cabin forward
of the mid-ship bulkhead on the port side. The shore power cord plugs into the starboard side of
the AC power supply box. Please do not
turn off any switches on the AC power
supply box, and
do not disconnect
the
onboard shore power cord from the box
,
only
from the dock. To disconnect the
shore power cord safely, turn off the dock
breaker, unplug the cord, and bring it
onboard. Coil cord into cabin.
Be careful
not to drop the cord into the water.
When finished sailing, plug shore end
back into outlet on the dock by lining up
the “L” prong and twisting into the outlet
to lock into place. Turn on the shore
breaker. Purple LEDs will illuminate on
both ends of the cord to indicate the cord
is energized. Also, make sure the green
main power and battery charger panel
lights on the AC power supply box in the
boat are illuminated. The shore power
cord should be run through the
notch at the base of the companionway
hatch board to allow the hatch to close
properly.
DC:With a charged DC battery, the boat
has access to running lights. Stellar J has
no additional built-in DC electronics; however, shore power keeps the battery charged to operate the
running and steaming lights. Each boat is unique so explore Stellar J’s systems before you leave the
dock.
After sailing, make sure to plug back into shore power. To plug in, see above.

11
Electronics- Systems are unique to each J80, so assess boat before leaving the dock.
Instruments: Stellar J has no built-in instrumentation
Running Lights:
Stellar J has built-in Running lights (for sailing) and a Steaming light (to add for motoring).
Always operate the running lights when underway after dark or in periods of limited visibility.
Turn on the Steaming light in addition to the Running lights when motoring after dark or in
periods of limited visibility. The combined switch is located on the starboard bulkhead outboard
of the plastic safety box and just below the “Cabin lights/Instruments” switch. Pull the pull-switch
halfway out for running lights (red port/ green starboard/white stern) and all the way out to add the
steaming light for motoring. Steaming light is located 1/3 of the way up the mast and shines in an arc
forward 225 degrees around to 22.5 degrees abaft the beam on port and starboard.
Cabin Light:
The pull switch for the cabin light is located just above the running lights switch. If it is pulled out,
you may turn on the cabin light on the starboard bulkhead using the switch on the base of the light.
Be sure all the lights are “Off” when you leave the boat.
Heater and Dehumidifier:
During fall, winter, and spring months, a heater and dehumidifier keep the boat dry inside.
Do Not Unplug!
Prior to sailing, empty any accumulated water in the dehumidifier by sliding
out the clear plastic drawer and pouring outside. While sailing, stow heater and dehumidifier in
spaces below the removable panels next to the mast. After sailing, return them to the v-berth, and
make sure they are plugged-in, upright and pointing in a safe direction.
Ensure heaters are not
pointing too close to any bulkheads or towards any combustible material!

12
Sails and Rigging
Jib/Genoa-
This sail remains hoisted
so the jib halyard should not be removed from the winch.
Stellar J’s jib halyard is a blue line on the winch on the port side of the cabin top. Minor adjustments
in jib luff tension, however, can be made on the winch.
If you accidentally release the jib halyard, make sure to re-tension before furling or unfurling the sail.
It can get jammed up top if there is slack in the halyard while furling.
To unfurl, first head onto a broad reach to reduce apparent wind. Uncoil
and uncleat furling line which runs from the bow roller to a cam cleat
adjacent the companionway to port. Make sure to bi-pass this cleat while
unfurling or it will tend to re-cleat itself making unfurling stop
unexpectedly. Prepare to control the speed of the furl with this line by
taking a single wrap around a winch or cleat as a leverage point. To unfurl,
pull on the working jib sheet. Ease lazy sheet as needed. Ease furling line
slowly to avoid an override in the spool at the bow.
To furl the headsail- again head onto a broad reach to reduce apparent wind
and allow the sail to furl quietly and smoothly. Ease sheets enough to allow
furling line to start the roll. Keep gentle pressure on both sheets as the
furling line is being hauled in to create an even wrap. Wrap sheets a
minimum of three times around the furl to well secure for winds at the
dock. Secure all lines.
Reefing the roller furling headsail
The J-80 headsail allows the option of furling the sail to reduce sail area based on wind requirements.
Some sails have black tape lines at desired reef points. Most do not so it is best to look at the sail and
furl to a point where the sail is smooth and does not have creases which can stress the sail fabric. To furl
a sail, ease working jib sheet first, haul in furling line to desired sail size, then re-tension jib sheet.
Fairleads typically will have to be adjusted to accommodate new size.
Roller Furling Headsail
Furler cam cleat

13
Mainsail
To rig the main, first un-attach halyard from the end of the boom. (Stellar’s pneumatic Quikvang
will support the boom once the halyard is not attached.) Next, attach halyard shackle to the head
of the main sail making sure halyard is free and clear to the top. Ease boom vang, untie sail ties,
and uncoil mainsheet for preparation of hoisting. Make sure reefing lines are eased as well unless
you pre-reefed at the dock. On a windy day, pre-rig the reefing line through reefing cringle to
simplify the reefing process on the water. (See pic) If wind speed is over 18 knots, make sure to
reef before you leave the dock (see section on reefing the main).
The main halyard on Stellar J is the grey line that runs from the port side of the mast along the port
side of the cabin top next to the companionway. When not in use, the halyard is shackled to the end of
the boom. Don’t let go of the halyard before attached unless you feel like taking a climb!
Hoisting the main:
Typically done outside the marina, J-80 mainsails do not require feeding the bolt rope into the
mast like the J24s. It can be helpful to have a crewmember jump the halyard at the mast and a
second person take up the slack in the cockpit aft of the halyard clutch. Sail should go up easily.
Do Not use a winch to raise the sail as the lines do not lead directly into the winch drum and you
will end up with an override! As the sail is raised, look up to make sure sail is going up free of
obstacles. Once sail is raised, coil halyard for safety.
Only raise the main halyard if the boat is head to wind so there is no load on the halyard. No winch is
required (although it may be necessary to help the sail slides up so they don’t jam in the sail track
above the gooseneck). Be careful not to over-hoist the sail (above the black band at the top of the
mast), or the leech of the sail will hang up on the backstay. Secure halyard on double cam cleats on
the mast; The one leading into cockpit is just a keeper for the tail of the halyard. Store the halyard in
the bag forward on the port side of the cockpit.
Lowering the main:
With the topping lift tensioned lower the sail and flake as you go. This is a typically a two-person
operation with a person fore and aft. If it is too choppy, bring the sail down best you can and throw
some ties around it to stabilize planning to fold properly when you reach the dock. Once flaked,
reconnect the halyard to the boom, ease vang, and raise boom to a desired horizontal position.
-
Cleated Main Halyard Double cam cleated halyard Flaked Mainsail
(Also see double cam cleats above)

14
Cunningham (doubles as a reef hook)
Boom Vang
Backstay
Main sheet & traveler
Mainsail Adjustments

15
Reefing the main
When the wind forecast calls for strong winds or you feel uncomfortable in the current
conditions, reefing the main sail is a good option to decrease the boats power.
Remember it is always easier to put a reef in at the docks than it is while out in high winds.
The main is slab-reefed and has a single reef point. The Cunningham doubles as a reefing hook at
the tack. The clew reef should be run to the reef point and back to the boom and secured with a
bowline. The reef runs through a sheave at the end of the boom and forward inside the boom to a
clutch at the gooseneck. See diagram below.
Important: Before leaving the dock make sure you have a reef-able sail and the reef lines are ready
to go through grommets then tied with a bowline around the boom. See diagram and pictures. Make
sure to never pull the reefing line into the boom. To avoid this, make sure the reefing line is
attached through the sail to the boom, or has a stopper knot on the end of it. (See pix) Let SSC staff
know if you would like further explanation.
Remember!Be careful when tensioning reef not to over secure and cause damage to the sail. If
unnatural “V” creases appear, ease lines slightly to avoid tearing sail at these points. Primarily,
do not over tighten the reefing line! If you see creases, ease so as not to rip out the grommet.
Reefing Diagram
Steps to Reefing the Main:
1) Let wind out of main (head upwind, sheet out or heave-to)
2) Ease main sheet and boom vang
3) Ease halyard to desired reef point. Secure Cunningham hook into cringle
4) Re-tension halyard (boom will lower/rise during this process)
5) Tighten reefing line until new clew is touching boom and pulling as outhaul

16
Reefing Components
Stowed reefing line w/ stopper knot
Reef line ready to go w/bowline to boom
Reefing cringle/Cunningham hook
Reefing line pulled tight
Reefing line Jam cleat

17
Reefing (cont.)–
***Sails may or may not have mid-sail grommets for ties. Never over-tension these! ***
Reefed Main

18
Securing the boat
Dock Lines and Fenders
Make sure to keep centerline of boat parallel to dock. Bow sits further from dock than stern.
Attach bow and stern lines and fore and aft spring lines. Fenders should generally be placed
at each stanchion to protect the boat.
Rafting up
Fenders properly placed to protect boats Spreaders must be staggered to not collide
Bow/stern and spring lines secure
Before walking away, move boat fore/aft, side to side by hand to ensure safe tie-up.
Make sure boom rests in a horizontal position.

19
Securing the boat (cont.)
Make sure all lines are secured.
Engine out of the water
Cockpit tidy

20
Securing
Stellar J
at the end of your sail
Disembarking
When you are done sailing for the day, it’s time to make sure the boat is ready for the next person.
Follow the securing checklist! Extra checklists are found at the beginning of this Boat Manual.
Especially complete the following procedures:
-Put all 3 fenders up amidships on each side of the boat, and secure forward and aft spring lines.
-Fold and cover sails and tidy lines
-Make sure roller furling jib is rolled completely and lines are well secured.
-Ease backstay and boom vang.
-Set boom to a horizontal position with main halyard.
-Disconnect fuel line and tighten tank cap.
-Lift engine out of water
-Make sure to clean up any mess, crumbs, dirty dishes, bottles or dirt that may have been
overlooked. Bring garbage with you!
-Remember to hose down and brush the boat to get all the salt water off.
Turn in the completed checklist!
Table of contents