Jacobsen 744853D User manual

WARNING: If incorrectly used this machine can cause severe injury. Those who use
and maintain this machine should be trained in its proper use, warned of its dangers
and should read the entire manual before attempting to set up, operate, adjust or
service the machine.
TECHNICAL MANUAL
Safety, Operation, Parts & Service
4138713 REV A
MODELS:
744853D 16" H.D. SODCUTTER BROUWER/JACOBSEN
744854D 18" H.D. SODCUTTER BROUWER/JACOBSEN

CALIFORNIA
Proposition 65 Warning
Diesel engine exhaust and some of
its constituents are known to the State
of California to cause cancer, birth
defects and other reproductive harm.
Californie Proposition 65
Avertissement
Les échappements des moteurs diesel
et certains de leurs composés sont
reconnus par l’Etat de Californie pour
être cancérigènes, provoquer des
défauts congénitaux et d’autres dangers
en matière de reproduction.
ADVERTENCIA
AVERTISSEMENT
WARNING
The engine exhaust from this product
contains chemicals known to the State
of California to cause cancer, birth
defects or other reproductive harm.
California Advertencia
de la Proposicion 65
El estado de California hace saber que
los gases de escape de los motores
diesel y algunos de sus componentes
producen cáncer, defectos de
nacimiento y otros daños en el
proceso de reproducción humana.
L’
é
mission du moteur de ce mat
é
riel
contient des produits chimiques que
l’Etat de Californie consid
è
re
ê
tre
canc
é
rig
è
nes, provoquer des d
é
fauts
cong
é
nitaux et d’autres dangers en
mati
è
re de reproduction.
El estado de California hace saber
que los gases de escape de este
producto contienen productos
quÍmicos que producen cáncer,
defectos de nacimiento y otros daños
en el proceso de reproducción
humana.
© 2003, TEXTRON INC

IMPORTANT MESSAGE
Thank you for purchasing this Ryan product. You have purchased a world class product, one of the best
designed and built anywhere.
This machine comes with a Technical Manual containing safety, operation, parts, maintenance and service
information. The useful life and good service you receive from this machine depends to a large extent on how
well you read and understand this manual. Treat your machine properly, lubricate and adjust it as instructed,
and it will give you many years of reliable service.
Your safe use of this Ryan product is one of our prime design objectives. Many safety features are built in, but
we also rely on your good sense and care to achieve accident-free operation. For best protection, study the
manual thoroughly. Learn the proper operation of all controls. Observe all safety precautions. Follow all
instructions and warnings completely. Do not remove or defeat any safety features. Make sure those who
operate this machine are as well informed and careful in its use as you are.
See a Ryan dealer for any service or parts needed. Ryan service ensures that you continue to receive the best
results possible from Ryan’s products. You can trust Ryan replacement parts because they are manufactured
with the same high precision and quality as the original parts.
Ryan designs and builds its equipment to serve many years in a safe and productive manner. For longest life,
use this machine only as directed in the manual, keep it in good repair and follow safety warnings and
instructions. You'll always be glad you did.
Jacobsen, a Textron Company
One Bob Cat Lane
Johnson Creek, WI 53038-0469


SET-UP
PRODUCT APPLICATION
The Ryan Tracaire is designed to be drawn behind a tractor or similar type vehicle utilizing a SAE
3-point tractor hitch. The Tracaire is used to aerate large areas such as fairways, parks and athletic
fields to relieve soil compaction.
SET-UP
DO NOT rely on tractor hydraulics to support
the Tracaire during set-up or maintenance. A
sudden hydraulic line failure can cause the
unit to drop unexpectedly causing severe
injuries to you or bystanders. ALWAYS use
good quality jackstands for support.
1. Back tractor up to Tracaire. Attach Tracaire to
3-point hitch on tractor and secure. See Figure
1.
FIGURE 1
1. Pillow Blocks
2. Hitch Locations
FIGURE 2
1. Jackstands
Tines and knives are sharp and could cut
hands. ALWAYS wear leather gloves or
similar hand protection when working on or
around tine wheels. Remove tines or knives
from aerating wheels before attempting axle
replacement.
2. Activate tractor hydraulic system and raise
Tracaire. Raise the unit approximately
6" (15.2 cm) above working surface and support
with jackstands placed beneath the pillow
blocks. Lower Tracaire onto jackstands and
shut off tractor engine. See Figure 2.
FIGURE 3
1. Pillow Block
2. Spacer Part No. 516294
3. Aerating tool
4. Jackstand position
3. Attach slicing knives or tines to wheels. To
obtain even spacing between tools, always
clamp tools to the side of aerating wheel as
shown in Figure 3.

SET-UP
4. Attach three (3) guard assemblies to frame using
hardware from loose parts bag.
5. Lubricate aerating wheels with a good lithium
based lubricant until the lubricant can be seen
between aerating wheel and spacer.
NOTE: Wipe off lubrication fittings before and
after lubrication of aerating wheels.
6. Activate tractor hydraulic system and raise
aerator. Remove jackstands supporting
Tracaire.
FIGURE 4
1. Guard Assemblies

- DO NOT allow any unauthorized or untrained personnel to operate this equipment. Read and
understand all operating instructions before attempting operation.
- Before operating Tracaire, inspect area to be aerated. Remove any objects that may present a
safety hazard or may damage the equipment.
- NEVER operate this equipment without all safety guards secured in place. DO NOT attempt to
make any adjustments or perform any service/maintenance while tractor engine is running.
- DO NOT leave tractor unattended at any time without lowering aerator and stopping tractor
engine.
NOTE:
- For maximum performance, a double set of tines may be mounted on the aerating wheels.
A 3/8-16 X 3" screw (Part No. 311213) is required to mount the double tine set.
- Lubricate aerating wheels after each four (4) hours of aerating, using a good lithium based lubricant.
- Failure to lubricate aerating wheels properly will result in damage to axle, bushings and wheels.
- NEVER cross hard objects or surfaces (sidewalks, drives, stepping stones, etc.) with tines down.
- When making turns, the tines or blades must be raised out of the ground to prevent turf from being
damaged.
1. Position the tractor and Tracaire to begin aerating.
2. Lower the Tracaire while the tractor is still stopped.
3. Move tractor slowly forward until tines are penetrating at the desired depth.
OPERATION
OPERATION

SERVICE
CLEARING BLOCKAGES
- DO NOT attempt to clear any blockage while the tractor engine is running. Sudden movement of
the tractor can cause serious injuries.
- DO NOT rely on tractor hydraulics to support the Tracaire during maintenance or repairs. A
sudden hydraulic line failure can cause the unit to drop unexpectedly causing severe injuries to
you or bystanders. ALWAYS use good quality jackstands for support.
- Tines and knives are sharp and could cut hands. ALWAYS wear leather gloves or similar hand
protection when working on or around tines or slicing knives.
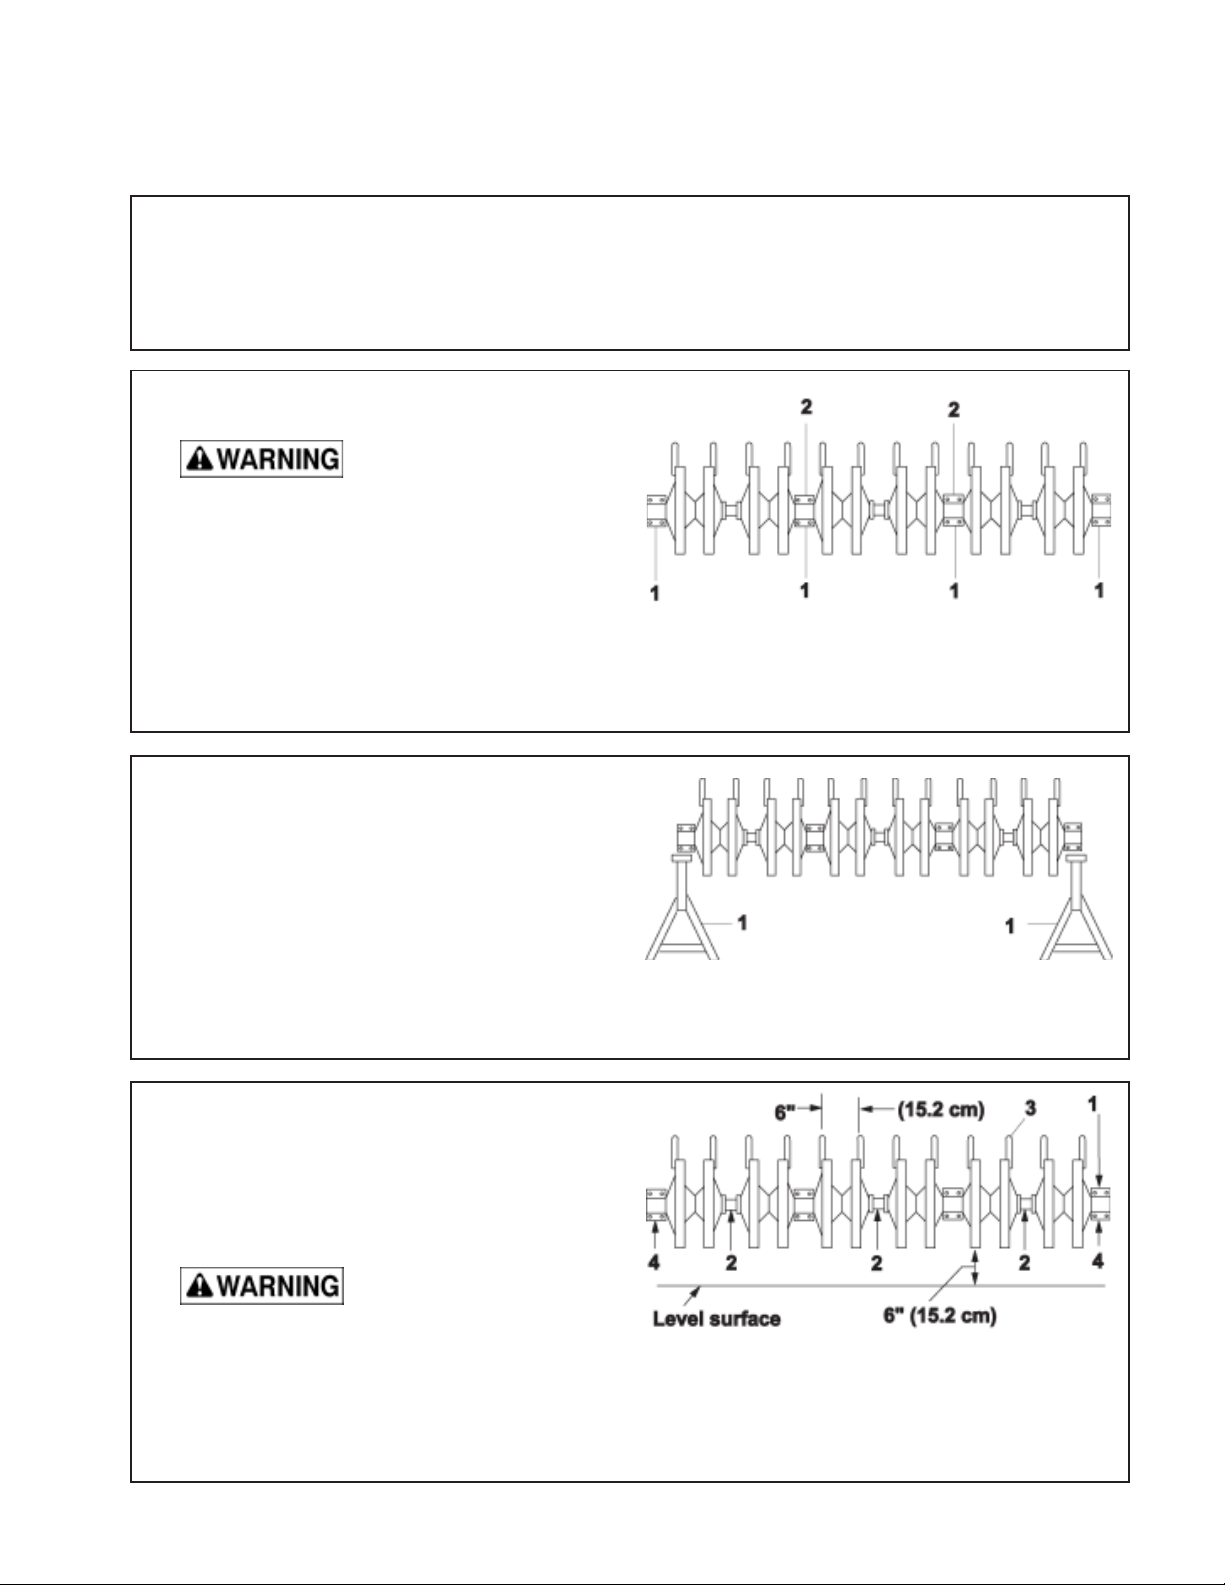
1. Using the tractor hydraulics, raise the Tracaire high enough to allow jackstands to be placed under pillow
blocks. Lower the unit down onto jackstands.
2. Shut off tractor engine.
3. Wearing good hand protection, carefully remove all built up thatch, etc. from tines or knives.
NOTE: If an object becomes wedged in the unit, it may be necessary to remove the tine guard(s) to
remove the blockage.
4. Start tractor engine, raise Tracaire and remove jackstands.
DAILY OR EXTENDED STORAGE
1. Thouroughly clean all tines inside and out when aerating is completed. A light coat of oil or rust inhibitor
inside and out , will help prevent rust and corrosion. This procedure will keep tines or knives in good
condition to insure proper coring the next time the unit is put into service.
2. Wipe off lubrication fittings before and after lubrication. Lubricate all lubrication fittings. Lubricating
before long storage periods, will help prevent moisture build-up in lubrication cavities.
3. Place unit on rubber mats, boards or a similar type material to prevent damage to tines or knives.
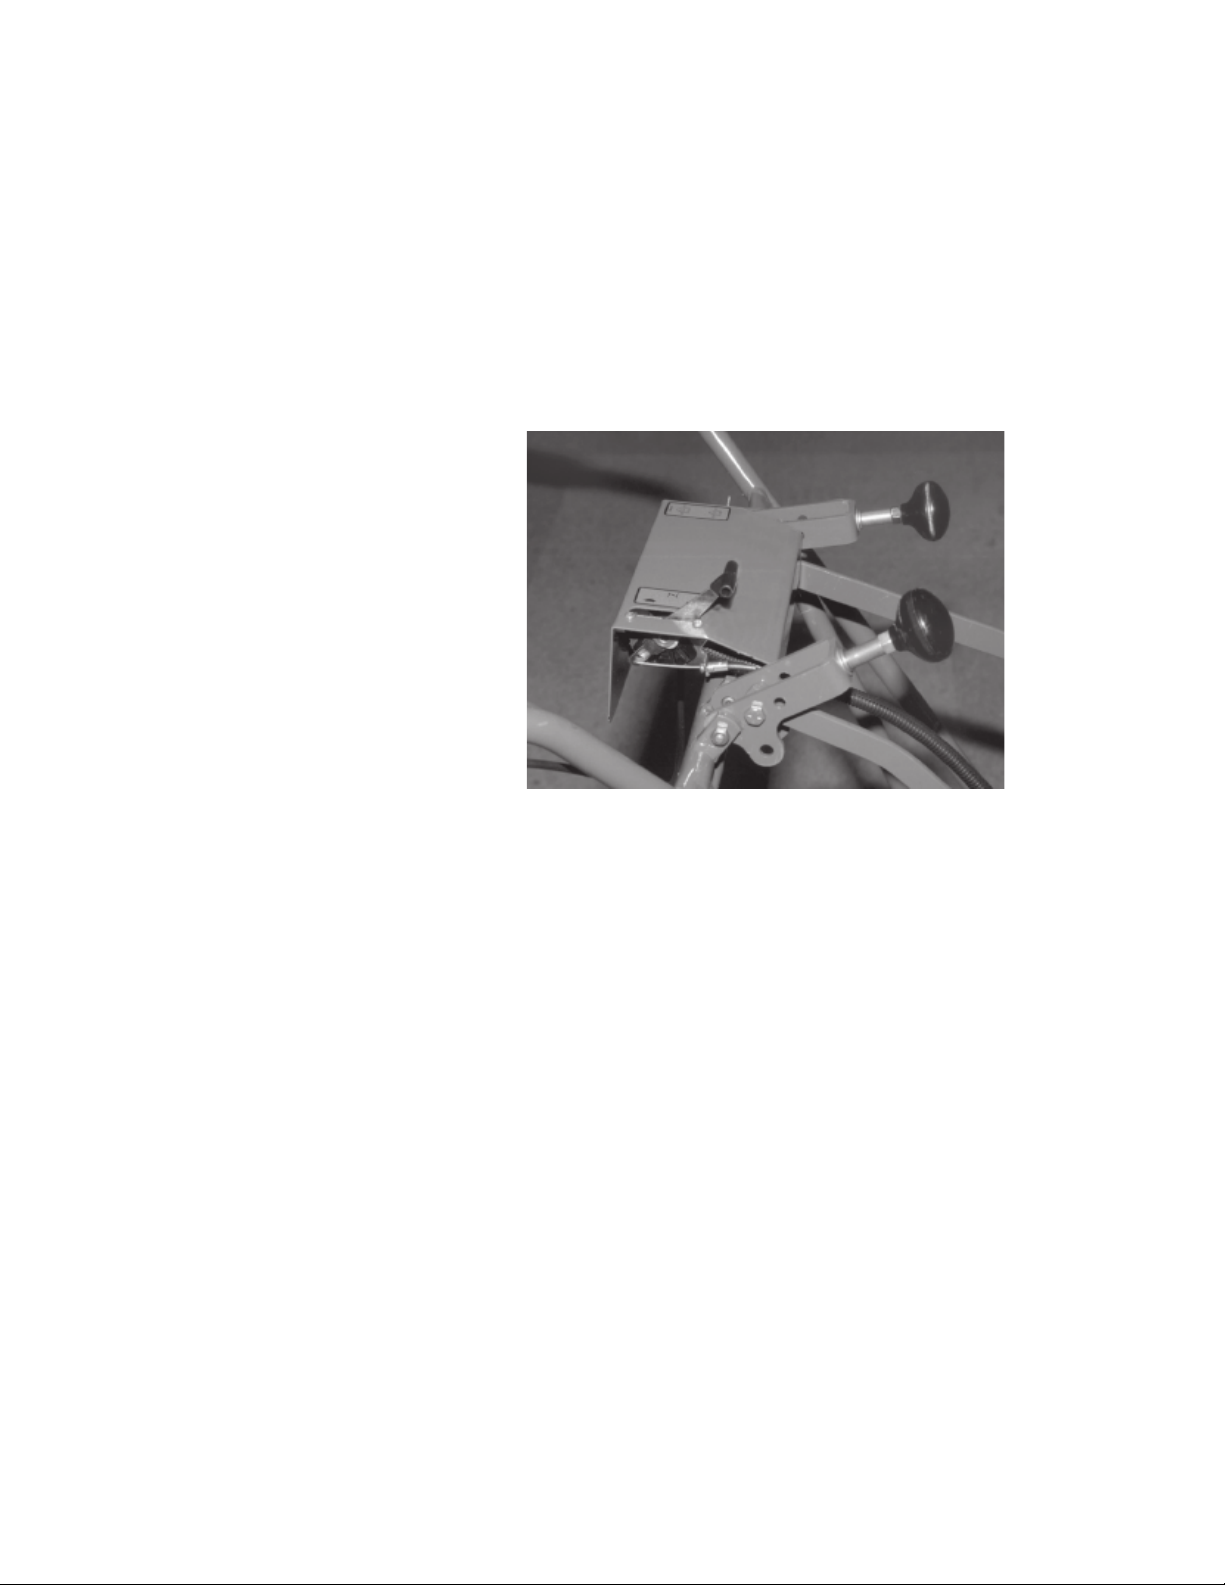
LUBRICATION
NOTE: Lubricate aerating wheels after every four (4) hours of aeration.
1. Wipe off all lubrication fittings.
2. Lubricate aerating wheels with a good lithium based lubricant.
3. Wipe off lubrication fittings when finished.
NOTE: After lubricating, check to make sure tine wheel bushings are rotating on the axle and not inside
the tine wheels. If the bushings are turning inside the tine wheel, the bushing may be worn through and
the wheel may have been damaged. If the wheel is damaged it may not accept a new bushing. If the
wheel is damaged to that point, it will need to be replaced.

AXLE REPLACEMENT
1. Activate tractor hydraulic system and raise Tracaire. Raise the unit approximately 6" (15.2 cm) above
working surface and support with jackstands placed beneath the pillow blocks. Lower Tracaire onto
jackstands and shut off tractor engine.
2. Loosen and remove the three (3) tine guards. Retain original hardware for re-installation.
Tines and knives are sharp and may cut hands. ALWAYS wear leather gloves or similar hand
protection when working on or around tine wheels. Remove tines or knives from aerating wheels
before attempting axle replacement.
3. Remove tines or knives from aerating wheels.
4. Loosen set screws in pillow blocks. Remove set screw from right pillow block to allow axle to be
removed.
When the axle is removed, the tine wheels should be removed carefully. The aerating wheels
weigh approximately 56 lbs. (25 kg) each and may cause serious injuries if accidentally dropped.
5. Remove existing axle and aerating wheels.
6. Insert new axle, minus aerating wheels, through pillow blocks.
7. Re-install right pillow block and secure.
8. Insert center punch through set screw hole and mark set screw location on axle.
9. Loosen and remove right pillow block and new axle. Drill a 3/8" (10 mm) diameter by 3/8" (10 mm) deep
hole at center punch mark.
10. Replace new axle, aerating wheels, spacers and right pillow block on Tracaire.
11. Replace and tighten set screws to hold axle in position.
12. Re-install tines or knives.
13. Using original retained hardware, re-install tine guards.
14. Restart tractor engine and raise Tracaire from jackstands. Remove jackstands.
SERVICE

SPECIFICATIONS
Axle: 1-1/4" (3.2cm) diameter steel
rod clamped to frame
Aerating Depth: Up to 5" (12.7cm)
Aerating Pattern: 6" X 6" (15.2cm x 15.2cm)
Aerating Width: 6' (183cm)
Chassis: 2" (5.1cm) diameter high
strength steel pipe
Hitch: Standard SAE 3-point tractor
hitch (category 1)
Lubrication: Lubrication Fittings
Operating Speed: Up to 10 mph (16.1km)
Tines: See Aerating Tools (Page 9)
Weight: Approx. 800 lbs. (363kg)
Wheels: Cast iron with sintered bronze
bushings, grooved each side for
mounting aerating tines on both
sides
ACCESSORIES
DRAGMAT (Service Parts Only) - When aerating a
fairway, a dragmat can be attached directly behind
the Tracaire to break up the cores while aerating all
in one quick easy operation.
Mat size: 12' (3 658mm) wide X 10' (3 048mm) long.
INSTALLATION
1. Remove the two (2) outside screws on outside
pillow blocks of frame.
2. Attach bracket assembly C (547139) using (2)
1/2-13 X 1-3/4" screws A (312176) and (2)
lockwashers B (120166) as shown. Repeat for
opposite side.
3. Insert "S" hooks in hole in bracket assembly
attaching dragmat assembly to aerator.
SPECIFICATIONS/ACCESSORIES

(Single Tine Part Numbers)
515196 - 1/2" Coring Tine
515197 - 3/4" Coring Tine
These tines are used for thorough aeration programs
in the Spring and Fall. Soil cores up to 4" (102mm)
in length can be removed with minimal surface
disturbance.
(Single Knife Part Numbers)
521155 - Deep Slicing Knife
515193 - Shallow Slicing Knife
Slicing knives are used for aeration and renovation
programs during all seasons. Slicing knives control
thatch by cutting through grass runners and also
have the advantage of no surface clean up after
aerating. Knives are especially helpful in that they
do not place buried seeds of noxious weeds on the
surface where they can germinate.
Slicing knives are especially recommended for
athletic fields. Slicing allows moisture, air and
fertilizer to be absorbed while not creating hazardous
playing conditions for athletes.
(Single Tine Part Number)
520404 - Aerating Tine
These tines are for turf building and Fall renovation
programs. These tines will thoroughly open up the
soil by penetrating deep into the ground bringing up
large amounts of soil, which then becomes top
dressing.
AERATING TOOLS

10
2
41
1
27
4
1
27
25
25
FRONT
OF
UNIT
17
21
13
12
19 9
24 14 11
5
18
16
5
15
2
3
8
22
6
26
4
1
7
25
25
25 1
4
23
10
6
25
56
20
1
4
4
1

11
ITEM PART NO. DESCRIPTION QTY ITEM PART NO. DESCRIPTION QTY
1 120177 LOCKWASHER 11
2 2702117 SCREW 3
3 306328 PIN,COTTER.09 x.75 2
4 306562 NUT, 3/8 - 16 11
5 306835 SCREW 6
6 315340 BLT-HEX 3/8-16X3-1/2 4
7 316913 SCREW, 1/2-13x4 2
8 316952 WASHER, 5/16" 4
9 518373 BRKT-CONTROL ROD 2
10 518577 BRKT-RIGHT, REAR 1
11 518587 BRKT-LEFT, FRONT 1
12 524596 BRKT-RIGHT, FRONT 2
13 547032 PLATE-BUMPER, RIGHT 1
14 547033 PLATE-BUMPER, LEFT 1
15 547034 SKID-RIGHT 1
16 547035 SKID-LEFT 1
17 547048 BUMPER-RIGHT 1
18 547049 BUMPER-LEFT 1
19 547152 ROD-CONTROL 2
20 547179 BRKT-LEFT, REAR 1
21 548041 SCREW. 3/8-16x1" G8 2
22 548051 NUT-.5-13 CENTERLOCK 2
23 548052 NUT,.38-16 HX UNITORQ GA 2
24 548205 SCREW-SET, 1/4-20x1/4 2
25 306981 WSHR, FLAT 6
26 64123-93 BLT-HEX 3/8-16X5 1
27 819233 BUSHING 4
28 545504 ROLL DIVERTER, COMP. 1
(INCLUDES ITEMS 1-27)

12
37
10
45 4
12 12
17
20
21
24
6
2
47
7
22
26
7
16
43
25
4
13
31
13
6
2
15
532
42
3
23
16
30
36
14
4
37
38
39
41
40
38
35
6
2
8
1
46
16
28
29
34
5
27
35
7
9
4
11
6
2

13
ITEM PART NO. DESCRIPTION QTY ITEM PART NO. DESCRIPTION QTY
1 64006-05 LOCKWSHR-HELICAL 1/2 1
2 64006-03 WASHER, 3/8 HELICAL LCK 12
3 64123-67 BLT-HEX 3/8-16X2 2
4 304636 COTTER PIN, 12 x 1.12 YS 12
5 64123-50 BOLT-HEX 3/8-16X1 6
6 64025-05 NUT-3/8-16 HEX 12
7 64025-19 NUT-1/2-13 HEX 7
8 311398 SCREW, 1/2-13X3-1/2 1
9 515586 COLLAR 1
10 517052 SEAT 1
11 517951 PIN-PIVOT, 1/2x9-19/32 1
12 517968 PIN-CLEVIS, 1/2x4 2
13 517994 PIN-PIVOT, 1/2x5-5/8 2
14 518159 AXLE 2
15 518285 BAR-DRAG 1
16 518535 SPRING 3
17 800237 BOLT-CRG, 3/8-16x1-1/2 2
18 * 545434 SPACER-LEFT COMPLETE 1
(INCLUDES ITEM 19)
19 * 318243 PIN-ROLL, 3/8"x1" 1
20 545570 SPACER-RIGHT, COMPLETE 1
(INCLUDES ITEM 21)
21 318243 PIN-ROLL, 3/8"x1" 1
22 545609 FOOTREST 1
23 546321 SCREW, ADJUSTING 2
24 546998 BRKT-ADJUSTING 2
25 547002 SUPPORT-FRONT 1
26 547003 PIN-HITCH 1
27 547004 FRAME-SEAT 1
28 547005 PLATE-PIVOT 1
29 547006 SUPPORT-MIDDLE 1
30 547007 SUPPORT-REAR 1
31 547008 RACK-REAR 1
32 547011 BRKT-EXTENSION 1
(INCLUDES ITEM 33)
33 316949 PIN-SPIROL 1/4x1-1/8 5
34 547014 YOKE-EXTENSION 1
35 547016 YOKE-WHEEL 2
36 547018 WHEEL-COMPLETE 2
(INCLUDES ITEMS 37-41)
37 516491 CAP-END 2
38 548151 BEARING-ROLLER 2
39 548224 FITTING-LUBE, 1/4-28 1
40 548493 TIRE-4.8/4.00x8, 2 PLY 1
41 548880 STEM-VALVE 1
42 547042 CLAMP 1
43 547346 RACK-PRIMARY 1
(INCLUDES ITEM 44)
44 316949 PIN-SPIROL 1/4x1-1/8 32
45 547451 GUARD 1
46 548201 SETSCREW, 5/16-18 X 5/16 1
47 604174 WASHER-3/8 2
48 545505 SULKY ROLLER, COMP. 1
(INCLUDES ITEMS 1-47)
* NOT ILLUSTRATED

14
1
3
11
32
10
35
33 5
14 42
13
8
19
18
37
12
17
44 22
7
15
16
43
26
20
29
40
28
31 4
36
9
39
34 21
30
40
38
2
25
24
40 23
6
NOTE: Center boss on washer should be against inner race of bearing.
41

15
ITEM PART NO. DESCRIPTION QTY ITEM PART NO. DESCRIPTION QTY
1 64006-03 WASHER, 3/8 HELICAL LCK 4
2 64001-3 NUT, 1/2-20 HEX JAM 2
3 306539 SCRW,.38-16.875 HX G5 4
4 64164-28 KEY-#808 WOODRUFF 1
5 800583 SCRW,.25-20 1.00 BS HS G8 2
(APPLY LOCKTITE #290 OR EQUIVALENT TO
THREADS PRIOR TO ASSEMBLY)
6 316924 SCRW,.25-28.38 BS HS G8 2
7 322494 O-RING,2.05.103 BUNA-N 70 1
8 515200 WSHR,.47.97.03 YS FLAT 2
9 516262 PLUG 2
10 516333 DISC 1
11 516338 SPROCKET 1
12 516343 WASHER, SPECIAL 1
13 518528 SPRING-PRESSURE PLATE 1
14 519904 LINER 1
15 520229 BEARING-THRUST 1
16 520231 WASHER-THRUST 2
17 521316 BOLT-SPECIAL 1
18 521477 SHIM, .015 (.381mm) 5
19 521478 SHIM, .005 (.127mm) 6
20 521480 RING-SEAL 1
21 521485 NUT-ADJUSTING 1
22 521486 BUSHING-CAM 1
23 521487 STOP-CAM 1
24 521490 ROLLER-CAM 2
25 521491 WASHER-THRUST 2
26 521495 RETAINER 1
27 521497 CAM 1
28 521498 ECCENTRIC 1
(APPLY LOCKTITE #290 OR EQUIVALENT TO
THREADS PRIOR TO ASSEMBLY)
29 521499 ROD-CONNECTING 1
30 521500 TRUNNION 1
31 521501 SHAFT-CLUTCH 1
32 521508 FLYWHEEL 1
33 521509 PLATE-PRESSURE 1
34 521511 WASHER-BELLEVILLE 3
35 545358 TIE ROD, COMPLETE 1
36 548111 BEARING-BALL 2
37 548112 BEARING-BALL 1
38 548115 BEARING-NEEDLE 2
39 548209 SET SCREW, 5/16-24x5/16 2
40 548224 FITTING-LUBE, 1/4-28 2
41 548225 FITTING-LUBE, 1/4-28, 45 2
42 548350 RING-LOCK 1
43 64139-02 BLT-WLF 1/4-20X1/2 2
44 800433 PLUG, 3/8-18 NPT 1

16
37
29
30
5
3
42
40
41
23
19
35
20
26
19
41
40
42
18
14
21
28 22
61
43
4
13
12 38
2
39
32
33
34
17
15
44
24
36
31
25
7
10
8
17
39
32
33
33
9
10
34
17
15
36
31
11
11
16

17
ITEM PART NO. DESCRIPTION QTY ITEM PART NO. DESCRIPTION QTY
1 64123-80 BLT-HEX 1/4-20X1-1/4 1
2 64006-01 LOCKWASHER-1/4 HELICAL 6
3 307665 NUT,.75-16 YS HX JAM 2
4 64025-19 NUT-1/2-13 HEX 1
5 309799 LWSHR,.75 ZS SHKPRF EXT 2
6 515607 SHIFTER LEVER 1
7 515618 SHAFT 1
8 515638 SPROCKET 1
9 515639 GEAR 1
10 515640 SHAFT 2
11 812009 BRG,BALL.67 1.57.47 "OP" 2
12 516158 PIN (PLATED) 1
13 518453 SPRING 1
14 520598 GEARCASE 1
15 520600 GEAR,45T X 4.70 O.D. 2
16 520601 GEAR, 48T X 5.00 O.D. 1
17 520621 SPACER 5
18 520688 GASKET 1
19 520722 SPACER 2
20 520723 SHAFT 1
21 521222 COVER-GEARCASE 1
22 524539 DECAL,GEAR LUBE 1
23 545626 SPROCKET AY 1
24 546070 ECCENTRIC 1
25 546071 FORK AY, SHIFTER 1
26 547398 CHAIN AY,#50 RLR 1
(INCLUDES ITEM 27)
27 * 548481 LINK-CONNECTOR 1
28 800113 PLUG,.5-14NPT PS SQ HD 1
29 547423 DRIVE WHEEL 16" 2
30 547424 DRIVE WHEEL 18" 2
31 548080 BEARING-NEEDLE 2
32 548322 RING-LOCK 2
33 548325 RING-LOCK 4
34 548327 RING-LOCK 2
35 64164-10 1/4X1/4X1-1/4 MACH KEY 2
36 548482 PLUG-EXPANSION, 1-1/4 2
37 548597 LOCKNUT, 1/4-20 1
38 548726 SCREW, MACH 1/4-20x3/4 6
39 548931 PLUG-EXPANSION, 1-3/4 1
40 548952 RING-RETAINING, INT 2
41 548953 BEARING-BALL 2
42 548954 SEAL-OIL 2
43 548984 SCREW, 1/2-13x4 1
44 553046 KEY-WOODRUFF, #3 1
* NOT ILLUSTRATED

18
53
44
14
1
4
9
26
21
3413 16
35
36
34
27
47
46
42
12
23
22
7
39 14
15
48
4910
52
40
228
11
51
50
50
5
32
20
43
6
45 8
4
37
53
38
16
17 18
30
29
4
4
31
31
50
19
25
43
641617
18
45
38
37
24
33
7
5
This manual suits for next models
1
Table of contents
Other Jacobsen Industrial Equipment manuals
Popular Industrial Equipment manuals by other brands

SCHUNK
SCHUNK GSW-B-AGE Assembly and operating manual

CMD
CMD winflex DG Installation and maintenance instructions

Dedoes
Dedoes RJ Thrift-O-Matic 8 Place Machine manual

Evoqua
Evoqua V10K instruction manual

Graco
Graco 25C453 Instructions - parts

Siemens
Siemens Compact PLUS 6SE7024-1EP85-0AA0 operating instructions

Grizzly
Grizzly G0937 owner's manual

PACLITE Equipment
PACLITE Equipment IMPACT430DE Operator's manual

Forum
Forum BOP AT 300 MkII Operation & maintenance manual

Bartec
Bartec PBTC-200-E Operation and installation manual

Digital Control
Digital Control TERATRAK R1 user manual

Asco
Asco P152 Series Installation and maintenance instructions