Jacuzzi AT1201-DF User manual

ITEM #0642615
MODEL #AT1201-DF
BIANCO ROUND DUAL FLUSH
HIGH-EFFICIENCY TOILET
13
1
Jacuzzi Luxury Bath
14525 Monte Vista Avenue
Chino, CA 91710
1-800-288-4002
www.jacuzzi.com
TM

2
TABLE OF CONTENTS
Package Contents ...................................................................................................................
Hardware Contents .................................................................................................................
Safety Information ..................................................................................................................
Preparation .............................................................................................................................
Assembly Instructions .............................................................................................................
Care and Maintenance ............................................................................................................
Troubleshooting ......................................................................................................................
Page 2
3
4
5
5
6
11
12
Operation ................................................................................................................................
11

A
C
B
PACKAGE CONTENTS
3
YTITNAUQNOITPIRCSEDTRAP
A
Tank 1
B
Bowl 1
C Seat 1
FF-II
Wax Ring
AA-EE&JJ-KK
Mounting Hardware 1
1

HARDWARE CONTENTS (shown actual size)
4
AA DD EE
CC
FF
BB
GG
HH
II
JJ
KK
LL
MM
NN
Large Black
Rubber Washer
Qty. 2
Foam Gasket
(Not shown to size)
Qty. 1
Brass Bolt
with Round
Head
Qty. 2
Large Metal
Washer
Qty. 2
Large Nut
Qty. 2
Retainer
Washer
Qty. 2
Floor Bolt
Cap
Qty. 2
Plastic Seat
Washer
Qty. 2
Plastic Seat
Nut
Qty. 2
Plastic
Seat Bolt
Qty. 2
Small
Metal Washer
Qty. 2
Small Nut
Qty. 2
Floor Flange
Brass Bolt
Qty. 2
Wax Ring
(Not shown
to size)
Qty. 1

SAFETY INFORMATION
Please read and understand this entire manual before attempting to assemble, operate or install
the product.
5
•Handle with care. Vitreous chinaware has glass-like with sharp edg es if broken. Do not drop,
handle roughly or overtighten bolts.
•Risk of hazardous gases. If new toilet is not installed immediately after removing an old toilet,
temporarily plug floor flange hole with a towel (or cover) to block sewer gases from escaping.
•Observe local plumbing and building codes.
WARNINGS AND CAUTIONS
Before beginning assembly of product, make sure all parts are present. Compare parts with
package contents list and diagram . If any part is missing or damaged, do not attempt to
assemble, install or operate the product. Please contact customer service for replacement parts
Estimated Assembly Time: 60 minutes
Tools Required for Assembly (not included): Toilet Water Supply Line, Adjustable Wrench, Putty
Knife, Flathead Screwdriver, Hacksaw, Carpenter’s Level.
If replacing an existing toilet, follow these general guidelines. (Not all toilets and connections are
the same. Therefore, these guidelines may or may not apply.)
Remove Old Toilet
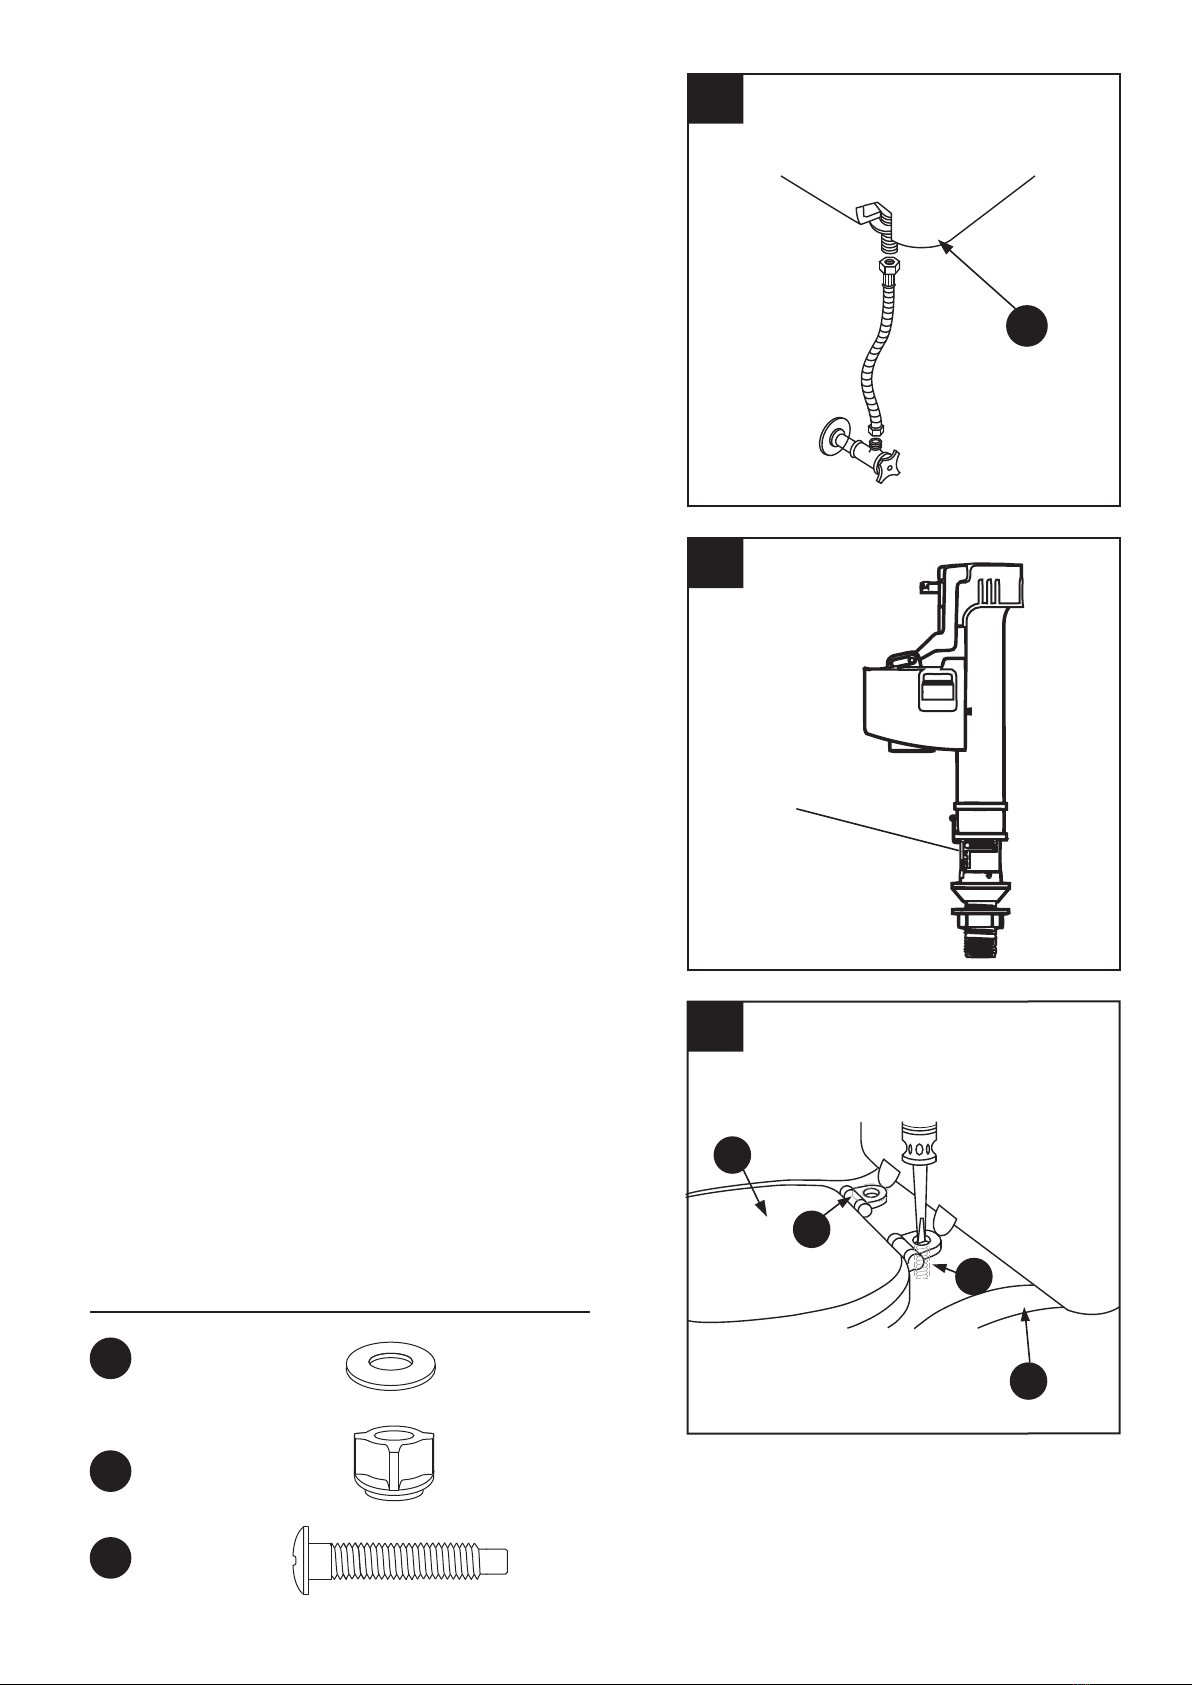
•Turnoff water supply and flush tank completely. Use a towel to dry remaining water from tank and
bowl .
•Disconnect and remove old water supply line.
•Remove tank from bowl by removing old tank-to-bowl hardware.
•Remove bowl from floor by removing bolt caps and floor bolt nuts.
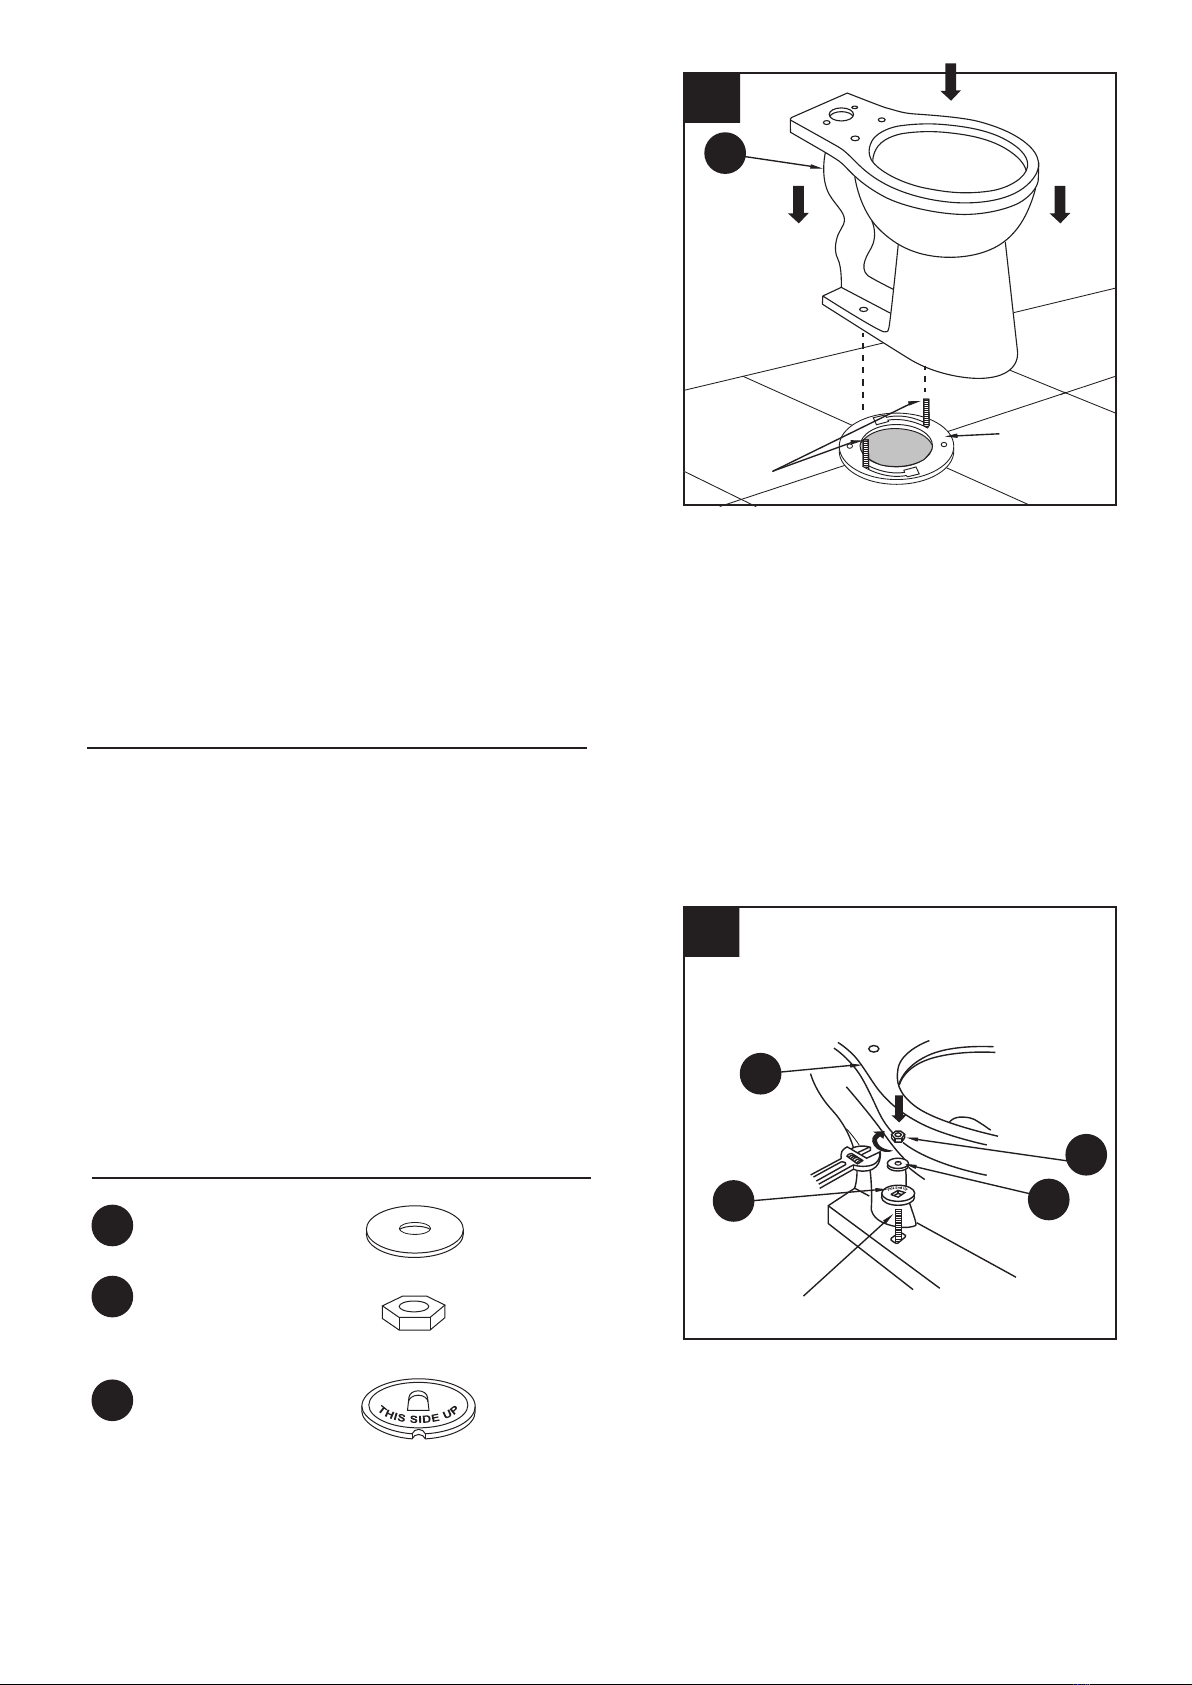
•Remove floor bolts from toilet flange and clean old wax, putty and sealant from base area.
(Temporarily plug floor flange with a towel or cover to block sewer gases from escaping.)
NOTE: MOUNTING SURFACE MUST BE CLEAN AND LEVEL BEFORE NEW TOILET IS
INSTALLED.
PREPARATION
at 1-800-288-4002, 9 a.m. - 8 p.m. EST, Monday - Friday.

6
Toilet
Flange
II
ASSEMBLY INSTRUCTIONS
1.
Install Floor Bolts
Insert floor flange brass bolts (II) into the toilet
flange (not included) with bolt heads down and
threaded ends facing up.
(Bolts should be parallel to wall and 6 in.
apart.)
Hardware Used
II x 2
Floor Flange
Brass Bolt
Hardware Used
FF x 1
2. Install Wax Ring
Turn bowl (B) upside down onto a towel or
cushioned surface. Place wax ring (FF) over
the raised outlet ring of the bowl (B). (If wax
ring (FF) has an integral plastic flange, be sure
flange taper points away from the toilet.) Press
firmly and slightly twist wax ring (FF) against
bottom of bowl (B) so the wax ring (FF)
adheres to the bowl (B).
1
2
FF
B

7
Hardware Used
3. Position Toilet Bowl on Floor Flange
Unplug waste opening in floor flange (if
necessary). Gently lower the bowl (B) right
side up into position with the floor flange brass
bolts (II) protruding up through the holes in the
base of the bowl (B).
Note: Keep the bowl (B) level as it is lowered
onto the floor flange.
Once bowl (B) is in position, press down with
a slight twisting motion on the top center of the
bowl (B), eventually applying full body weight to
evenly compress the wax ring (FF) to create a
watertight seal. CAUTION: Do not rock the
bowl (B) back and forth as this may break
the seal.
Make sure the bowl (B) is as level as possible.
It may be necessary to use small wedges
(shims) under the edge of the bowl (B) due to
slight variations in vitreous chinaware or
uneven floors. Bowl (B) should be firmly
seated on the floor so it does not wobble or
rock.
3
4
Toilet
Flange
B
Hardware Used
GG
HH
JJ
4. Secure Bowl to Floor
Place retaining washers (JJ) (note “This Side
Up”), small metal washers (GG) and small nuts
(HH) on floor flange brass bolts (II). Alternately
tighten small nuts (HH) until bowl (B) is firmly
seated on floor.
DO NOT OVERTIGHTEN SMALL NUTS (HH)
BECAUSE VITREOUS CHINA CAN EASILY
CRACK OR CHIP.
Pour water into bowl (B) to prevent the escape
of sewer gases.
x 2
x 2
x 2
Small Metal
Washer
Small Nut
Retainer
Washer
B
JJ GG
HH
Floor Flange Brass Bolt (x2)

Hardware Used
KK
5. Cut Off Excess
Using a hacksaw, cut off excess length of floor
flange brass bolts (II) so floor bolt caps (KK)
will fit; leave no more than 1/4 in. above
small nuts (HH).
5
Floor Bolt Cap x 2
B
KK
8

Hardware Used
EE
BB
CC
DD
AA
6
6. Install Tank
Install foam gasket (AA) over threaded outlet
on bottom of tank (A) and lower onto bowl (B)
so tapered end of foam gasket (AA) fits evenly
into water inlet opening on bowl (B).
black rubber washer (BB) onto the brass bolts
with round heads (EE). Insert the brass bolts
with round heads (EE) down through the holes
in the bottom (inside) of the tank (A) and through
the bolt holes in the bowl (B)
. With the tank (A)
parallel to the
wall
(standing
level
and upright),
position
large
metal washer
(CC)
and
large
nut
(DD)
on the
brass
bolts with round
heads
(EE)
and
alternately
hand tighten.
DO NOT TURN BRASS BOLTS WITH
ROUND HEADS (EE) WITH SCREWDRIVER
FROM INSIDE THE TANK (A). INSTEAD,
TIGHTEN LARGE NUTS (DD) FROM
BELOW, HOLDING BRASS BOLTS WITH
ROUND HEADS (EE) IN PLACE AS
NECESSARY.
Push down on the tank (A) and alternately hand
tighten large nuts (DD) again, keeping tank
level. Using pliers or wrench (not included),
alternately give the large nuts (DD) another 1/2
turn to level tank (A).
TO AVOID CRACKING THE BOWL (B), DO
NOT OVERTIGHTEN LARGE NUTS (DD).
Foam Gasket
x 2
x 2
x 2
x 1
Black Rubber
Washer
Large Metal
Washer
Large Nut
Brass Bolt
with Round
Head x 2
B
BB
AEE
AA
CC
DD
9
Place the

7
7. Water Supply Line
Connect the water supply line (not included)
between the tank (A) and shut-off
valve. Tighten the tank connection coupling
nut 1/4 turn beyond hand tight. (DO NOT
OVERTIGHTEN.)
Turn on supply valve and allow tank (A) to fill.
Check for leaks at all connections and tighten
or correct as needed.
8
8. Tank Water Level Adjustment
The fill valve and tank water level are set at
the factory and should not require adjustment.
However, the water level is controlled by the
float on the fill valve and can be adjusted by
turning the adjustment inner pipe as necessary.
9
9. Install Tank Lid and Seat
Place seat (C) on bowl (B), centering
the hinges over the holes in the bowl (B).
Place plastic seat washers (LL) on plastic seat
bolts (NN) and insert plastic seat bolts (NN)
into hinge holes. Using a screwdriver (not
included) and plastic seat nuts (MM), secure
seat (C) to toilet bowl (B). Close hinge covers.
A
Hardware Used
LL
MM
NN
Plastic
Seat Washer x 2
x 2
x 2
Adjustment
Inner Pipe
C
NN
Plastic
Seat Bolt
Plastic
Seat Nut
10
B
LL

The new toilet is made of stain-, acid- and abrasion-resistant vitreous china. Clean the outside
surface with mild soap, warm water and a soft cloth. On stubborn stains use a powdered
detergent and damp sponge or nylon scouring pad. Never use abrasive scouring powders,
cleansers or pads because they will scratch, damage and dull the surface. CAUTION: DO NOT
USE IN-TANK CLEANERS. Products containing chlorine (calcium hypochlorite) can seriously
damage tank fittings, potentially causing leaks, excessive water use and property damage. The
manufacturer shall not be responsible or liable for any tank fitting damage caused by the use of
cleaners containing chlorine (calcium hypochlorite).
When cleaning the toilet seat, wash it with mild soapy water. Rinse seat thoroughly with clean
water and dry with a soft cloth. Avoid detergents, disinfectants or cleaning products in aerosol
cans. NEVER use abrasive scouring powders on the seat. Some bathroom chemicals and
cosmetics may cause damage to the seat’s finish, so test your cleaning solution on an
inconspicuous area before applying to the entire surface.
TOILET CARE AND MAINTENANCE
11
The manufacturer provides a LIMITED ONE (1) YEAR WARRANTY for its vitreous chinaware
plumbing fixtures to be free of manufacturing defects in material and workmanship.
This warranty is not transferable.
The manufacturer, at its election, may repair, replace or make appropriate adjustments where
inspection discloses any such defects occurring in normal usage.
No warranty is given for installation mistakes, water damage or misuse. For a long-lasting finish,
take care in maintaining the product.
The manufacturer’s obligation shall be limited to such repair and or replacement. Purchaser shall
be
responsible for all shipping charges for returned product. This warranty gives you specific legal
rights, and you may have other rights that vary from state to state.
To obtain warranty service, contact 1-800-288-4002.
ONE-YEAR LIMITED WARRANTY
POWER
POWERCHOICE
TM
DOWN FOR POWER
POWER WHENYOU NEED IT
P O W E RE C O
POWERCHOICE POWERCHOICE
DOWN WITH GREEN BUTTON FOR ECO
TWO POWERCHOICE™ FLUSH OPTIONS
SAVINGS WHEN YOU DON’T
OPERATION
1.6 GALLON POWER FLUSH
CLEARS AND CLEANS THE BOWL
1.0 GALLON ECO FLUSH SAVES
WATER AND SAVES MONEY

REPLACEMENT PARTS LIST
#TRAPNOITPIRCSEDTRAP
1
2
3
4
5
6
7
8
9
10
12
Printed in China
Toilet fill valve
Toilet flush valve
Toilet flush lever
Toilet tank-to-bowl connection kit
Toilet bowl wax ring and floor hardware
White toilet bowl bolt cap covers
White RF toilet seat
White toilet seat bolts
White toilet tank lid
White toilet seat hinges
642615-1
642615-2
642615-3
710013-1
710009
710013-2
642615-4
642615-5
LW6203WA-E
642615-6
642615-1 642615-2 642615-3 710013-1 710009
710013-2 642615-4 LW6203WA-E
642615-5 642615-6

ARTICLE #0642615
MODÈLE #AT1201-DF
TOILETTE RONDE À DOUBLE CHA
SSE À RENDEMENT ÉLEVÉ BIANCO
13
Jacuzzi Luxury Bath
14525 Monte Vista Avenue
Chino, CA 91710
1-800-288-4002
www.jacuzzi.com
TM

14
TABLE DES MATIÈRES
Contenu de l’emballage ..........................................................................................................
Quincaillerie incluse ................................................................................................................
Consignes de sécurité ............................................................................................................
Préparation .............................................................................................................................
Instructions pour l’assemblage ................................................................................................
Entretien ..................................................................................................................................
Dépannage .............................................................................................................................
Page 2
15
16
17
17
18
23
24
Fonctionnement. ...................................................................................................................... 23

A
C
B
CONTENU DE L’EMBALLAGE
15
PIÈCE DESCRIPTION QUANTITÉ
A
Réservoir
1
B
Cuvette
l 1
C
Siège
1
FF-II
AA-EE&JJ-KK 1
1
Anneau en cire
Quincaillerie de fixation

QUINCAILLERIE INCLUSE (grandeur réelle)
16
AA DD EE
CC
FF
BB
GG
HH
II
JJ
KK
LL
MM
NN
Grande rondelle
en caoutchouc noir
Qté : 2
Joint d’étanchéité
en mousse
(grandeur non réelle)
Qté : 1
Boulon en
laiton à tête
ronde
Qté : 2
Grande rondelle
métallique
Qté : 2
Grand écrou
Qté : 2
Rondelle de
retenue
Qté : 2
Cache-boulon
Qté : 2
Rondelle de
siège en plastique
Qté : 2
Écrou de siège
en plastique
Qté : 2
Boulon de siège
en plastique
Qté : 2
Petite rondelle
métallique
Qté : 2
Petit écrou
Qté : 2
Boulon en laiton
pour bride de sol
Qté : 2
Anneau en cire
(grandeur non réelle)
Qté : 1

CONSIGNES DE SÉCURITÉ
Assurez-vous de lire et de comprendre l’intégralité de ce manuel avant de tenter d’assembler,
d’installer ou d’utiliser le produit.
17
• Manipulez avec soin. La porcelaine vitrifiée s’apparente au verre et ses bords deviennent
coupants lorsqu’ils sont brisés. Ne laissez pas tomber le produit, ne le manipulez pas
rudement et ne serrez pas les boulons de façon excessive.
• Risque d’émanation de gaz nocifs. Si vous n’installez pas la nouvelle toilette immédiatement
après avoir retiré l’ancienne, bouchez temporairement le trou de la bride de sol à l'aide d'un
linge ou d'un couvercle pour empêcher les gaz émanant des égouts de se répandre.
• Respectez le code du bâtiment et le code de plomberie en vigueur.
AVERTISSEMENTS ET MISES EN GARDE
Avant de commencer l’assemblage du produit, assurez-vous d’avoir toutes les pièces Comparez
les pièces dans l’emballage avec la liste et le tableau du présent document. S’il y a des pièces
manquantes ou endommagées, ne tentez pas d’assembler, d’installer ni d’utiliser le produit.
Pour obtenir des pièces de rechange, veuillez communiquer avec notre service à la clientèle au
1-800-288-4002, de 9 h et 20 h (HNE), du lundi au vendredi.
Temps d’assemblage approximatif : 60 minutes
Outils nécessaires pour l’assemblage (non inclus) : conduite d’alimentation en eau pour toilette,
clé à molette, couteau à mastiquer, tournevis à tête plate, scie à métaux, niveau de menuisier.
Si vous remplacez une toilette déjà en place, veuillez suivre les directives générales suivantes.
(Les toilettes et les raccords ne sont pas tous pareils. Ces directives pourraient donc ne pas
s'appliquer dans votre cas.)
Retrait de la vieille toilette
•Fermez l’alimentation en eau et actionnez la chasse d’eau de façon à vider complètement le
réservoir. Asséchez le réservoir et la cuvette à l’aide d’une serviette.
•Débranchez et retirez la vieille conduite d’alimentation en eau.
•Retirez le réservoir de la cuvette en enlevant les fixations qui le maintiennent.
•Retirez la cuvette en enlevant les cache-boulons et les écrous d’ancrage.
•Retirez les boulons de la bride de sol et nettoyez les résidus de cire, de mastic et de pâte
d’étanchéité. (Bouchez temporairement le trou de la bride de sol à l'aide d'un linge ou d'un
couvercle pour empêcher les gaz émanant des égouts de se répandre.)
REMARQUE : ASSUREZ-VOUS QUE LA SURFACE DE MONTAGE EST PROPRE ET PLANE
AVANT DE COMMENCER L’INSTALLATION DE LA NOUVELLE TOILETTE.
PRÉPARATION

18
Bride de toilette
II
INSTRUCTIONS POUR L’ASSEMBLAGE
Quincaillerie utilisée
II x 2
Boulon en
laiton pour
bride de sol
Quincaillerie utilisée
FF x 1
Anneau
en cire
1
2
FF
B
1.
Installation des boulons de la bride de sol
Insérez les boulons d’ancrage en laiton (II) dans
la bride de sol (non incluse), tête vers le bas et
extrémité filetée vers le haut. (Les boulons
doivent être parallèles au mur et espacés de
15,24 cm.)
2.
Installation de l’anneau en cire
Posez la cuvette (B) à l’envers sur une serviette
ou une surface matelassée. Placez l’anneau en
cire (FF) sur l’anneau de sortie saillant de la
cuvette (B). (Si l’anneau en cire (FF) est doté
d’une bride en plastique, assurez-vous que son
extrémité conique n’est pas orientée vers la
toilette.) Appuyez fermement sur l’anneau en
cire (FF) en appliquant un léger mouvement de
rotation afin qu'il adhère bien au dessous de la
cuvette (B).

19
Quincaillerie utilisée
3
Bride de toilette
B
3. Installation de la cuvette sur la bride de sol
Dégagez le trou de la bride de sol (au besoin).
Abaissez doucement la cuvette (B) (à l’endroit)
de façon à ce que les boulons en laiton (II)
ressortent des trous de la base de la cuvette (B).
Remarque : Maintenez la cuvette (B) de
niveau tout en l’abaissant sur la bride de sol.
Une fois la cuvette (B) en place, appuyez sur le
centre arrière en appliquant un léger
mouvement de rotation et augmentez
graduellement la pression exercée jusqu’à y
mettre tout votre poids, de façon à comprimer
uniformément l’anneau en cire (FF) pour obtenir
un joint étanche. MISE EN GARDE : Évitez de
balancer la cuvette (B) dans un mouvement
de va-et-vient, car vous risquez de rompre le
joint.
Faites en sorte que la cuvette (B) soit le plus
possible de niveau. Il se peut que vous ayez à
poser des cales sous les rebords de la cuvette
(B) si le plancher ou le bord de la porcelaine
vitrifiée est inégal. La cuvette (B) doit être
fermement posée au sol afin d’éviter qu’elle
vacille ou qu’elle se balance.
Boulon en laiton pour bride de sol (x 2)

4
Quincaillerie utilisée
GG
HH
JJ
x 2
x 2
x 2
Petite rondelle
métallique
Petit écrou
Rondelle
de retenue
B
JJ GG
HH
Quincaillerie utilisée
KK
5
Cache-boulon x 2
B
KK
20
4. Fixation de la cuvette au plancher
Placez les rondelles de retenue (JJ) (suivez la
mention « Ce côté vers le haut »), les petites
rondelles métalliques (GG) et les petits écrous
(HH) sur les boulons en laiton pour bride de sol
(II). Serrez les petits écrous (HH) en alternant de
l’un à l’autre jusqu’à ce que la cuvette (B) soit
solidement fixée au sol.
ÉVITEZ DE SERRER LES PETITS ÉCROUS
(HH) DE FAÇON EXCESSIVE; LA
PORCELAINE VITRIFIÉE PEUT FACILEMENT
SE FISSURER OU S’ÉBRÉCHER.
Versez de l’eau dans la cuvette (B) afin
d’empêcher les gaz émanant des égouts de se
répandre.
5. Retrait de l’excédent
À l'aide d'une scie à métaux, coupez l'excédent
des boulons en laiton pour bride de sol (II) de
façon à pouvoir poser les cache-boulons (KK)
(ne laissez pas les boulons dépasser de plus de
0,64 cm au-dessus des écrous [HH]).
Boulon en laiton pour bride de sol (x 2)
Table of contents
Languages:
Popular Toilet manuals by other brands

Glacier bay
Glacier bay N2428R-10 Use and care guide

American Standard
American Standard CADET 2462.100 installation instructions

Camargue
Camargue CLEAN & DRY installation guide

Separett
Separett Tiny installation manual

Dometic
Dometic MASTERFLUSH MF7100 quick start guide

Kohler
Kohler K-5401TW-2-0 installation guide

Setma
Setma waterGenie Compact Installation and operating instructions

Thetford
Thetford C2 Repair guide

Helvex
Helvex WC DRAKAR installation guide

Grohe
Grohe Eurocube 39736000 installation instructions

SeaLand
SeaLand Traveler Lite 500 Plus Series owner's manual

Kohler
Kohler K-3639 Installation and care guide