Jade Marquise User manual


38 7/16” 42 5/16”

A
Tilethewall.
Apply silicone all along the joint between the
baseand tiles.
Placezlestuilessur le mur.
Appliquez le silicone tout le long du joint entre la base
etlestuiles.
legs placed at the bottom of the base. Lock position
with nuts.
desécrous.
Aligned with A- Bwall wooden stile drill the acrylic
basewitha drillbit.
Aligné avec le montant en bois du mur A - B,percez la
baseenacryliqueavec une mèche.
Fasten the acrylic base to the wall with self-tapping
screws.
Attachez la base en acrylique au mur avec des vis
autotaraudeuses.
3
5
4
2
3
Silicone
Montant de bois
Cloison séche
Tuiles
Jade Bathrooms Products Inc. 11900 J.J. Joubert Suite B, Rivière des Prairies, Québec, Canada H1E 7E7 Tel: 514-832-0555 Fax: 514-832-0554
Customer Service / Service à la clientèle 1-866-333-0555
Base en acrylique
/ NIVEAU
Attention:
Not included.
Non inclus.
ATTENTION
Ramplug supplied
cheville inclus
Suggested Ramplug
for drywall
Cheville suggéré
pour mur sec (drywall)

Following dimensions of the picture B attach the
glass clamps at both corners of the acrylic base
with self-tappingscrews(2St4x20)
6
4
Mount the short and long gaskets onto the glass
panels.
8
En suivant les dimensions de l'image B attachez les
brides du verre aux deux coins de la base en
acryliqueavecdesvisautotaraudeuses (2St4x20).
Attachtheclampingplate (gasketsincluded) withscrew
(2M6x16). Followtheorder ofpictureC.
Do not tighten. Some play is necessary to insert the glass
panel.
7
Attachez la plaque de presseur (joints inclues) avec des vis
(2M6x16).
Ne pas serrez. Un jeu est nécessaire pour insérer le panneau
deverre.
Suivez l’ordredespiècesmontrésurl’image C.
Montez les joints courts et longs sur les panneaux de
verre.
CLAMP - BRIDE
GASKET - JOINT
CLAMPING
PLATE
3 ½” - 9 cm
1 ” - 2.5 cm
Edge-Centre distance
Corner-Center
distance
Picture C - Image C
Picture B
Distance bord - centre
Distance coin - centre
GASKET - JOINT
PLAQUE DE PRESSEUR
Jade Bathrooms Products Inc. 11900 J.J. Joubert Suite B, Rivière des Prairies, Québec, Canada H1E 7E7 Tel: 514-832-0555 Fax: 514-832-0554
Customer Service / Service à la clientèle 1-866-333-0555

5
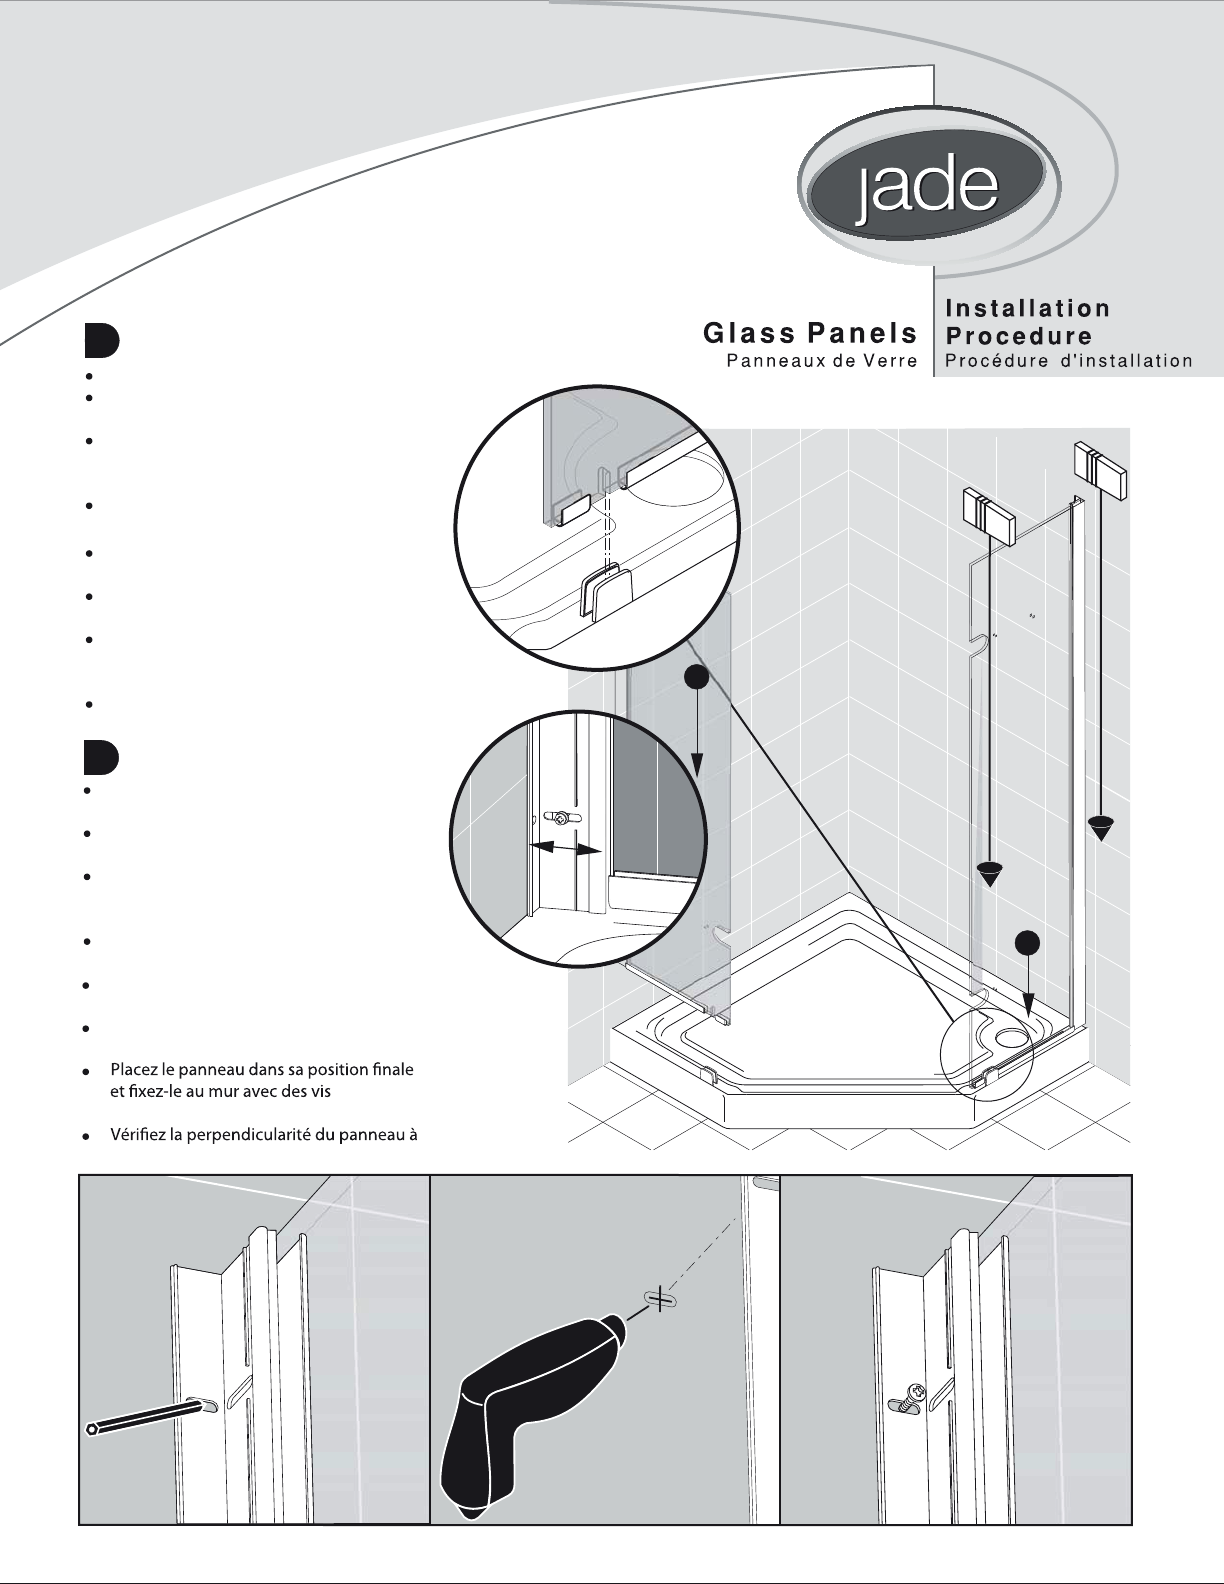
Doglasspanels installationoneat a time.
Slide the glass notch onto the clamp
screw.
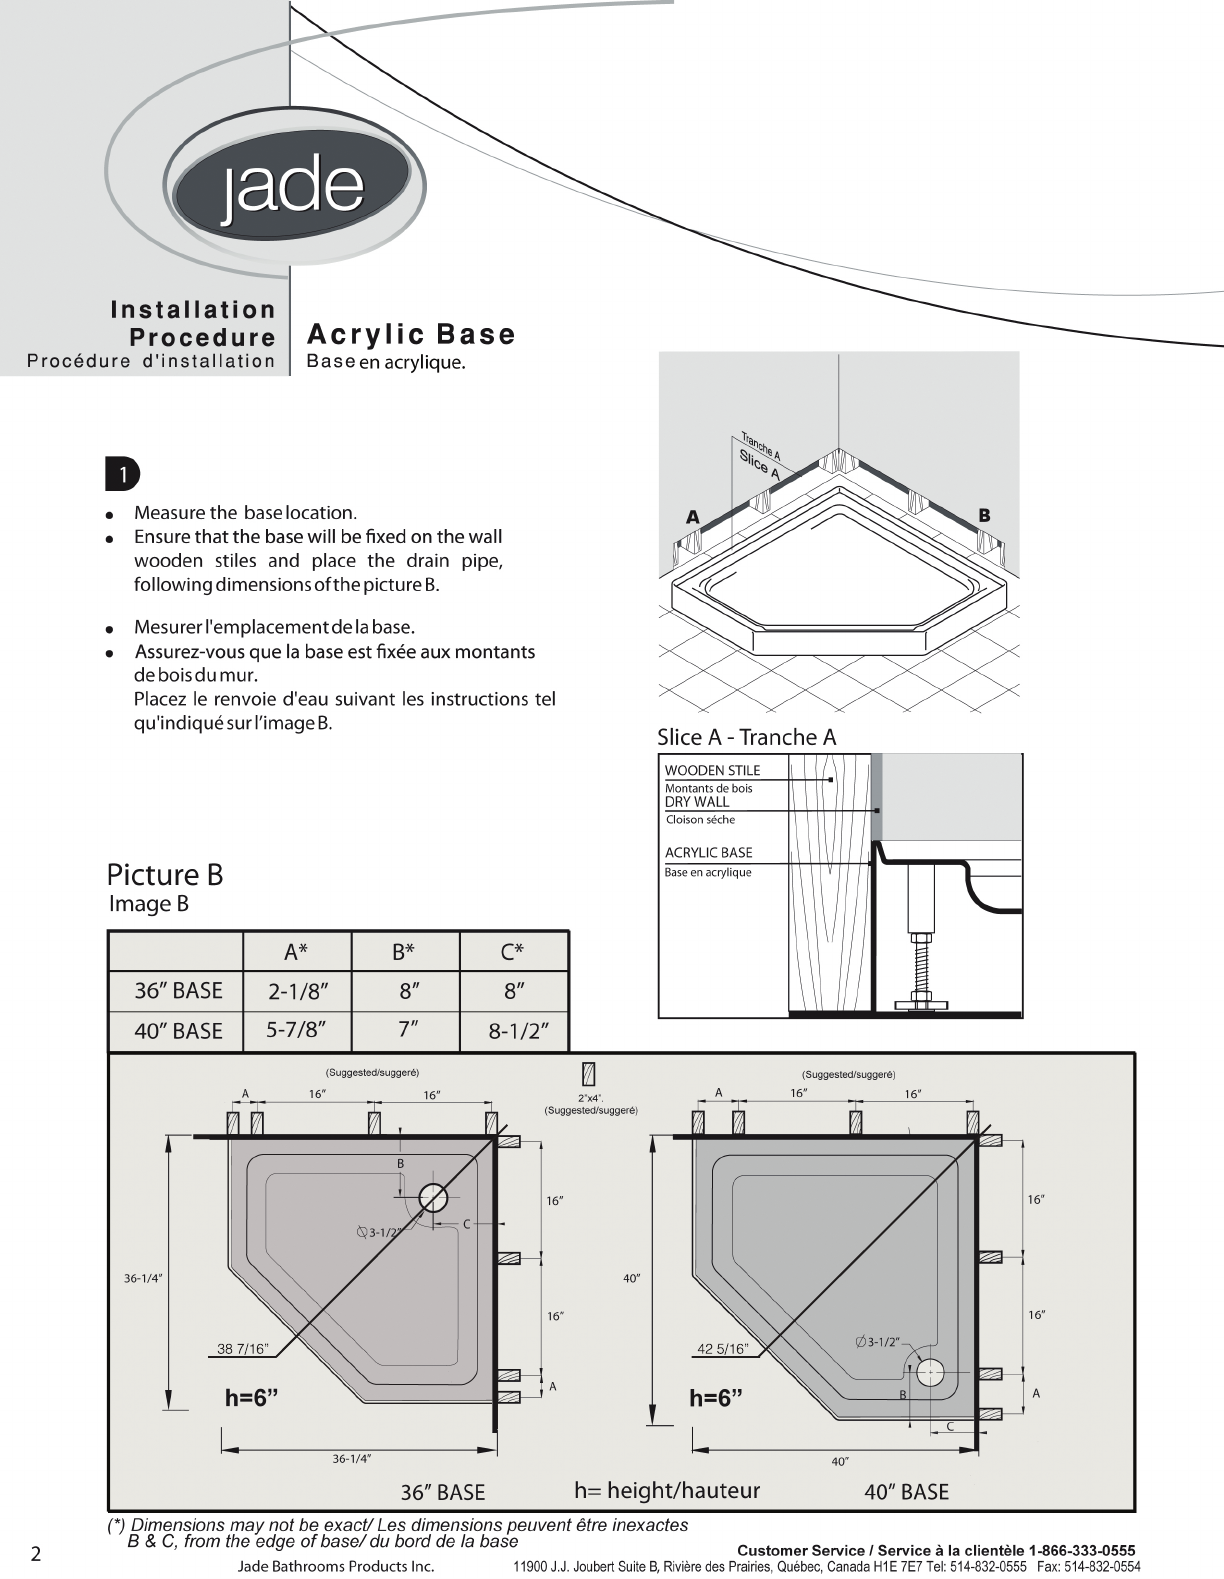
Do the needed adjustment on the wall
jamb as shown in picture D to meet the
wall.
Verify perpendicularity of the panel to the
bottomtray.
9
Use a pencil to mark the hole positions
alongthealuminium walljamb.
Remove the panel to drill on the wall with
a drillbit.
Place the panel back in its nal position
and x it to the wall by using (8) St5x40
self-tappingscrews.
Verify perpendicularity of the panel to the
bottomtray.
10
Faire l’installation des panneaux de verre,
unàla fois.
Glissez l’entaille du verre dans la vis de
bride.
Faites les ajustements requis sur le
montant de mur comme montré sur l’ image D
pourrencontrerle mur.
Vériez la perpendicularité du panneau à
labaseinférieure.
D
2
1
Utilisez un crayon pour marquer la position
destrousle long dumontantdemur.
Enlevez le panneau pour percer le mur
avecunemèche.
autotaraudeusesSt5x40(8).
labaseinférieure.
Vertical in left-right direction
Verticale dans la direction gauche-droite
Vertical in front-after direction - Verticale dans la direction avant-après
Jade Bathrooms Products Inc. 11900 J.J. Joubert Suite B, Rivière des Prairies, Québec, Canada H1E 7E7 Tel: 514-832-0555 Fax: 514-832-0554
Customer Service / Service à la clientèle 1-866-333-0555

Level theglasspaneladjusting screwpositionson
walland panel.
Finallytigthentheglassclamp.
Nivelez le panneau de verre en ajustant les positions
desvissurlemuret le panneau.
Finalementserrezlabrideduverre.
Snapaluminiumcoverstripintothewalljamb.
6
12
11
1
2
Snapplasticontopofaluminiumwalljamb.
13
Enfoncez la bande couvrante en aluminium dans le
montantdumur.
Enfoncez la pièce de plastique au sommet du montant
demur.
Front-after adjustment
Left-right adjustment
Ajustement gauche-droite
Ajustement avant-arrière
Jade Bathrooms Products Inc. 11900 J.J. Joubert Suite B, Rivière des Prairies, Québec, Canada H1E 7E7 Tel: 514-832-0555 Fax: 514-832-0554
Customer Service / Service à la clientèle 1-866-333-0555

Screwthesecondclampon the outline.
Finally,proceedtomountthe shelf.
Repeatprocedureforthesecond shelf.
Vissezlasecondebridesurlecontour.
Finalement,procédezaumontagedel’étagère.
Répétezlaprocédurepourladeuxièmeétagère.
17
ROUND NUT
ROUND GASKET
BUSH
GLASS CLAMP
BUSH
GASKET
BUSH - Bague
CLAMPING PLATE - Plaque de serrage
M6x25
CLAMP - Bride
BUSH - Bague
Makesuretheshelfis leveled.
Useapenciltomark the secondclampoutline
whenitislined up totheglasshole.Removethe shelf.
Mount the shelf partially following the piece order
shownbelowtoknowthe right positionofthe
secondclamp.
Donottigthen theclampsince it willberemoved.
15
Place the bushes into the glass hole and attach the
clamppiecesfollowingthepicture below.
14
Placez les bagues dans les trous du verre et attachez les
Montez l’étagère partiellement en suivant l’ordre des
pièces montré ci-dessous pour savoir la bonne position de
ladeuxièmebride.
Nepasserrerlabridepuisqu’elleseraenlevée.
Assurezvousquel’étagère est de niveau.
Utilisez un crayon pour marquer le second contour de bride
quand il est aligné au trou du verre.Enlevezl’étagère.
16
7
Bride de verre
Bague
Joint rond
Ecrou rond
Bague
Joint
Jade Bathrooms Products Inc. 11900 J.J. Joubert Suite B, Rivière des Prairies, Québec, Canada H1E 7E7 Tel: 514-832-0555 Fax: 514-832-0554
Customer Service / Service à la clientèle 1-866-333-0555

Mountthesidegaskets (2 short-1long)
Placetheglassdoor into thehingeslots.
Montezlesjointslatéraux(2courts - 1 long)
Placezlaportedeverredans les fentes des charnières.
8
18 Nowtigthenthehinges.
Maintenantserrezlescharnières.
18
19
1
2
3
4
1
Mountthehingesto the glasspanelfollowingthe order.
whareasthesecond part (2) has to provide enough play
fortheglassdoor installation.
Montez les charnières au panneau de verre en suivant
l’ordre.
(1) tandis que la seconde partie (2) doit produire assez de
jeupourl’installationdelaporte de verre.
1
2
20
HINGE
GASKET
GASKET
CLAMPING PLATE
Charnière
Joint
Joint
Plaque de serrage
Jade Bathrooms Products Inc. 11900 J.J. Joubert Suite B, Rivière des Prairies, Québec, Canada H1E 7E7 Tel: 514-832-0555 Fax: 514-832-0554
Customer Service / Service à la clientèle 1-866-333-0555

Attach the handle to the glass door following the order of
thepiecesshownbelow.
Attachez la poignée à la porte de verre en suivant l’ordre
despiècesmontréci-dessous.
9
21
2
1
1
2
HANDLE
Mountthesideand bottom doorgaskets.
Montezlesjointslatéralet inférieur de la porte.
22
Poignée
Jade Bathrooms Products Inc. 11900 J.J. Joubert Suite B, Rivière des Prairies, Québec, Canada H1E 7E7 Tel: 514-832-0555 Fax: 514-832-0554
Customer Service / Service à la clientèle 1-866-333-0555
1
DECORATIVE NUT
DOUILLE DECORATIVE
PLASTIC GASKET
JOINT EN PLASTIQUE
DECORATIVE CAP
CAPUCHON DECORATIF VIS
SCREW

24
23
Seal exterior applying silicone all along the wall jambs
andthewall.
Scellez l’extérieur en appliquant du silicone tout le long
desmontantsde muretdumur.
10
11900 J. J. Joubert Suite B
Rivière des Prairies, Québec
Canada H1E 7E7
Tel: 514-832-0555 Fax: 514-832-0554
Toll free:1- 866-333-0555
1 year warranty / 1 an de garantie
PLEASE NOTE JADE IS NOT RESPONSIBLE FOR ANY DAMAGE DUE TO LEAK.
PLUMBER MUST CHECK FOR LEAK AT THE TIME OF INSTALLATION
WARNING
VEUILLEZ NOTER QUE JADE N'EST PAS RESPONSABLE D’AUCUN DOMMAGE DÛ À DES FUITES.
LE PLOMBIER DOIT VÉRIFIER TOUTE FUITE AU MOMENT DE L'INSTALLATION
AVERTISSEMENT
LISTED/
HOMOLOGUÉ
50628
CSA B 45.0/45.5
ANSIZ124 SERIES
ASME A 112.19 SERIES
SHOWER TRAY / BASE DE DOUCHE
Sans frais:1- 866-333-0555

11
11900 J. J. Joubert Suite B
Rivière des Prairies, Québec
Canada H1E 7E7
Tel: 514-832-0555 Fax: 514-832-0554
Toll free:1- 866-333-0555
Shower Dimensions / Dimensions de la douche
PANNEAU A
PANNEAU B
ouverture
Sans frais:1- 866-333-0555
Attention:
la porte est réversible.
Il est possible de l’installer en
en inverse de ce manuel.
Il suffit de permutter la porte et
les panneaux et de suivre les
mêmes instructions et de
permutter les dimensions.
Faire attention à la position des
trous des poignées de la porte
ainsi que des pentures (éffet
miroir).
Attention:
The door is reversible.
It’s possible to install it in the reverse
sense that this manual shows.
just switch around the door & panels
, and follow the same instructions.
Pay attention to the position of
the door-handles holes, and the
hinges (mirror effect)
REVERSIBILITY / réversibilité
total
H*
78 3/8”
(*)Total Height = Base + Glass
(*) Hauteur Totale = Base + Verre

A
B
C
B
D
OK
A
B
C
D
2”-1/2 (63mm)
46”-1/4 (1174mm)
10”-1/8 (257mm)
10”-1/8 (269mm)
VERTICAL GASKET
joint en plastique verticale
DIMENSIONS
12
1
2
Jade Bathrooms Products Inc. 11900 J.J. Joubert Suite B, Rivière des Prairies, Québec, Canada H1E 7E7 Tel: 514-832-0555 Fax: 514-832-0554
Customer Service / Service à la clientèle 1-866-333-0555
Other Jade Bathroom Fixture manuals
Popular Bathroom Fixture manuals by other brands

FHC
FHC ZEPHYR ZEP03 quick start guide

Oras
Oras Electra 6661STX Installation and maintenance guide

Hans Grohe
Hans Grohe Rainfinity 250 3jet EcoSmart 26233 Series Instructions for use/assembly instructions

Signature Hardware
Signature Hardware PINECREST 948807 manual

Spectrum Brands
Spectrum Brands Pfister Contempra R89-XNC Maintenance & Care Guide

Rigel
Rigel RL-LV8090 instruction manual

PDP
PDP Kubi KUF9 manual

Triton
Triton Muse 2 Installation and operating instructions

Toto
Toto Gyrostream TS110J1 Installation and owner's manual

Sanela
Sanela SLU 42K Instructions for use

Franke
Franke ACXX2004 Installation and operating instructions

HERMITAGE BATH
HERMITAGE BATH 7151 Series installation manual